


Painting a Hot section how to
 06-04-2012, 04:08 PM
#1


Hey guys,
I took these pictures a few weeks ago while doing this with the intent of doing a how to on this subject but forgot all about it, so here it is. Simply put, it's how I do a hot section on exhaust nozzles, I love the way it looks and it's easy to do.
What you'll need:
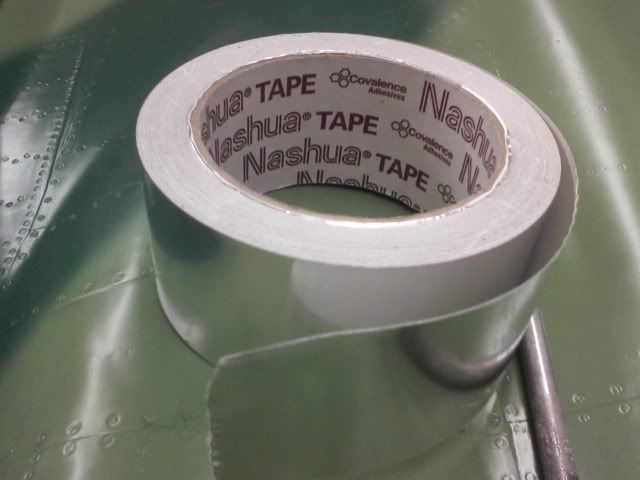
Aluminum Ducting tape (I prefer this over flite metal for this application as it is stickier, a little thicker, and allows some harsher sanding)
Xacto Knife
Masking tape
Airbrush (I used an Iwata HP-CR for this exerciese)
Mr Clean Magic Eraser
Paint colors - Black, Pthalo Blue Candy, Root Beer Candy
320 grit sand paper
Patience
Since RCU is acting lame and I can't upload pictures, I had to use photo bucket, that's alright though, it'll work fine
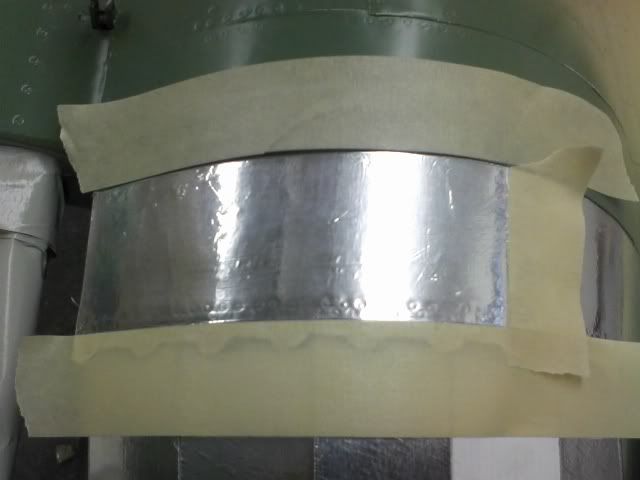
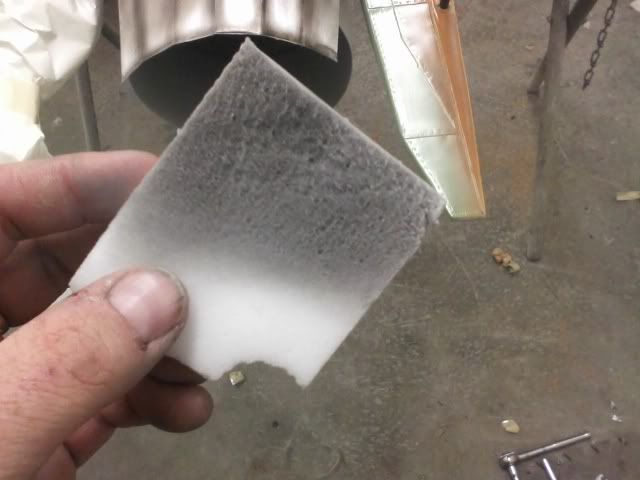
Step 1.
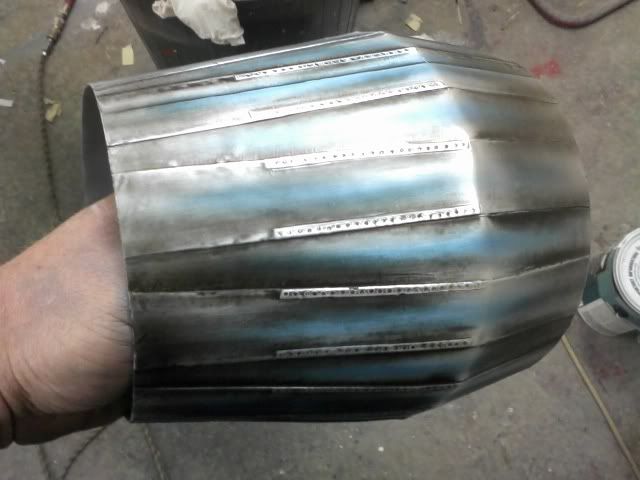
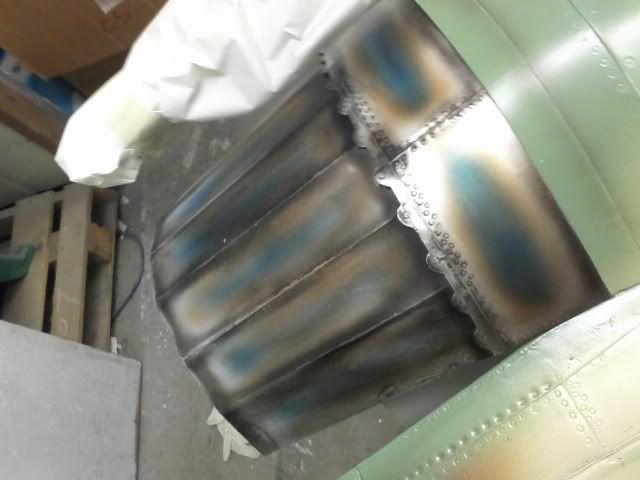
Here is the aluminum ducting tape I use, it's 2" wide which is plenty wide for doing nozzles and hot sections. Notice there is already a "grain" to the tape, I try to apply it so the grain is already going the direction I want.
Step 2.
Begin by taping off with masking tape the area's you don't want the aluminum tape to stick to. Once this stuff sticks, there is no getting it off. Use the masking tape so that you can remove the excess!!!!

Step 3.
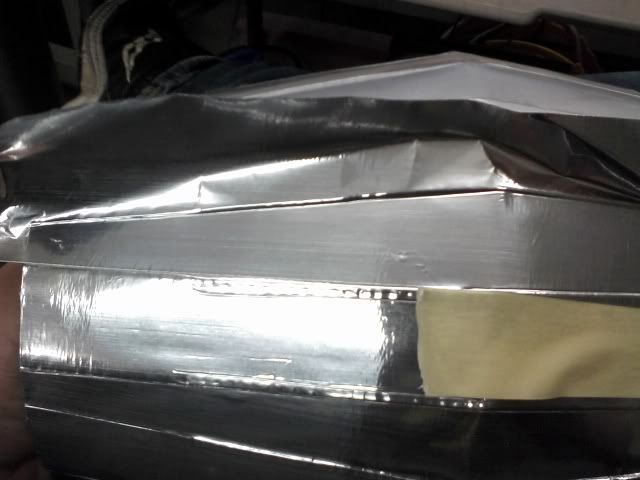
Start placing the tape where it needs to be, cut the excess off with a sharp exacto blade and just use your thumb to press it all down. Don't get to hell bent on burnishing it down like flite metal, you'll just put marks in it, it's thicker and softer than flite metal.
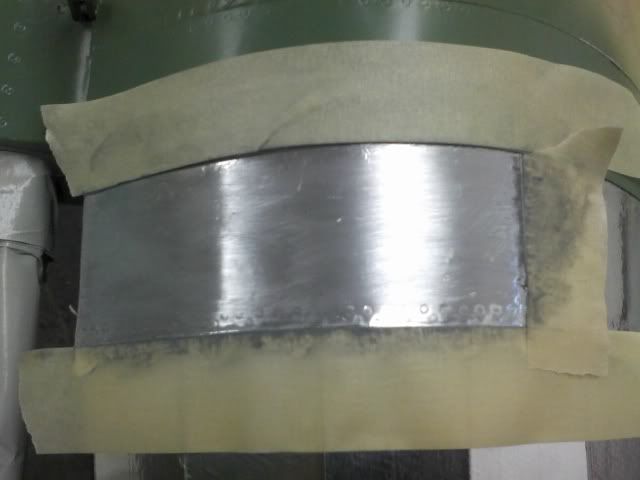
Step 4.
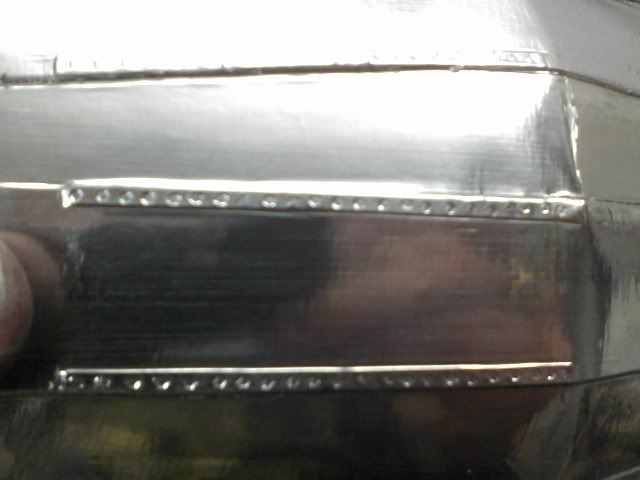
Using a hex head driver I pressed in fastener shapes where they needed to be on the nozzles

Step 5.
Hex heads in the nozzle
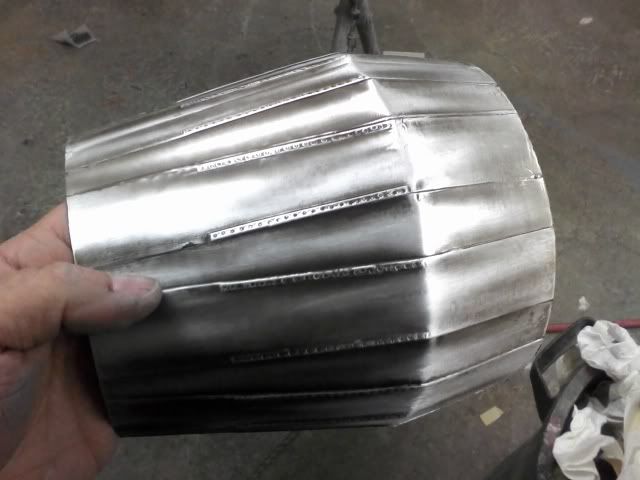
Step 6.
Here is the metal section on the fuselage. Don't worry about there being bumps, wrinkles, etc, that will all go away in the next steps.
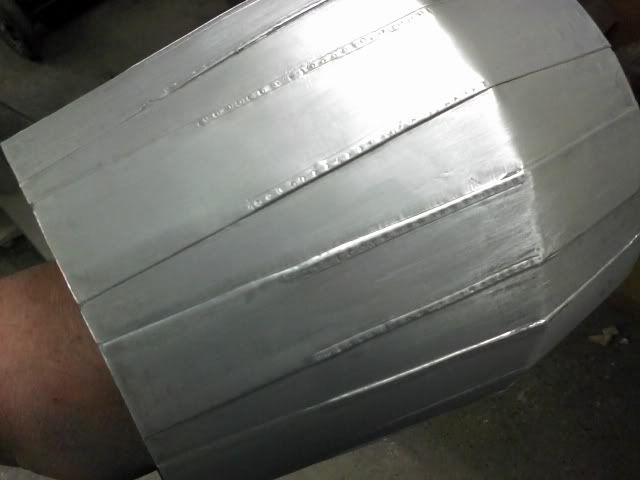
Step 7.
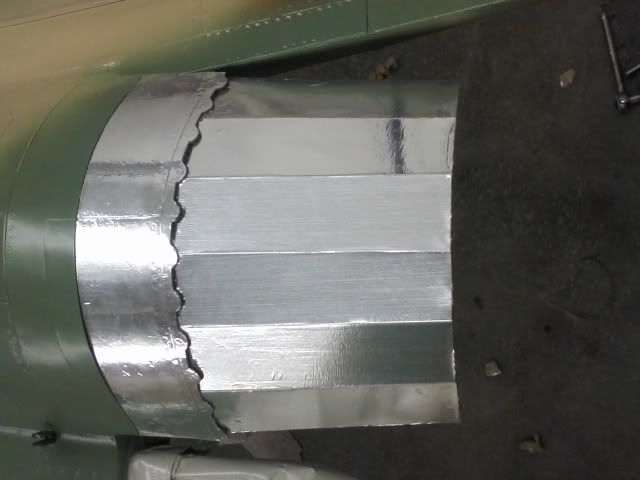
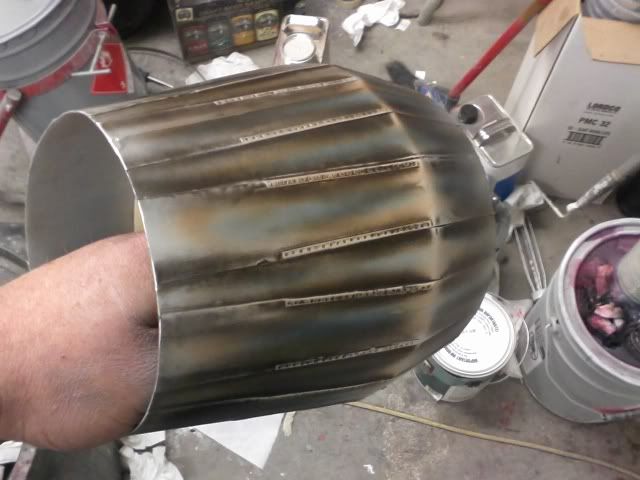
Next mask off one panel at a time in preparation for sanding
Step 8.
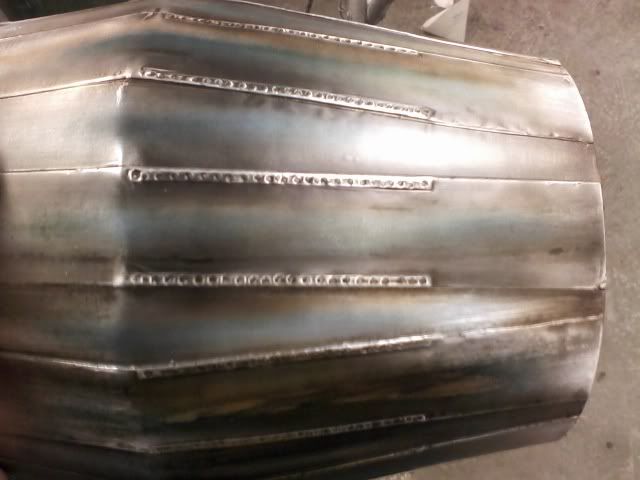
Sand in the direction of the metal grain. This particular jet is a Mig 29 and after looking at multiple images of the nozzles I wanted to keep it pretty rough looking. I started with 320 grit to knock down the bumps and scrapes, then went to 400 grit just to smooth it off a bit. Continue with progressively finer grits of paper if you want to have a smoother look.
Step 9.
If all of your sanding will be in the same direction, you don't need to mask off the adjacent panels, just be careful not to sand through any corners.
I took these pictures a few weeks ago while doing this with the intent of doing a how to on this subject but forgot all about it, so here it is. Simply put, it's how I do a hot section on exhaust nozzles, I love the way it looks and it's easy to do.
What you'll need:
Aluminum Ducting tape (I prefer this over flite metal for this application as it is stickier, a little thicker, and allows some harsher sanding)
Xacto Knife
Masking tape
Airbrush (I used an Iwata HP-CR for this exerciese)
Mr Clean Magic Eraser
Paint colors - Black, Pthalo Blue Candy, Root Beer Candy
320 grit sand paper
Patience
Since RCU is acting lame and I can't upload pictures, I had to use photo bucket, that's alright though, it'll work fine
Step 1.
Here is the aluminum ducting tape I use, it's 2" wide which is plenty wide for doing nozzles and hot sections. Notice there is already a "grain" to the tape, I try to apply it so the grain is already going the direction I want.
Step 2.
Begin by taping off with masking tape the area's you don't want the aluminum tape to stick to. Once this stuff sticks, there is no getting it off. Use the masking tape so that you can remove the excess!!!!
Step 3.
Start placing the tape where it needs to be, cut the excess off with a sharp exacto blade and just use your thumb to press it all down. Don't get to hell bent on burnishing it down like flite metal, you'll just put marks in it, it's thicker and softer than flite metal.
Step 4.
Using a hex head driver I pressed in fastener shapes where they needed to be on the nozzles
Step 5.
Hex heads in the nozzle
Step 6.
Here is the metal section on the fuselage. Don't worry about there being bumps, wrinkles, etc, that will all go away in the next steps.
Step 7.
Next mask off one panel at a time in preparation for sanding
Step 8.
Sand in the direction of the metal grain. This particular jet is a Mig 29 and after looking at multiple images of the nozzles I wanted to keep it pretty rough looking. I started with 320 grit to knock down the bumps and scrapes, then went to 400 grit just to smooth it off a bit. Continue with progressively finer grits of paper if you want to have a smoother look.
Step 9.
If all of your sanding will be in the same direction, you don't need to mask off the adjacent panels, just be careful not to sand through any corners.
 06-04-2012, 04:20 PM
#2
Ok, now for the fun part.
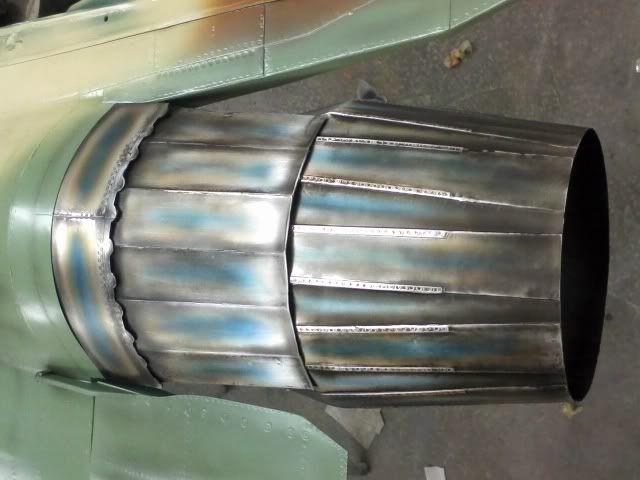
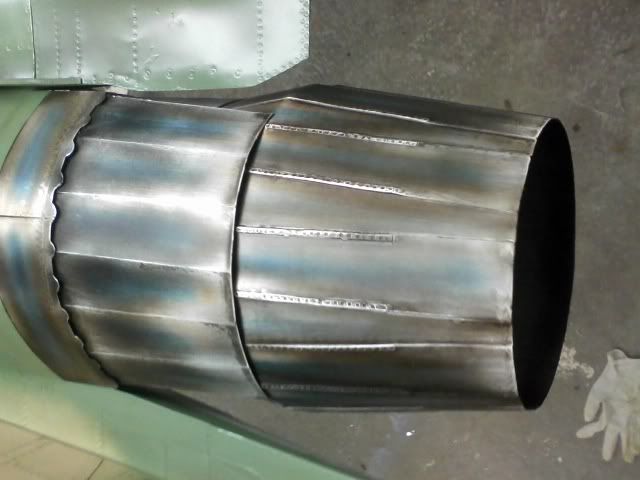
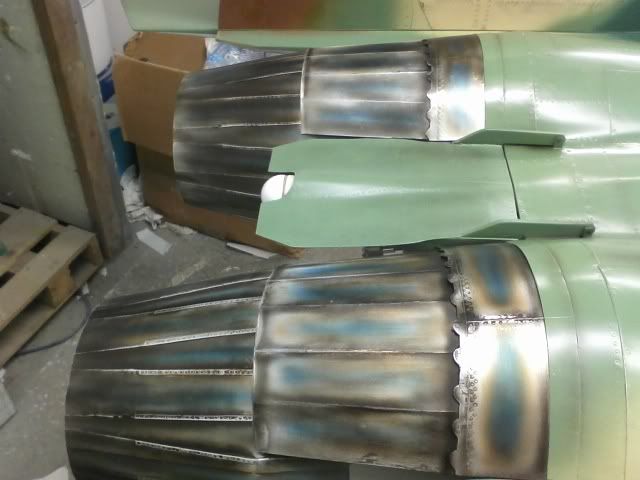
Break out your airbrush. All of your paint for this will be over reduced, we want to use it more as a wash than an actual pigmented paint. The black in particular. I am using PPG black in this case and SEM Candy's. The SEM Candy Concentrates are mixed with a PPG mixing base and reduced. You can use DBC500 or any of the clear carriers designed for Candy's.
Step 1.
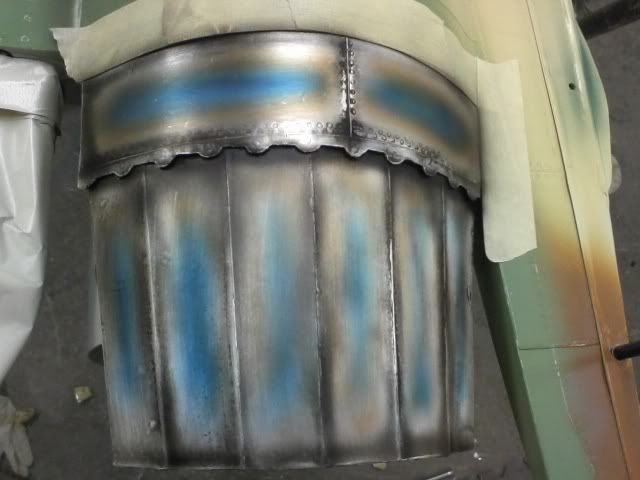
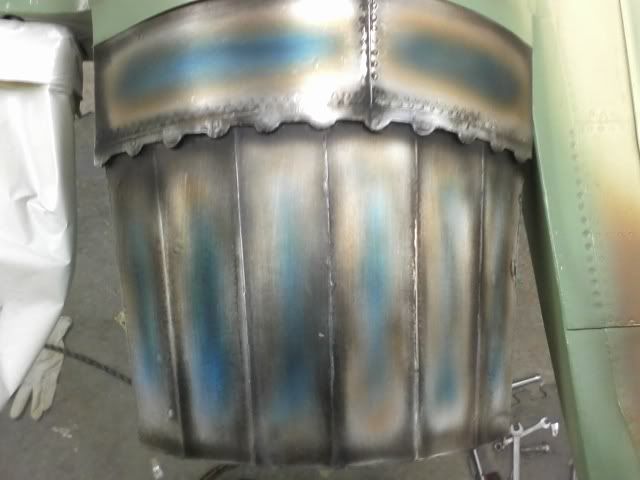
Start airbrushing your black on the sanded aluminum. Spray in the direction of the grain, but don't worry about even coverage. We don't want that, concentrate the black heavier where the nozzle would be dirtier from soot and crap in real life, along seams, in rivets, etc.
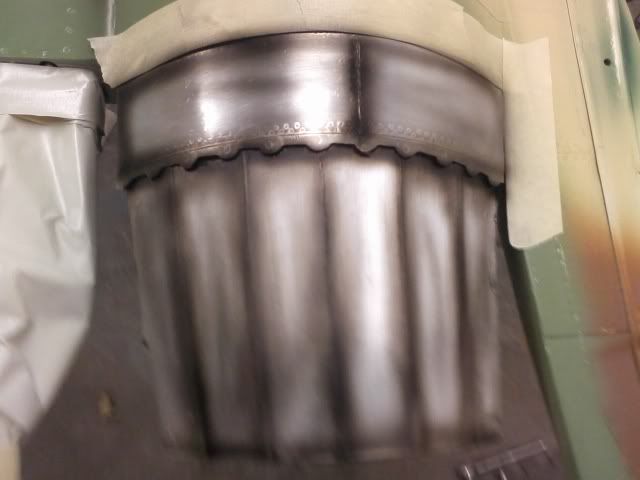
Step 2.
Take your Mr Clean Magic Eraser and start rubbing down the part, again, always in the direction of the grain. This will remove most of the black leaving deposits in the sanding scratches, valley's, rivets, grooves etc.

Step 3.
Now take your Pthalo blue candy, over-reduced as well and spray the area's where the blue should be, look at reference photo's to determine where the metal will blue the most.
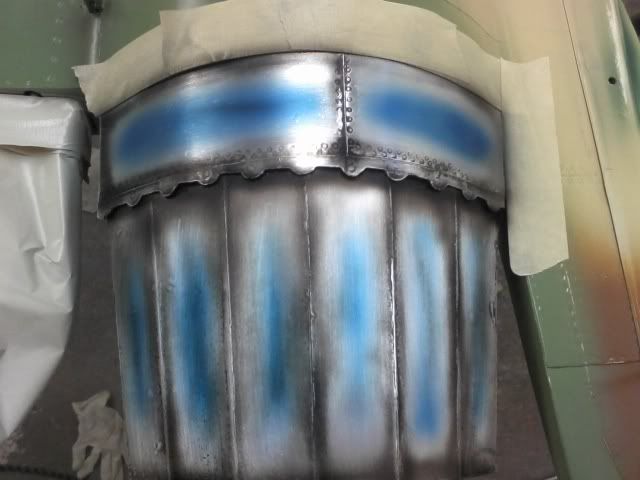
Step 4.
Rub down the blue with the magic eraser now.
Break out your airbrush. All of your paint for this will be over reduced, we want to use it more as a wash than an actual pigmented paint. The black in particular. I am using PPG black in this case and SEM Candy's. The SEM Candy Concentrates are mixed with a PPG mixing base and reduced. You can use DBC500 or any of the clear carriers designed for Candy's.
Step 1.
Start airbrushing your black on the sanded aluminum. Spray in the direction of the grain, but don't worry about even coverage. We don't want that, concentrate the black heavier where the nozzle would be dirtier from soot and crap in real life, along seams, in rivets, etc.
Step 2.
Take your Mr Clean Magic Eraser and start rubbing down the part, again, always in the direction of the grain. This will remove most of the black leaving deposits in the sanding scratches, valley's, rivets, grooves etc.
Step 3.
Now take your Pthalo blue candy, over-reduced as well and spray the area's where the blue should be, look at reference photo's to determine where the metal will blue the most.
Step 4.
Rub down the blue with the magic eraser now.
06-04-2012, 04:25 PM
#3
Step 5.
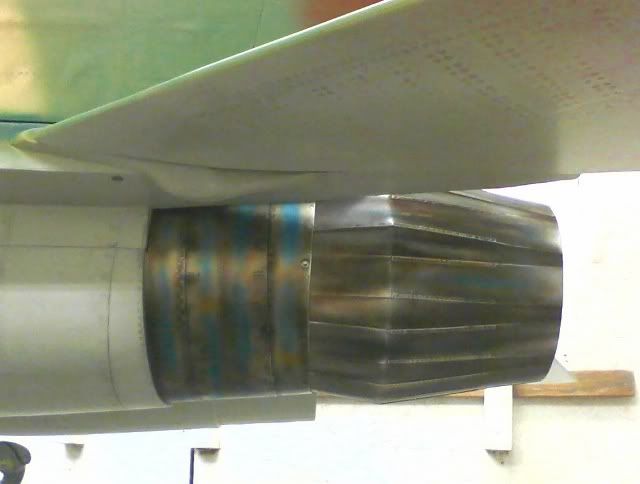
Now take your over reduced root beer candy and airbrush around the blue, let the root beer go well into the blue to help pull back the blue color around the edges, this will let the root beer blend better in with the blue.

Step 6.
Again, rub it down with the magic eraser
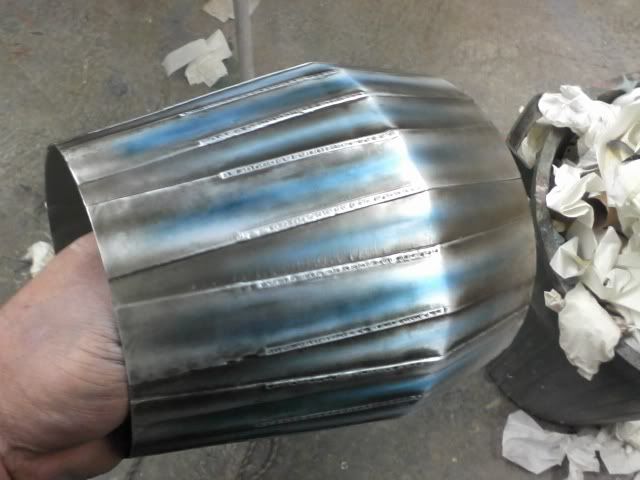
Step 7.
Spray some black back in so that there is a "soot" over some of the color again, this will actually richen the color a little and add some depth to it.
Step 8.
Clear coat with a satin clear (not flat, not gloss) and sit back and enjoy your efforts
Now take your over reduced root beer candy and airbrush around the blue, let the root beer go well into the blue to help pull back the blue color around the edges, this will let the root beer blend better in with the blue.
Step 6.
Again, rub it down with the magic eraser
Step 7.
Spray some black back in so that there is a "soot" over some of the color again, this will actually richen the color a little and add some depth to it.
Step 8.
Clear coat with a satin clear (not flat, not gloss) and sit back and enjoy your efforts


 06-05-2012, 06:53 AM
#15
ORIGINAL: sideshow
Those look like *****!
Awesome! They definitely have that Russian abused look to them.
btw...I like the photo bucket pics better than uploading, they're all full size already.
Thanks!
Those look like *****!
Awesome! They definitely have that Russian abused look to them.
btw...I like the photo bucket pics better than uploading, they're all full size already.
Thanks!
Hey Bob,
I had to read that first line a few times haha. I hope by "those look like *****" you mean the good kind of *****, lol. Even when I found pictures of a near factory fresh Mig, they look old and abused haha. Love it though, makes for a much more interesting model I think.
 06-05-2012, 10:48 AM
#18
ORIGINAL: hooker53
Jeremy. That's the best one I've seen yet. Thanks for posting this. I wish we had a Sp sticky for tips like this.
Jeremy. That's the best one I've seen yet. Thanks for posting this. I wish we had a Sp sticky for tips like this.
All you have to do is subscribe to the thread and it will be stored in your fourm settings
Awesome work as usual, I subscribed for future reference!
 06-05-2012, 11:27 AM
#19

My Feedback: (43)
While the real titanium is perfect, your paint is the best I have ever seen. If you look at the way the titanium turned colors, yours duplicated it perfectlly. I bet from 5 feet, you can't tell that yours isnt real titanium.
 06-05-2012, 12:34 PM
#21
...after the careful sanding has finished, i mix of black and brown oil paint makes it more real.
photos don't give justice of the final result..
http://www.rcuniverse.com/forum/m_10...m.htm#10807259
photos don't give justice of the final result..
http://www.rcuniverse.com/forum/m_10...m.htm#10807259

 06-06-2012, 01:18 PM
#24
Senior Member

Join Date: Apr 2004
Location: Falkenberg, GERMANY
Posts: 282
Likes: 0
Received 0 Likes
on
0 Posts
very nice....
Jeremy, that´s a great idea.....going to use that tape too. will try...
George, nice job...you haven´t sent me that pictures!!!
have tried a new procedure to paint nozzles...will be published in the new issure of the JP magazin. I guess it does work fine on that bare metal tape too.
Jeremy, that´s a great idea.....going to use that tape too. will try...
George, nice job...you haven´t sent me that pictures!!!
have tried a new procedure to paint nozzles...will be published in the new issure of the JP magazin. I guess it does work fine on that bare metal tape too.