


GR130
 10-14-2012 | 01:35 PM
#1

Hi all,
I'm new to this forum. Just a short introduction myself: My name is Lukacs and I'm living in Switzerland. I fly helicopter since i was 17. (more then 20 years
 with some breakes). My hobbies are also CNC milling / turning. I builded several mechanics and rotorheads. At the moment I'm on the way of building a turbine which I will convert to a shaft turbine later (if I gonnahave success with it) for a real <span style="color: #ff0000">big </span>Agusta A109 (also DIY). So after a lot of reading and studyingI decided to build a GR 130 as gas generator.
 So one of the reasons that I'm here is that a lot of turbine builders like Gerald Rutten / Frema / chrigui and lot more....are also here. another reason is: I've read a lot in the modelbouforum.nl but i could not get an account there. Also writing dutch with some translater engines is not that cool

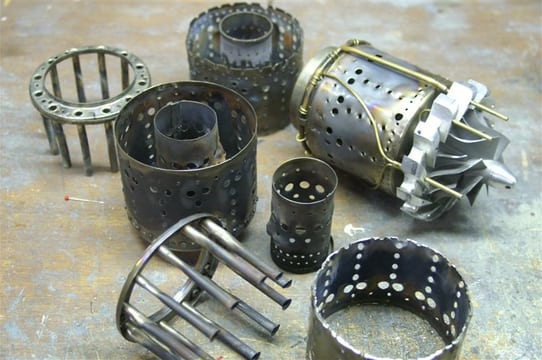
attached you find some pics....
best regards
Lukacs www.sudar.ch
sorry for my english, its not my native language</p>
 10-14-2012 | 02:56 PM
#2
Member
My Feedback: (2)
Joined: Dec 2002
Posts: 72
Likes: 0
Received 0 Likes
on
0 Posts
From: Port Rowan,
ON, CANADA
Hello Lukacs, looks good. I am also working on a Gr130. I started it in the spring and it will be my winter project this year. unfortunately I do not have CNC so everything is made manualy.
Here is a video of the kj66 I built last winter and flew this summer.
[youtube]http://www.youtube.com/watch?v=9uwnrapNFs8[/youtube]
Here is a video of the kj66 I built last winter and flew this summer.
[youtube]http://www.youtube.com/watch?v=9uwnrapNFs8[/youtube]
10-14-2012 | 09:49 PM
#3
Hi Geoff
That looks very nice!
After reading several articles about aligning the inner and outer CC rings I getmore and more confused. I know it's a mr. Kittelberger design and I read somewhere that he and also Ulrich Thiel mentioned that you have to correct align the holes (congruent !) But in the dutch forum I read that Gerald Rutten had to change the alignement on the GR180 so thatthe holes are not loger congruent to each other. So what is correct? Maybe Gerald himself can explain
thanx for your answers
PS: attached you find a picture what i'm talking about
Lukacs
10-15-2012 | 04:38 AM
#4
Member
My Feedback: (2)
Joined: Dec 2002
Posts: 72
Likes: 0
Received 0 Likes
on
0 Posts
From: Port Rowan,
ON, CANADA
I am not sure If I have seen a definite answer on how to position the holes of the outer and inner combustion chamber wrapper. On the Gtba some one found the lowest temp was achived with the holes offset so they dont line up. Also dont have the vaporiser sticks line up with the largest holes. Thats how I did my Kj.
Geoff
Geoff

 10-27-2012 | 10:38 AM
#8
Hey Geoff
Can you answer me several questions?
1. have you drilled a hole for the glow plug trough the outer CC, exactly at the end of the sticks and exactly over the sticks?
2. can you attach some pictures of the alignment of the inner / outer CC and the sticks?
3 You haven't expanded the holes, right?
Thanks for your help and support
Best regards
Lukacs
10-27-2012 | 01:02 PM
#9
Member
My Feedback: (2)
Joined: Dec 2002
Posts: 72
Likes: 0
Received 0 Likes
on
0 Posts
From: Port Rowan,
ON, CANADA
The center of the glow plug hole is at the end of the stick. It is in the middle of 2 rows of the lengthwise holes on the outer chamber. I dont know if there is enough clearance between glow plug element and the stick if they are alligned. It may have to be offset to clear. On my Kj66 the glow plug is in between two sticks. I did the glow plug fitting a little different then the plans. I turned a .375" od glow plug fitting with a small shoulder at the bottom of .275" od and .030" long. I drilled the hole in the chamber a little bigger than the .275 so the plug fit in tight then silver soldered it in place.
I have not welded the end plate with the sticks into place yet. I will try and get a pic of the alignment I plan to use.
The holes are all flat, not flared at all.
Geoff
I have not welded the end plate with the sticks into place yet. I will try and get a pic of the alignment I plan to use.
The holes are all flat, not flared at all.
Geoff
02-20-2013 | 12:27 PM
#12
for sure I need a balancing center too
The weeks are running fast.. I have only slow progress. But every part needs time and also the stuff around has to be built. This time the balancing center
Regards Lukacs
</p>
02-20-2013 | 12:49 PM
#17
A question to the UT160 builders! Is that right that the glow plug is onlyfittedon the case. there is no hole through the CC? Right?
That's the next part I would like to build. And I prefer the Ulrich Thiel's way if that is correct.
Regards Lukacs
That's the next part I would like to build. And I prefer the Ulrich Thiel's way if that is correct.
Regards Lukacs
02-21-2013 | 04:48 AM
#19
But how does it look like? How is the Jetcat glow plug mounted and / or is it solderd to the CC? Is there a additional hole in the CC for the Glowplug?
Thanks for your answers
Regards Lukacs
Thanks for your answers
Regards Lukacs


 02-23-2013 | 04:28 AM
#21

Hi Lukacs, sorry, I havn't been on rcuniverse a lot lately so I discovered your thread just now. Very nice to see you building this engine, also as for Geof, very good work!
Nice looking diffuser, I still make them more or less by hand, using my simple 2D hand mill. Jealous to see you all with cnc machines ha ha ha!
As for the burner hole pattern difference between inner and outer liner, for the GR130 I would leave them against each other, not offset. This helped on my GR180 but have not tested this on the smaller engine. Maybe it works, I guess it won't harm, the idea was to give greater mixture of the gases and create more even flame.
I would start with flat holes, in the event you have high temperatures and have examined all other possibsle sources you might flare the holes against flame direction so as to "push" the flame forward and improving gas mixing.
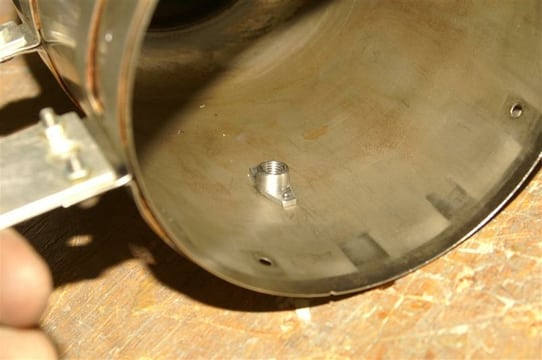
Plug hole; I made this little boss as seen below and it's fixed by meand of 2 x M2 bolt. The boss sit's tight against the chamber where I mark the position with a feltpen through the boss. After this I drilled a 5mm hole in the chamber.
As far as the P160 chamber, this could work as well, there have been many idea's on chamber geometry. The chamber you have made worked on the GR130, it's always possible to improve things but you can do that in a later stage if it's needed. I tested many chambers as well, not the P160 yet and would be curious to see how it works.


Hope this helps.
Best regards,
Gerald
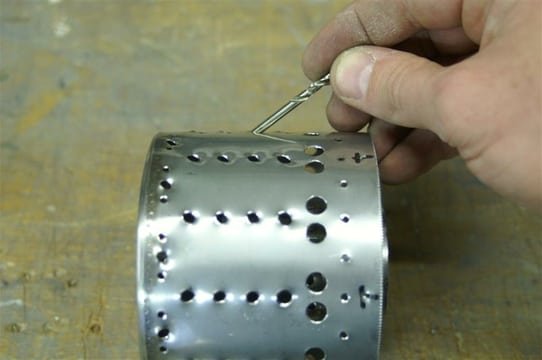
To flare the holes, push in the matching drill and bend it with the flare looking against the flame:
Nice looking diffuser, I still make them more or less by hand, using my simple 2D hand mill. Jealous to see you all with cnc machines ha ha ha!
As for the burner hole pattern difference between inner and outer liner, for the GR130 I would leave them against each other, not offset. This helped on my GR180 but have not tested this on the smaller engine. Maybe it works, I guess it won't harm, the idea was to give greater mixture of the gases and create more even flame.
I would start with flat holes, in the event you have high temperatures and have examined all other possibsle sources you might flare the holes against flame direction so as to "push" the flame forward and improving gas mixing.
Plug hole; I made this little boss as seen below and it's fixed by meand of 2 x M2 bolt. The boss sit's tight against the chamber where I mark the position with a feltpen through the boss. After this I drilled a 5mm hole in the chamber.
As far as the P160 chamber, this could work as well, there have been many idea's on chamber geometry. The chamber you have made worked on the GR130, it's always possible to improve things but you can do that in a later stage if it's needed. I tested many chambers as well, not the P160 yet and would be curious to see how it works.
Hope this helps.
Best regards,
Gerald
To flare the holes, push in the matching drill and bend it with the flare looking against the flame:
02-23-2013 | 06:34 AM
#22
@ Chrigui
Thank you for your Picutres! That helps a lot!!
@Gerald
Wow Cool that you joined my thread! I tried to reach you per mail but you've never answered,soI decided to try ithere. Also Ihadn't the chance to register onthe modellbouwforum.nl
Thanks forclaryfiing my questions!!!!!! That helps that I get quicker to the second Turbine stage......
Regards Lukacs
PS: attached you'll find a cool Idea I had for testing the load of the spring washers
02-23-2013 | 07:02 AM
#23
This mornig I turned the Washer +- 0.002 mm
First I turned the outer diameter and bored and reamedthe hole. After parting, I turned an alu- piece with a shoulder and glued the washer with CA. After finishing the other side I used Aceton to remove the finishedwasher.
Regards Lukacs
</p>
03-09-2013 | 12:20 AM
#24

ORIGINAL: athome
This mornig I turned the Washer +- 0.002 mm
First I turned the outer diameter and bored and reamedthe hole. After parting, I turned an alu- piece with a shoulder and glued the washer with CA. After finishing the other side I used Aceton to remove the finishedwasher.
Regards Lukacs
</p>
This mornig I turned the Washer +- 0.002 mm
First I turned the outer diameter and bored and reamedthe hole. After parting, I turned an alu- piece with a shoulder and glued the washer with CA. After finishing the other side I used Aceton to remove the finishedwasher.
Regards Lukacs
</p>
Nice work. The faces on that whasher, shaft an compressor is super important. On all these you need better than +- 1uM. Very difficult with turning, actually impossible. With grinding or even hand lapping with 2400 water paper on glas you can do it with light oil as lube. The most important tools are 1uM micrometer and dial gage. Also make sure your shaft is push fit at 150 - 200 deg C of compressor.
If these tolerances are not met balancing is difficult and bearing life will suffer.
I have attached picture of how I do glowplug nut. The nut has step at bottom, the hole in cc allows for front back slide due to expansion. The nut is brazed onto Ss strip which covers the elongated hole and attaches to front of CC. Later we put kink in strip for some "spring'.
This way the braze do not get hot and the joint will not crack. Also alignment is easier. Note the countersink of nut at top. Makes replacing glowpug easy as it guides thread.
You do not want airgap at nut cc interface. It makes gas start difficult, even kero start is better this way.
Andre
04-05-2013 | 01:38 PM
#25
Hi Guys
Thank you for joining my thread and helping me.
Today I met Dieter Albisser and bought a new Turbine wheel and shaft. The chinese turbinewheel sweeps so badly that I could not use it. This Albisser Turbinewheel looks absolut great... I will show you some pictures later.
The progress on the turbine is quite slow. Tried designing the difuser inlet, so that I can CNC turn the whole inlet. I do it from black POM.
Hope that 1.5/10 mm of space all around is OK or should there be almost zero mm space at the difusers end? Not sure if that would work out when fireing up the turbine for the first time.
Did also some spreadsheet calculation for resonance vibrations. These results showed me that I would need a bigger/stronger shaft for rotational speed more than 100k (I saw that Gerald drawed also a bigger shaft on his documentation). But Dieter Albisser mentioned that tey used this standard kj66 shaft also for heavier wheels and more than 123k speed. Hope that's ok as well.
PS found an other cool guy who is doing quite the same here his Webpage: http://www.bigscaleheli.com
Best regards Lukacs<br type="_moz" />
Thank you for joining my thread and helping me.
Today I met Dieter Albisser and bought a new Turbine wheel and shaft. The chinese turbinewheel sweeps so badly that I could not use it. This Albisser Turbinewheel looks absolut great... I will show you some pictures later.
The progress on the turbine is quite slow. Tried designing the difuser inlet, so that I can CNC turn the whole inlet. I do it from black POM.
Hope that 1.5/10 mm of space all around is OK or should there be almost zero mm space at the difusers end? Not sure if that would work out when fireing up the turbine for the first time.
Did also some spreadsheet calculation for resonance vibrations. These results showed me that I would need a bigger/stronger shaft for rotational speed more than 100k (I saw that Gerald drawed also a bigger shaft on his documentation). But Dieter Albisser mentioned that tey used this standard kj66 shaft also for heavier wheels and more than 123k speed. Hope that's ok as well.
PS found an other cool guy who is doing quite the same
here his Webpage: http://www.bigscaleheli.comBest regards Lukacs<br type="_moz" />

