


Skymaster BAE Hawk 100 assembly
 03-19-2015, 06:41 AM
#1

Thread Starter
My Feedback: (95)

Join Date: Aug 2002
Location: Mason, OH
Posts: 982
Likes: 0
Received 0 Likes
on
0 Posts
I was going to call it the "Skymaster high drama build thread" so people look at it. Apparently drama is in vogue these days.
Anyway, the negative stuff in the jet forum is getting old so I thought I would bore you to death with another Skymaster Hawk build thread.
I picked up two Skymaster Hawks for me and my buddy Dirr from Dana at Chief. We had always talked about the dream of having someone actually having SM airplanes "in stock" state side but never thought it would happen since it is an incredible investment for any company. Dreams do come true!
This is actually my 2nd SM Hawk. I built one not too long ago but sold it after my Wife wanted to buy a house that was double the price of the one we had. I believe it is still flying down in South America somewhere.
Both Hawks will be ready for KY Jets or actually sooner. Mine is the Hawk 100 and Dirr had the Goshawk.

 03-19-2015, 07:17 AM
#3
Thread Starter
My Feedback: (95)
Join Date: Aug 2002
Location: Mason, OH
Posts: 982
Likes: 0
Received 0 Likes
on
0 Posts
I did some mods on these two Hawks that I also did on my last Hawk. These are nothing new if you have researched SM Hawk threads in the past.
With the weight of the Hawk in the high 40lbs wet it can sometimes be damaging to set it on a fender stand. The belly fiberglass in the areas without formers are very flexable and I have actually seen a guy that had crush marks showing around those areas. The fix is easy. I had just added some CF to those vulnerable areas.


The fiberglass is thin around the hatch openings and it is very easy to have cracks develop in those areas from just taking stuff in and out of the fuse. I added thin strips of wood glued to the underside lip of the hatch areas. Neither of these mods are critical but I like having robust nice looking stuff and the added weight is minimal.

One more area that can be a little fragile is the cockpit. The plastic can easily break, especially since the entire frame and canopy sits on the cockpit tubs when you remove it. I put a thin layer of fiberglass on my previous Hawk but this time I did something different. I took some hysol and mixed it will some CF powder and put a bead around the base of both tubs and around the corners for support. You can add the powder gradually and almost obtain the same grey color that the cockpit is painted.


The only performance related mod is done with the elevator mount. The wood plate under the fliberglass in the area that the elevator mount is attached can have small gaps. If the gap between the fiberglass and wood is significant you can have some flex movement in that area. I have seen where others have cut off some of the fiberglass but that just doesn't look clean to me. My option was to drill two small 1/16 holes and fill a syringe with hysol and inject it into that gap. You have to loosen the mount bolts and relieve the pressure and once dried you can tighten them back to a flex free position. Keep in mind that the gap is very small.... maybe the thickness of card stock. You can choose to just tighten the bolts and crush it down but it sometimes will give you a little bulge on the side of the fiberglass.


Don't read into any of this information as me saying that SM is not a quality product. That is completely opposite. SM makes awesome jets and I will likely tweak or try to make better anything I own.
With the weight of the Hawk in the high 40lbs wet it can sometimes be damaging to set it on a fender stand. The belly fiberglass in the areas without formers are very flexable and I have actually seen a guy that had crush marks showing around those areas. The fix is easy. I had just added some CF to those vulnerable areas.
The fiberglass is thin around the hatch openings and it is very easy to have cracks develop in those areas from just taking stuff in and out of the fuse. I added thin strips of wood glued to the underside lip of the hatch areas. Neither of these mods are critical but I like having robust nice looking stuff and the added weight is minimal.
One more area that can be a little fragile is the cockpit. The plastic can easily break, especially since the entire frame and canopy sits on the cockpit tubs when you remove it. I put a thin layer of fiberglass on my previous Hawk but this time I did something different. I took some hysol and mixed it will some CF powder and put a bead around the base of both tubs and around the corners for support. You can add the powder gradually and almost obtain the same grey color that the cockpit is painted.
The only performance related mod is done with the elevator mount. The wood plate under the fliberglass in the area that the elevator mount is attached can have small gaps. If the gap between the fiberglass and wood is significant you can have some flex movement in that area. I have seen where others have cut off some of the fiberglass but that just doesn't look clean to me. My option was to drill two small 1/16 holes and fill a syringe with hysol and inject it into that gap. You have to loosen the mount bolts and relieve the pressure and once dried you can tighten them back to a flex free position. Keep in mind that the gap is very small.... maybe the thickness of card stock. You can choose to just tighten the bolts and crush it down but it sometimes will give you a little bulge on the side of the fiberglass.
Don't read into any of this information as me saying that SM is not a quality product. That is completely opposite. SM makes awesome jets and I will likely tweak or try to make better anything I own.
03-19-2015, 07:25 AM
#4
Thread Starter
My Feedback: (95)
Join Date: Aug 2002
Location: Mason, OH
Posts: 982
Likes: 0
Received 0 Likes
on
0 Posts
I also had to change the det cord on the canopy. It comes from SM mounted on the outside and it always gets pulled up from cleaning your plane or just handling it. Taylormade makes a det cord decal that mounts from the inside.... much better.


03-19-2015, 07:33 AM
#6
Thread Starter
My Feedback: (95)
Join Date: Aug 2002
Location: Mason, OH
Posts: 982
Likes: 0
Received 0 Likes
on
0 Posts
I did have to fix one mistake and it wasn't fun. It appears that the clamp that the holds the rudder in place wouldn't work. Someone drilled the hole too large for the threaded tap and there was just not enough thread depth to tighten it. I had to redrill and tap it. The hard part was first getting it out....it was bolted and glued in. The other hard part was getting it remounted and aligned properly for the rudder post. Glad that is over.


It is nice and secure now!
It is nice and secure now!
Last edited by Joe Westrich; 03-19-2015 at 07:36 AM.
03-19-2015, 08:42 AM
#8

 03-19-2015, 09:16 AM
#10
Thread Starter
My Feedback: (95)
Join Date: Aug 2002
Location: Mason, OH
Posts: 982
Likes: 0
Received 0 Likes
on
0 Posts
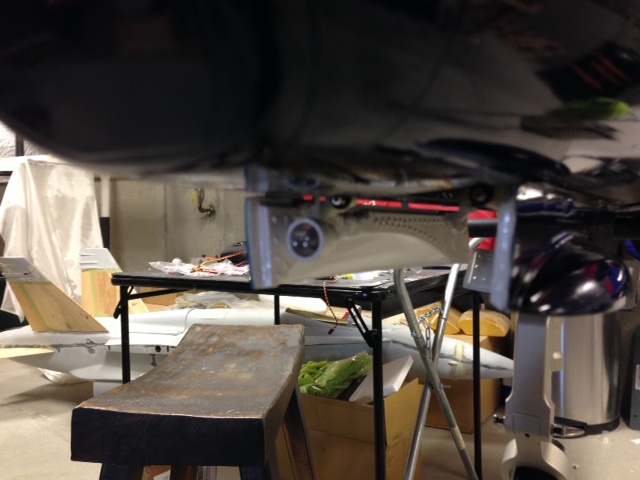
I have not finalized the equip layout but this is the direction it is going...


Although it is already changing... I am removing the two switches and smartfly and going with a PB SRS comp and dual Rx
Although it is already changing... I am removing the two switches and smartfly and going with a PB SRS comp and dual Rx
Last edited by Joe Westrich; 03-19-2015 at 09:26 AM.
 03-19-2015, 07:14 PM
#13
Thread Starter
My Feedback: (95)
Join Date: Aug 2002
Location: Mason, OH
Posts: 982
Likes: 0
Received 0 Likes
on
0 Posts
I also picked up the light kit from Details4scale. I did change the landing light in the nose to a scale location, which is on the inside of the gear door.


Last edited by Joe Westrich; 03-19-2015 at 07:16 PM.
05-12-2015, 11:45 AM
#14
Thread Starter
My Feedback: (95)
Join Date: Aug 2002
Location: Mason, OH
Posts: 982
Likes: 0
Received 0 Likes
on
0 Posts
I thought I would finish out this thread. The Hawk is complete and has 3 perfect flights on it. Here is a few pics of the pylons and underwing business. The rocket pod and outer pylon is from details4scale.
.

.
Last edited by Joe Westrich; 05-12-2015 at 11:52 AM.
05-12-2015, 11:49 AM
#15
Thread Starter
My Feedback: (95)
Join Date: Aug 2002
Location: Mason, OH
Posts: 982
Likes: 0
Received 0 Likes
on
0 Posts
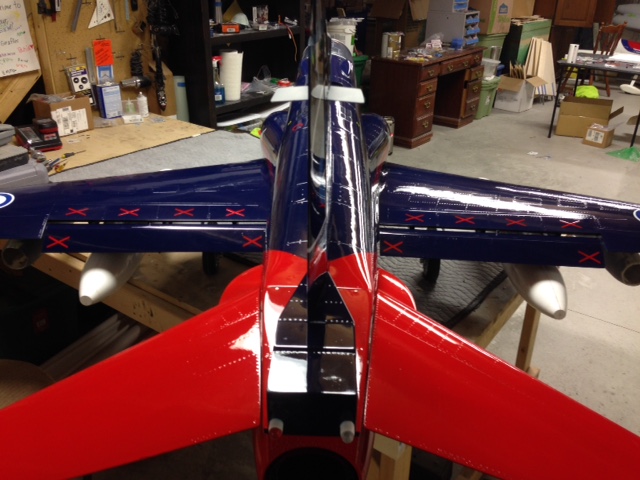
I modified the outer wing pylons. My walk around book shows the outer pylon and aileron linkage cover as integrated. I combined the cover and pylon and with a little body work... it turned out ok.


05-12-2015, 11:59 AM
#16
Thread Starter
My Feedback: (95)
Join Date: Aug 2002
Location: Mason, OH
Posts: 982
Likes: 0
Received 0 Likes
on
0 Posts
I got the maiden flight on cell phone video. It's good for watching the take-off and landing....that's about it. I had a little too much expo on the elevator so the landing was dropped in but I caught it a couple feet off the ground. I reduced expo and everything is great now. The K210 works great for the SM Hawk.
https://www.youtube.com/watch?v=iGc5aBqhmyY

https://www.youtube.com/watch?v=iGc5aBqhmyY
05-12-2015, 04:34 PM
#18
Thread Starter
My Feedback: (95)
Join Date: Aug 2002
Location: Mason, OH
Posts: 982
Likes: 0
Received 0 Likes
on
0 Posts
Thanks. I am finishing my friends Hawk now. Yes...more Hawks, I know. :-) They are plentiful for a reason.
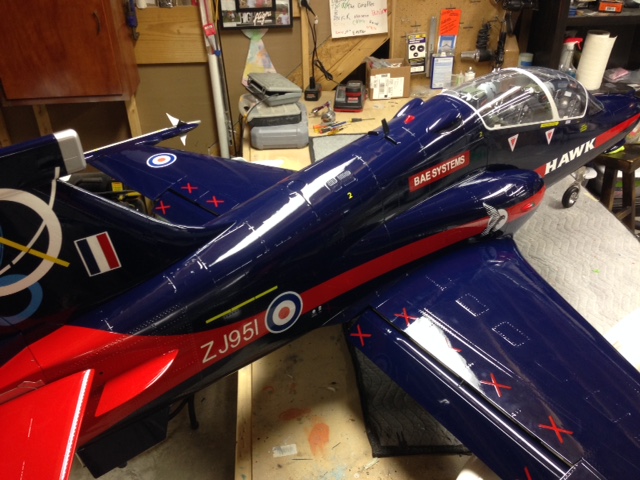
I did notice one thing when flying it. The dark blue can silhouette fairly easy. I think I may repaint the wing tanks to a flat grey. It should make it stand out.
In this picture, it looks almost black.

I did notice one thing when flying it. The dark blue can silhouette fairly easy. I think I may repaint the wing tanks to a flat grey. It should make it stand out.
In this picture, it looks almost black.
 04-19-2017, 07:40 PM
#20

Join Date: Apr 2014
Location: Krasnodar, RUSSIAN FEDERATION
Posts: 125
Received 0 Likes
on
0 Posts
You can find there BAe Hawk Sprengstoffschnur (MDC), Tailormadedecals
(there is water slide ore stickers, on your choice)
(there is water slide ore stickers, on your choice)
07-09-2022, 06:45 PM
#21
My Feedback: (2)
Thanks. I am finishing my friends Hawk now. Yes...more Hawks, I know. :-) They are plentiful for a reason.
I did notice one thing when flying it. The dark blue can silhouette fairly easy. I think I may repaint the wing tanks to a flat grey. It should make it stand out.
In this picture, it looks almost black.
I did notice one thing when flying it. The dark blue can silhouette fairly easy. I think I may repaint the wing tanks to a flat grey. It should make it stand out.
In this picture, it looks almost black.
Thanks much in advance,
Shaz
05-10-2023, 12:46 PM
#22
since i am building for a friend the same plane,hawk 100 from SM, i didnt found any details of the neutral position of the elevator.it would be awesome if you could share some details about that.also some pictures inside the elevator hatch will be greate also!!! thank you in advance!!!
