


GJC/FB 2.5M Viper Build
 01-07-2016, 04:15 PM
#1

Thread Starter

Well since the Rebel is done and the F-14 is almost done again I am getting this project for a friend underway. Custom scheme buy the own, it was all in one box, had one small crack on the fuselage from handling at the factory but other than that no issues so far. Seems like a nice solid jet, I really like their live hinging, much better than SM live hing and no slop. So a plus there. That being said I will also be building a SM 2.5M Viper soon as well so it will be interesting to compare the two. Another plus is the wheel wells they install looks good and gives a much more scale look.
Items to be used in this one is a nice powerbox royal with igyro, and I must say I really like this setup light and compact. I will be using the bus system they have now to help clean up the install. Turbine will most likely be a JC Rhino and I will be installing some braincube lights as well. Cheers!


Its a nice size jet
Items to be used in this one is a nice powerbox royal with igyro, and I must say I really like this setup light and compact. I will be using the bus system they have now to help clean up the install. Turbine will most likely be a JC Rhino and I will be installing some braincube lights as well. Cheers!
Its a nice size jet
 01-08-2016, 03:55 PM
#2
Thread Starter
Got to work a little today, I had some hysol curing on the F-14 so I jumped to this one, I started with the servos on the tail, rudder is straight forward and so are the stabs. I did have to do some clean up to one of the servo boxes and you have to cut notches for the servo wires but it was all quick and easy. I made sure to put the stab servos as close to the bottom side as possible to help with servo arm length. I will say the stabs are beefy, looks like a nice strong layup.
I am going to put the wing servos in next that way I can cut all the control horn slots at the same time and glue them in at the same time. Sooooo much room inside and with the bottom open like it is the tail wiring should be a snap.


I am going to put the wing servos in next that way I can cut all the control horn slots at the same time and glue them in at the same time. Sooooo much room inside and with the bottom open like it is the tail wiring should be a snap.
01-10-2016, 05:49 PM
#3
Thread Starter
Finished up what I needed to do on the F-14 so now I can get going on this viper. I started by getting the nose steering servo in and hooked up, typical to the asian arf arena I had to redo some stuff and throw out their hardware. It looks like the heat up the airline to get it on the barbs and both lines to the nose gear were ruined so I had to redo it. Plus they cut the push/pull rods two short so I had to make two new ones, this is the stuff that slows you down and can be a pain. I am going to get the servos for the wings mounted next that attached to the servo door with L brackers and screws. Much easier to deal with than a servo box in the wing.


01-10-2016, 07:10 PM
#4
Thread Starter
Finished up getting the servos in the wings, they go in quick! The only ass pain was the screws they sent to attach the L brackets to the cover are smaller than the hole in the bracket. Luck for me I always keep a nice hefty supply of small screws  Tomorrow after work I will cut and install all the control horns for the jet, the ailerons are pre cut but everything else will require the usual mark and cut. plus the already cut the opening for the flaps so it should be a quick rod install as well. Cheers!


Tomorrow after work I will cut and install all the control horns for the jet, the ailerons are pre cut but everything else will require the usual mark and cut. plus the already cut the opening for the flaps so it should be a quick rod install as well. Cheers!
01-11-2016, 09:51 PM
#5

Hey FenderBean! Nice build log. I have not announced it yet but I just pulled the plug and got an FB Viper as well. It should be here by Feb 5th. : Fingers crossed". I just got world that its getting ready for paint. I too am going to start a build thread soon but will wait until I get it in. I haven't seen a FB Viper build on here and I believe this one is the first. I will be following your thread! This one is going to take a little bit, Having to buy bits at a time haha I wish I made "CW3 Pay". Are you doing JR 8911 all around?
 01-12-2016, 08:08 AM
#6
Thread Starter
Hey FenderBean! Nice build log. I have not announced it yet but I just pulled the plug and got an FB Viper as well. It should be here by Feb 5th. : Fingers crossed". I just got world that its getting ready for paint. I too am going to start a build thread soon but will wait until I get it in. I haven't seen a FB Viper build on here and I believe this one is the first. I will be following your thread! This one is going to take a little bit, Having to buy bits at a time haha I wish I made "CW3 Pay". Are you doing JR 8911 all around?
but any rank in the Army isnt paid enough for what they do and deal with.
01-12-2016, 08:42 PM
#7
Thanks, the owner sent me all 8911, except the nose steering he sent a MK HV servo. Good luck on your jet, I am getting a SM in this size but after seeing the FB I really like it. And thats W4 paybut any rank in the Army isnt paid enough for what they do and deal with.
but any rank in the Army isnt paid enough for what they do and deal with.
01-13-2016, 09:05 AM
#8
Thread Starter
There was a guy looking for info from you guys who was going to hawaii. I actually think FB does a better job than SM on the layup, the stabs are beefy and so are the live hinges. SM maybe less weight but its not as strong and their live hinging leaves a lot to be desired.
haha my bad Chief! I just seen quick shot of the rank in one of your youtube videos. But hey its better than the E6 pay lol I get. Yeah I was looking at both too and just really liked the FB. I was also looking at the Carf viper too but ended up picking the FB. From what you have seen, how is the quality of it? do you see anything thing that may need reinforcing or changed to ensure it operates safely? If you get a chance to be stationed in Hawaii you need to come out. Most likely you would be at Schofield barracks or Wheeler Army Air field. Flying Jets is at the Marine Corps base and its right on the water. So you are literally flying lows passes on the ocean haha. Cant get better than that!
Last edited by FenderBean; 01-13-2016 at 09:11 AM.
01-15-2016, 05:25 AM
#9
Really I wonder if he ever got the information he was looking for. That's good to hear. How much more do you have left on it? Also where are you finding your Jet Central Ev2 electric valves? I have looked every were and cant seem to find them. I was watching your youtube vid. on the F14 and seen them. I am looking for some but don't know were to get them.
01-15-2016, 06:04 AM
#10
Thread Starter
I got mine a long time ago from a jc dealer, you can probably call Jose or even I can order you some since he does jc and global jet club. I bought a bunch back in the day and I'm down to my last two which are going in my new jet. Nice valves
01-16-2016, 10:58 AM
#12
Thread Starter
Well I had a late night last with the family, bowling and beer so I slept in this morning. I did some more work on the getting the servo arms cut and ready to glue the control horns. I am going to get the ailerons and flaps next so that way when I miss up the hysol I can do all of them at once.
Once thats done it should go really fast, I need to make a mount system of the one large fuel tank.


The good thing about the design of this is if you need to take the stabs off its once screw on the bottom of the wing. The carbon tube is glued into one side and the other side has the drilled and tapped hole.
Once thats done it should go really fast, I need to make a mount system of the one large fuel tank.
The good thing about the design of this is if you need to take the stabs off its once screw on the bottom of the wing. The carbon tube is glued into one side and the other side has the drilled and tapped hole.
01-17-2016, 09:23 AM
#13
Thread Starter
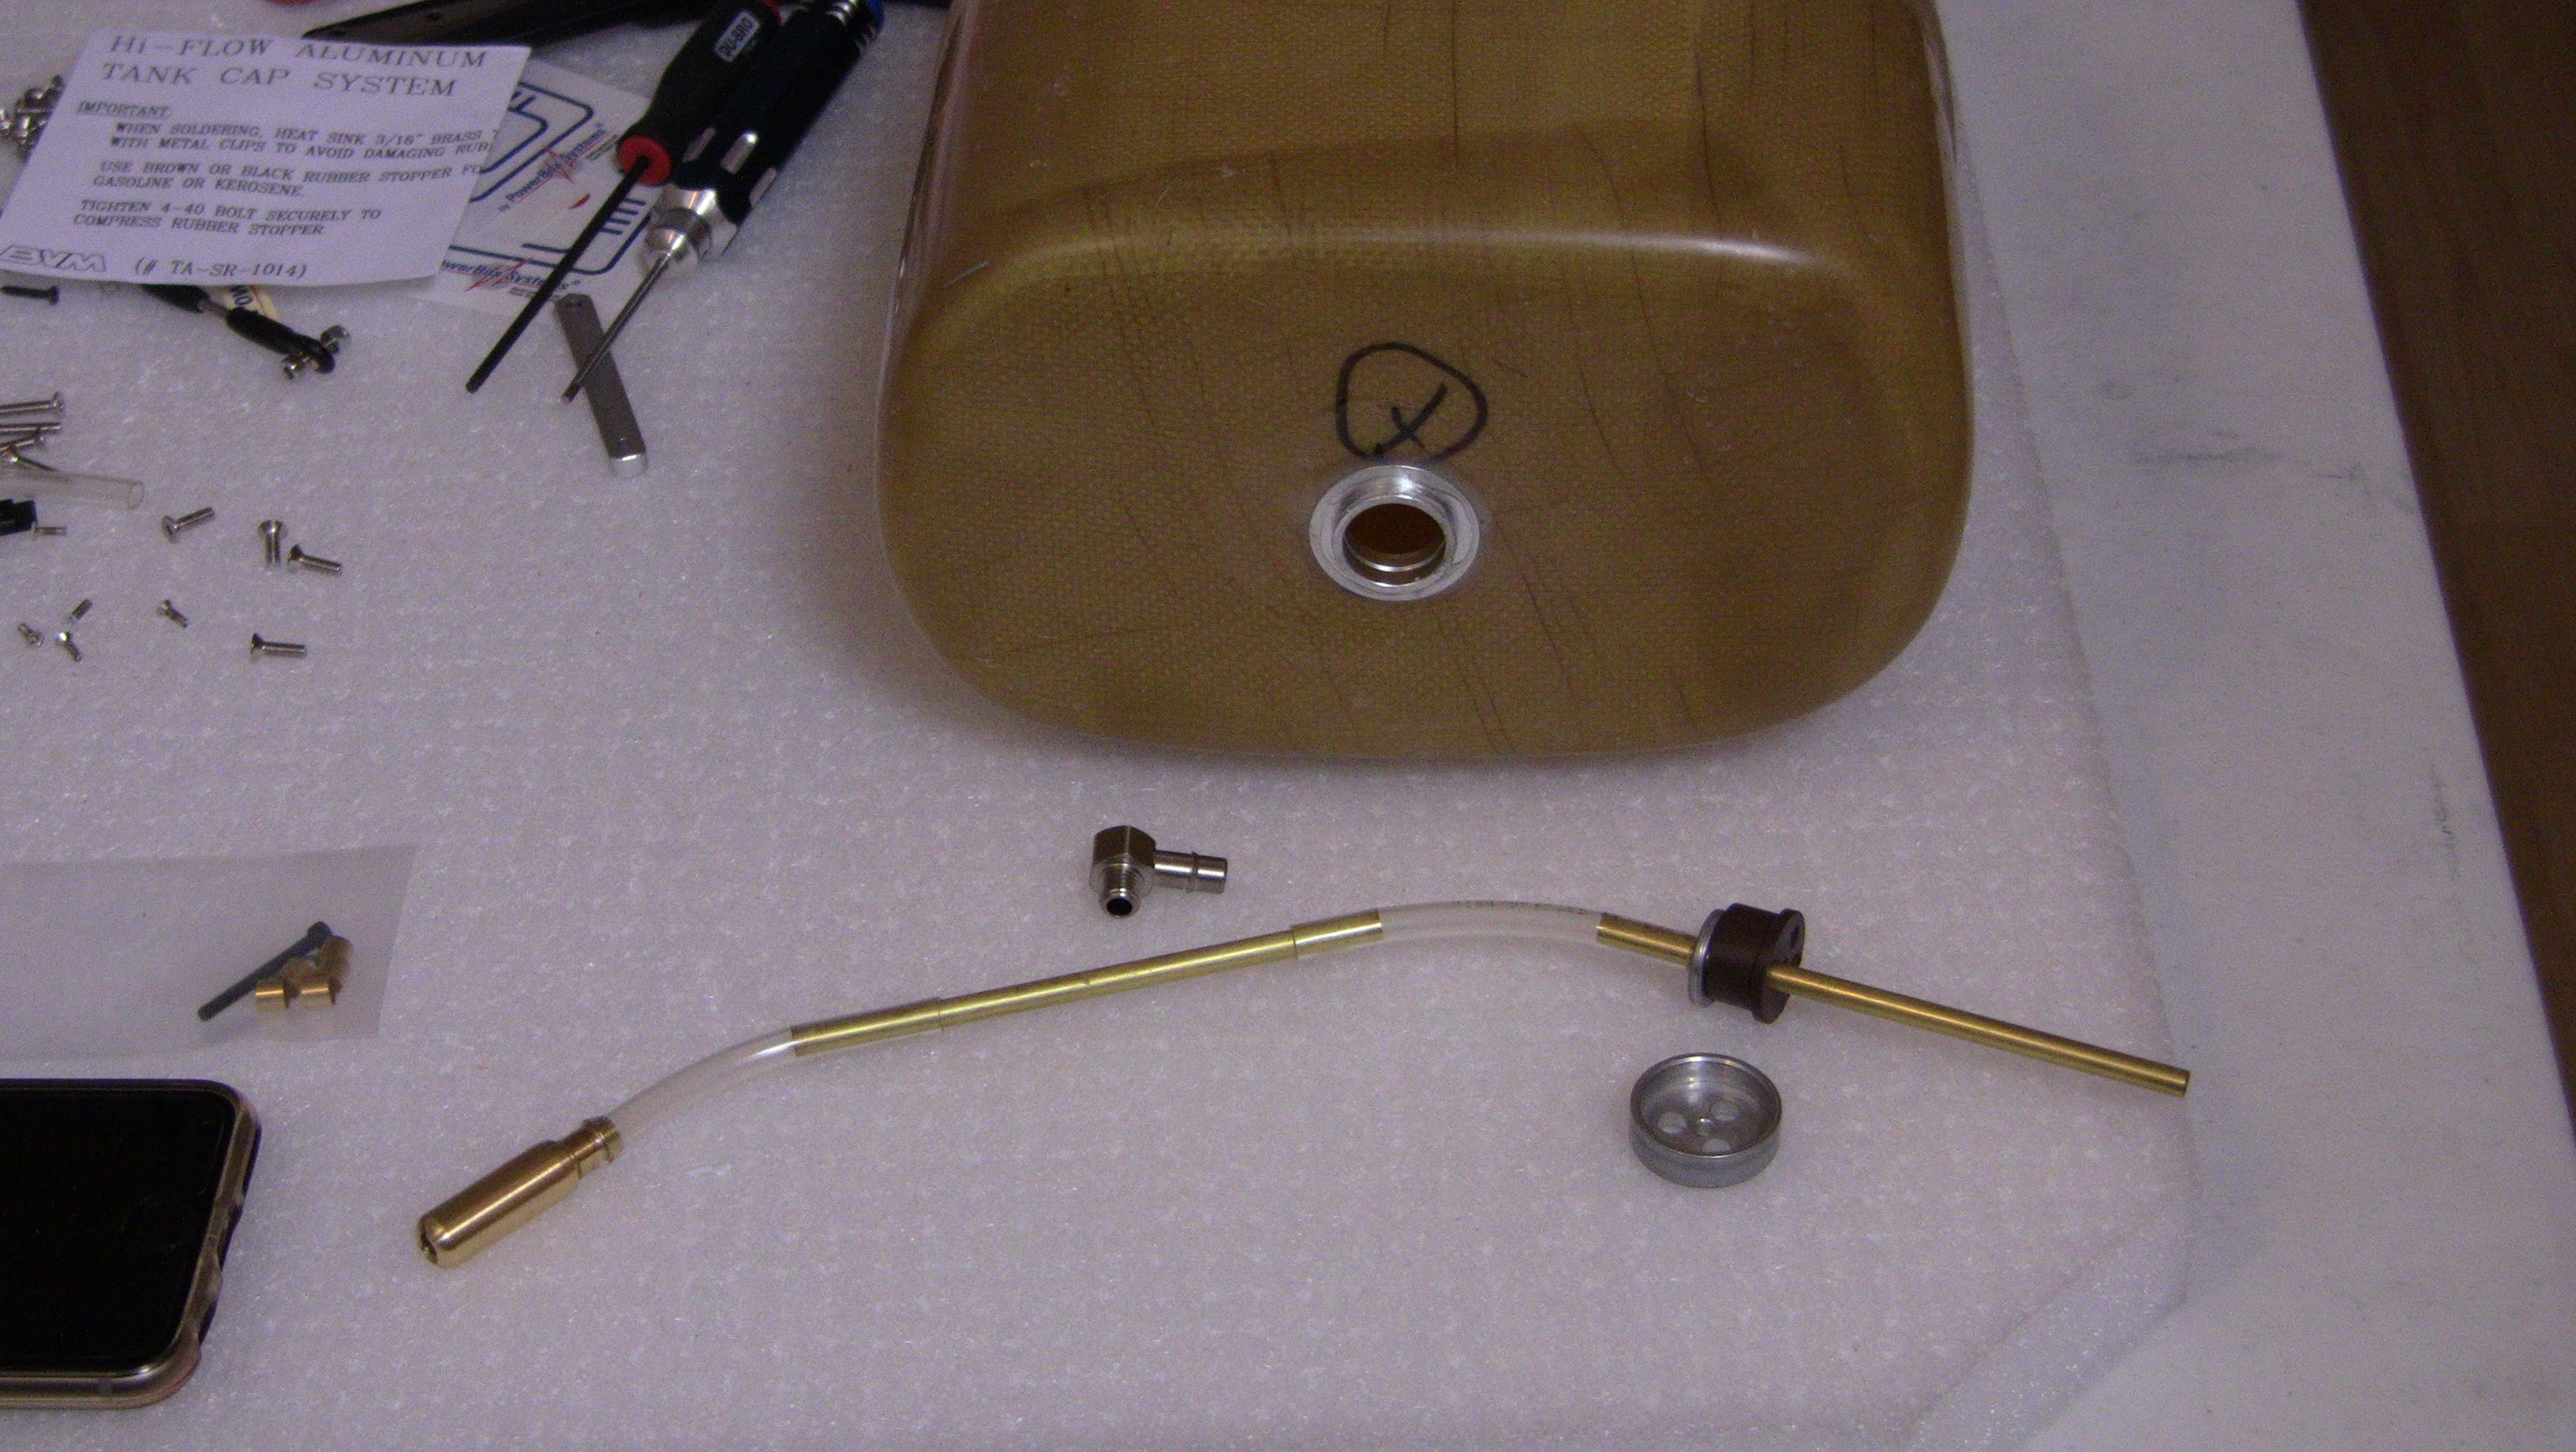
Last night I got all the control horns glued in and it was really nice to to cut some slots and have wood there to glue to. I am moving to the tank installation since it requires a mount to be fabricated and should be the last bit of major gluing as well. I used BVM hi flow all around the and using a MAP hi-flow UAT, this will give the turbine more than enough flow and vent so if there is a flame its not even a question plumbing  Or at least thats my story and im sticking to it LOL j/k
The jet only has one large tank so plumbing is simple and for those they maybe wondering BVM made a nice diagram to give folks the correct way to plumb a system. If you were wondering that is.


I am trying to get as much done as I can this long weekend due to whats about to happen with work. Most know of the accident here and with the final findings done we will start flying Tuesday, but only test flights at first. Out of 24 aircraft I think we may have 4 that are not in a test flight status SO what does this mean you may ask well for us little old MTPs we have to do them all before the regular pilots can fly them. So I have a busy week coming and probably the week after. I will say im a bit nervous based on the findings but its my job so if the build goes silent for a week or so you know. I know I said this but for those who donated to the Condor fund we all thank you! cheers!
Or at least thats my story and im sticking to it LOL j/kThe jet only has one large tank so plumbing is simple and for those they maybe wondering BVM made a nice diagram to give folks the correct way to plumb a system. If you were wondering that is.
I am trying to get as much done as I can this long weekend due to whats about to happen with work. Most know of the accident here and with the final findings done we will start flying Tuesday, but only test flights at first. Out of 24 aircraft I think we may have 4 that are not in a test flight status
SO what does this mean you may ask well for us little old MTPs we have to do them all before the regular pilots can fly them. So I have a busy week coming and probably the week after. I will say im a bit nervous based on the findings but its my job so if the build goes silent for a week or so you know. I know I said this but for those who donated to the Condor fund we all thank you! cheers!
Last edited by FenderBean; 01-17-2016 at 09:26 AM.
01-17-2016, 10:52 AM
#14
MAN! You have this thing coming along good. I cant thank you enough for posting all the pictures. This is going to help me out a time when mine arrives. Ill have to look up what happened at your work. Im sure you have hurd what happened over here in HI. It sad and I gonna keep all of them and thier families in my prayers. I got 4 8911HVs in the other day from a forms member. All I have left to get is 3 more for the control serv. Then ill be good there. I was looking to get 3 of the MKS 777 servos to put on there. The specs look good and ill be using the jeti control box 400 for all connections and power.
01-17-2016, 12:50 PM
#15
Thread Starter
No problem thats why I do the builds. Made the aft tank support and its drying, I will require a little trimming to level the tank but easier to shorten than add. I will all use velcro with a front and top ply supports to make sure it doesnt move under the loads. I also finished the tank by drilling a hole on top center for the bvm hi-flow vent fitting and adding some lock wire to the clunk line.


01-18-2016, 09:05 AM
#16
Awesome this is giving me some great ideas. I am looking to go 3/16 tubing all around on the suction side and then try to ensure there is no issue with fuel and cav. I am looking to use the intairco super trap but wanted to get your input on that. I know you used one before but didn't know what you thought of it. Also have you used dreamworks heat shield bush on?
01-18-2016, 01:56 PM
#17
Thread Starter
I have used bvm ceramic paint and both dreamworks and bvm heat blankets. I like the interairco uat since it's clear but I can't say anything yet since I have ran one yet. Once the cold weather goes away I will work on getting the runs to see if it holds up.
01-18-2016, 02:22 PM
#18
Thread Starter
Installed the dreamworks flush vent(hi-flow version). I had to re glue the tank stopper fitting since they did use some sand paper to rough up the area the glue just didnt stick. Still pondering how I will mount the tank, its will have a lot of fuel and weight so making it secure while still being removable is a bit challenging. Other than not much done today, We took the kid out to spend some of that x-mas money he got so that ate up the day.


01-19-2016, 12:11 PM
#20
Thread Starter
Your going to need 2 inch on the stabs ailerons and rudder unless you cut some larger slots for the control rods. If you use the traditional clevis you can use what ever you would like.
 01-19-2016, 07:44 PM
#22
Thread Starter
Hi Bigels and Thanks its my 5th build thread and they all have been a lot of fun. I notice your from Savannah, I dont suppose I know you? I was stationed there until early 2010 and new everyone around there, Good friends with Robbe and a few others there.
01-20-2016, 02:19 PM
#23
Thread Starter
It was a slow start since I needed some info from the owner prior to proceeding but once the hysol cures I can get to some equipment mounting. The PB display will be mounted per the picture and the UAT is on the left side above the tank. You have to be careful when installing items here since the cockpit buckets sit in this area and you cannot have anything on top middle. The method is for everything to be easily seen for any kind of maintenance or trouble shooting. Clean and organized as well


 01-20-2016, 03:42 PM
#25
Thread Starter