


CARF Joker build thread
 10-31-2017, 03:04 PM
#76

My Feedback: (12)

Join Date: Sep 2002
Location: Oklahoma City, OK
Posts: 250
Likes: 0
Received 0 Likes
on
0 Posts
David if you have a battery you can simply plug it into the retract to make it cycle, if it does not move reverse the connection. If it will not move with the battery connected either way i'd say the motor is shot, but these unit are really robust.
If you are concerned about overvoltage use a regulator or lower voltage source. All sensing is done in the control box so DON'T over drive the the retract.
If you are concerned about overvoltage use a regulator or lower voltage source. All sensing is done in the control box so DON'T over drive the the retract.
Last edited by DavidQ; 10-31-2017 at 03:07 PM.

 11-11-2017, 08:36 AM
#89

Thread Starter
From Memory you just screw through the carbon bell straight into the former?
OK, we managed to fly Mark's Joker today. Very little wind, but what there was came cross wind for our grass site. It rained until an hour before we flew, so wet grass too. Even so it took off and landed easily going down our 360' strip, even without a head wind. It was all a bit last minute, so the radio set up was a combination of three people! Never good as there is presumption on many things. First flight there was not enough movement for the perfect balanced controls and too much expo...it was a bit dead on the controls, but there was still enough control power, it was just very soft on the control response. Second flight with more movement and less expo was good, the third flight with the owner having a go gave the opportunity to reduce the expo further, as he confirmed he was happy with a sharper feeling. The set up woes meant the iGyro 3e wasn't used, but its still very smooth. Control was 100 D/R with 35% expo before we activate the Gyro. All around using the MAC2607 midi servos fitted with 17mm radius arms.
The P-100Rx is perfect power, I know CARF were concerned that it would be overpower-it's not a speed machine, but the open inlets add drag nicely and the one or two full power passes I made were perfect on top end. Because of the 2ltr tank and full power testing, range check etc I kept the first flight low power and short at 4 1/2 minutes, only one full power climb-it still landed with just under a half tank. The next two flights and open flying had us set the timer at 6 minutes until the owners throttle use is known.
Retracts work well and spring rate is perfect, different landing techniques over the three (and a half) flights showed the gear is well suited. The half flight with 'little Stevie' flying flamed out with lots of smoke and a down wind landing was made with no drama, even with a full tank. I quickly pointed at the new fuel filter that was dry along with the whole fuel system until we arrived at the field. 1/8th turn tighter on the filter and the last flight was again faultless. (Today was a great lesson for preparation...little of which occurred!!) The Joker still came away unscathed and a happy owner.
We will do final tweaks next week with better weather.
Few shots and Neil was doing some video so will see what he gets.
11-11-2017, 01:09 PM
#90
My Feedback: (1)
Dave,
Congrats to your friend on the maiden and thanks for the detailed flight report. I'm glad to hear that the P-100 wasn't too much as I'm putting a Jets-Munt M100 in mine; also pleased that you were able to manage 6 minute flights with that engine on the stock tank. Did you end up with C/G and control throws per your earlier posting (180 mm C/G) or closer the the CARF instructions at 175 mm. Looking forward to some video.
Dave
11-11-2017, 02:20 PM
#91
Thread Starter
I think Mark had it at 175 mm, but I felt it a fraction nose heavy, so stick with the 180mm
didnt measure movement, after the first flight I adjusted to look right and it suited. Will ask M if he can assemble and measure.
didnt measure movement, after the first flight I adjusted to look right and it suited. Will ask M if he can assemble and measure.
11-12-2017, 04:37 AM
#93
Thread Starter
Because of the short strip and small size flaps we did add a small amount (4-5mm at the root) Since it changes the sit on approach. Not sure it actually needed it.
Dave
Dave
11-12-2017, 11:54 AM
#94
My Feedback: (1)
Some pics of my progress so far:
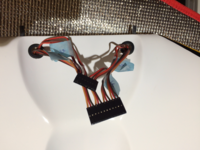
Wing servos mounted, polarized multi-connectors wired (8 pin for gear and brakes, 12 for ailerons/flaps):
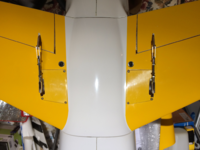
Servos were a bit too tall so elevator access pockets and covers had to be modified to fit
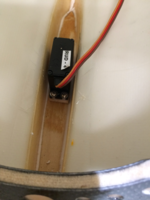
and rudder servo had to be shimmed to allow servo horn to line up with the slot in the vertical stab:
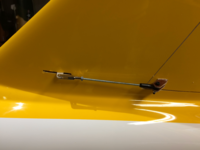
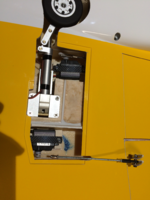
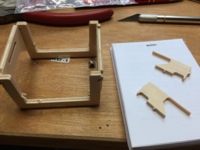
Does anyone know what these plywood pieces are for, I'm assuming the ones on the left are to mount the header tank/UAT but have no idea what the ones on the right are for:
Also how is everyone attaching (or planning to attach) the fairing for the rudder and aileron linkages? I'm thinking they would need to be able to be removed later without damaging the finish if a servo needs to be replaced or a linkage adjusted. I was thinking maybe pacer 560 canopy glue but wasn't' sure if that would hold well enough,
Wing servos mounted, polarized multi-connectors wired (8 pin for gear and brakes, 12 for ailerons/flaps):
Servos were a bit too tall so elevator access pockets and covers had to be modified to fit
and rudder servo had to be shimmed to allow servo horn to line up with the slot in the vertical stab:
Does anyone know what these plywood pieces are for, I'm assuming the ones on the left are to mount the header tank/UAT but have no idea what the ones on the right are for:
Also how is everyone attaching (or planning to attach) the fairing for the rudder and aileron linkages? I'm thinking they would need to be able to be removed later without damaging the finish if a servo needs to be replaced or a linkage adjusted. I was thinking maybe pacer 560 canopy glue but wasn't' sure if that would hold well enough,
Last edited by dccatl; 11-12-2017 at 11:58 AM.
11-12-2017, 12:37 PM
#96
Thread Starter
Here is a video Neil did of the second flight. Time was increased to 6 minutes on the timer after this flight, expo reduced further to the 35% figure
11-12-2017, 02:00 PM
#97
My Feedback: (1)
Yes! Finally some video. Looks to be a great flying plane, slow flight seems very stable. Did you try any knife edge? How much fuel remained after that 6 min flight? Thanks to Neil and Dave for posting. Looking forward to getting mine finished and in the air.
11-12-2017, 02:56 PM
#98
Thread Starter
Yes, very stable. Slow flight was not that slow, std test flight procedure for me to carry energy since any off field landing it going to be bad. Same on the landings, no slow approach since dropping short with the patch edge will write off any model.
Didn’t do any KE, it’s not my model, so ringing it out on the first day is not sensible, plus I’m not sure how the midi servo is going to cope with that much load. Mark doesn’t do KE, so wasn’t needed to set up that for him. I know from experience it will KE fine, 2% opposite aileron mix is going to be needed.
Didn’t do any KE, it’s not my model, so ringing it out on the first day is not sensible, plus I’m not sure how the midi servo is going to cope with that much load. Mark doesn’t do KE, so wasn’t needed to set up that for him. I know from experience it will KE fine, 2% opposite aileron mix is going to be needed.
12-01-2017, 04:06 AM
#99
Yesterday I finally maiden my Joker!!!
What a fun plane to fly, I really enjoyed it, simple, fast , super stable in a 15kts windy conditions.
The power of the New Kingtech KT85 is a perfect combination.
A must in your hangar!!!
Unfortunatelly I cant upload pictures, you can take a look here and find some....
https://www.facebook.com/GSA-Giant-Scale-Aviation-461383477268074/