Have Turbo Beaver, need brakes
 07-12-2020, 12:34 PM
#1
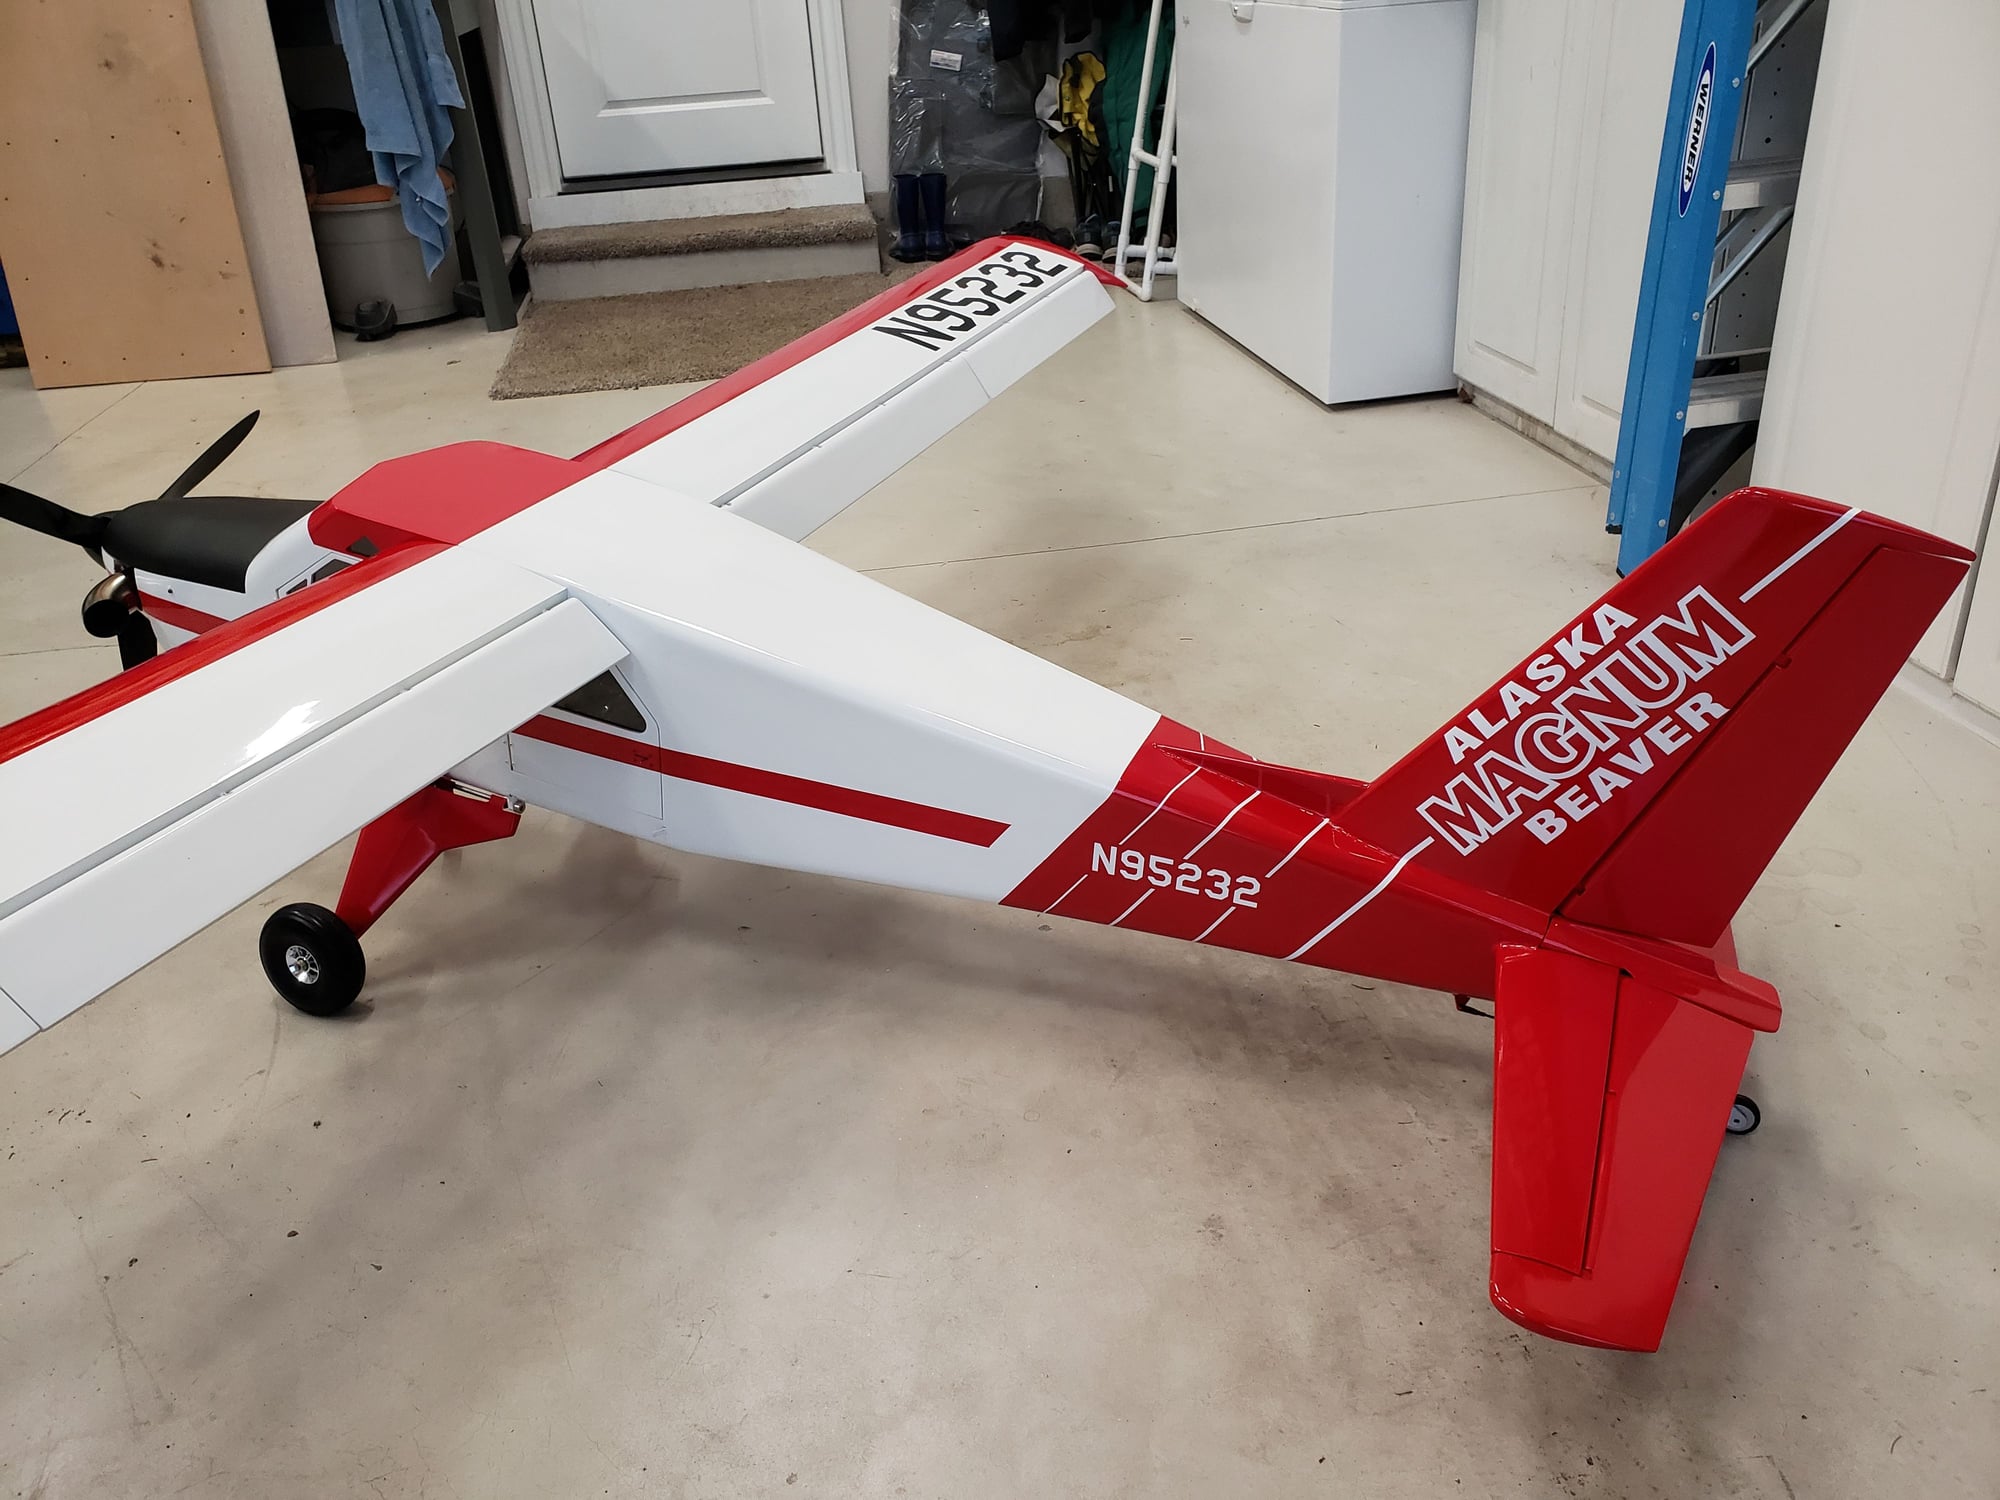
I would like to put 6" tundra tires with electric brakes on my Turbo Beaver that fly on a K45TP
Any body have any ideas for me?
I toyed with the idea of one brake on the tail wheel but my thought is it would just drag whDr activated
The Beaver weights 25lbs
Any body have any ideas for me?
I toyed with the idea of one brake on the tail wheel but my thought is it would just drag whDr activated
The Beaver weights 25lbs
 07-12-2020, 03:02 PM
#2

My Feedback: (3)
Would something like this be an option?
https://www.aviationconceptsrc.com/h...ic-disc-brakes
or
https://robart.com/collections/brake...em-brake-valve
https://www.aviationconceptsrc.com/h...ic-disc-brakes
or
https://robart.com/collections/brake...em-brake-valve
07-12-2020, 05:36 PM
#3

My Feedback: (53)

I doubt you will find something that fit those tundras tire.....unless they are aluminum and can be machined...to fit electric brakes??
unless your just looking for the size...maybe war bird type wheels and tire would work?
07-12-2020, 08:26 PM
#5

See this thread Carbon Cub von Grupp......und sie passt doch in einen A 6 Kombi... he modified a 1/5 scale car kit to work.
https://www.ebay.com/itm/Front-wheel...-/111922043436
https://www.ebay.com/itm/Front-wheel...-/111922043436
The following users liked this post:
Dansy (07-13-2020)
07-13-2020, 11:28 AM
#6

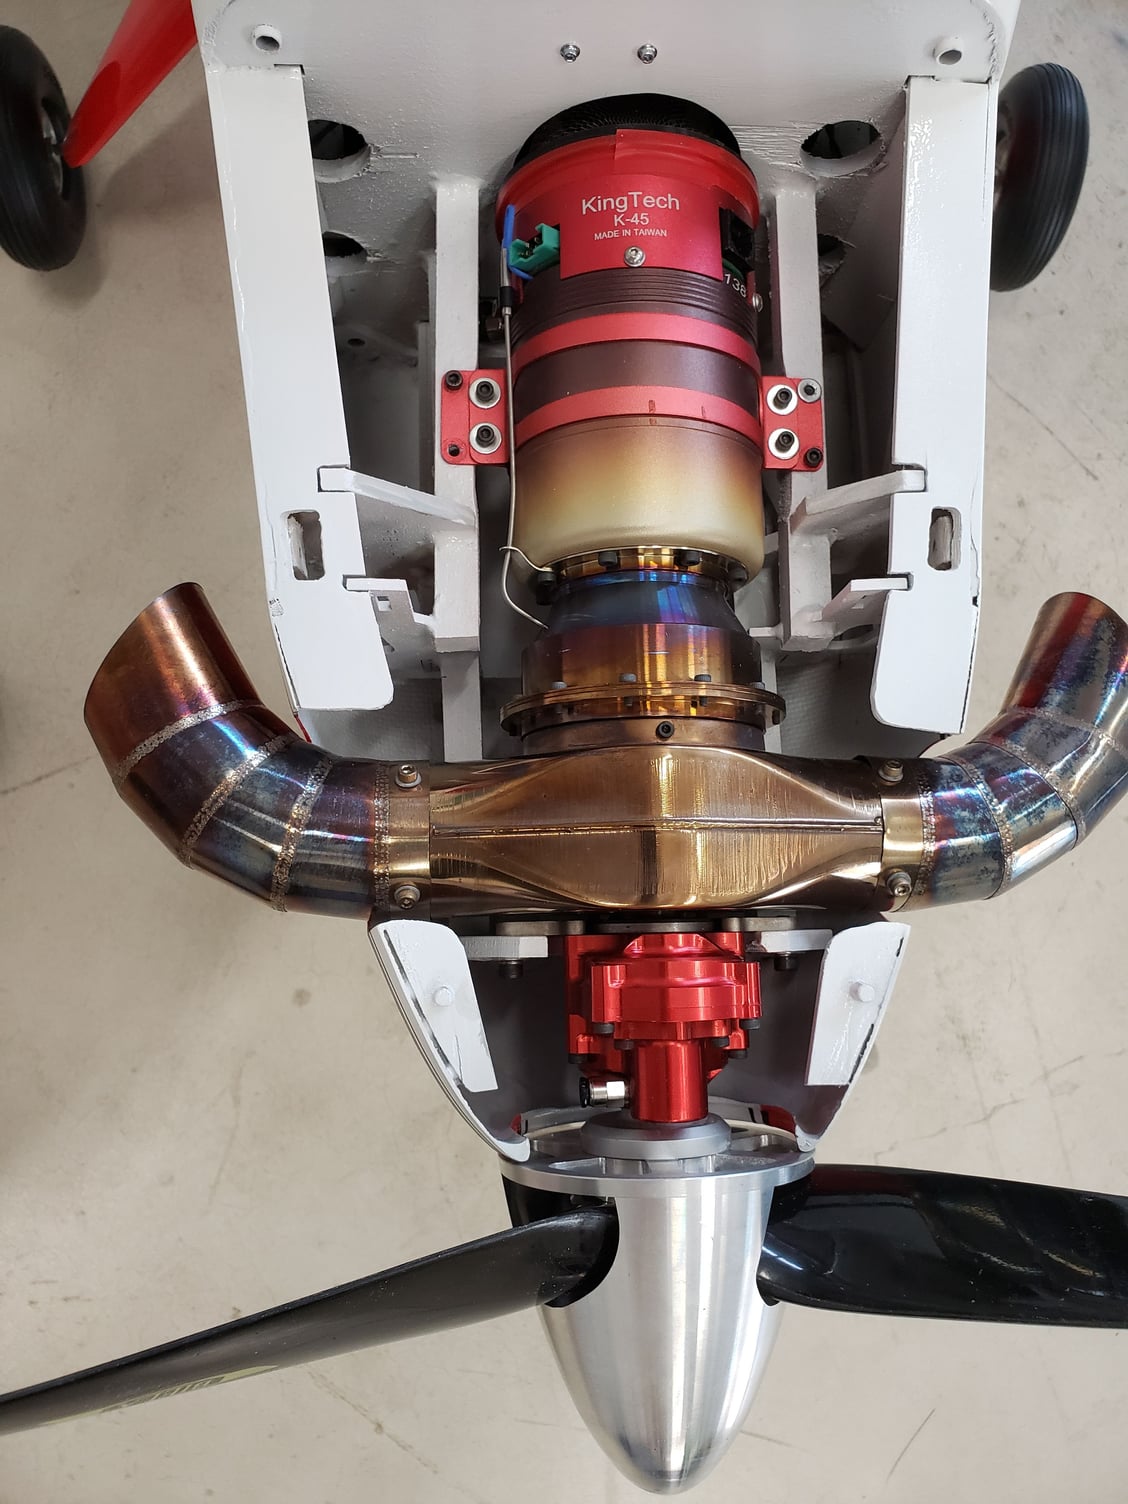
didiwatt, I recently completed the same conversion on my Legend 120" Beaver from Xtream Flight. I pondered the brake issue for some time and finally went with the Electron brake system using the 130 mm tire size. I too was wanting Bush Wheels for it but that would require a lot of modifications. Mounting the Electron setup was fairly easy and they work good. (some mod's were required) I have the controller set up in the ABS mode and have not had any nose over problems when using brakes at faster speeds.
Rod
Rod
07-13-2020, 03:24 PM
#8
didiwatt, I recently completed the same conversion on my Legend 120" Beaver from Xtream Flight. I pondered the brake issue for some time and finally went with the Electron brake system using the 130 mm tire size. I too was wanting Bush Wheels for it but that would require a lot of modifications. Mounting the Electron setup was fairly easy and they work good. (some mod's were required) I have the controller set up in the ABS mode and have not had any nose over problems when using brakes at faster speeds.
Rod
Rod
07-13-2020, 03:27 PM
#9

I bought one of these along with Electron Brakes and wheels for the Phoenix Tucano that I'm converting to a K45TP.
Last edited by wfield0455; 07-13-2020 at 03:29 PM.
 07-14-2020, 08:39 AM
#11
I used the Xicoy controller for the brakes. It works just fine. If you want differential braking, then just add a second controller and use one on each wheel.
I believe the 130mm brake and wheel set is the largest out there. I looked for sometime before making the decision to go with the Electron setup. I purchased mine through JAG RC. Great service.
Rod
I believe the 130mm brake and wheel set is the largest out there. I looked for sometime before making the decision to go with the Electron setup. I purchased mine through JAG RC. Great service.
Rod
07-14-2020, 08:46 AM
#12
F1, I did take a lot of photos during the conversion. Maybe a bit later in the season I can post some for you. We are in the middle of our very short, comparatively, summer flying season up here right now. I did find out that the plane flies very light on the controls. Actually flies like a trainer. After 5 flights I got blown into tall grass on landing for the 6th flight and nosed over. Right now the turbine is getting checked out at the factory. I did put a temp sensor in the engine compartment as I was concerned about heat in there. With the airflow design I used, I never saw any temps over 120 F, as soon as the prop starts turning, it cools down to around 80F and stays there.
11-06-2020, 09:06 PM
#13
Join Date: Feb 2013
Location: , OH
Posts: 59
Likes: 0
Received 0 Likes
on
0 Posts
Didiwatt, great looking turbo beaver. I was hoping you could answer some questions because I'm contemplating building the mraerodesign kit this winter, but powered by the new xicoy x45tp. I built the mraerodesign cap10 last year, and the quality of the kit was excellent.
Regarding the Beaver, I was wanting to know what size gas tank were you able to accommodate in the fuselage. According to the newest spec on the xicoy website, the X 45 tp has a 335 cc per minute consumption rate which even for a 10-minute fight would mean a lot of gas. Would you happen to know what your total weight was with the King Tech turbine? How did the airplane fly? Any difficulty getting the CG right?
Regarding the Beaver, I was wanting to know what size gas tank were you able to accommodate in the fuselage. According to the newest spec on the xicoy website, the X 45 tp has a 335 cc per minute consumption rate which even for a 10-minute fight would mean a lot of gas. Would you happen to know what your total weight was with the King Tech turbine? How did the airplane fly? Any difficulty getting the CG right?
11-07-2020, 04:35 AM
#14
Hi
Right after those photos I had trouble with my new Jetti transmitter and crashed the Beaver on its 4th flight. I was able to save the wings, stab and rudder and have since built a new fuselage.
I put 2 flights on it last week and it Flys good. Weights 26lbs with uat full and small amount of fuel. I am using a 50oz tank now which is a little small. May have to stack a small 2nd tank on top. I have a Tucano with the K45 with a 65oz tank and can fly aggressive for 6 minutes.
Balance was no problem.
I added plywood plate to the fuselage and had TNT make me an aluminum landing gear so that I could fit wheels for electric brakes. I still made the scale gear which I can use for static or a non AMA field.
If you get the kit, let me know and I can send pictures and offer advise.
I just ordered his Pilatus
My email address is [email protected]
Last edited by didiwatt; 11-07-2020 at 01:57 PM.
 11-08-2020, 05:05 AM
#16
It is a 24 with a carbon fiber plate. I was flying by me at about 50ft and quarter throttle. I reached down and added 1 click of up trim. The plane kept rising and the transmitter started beeping. The radio was new to me. Other trim buttons did not work. Before I knew it, the plane stalled and crashed. No buttons worked and I coild not even turn the radio off. I did not have the case back wrench with me so I had to return home with trsnsmitter still on.
When I got home 2 hours latter the transmitter was still on and not responding. I happen to notice that the up elevator trim button was not level and the lower curve was stuck under the c/f face plate. I rolled it around and it popped back level and everything worked properly.
If you own a Jetti radio, try it out. Hold the trim button down until it reaches full trim and continue holding it down and see what happens. To my knowledge they have not fixed this software and hardware problem.
The fix I did was to run a #11 exact blade around the aluminum button forcing the blade outward. This will remove excess carbon fiber and increase clearance. I did it to all trim buttons of course.
You could remove the faceplate also but that would require a lot of work.
I like my Jetti but this was a very expensive problem. Just the turbine repair bill was $850
11-08-2020, 05:10 AM
#17
My Feedback: (53)
It is a 24 with a carbon fiber plate. I was flying by me at about 50ft and quarter throttle. I reached down and added 1 click of up trim. The plane kept rising and the transmitter started beeping. The radio was new to me. Other trim buttons did not work. Before I knew it, the plane stalled and crashed. No buttons worked and I coild not even turn the radio off. I did not have the case back wrench with me so I had to return home with trsnsmitter still on.
When I got home 2 hours latter the transmitter was still on and not responding. I happen to notice that the up elevator trim button was not level and the lower curve was stuck under the c/f face plate. I rolled it around and it popped back level and everything worked properly.
If you own a Jetti radio, try it out. Hold the trim button down until it reaches full trim and continue holding it down and see what happens. To my knowledge they have not fixed this software and hardware problem.
The fix I did was to run a #11 exact blade around the aluminum button forcing the blade outward. This will remove excess carbon fiber and increase clearance. I did it to all trim buttons of course.
You could remove the faceplate also but that would require a lot of work.
I like my Jetti but this was a very expensive problem. Just the turbine repair bill was $850
When I got home 2 hours latter the transmitter was still on and not responding. I happen to notice that the up elevator trim button was not level and the lower curve was stuck under the c/f face plate. I rolled it around and it popped back level and everything worked properly.
If you own a Jetti radio, try it out. Hold the trim button down until it reaches full trim and continue holding it down and see what happens. To my knowledge they have not fixed this software and hardware problem.
The fix I did was to run a #11 exact blade around the aluminum button forcing the blade outward. This will remove excess carbon fiber and increase clearance. I did it to all trim buttons of course.
You could remove the faceplate also but that would require a lot of work.
I like my Jetti but this was a very expensive problem. Just the turbine repair bill was $850
11-08-2020, 05:39 AM
#19
11-08-2020, 10:24 AM
#20
Xicoy sells these wheel brakes as a kit:
https://www.xicoy.com/catalog/produc...9ir8vj69es49t3
The brake hub is stationary and the disk floats on pins which can be screws that extend thru the wheel hub from the outboard side. Might take some engineering to adapt it to what you have but I found the braking was really good with his controller.
paulD
11-09-2020, 10:25 AM
#21
Join Date: Feb 2013
Location: , OH
Posts: 59
Likes: 0
Received 0 Likes
on
0 Posts
Hello,
Thank you for the information on your plane, and despite the misfortune involving the radio, very glad to hear you built a replacement fuselage and it's flying. Yes, I'll certainly contact you if I decide to order the mraerodesign kit. Appreciate the help.
I had contacted the AMA to ask about the possibility of a brake waiver, given the slow idle rpm (1000rpm for the Xicoy) and slow flying characteristic, to avoid experiencing an inadvertent nose-over and possible damage to the gearbox. I've not heard back and will follow-up, but realistically I don't think anything will come of it.
The 26 lb plus fuel will make for wing loading a little on the high side so I was curious how the aircraft handled on landings? Does it slow down well with the flaps? Any unpleasant flight characteristics?
Did getting the cg require weight in the nose? I had read an old article in which the author had installed a Saito FG30 and needed 3lbs nose weight. The turbo beaver appears to have a 1.5-2.0 inch longer nose, so I curious how this worked out. Thanks.
11-12-2020, 10:40 AM
#23
didiwatt,
I just ordered the more scale TP Beaver from MR Aerodesign myself. I should have it around Dec 1. I may be asking to see an occasional photo from your build. Sorry to hear that you lost your first one. If your new fuselage is anything like your original you have a beautiful plane!
Rod
I just ordered the more scale TP Beaver from MR Aerodesign myself. I should have it around Dec 1. I may be asking to see an occasional photo from your build. Sorry to hear that you lost your first one. If your new fuselage is anything like your original you have a beautiful plane!
Rod
11-15-2020, 10:13 AM
#24
Those thinking about building the MR Designs Beaver or Porter and using the new Xicoy, I recommend you contact Martin at MR Designs. The motor mount area will have to be completely redesigned which he can do.
The Kingtech is rail mount and it appears the Xivoy is firewall mounted.
The Kingtech is rail mount and it appears the Xivoy is firewall mounted.