


1/6 Scale F4U Corsair Group Build
 09-24-2010, 02:31 PM
#1901

Thread Starter

I asked our friend Lex Cralley (owns a full scale Brewster built Corsair that he recovered from a swamp in N.C.) about getting some measurements and this is his reply:
Richard,
Good to hear from you. "Things" are quite a bit better than they have been. We have only painted one airplane this year, and that was done in March. We now, as of Oshkosh, have an order for 5 sets of new gundoors to build with more orders expected and have a few high end paint jobs just coming in the door now. I now have a years work or more backlog. When business got so slow I moved the Corsair fuselage to the hanger and began dissasembly of the tailcones to build one good one. I guess at least something good has come from slow business.
I am always happy to help with any info I can provide you and the group. All of the cowling (such as it is) is at the hanger and our gundoor parts and tooling are here at my home/pole barn 20.5 miles away. I will be at the hanger latter today and I will bring the micro film and prints I have made for making the nose bowls ect to email to you tonight. I do not have internet at the hangar.
Lex
 09-24-2010, 06:40 PM
#1902

Verry cooool news Richard!!!!!!!
Looking forward to hearing an answer. I don't remember which version the F3A is closest to. Last night I measured the drawings by Jacek Jackiwicz in the Aircraft Monograph 19 F4U Corsair. His drawing came out to be 52" diameter at the back of the nose ring. The Aero Detail book I have stated that the cowl was a diameter of 1.4 meters, which comes out to about 55 1/8". They did not say where on the cowl that measurement was. The book also said the R2800-8 measured 1.32 meters, or about 51 31/32 or about 52". This figure would better support the Matt drawing at 56".
Hi Chad,
Thanks for the info on the sheeting. If I could, I'd like to have both PDF and a set of plans. I may have access to a large format printer at work, but it's currently at one of our other offices. PM me for $ for printing and shipping. My address should be in the original roster.
If I get a chance to measre the PoF Corsair, I would like to measure at the back of the nose ring, at the front of the cowl flaps, and at the first panel line on the fuse. I'll try.
Scott
 09-25-2010, 07:42 PM
#1903
Hello all,
I just got back from the Airshow. I arrived at about 11 AM, just in time to see the Corsair, A P-40 and a P-50 take off and perform multiple passes over the runway. Next, a Hellcat went up and performed a number of maneuvers including two consecutive loops, a barrel roll, and a 4 point roll. The planes, when not flying, were kept past barriers for the audience. I had a chance to ask the pilot about taking the measurements. He said it would be ok, but not until the waiver for the airshow expired at the end of the show. In the afternoon, the planes went up again. This time, the fellas who flew the Corsair and Hellcat switched planes. The Hellcat, P-40 and P-51 made multiple passes over the airfield. Once they came down, the Corsair went up and performed a number of maneuvers including a couple of knive edges, a full cuban 8, a couple of non-consecutive loops and a couple of rolls. There was also an L19 that performed aerobatics in both the morning and afternoon. The day of flying was ended with a number of passes by the PoF flying wing.
Lots of fun!
After the flying was done, I was invited to take the measurements I wanted. I took 3 measurements, 1 at the back of the nose ring, 1 in front of the cowl flaps. and 1 at the first panel line,which intersects the exhausts.
I spent $30 for gas, $2 entry fee, and $22 for food and drink for a total of $54. Here's the question. Did I spend more, or less that $1 per inch?
Drum roll please!
Drum, drum, drum drum
For the measurement at the nose ring, I spent just a fraction less tha $1.04 per inch, and at the cowl flaps and first panel line, I spent $1.00 per inch.
The nose ring measures 52". At the front of the cowl flaps, and at the first panel line, it measures 54".
Scott.
09-25-2010, 08:47 PM
#1904
Oh, I forgot to mention, there were also a couple of very large scale electric RCs that did some demo flights. One was a civillian high wing twin, perhaps an aero commander, and the other was an aerobatic, maybe a 540 or such. Both were over 100".
Scott
Scott
09-26-2010, 12:33 PM
#1905
Thread Starter
Sounds like a very cool day Scott! Hopefully there will be some video of the flights out soon.
Regarding the measurements, here is the response from Lex:
Richard,
I brought all of the related items home today so we can try to resolve questions.
I do need to know which areas of the cowl are in need of dimensions. The micofilm is somewhat of a chaos. I have to look the part up in the illistrated parts manual "IPB" to establish the part number, them look to the index microfilm to find the drawings, which may be on several different rolls, (there are over 30 rolls) so if you could let me know which dimensions of which parts are in question it would help.
Thanks,
Lex
09-27-2010, 11:32 AM
#1906
Junior Member
Join Date: Sep 2010
Location: Mt Vernon,
NY
Posts: 9
Likes: 0
Received 0 Likes
on
0 Posts
Greetings from lovely Stratford, CT. I wanted to shout out and say hello to everyone. My name is Drew King and I am the Restoration Director handling the tear down, repair and rebuild of the Stratford Corsair. This bird is a FG1-D and she is in rough shape no doubt, but we are trying. If your in the area and are interested in stopping in to check out the project (and maybe become a volunteer) please drop me a message.
If we can be of any help let me know as this looks like a really cool project and we have a full size one sitting in pieces in the shop. Also we are doing the restoration in Building 6 of the old Chance Vought plant, it was the R&D / skunkworks building.
I am tracking the project on my blog http://monumentman.wordpress.com
You can check out our video at youtube [youtube]http://www.youtube.com/watch?v=GNBP8tn_L70&feature=player_embedded[/youtube]
09-27-2010, 12:00 PM
#1907
Thread Starter
Greetings and welcome to RC Universe! It's great to have you Drew. I for one would volunteer in a heartbeat! I have a forum dedicated to all Corsairs here:
http://f4ucorsair.freeforums.org
It's free and you are welcome to post anything about the restoration there. I will definitely be following the restoration and love the video!
http://f4ucorsair.freeforums.org
It's free and you are welcome to post anything about the restoration there. I will definitely be following the restoration and love the video!
09-27-2010, 09:13 PM
#1908
Hi Drew,
As Richard said, welcome to RCU.
It's really something special to see you and Lex taking an interest in our project. Thanks to restorers like you, there are still Corsairs, both flying, and on display, to provide a resource and wealth of living history that these planes represent. I hope some day to be able to visit your project and admire the hard work and dedication of you and your team.
Scott Ramos
09-27-2010, 11:24 PM
#1909

My Feedback: (60)
Join Date: Dec 2001
Location: Litchfield Park,
AZ
Posts: 7,677
Likes: 0
Received 25 Likes
on
23 Posts
ORIGINAL: saramos
Hi Chad,
Thanks for the info on the sheeting. If I could, I'd like to have both PDF and a set of plans. I may have access to a large format printer at work, but it's currently at one of our other offices. PM me for $ for printing and shipping. My address should be in the original roster.
Hi Chad,
Thanks for the info on the sheeting. If I could, I'd like to have both PDF and a set of plans. I may have access to a large format printer at work, but it's currently at one of our other offices. PM me for $ for printing and shipping. My address should be in the original roster.
Send me an email at the addy below and I will send you the PDF files. I will try and remember to get a quote on the printing costs tomorrow and let you know.
[email protected]
09-28-2010, 12:57 PM
#1910
My Feedback: (60)
Join Date: Dec 2001
Location: Litchfield Park,
AZ
Posts: 7,677
Likes: 0
Received 25 Likes
on
23 Posts
ORIGINAL: saramos
For the measurement at the nose ring, I spent just a fraction less tha $1.04 per inch, and at the cowl flaps and first panel line, I spent $1.00 per inch.
The nose ring measures 52''. At the front of the cowl flaps, and at the first panel line, it measures 54''.
For the measurement at the nose ring, I spent just a fraction less tha $1.04 per inch, and at the cowl flaps and first panel line, I spent $1.00 per inch.
The nose ring measures 52''. At the front of the cowl flaps, and at the first panel line, it measures 54''.
Based on those measurements, and also the given length of 33' 4" for the F4U-1a, the Brian Taylor plan is precisely spot on. How's that for an interesting turn of events?
09-28-2010, 01:30 PM
#1911
Senior Member

Join Date: Dec 2007
Location: Haarlem, NETHERLANDS
Posts: 257
Likes: 0
Received 0 Likes
on
0 Posts
That is kinda interesting Chad, I came to the same conclusion when I got the measurements from Scott.
I know that Brian actually went to a museum and took measurements from a real Corsair for his plans, so it would have been odd if he got it wrong.
Before I joined this group I had already a lot of work put into the Brian Taylor Corsair.
I have digitized his plans and have made Cad files for the wings at least, I'de have to look how far I got, I stopped working on it when I joined here.
I'll be happy to send you a copy if you want.
Danny
09-28-2010, 02:10 PM
#1912
Thread Starter
Good find guys. Hopefully we'll finally get the answers we need. I've asked Drew and Lex if they can measure the cowl for us since they have one. I'll let you know what they find or maybe they'll post their findings for us.
I would like measurements of A to B, B to C and C to D as shown in the attached picture. Does anyone have these?
I know B to Dis 30" because in the Erection and Maintenance manual on page 5 it shows those points as stations 18 and 48 (fractions removed).
I would like measurements of A to B, B to C and C to D as shown in the attached picture. Does anyone have these?
I know B to Dis 30" because in the Erection and Maintenance manual on page 5 it shows those points as stations 18 and 48 (fractions removed).
09-28-2010, 02:51 PM
#1913
Join Date: Sep 2006
Location: Glendale,
CA
Posts: 154
Likes: 0
Received 0 Likes
on
0 Posts
Just out of curiosity, what were some of the "well documented faults" in the BT outline (mentioned in post #1806)
that led to his plan being rejected as an inmformation source? How close did he get aside from cowl diameter?
GeneH
that led to his plan being rejected as an inmformation source? How close did he get aside from cowl diameter?
GeneH
09-28-2010, 11:22 PM
#1914
Hi Richard
From VS-10620, the distance A-B is 11 11/16". The nose ring assebly is a total length of 12 13/16", but the cowl access panels overlap 1 1/8". VS-10645 shows the distance AD to be 43 9/16". D is at Station 48 11/32. This means that Station 0 is 4 25/32" forward of the cowl at what I presume to be the back of the prop hub. In VS-24665, I found 1 reference just forward of the cowl flap assembly as station 40 3/32. This means the distance BC to be about 40 3/32" - 11 11/16" - 4 25/32 which is 23 5/8".
Looking at the drawing, the panels may actually extend past station 40 3/32. If so, the panels may be fractionally larger, perhaps enough for them to be 24". It would be great to get a confirmation from Lex or Drew about the proper distance of B-C.
Scott
A-B 11 11/16" from VS-10620
A-D 43 9/16" from VS-10645
B-C 23 5/8" Deduced from the above drawings and the Station Diagram, Figure 5, page 5 E&M handbook for Navy models F4U-1, F3A-1. FG-1, F4U-1C, FG-1D, 1945.
09-28-2010, 11:55 PM
#1915
Junior Member
Join Date: Sep 2010
Location: Mt Vernon,
NY
Posts: 9
Likes: 0
Received 0 Likes
on
0 Posts
Thursday night Ill have the measurements for you guys, unless Lex beats me to the punch. I happen to be working with the Cowl Flaps (CD) and the attachment strips (BC) and the nose bowl is sitting next to my work bench (AB).
Drew
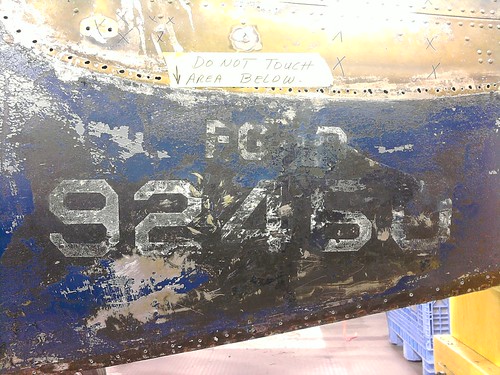
I thought guys might be interested in seeing the actual WW2 markings on the tail section.
For reference, take notice the shape of the letters.
For reference, take notice the shape of the letters.
Drew
09-29-2010, 09:09 AM
#1918
Member
Join Date: Mar 2005
Location: Suffolk, UNITED KINGDOM
Posts: 49
Likes: 0
Received 0 Likes
on
0 Posts
Hi All, The reference Corsair that BT measured is KD431 the Goodyear FG1A (July 1944) in the Fleet Air Arm museum in Yeovilton UK. A super book called 'The time capsule fighter' ISBN 0-7509-4305-X from www.suttonpublishing.co.uk (£19.99) has been mentioned before and it tells the story of how they stripped it back to the original factory paint finish. It has the original engine which has not been removed and it is about as authentic an original Corsair as can be found now.
BT does have an excellent reputation for reproducing very accurate plans and it was one of his last designs and probably his best. Yes there are some slight compromises like the extended length of the oleos and maybe the front leg pivot position, as you know so well the real one is very very close to the leading edge. But his retracts (as detailed on the plan) have the correct retracting and rotating angles (not 90 degrees) and it all works.
Can it be improved? Yes of course it can and good luck to all of you who are trying.
Having built one and got up to about 70 flights so far, I can say it is a super model to fly, but exhibits the same characteristic of the full sized Corsair (before the wing stall strip was fitted) of dropping a wing at the flare unless the power is kept on. For that reason I would urge you all to keep the tail feathers and especially the tail wheel assembly super light to avoid having to compensate with many times the weight of lead up front. Spins are very fast but it does exit after three turns. I don't think I will be doing these again after reading the Corsair test pilot's book.
Suggest you try and keep the AUW to max 20lbs dry. Mine is electric with engine sound at 20 3/4 lbs with speakers and batteries. All balsa was weighed and graded first with only the lightest balsa going behind the C of G. Wing and tail sheeting 1/16", fus sheeting 3/32" with tissue covering to keep that dreaded weight down. All as plan. The two pounds of loud speakers in the cowls were necessary to get the C of G correct and no lead was required.
Thanks to Peter Rake for the photos taken recently at Kings Lynn.
Regards,
John
09-29-2010, 09:49 AM
#1919
Thanks John, Great information and a great looking Corsair. I'm about 1/2 way through reading the KD431 book.
Does anyone have drawings of the bulkhead that separates the fuel compartment and cockpit? It looks like it is between Sta 128 and Sta 134.
Scott
Does anyone have drawings of the bulkhead that separates the fuel compartment and cockpit? It looks like it is between Sta 128 and Sta 134.
Scott
 09-29-2010, 10:48 PM
#1921
That is the one I'm looking for. It forms the start of the cockpit and it's placement would be critical for a scale cockpit. Am I correct that this is just a few inches forward of Sta 138.6? In the photo, it looks like the brackets for the pulleys are attached to Sta 138.6 and the two holes for the cables entering the wing are between the station and the forward panel of the cockpit.
Thanks,
Scott
Thanks,
Scott
09-30-2010, 12:46 AM
#1922
Junior Member
Join Date: Sep 2010
Location: Mt Vernon,
NY
Posts: 9
Likes: 0
Received 0 Likes
on
0 Posts
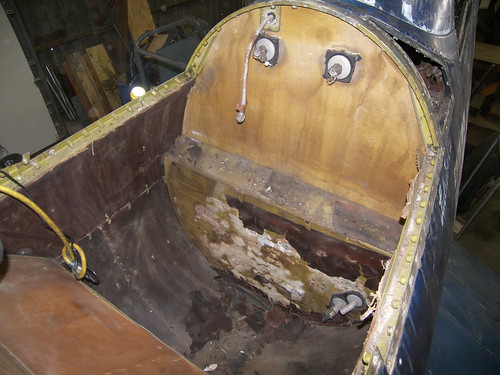
Scott, Here is what I can show you. If you notice the lower hydraulic lines, they pass directly east and west out the side of plane and into the wing root. The pulleys you see at the base go to the Rudder if I remember correctly. Hope this helps ya out.
[link=http://www.flickr.com/photos/cherrybomb13/sets/72157624939730173/with/5037814683/]Corsair Cockpit Firewall[/link]
[link=http://www.flickr.com/photos/cherrybomb13/sets/72157624939730173/with/5037814683/]Corsair Cockpit Firewall[/link]
09-30-2010, 01:56 AM
#1923
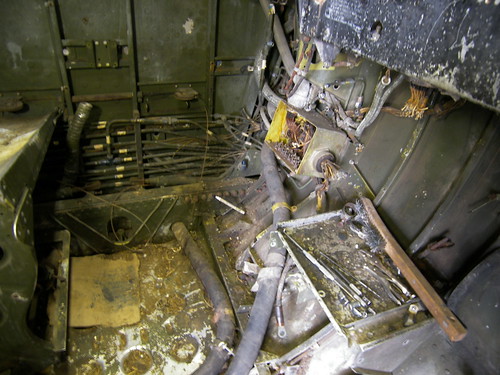
Thank you Drew.
I can now clearly see the relationship between the bulkhead separating the cockpit and fuel compartment to Sta 138.6.
Scott
I can now clearly see the relationship between the bulkhead separating the cockpit and fuel compartment to Sta 138.6.
Scott
09-30-2010, 10:09 PM
#1924
Junior Member
Join Date: Sep 2010
Location: Mt Vernon,
NY
Posts: 9
Likes: 0
Received 0 Likes
on
0 Posts
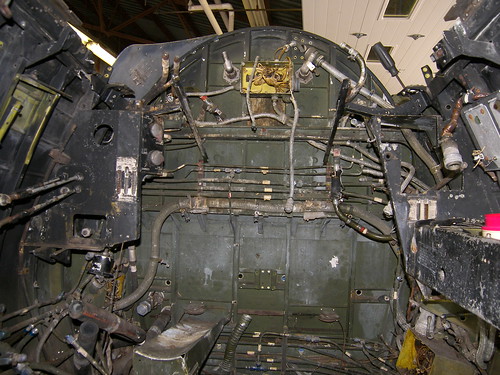
Scott,
From the tape measure in the shop. AB 12in BC 24 1/2 This is based on measuring one of the Cowl Bonding strips CD is a Cowl Flap 5 7/8 x 7 1/2 It was the smaller squarish one that I had available to measure. Mind that this is from a Akron built FG1-D
I have attached a photo here to show the cockpit frame with a tape measure to better explain the space difference between the firewall and the framing.
10-01-2010, 01:01 AM
#1925
That makes a difference of 7/16 between the 44" total for A-D from your measurements to the 43 9/16" in VS10645. That's close. I wonder if there was that much difference between the manufacturers or if the difference is inaccuracies in the drawings?
Great photo. It definitely helps locating the bulkhead between the fuel compartment and cockpit.
Scott
Great photo. It definitely helps locating the bulkhead between the fuel compartment and cockpit.
Scott