


Mato Sherman to El-mod quick report
 02-21-2011 | 01:56 AM
#1

Thread Starter

Joined: Jan 2007
Posts: 1,547
Likes: 0
Received 17 Likes
on
15 Posts
From: San Paolo Solbrito, ITALY
I have just finished working on my Mato Sherman conversion to El-mod, and I wanted to share the build.
It's mostly pictures since almost no change is completely new on this forum so... enjoy pics with a quick description:
First, reworking the suspensions to make them fully functional:


Bearings added to drive shaft (I keep the original gearboxes for now):

Front transmission cover has been reworked to make it shorter ad with a different curvature (used heat to bend it)


Saw off bottom of turret, removed part of the wall to lower it to correct height and re-glued in position:


It's mostly pictures since almost no change is completely new on this forum so... enjoy pics with a quick description:
First, reworking the suspensions to make them fully functional:
Bearings added to drive shaft (I keep the original gearboxes for now):
Front transmission cover has been reworked to make it shorter ad with a different curvature (used heat to bend it)
Saw off bottom of turret, removed part of the wall to lower it to correct height and re-glued in position:
 02-21-2011 | 01:58 AM
#2
Thread Starter
Joined: Jan 2007
Posts: 1,547
Likes: 0
Received 17 Likes
on
15 Posts
From: San Paolo Solbrito, ITALY
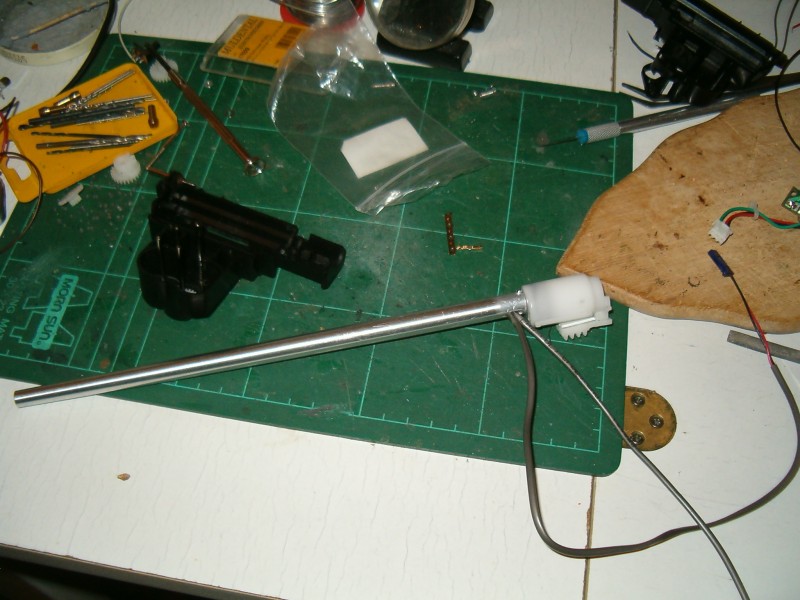
Modified airsoft gun to act backwards as a recoil unit, together with a new aluminium tapered barrel in scale (with IR led and flash led in series inside the barrel):

Cutout the windows in the cupola and put transparent plastic sheets:

Riassembling the turret: the base for el-mod CSI receiver was put inside the commander cupola. Added small bits of details to turret too (handles, periscopes, etc.).


Adding plates to close the rear of the hull: this baby is going to run in the garden, hence the need to avoid dirt from entering the hull:


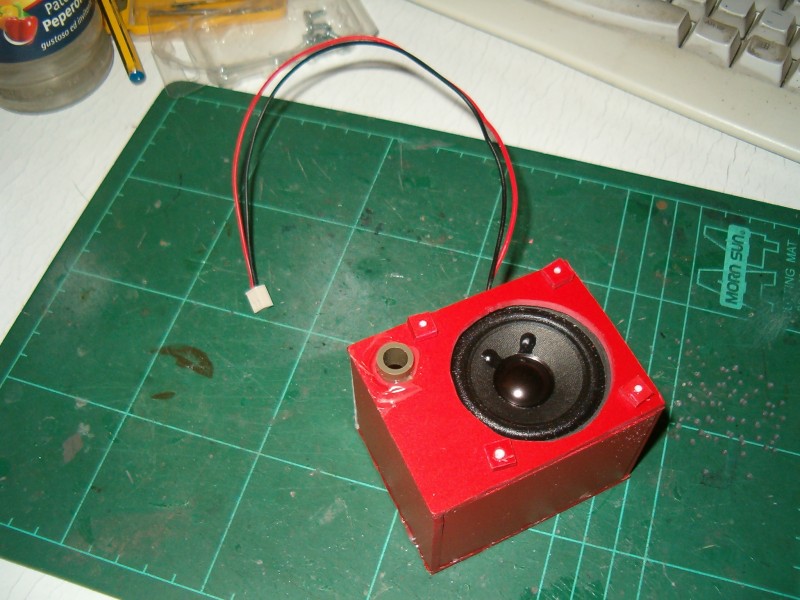
Building a proper speaker for the Blaster IV: a forex box with a visaton FRWS5 speaker, built to size to fit the rear hull:

Cutout the windows in the cupola and put transparent plastic sheets:
Riassembling the turret: the base for el-mod CSI receiver was put inside the commander cupola. Added small bits of details to turret too (handles, periscopes, etc.).
Adding plates to close the rear of the hull: this baby is going to run in the garden, hence the need to avoid dirt from entering the hull:
Building a proper speaker for the Blaster IV: a forex box with a visaton FRWS5 speaker, built to size to fit the rear hull:
02-21-2011 | 01:59 AM
#3
Thread Starter
Joined: Jan 2007
Posts: 1,547
Likes: 0
Received 17 Likes
on
15 Posts
From: San Paolo Solbrito, ITALY
Building a support for the main switch, the volume knob and the onboard battery charger, which will be accessible through the driver and radio operator hatches:


Didn't like the little room inside the tank (mostly due to the recoil unit protruding under the turret), so I decided to saw away the battery box, built a new support plate in forex and found a new satisfactory layout for everything.
Also built a quick closing/opening system for the upper hull (didnt' like the screw system):


Texturing hull and turret parts using putty and acetone:

Cutting stencils out of paper and 0.5mm styrene:

After airbrushing, before final touches with oils and drybrush:

Today drybrushing time and -most of all- building and uploading the custom soundset for the sherman.
As usual I amused myself with battle and user sounds. I took from here the idea of 'Amazing Grace' added to the tank explosion and 'Halls of Montezuma' as a battle march
Also tested the battle system and checked that everything worked ok.
Last step left is putting all the luggage on....

A crappy indoor picture of the finished tank, standing on the bridge I built yesterday for my tank club:

Didn't like the little room inside the tank (mostly due to the recoil unit protruding under the turret), so I decided to saw away the battery box, built a new support plate in forex and found a new satisfactory layout for everything.
Also built a quick closing/opening system for the upper hull (didnt' like the screw system):
Texturing hull and turret parts using putty and acetone:
Cutting stencils out of paper and 0.5mm styrene:
After airbrushing, before final touches with oils and drybrush:
Today drybrushing time and -most of all- building and uploading the custom soundset for the sherman.
As usual I amused myself with battle and user sounds. I took from here the idea of 'Amazing Grace' added to the tank explosion and 'Halls of Montezuma' as a battle march
Also tested the battle system and checked that everything worked ok.
Last step left is putting all the luggage on....
A crappy indoor picture of the finished tank, standing on the bridge I built yesterday for my tank club:
02-21-2011 | 05:16 AM
#6

Senior Member
Very Nice. Some new twists to the build. Thanks for sharing this great looking Sherman.
How about a little more detail about the airsoft to recoil conversion.
Dan
How about a little more detail about the airsoft to recoil conversion.
Dan
02-21-2011 | 06:02 AM
#7
Thread Starter
Joined: Jan 2007
Posts: 1,547
Likes: 0
Received 17 Likes
on
15 Posts
From: San Paolo Solbrito, ITALY
The build took about a month, plus painting.
The airsoft unit conversion to recoil is pretty much as the 'correct recoil' conversion of stock HL units:
- reverse polarity of airsoft motor
- connect or glue both internal pistons together
- put an external spring pulling back both pistons, cutting a slot to let it slide
- remove internal big spring
- use the rear screw fixing the spring to act as a stop for the piston
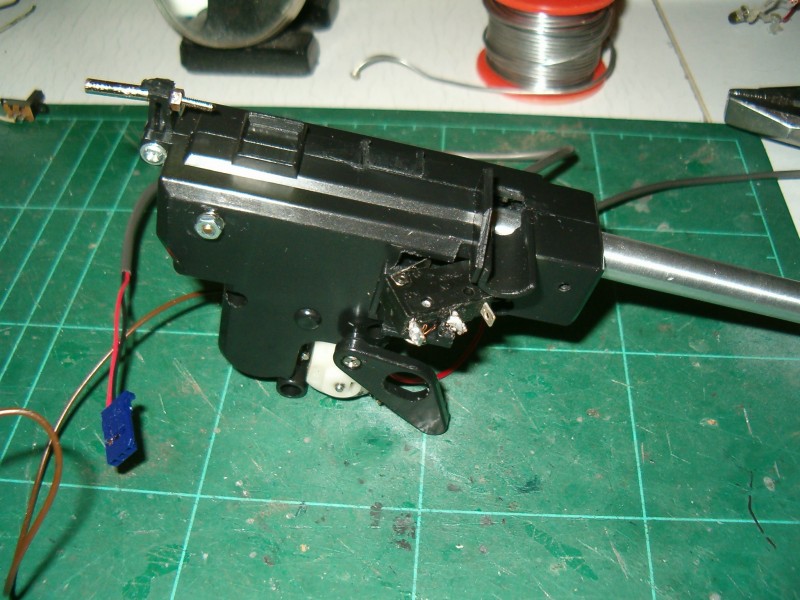
- add a microswitch to operate the automatic return to position (in the mato unit there's a switch already there since the airsoft is automatic, so, it's easier).
- connect the gun barrel, of course, and enlarge the sliding bore on the front of the unit
I don't have many pictures of the conversion, but I did it already on my old Panzer III. Here's another picture showing the position of the micro on the MAto unit
The airsoft unit conversion to recoil is pretty much as the 'correct recoil' conversion of stock HL units:
- reverse polarity of airsoft motor
- connect or glue both internal pistons together
- put an external spring pulling back both pistons, cutting a slot to let it slide
- remove internal big spring
- use the rear screw fixing the spring to act as a stop for the piston
- add a microswitch to operate the automatic return to position (in the mato unit there's a switch already there since the airsoft is automatic, so, it's easier).
- connect the gun barrel, of course, and enlarge the sliding bore on the front of the unit
I don't have many pictures of the conversion, but I did it already on my old Panzer III. Here's another picture showing the position of the micro on the MAto unit
02-21-2011 | 06:43 AM
#8

Great job and a lot of work on nice detailing. Removing the high ring at the turret base I find easier and faster with a Demmel. On the TC episcopes, have you tried Micro Glaze? It works and looks great with a mimimum of cutting/fussing. Just paint it on. Later you can put on a second coat for added stregth. From Micro-Mart.
02-21-2011 | 07:22 AM
#10
Senior Member
Thanks
I have a box full of these airsoft guns. I might have to give this a try.
They biggest drawback to these and the Heng long recoil is how much vertical space they take up, but in the right tank they work good.
Dan
I have a box full of these airsoft guns. I might have to give this a try.
They biggest drawback to these and the Heng long recoil is how much vertical space they take up, but in the right tank they work good.
Dan
 02-21-2011 | 03:00 PM
#12
03-18-2011 | 01:47 AM
#13
Thread Starter
Joined: Jan 2007
Posts: 1,547
Likes: 0
Received 17 Likes
on
15 Posts
From: San Paolo Solbrito, ITALY
Just to complete the thread, a short video showing some battle sound effects I took some inspiration from this forum.
[youtube]http://www.youtube.com/watch?v=LDnP4RcnbLg&feature=channel_video_title[/youtube]
[youtube]http://www.youtube.com/watch?v=LDnP4RcnbLg&feature=channel_video_title[/youtube]
 03-18-2011 | 11:35 AM
#16
Hi Dan here is a link to Panzerketten it shows one way of doing a recoil unit from a BB gun http://uk.babelfish.yahoo.com/transl...rUrl=Translate
I did one similar it works well, but tried to do another and it turned to dust the inside just broke up,tried to modifie it to much.
This one looks better and keeping it simple makes it more reliable.I tried the internal spring ,using the one fitted, it was to strong.
regards pete
I did one similar it works well, but tried to do another and it turned to dust the inside just broke up,tried to modifie it to much.
This one looks better and keeping it simple makes it more reliable.I tried the internal spring ,using the one fitted, it was to strong.
regards pete
03-18-2011 | 12:36 PM
#17
Thread Starter
Joined: Jan 2007
Posts: 1,547
Likes: 0
Received 17 Likes
on
15 Posts
From: San Paolo Solbrito, ITALY
Well, Germans always do it the best way in mechanics, but it can be kept much simpler.
Here is a translated link to a thread from a friend of mine. The modified gun is that of a Stug, hence the recoil spring put on top, but it can be put on a side as well.
http://uk.babelfish.yahoo.com/transl...rUrl=Translate
Here is a translated link to a thread from a friend of mine. The modified gun is that of a Stug, hence the recoil spring put on top, but it can be put on a side as well.
http://uk.babelfish.yahoo.com/transl...rUrl=Translate
03-18-2011 | 02:58 PM
#18

Now that is one sweet Mato Sherman. Mine will eventually be an M4 A3E2 which is a Jumbo. I got the duck bill extenders all sorted out just need to finiosh it. BUT I jus got a brand new Tamiay FO Pershing from the AAF( Thanks Karen and Natasha) so i am enthralled with it. I LOVE the PERSHING and I cant wait to start the build. Got some goodies and surprises for it. But again Very nice Sherman excellent work mate.


