


Killing some time...


 03-28-2012 | 06:09 PM
#27
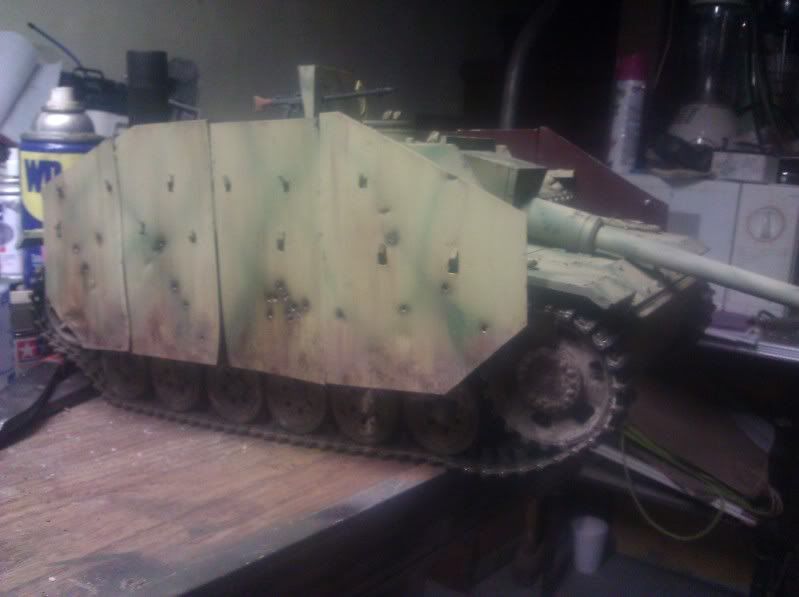
I wanted to at least get one side near done...but I am out of steam for tonight....here is all I got.Letme know what you guys think.I didn't want it to look too beat up, but then again, I didn't want it new either. As always, your input is welcome and appreicated.
03-28-2012 | 06:20 PM
#28
WOW
Very nice!
Very nice!
03-28-2012 | 06:31 PM
#30
Coming from you, Brett, that is a serious compliment! thank yo for that. I would love to do something if it would help the guys out in any way. I enjoy this part of it alot and the end result brings satisfaction. Hopefully we can all get together soon after the Danville event. I miss you guys!
03-28-2012 | 10:30 PM
#31
Senior Member
Joined: Oct 2009
Posts: 324
Likes: 0
Received 0 Likes
on
0 Posts
From: , NJ
Joe, as always(and we have come to expect it) your craftsmanship comes through every time.I`ve done some research on the side armor plates that were employeed on the Stug,and for the most commononlyseen type they look exactly like you have constructed for your tank.Nicely executed,Joe.Can`t wait to see it in person.
P.S.does this side armor count as IFA when we battle? lol
Charlie
P.S.does this side armor count as IFA when we battle? lol
Charlie
03-29-2012 | 09:15 AM
#32
Charlie, I appreciate that.I tried to do some research and swanted to make it look acceptable to what would have been used in real world. From what I saw online, there were wuite a few different variation s of mounts and plate designs...some rather rough and others more refined in look.
As for the IFA, I will have to argue that point and see how far I get. LOL
As for the IFA, I will have to argue that point and see how far I get. LOL

 03-29-2012 | 07:32 PM
#35
Ok, so I fought througha headache all day to get the other side done. the weathering is not complete, but here is where I am. Hope you guys like it. Have some parts coming to get the main gun operational. I will post pics of how it works when I get it all together. There just isn't much to show with that just yet.
03-30-2012 | 06:29 AM
#36
Wow!!! This Stug is "SICK"!!!! It looks real !!! All you need is a good background shot and it would be hard to tell it is a model. Very Cool!!!!
Thanks for posting the photo's. Can't wait to see how you did the main gun traverse and elevation. I am working on a StuG III G late version
and there is not a whole lot of room in the fighting compartment to install traverse and elevation electronics.
Thanks for posting the photo's. Can't wait to see how you did the main gun traverse and elevation. I am working on a StuG III G late version
and there is not a whole lot of room in the fighting compartment to install traverse and elevation electronics.
 03-30-2012 | 08:46 AM
#39
maus, keep inmind that I am not using the Tamiya recoil, as BubbjJoe did. Mine will be using a mini servo for the recoil unit, but I will be using the stug elevation units as elevation and traverse for the main gun. Still need to figure how all is going to come together, but come it will.
03-31-2012 | 04:16 AM
#43
ORIGINAL: philipat
Hmmm...I must be doing something wrong. I tried using electrical solder with some of my brass work and it didn't hold.
Hmmm...I must be doing something wrong. I tried using electrical solder with some of my brass work and it didn't hold.
did you use Flux Paste Philipat?
03-31-2012 | 06:32 PM
#45
Ok, so after a long day of wleding and fabricating on a Mustang, I decided tofuss with the mantlet on the Stug....sigh...alot of failed attempts later, I foind a way to make this thing work pretty well...in theory.....I think...
What I did was take 2 pieces of brass stock and drill a hole through both to press in a bearing. A piece of round brass stock to connect the two together as a shaft was installed. I then soldered the one part of flat stock to the brass tunbe that is glued into the mantlet. and on the other side I sodlered another piece of round stock to the first piece of round stock. This will be used as the pivot for elevation. Traverse is the second piece of flat brass with the other bearing in it. I took s coupl eof pictures but it is still not finished. For elevation pivot points I glued 2 ball ends to styrene. This will allow a little more side movement in the traverse system. I am waiting for a servo to arrive so I can mount that as a recoil unit, and then I can install the entire thing and test it with motors.


What I did was take 2 pieces of brass stock and drill a hole through both to press in a bearing. A piece of round brass stock to connect the two together as a shaft was installed. I then soldered the one part of flat stock to the brass tunbe that is glued into the mantlet. and on the other side I sodlered another piece of round stock to the first piece of round stock. This will be used as the pivot for elevation. Traverse is the second piece of flat brass with the other bearing in it. I took s coupl eof pictures but it is still not finished. For elevation pivot points I glued 2 ball ends to styrene. This will allow a little more side movement in the traverse system. I am waiting for a servo to arrive so I can mount that as a recoil unit, and then I can install the entire thing and test it with motors.
 04-01-2012 | 04:37 AM
#47

ORIGINAL: Airbrushler
did you use Flux Paste Philipat?
ORIGINAL: philipat
Hmmm...I must be doing something wrong. I tried using electrical solder with some of my brass work and it didn't hold.
Hmmm...I must be doing something wrong. I tried using electrical solder with some of my brass work and it didn't hold.
did you use Flux Paste Philipat?
 04-01-2012 | 08:26 AM
#48
The flux is a must in my opinion. Whatever type of solder, adding flux to the parts is never going to allow you to go wrong. I add the flux, then heat the one part and add sodler to it. Then do the same to the other part and then sodler them together. tjis makes for a very strong bond.
04-01-2012 | 09:35 AM
#49

Senior Member
Joined: Jul 2008
Posts: 803
Likes: 0
Received 0 Likes
on
0 Posts
From: toronto, ON, CANADA
ORIGINAL: yellowshaker
I have a picture of a Stug that bubbajoe had done some time ago. Here it is...
I have a picture of a Stug that bubbajoe had done some time ago. Here it is...
it is easer to use a tamiya recoil than a servo for recoil as it is much more compact and pershing recoils are cheep from JRRC
04-01-2012 | 09:38 AM
#50
I actually have the Pershing recoil unit sitting here, but I figured that the servo would be easier with the elmod system.
Bubba, I was looking at your stug video on youtube and wanted to ask what you used in yours for the mechanical aspects of the traverse. It looked like you have some type of custom ball fitting, but I was unable to find anything that would work, so I made a different design for mine.</p>

