


JS-3 conversion kit for the KV-1
 04-05-2013 | 10:36 AM
#26
Most of us don't care much for any history lesson.  We can find it ourselves on the Internet or in books.
These are Radio Controlled Tanks, I buy and build because they look cool or I like them.
~ Jeff
We can find it ourselves on the Internet or in books.These are Radio Controlled Tanks, I buy and build because they look cool or I like them.
~ Jeff
 04-05-2013 | 11:46 AM
#27

ORIGINAL: Panther F
Most of us don't care much for any history lesson. We can find it ourselves on the Internet or in books.
These are Radio Controlled Tanks, I buy and build because they look cool or I like them.
~ Jeff
Most of us don't care much for any history lesson.
We can find it ourselves on the Internet or in books.These are Radio Controlled Tanks, I buy and build because they look cool or I like them.
~ Jeff
04-05-2013 | 12:03 PM
#28

Wait i'm relatively new here... pattoncommander was in WWII? Vietnam? Cold War?<div>
</div><div>I love reading his posts, very entertaining (in a very good way). Just a bit confused who he is </div>
</div><div>I love reading his posts, very entertaining (in a very good way). Just a bit confused who he is
</div>
04-05-2013 | 01:39 PM
#29
ORIGINAL: Ronan87
Wait i'm relatively new here... pattoncommander was in WWII? Vietnam? Cold War?<div>
</div><div>I love reading his posts, very entertaining (in a very good way). Just a bit confused who he is</div>
Wait i'm relatively new here... pattoncommander was in WWII? Vietnam? Cold War?<div>
</div><div>I love reading his posts, very entertaining (in a very good way). Just a bit confused who he is
</div>
He "says" he was in the Korean War at age 14, so is supposed to be an expert on the Patton Tank.
Not anything on WWII which we all have learned about from the same place.
~ Jeff
04-08-2013 | 01:16 PM
#30

This is all I have I thought I took more but I have also lost a few hundred pictures so they may be amongst the lost, this IS3 is/was located at the military museum Brussels since I took these pictures the museum has gone through a spot of renovation and all the tanks were removed so I don’t know if it has returned, the IS3 was complete even down to the original batteries still inside, the reliability problems with these tanks meant that all were used as gate guards with no mileage on them, IS3 was probably the most unreliable tank ever produced and would no doubt have broken down before entering battle though it still looked formidable


By the way this tank had stood outside for 7 years when I took these pictures
By the way this tank had stood outside for 7 years when I took these pictures
04-08-2013 | 01:38 PM
#31
Thanks for the pictures.
I think seeing this on the RC battlefield will be cool.
~ Jeff
I think seeing this on the RC battlefield will be cool.
~ Jeff
04-08-2013 | 02:38 PM
#32
Joined: Aug 2011
Posts: 1,063
Likes: 0
Received 0 Likes
on
0 Posts
From: Cambridge ON, CANADA
It would be extremely difficult to use the Taigen all metal to convert to the IS3. I would not recommend it.
Not saying it is impossible but holy smokes you would need some equipment and a bunch of skills.
Not saying it is impossible but holy smokes you would need some equipment and a bunch of skills.
ORIGINAL: FreakyDude
I'll let you know, I ordered a Taigen KV-1 for for a JS-3 conversion last week. My own motor pool is getting long in the tooth so I thought I could freshen it up.
I'll let you know, I ordered a Taigen KV-1 for for a JS-3 conversion last week. My own motor pool is getting long in the tooth so I thought I could freshen it up.
ORIGINAL: DirtyBird69
I wonder if this would work on a taigen KV-1....? being that Taigen has a bunch of asiatam parts I wonder if the wheel covers would fit and what not?
I wonder if this would work on a taigen KV-1....? being that Taigen has a bunch of asiatam parts I wonder if the wheel covers would fit and what not?
 04-11-2013 | 07:24 PM
#34
ok I ordered one last week I have both the plastic KV-1 lower hull and a Asiatam KV-1 metal lower hull will see if I can get the metal one to work if not ill fall back on to the plastic HL one .
Jimmy
Jimmy
04-19-2013 | 12:55 AM
#36

Thread Starter
Joined: Jan 2007
Posts: 1,547
Likes: 0
Received 17 Likes
on
15 Posts
From: San Paolo Solbrito, ITALY
I have received my two kits from Christian juckenburg, i.e. the SU-152 and the JS-3 conversion kits for the heng long KV-1.
Both were carefully packaged, with all small parts in several bags.

The instructions came in form of several A4 sheets in B/W, filled with pictures. Step-by-step procedure description is lacking (except some general tips about handling of resin parts and explanations about how to modify the supension heigth), but the pics themselves are many and self- explanatory enough .
All resin parts were well moulded, with rich details and few cleaning required. No visible deformation and just one bubble in the barrel found so far.

The single-piece hull is impressive for both size and detail, and it is designed to fit the HL KV-1 plastic lower hull.
I have tried to fit it on a Asiatam metal lower hull and can confirm that it doesn't fit without working on the rear of the resin hull, which is designed to fit between the side walls of the metal one.
Since the side walls are thicker on the metal hull than on the plastic one, it doesn't fit out of the box.
The turret is made in two pieces, with the lower part moulded to accept a standard HL turret ring. The upper part of the turret has a nice fusion texture.
There is a bag with the replacement outer wheels, cast in some black plastic rather than resin, softer to the touch and more fit for running over the tracks. This is a nice addition, with RC in mind, and Christian must be praised for that.
Also some spare tracks are supplied to be put on the upper hull.
The barrel is not hollow and will require a replacement with either an aluminium turned one or something else, in order to fit IR and/or flash units inside it.
A cople of metal axles are supplied to build hinges and handles.
Overall, a very nice kit, worth the price.
(a last picture with main parts one over the other... I know, I took the picture with motor grills rotated by 180°)

Both were carefully packaged, with all small parts in several bags.
The instructions came in form of several A4 sheets in B/W, filled with pictures. Step-by-step procedure description is lacking (except some general tips about handling of resin parts and explanations about how to modify the supension heigth), but the pics themselves are many and self- explanatory enough .
All resin parts were well moulded, with rich details and few cleaning required. No visible deformation and just one bubble in the barrel found so far.
The single-piece hull is impressive for both size and detail, and it is designed to fit the HL KV-1 plastic lower hull.
I have tried to fit it on a Asiatam metal lower hull and can confirm that it doesn't fit without working on the rear of the resin hull, which is designed to fit between the side walls of the metal one.
Since the side walls are thicker on the metal hull than on the plastic one, it doesn't fit out of the box.
The turret is made in two pieces, with the lower part moulded to accept a standard HL turret ring. The upper part of the turret has a nice fusion texture.
There is a bag with the replacement outer wheels, cast in some black plastic rather than resin, softer to the touch and more fit for running over the tracks. This is a nice addition, with RC in mind, and Christian must be praised for that.
Also some spare tracks are supplied to be put on the upper hull.
The barrel is not hollow and will require a replacement with either an aluminium turned one or something else, in order to fit IR and/or flash units inside it.
A cople of metal axles are supplied to build hinges and handles.
Overall, a very nice kit, worth the price.
(a last picture with main parts one over the other... I know, I took the picture with motor grills rotated by 180°)
04-19-2013 | 02:01 AM
#38
Thread Starter
Joined: Jan 2007
Posts: 1,547
Likes: 0
Received 17 Likes
on
15 Posts
From: San Paolo Solbrito, ITALY
Didn't post them to keep the thread focused on the JS-3, anyway I took a couple of pictures I can share:

Same care in package, with bags for smaller parts and metal axles for hinges.
The single-piece casamate is impressive and reach in details. The gun is designed with elevation pivoting axles. The barrel cylinder is not hollow, but since its size (short and thick... it's a 152mm after all!) I think it is possible to drill it, thus allowing at least wires for muzzle flash and/or IR led to pass through it. The muzzle brake is a separate part and is correctly drilled.
In case someone wishes a working barrel recoil more work is needed (a sleeve will be required to sustain the mantlet).
Same kind of instructions (A4 sheets of pictures), this kit looks and easier build. It will fit metal lower hulls since its interface is with the upper hull only, which requires several not too difficult cuts to fit the casamate and the new engine covers (you see them detailed on the instruction sheet in the picture above).
Another kit worth the price, imho.
 04-19-2013 | 03:11 AM
#40
Thread Starter
Joined: Jan 2007
Posts: 1,547
Likes: 0
Received 17 Likes
on
15 Posts
From: San Paolo Solbrito, ITALY
I'm not sure exaclty because the fitting test can't go too far without cutting the resin hull first: anyway I had to unscrew the whole back of the metal hull, and it will also be necessary to remove the front metal hooks and front plate, and possibly to cut a bit of the inner aluminium front plate (maybe this is not needed).
As for the resin hull, the rear requires at least the outlined part in the picture below to be cut (is is meant to slide inside the hull) while the rest of the hull follows the rear rounded wall, the one around the final transmission cover.
But since I will be using the metal hull for the Su-152 and have ordered a plastic one for the JS-3, I'm sorry but cannot go more far in my hints, and I'm not sure about how the resin hull will copy the metal one, even after these works. It should, though.
Uploaded the picture twice since the first version wasn't clear. See the second one with the dotted outline.
04-19-2013 | 04:37 AM
#42
Thread Starter
Joined: Jan 2007
Posts: 1,547
Likes: 0
Received 17 Likes
on
15 Posts
From: San Paolo Solbrito, ITALY
I have almost finished a Stug IV: after that I think I will begin with the SU-152, while thinkering about the JS-3 turret mechanics.
Sure will post some pics along the road.
Sure will post some pics along the road.
04-19-2013 | 10:07 AM
#45
Well how did they mate it to the hull? I'd be interested to see that. I know that the JS-3 was based off a JS hull, which is narrower than the KV hull.
04-20-2013 | 06:24 AM
#46
Maaaaan... that looks really great!  And so does the 152 as well.
I just love the front glacis angles and the low profile of their turret designs. No matter if the tank was junk or not, it's a very cool kit.
And I want one!
~ Jeff
And so does the 152 as well.I just love the front glacis angles and the low profile of their turret designs. No matter if the tank was junk or not, it's a very cool kit.
And I want one!
~ Jeff
09-02-2013 | 12:10 AM
#50
Thread Starter
Joined: Jan 2007
Posts: 1,547
Likes: 0
Received 17 Likes
on
15 Posts
From: San Paolo Solbrito, ITALY
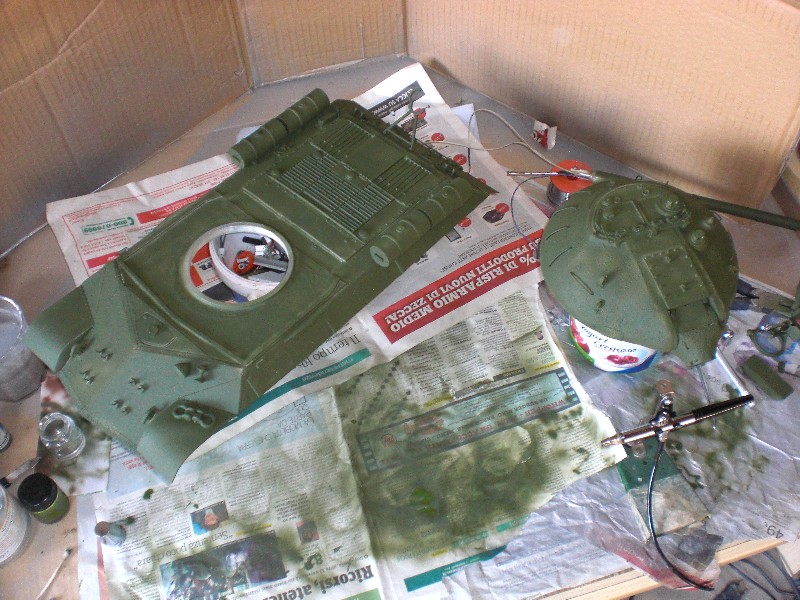
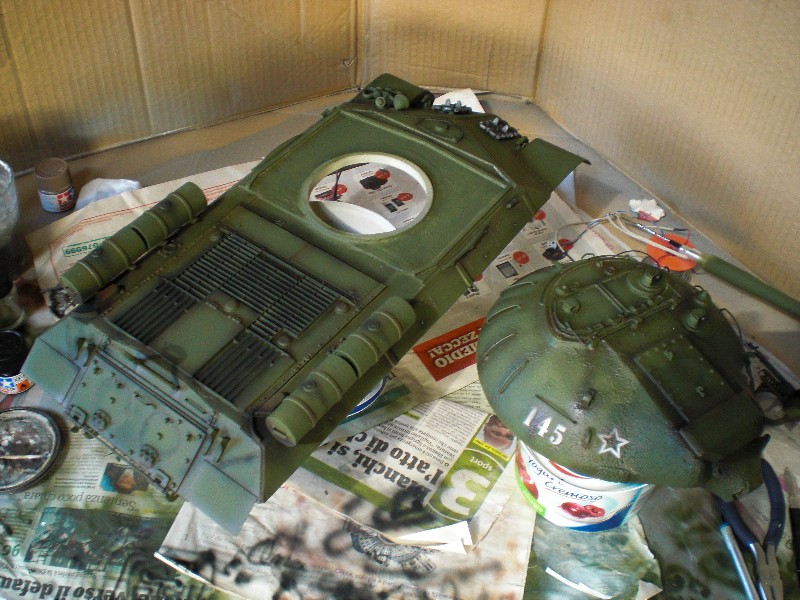
Airbrush painting: first pic is model after the 3 shades of Russian green, second one is after airbrushing all the colors and stenciling the numbers and stars.
That's were I am now.
Next steps will be detailing by brush and then final assembling.
Control electronics will be supplied by the new IBU2-full option by Scooter.
Feel free to put questions about any of the above steps.
That's were I am now.
Next steps will be detailing by brush and then final assembling.
Control electronics will be supplied by the new IBU2-full option by Scooter.
Feel free to put questions about any of the above steps.
Last edited by borealis; 09-02-2013 at 12:12 AM.

