


For my Australian Brother


 05-13-2013, 03:38 PM
#2
Senior Member

Join Date: Nov 2006
Location: Grande Prairie,
AB, CANADA
Posts: 8,976
Likes: 0
Received 4 Likes
on
4 Posts
WOW Joe. You have really outdone yourself with that one. All the little things that only us tank nuts notice. Great looking paint too.
 05-13-2013, 03:59 PM
#6
Thanks all. It is being done for a friend over the pond. He seems to like it so far, which makes me happy.
Ronan, what do you mean? The type of pains i am using? If so, theis is done with Tamiya paints and then oils and pigments as well for fading and weathering techniques
Here's a dew more shots
Ronan, what do you mean? The type of pains i am using? If so, theis is done with Tamiya paints and then oils and pigments as well for fading and weathering techniques
Here's a dew more shots


 05-13-2013, 04:19 PM
#8

Yes which tamiya one's for the tan/brown/green?
The one's i use from Tamiya do NOT come out like that. I have been trying to get the shades you did quite a few time's already...
Also which primer?
Thanks bud 
05-13-2013, 04:26 PM
#9
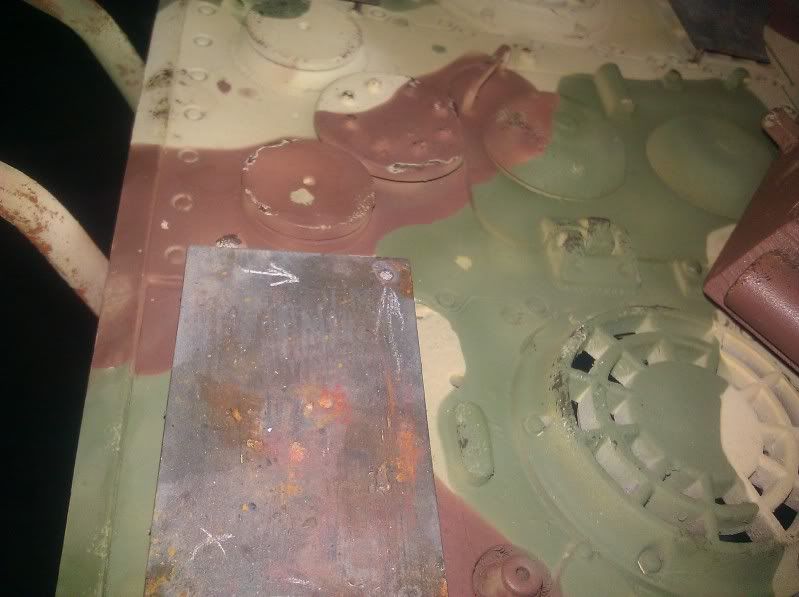
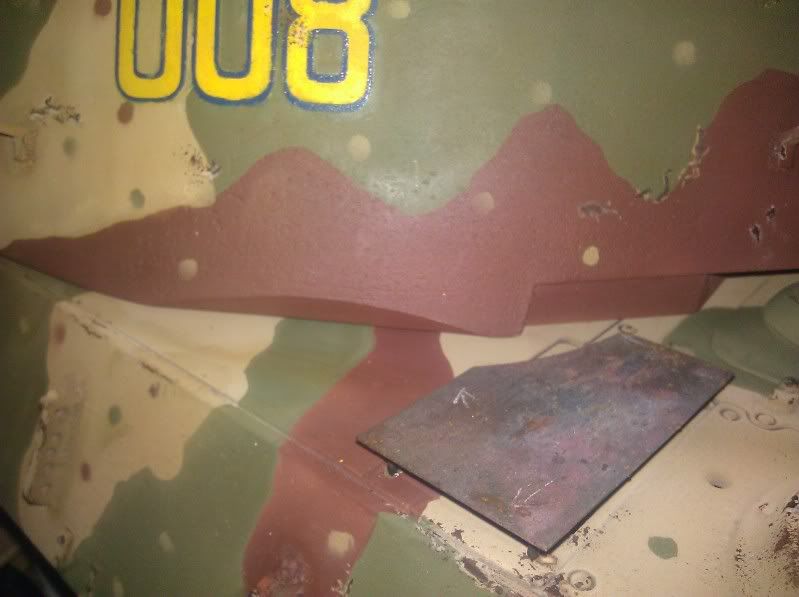
Ronan, the colors were Dark Yellow, mixed with deck tank and then adding white as I went for a basecoat. This was done in a modualtion style.
After that the red was added using red brown also being lightened a bit with deck tan...the reen was olive drab lightened with deck tan as well...
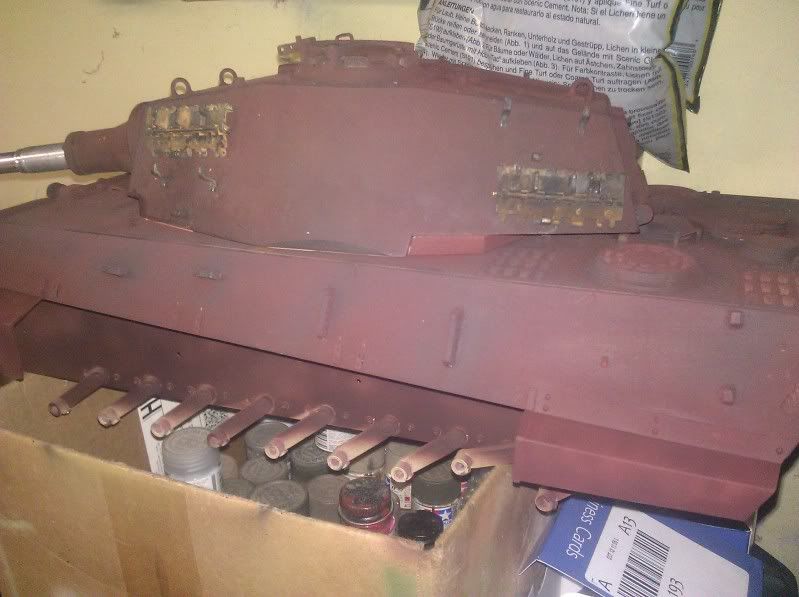
in the pics you can see how it first looked when applied this way. The colors, though moulated a bit, are dull and do not blend well until you add a filter to bring it all together. You need to do this carefully so you do not take too much away from the modulation details and darken the tank too much. It has to be a slow process. Though i do add most of the chipping effects first and then the filter so it looks more natural. I painted all the chips on this moel, and chose not to use other techniques. Anyway, the primer was a Vallejo black primer and then I painted the entire tank inTamiya hull red which looks like the real german tank primer. If you have any questions feel free to ask.

After that the red was added using red brown also being lightened a bit with deck tan...the reen was olive drab lightened with deck tan as well...
in the pics you can see how it first looked when applied this way. The colors, though moulated a bit, are dull and do not blend well until you add a filter to bring it all together. You need to do this carefully so you do not take too much away from the modulation details and darken the tank too much. It has to be a slow process. Though i do add most of the chipping effects first and then the filter so it looks more natural. I painted all the chips on this moel, and chose not to use other techniques. Anyway, the primer was a Vallejo black primer and then I painted the entire tank inTamiya hull red which looks like the real german tank primer. If you have any questions feel free to ask.

 05-13-2013, 04:39 PM
#10
Ok so pretty much everything I do EXCEPT the deck tan (I tried yellow, white, etc).
Thanks bud now I can finally get the shade I want exactly! deck tan for lightening.... Thanks!
05-13-2013, 04:48 PM
#11
It does depend on what you are trrying to achieve. I also have used white or buff to lighten the dark yellow...this was just my choice on this build.
Glad to be of help...also, check out akinterractive. They have Vallejo colors already mixed which are great pains to airbrush with. I use them as well, and sometimes find them alot easier to get the color i am going for. They sell sets and are starting to sell individual colors now.
Glad to be of help...also, check out akinterractive. They have Vallejo colors already mixed which are great pains to airbrush with. I use them as well, and sometimes find them alot easier to get the color i am going for. They sell sets and are starting to sell individual colors now.
 05-13-2013, 05:16 PM
#13
ORIGINAL: yellowshaker
It does depend on what you are trrying to achieve. I also have used white or buff to lighten the dark yellow...this was just my choice on this build.
Glad to be of help...also, check out akinterractive. They have Vallejo colors already mixed which are great pains to airbrush with. I use them as well, and sometimes find them alot easier to get the color i am going for. They sell sets and are starting to sell individual colors now.
Vallejo i'm not a big fan off, i found their airbush ready paint to be either too thick or thin depending of the color... maybe a bad batch?
05-13-2013, 05:47 PM
#14

Join Date: May 2008
Location: Staten Island,
NY
Posts: 770
Likes: 0
Received 0 Likes
on
0 Posts
Wow Joe this tank is a real pleasure to look at and see all that you have achieved in this hobby. man that tank looks awesome.not the norm.
 05-14-2013, 05:24 AM
#17

ORIGINAL: ausf
Outstanding.
Love the anti-aircraft covers.
Outstanding.
Love the anti-aircraft covers.
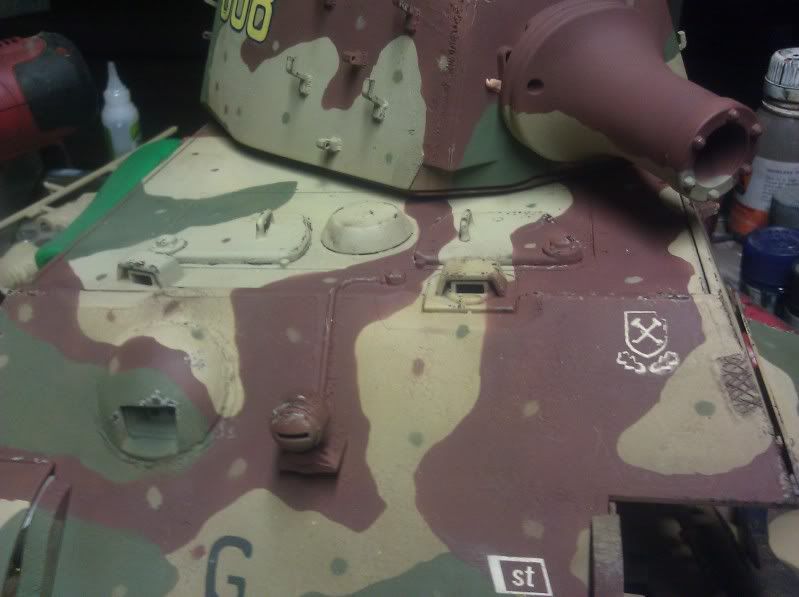
from what I have been reading, they were not "anti-aircraft" covers.....50 cal/20mm shells would go right through them.....they were put on so as the gas ran out, the troops could ride on the backs of the tanks without getting cooked or having them blocking the air flow for the cooling system. Soviet tanks were designed to have troops on the back of them. These were field mods so german troops could do the same.
tank looks just plain real Joe....great job.
05-14-2013, 07:45 AM
#18
ORIGINAL: mustclime
from what I have been reading, they were not "anti-aircraft" covers.....50 cal/20mm shells would go right through them.....they were put on so as the gas ran out, the troops could ride on the backs of the tanks without getting cooked or having them blocking the air flow for the cooling system. Soviet tanks were designed to have troops on the back of them. These were field mods so german troops could do the same.
tank looks just plain real Joe....great job.
ORIGINAL: ausf
Outstanding.
Love the anti-aircraft covers.
Outstanding.
Love the anti-aircraft covers.
from what I have been reading, they were not "anti-aircraft" covers.....50 cal/20mm shells would go right through them.....they were put on so as the gas ran out, the troops could ride on the backs of the tanks without getting cooked or having them blocking the air flow for the cooling system. Soviet tanks were designed to have troops on the back of them. These were field mods so german troops could do the same.
tank looks just plain real Joe....great job.
 05-15-2013, 09:03 AM
#23
ORIGINAL: yellowshaker
Yes, they were used for protection against shrapnel. And they look wicked cool too!
Yes, they were used for protection against shrapnel. And they look wicked cool too!
Yes,I have readthat also.....but as someone on another forum pointed out.....why no shields on the intake fan openings?....some had itbut most didn't, they all have them where the hot air comes out.....If you read Tigers In The Mud, the auther writes about trying to bring a wounded german solder back from the front and killing him with the heat from the tank doring the trip.
05-15-2013, 09:36 AM
#24
ORIGINAL: mustclime
If you read Tigers In The Mud, the auther writes about trying to bring a wounded german solder back from the front and killing him with the heat from the tank doring the trip.
If you read Tigers In The Mud, the auther writes about trying to bring a wounded german solder back from the front and killing him with the heat from the tank doring the trip.
05-15-2013, 10:39 AM
#25
ORIGINAL: mustclime
Yes,I have readthat also.....but as someone on another forum pointed out.....why no shields on the intake fan openings?....some had itbut most didn't, they all have them where the hot air comes out.....If you read Tigers In The Mud, the auther writes about trying to bring a wounded german solder back from the front and killing him with the heat from the tank doring the trip.
Yes,I have readthat also.....but as someone on another forum pointed out.....why no shields on the intake fan openings?....some had itbut most didn't, they all have them where the hot air comes out.....If you read Tigers In The Mud, the auther writes about trying to bring a wounded german solder back from the front and killing him with the heat from the tank doring the trip.
The rectangular grates are air intakes.
The large round towers are engine exhaust cooling fans, probably blowing the most hot air.
The Panther G and Jagdpanther G2 heated the crew compartment by diverting some of this heated exhaust air through internal ducting.
That was the purpose of the small pie pieces on the crew heater.
Thomas Jentz references the use of the armor plates over the grates/louvers twice in Panzer tracts 9-3:
"the modification of protecting cooling air louvers on the rear deck from being penetrated by straffing aircraft by cutting up sections of Schurzen plates was actually implemented."
The Waffenamt authorized the field units to implement a series of improvements on their Jagdpanthers after issue. Among others were:
"Starting in December 1944, fabricating protective covers from pieces of Schurzen and installing these covers for louvers on the rear deck."
I know these references are for a JP, I can't see why it would be treated any different on a KT.