


Using Tamiya recoil and servo elevation.
 12-30-2014 | 08:30 AM
#1


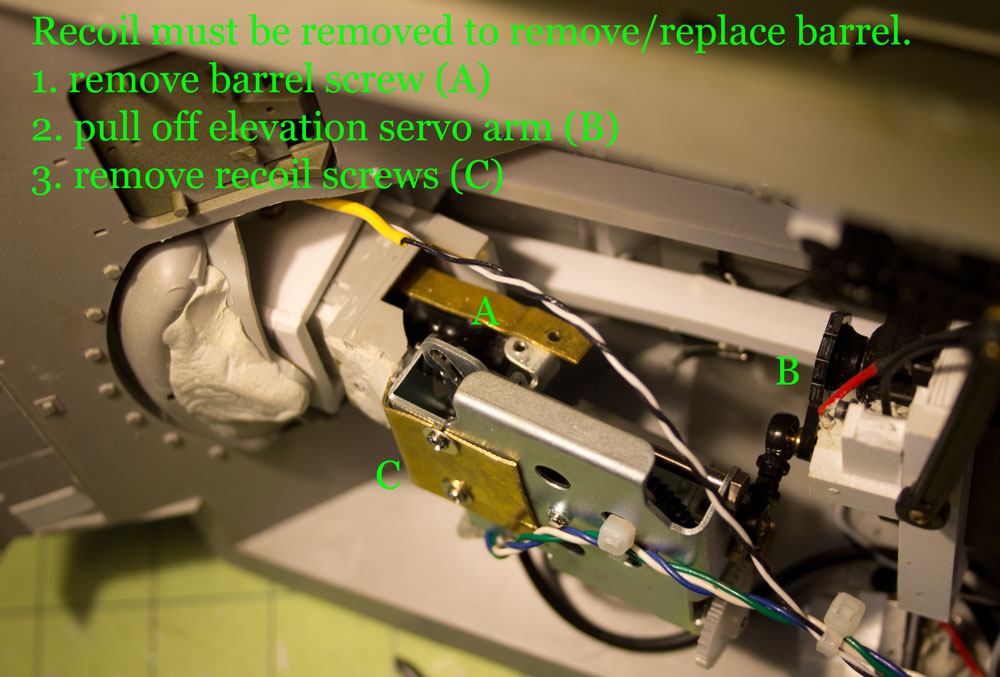
To ship the SU-100 to it's new owner, I needed to remove the barrel. It's a bit involved, so I wanted to take some photos with instructions, but I figured this would be a good opportunity to show you guys how I did it if you're interested in traverse or elevation with another project.
The servos are Futabu with the boards and stops removed, so they are in essence and small motor/gearbox combo.
The recoil unit itself is connected to the mantlet gimbal and the elevation servo drives the unit. The entire assemble shifts side to side for traverse.
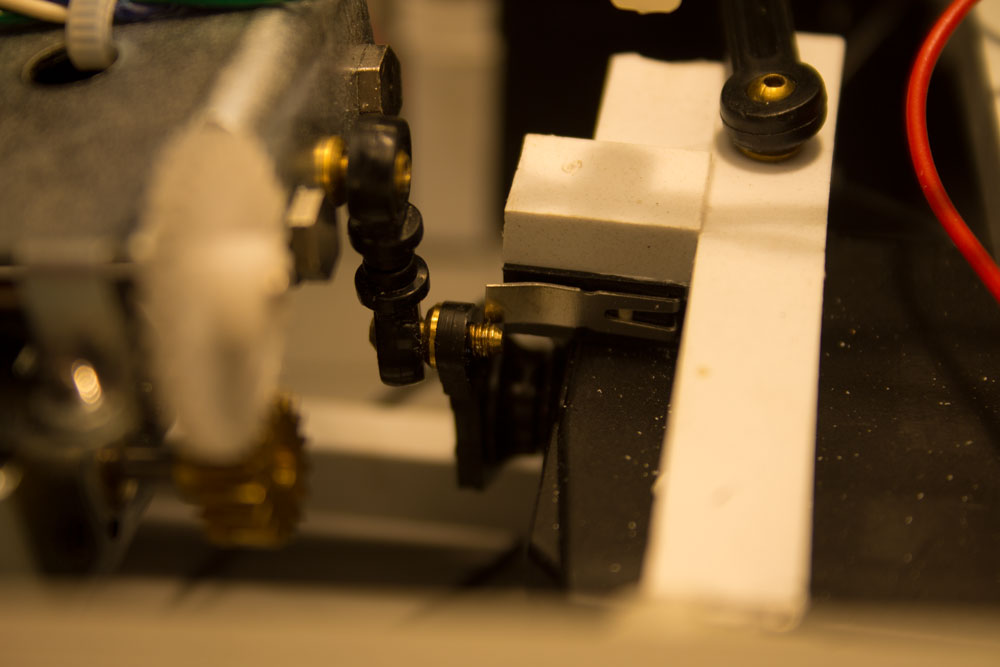
The first photo is one of the micro-switches. This one is an elevation stop (it may need to be adjusted after barrel installation, the others won't be affected at all). The switch stops travel by cutting power when depressed (the metal arm is fully adjustable by bending, it contacts a small button with an audible click), but allows travel in the opposite direction until it hits the other switch. This photo show where it hits the servo arm to limit travel, fully depressed.
The servos are Futabu with the boards and stops removed, so they are in essence and small motor/gearbox combo.
The recoil unit itself is connected to the mantlet gimbal and the elevation servo drives the unit. The entire assemble shifts side to side for traverse.
The first photo is one of the micro-switches. This one is an elevation stop (it may need to be adjusted after barrel installation, the others won't be affected at all). The switch stops travel by cutting power when depressed (the metal arm is fully adjustable by bending, it contacts a small button with an audible click), but allows travel in the opposite direction until it hits the other switch. This photo show where it hits the servo arm to limit travel, fully depressed.
Last edited by ausf; 12-30-2014 at 08:38 AM.
 12-30-2014 | 10:06 AM
#2
Thanks Ausf!!! I will be using this in my conversion of a SU-100. Lots of aves used in this project I see. 
12-30-2014 | 12:21 PM
#3
Here's a vid of the microswitches in action before I packed it up for shipping. The parts were clearly seen before uploading, but Youtube's publishing really obliterated the detail.
You can barely make out the elevation switch lever in the center, the traverse switches are easier to see. The travel is stopped by the switches, on the Tx, I'm holding sticks full on. Control is proportional as it would be using the Tamiya elevation/rotation motors, it's just hard to hold an iPad in one hand and a Tx in the other.
https://www.youtube.com/watch?v=pgINabDdma4
12-30-2014 | 12:26 PM
#4
12-30-2014 | 01:08 PM
#5
So, duct tape and aves? Makes me think of that show Red Green!!!! Certainly the all purpose tool. I will be tying it on my next build, aves that is. Have not had to use duct tale yet!


