


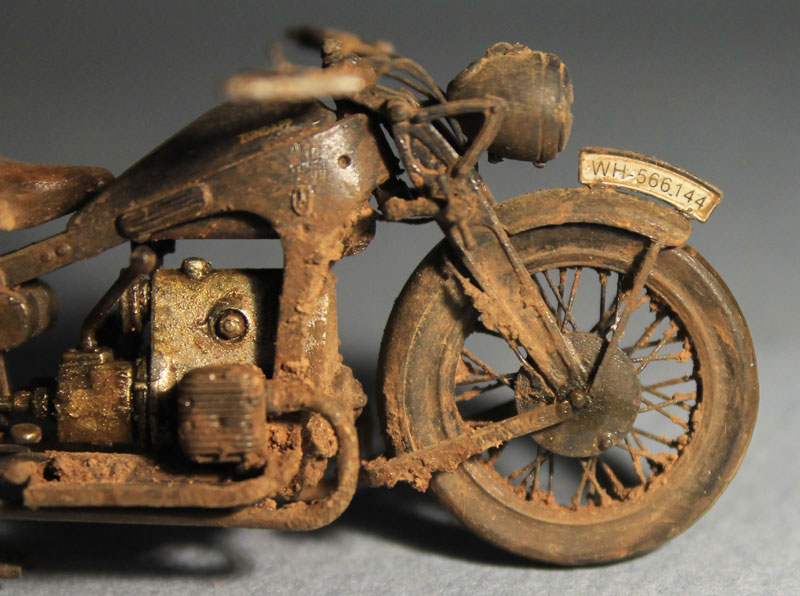
Simple weathering (dry mud).
 04-18-2015, 02:54 PM
#1

It's not a tank, nor 1/16, but it is Panzer Grey and muddy.
It's a 1/35 Zundapp kit. It's smaller than your thumb (unless you have tiny hands) and it's an example of loads of Future and one dry pigment set in PVA. Simple and minutes worth of work.
I'm sculpting a master for a figure to go with the kit, I thought you guys would enjoy a few pics.
Fire off any comments or questions.
 04-18-2015, 05:12 PM
#2

Great work as always, Jeff. Looks like she's been rode hard and put away wet. 
Three quick questions,
1) Future is the floor wax, right? The stuff that got bought out by Pledge and is now known by some ridiculously long name like Pledge/Future Multi Surface Floor Finish (or something similar)?
2) What's PVA? White glue, maybe?
3) Would you be willing to name the specific pigment you used?
I'd like to get a little mud on my Kubel, so any tips would be most appreciated. In fact, when I saw the title of the thread I was really hoping you were gonna do a tutorial on how to achieve this type of effect. (hint, hint)
04-18-2015, 05:42 PM
#3
Yep, Future is the floor wax, which really is the best gloss acrylic coating around, and not just because you get a lifetime supply in one bottle. It's ready to AB as is, self-leveling and tough as nails (designed to be walked on, has to be right?). For some reason, RC tankers seem to be opposed to this step on finishing, but there's no way to get a decal to sit properly unless it's a gloss surface. The Zundapp on the gas tank, license plates and speedometer decals would never work otherwise. Do you see any decal edge in any of those photos? Is it shiney? The pigments were added right above the sealing Future coat, no flat coat.
PVA is a waterbased white glue, Elmers, etc. I use Bindex, but have other uses for it, no need to hunt down that particular product.
The pigment used was MIG's Europe Dust, which I don't think is still available but really any dry pigment you like will work. No need to buy a particular brand, they are all just dry oxides, you're paying for a label, name and packaging. I have a bunch of 80 lb bags in my basement. They all work the same. I have a bunch of MIGs on hand because I used to import them before he lost the company, so grabbed what was easiest for me.
No tutorial, I spill a bunch of pigment on to a piece of wax paper, a squirt of glue, dip a small paint brush in the glue, then pigment, then spread it on the model. Use a wet brush to sip off where you don't want it, then dust some straight pigment over the whole thing when it's dry.
04-18-2015, 06:10 PM
#4
Thanks, Jeff. This is one tanker you don't have to convince about Future. Been using it on static aircraft models for years, and I won't lay decals without a coat of future first. I usually get to a point where I airbrush the whole plane with future and then apply all the decals. A flat coat on top and my decals look like they were painted on. I think every decent modeler in the world has a bottle of the stuff in one name or another (they have different names in different countries).
I'll try the mud on the Kubel and let you know how it comes out. Never has much use for mud with airplanes.
I'll try the mud on the Kubel and let you know how it comes out. Never has much use for mud with airplanes.
04-19-2015, 03:25 AM
#5
I use plenty 'o dirt on my AC.
And talk about decals, beside the painted wood effect, this entire plane is decal, someplaces three deep.


And talk about decals, beside the painted wood effect, this entire plane is decal, someplaces three deep.
Last edited by ausf; 04-19-2015 at 03:31 AM.
04-20-2015, 09:02 AM
#6
Jeff did you use the Mig Gun Metal pigment as well? I just tried it and it is great for shinning up exposed metal. Is there a brass or gold pigment or buffing something for spent ammo casings, like 88 and 75mm? This Mig Gun Metal works great with just brushing it on and buffing with a stiff brush.
04-20-2015, 09:07 AM
#7
Senior Member

Join Date: Nov 2006
Location: Grande Prairie,
AB, CANADA
Posts: 8,976
Likes: 0
Received 4 Likes
on
4 Posts
Future
I am another believer in future, and have been using it for years. It actually softens decals as well. I used the stuff on my 1/24 scale slot cars years ago.
I am another believer in future, and have been using it for years. It actually softens decals as well. I used the stuff on my 1/24 scale slot cars years ago.
Last edited by YHR; 04-20-2015 at 12:23 PM.

 04-20-2015, 10:41 AM
#9
Rudy, I didn't, but thanks for reminding me of it. I know I do have it somewhere because I used it as a lubricant for pinewood derby car wheels when my kids raced. I have some projects where I'll need the effect.
Erik, I used the base model Canon Rebel. I don't remember the model number, but it's the cheapest one they make, it was a replacement for my wife's original Rebel and I'd hate to see all those lenses go to waste. Plus it is compatible with the animation program I mess around with for stuff like this:
https://www.youtube.com/watch?v=_MBqKu0a9wE https://www.youtube.com/watch?v=QyP8SCKBhbk
04-20-2015, 11:34 AM
#10
Jeff you didn't use it because you left it next the graphite and 3-1 oil?  So was it just dry brushing some silver or gunmetal to get the worn metal look on the front and gas tank?
So was it just dry brushing some silver or gunmetal to get the worn metal look on the front and gas tank?
04-20-2015, 12:18 PM
#11
 I'm guessing my MIG bottle is in some box with a bunch of derby wheels somewhere. I do have graphite now though, I guess that'll burnish well.
The gastank is plain old Vallejo Panzer Grey, it's just the light reflection that you're seeing in the pic, but yeah, it does look like graphite.
04-20-2015, 12:28 PM
#12
Just plain light? You are good!!!! Ok, I was being a smart A. Still looks cool with all thet dirt and mud. I have a book on Grossdeutschland infantry and the cover photo is of a trooper on a bike in color. Very dust guy!!! Thanks again for sharing your Zundapp photos as it give me ideas.
Thanks again for sharing your Zundapp photos as it give me ideas.
04-20-2015, 02:05 PM
#13
Member
Question for you Future user/advocates: I am doing some extensive customizing of a Mato all metal Sherman. All my internals are nearly done, the entire tank is primed waiting for paint. I am still deciding on whether to custom paint numbers, etc. on it or go with some decals. I know how Future assists the decal. My worry is this: I want a real flat weathered look. I am going for a mid summer - late fall '44 dusty Normandy look with paint already sun-weathered by the long wait for the invasion. If I use future (for the decals) or just to protect the base coat, can it be dulled down sufficiently with my application of dust, rain marks, dirt etc; or will I need a Dullcoat hit at the end? Thanks in advance.
04-20-2015, 02:59 PM
#14
All of these, the Tammy JS-2, HL Stug and Xion Kkrad all have multiple applications of Future (as does the Zundapp above) and NO dull coat applied. Future is what allowed all the finishing techniques on them, it's not about sealing decals, although that is one advantage. In you case, if you laid down Future on the basecoat before painting your markings, you can edit your marking without damaging the base coat.


Last edited by ausf; 04-20-2015 at 03:03 PM.
04-20-2015, 04:29 PM
#16
Google Swannys and Future and you'll get a dissertation on the uses of it, he started the whole use of it years ago.
Short answer, straight from the bottle, no thinning and I like a few thin coats as opposed to one heavy, but the stuff was meant to be mopped on.
Short answer, straight from the bottle, no thinning and I like a few thin coats as opposed to one heavy, but the stuff was meant to be mopped on.
04-21-2015, 02:47 AM
#17
I've always used future mainly on aircraft, but when it's ready for decals I give the whole plane a coat of future with an airbrush, apply all decals and weathering, and then dulcote over that. Here's the result on an Bf109, very flat finish, no decal edge marks..
