


3D Printed 1/16th FV101 Scorpion
 10-09-2016, 03:44 PM
#251

Join Date: Nov 2010
Location: HamiltonWaikato, NEW ZEALAND
Posts: 937
Likes: 0
Received 78 Likes
on
55 Posts
Should have posted this last week, but didn't quite happen -
Did some work on the Scorp – painted it with WAJ (What A Job)– as afiller - turret, upper hull, lower fronthull, wheels. Probably should have done this prior to attaching the variousbits & pieces, would have been much easier


Tried screwing on the outer road wheels while clamping them,got a few done, but really need a long phillip’s T driver to access them -

 Having arthritic hands doesn’t help.
Joined up 1 set of tracks & fitted them, still need tofinish applying pads to the joined track, having done the un joined track

Mal
Did some work on the Scorp – painted it with WAJ (What A Job)– as afiller - turret, upper hull, lower fronthull, wheels. Probably should have done this prior to attaching the variousbits & pieces, would have been much easier
Tried screwing on the outer road wheels while clamping them,got a few done, but really need a long phillip’s T driver to access them -
Joined up 1 set of tracks & fitted them, still need tofinish applying pads to the joined track, having done the un joined track
Mal
 01-10-2017, 06:31 PM
#252
Join Date: Nov 2010
Location: HamiltonWaikato, NEW ZEALAND
Posts: 937
Likes: 0
Received 78 Likes
on
55 Posts
Scorpion had some TLC applied, including a repaint, so it’sback to Humbrol 81 yellow 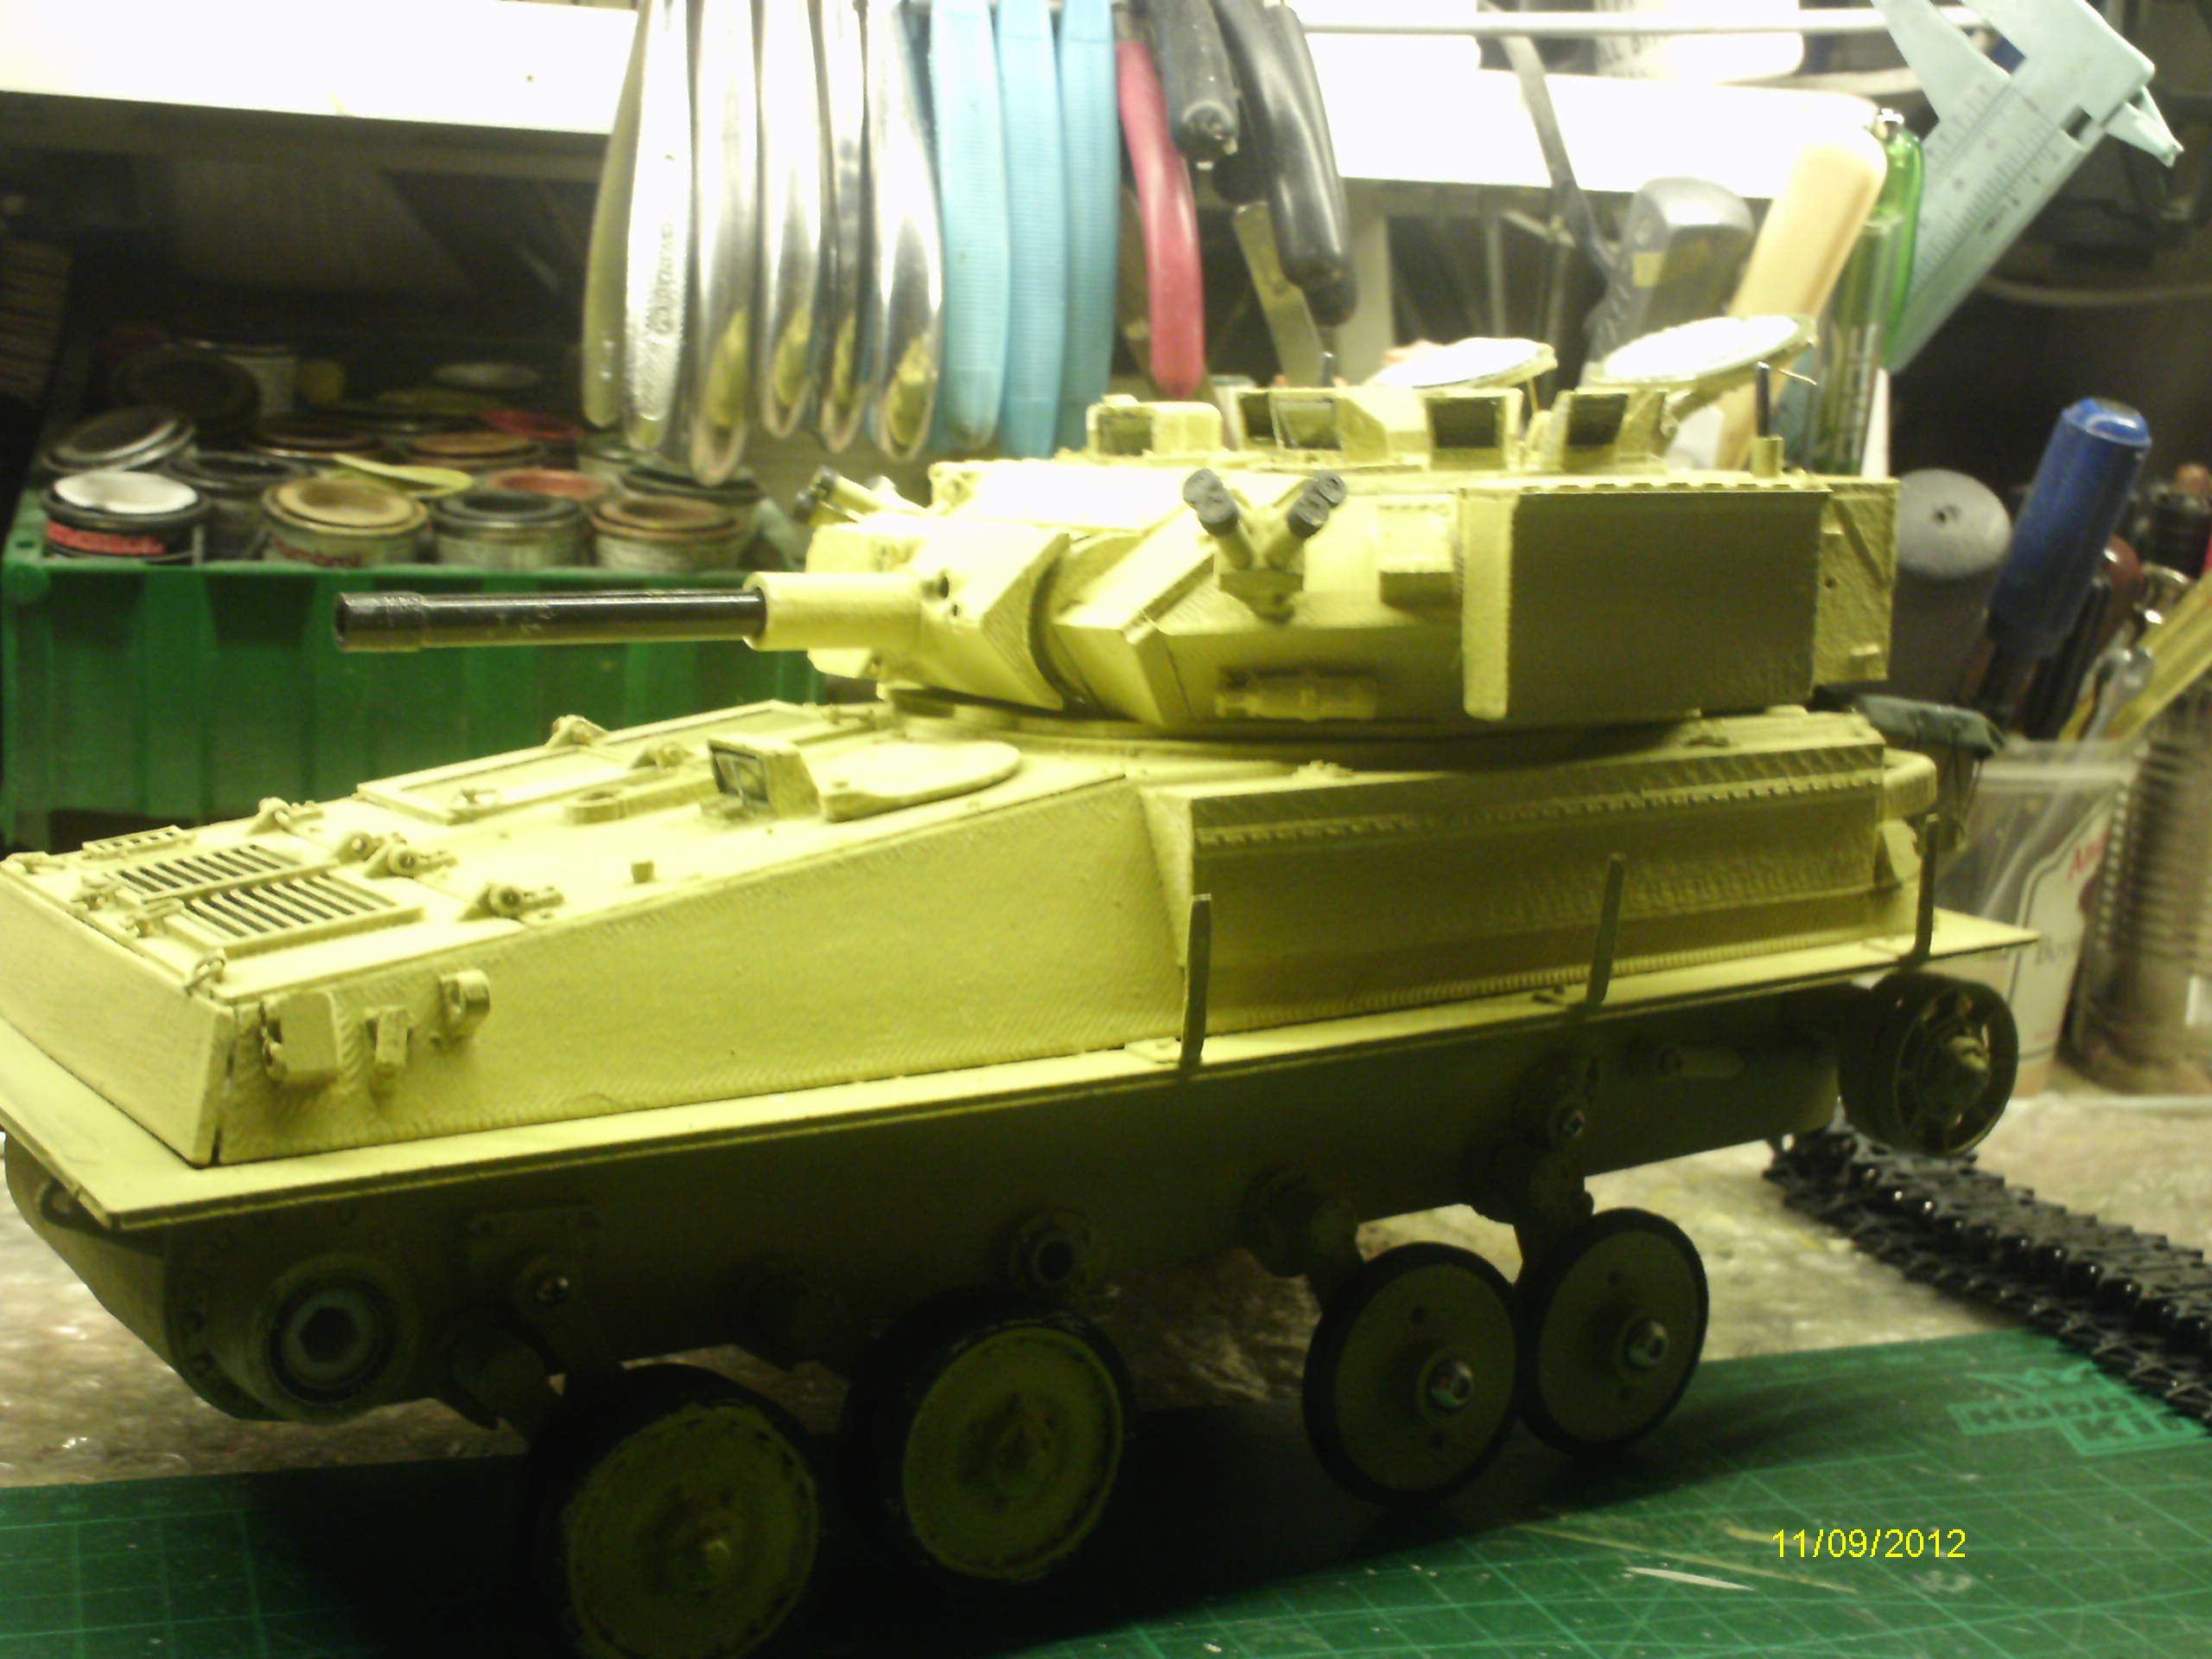


Based on my Cent TC hatch experience, did a similar thing tothe turret hatches – applied paint , including rubber hatch edging -
Finished applying pads to the tracks –
Worked on the tow ropes, tried using shoe polish light tan –
 - coffee –
  – comparison – plain, coffee, light tan & Brown –
  plain & brown –

 I’ve tried paint in the past, but that has resulted in a stiffunbending rope, the shoe polish liquid both soaks into the rope & leaves itflexible. The length of blank heat shrink tube is used as a training device(like braces on teeth) to encourage the loop.
Bent the exhaust grille –
 taped the cut out –
 cut the cut out –
  painted the exhaust –
  emplaced grille –
 -made bands from litho plate, though need to check the spacing beforegluing
Also added the jerry cans to the turret stowage bin, but asthe cans are hollow, need to hide the hole –

Mal
Based on my Cent TC hatch experience, did a similar thing tothe turret hatches –
Finished applying pads to the tracks –
Worked on the tow ropes, tried using shoe polish light tan –
Bent the exhaust grille –
Also added the jerry cans to the turret stowage bin, but asthe cans are hollow, need to hide the hole –
Mal
01-16-2017, 01:12 PM
#256


Join Date: Jul 2007
Location: Camberley, UNITED KINGDOM
Posts: 173
Likes: 0
Received 0 Likes
on
0 Posts
The driver is a conversion of fyndads challenger commander, you are correct, its the later helmet, we were issued them in the late 80's, which is the time my model depicts
Gareth
Gareth
01-17-2017, 06:33 PM
#257
Join Date: Nov 2010
Location: HamiltonWaikato, NEW ZEALAND
Posts: 937
Likes: 0
Received 78 Likes
on
55 Posts
Hi Gareth
Cool. I'm trying to get some head & shoulder figures done, mostly beret wearers, but also want the US Gentex CVC wearers as well. Made contact with a Shapeways guy, but he's busy, so might be a while.
Mal
Cool. I'm trying to get some head & shoulder figures done, mostly beret wearers, but also want the US Gentex CVC wearers as well. Made contact with a Shapeways guy, but he's busy, so might be a while.
Mal
02-08-2017, 06:17 PM
#264
Join Date: Nov 2010
Location: HamiltonWaikato, NEW ZEALAND
Posts: 937
Likes: 0
Received 78 Likes
on
55 Posts
Made an order to East Coast Armory - http://eastcoastarmory.com/sherman_16.htm- the package arrived yesterday.
Included in it were these aerials & bases – - Flex Resin M1 Abrams antenna bases – they’re very flexible.
They’renot 100% accurate as to the radios fitted to NZ Scorpions –
 - but close enough & being flexible, can bebent over for the ‘Tactical’ look –
 - Will probably replace the wire portion withpiano wire, as the latter is straighter -

 –
–
Mal
Included in it were these aerials & bases –
They’renot 100% accurate as to the radios fitted to NZ Scorpions –
Mal
02-23-2017, 05:07 PM
#265
Thread Starter
Join Date: Mar 2009
Location: Saint Paul, MN
Posts: 288
Likes: 0
Received 0 Likes
on
0 Posts
All your scorpions look amazing! I've been away for a while busy on snow blowers all winter. Things are starting to slow down though finally. I actually took the kits off my site over the winter because I was just that swamped with blower orders!
I listed some of the things back on my site today. Electronics and Hardware kits. I have decided to release and sell the full STL package for the tank!!!
STL Files Now For Sale! (I use GetDPD for digital products) : https://spyker-workshop.dpdcart.com/product/147208
Hardware Kit (Check out my brand new website I build also!) : https://spykerworkshop.com/shop/scor...-hardware-kit/
Electronics Kit : https://spykerworkshop.com/shop/scor...ectronics-kit/
I still won't be selling the full 3d printed kits yet, but I should start again within a few months. Now you can print your own though! Anyone plan to?
Also all winter I was working on a whole new item that I recently released, very tank-like so it fits here too it is a 1/14th scale tracked vehicle with a massive amount of custom options, check it out here: https://spykerworkshop.com/
03-10-2017, 05:11 AM
#266
Thread Starter
Join Date: Mar 2009
Location: Saint Paul, MN
Posts: 288
Likes: 0
Received 0 Likes
on
0 Posts
I just got the whole Scorpion Tank printed KITS all back up on my store now if anyone is still interested in ordering one!
Walk-through product page (might be slightly confusing page): https://spykerworkshop.com/shop/comp...on-chassis-kit
OR
Individual products here: https://spykerworkshop.com/product-c.../scorpiontank/
STL files here: https://spyker-workshop.dpdcart.com/product/147208
Walk-through product page (might be slightly confusing page): https://spykerworkshop.com/shop/comp...on-chassis-kit
OR
Individual products here: https://spykerworkshop.com/product-c.../scorpiontank/
STL files here: https://spyker-workshop.dpdcart.com/product/147208
03-19-2017, 03:31 PM
#267
Join Date: Nov 2010
Location: HamiltonWaikato, NEW ZEALAND
Posts: 937
Likes: 0
Received 78 Likes
on
55 Posts
Hi Moo
Nice.
Had an idea using light gathering acrylic rod. I’ve usedthis in the past for weapon sights on airsoft guns, as it provides a brilliantdot for aiming, in normal to low light conditions – doesn’t work in the darkthough.
Drilled a small hole 4mm deep in a 10mm section, cut it fromfull rod, polished the end with a sanding stick, applied it to the Scorpion pianowire aerial end – no glue, just sits there.
The result –
 – if there’s any light in the room,its gathered through the sides & concentrated on the ends, making theaerial ends quite obvious & less of a danger to eyeballs.
Mal
Nice.
Had an idea using light gathering acrylic rod. I’ve usedthis in the past for weapon sights on airsoft guns, as it provides a brilliantdot for aiming, in normal to low light conditions – doesn’t work in the darkthough.
Drilled a small hole 4mm deep in a 10mm section, cut it fromfull rod, polished the end with a sanding stick, applied it to the Scorpion pianowire aerial end – no glue, just sits there.
The result –
Mal
05-12-2017, 04:53 PM
#268
Junior Member
Join Date: May 2017
Posts: 1
Likes: 0
Received 0 Likes
on
0 Posts
Moo - I'm interested in buying a set of the STL files. Can you tell me what sort of plastic you use to print the models that you sell. I'd be using a Zortrax M200 printer and ABS warps on large, flat parts in that printer so I'd prefer to use something like Meltink PLA+PHA. In my experience, though, PLA+PHA doesn't shrink as much as ABS does and since you seem to have really fine-tuned your parts for fit I'm guessing that one would want to use the same sort of filament that you did.
I might also be interested in using my CNC machine tools to make some of the parts - can (or will) you supply part files in formats that are 3D CAD-readable, like STEP or IGES?
Mike
I might also be interested in using my CNC machine tools to make some of the parts - can (or will) you supply part files in formats that are 3D CAD-readable, like STEP or IGES?
Mike
05-13-2017, 02:00 AM
#269
Junior Member
Join Date: Jul 2008
Location: truro, DE
Posts: 14
Likes: 0
Received 0 Likes
on
0 Posts
Hi moo
great job and all the photos of people building them is great. If your selling the files to print your own does that mean you could enlarge the files to print out a 1/6 th one?
will
great job and all the photos of people building them is great. If your selling the files to print your own does that mean you could enlarge the files to print out a 1/6 th one?
will
08-02-2017, 04:42 AM
#270
Thread Starter
Join Date: Mar 2009
Location: Saint Paul, MN
Posts: 288
Likes: 0
Received 0 Likes
on
0 Posts
willhappy - sorry for the delay in reply but just scaling the files up would not work at all, all the hardware and stuff would be way off then. It would need a complete and total re-work to make it into another scale.
I've been working on a new upgrade for the Scorpion! I'm still not sure how well it will work but I've had my transmission gears break on my tank many many times. The blue tamiya gear always seems to break on me. So I found a geared motor to source and use, it has all metal gears, but a much smaller motor runs it. I'm getting the motors in the mail today but here is my progress. It will probably not be as fast as the old transmission but it should be much much much stronger and more reliable. It cuts down on some of the hardware and print time but overall the price would go up on the kits because of the cost of these gearboxes. It should be cheaper once you account for the lack of needing the 370 motors which normally run about 15$ a piece.
If everything works out good I will be selling a conversion kit for this. Would involve removing the sprocket piece from the hull, depending on what glue you used it could be difficult. Then attach the new sprocket ring, and carefully dremel out the hole to 20mm to match as seen in the pic below.
This also makes the sprocket not look really scale anymore, but overall it should be a massive improvement.
This is the gearbox being used here, many gear ratios so I hope the one I decided on will work!
https://www.pololu.com/product/1163
Pictures attached:
Last edited by TheGreatestMoo; 08-02-2017 at 04:46 AM.
08-02-2017, 08:53 AM
#271
Thread Starter
Join Date: Mar 2009
Location: Saint Paul, MN
Posts: 288
Likes: 0
Received 0 Likes
on
0 Posts
Well I got the new geared motors installed in my Scorpion and I'm not sure where to go from here. It is much more quiet operation then the my tamiya transmission, however it is VERY slow. It is slightly slower then my Taigen Sherman tank.
Has anyone else had issues with their gears in the tamiya transmission?
I was running "Venom" 370 motors which I think are higher RPM then the stock 370's maybe mine was just too much power?
Has anyone else had issues with their gears in the tamiya transmission?
I was running "Venom" 370 motors which I think are higher RPM then the stock 370's maybe mine was just too much power?
08-02-2017, 10:39 AM
#272
Which ratio did you use?
 08-02-2017, 12:32 PM
#273
Thread Starter
Join Date: Mar 2009
Location: Saint Paul, MN
Posts: 288
Likes: 0
Received 0 Likes
on
0 Posts
I used the 73:1 ratio one ~180 RPM. It is about just strong enough, I think if I went to a faster RPM it would not have enough torque or over heat the motors. So IDK what to do really. I've been trying to figure out how to get the tamiya gears machined in brass or steel but I'm getting just INSANE quotes from companies. Like $8000+ each gear....? How do other RC companies have their gears made, anyone know?
08-03-2017, 03:25 AM
#275
Thread Starter
Join Date: Mar 2009
Location: Saint Paul, MN
Posts: 288
Likes: 0
Received 0 Likes
on
0 Posts
Gear is too small for shapeways to print, tried to.
I ordered myself a bar of brass, going to attempt to machine a gear myself on my mini CNC, but I'm not too hopeful lol but we will see.
Still searching for alternatives. Quotes from companies are seriously insane though, I probably just can't find the right place to make something like this.
I ordered myself a bar of brass, going to attempt to machine a gear myself on my mini CNC, but I'm not too hopeful lol but we will see.
Still searching for alternatives. Quotes from companies are seriously insane though, I probably just can't find the right place to make something like this.