


M4 75mm small hatch build
 03-25-2017 | 08:50 PM
#26

Thread Starter

Wow I still cant believe this thread is still on one page.
Well, Im working to get this tan finished by the summer D-Day Tank Fest at the LA museum. Its our biggest battle of the year.
Got around to starting all the front detail work. Im scratch building most of it either cause the parts aren't produced or Im just trying to save money and make them myself.
Still along way to go.....
.
 04-17-2017 | 08:51 PM
#27
Thread Starter
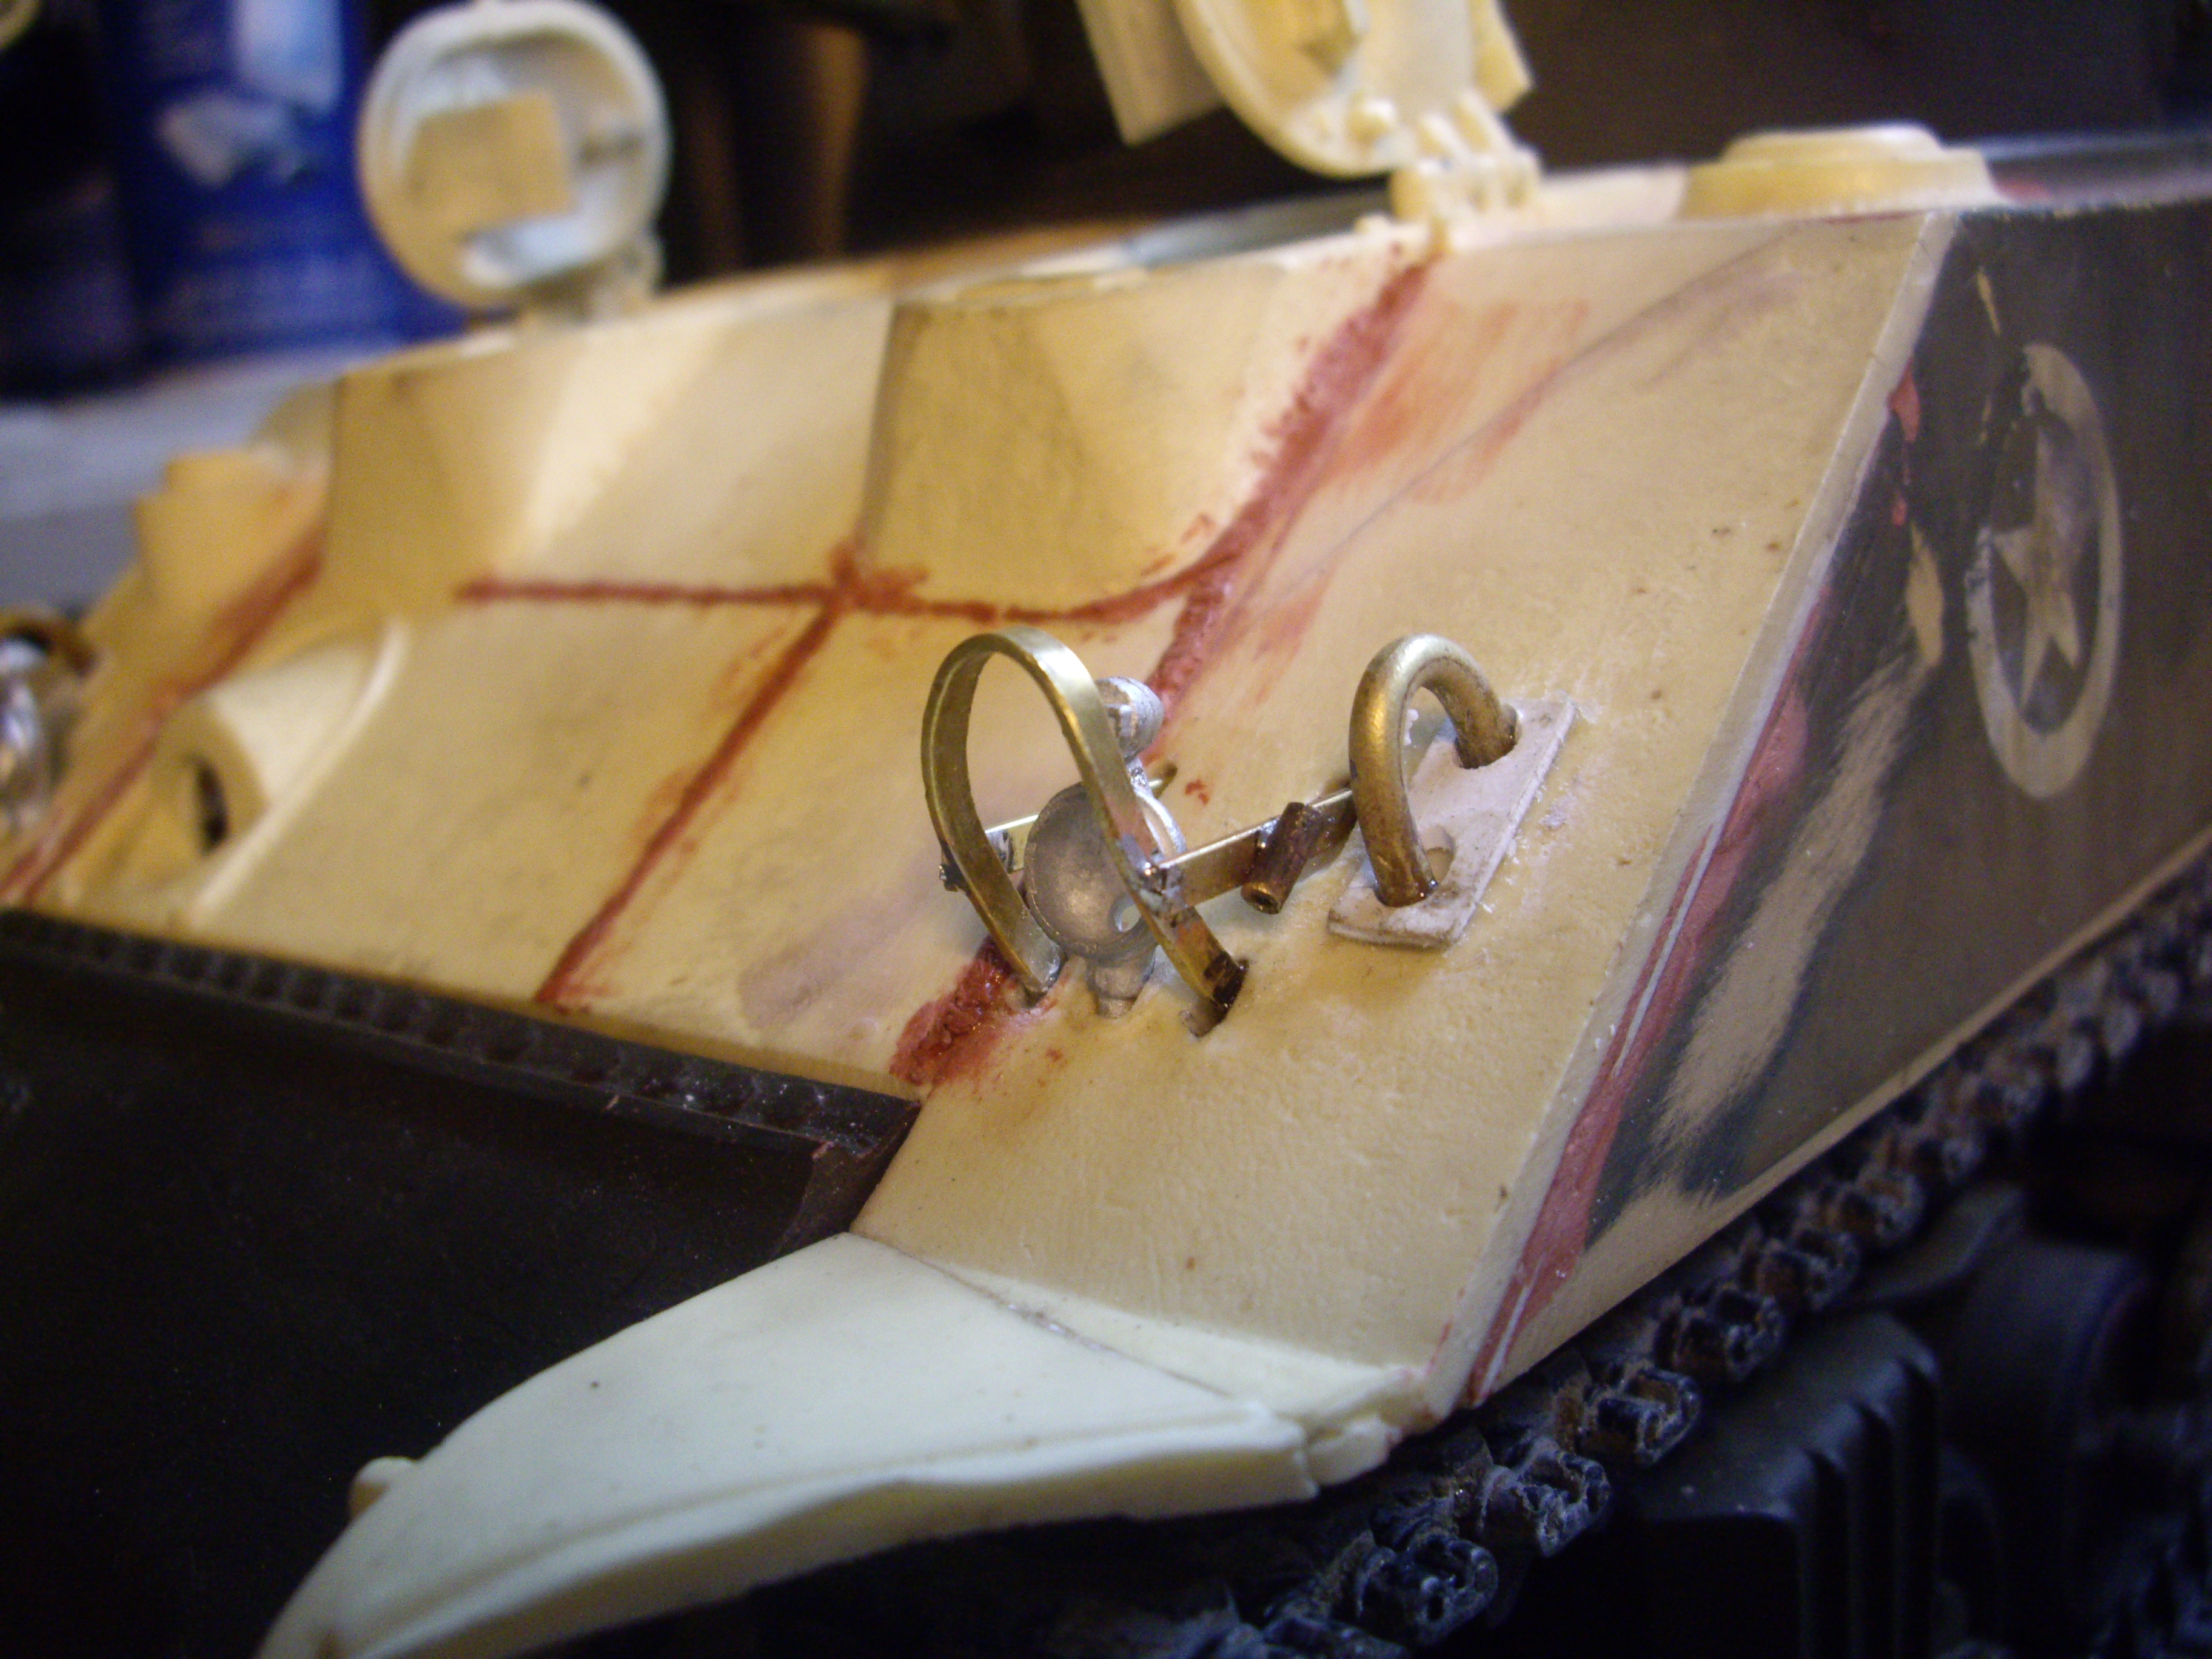
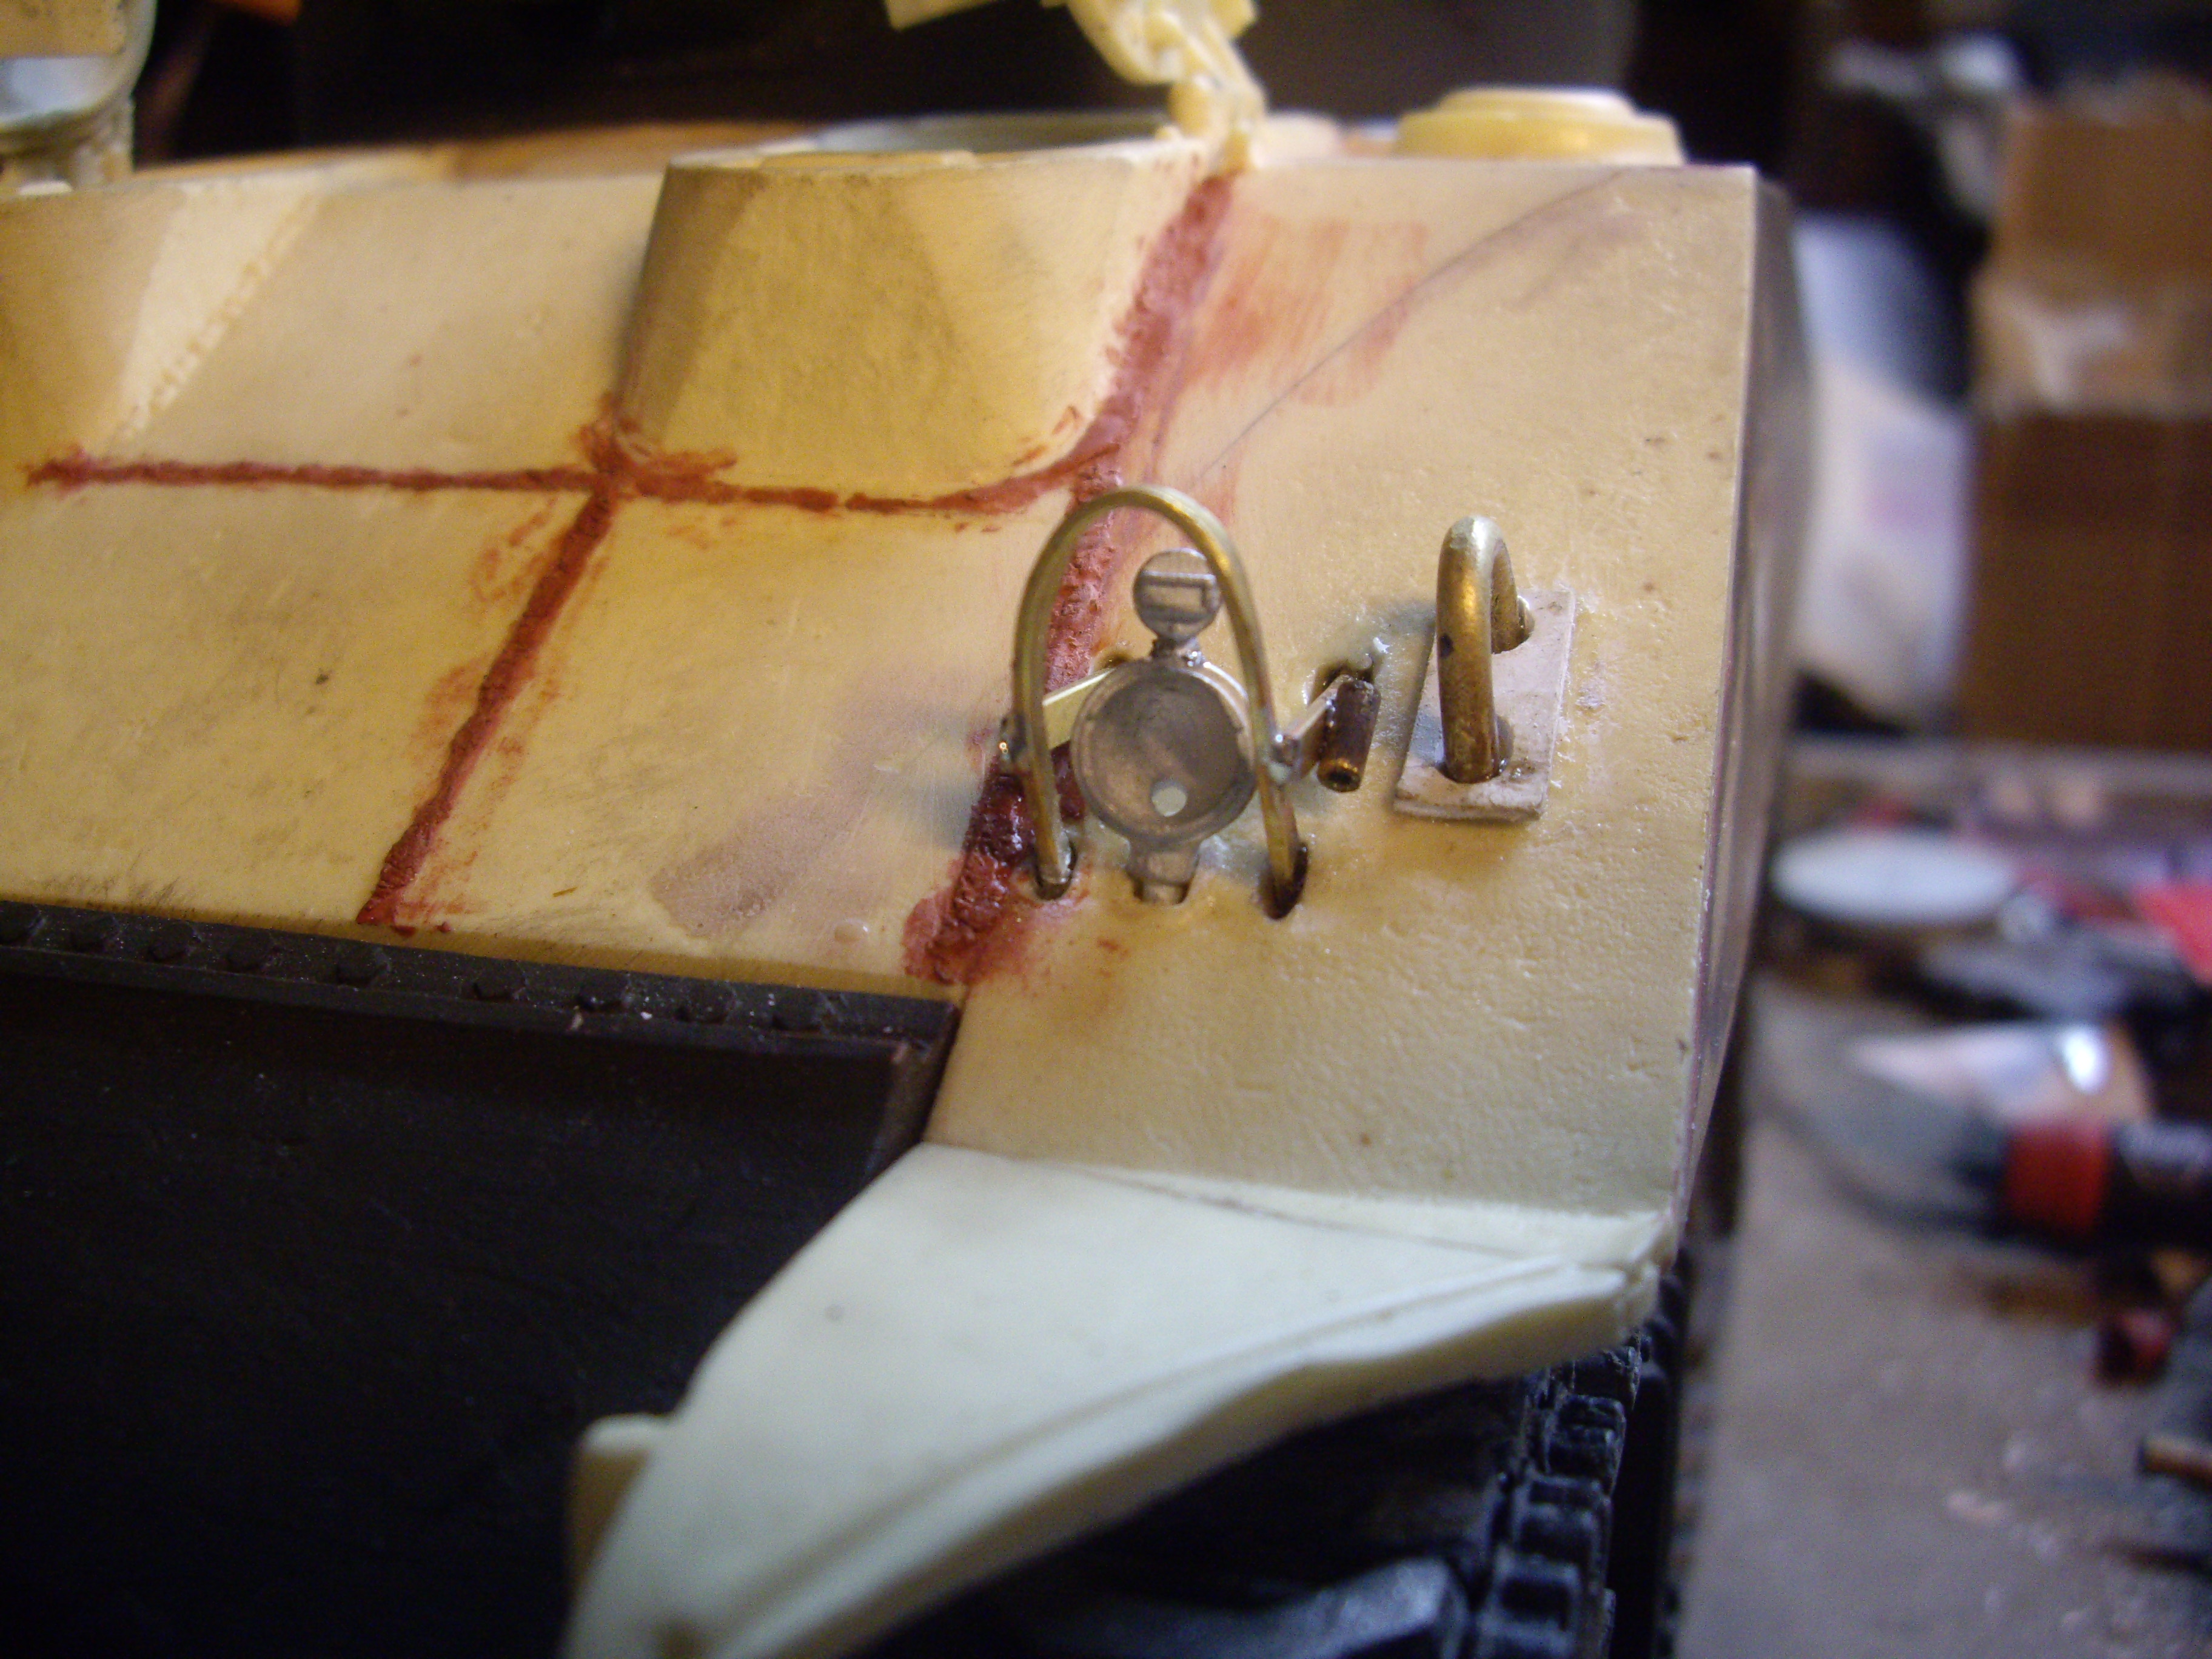
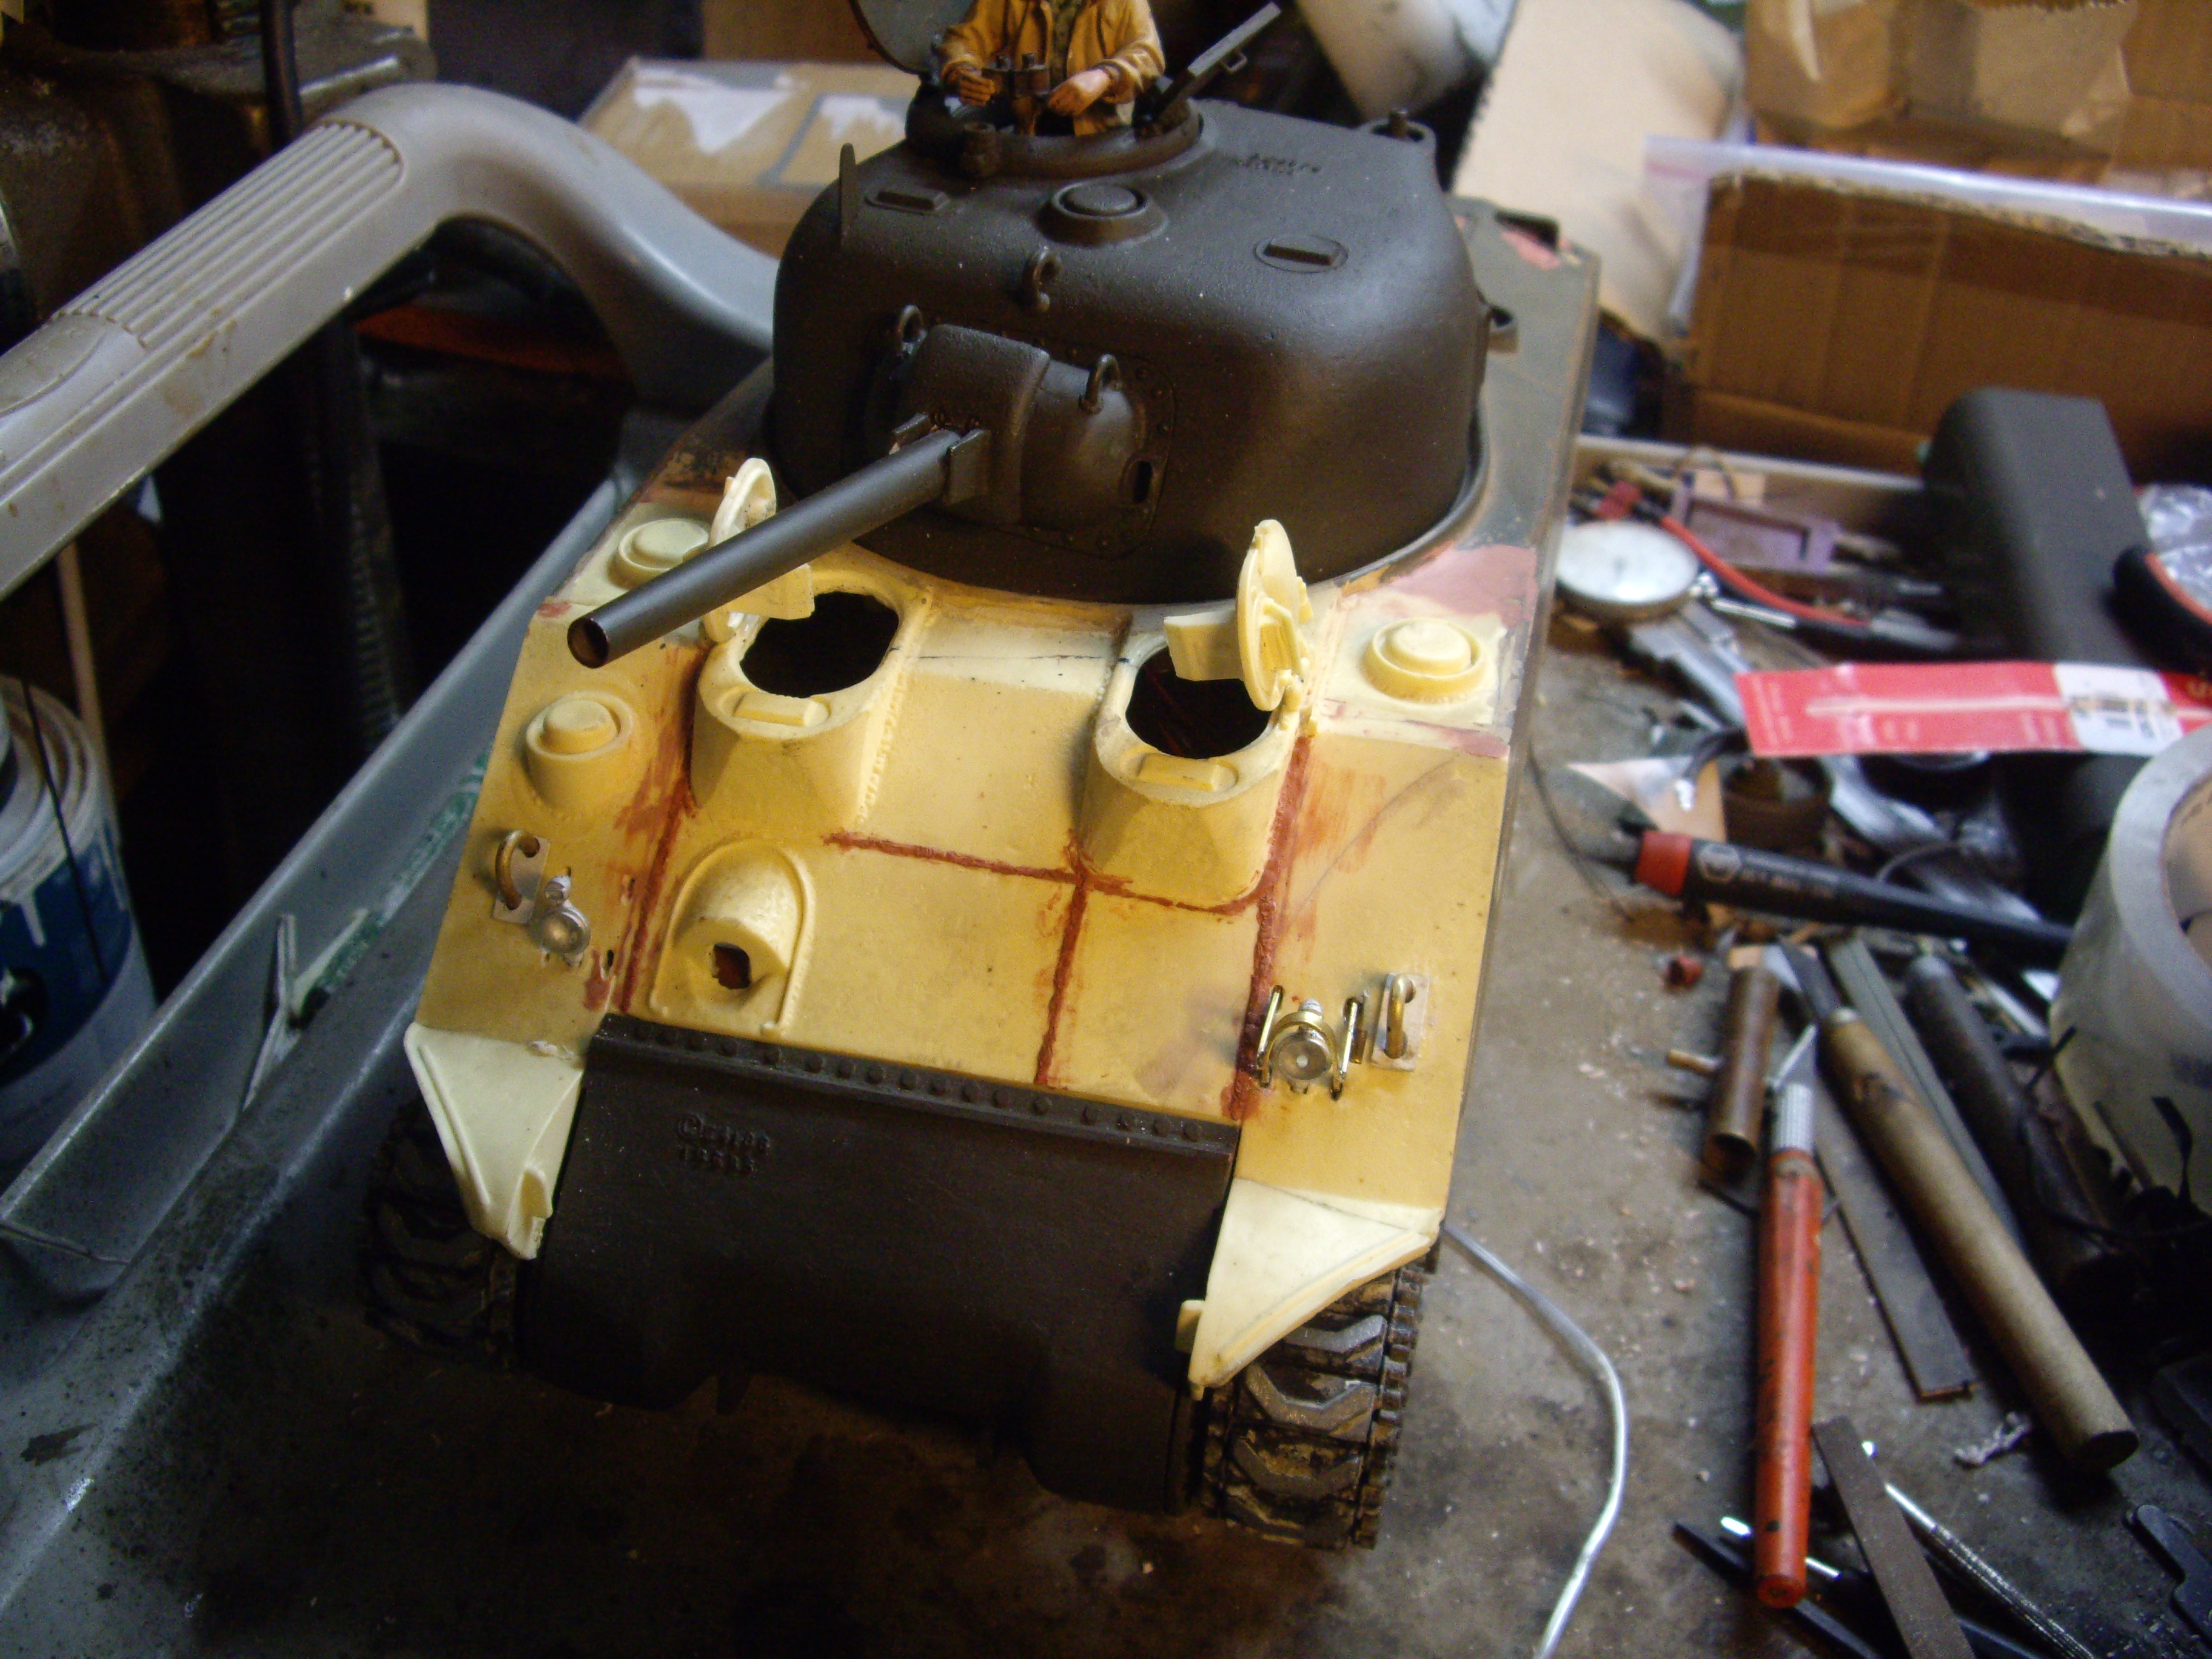
Ok the front is just about done now. I am really happy with my custom made brush guards. The hatches are drilled and hinge pinned now and all the bondo is on. Maybe a tad of cleanup on the weld joints on the brush guards and lift rings and I will move to the back and rear deck work. Trying really hard to get it done by DDay battle.

04-18-2017 | 01:17 PM
#30
Thread Starter
I guess pictures arent coming through now that the board has updated to some other bbs type. None of my previous pictures are showing...
im using an IBU2 and no smokers. I despise them for many reasons. My tanks are scale models for me that that do IR combat. I cant stand smokers in my model trains either.... Just not my thing....
im using an IBU2 and no smokers. I despise them for many reasons. My tanks are scale models for me that that do IR combat. I cant stand smokers in my model trains either.... Just not my thing....
04-27-2017 | 09:11 AM
#31
Junior Member
Joined: Apr 2017
Posts: 1
Likes: 0
Received 0 Likes
on
0 Posts
Hi Rich, I was told that you're the guru of shermans. Is there a way I can contact you for some advise?
i have a Tamiya sherman. I want to buy a taigen 76mm gun and turret I/R to put on my ez-8. Can this be done? If not what or who do you advise to use/purchase the best working turret and gun.
Thanks, Jeff.
i have a Tamiya sherman. I want to buy a taigen 76mm gun and turret I/R to put on my ez-8. Can this be done? If not what or who do you advise to use/purchase the best working turret and gun.
Thanks, Jeff.
04-27-2017 | 11:39 AM
#32
Thread Starter
Fatboy I sent you a PM.
but for the sake of the board I will reply in general.
there are three options for the ez8 right now. Nick Aguilar makes an addition kit from urethane for the tamiya sherman but it is not for the unskilled modeler. Lots of effort and skill are needed to make the turret equipment fit amd work. A search of my started threads will bring up my build like this and show How I did it.
Axels Model Beau supposedly also sells a T23 turret kit, the you still have to convert the rear deck. Their turret looks nice but I have no experience using it.
The easy way is get a Taigen upper hull and turret and mount them on the tamiya chassis. They fit right on. Then cut off the front fenders. Make the side skirt rail and supports and make new front fenders the full width out to the side skirt rail.
My friend did this recently.
Last edited by RichJohnson; 05-23-2017 at 04:12 PM.
05-09-2017 | 08:21 AM
#33
Thread Starter
Ok trying the Ipad photos this time,lets see if it works.
got more work done on the tools and rear armor and lift rings and such. So much work to detail out this model. Stil plenty more work planned.
got more work done on the tools and rear armor and lift rings and such. So much work to detail out this model. Stil plenty more work planned.
05-09-2017 | 08:24 AM
#34
Thread Starter
So it looks like even though there are several photo slots to upload a bunch at one the post will only allow one photo in it with this software bbs from an Ipad....
05-23-2017 | 09:53 AM
#35
Thread Starter
Just about done. Footman loops installed, tool mounting finished. Now just need maybe to make one more footman on the back, need to verify with photos then primer the hull.
still have to finish grinding the a3 door off the rear chassis but that will come while i paint.
still have to finish grinding the a3 door off the rear chassis but that will come while i paint.
05-26-2017 | 05:31 AM
#36
Thread Starter
So I finished grinding off the A3 rear engine access door and one of the two tow shackle tabs. Then bondo and sand and paint. I added the rear armor plate on the sides that protects the filter boxes, that was fun as I accidently copied a Baldwin m4 then I found a better picture that was an Alco, so I re made them. I filled in the rear corners of the upper hull by boxing them in more just for support of the armor plate which I used plexi to make. Then the styrene angled pieces are the remanents of the sand shield system. Seems they were welded to the armor plates so they all lasted in some sort of condition to today as most photos show them still there, though usually bent up or cut down. I left them angled hanging out the rear as if the sand shields had been removed recently, it looks odd but that's what they look like.
The filter boxes are Tamiya but Im not using them, Alco had a stepped down cylinder type filter canister so I am going to have to fab that myself. Every time I look at the tank I see more work that needs to get done. Im going to paint the upper hull today, prime really, then paint this weekend. I will come back and fab the filter cans, I don't even have styrene tube that big on hand.
The filter boxes are Tamiya but Im not using them, Alco had a stepped down cylinder type filter canister so I am going to have to fab that myself. Every time I look at the tank I see more work that needs to get done. Im going to paint the upper hull today, prime really, then paint this weekend. I will come back and fab the filter cans, I don't even have styrene tube that big on hand.
05-28-2017 | 05:43 AM
#37
Rich, this is absolutely STUNNING work!! I've been studying your pictures here to see the fine Sherman details.
I have a LOT of books on the Sherman and I've been wearing them out researching what goes exactly where. BUT I CAN NOT find any CLOSE UP pics of the turret gunners' periscope (the one right in front of the commanders' hatch. Even on the web, all the pics are at a distance and hard to make out. This Sherman book I purchased a few months ago is outstanding in detail pics but not that much for the periscopes.
Where can I get pics of the gunners' turret periscope for an early M4A3 (75) small hatch Sherman?
Mike
05-28-2017 | 06:12 AM
#38
Thread Starter
It was pretty much exactly the same as the ones in the driver hatches. Various manufacturers added the wire frame brush guard over it around summer to fall 1943. Hence mine doesn't have it.
This should help Sherman 75mm turrets
This should help Sherman 75mm turrets
05-28-2017 | 06:38 AM
#39
Thanks Rich!
I'm not putting a guard around this gunners' periscope either. This turret has a ridge (rim) around the mount but I think I'm going to make it flush from what I can tell by the pictures. And a couple of screw heads on each side of the periscope.
Mike (sure wish I could post pics on here...)
I'm not putting a guard around this gunners' periscope either. This turret has a ridge (rim) around the mount but I think I'm going to make it flush from what I can tell by the pictures. And a couple of screw heads on each side of the periscope.
Mike (sure wish I could post pics on here...)
05-28-2017 | 07:47 AM
#41
PM sent.
It's a D50878 turret cast by Continental Foundry and Machine Company in East Chicago, Indiana. Turrets were also cast by this company in Wheeling, West Virginia.
I got gunners' periscope figured out now. It'll be easier than I thought it'd be. Thanks!
Mike
It's a D50878 turret cast by Continental Foundry and Machine Company in East Chicago, Indiana. Turrets were also cast by this company in Wheeling, West Virginia.
I got gunners' periscope figured out now. It'll be easier than I thought it'd be. Thanks!
Mike
Last edited by Old MSgt; 05-28-2017 at 01:46 PM.
05-30-2017 | 05:51 AM
#42
Thread Starter
Ok been power building all weekend trying to finish by our big D Day battle at the El Monte Museum for LA Tank fest.
Got my paint job done, my tools installed and strapped and started working on my stowage while I was home. While I was mobile I was researching units to label it.
Im thinking 751st Tank Battalion B co Anzio 1943.
Yes, I have not finished the air filters. I need to fab the oil bath filter housings because they are different than tamyia and I just don't have time. That will have to come in the future.
03-14-2018 | 08:17 PM
#46
Thread Starter
I finally got the siren installed. I had made two different ones that I didn't like and then two weeks ago I cam upon a new item on shapeways. Also found a new addition there of tow shackles for the Sherman so I bought both and got them set and installed. Now, she's done.
https://www.shapeways.com/product/85...li=marketplace
https://www.shapeways.com/product/RZ...118&li=ostatus
https://www.shapeways.com/product/85...li=marketplace
https://www.shapeways.com/product/RZ...118&li=ostatus


