


Armortek Leichter Panzersp‰hwagen Sd.Kfz.222 rebuild
 04-17-2016, 01:17 PM
#1

Thread Starter

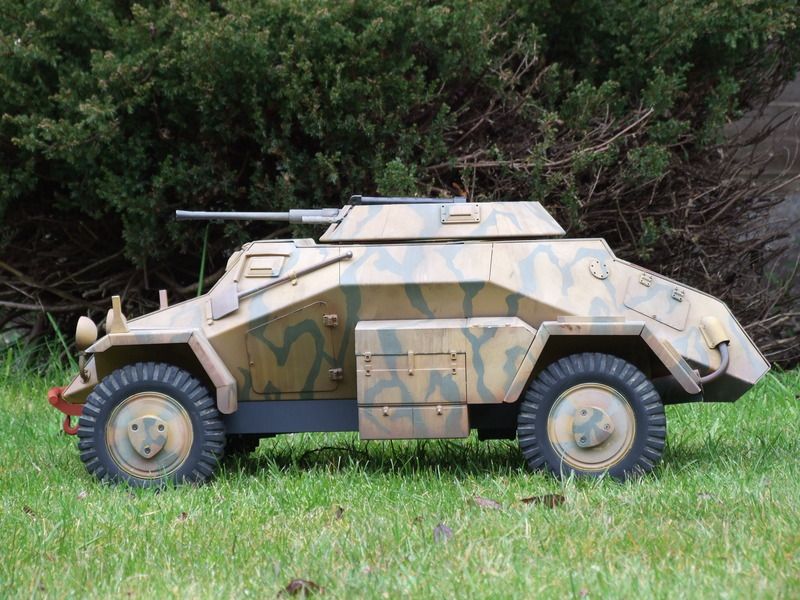
A few months ago I bought a second-hand 1/6 scale Armortek Leichter Panzersp‰hwagen Sd.Kfz.222 the rebuild will be done in two parts first will be the Fahrgestell second will be the Panzeraufbau this will include the Turm and 2cm Flak 38.
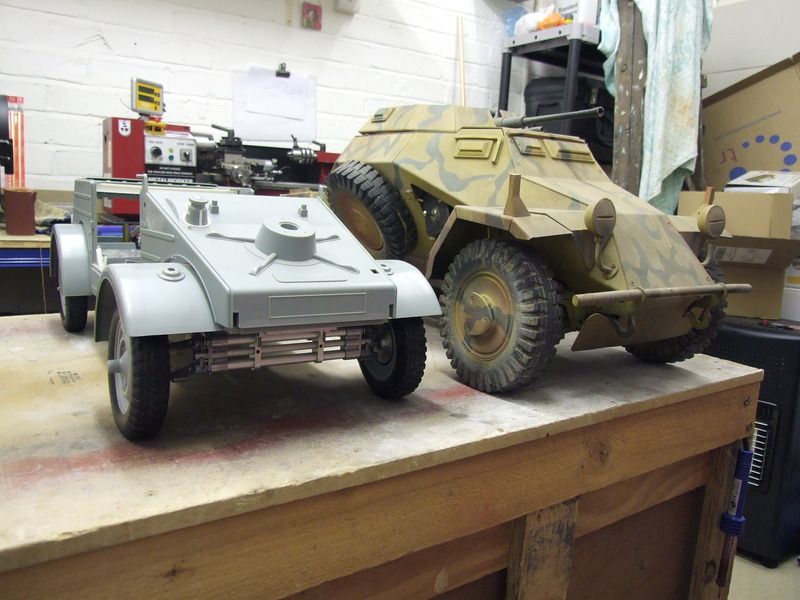
Unfortunately I didnít take any pictures of the Panzersp‰hwagen before I started the rebuild this picture with my K¸belwagen shows the size difference.
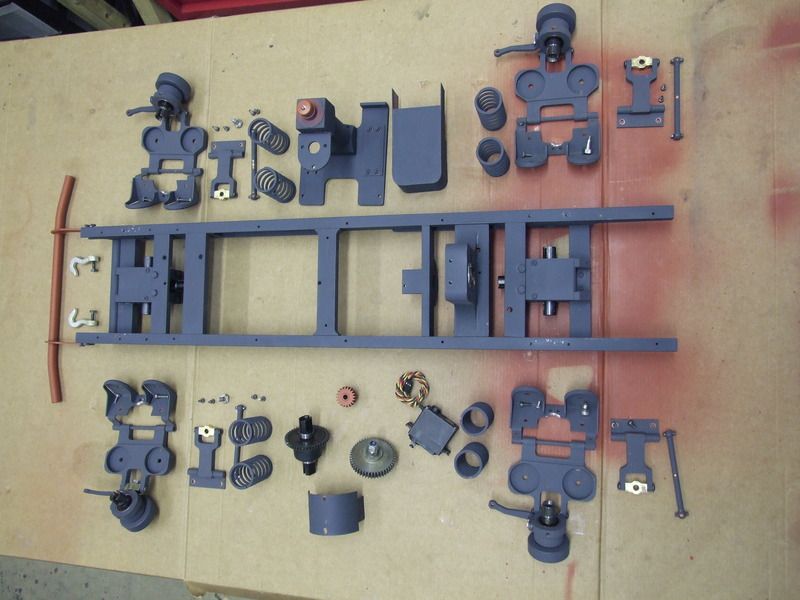
The project begins with stripping everything down to single components stripping of original paint and readying for various layers of paint, all alloy parts are fist coated with acid etch primer then red oxide and finally dunkelgrau RAL7021 this will be changed at a later date to dunkelgelb RAL7028
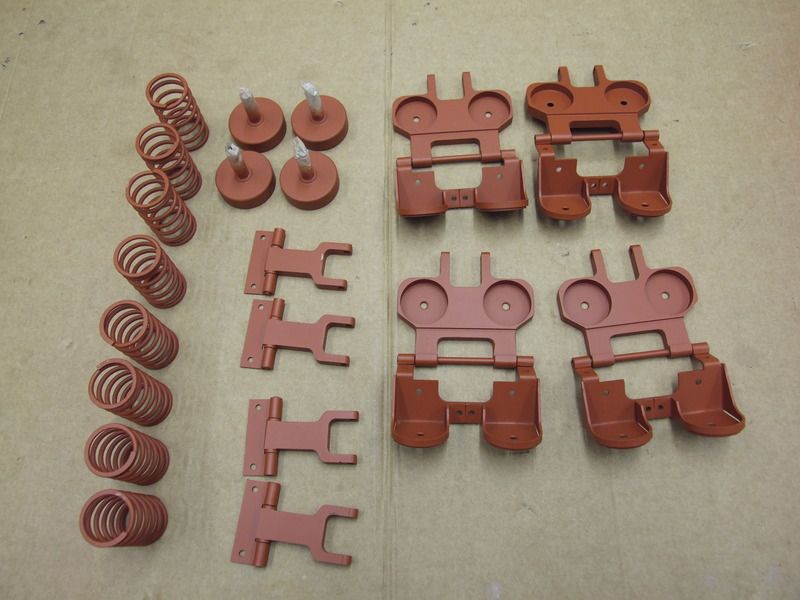
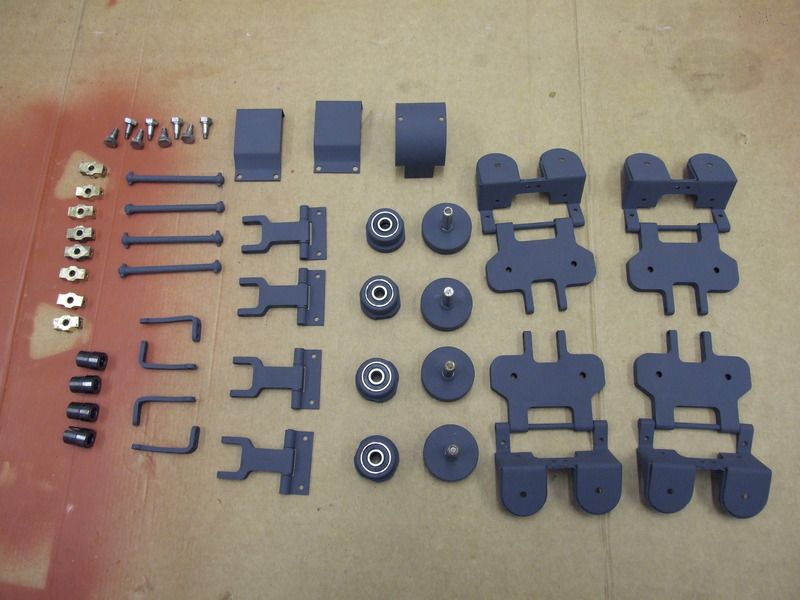
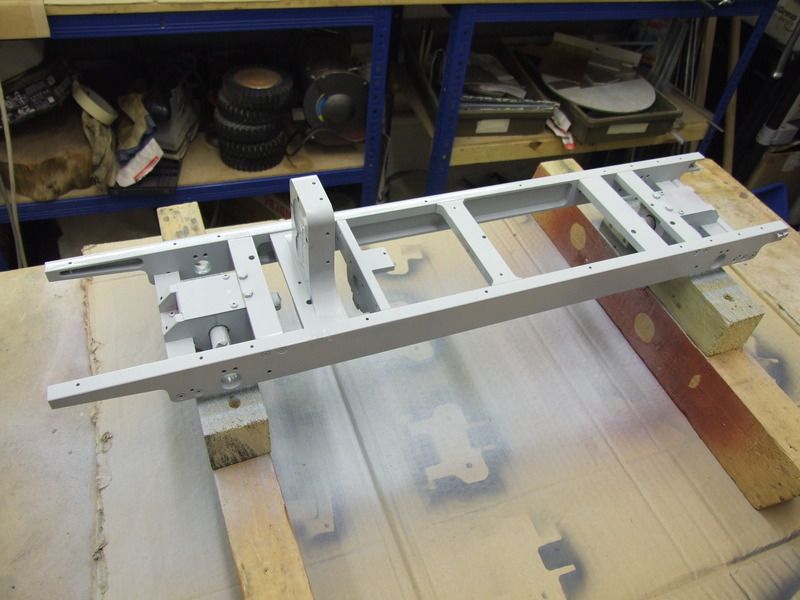
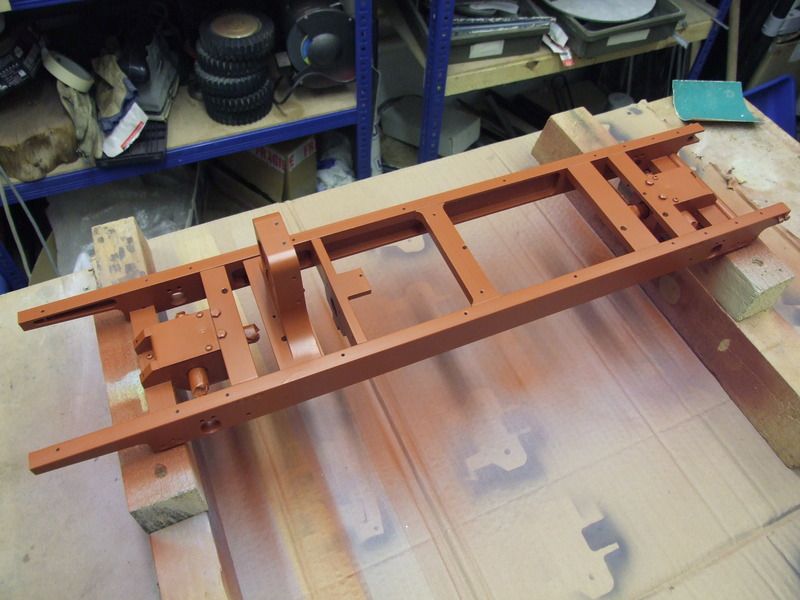
Once everything was painted all parts were laid out ready for rebuild all screws that required Locktite 222 had this applied during the rebuild
Unfortunately I didnít take any pictures of the Panzersp‰hwagen before I started the rebuild this picture with my K¸belwagen shows the size difference.
The project begins with stripping everything down to single components stripping of original paint and readying for various layers of paint, all alloy parts are fist coated with acid etch primer then red oxide and finally dunkelgrau RAL7021 this will be changed at a later date to dunkelgelb RAL7028
Once everything was painted all parts were laid out ready for rebuild all screws that required Locktite 222 had this applied during the rebuild
 04-18-2016, 12:49 PM
#3
Thread Starter
Yes it came with the motion pack sound won’t be difficult to add and I will be using a Benadini sound system including LED’s for the MG34 and 2cm Flak gun.
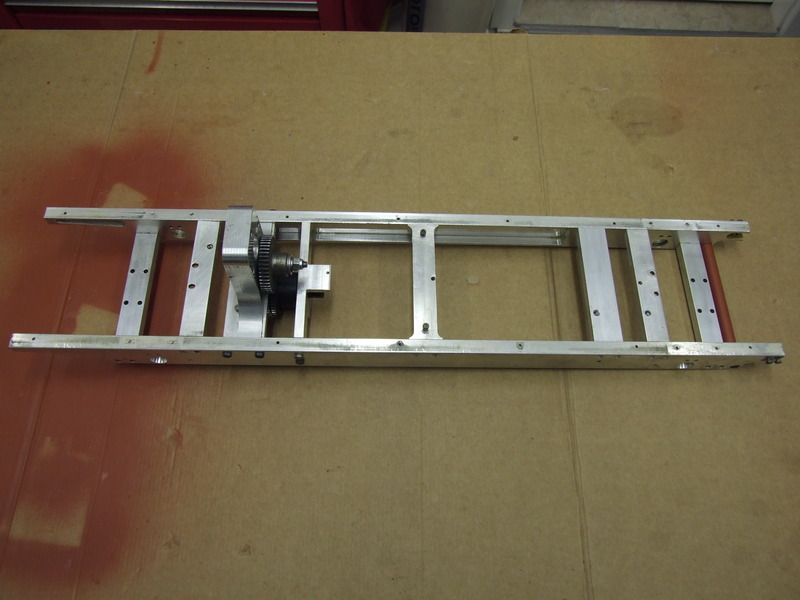
This is the re-built Fahrgestell ready for testing


This is the re-built Fahrgestell ready for testing
04-18-2016, 02:07 PM
#4
Wow, that is big and your work is really good. I have always wanted a 1/6 scale tank, Stug or Panzer III.
04-18-2016, 11:48 PM
#5
Thread Starter
It’s not that large when I have the upper hull on the chassis I will take some pictures and measurements it’s not that much longer than the K¸belwagen
04-26-2016, 01:36 PM
#6
Thread Starter
Gary I bought a few cans back in 2010 it was £12 per can then, I was surprised at the price when I bought the latest one.
The 222 is now back together and has been tested ready for Munster in a few weeks’ time when I return I will start detailing the Panzeraufbau and give the whole model a full respray.
The 222 is now back together and has been tested ready for Munster in a few weeks’ time when I return I will start detailing the Panzeraufbau and give the whole model a full respray.
 04-29-2016, 12:45 PM
#11
Like the new Camo scheme.
05-08-2016, 11:43 PM
#13
Thread Starter
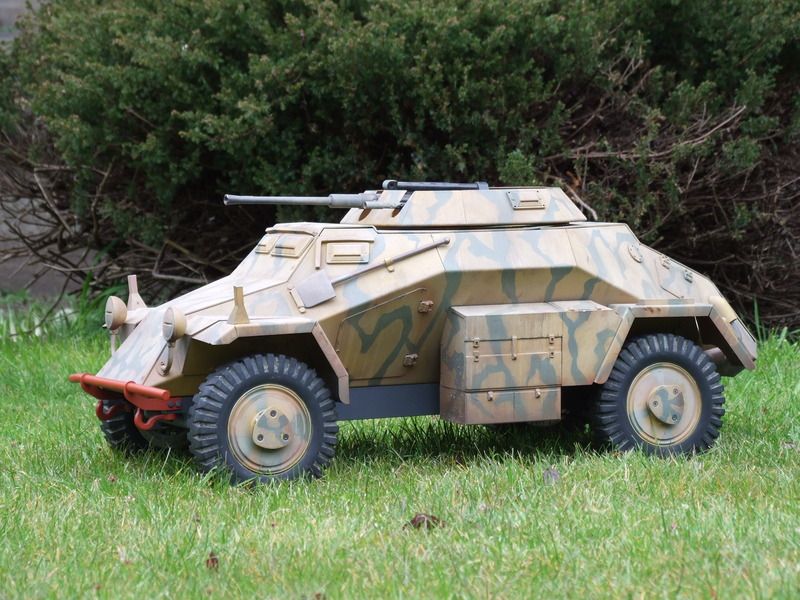
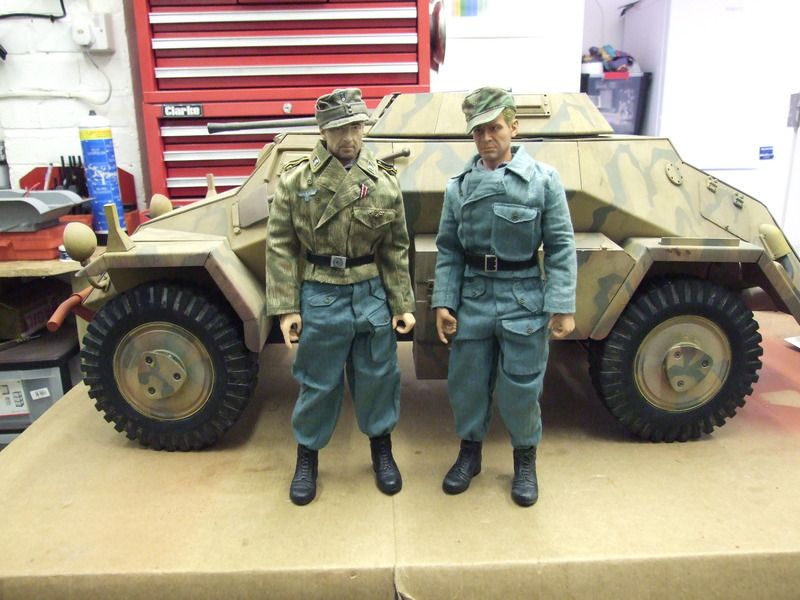
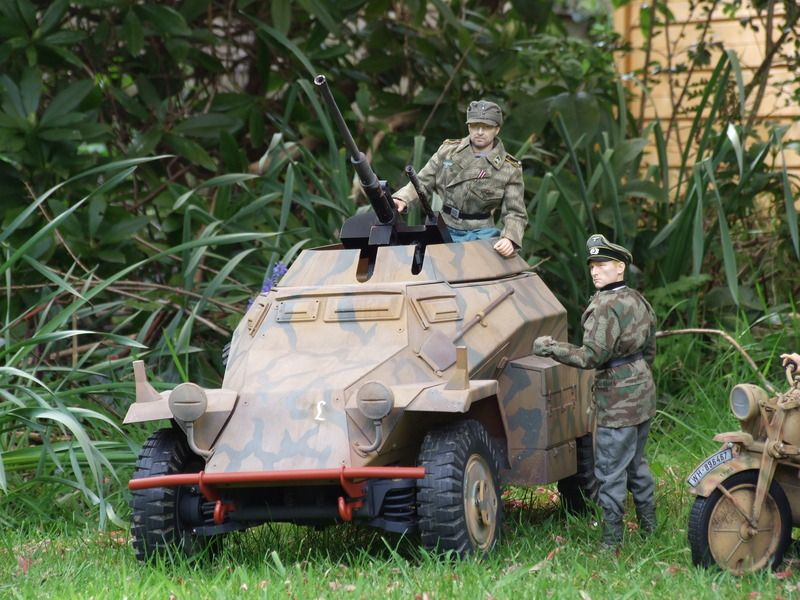
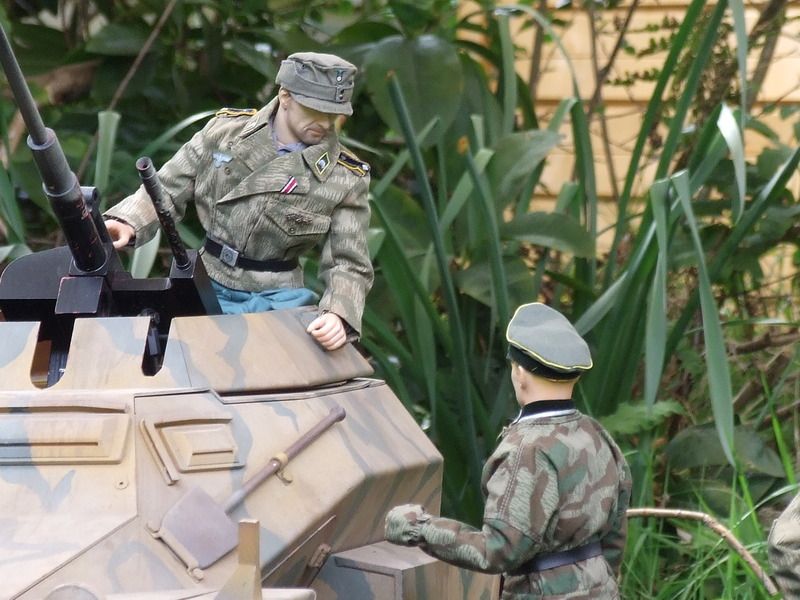
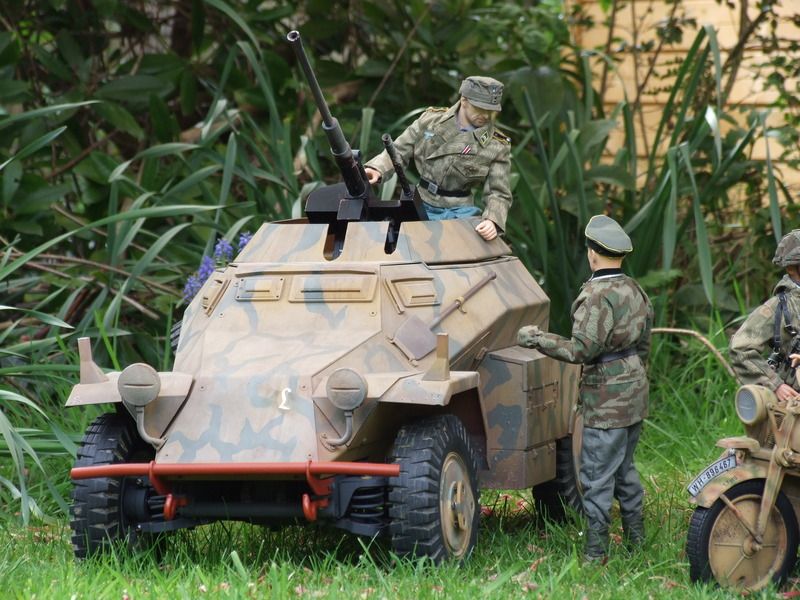
While the weather has been nice over the weekend I took the Panzersp‰hwagen out into the garden for some pictures complete with x2 dolly’s I have put together for the crew the commander in the Sumpftarnung is a Feldwebel the other in the reed green denims, the Panzersp‰hwagen has divisional markings of Panzer-Aufkl‰rungs-Lehr-Abteilung 130 by the Normandy campaign Panzer-Aufkl‰rungs-Lehr-Abteilung 130 was using Sd.Kfz.234/2 Puma, I have found pictures of Panzer-Aufkl‰rungs-Lehr with Sd.Kfz.222 but these must have been handed in when they received the Puma.
06-30-2016, 12:27 PM
#14
Thread Starter
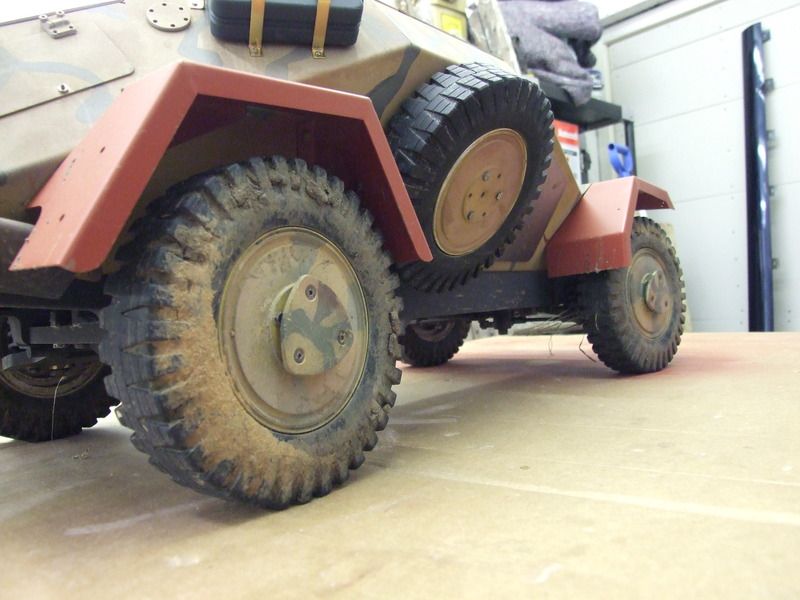
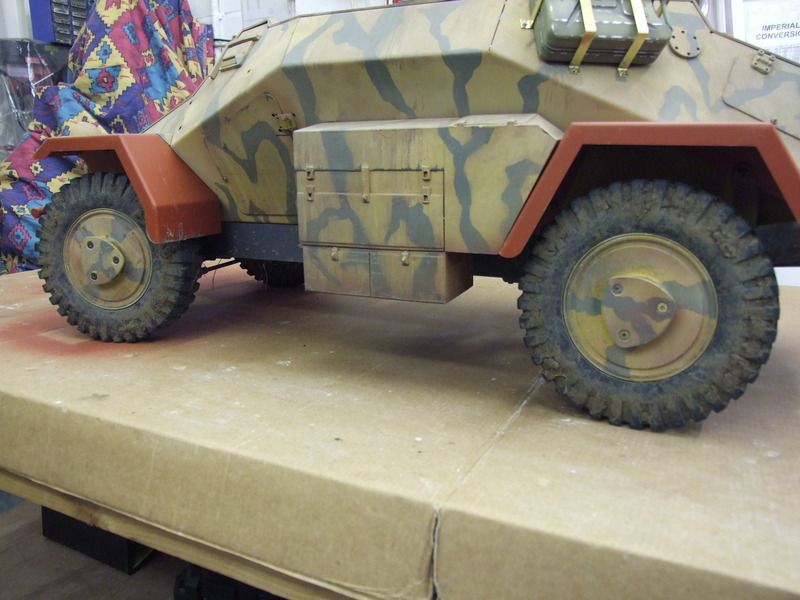
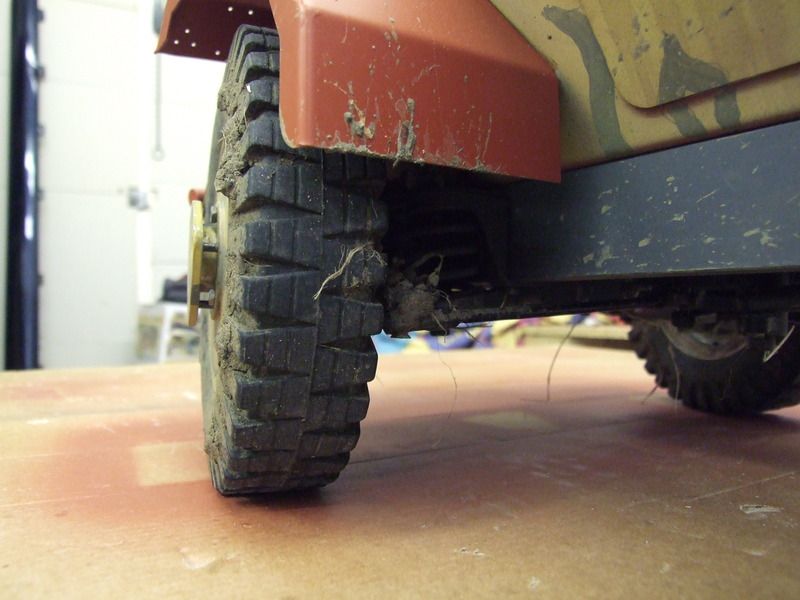
Unfortunately during recent tests I didn’t take any action shots of the 222 traversing hills, uneven ground and mud but I have a few after the event pictures in my workshop.
 [/URL]
So works commences on the Panzersp‰hwagen with the Panzeraufbau completely stripped down and in the process of being prepared ready for reassembly and brazing the Panzeraufbau to give more strength, to strip the paint down to bare metal I use standard thinners this works rather well.
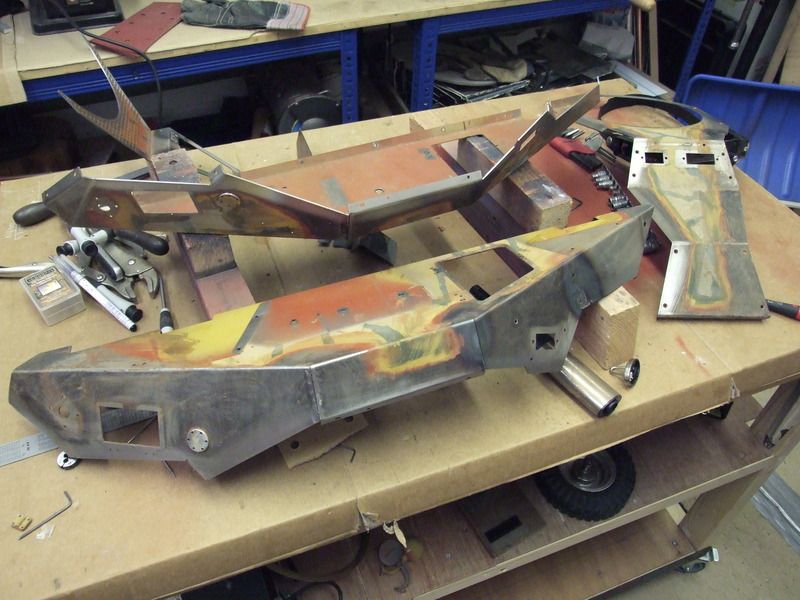
[/URL]So works commences on the Panzersp‰hwagen with the Panzeraufbau completely stripped down and in the process of being prepared ready for reassembly and brazing the Panzeraufbau to give more strength, to strip the paint down to bare metal I use standard thinners this works rather well.
07-02-2016, 07:56 AM
#15
Nice strip down.
07-28-2016, 01:43 PM
#16
Thread Starter
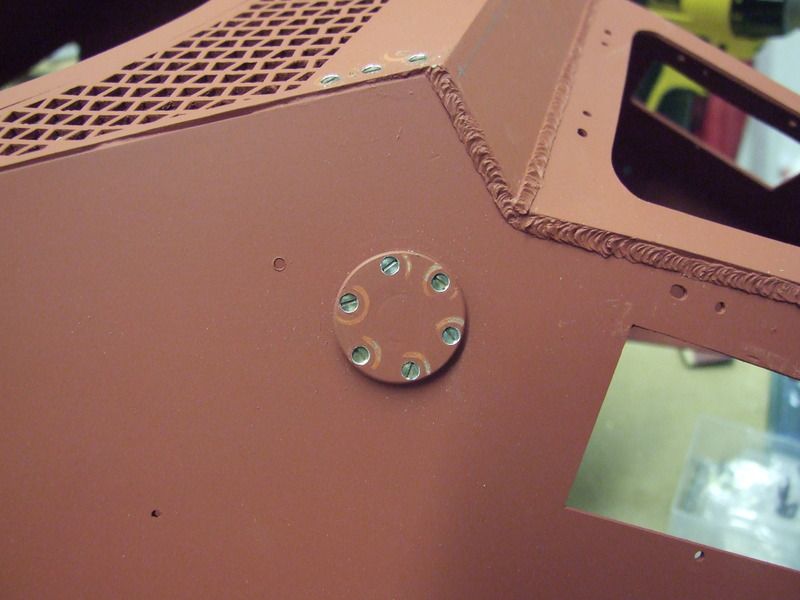
With the Panzeraufbau from the Panzersp‰hwagen re-assembled I wanted to make this more rigid especially where there are no brackets to bolt sections together so I decided to add strength the only way was to braze the Panzeraufbau sections this also helps with the weld lines

Another feature I wanted to improve was the radius on the folds I wanted them to have sharp edges for this I applied some resin then sanded this down to give a smooth surface and my sharp edges , the I started to apply some weld lines using one of my usual techniques.


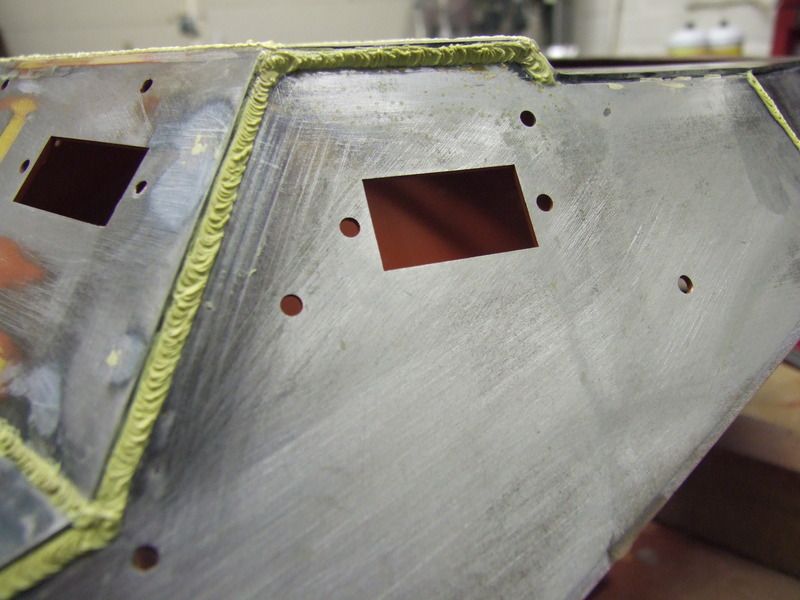
I also added an alloy plate to the front this shows the increased armour on the front plate for the 5 series Sd.Kfz.222

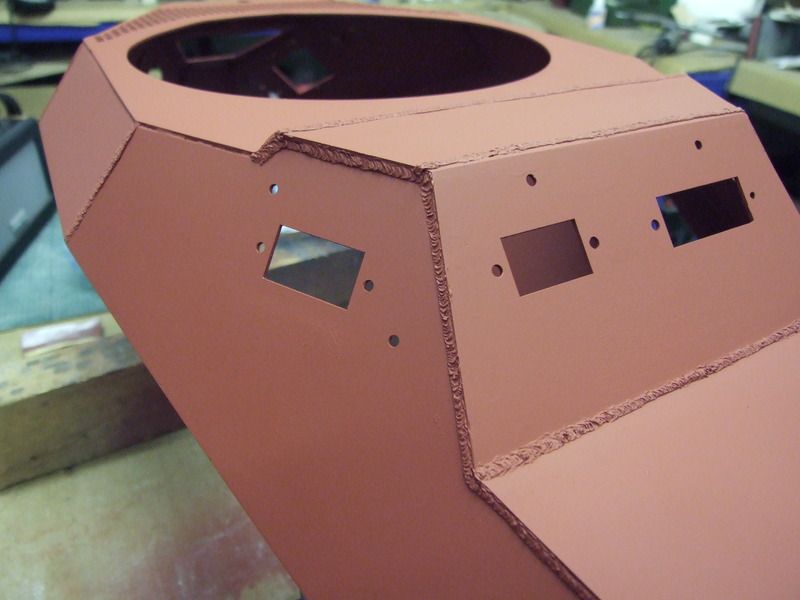
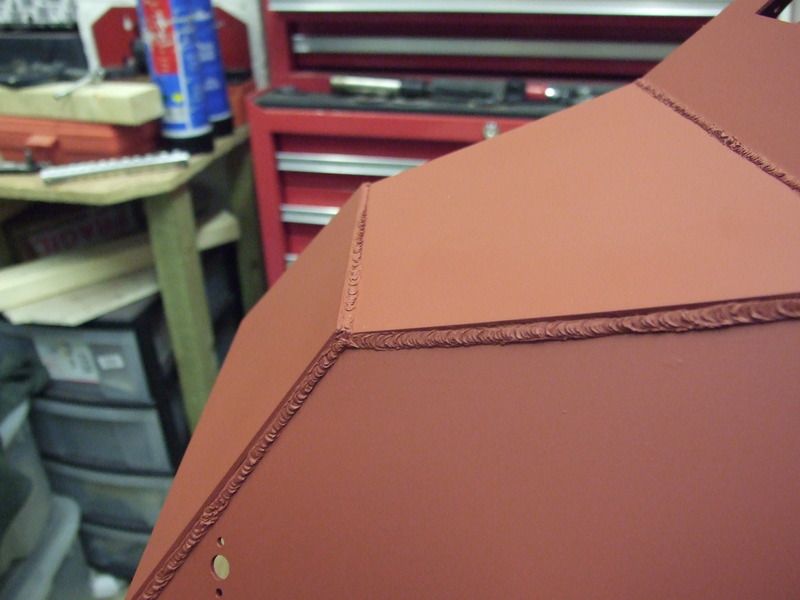
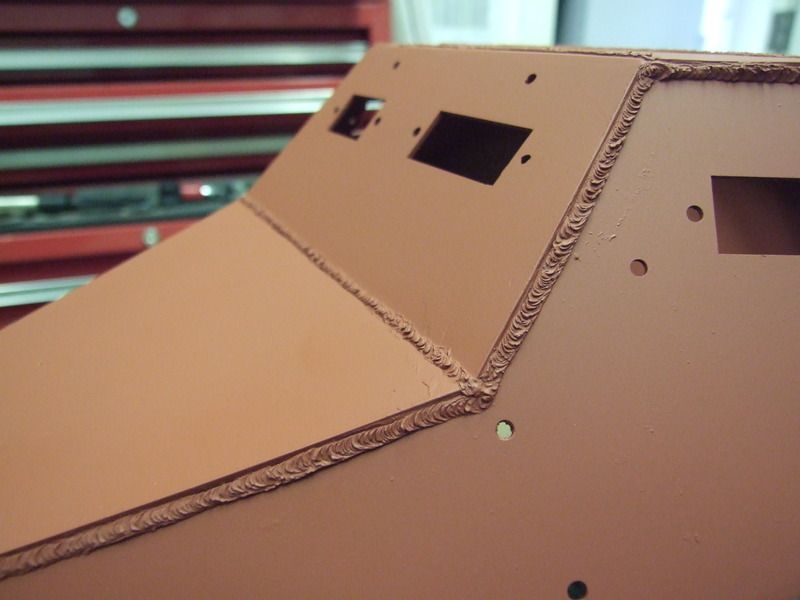
Then with a fresh coat of red oxide primer applied I started to add some missing detail such as the bullet guards and the water filler cap then added some bolt detail.
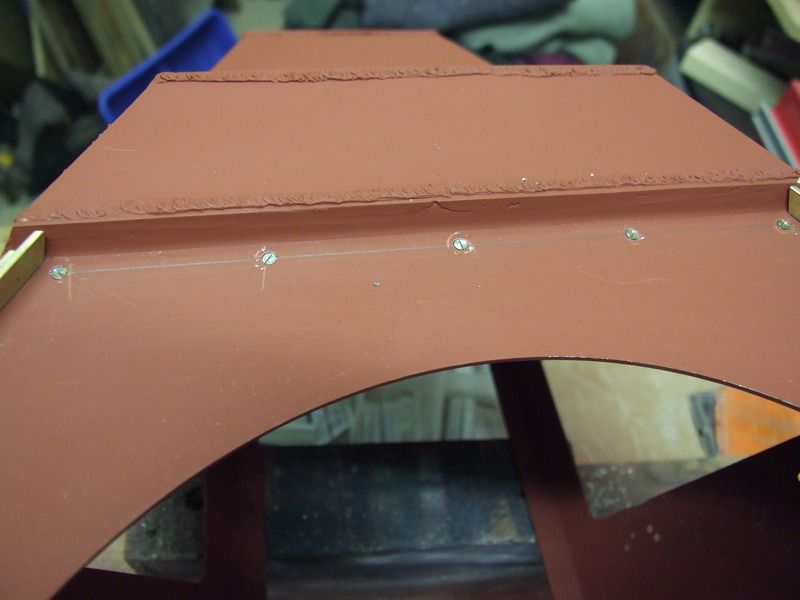
More detail will be added as and when I have more spare time.
Another feature I wanted to improve was the radius on the folds I wanted them to have sharp edges for this I applied some resin then sanded this down to give a smooth surface and my sharp edges , the I started to apply some weld lines using one of my usual techniques.
I also added an alloy plate to the front this shows the increased armour on the front plate for the 5 series Sd.Kfz.222
Then with a fresh coat of red oxide primer applied I started to add some missing detail such as the bullet guards and the water filler cap then added some bolt detail.
More detail will be added as and when I have more spare time.
07-29-2016, 05:24 AM
#17
Total strip down and weld bead detail looks great!!!!
10-09-2016, 01:58 PM
#18
Thread Starter
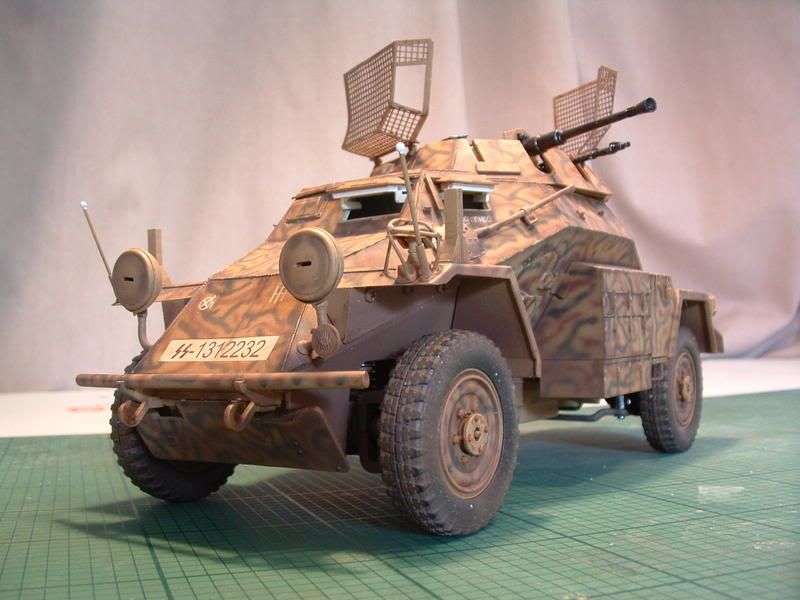
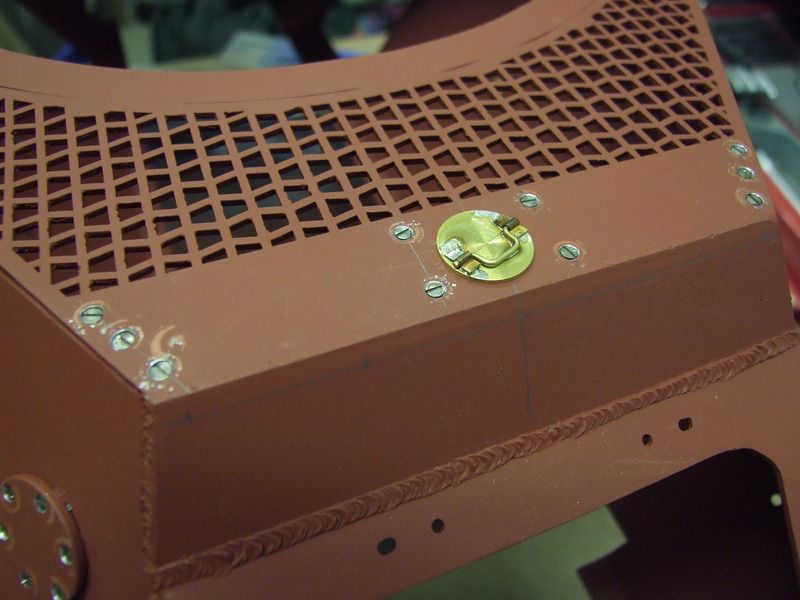
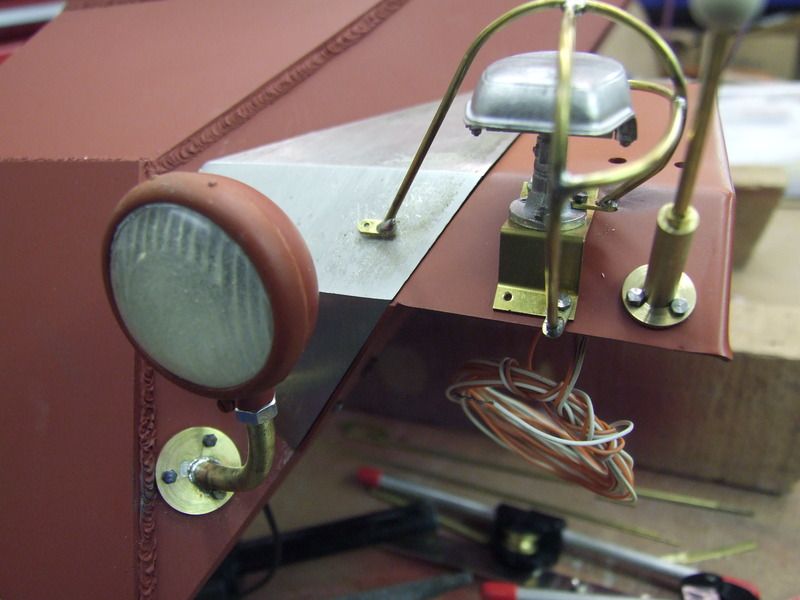
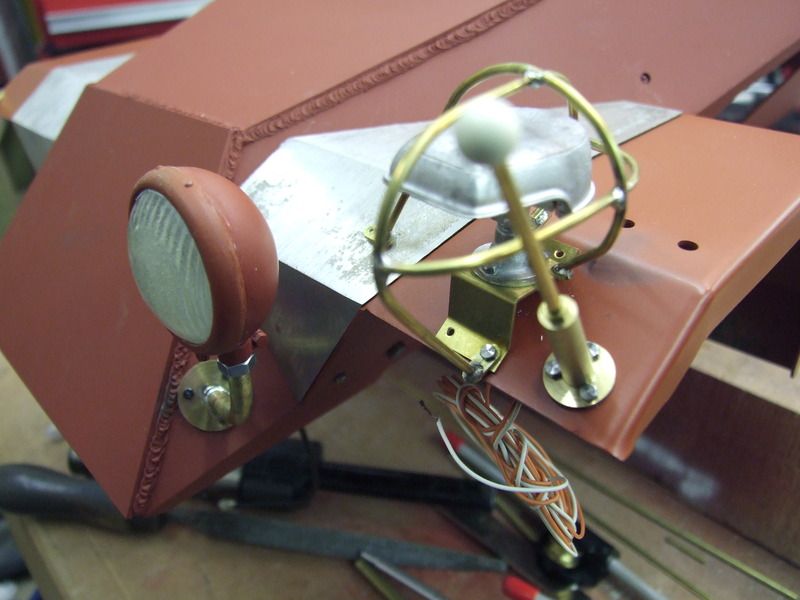
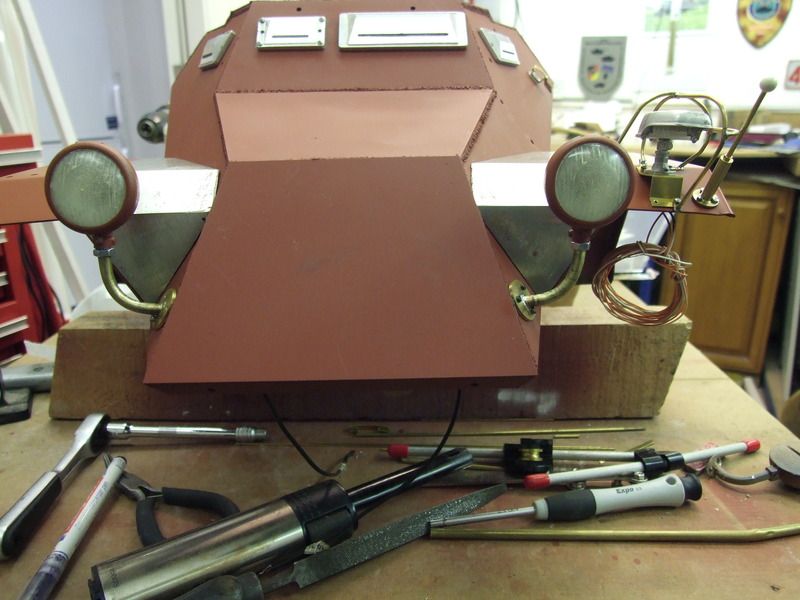
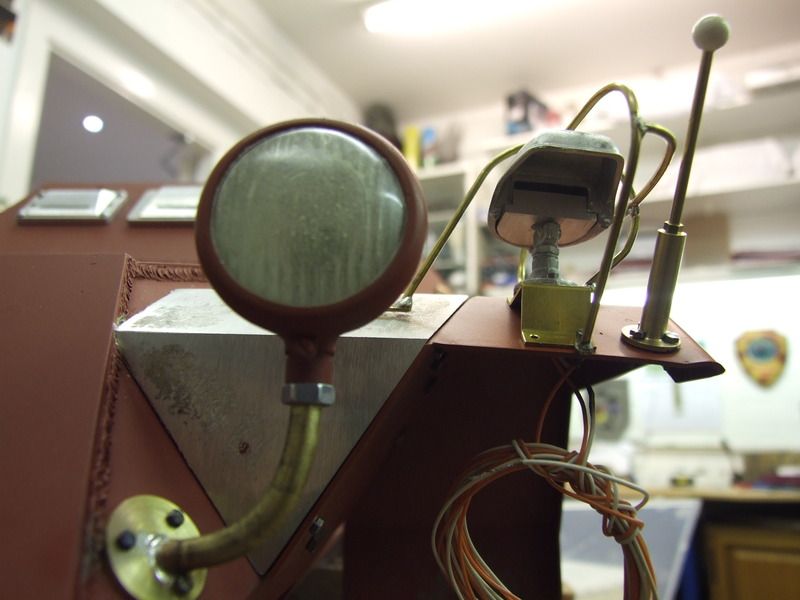
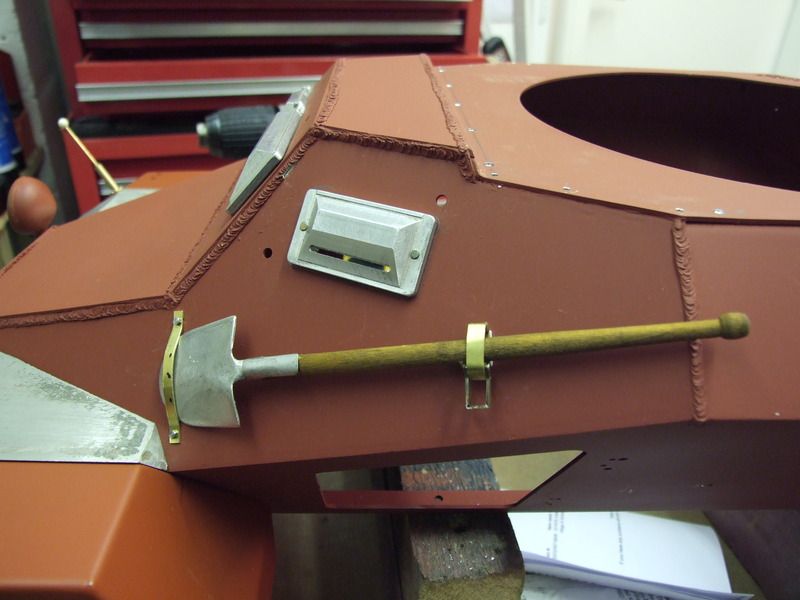
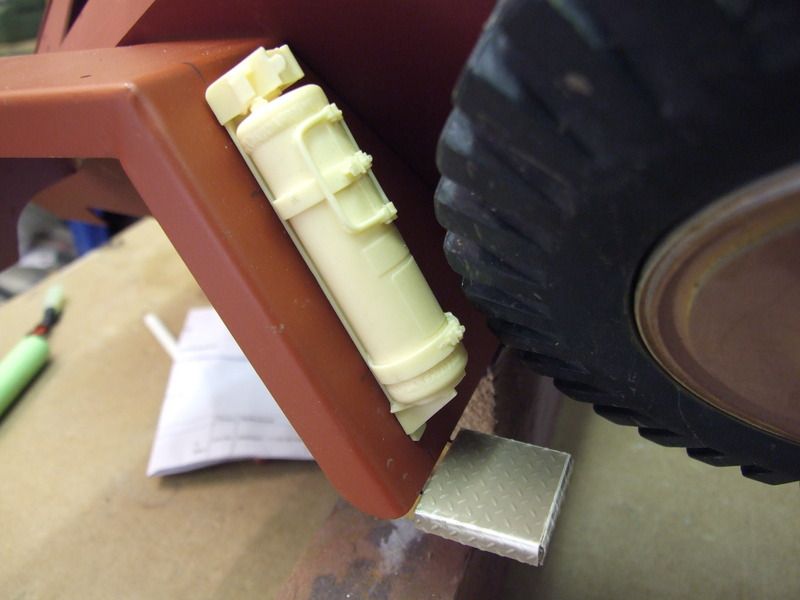
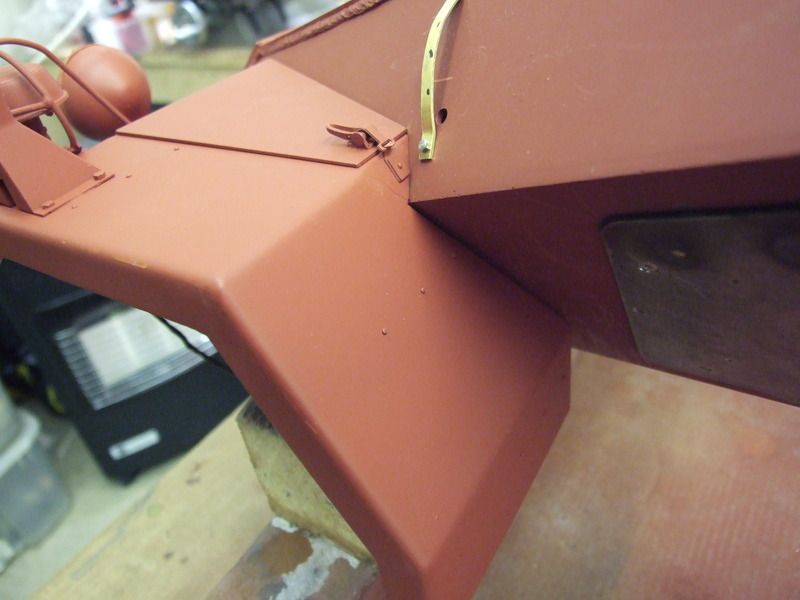
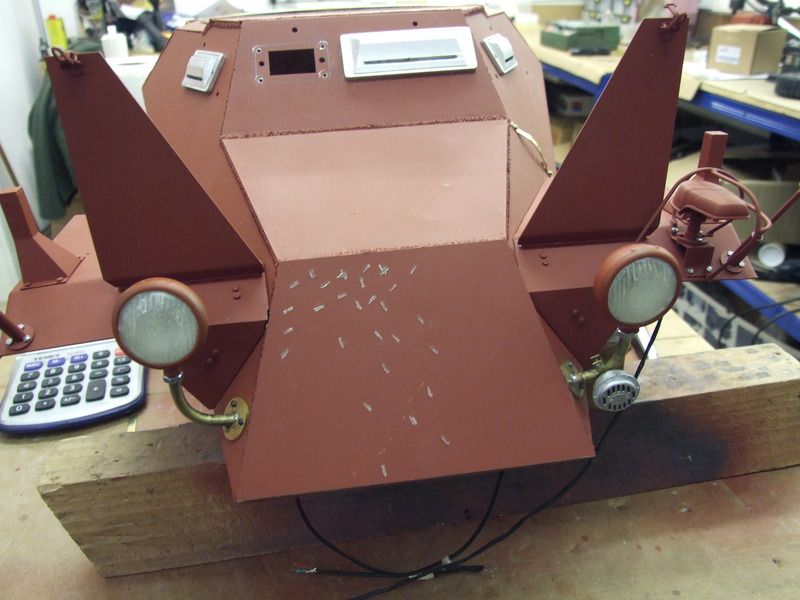
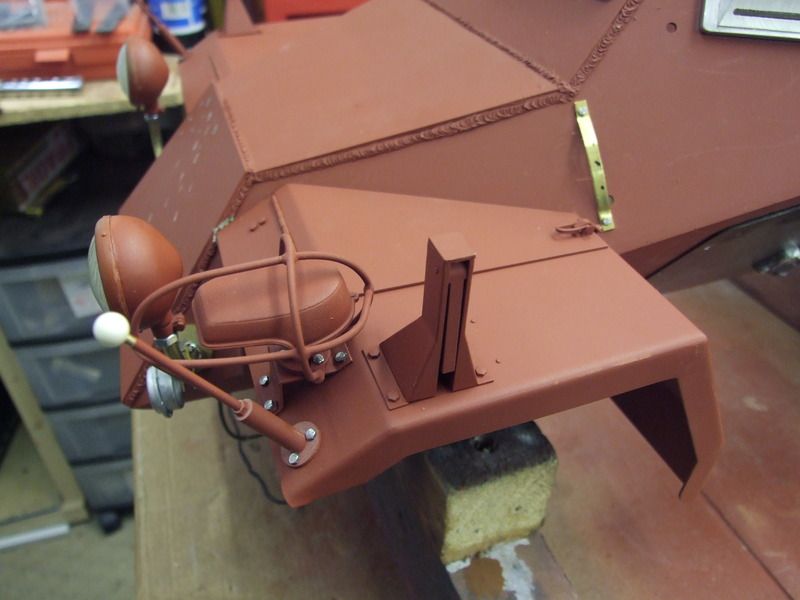
It’s been awhile since I show any updated pictures of the build, recently I have been working on the headlamps and mounting brackets along with the width markers and Notek lamp with guard all these parts are self-made apart from the Armourpax Notek which I modified so I could install an LED,
The driver’s vision ports have been reshaped and the slits opened, I have added a shovel from Mike Stannard with my own front bracket.
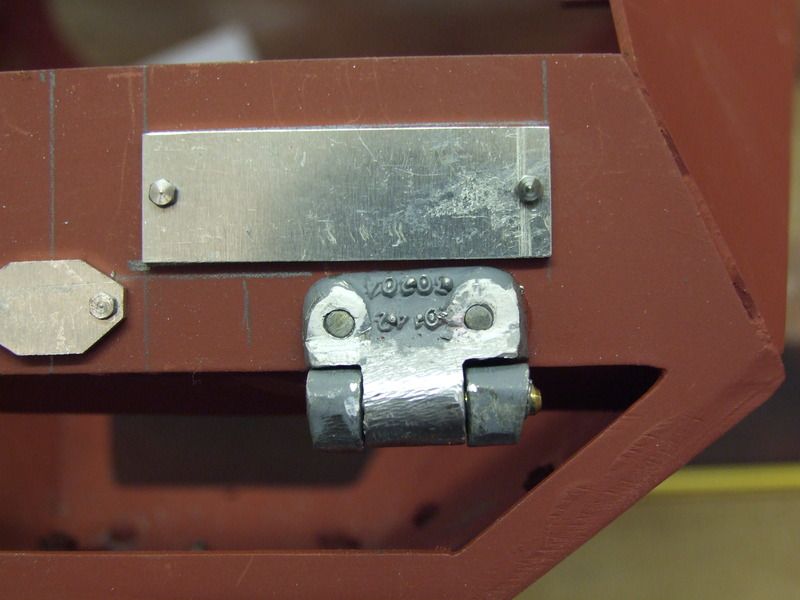
The rear part has had hinges and detail added as in a later 5 Series vehicle.
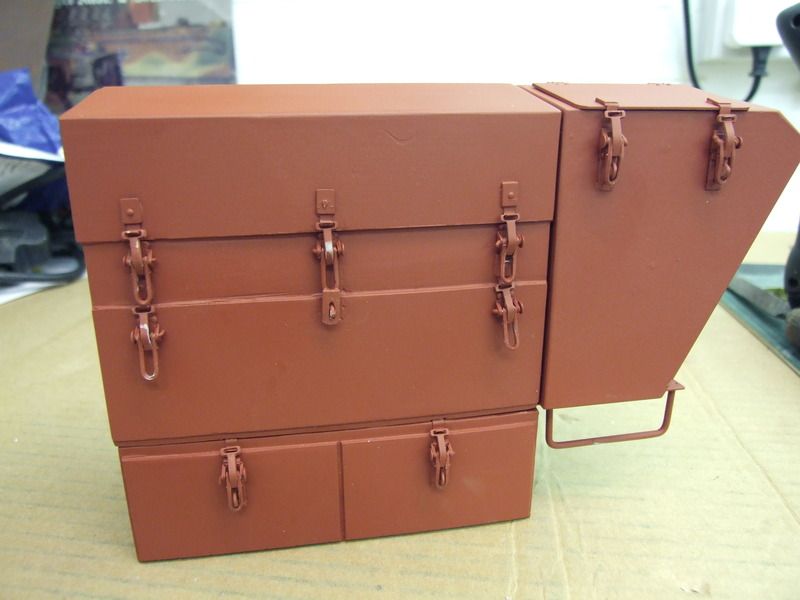
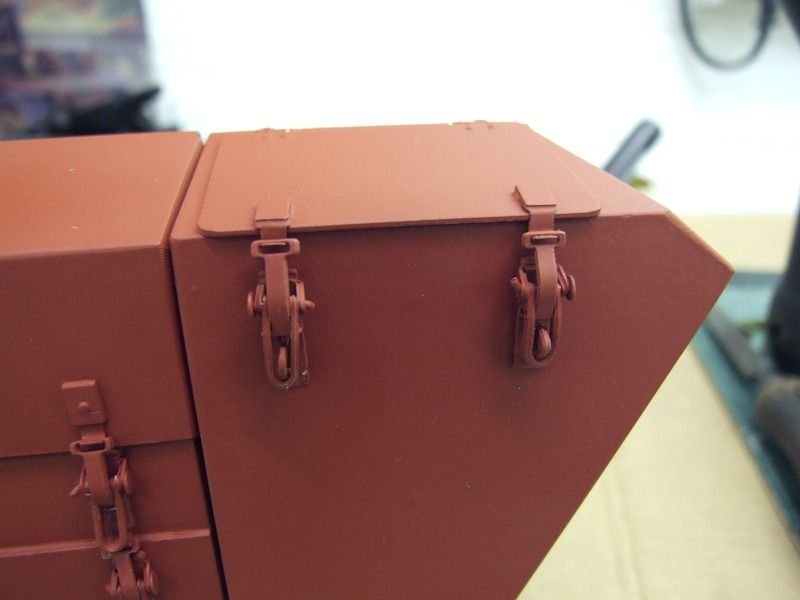
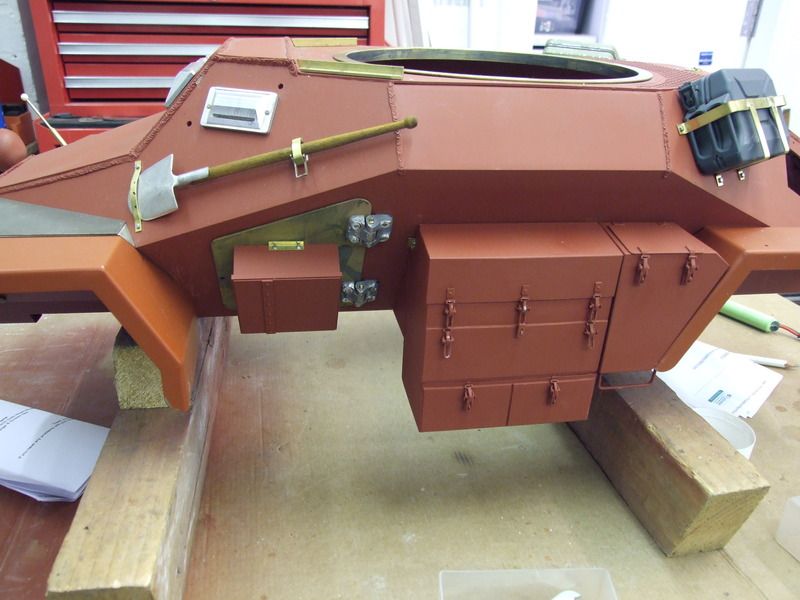
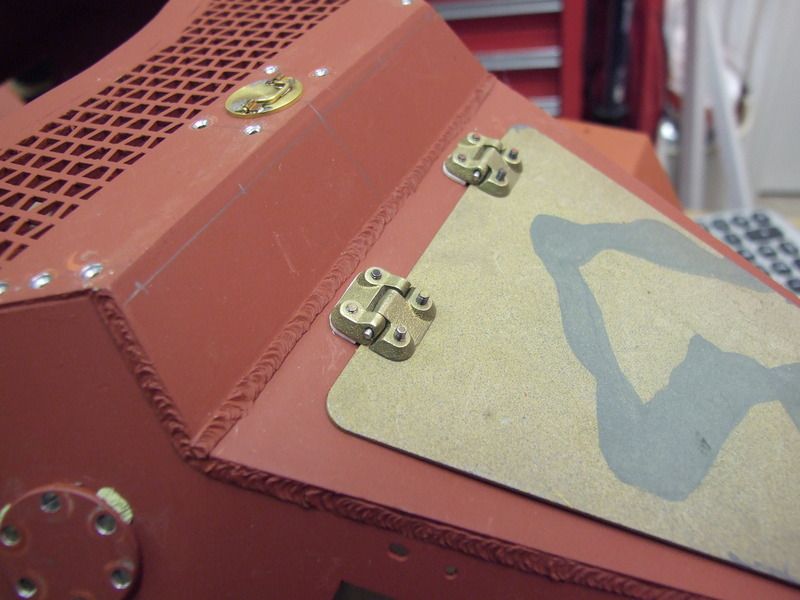
The side stowage bins have been modified complete with hinges, catches and ne lids.
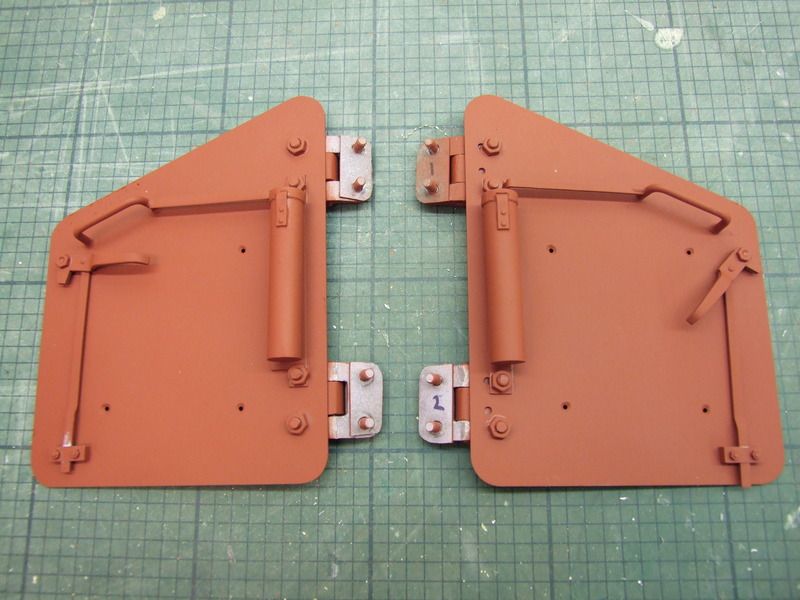
The drivers doors have had hinges added and stowage bins I just need to add new locking catches
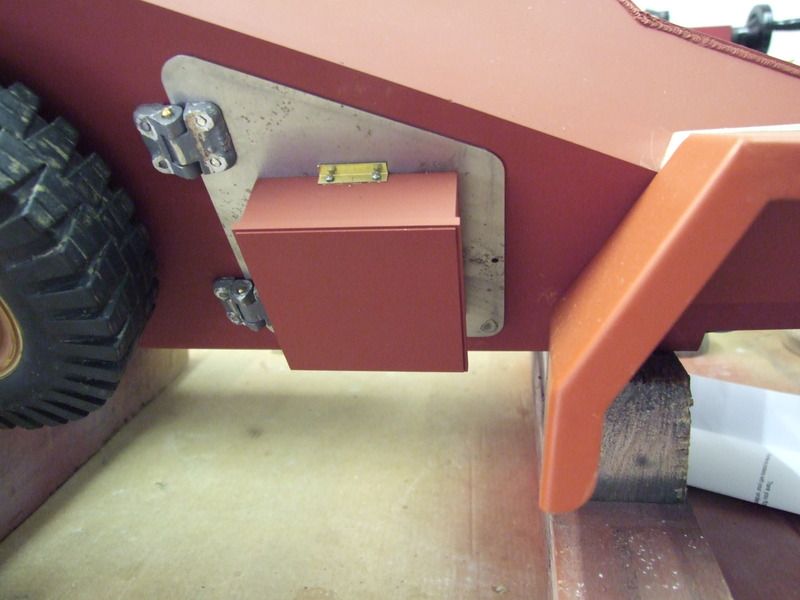
Armourpax tetra extinguisher has been added along with the lower mudguard step
The driver’s vision ports have been reshaped and the slits opened, I have added a shovel from Mike Stannard with my own front bracket.
The rear part has had hinges and detail added as in a later 5 Series vehicle.
The side stowage bins have been modified complete with hinges, catches and ne lids.
The drivers doors have had hinges added and stowage bins I just need to add new locking catches
Armourpax tetra extinguisher has been added along with the lower mudguard step
10-09-2016, 03:24 PM
#19

I love the simulated welds. they are certainly much more realistic at this scale as opposed to much of the ones i have seen on the smaller scales. To me it seems too many people actually over emphasis the welds on models and they have very little realistic actual shape and form.
10-10-2016, 02:34 PM
#20
Thread Starter
To be brutally honest these welds are over scale, trying to keep them more of an accurate size takes time but I’m glad you like them regardless.
10-10-2016, 02:43 PM
#21
AWWW, Mark! If the welds were surface smooth as actual weld, nobody could see them unless close exam!
It looks GREAT! I know you're just being modest but the fine detail and attention to accuracy you do are ABSOLUTELY OUTSTANDING!
Your work is always astonishing!
Mike
It looks GREAT! I know you're just being modest but the fine detail and attention to accuracy you do are ABSOLUTELY OUTSTANDING!
Your work is always astonishing!
Mike
Last edited by Old MSgt; 10-10-2016 at 02:50 PM.
11-14-2016, 12:25 PM
#23
Thread Starter
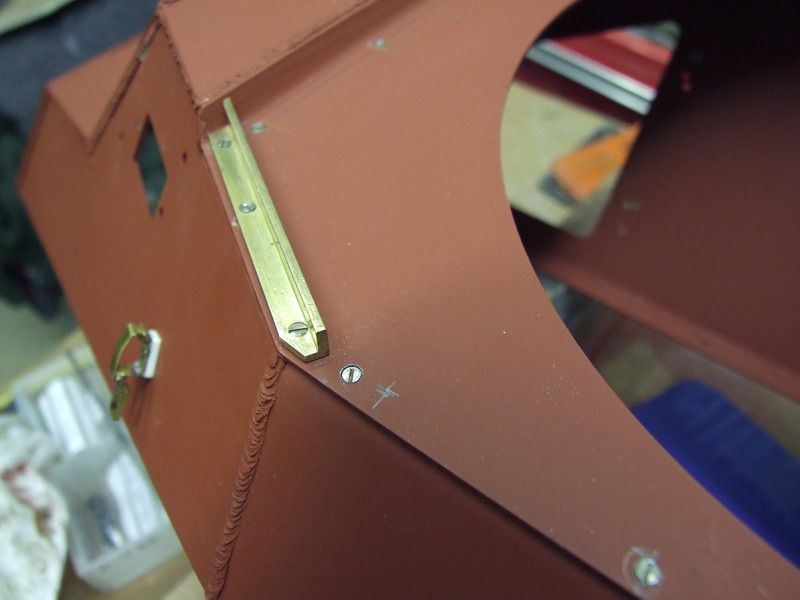
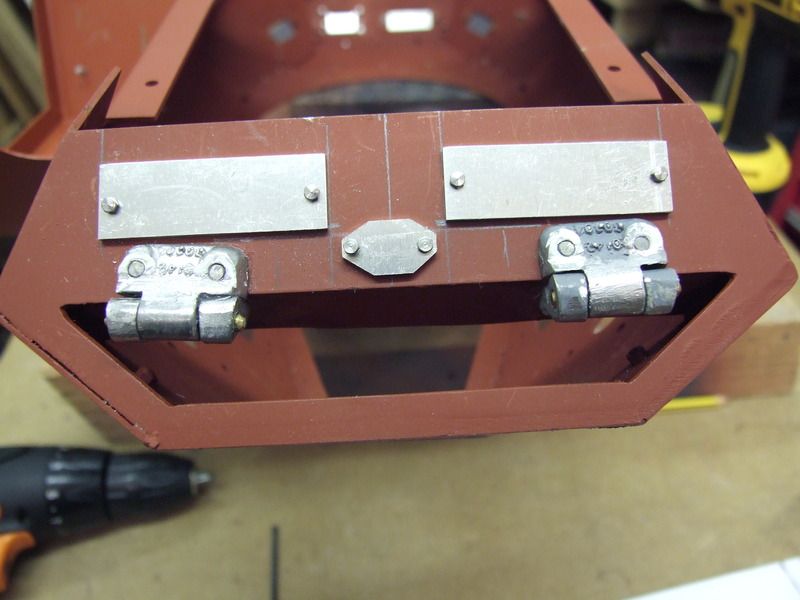
Latest update on my Sd.Kfz.222 Panzersp‰hwagen, recently I have been working on a few time consuming updates one being completing the front mudguards this included the semaphore indicators and the stowage bins built into the front mudguards, all bolt and rivet details were added along with catches for the bins these are now complete and ready for me to move onto the next part for detailing. 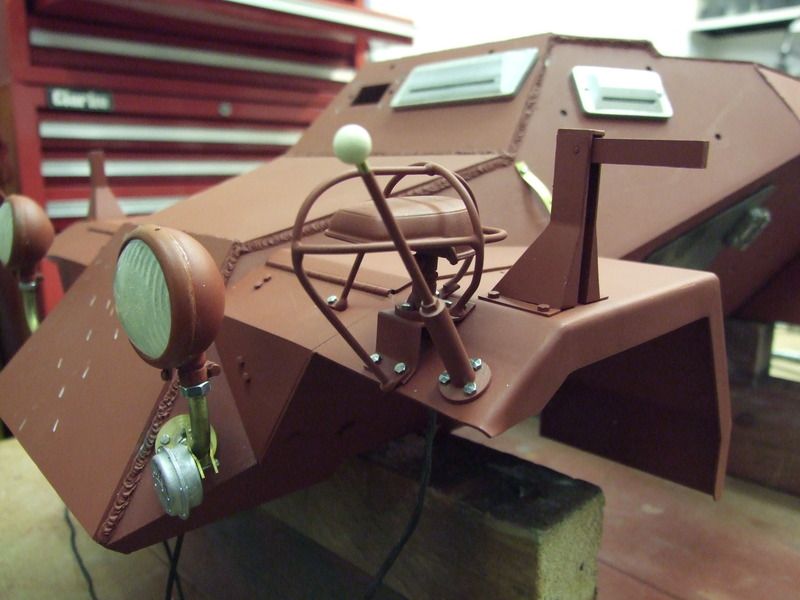


11-19-2016, 08:30 AM
#24
Thread Starter
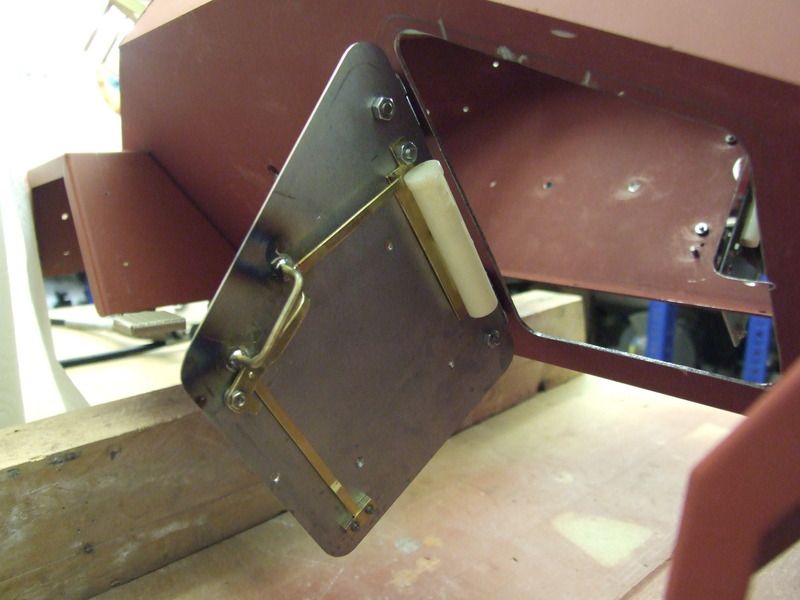
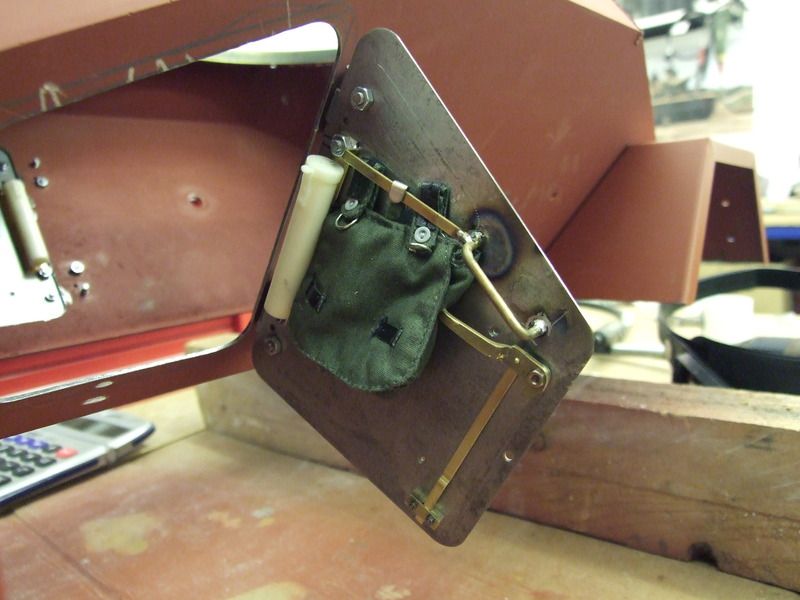
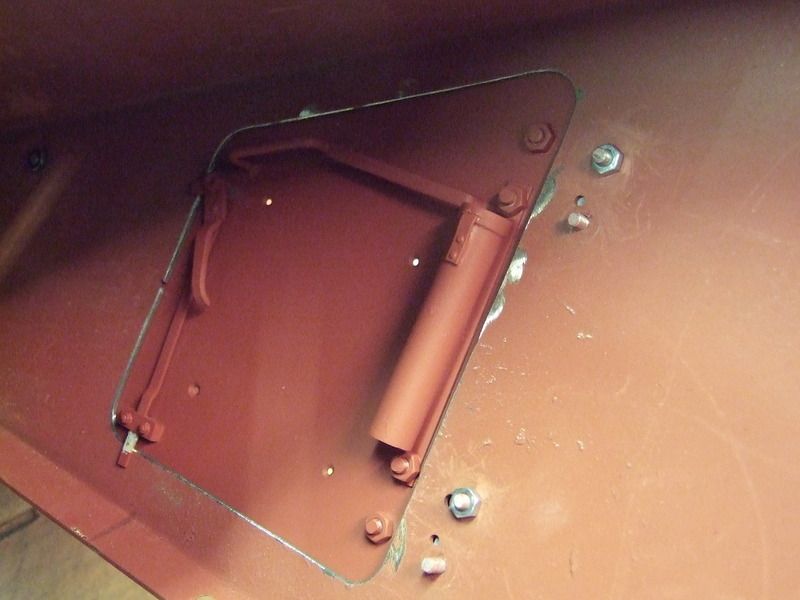
Another upgrade I have been working on is the doors or to be precise the internal detail of the doors, I have added the locking system and also the oxygen tube, the doors can be locked from both inside and outside.
11-19-2016, 09:54 AM
#25
That looks really awesome. A really great vehicle and the possibilities in this scale are so much more than the smaller scales. As you know, I just picked up my first 1/6 scale piece, the toy schwimmwagen, and I hope you won't mind if I study and copy your techniques over the next couple years as I try to make this thing actually drive and schwimm. 