


New Taigen Metal Panzer IV Ausf. G
 06-07-2017, 06:54 AM
#1

Thread Starter

Join Date: Jun 2017
Location: Kolding, Denmark
Posts: 20
Likes: 0
Received 0 Likes
on
0 Posts
Hey all.
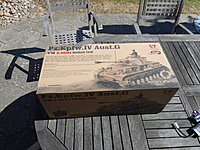
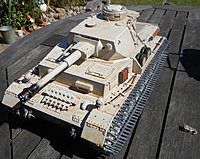
I recently got me the new Panzer IV from Taigen.
Overall its a great little runner, although it have the same obvious flaws as the plastic version (return roller, idler/drive position, no slope on engine deck). But thats just for accuracy. The detail level of the tank in general have taken a giant leap forward IMHO.
I took great care to document everything right out of the box.
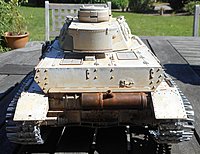
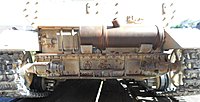
The biggest flaws, as I see them, is the completely fully cast lower hull. There is not much room for improving it without a lot of grinding out parts(especially drive shaft supports are a problem). So I actually think the Asiatam hull did it better (yes. Asiatam!)
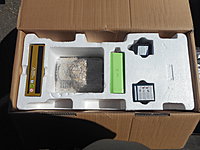
Anyways, Here is a bunch of pictures from the unboxing of the tank!
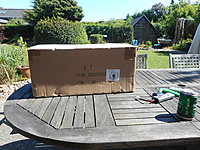
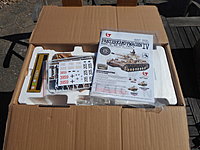
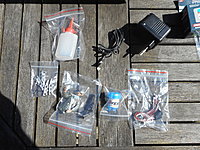
Extra goodies from Dominique at RCtank.de was neatly packed inside with the tank
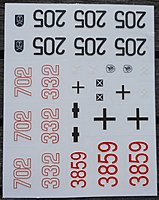
Relly like the new decal sheet. Could have used more crosses though.
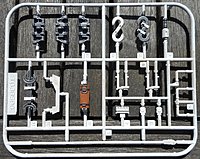
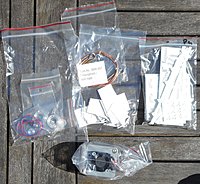
Accesories with the same crappy tank commander, smoke fluid, apple, spare single sided track, wiring for 6ch remote and a charger to charge the battery inside the tank.
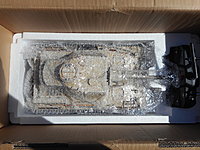
Some slight transportation damage. Easily popped back into place.

I recently got me the new Panzer IV from Taigen.
Overall its a great little runner, although it have the same obvious flaws as the plastic version (return roller, idler/drive position, no slope on engine deck). But thats just for accuracy. The detail level of the tank in general have taken a giant leap forward IMHO.
I took great care to document everything right out of the box.
The biggest flaws, as I see them, is the completely fully cast lower hull. There is not much room for improving it without a lot of grinding out parts(especially drive shaft supports are a problem). So I actually think the Asiatam hull did it better (yes. Asiatam!)
Anyways, Here is a bunch of pictures from the unboxing of the tank!
Extra goodies from Dominique at RCtank.de was neatly packed inside with the tank
Relly like the new decal sheet. Could have used more crosses though.
Accesories with the same crappy tank commander, smoke fluid, apple, spare single sided track, wiring for 6ch remote and a charger to charge the battery inside the tank.
Some slight transportation damage. Easily popped back into place.
 06-07-2017, 06:56 AM
#2
Thread Starter
Join Date: Jun 2017
Location: Kolding, Denmark
Posts: 20
Likes: 0
Received 0 Likes
on
0 Posts
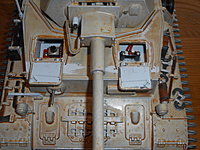
A shame they didnt clean the plastic parts a bit better.

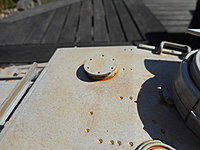
Look at all those weld lines!!!

The coke like "weathering" they used for the tank is actually a bit sticky like and I was afraid I was going to break the hinges on the hatches, when trying to pry them open...
Uhh look!! LED flash
WHY!!! Why have the switches underneath the tank, when you have perfectly working driver/rdo op hatches on the top???

Look at all those weld lines!!!
The coke like "weathering" they used for the tank is actually a bit sticky like and I was afraid I was going to break the hinges on the hatches, when trying to pry them open...
Uhh look!! LED flash
WHY!!! Why have the switches underneath the tank, when you have perfectly working driver/rdo op hatches on the top???
Last edited by Arnie_DK; 06-07-2017 at 07:14 AM.
06-07-2017, 06:57 AM
#3
Thread Starter
Join Date: Jun 2017
Location: Kolding, Denmark
Posts: 20
Likes: 0
Received 0 Likes
on
0 Posts
So... After initial unboxing I found out that the Tank wouldnt receive IR hits from my other Taigen tanks.
Could shoot them just fine though.
I asked Dominique about this problem and he then asked Taigen.
Aparently Taigen have altered the new boards so they no longer work with their older board without telling anyone. So yeah... I have panzer IV that cant die, but can kill everything else... Meh
Could shoot them just fine though.
I asked Dominique about this problem and he then asked Taigen.
Aparently Taigen have altered the new boards so they no longer work with their older board without telling anyone. So yeah... I have panzer IV that cant die, but can kill everything else... Meh
Last edited by Arnie_DK; 06-07-2017 at 07:03 AM.
06-07-2017, 07:24 AM
#4
Thread Starter
Join Date: Jun 2017
Location: Kolding, Denmark
Posts: 20
Likes: 0
Received 0 Likes
on
0 Posts
Okay... So thats unboxing and initial thoughts done and dealt with.
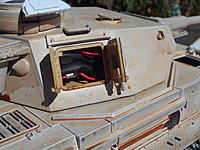
Since I now know that the board actually works as it should, I could start my mods to this tank.
First off, I wanted to install a ATRC unit, Drive shaft supports and move the switches from underneath the tank, to the driver/rdo op hatches.
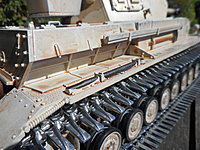
During this, I also took apart some of the wheels and suspension. Nothing have changed here, except for the suspension being secured with a C ring (i believe its called) from the inside of the hull and the return rollers are secured with pins that is just pushed into the hull.

Fitting the drive supports is NOT an easy task... Normally these fit just fine underneath the drive shaft covers, but since these are molded in the hull...no such option.
After some grinding on both the hull and supports, I managed to get them to fit. Sandwiched between the gearbox and hull... Will see how well this holds up, but I have some doubts...

As well as getting the supports installed, I made a shelf for the switches, which doubles as a splashguard from the gearboxes
Just need to sort out the electronics in the hull. Right now they are more or less just stuffed in there.

Since I now know that the board actually works as it should, I could start my mods to this tank.
First off, I wanted to install a ATRC unit, Drive shaft supports and move the switches from underneath the tank, to the driver/rdo op hatches.
During this, I also took apart some of the wheels and suspension. Nothing have changed here, except for the suspension being secured with a C ring (i believe its called) from the inside of the hull and the return rollers are secured with pins that is just pushed into the hull.
Fitting the drive supports is NOT an easy task... Normally these fit just fine underneath the drive shaft covers, but since these are molded in the hull...no such option.
After some grinding on both the hull and supports, I managed to get them to fit. Sandwiched between the gearbox and hull... Will see how well this holds up, but I have some doubts...
As well as getting the supports installed, I made a shelf for the switches, which doubles as a splashguard from the gearboxes
Just need to sort out the electronics in the hull. Right now they are more or less just stuffed in there.
06-26-2017, 04:05 PM
#5
Interesting work you're doing. Glad to see some reviews on the new PzIV.
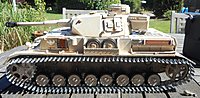
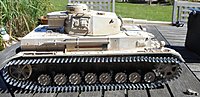
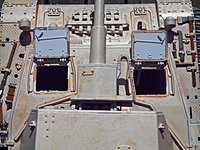
Looks like they're using right-side tracks on both sides. So, one is right and the other backwards. Glad to see that the rear idler adjusters have the handles and drain ports in the right spots and metal return rollers with rubber tires. Any photos of how the suspension secures to the hull?
Fully cast metal hull...ugh. I was hoping for an internal metal frame with a plastic outer, like the PzIII. Makes it easier to tweak and correct. Love how the spare tracks on the front glacis continue to defy the law of gravity. Is the upper hull plastic?
Nice to see good welds, correct headlight covers, antenna trough, TC's aiming sight and other good details. Seems like several steps forward in detail, with a few backwards in terms of "tweak-ability".
Looking forward to the rest of your mods.
 06-27-2017, 04:18 AM
#7
This is why I'm waiting for the Imex version. They plan to correct at least the position of the return roller and they'll be using proper right and left side tracks.
06-27-2017, 09:34 AM
#8

Interesting work you're doing. Glad to see some reviews on the new PzIV.
Looks like they're using right-side tracks on both sides. So, one is right and the other backwards. Glad to see that the rear idler adjusters have the handles and drain ports in the right spots and metal return rollers with rubber tires. Any photos of how the suspension secures to the hull?
Fully cast metal hull...ugh. I was hoping for an internal metal frame with a plastic outer, like the PzIII. Makes it easier to tweak and correct. Love how the spare tracks on the front glacis continue to defy the law of gravity. Is the upper hull plastic?
Nice to see good welds, correct headlight covers, antenna trough, TC's aiming sight and other good details. Seems like several steps forward in detail, with a few backwards in terms of "tweak-ability".
Looking forward to the rest of your mods.
 As for the upper hull it is still plastic yes. We have yet to step into the all metal game so far, it really adds too much money to the cost and on a few of the tanks they just got too top heavy to drive without tipping at only a few degrees. The lower metal hulls have proven so far to be absolutely ROCK solid. Upgradability on them may be a bit lower, but the quality has gone through the roof for the lower. The new latch system in the rear is a big plus as well. Putting the latches on the bottom allows us to brace the upper hull at the same time and make it a bit easier to shut. Both the new PIII and PIV have this latch system.
I'm glad you are enjoying it! We will have both a summer and winter version for the PIV with the summer releasing first and possible a winter and summer version of the PIII too
 06-27-2017, 11:55 AM
#10
I'm with ya on the plastic turrets, Rich. Too much strain on a plastic upper hull if you use metal. And it's not just the downward weight, but also every time you remove the upper hull. The extra weight causes more flex and I think it would be easier to do damage to the plastic upper hull, especially on some of the tanks with really big turrets, like the KT.
06-27-2017, 12:49 PM
#11
I prefer plastic turrets, too. The weight concerns me. But, I also prefer the plastic turrets because they are more easily modified and detailed. I'm glad that detail and stability for the lower hulls has increased. Just wish they had corrected the last return roller and sprocket heights. Maybe the US versions...
Looking forward to seeing the new PzIIIs, too.
Looking forward to seeing the new PzIIIs, too.
06-27-2017, 01:39 PM
#12
I'm with ya on the plastic turrets, Rich. Too much strain on a plastic upper hull if you use metal. And it's not just the downward weight, but also every time you remove the upper hull. The extra weight causes more flex and I think it would be easier to do damage to the plastic upper hull, especially on some of the tanks with really big turrets, like the KT.
I prefer plastic turrets, too. The weight concerns me. But, I also prefer the plastic turrets because they are more easily modified and detailed. I'm glad that detail and stability for the lower hulls has increased. Just wish they had corrected the last return roller and sprocket heights. Maybe the US versions...
Looking forward to seeing the new PzIIIs, too.
Looking forward to seeing the new PzIIIs, too.
06-28-2017, 03:54 AM
#13

Join Date: Mar 2017
Posts: 186
Likes: 0
Received 0 Likes
on
0 Posts
Yea I personally like the plastic turrets too but the customer base screams METAL for everything. I will however make sure the feedback is passed along. I'm sure we will see of the newer models in a plastic version or possibly a plastic turret version of some of the current models at some point in time, just atm the metal tanks outsell the plastic models by a fair margin. Also yes, I've been told the rear return roller will be fixed (and even verified AND seen it myself when I visited the factory a few months ago) but the sprocket has other issues that is a bit harder to fix quickly like we did with the rear return rollers. It might get a fix in the future but I am not sure on that one honestly.
I would like to have the P4G; but, I would like it in full side armor......
Springman
Last edited by Springman65; 06-28-2017 at 03:57 AM. Reason: adda bt
06-28-2017, 10:39 AM
#14
Maybe the trick would be to make the plastic upper hull a bit thicker? At least in the turret ring area - a little more plastic on the underside would not show and probably not take much mold rework either.
I would like to have the P4G; but, I would like it in full side armor......
Springman
I would like to have the P4G; but, I would like it in full side armor......
Springman
06-29-2017, 05:35 AM
#15
Well just in case you do want I do have the Tiger 1 lower hull brace here: Tiger 1 Lower Hull Brace that might assist. I know its for the lower hull but you guys are pretty crafty I'll add it to inventory permanently soon... working on the site now actually.
I'll add it to inventory permanently soon... working on the site now actually.
06-29-2017, 12:12 PM
#16
That's a good mod, and I've added that brace to several of my tanks, using an extra in the middle of a Tiger one, but is there any way to do anything about that price? Six bucks for a strip of flat steel and a couple machine screws seems just a tad high, but I always have been a cheap buzzard.
06-29-2017, 12:50 PM
#17
That's a good mod, and I've added that brace to several of my tanks, using an extra in the middle of a Tiger one, but is there any way to do anything about that price? Six bucks for a strip of flat steel and a couple machine screws seems just a tad high, but I always have been a cheap buzzard.
06-29-2017, 02:56 PM
#18
Bracing the upper hull is what I would have done anyways, probably with some 2 or 3-mm styrene.
Too bad about the sprocket. But, it would take a bit of a redesign. When I was building my PzIV, I took a look at it to see what the limiting factor is. I think that it's mostly limited by the track guard and the mud flaps over the sprocket. The uppermost hinge for the mud flaps is too far back. As a result the initial slant on the top piece of the mud flap is too shallow. That hinge should be another mm (on the model, not 1:1 scale) or two forward making the flat bit of track guard a touch longer and the drop on the mud flap steeper, more vertical. That would, I think, create the room to bring the sprocket up to the correct height. But, that would require redoing the molds. Too bad the HL designers missed that detail. They had a slight on Tamiya since they got a R/C PzIV to the market first.
Oh well...might be able to cut off the cast metal transmission cover and reinstall a plastic one after raising the sprocket height on the metal hull. It would be interesting to see if someone could make that work.
06-30-2017, 05:35 AM
#19
Bracing the upper hull is what I would have done anyways, probably with some 2 or 3-mm styrene.
Too bad about the sprocket. But, it would take a bit of a redesign. When I was building my PzIV, I took a look at it to see what the limiting factor is. I think that it's mostly limited by the track guard and the mud flaps over the sprocket. The uppermost hinge for the mud flaps is too far back. As a result the initial slant on the top piece of the mud flap is too shallow. That hinge should be another mm (on the model, not 1:1 scale) or two forward making the flat bit of track guard a touch longer and the drop on the mud flap steeper, more vertical. That would, I think, create the room to bring the sprocket up to the correct height. But, that would require redoing the molds. Too bad the HL designers missed that detail. They had a slight on Tamiya since they got a R/C PzIV to the market first.
Oh well...might be able to cut off the cast metal transmission cover and reinstall a plastic one after raising the sprocket height on the metal hull. It would be interesting to see if someone could make that work.
Too bad about the sprocket. But, it would take a bit of a redesign. When I was building my PzIV, I took a look at it to see what the limiting factor is. I think that it's mostly limited by the track guard and the mud flaps over the sprocket. The uppermost hinge for the mud flaps is too far back. As a result the initial slant on the top piece of the mud flap is too shallow. That hinge should be another mm (on the model, not 1:1 scale) or two forward making the flat bit of track guard a touch longer and the drop on the mud flap steeper, more vertical. That would, I think, create the room to bring the sprocket up to the correct height. But, that would require redoing the molds. Too bad the HL designers missed that detail. They had a slight on Tamiya since they got a R/C PzIV to the market first.
Oh well...might be able to cut off the cast metal transmission cover and reinstall a plastic one after raising the sprocket height on the metal hull. It would be interesting to see if someone could make that work.
I'll pass this along today when I speak with them. Can't promise anything of course but it is always a big help. Thanks!
07-01-2017, 09:14 AM
#20
Oh, if they're going to redo the upper hull molds, they should fix the slanted rear deck and enlarge the brake exhaust port armor cover (cylinder on driver's side next to jack block...I used 1/2" half-round styrene and seemed to come out about right). For the rear deck, keep the forward portion at the original height, the rear edge should be 3-mm lower; keep the side louvers horizontal with the top of the boxes following the sloped rear hull; trim the back plate accordingly.
Overall, the quality is definitely headed in the right direction.
07-20-2017, 02:03 AM
#21
Thread Starter
Join Date: Jun 2017
Location: Kolding, Denmark
Posts: 20
Likes: 0
Received 0 Likes
on
0 Posts
Finished up the re-paint and for now, I'm satisfied. Decided not to move the rear return roller or install adjustable idlers as the tank actually runs really great from stock and there would be a lot of sawing and grinding involved with installing the mods.
So a nice clean re-paint with a wash is all I wanted to do to it for now. Might add some mud and dust later on though.
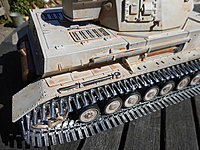
Oh, and I swapped the tracks for Mato late tracks.
And then, I decided to have some fun in the garden
EDIT: Aparently I cant share images here as I can on RCTW, so here's a link to my photobucket instead: RC Tank Slideshow by Arnie_DK | Photobucket
So a nice clean re-paint with a wash is all I wanted to do to it for now. Might add some mud and dust later on though.
Oh, and I swapped the tracks for Mato late tracks.
And then, I decided to have some fun in the garden
EDIT: Aparently I cant share images here as I can on RCTW, so here's a link to my photobucket instead: RC Tank Slideshow by Arnie_DK | Photobucket
Last edited by Arnie_DK; 07-20-2017 at 02:12 AM.
07-20-2017, 05:00 AM
#22
EDIT: Aparently I cant share images here as I can on RCTW, so here's a link to my photobucket instead: RC Tank Slideshow by Arnie_DK Photobucket
07-20-2017, 05:34 AM
#23
Tank looks good.
I prefer to just upload the photos directly to the forum. Skip the whole PB problem or having some of photo hosting sites go the way of the dodo. Not as convenient...but less hassle later.
I prefer to just upload the photos directly to the forum. Skip the whole PB problem or having some of photo hosting sites go the way of the dodo. Not as convenient...but less hassle later.
07-20-2017, 06:49 AM
#24
If you want to host photos offsite like PB, which I used, there is also Flikr. I have not tried sharing from there yet but I set one up for all the San Diego battle pics.
I didn't know PB shut off the inbed linking. That sucks.
I didn't know PB shut off the inbed linking. That sucks.
07-20-2017, 12:58 PM
#25
Thread Starter
Join Date: Jun 2017
Location: Kolding, Denmark
Posts: 20
Likes: 0
Received 0 Likes
on
0 Posts
Aparently I was mistaken. On my browser it looked like the pictures was shared just fine, but I was told they didnt... So just shared the link for the slideshow like here.
