


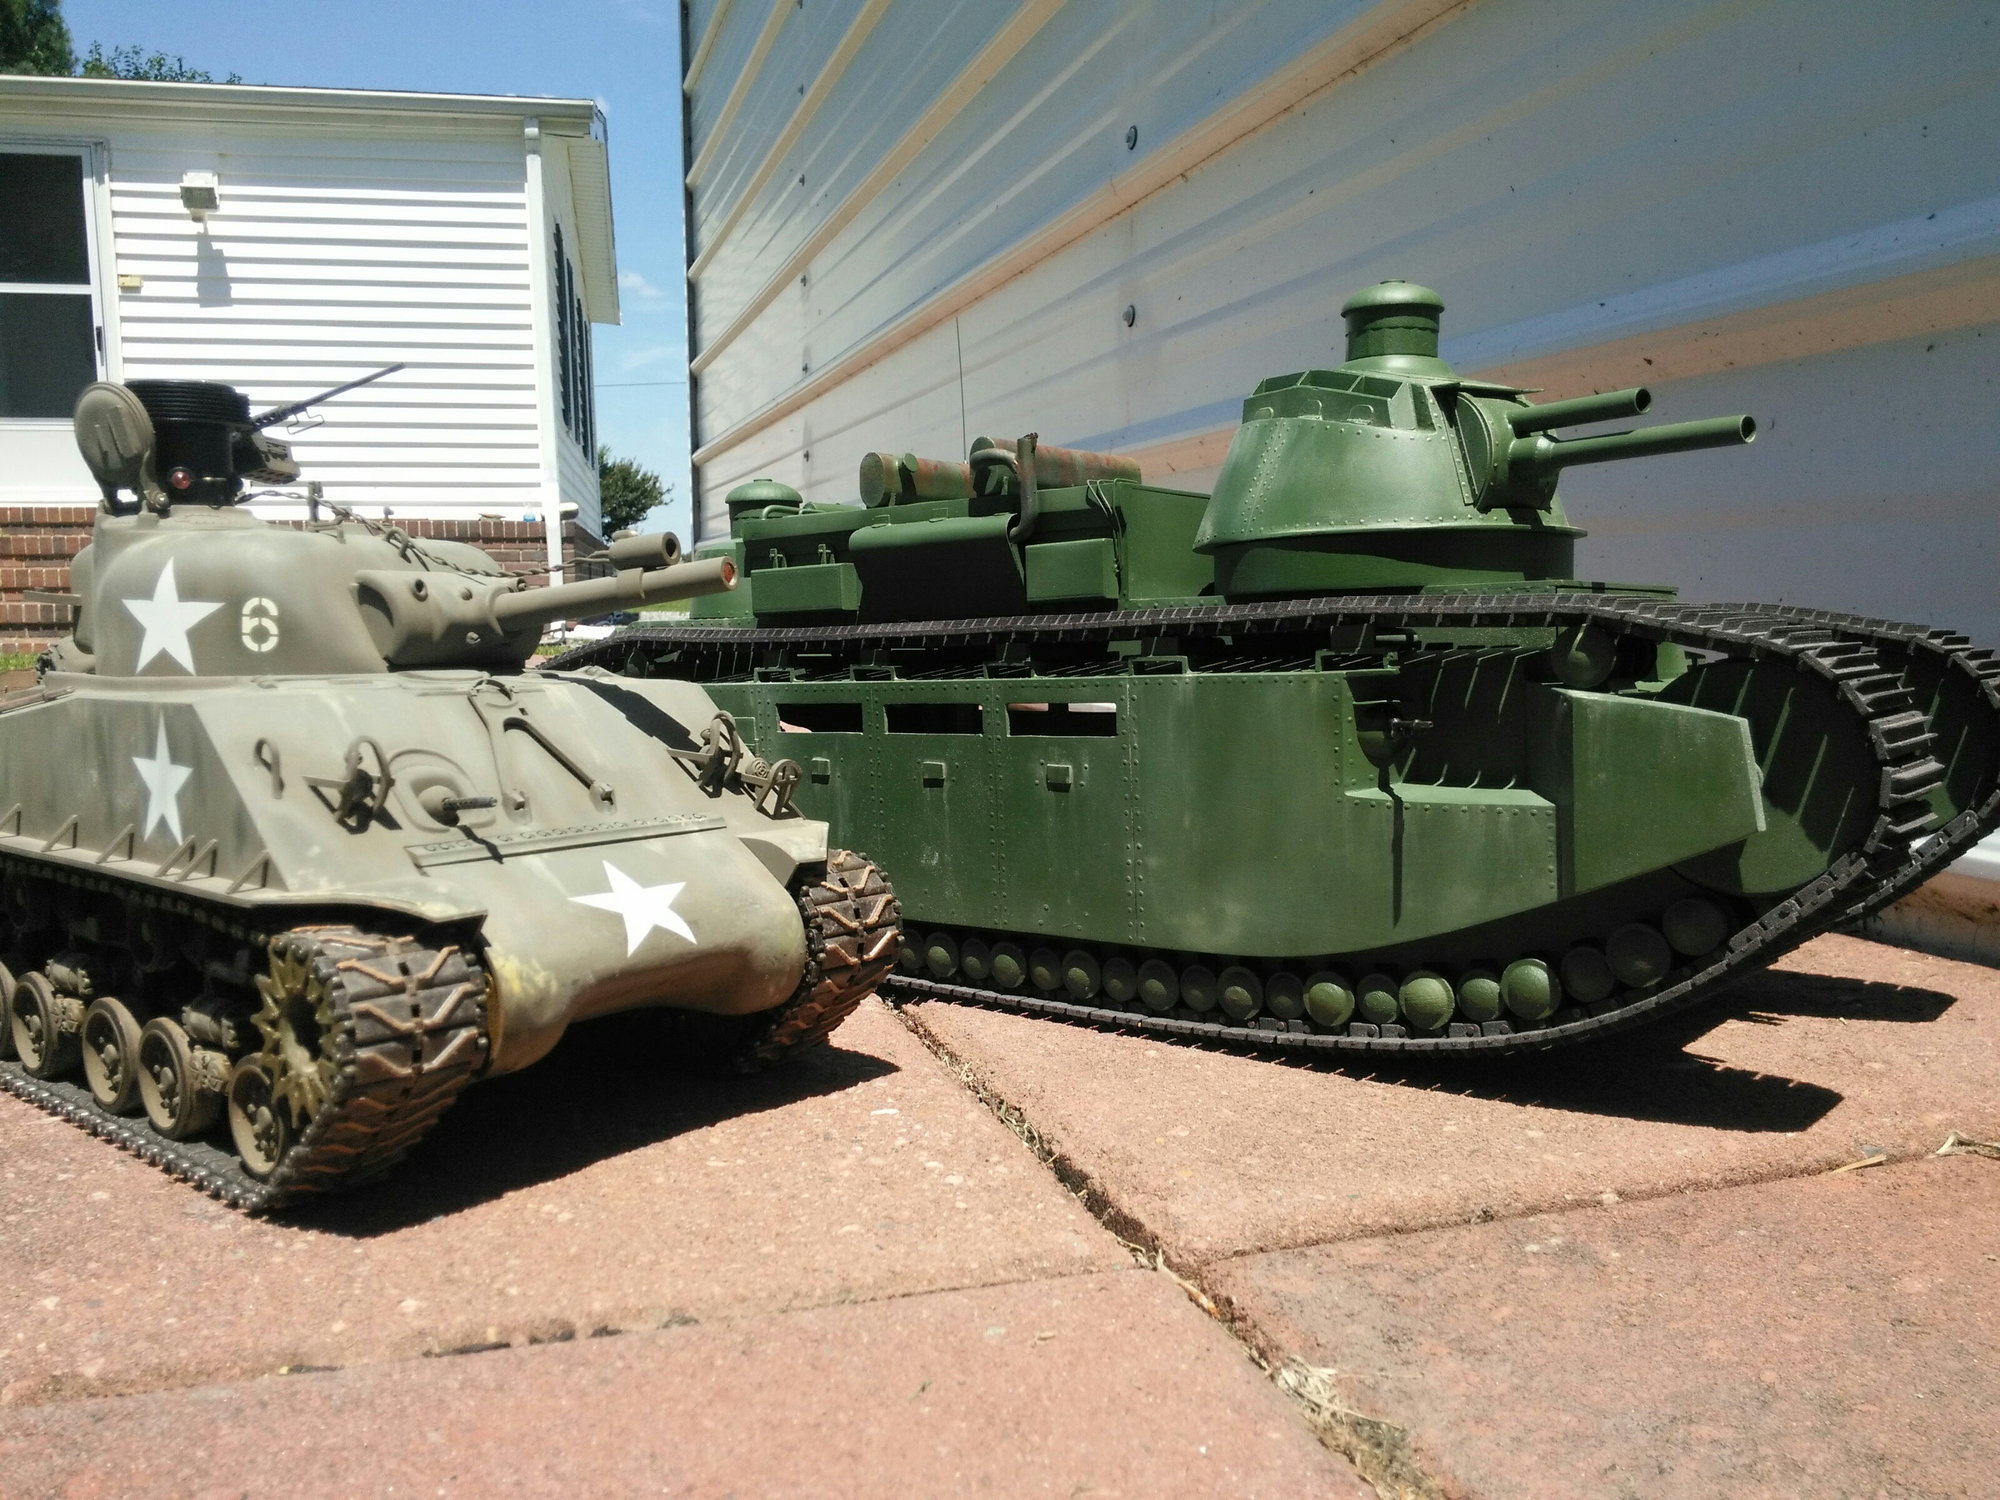
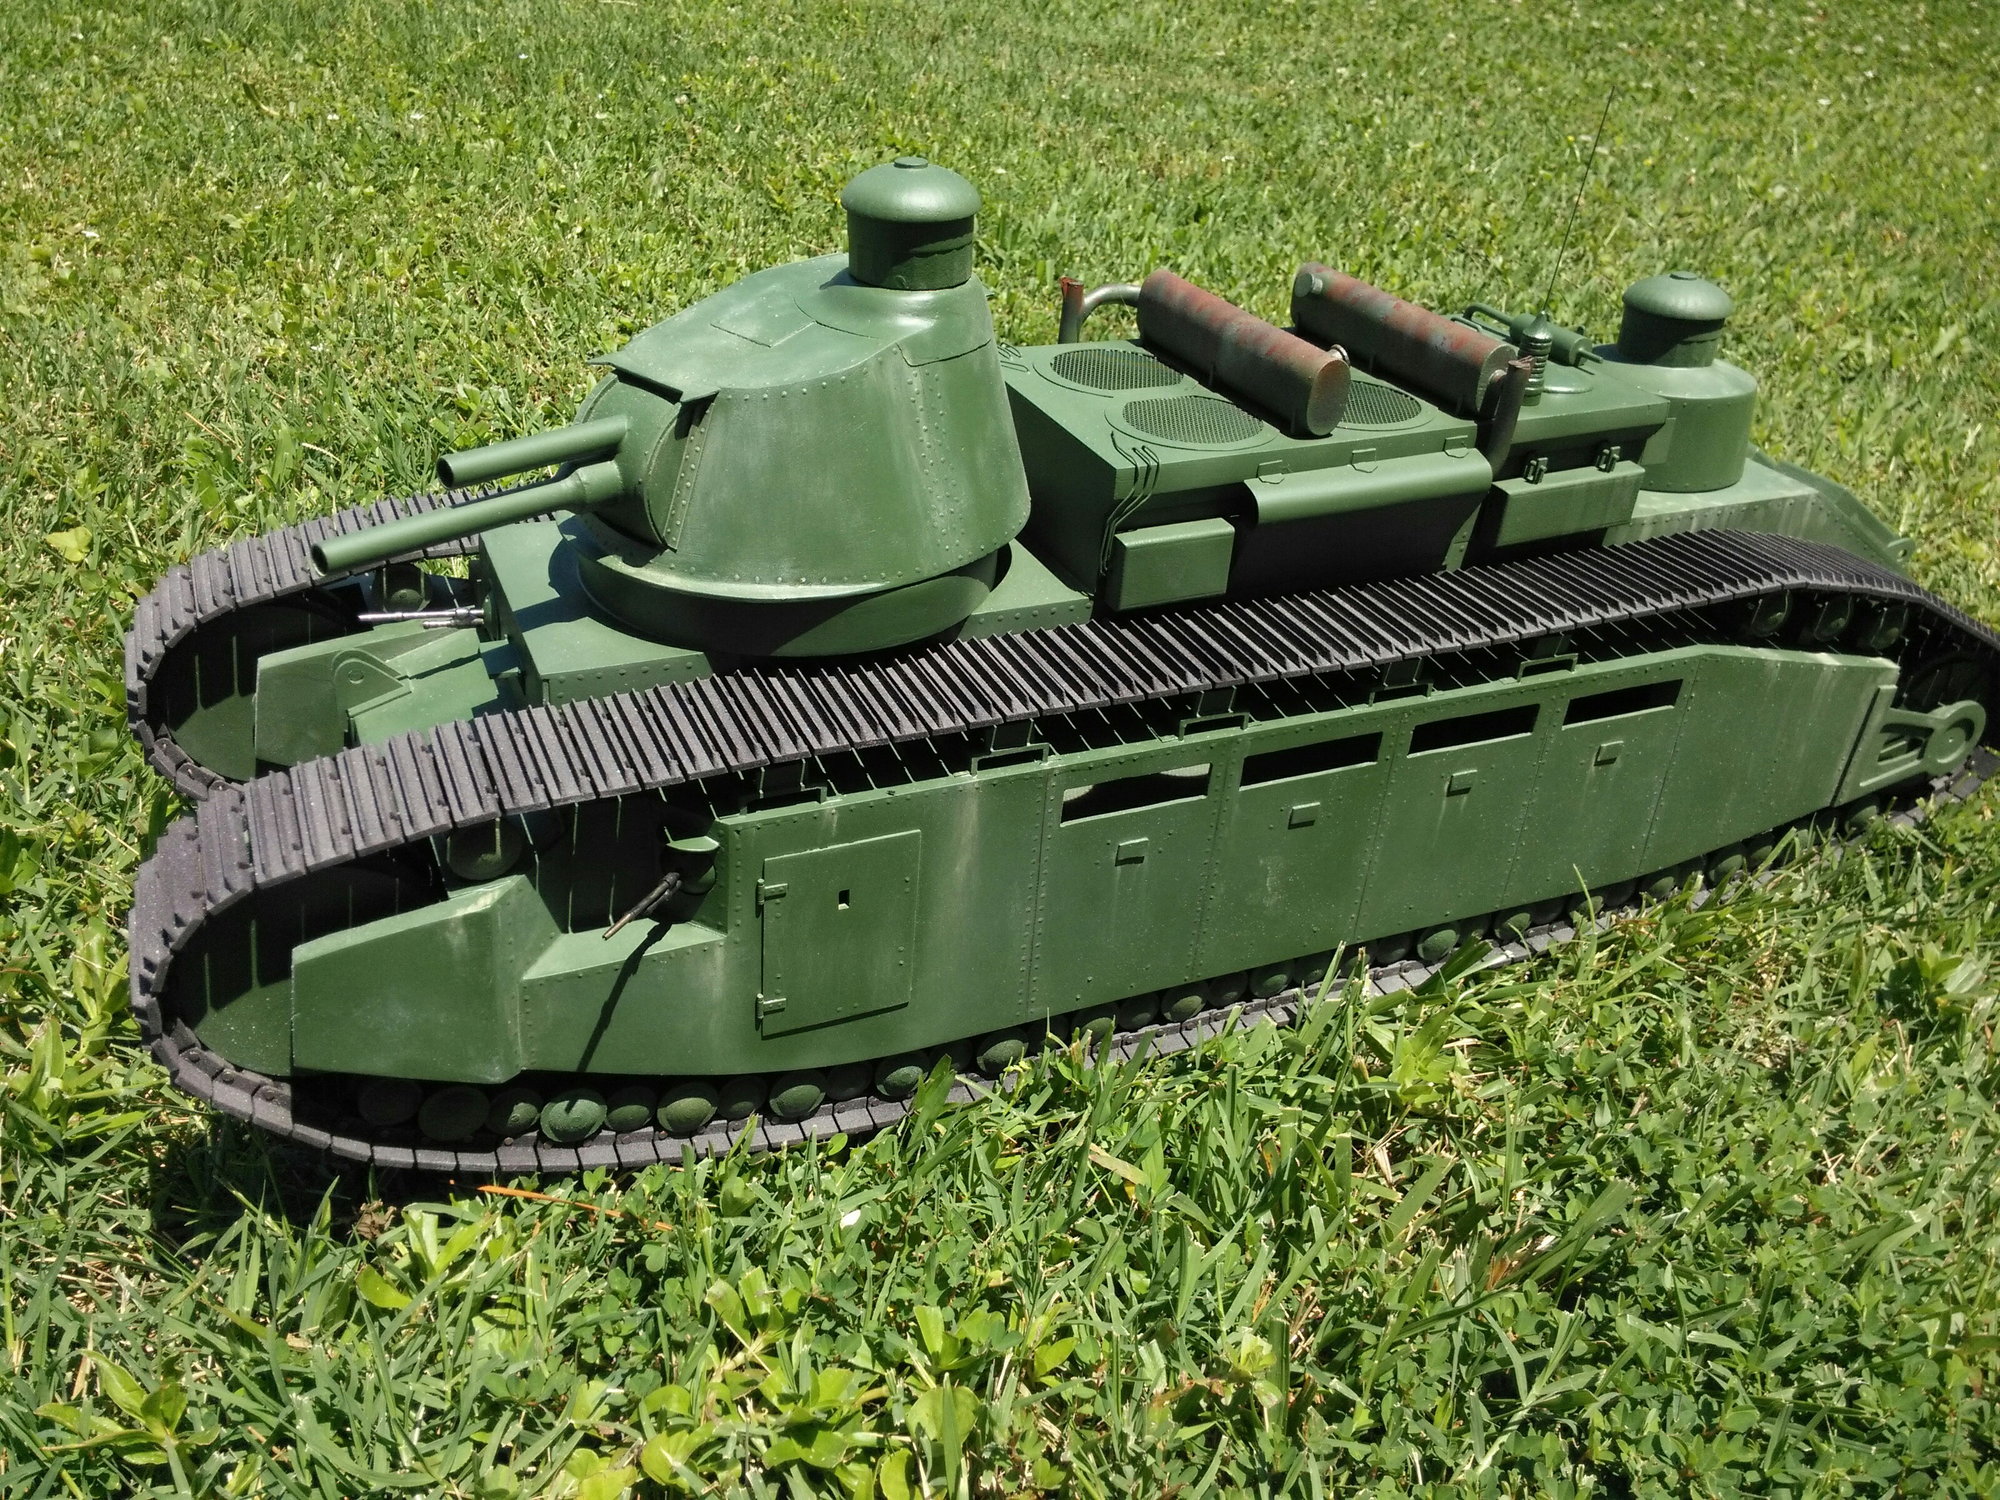
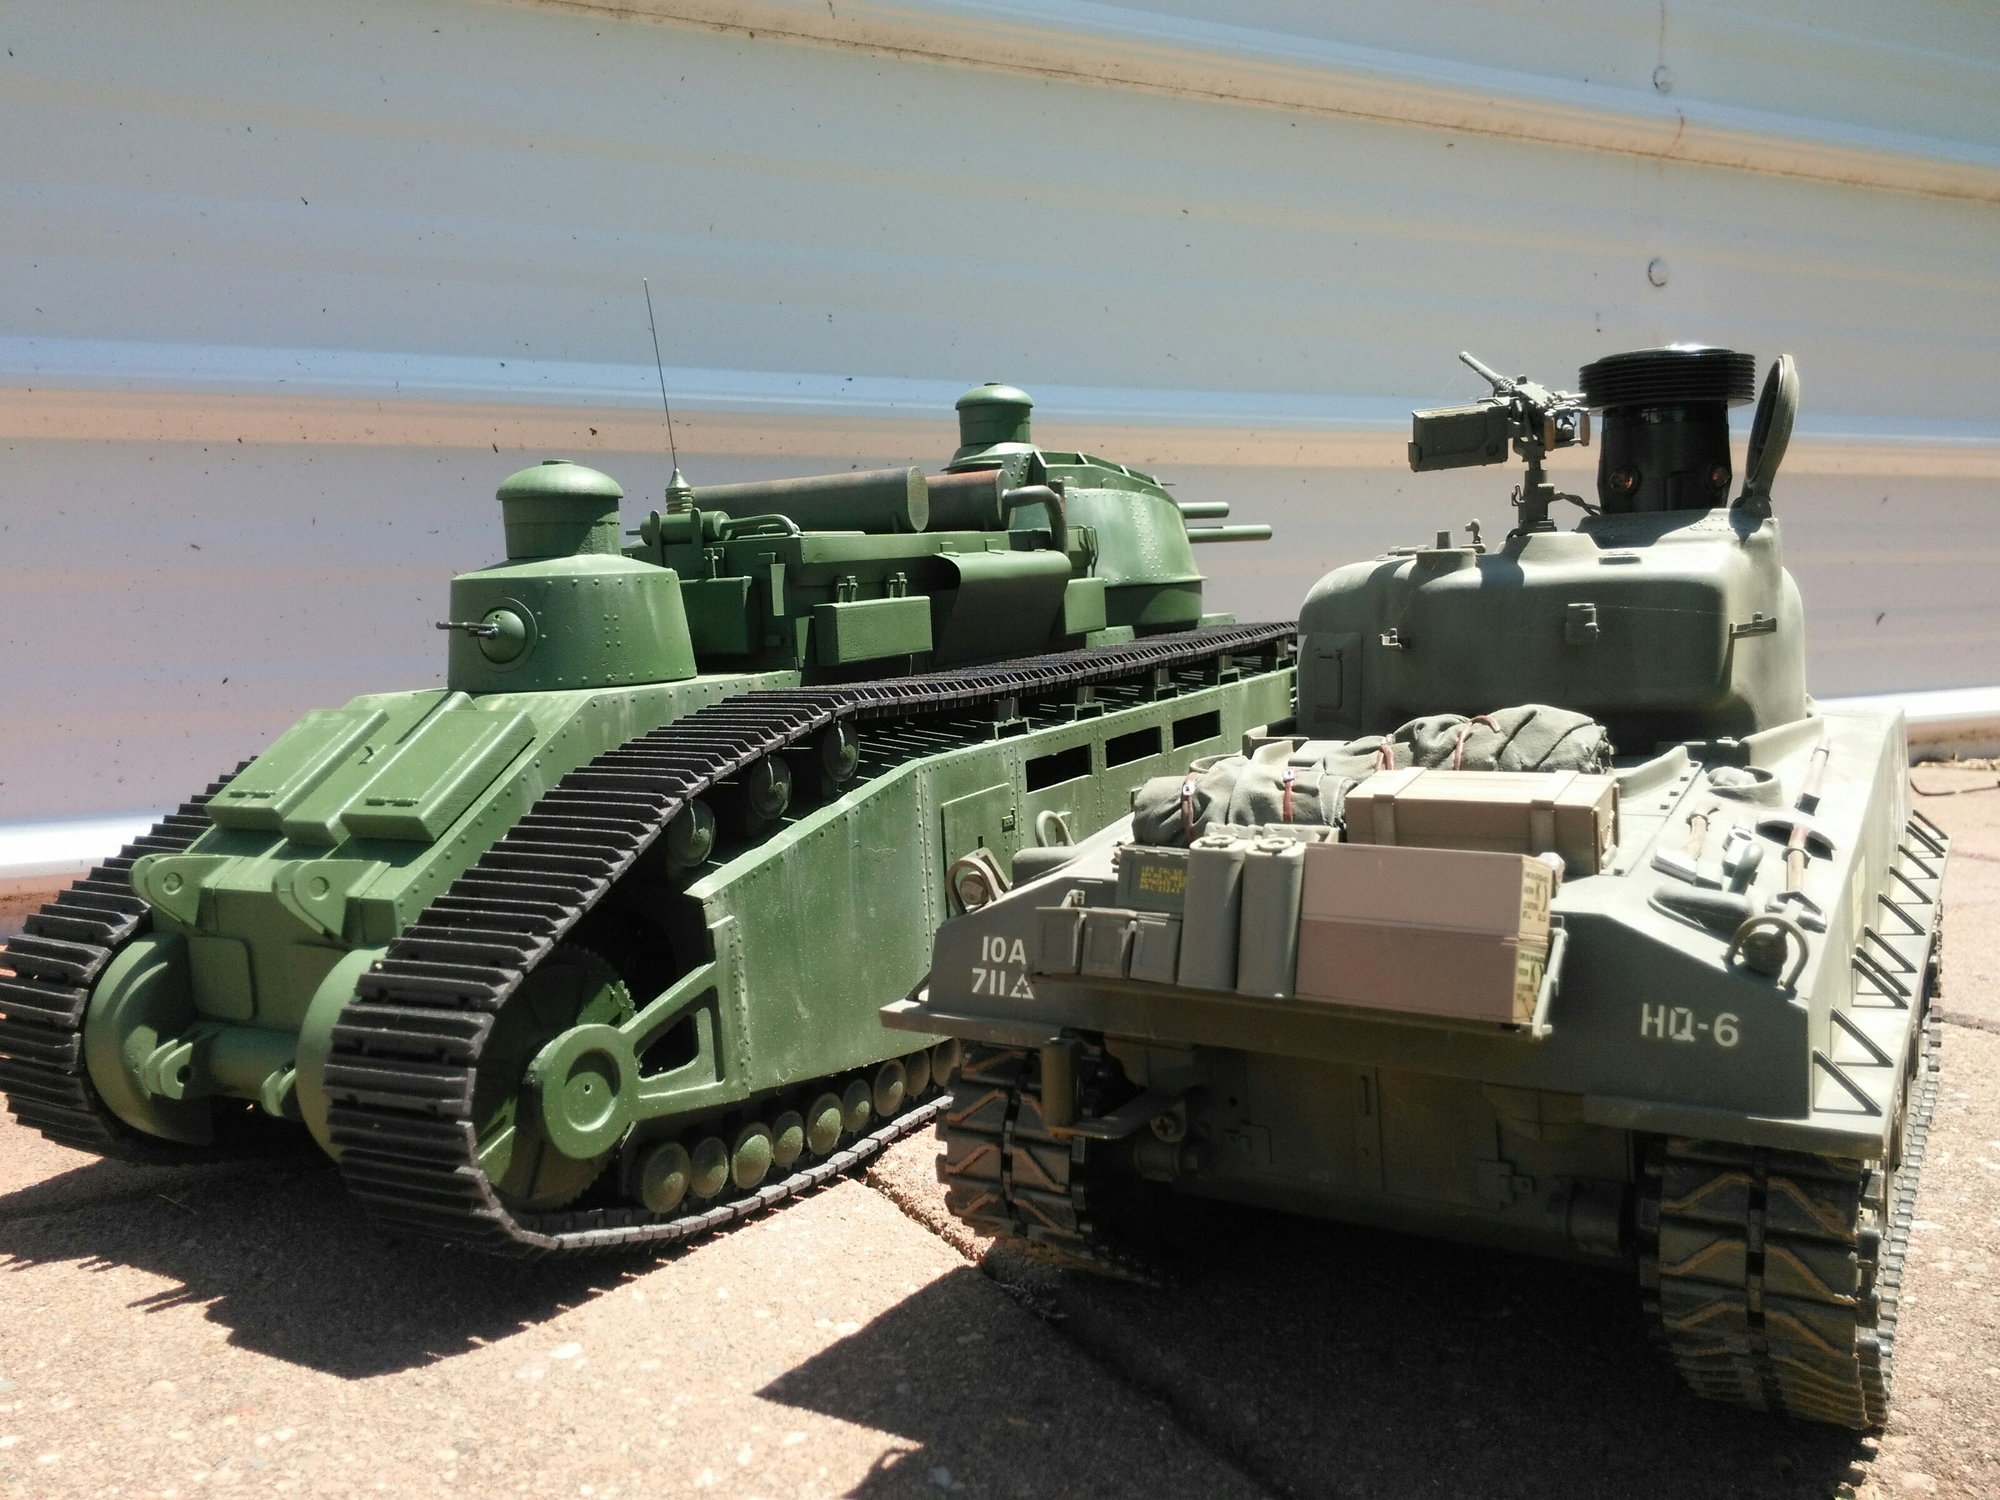
Char 2C in 1/16 scale
 06-23-2019, 08:52 AM
#1
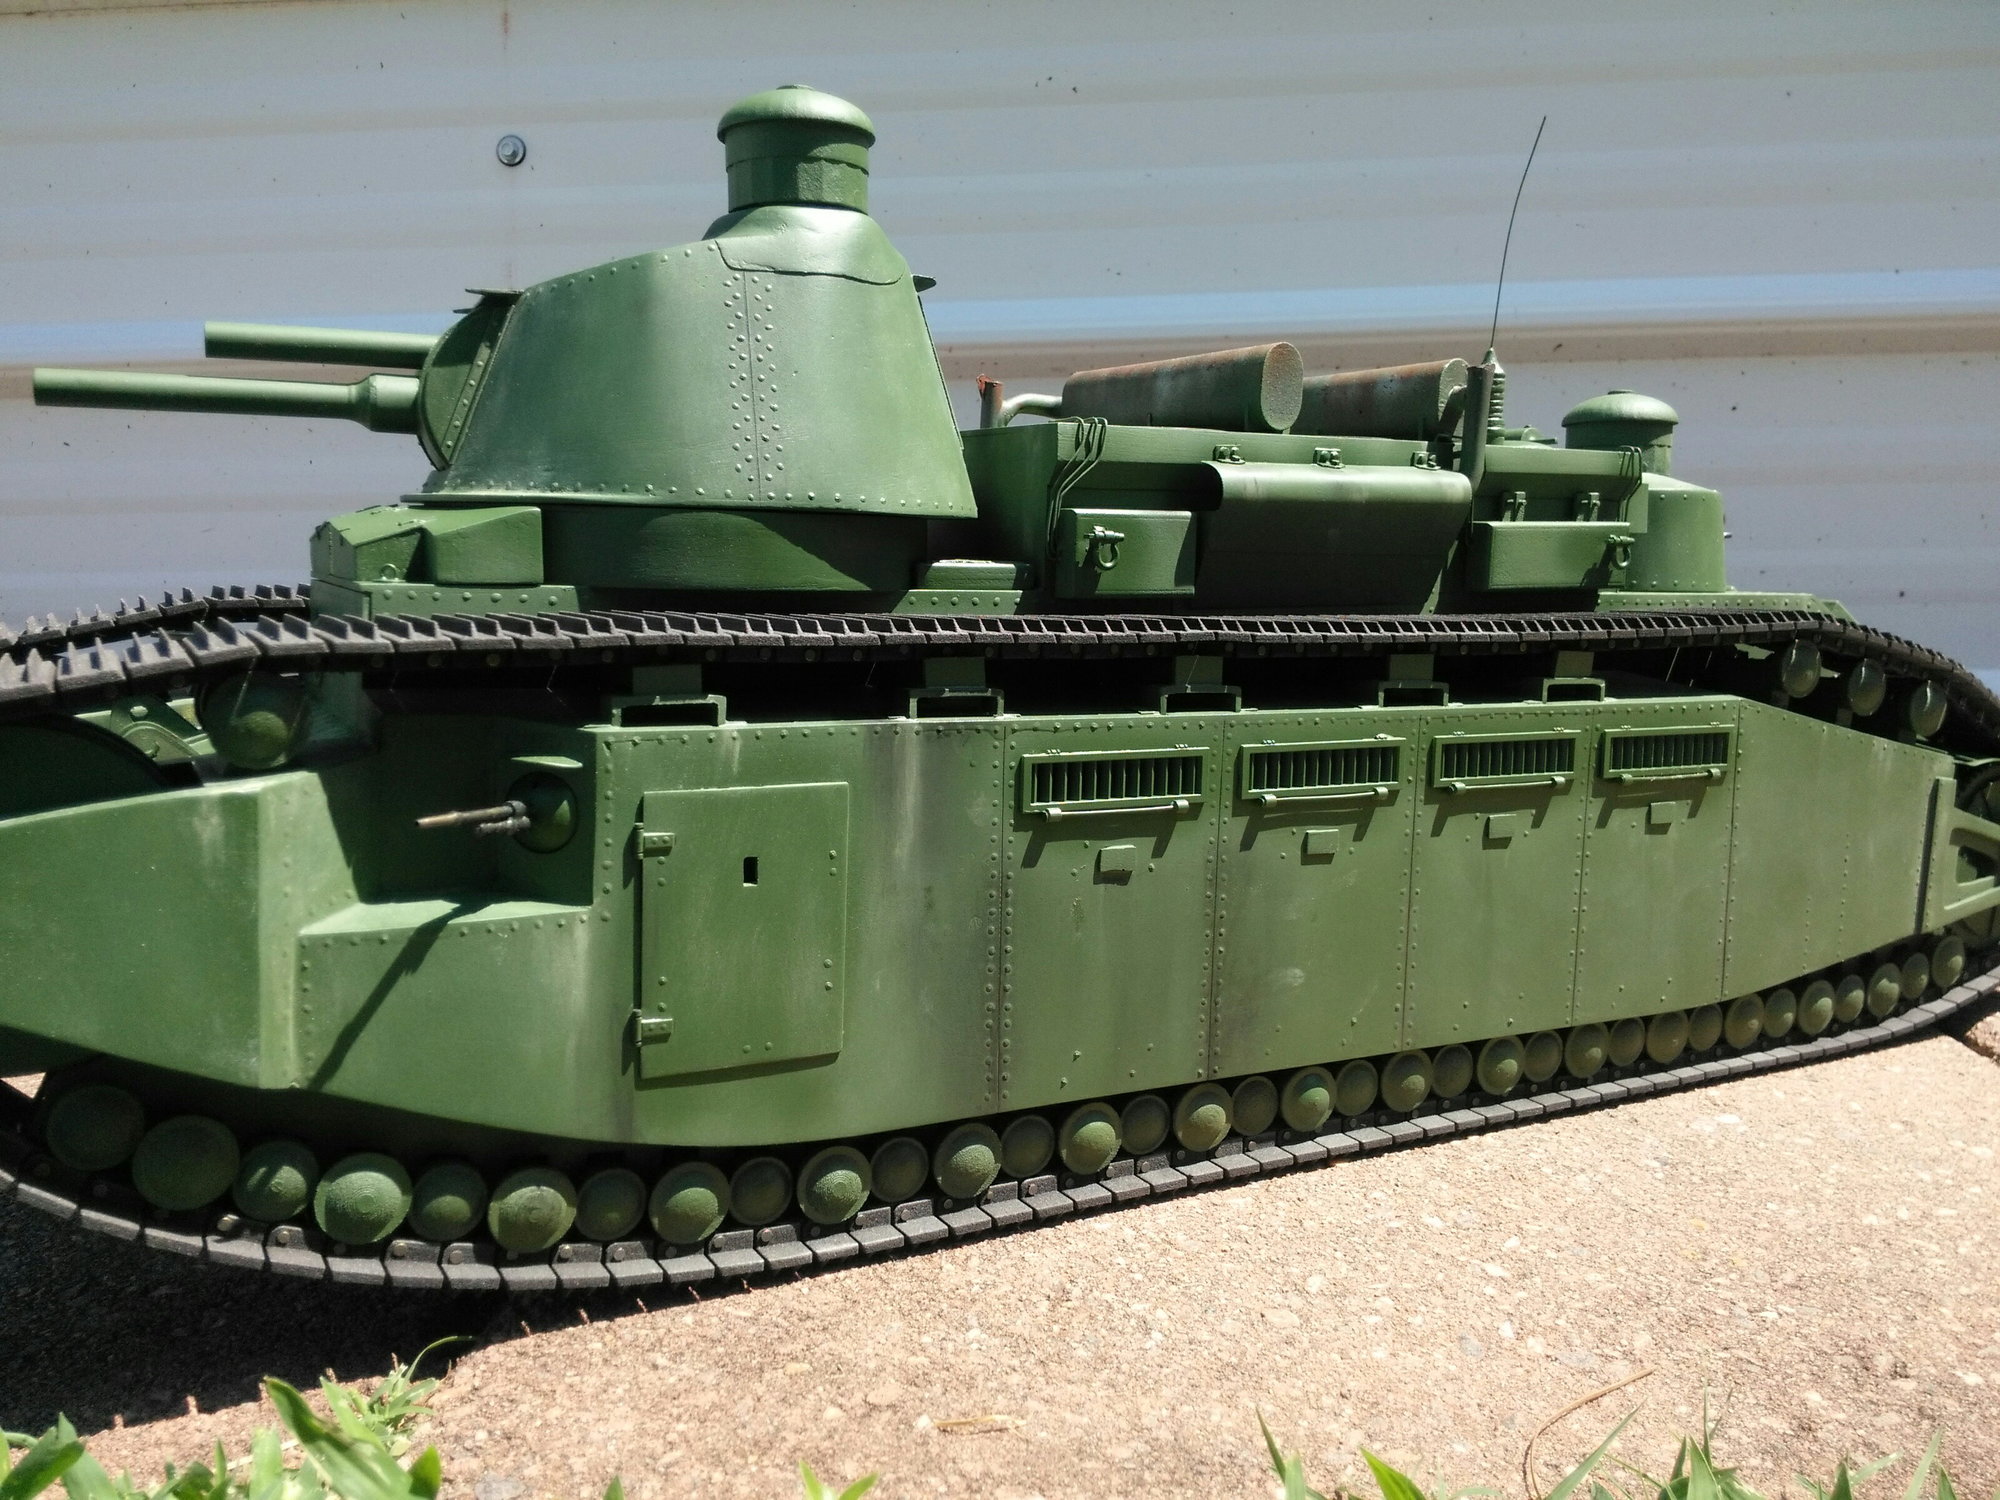
I finally found a CAD program that I was able to have some luck with! Since I have had an interest in the 1/16 IR tank battles I thought what better way to learn about 3D printing than to design and build a 1/16 tank model. If you check out my gallery you'll see I have an affinity for scratch building "different" model subjects and this carried over into my tank modeling, hence the Char 2C was born.
So far I have only driven the model across the top of my smooth work bench, who knows on the dirt roads at the Danville battle field the thing might just shed it's treads!
As of now only a DKLM "slow" gearbox is installed and I am still pondering what electronics to use for the IR battles, I will be at Danville this June 29th and will have a bunch of questions for all the experianced tankers which have been super helpful in the past helping me with the Tamiya Sherman that my wife & I built.
I still have a lot of small detail parts to design and have printed but it is starting to look like a Char 2C.
Last edited by 1qaz; 06-23-2019 at 09:01 AM.
 06-23-2019, 11:21 AM
#2

Very cool. Which CAD program is it you found you liked?
 06-23-2019, 12:00 PM
#3
Thank you Tankme,
The program that I am using is called Tinker CAD, it is a free on-line program. It's kinda limited when it comes to designing anything with a compound curve to it but as we all know tanks are a very square slab sided subjects. The hull on my model is made from .062 G10 sheet, it's all the tread links, wheels & other parts stuck on the outside where the 3D printing really came in handy.
I am still learning but Tinker CAD is a very simple "user friendly" program, the proof of that is that I was able to figure it out!
Last edited by 1qaz; 06-23-2019 at 12:04 PM.

 06-23-2019, 12:45 PM
#5
Very cool! It would be nice to see a movie of it in action when you get it battle ready.
06-23-2019, 06:37 PM
#6

Very nice! Always good to see something different for a change.
06-24-2019, 04:20 AM
#8
Thank you all for the kind words, Eric as of yet I still have not made up my mind about what electronics to use. I am thinking that a Clark 60 board will be the way to go because of the gearbox design. I have never seen a gearbox that is designed like the DKLM where it has a primary motor for forward & reverse and a separate motor for steering. From what I have been told adapting a Tamiya unit to this setup is a challenge,
So far all I have done is make a long set of wire leads where I can run the motors from a hand held battery to drive the thing around, I am concerned that the model my try and shed it's treads in sharp turns because the thing is so long but time will tell.
I will be at Danville this coming weekend and hopefully with all the experianced tankers there I will get a clue as to which way to go with the electronics for this thing.
Larry
Last edited by 1qaz; 06-24-2019 at 04:23 AM.
06-24-2019, 04:28 AM
#9
Actually, I used the Tamiya Type 10 electronics for the DKLM gearbox in my Churchill and it worked out really well, plug and play.
Any of the Tamiya Leo 2A6, M1A1/2 or Type 10 could be used with the DKLM gearbox.
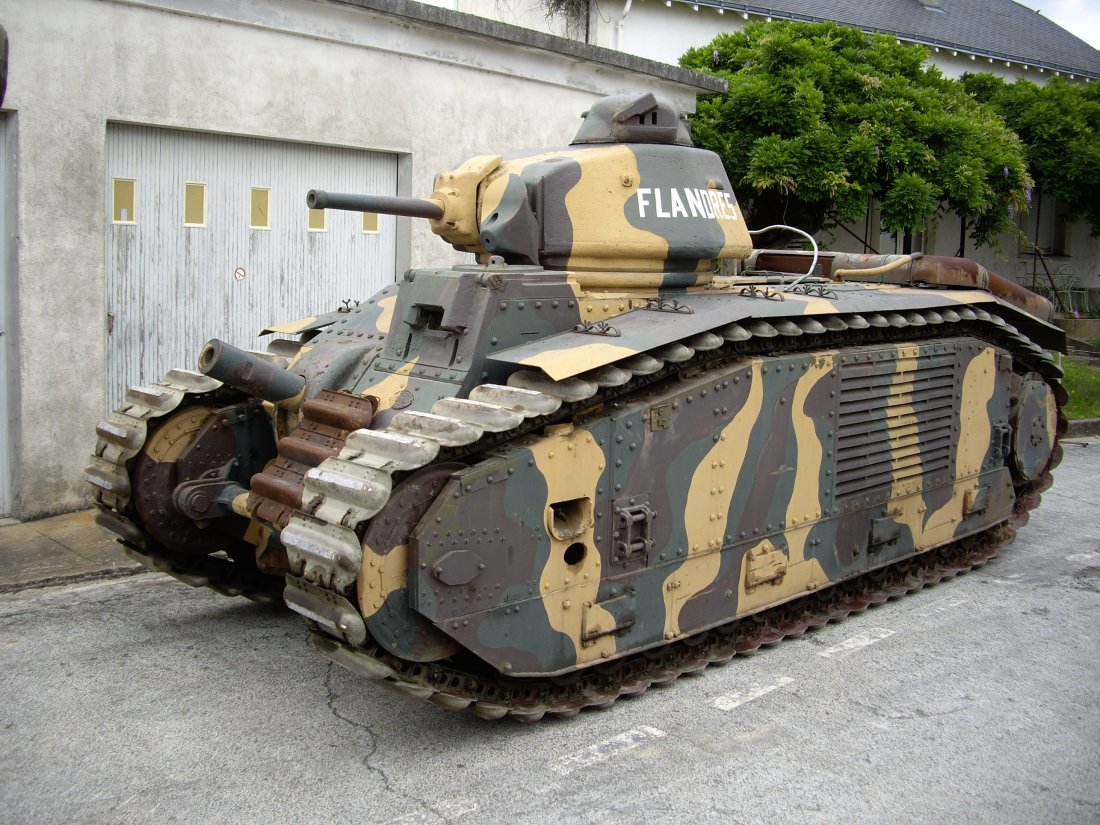
Also for those interested, despite cartoonish appearance, nice history on the Char 2C:
Any of the Tamiya Leo 2A6, M1A1/2 or Type 10 could be used with the DKLM gearbox.
Also for those interested, despite cartoonish appearance, nice history on the Char 2C:
06-24-2019, 04:54 AM
#10
Thank you all for the kind words, Eric as of yet I still have not made up my mind about what electronics to use. I am thinking that a Clark 60 board will be the way to go because of the gearbox design. I have never seen a gearbox that is designed like the DKLM where it has a primary motor for forward & reverse and a separate motor for steering. From what I have been told adapting a Tamiya unit to this setup is a challenge,
So far all I have done is make a long set of wire leads where I can run the motors from a hand held battery to drive the thing around, I am concerned that the model my try and shed it's treads in sharp turns because the thing is so long but time will tell.
I will be at Danville this coming weekend and hopefully with all the experianced tankers there I will get a clue as to which way to go with the electronics for this thing.
Larry
So far all I have done is make a long set of wire leads where I can run the motors from a hand held battery to drive the thing around, I am concerned that the model my try and shed it's treads in sharp turns because the thing is so long but time will tell.
I will be at Danville this coming weekend and hopefully with all the experianced tankers there I will get a clue as to which way to go with the electronics for this thing.
Larry
What an awesome tank you have. Congrats.
07-03-2019, 07:44 AM
#12
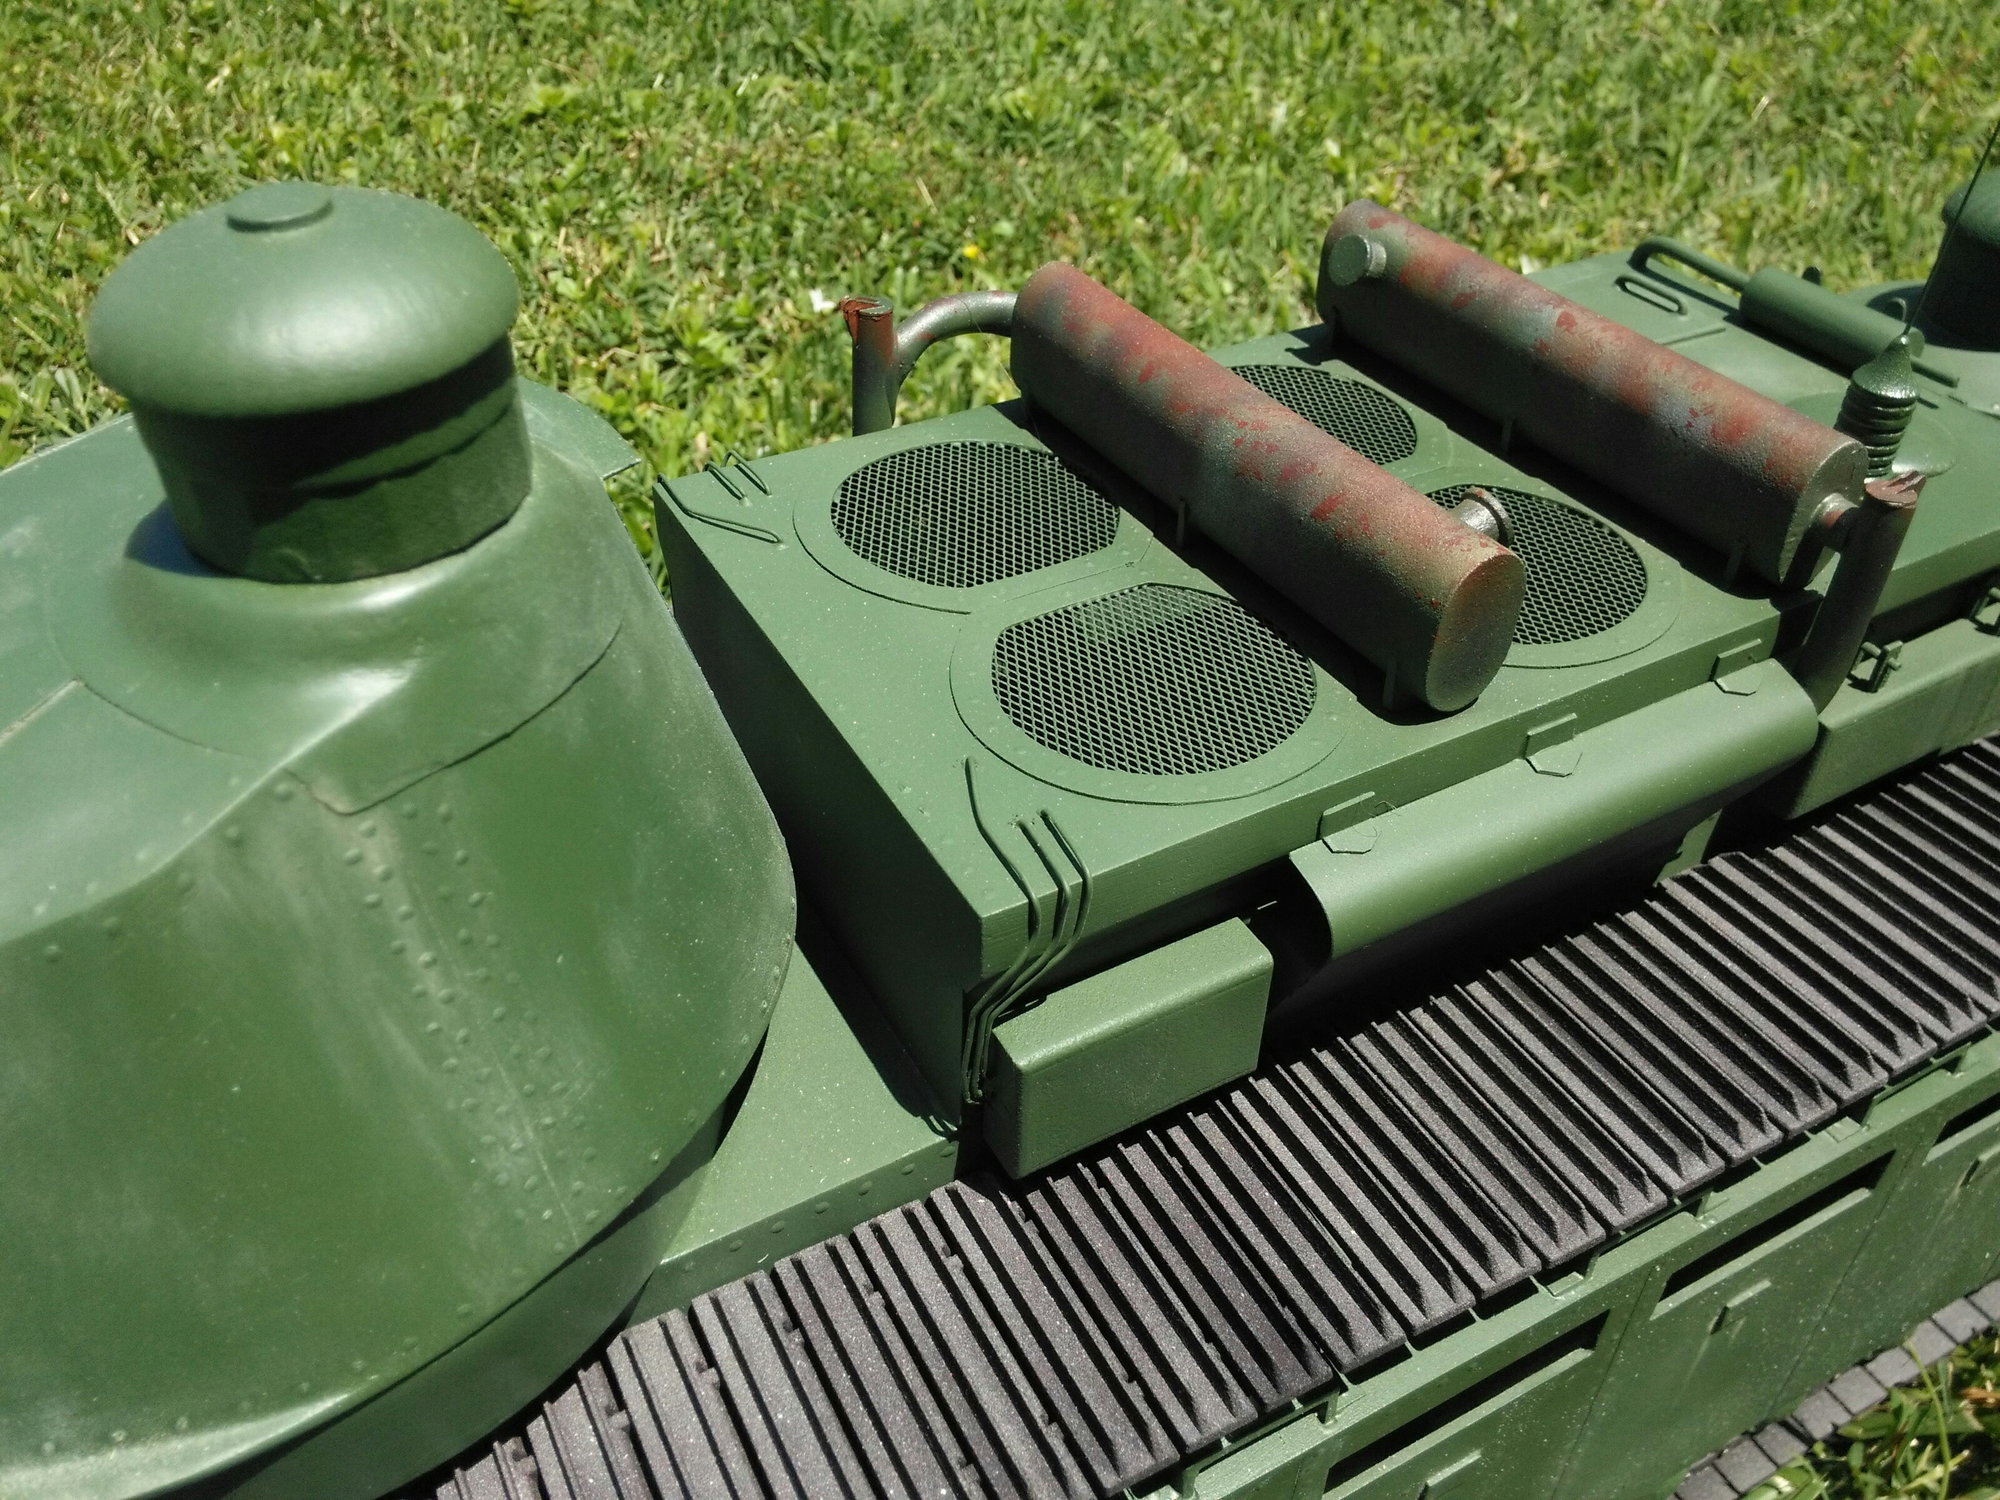
Finally got my last small parts from ShapeWays, the louvers on the sides of the model and the 4 small shackles that are on the boxes up on the engine house. I now have on order an IBU2 tank board which should be here next week and I have started to mount all the electronic stuff. The base for the Tamiya "apple" is mounted up in the turret, the IR emitter is mounted in the upper part of the gun barrel so you can't see it.
Now to do a bunch more weathering, build the headlight which sits up between the drivers window and the forward machine gun, things are coming together!

Now to do a bunch more weathering, build the headlight which sits up between the drivers window and the forward machine gun, things are coming together!
07-03-2019, 11:54 AM
#14
Super cool model. I'd be curious how much the printed parts were from Shapeways- if you care to share. Excellent job and great looking model. I use SW for a lot of printed parts, but never made complete tank using parts printed by them.
Best regards,
Bob
Best regards,
Bob
07-03-2019, 04:35 PM
#15
Thank you guys for the compliments! Bob, the hull of the tank is all made from .062 G10 sheet, it's the same stuff that circuit boards are made from and it is some tuff stuff. The parts that I had printed by Shape Ways were the track links (158 required), all the wheels, the bearing blocks for all the road wheels, the strange boxes that are all over the tank, the side louvers, the 4 small shackles, the mushroom hatch parts on both of the turrets, and finally the 2 mufflers on top of the engine house. All of these parts came in at just under $2000.00 dollars, the material I opted to go with was their versatile plastic which is actually one of the least expensive materials to go with! Also part of the grand total was thrown in the trash because of my design issues, the drive wheels had to be printed 3 times before I finally got it right in the CAD program so that is my fault.
I am super happy with the quality of the parts that I have received from SW and when I went to Danville this past weekend nobody could break a tread link, one of the guys was hitting a link with a hammer and it's still just fine so it is some really strong material.
Once I get the IBU2 board in the thing I'll post a video of the model actually running, that is if the treads stay on
I am not sure if I'll scratch build another tank anytime soon due to the price, but I just had to build something different instead of another Tiger or Sherman. One thing is for sure, I will never complain about the price of a Tamiya tank kit ever again
Last edited by 1qaz; 07-04-2019 at 02:39 AM.
07-06-2019, 03:04 PM
#16
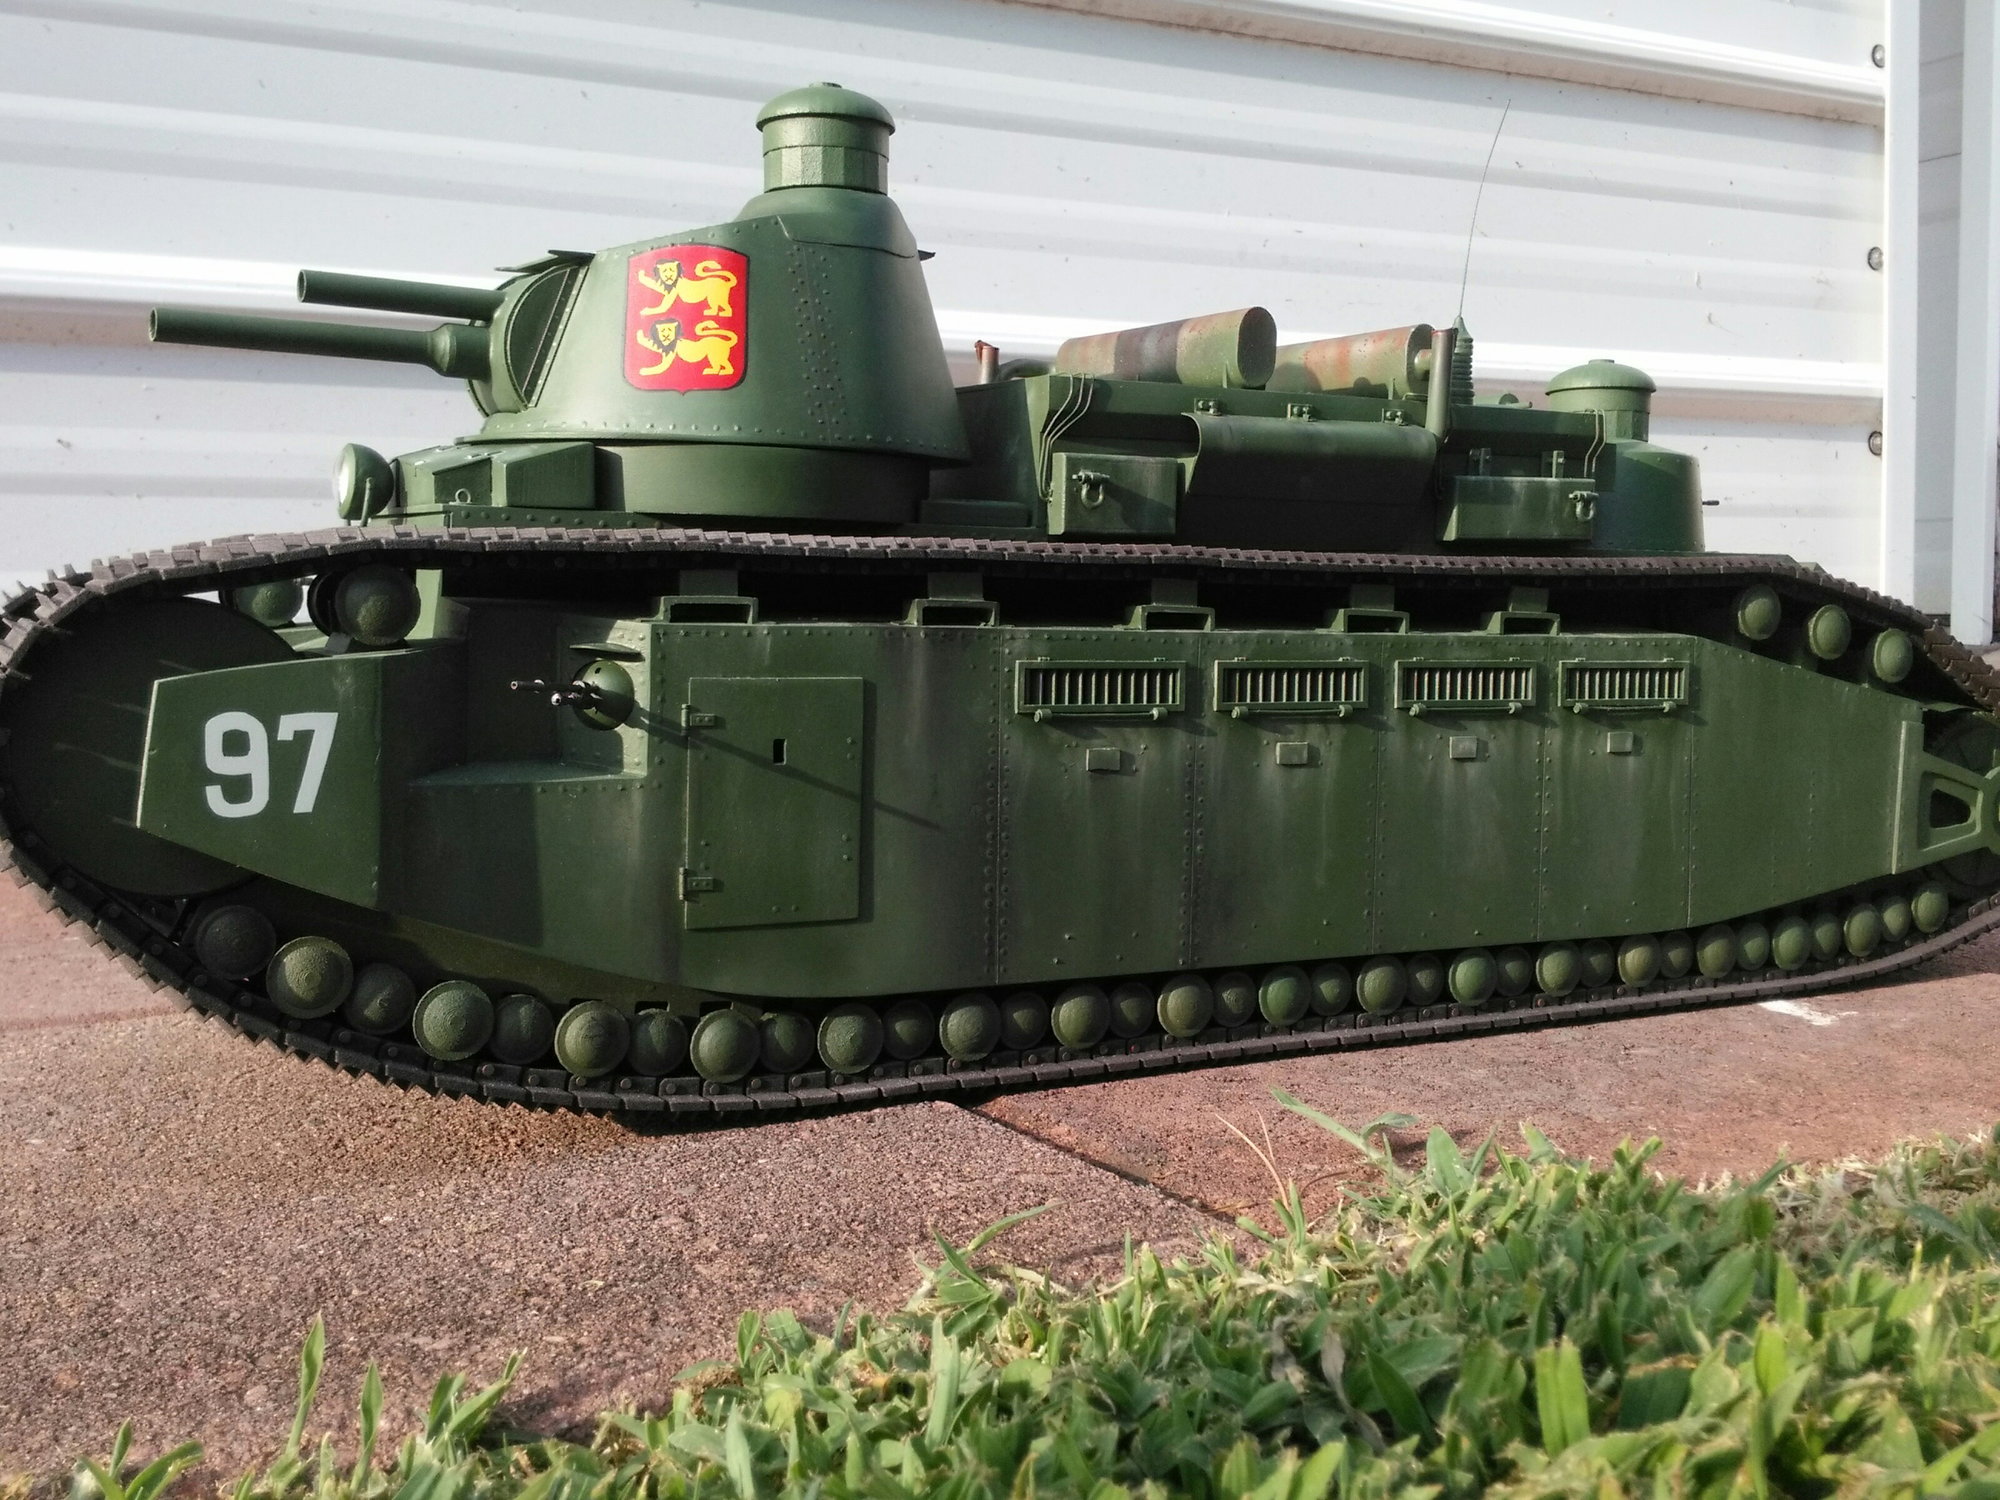
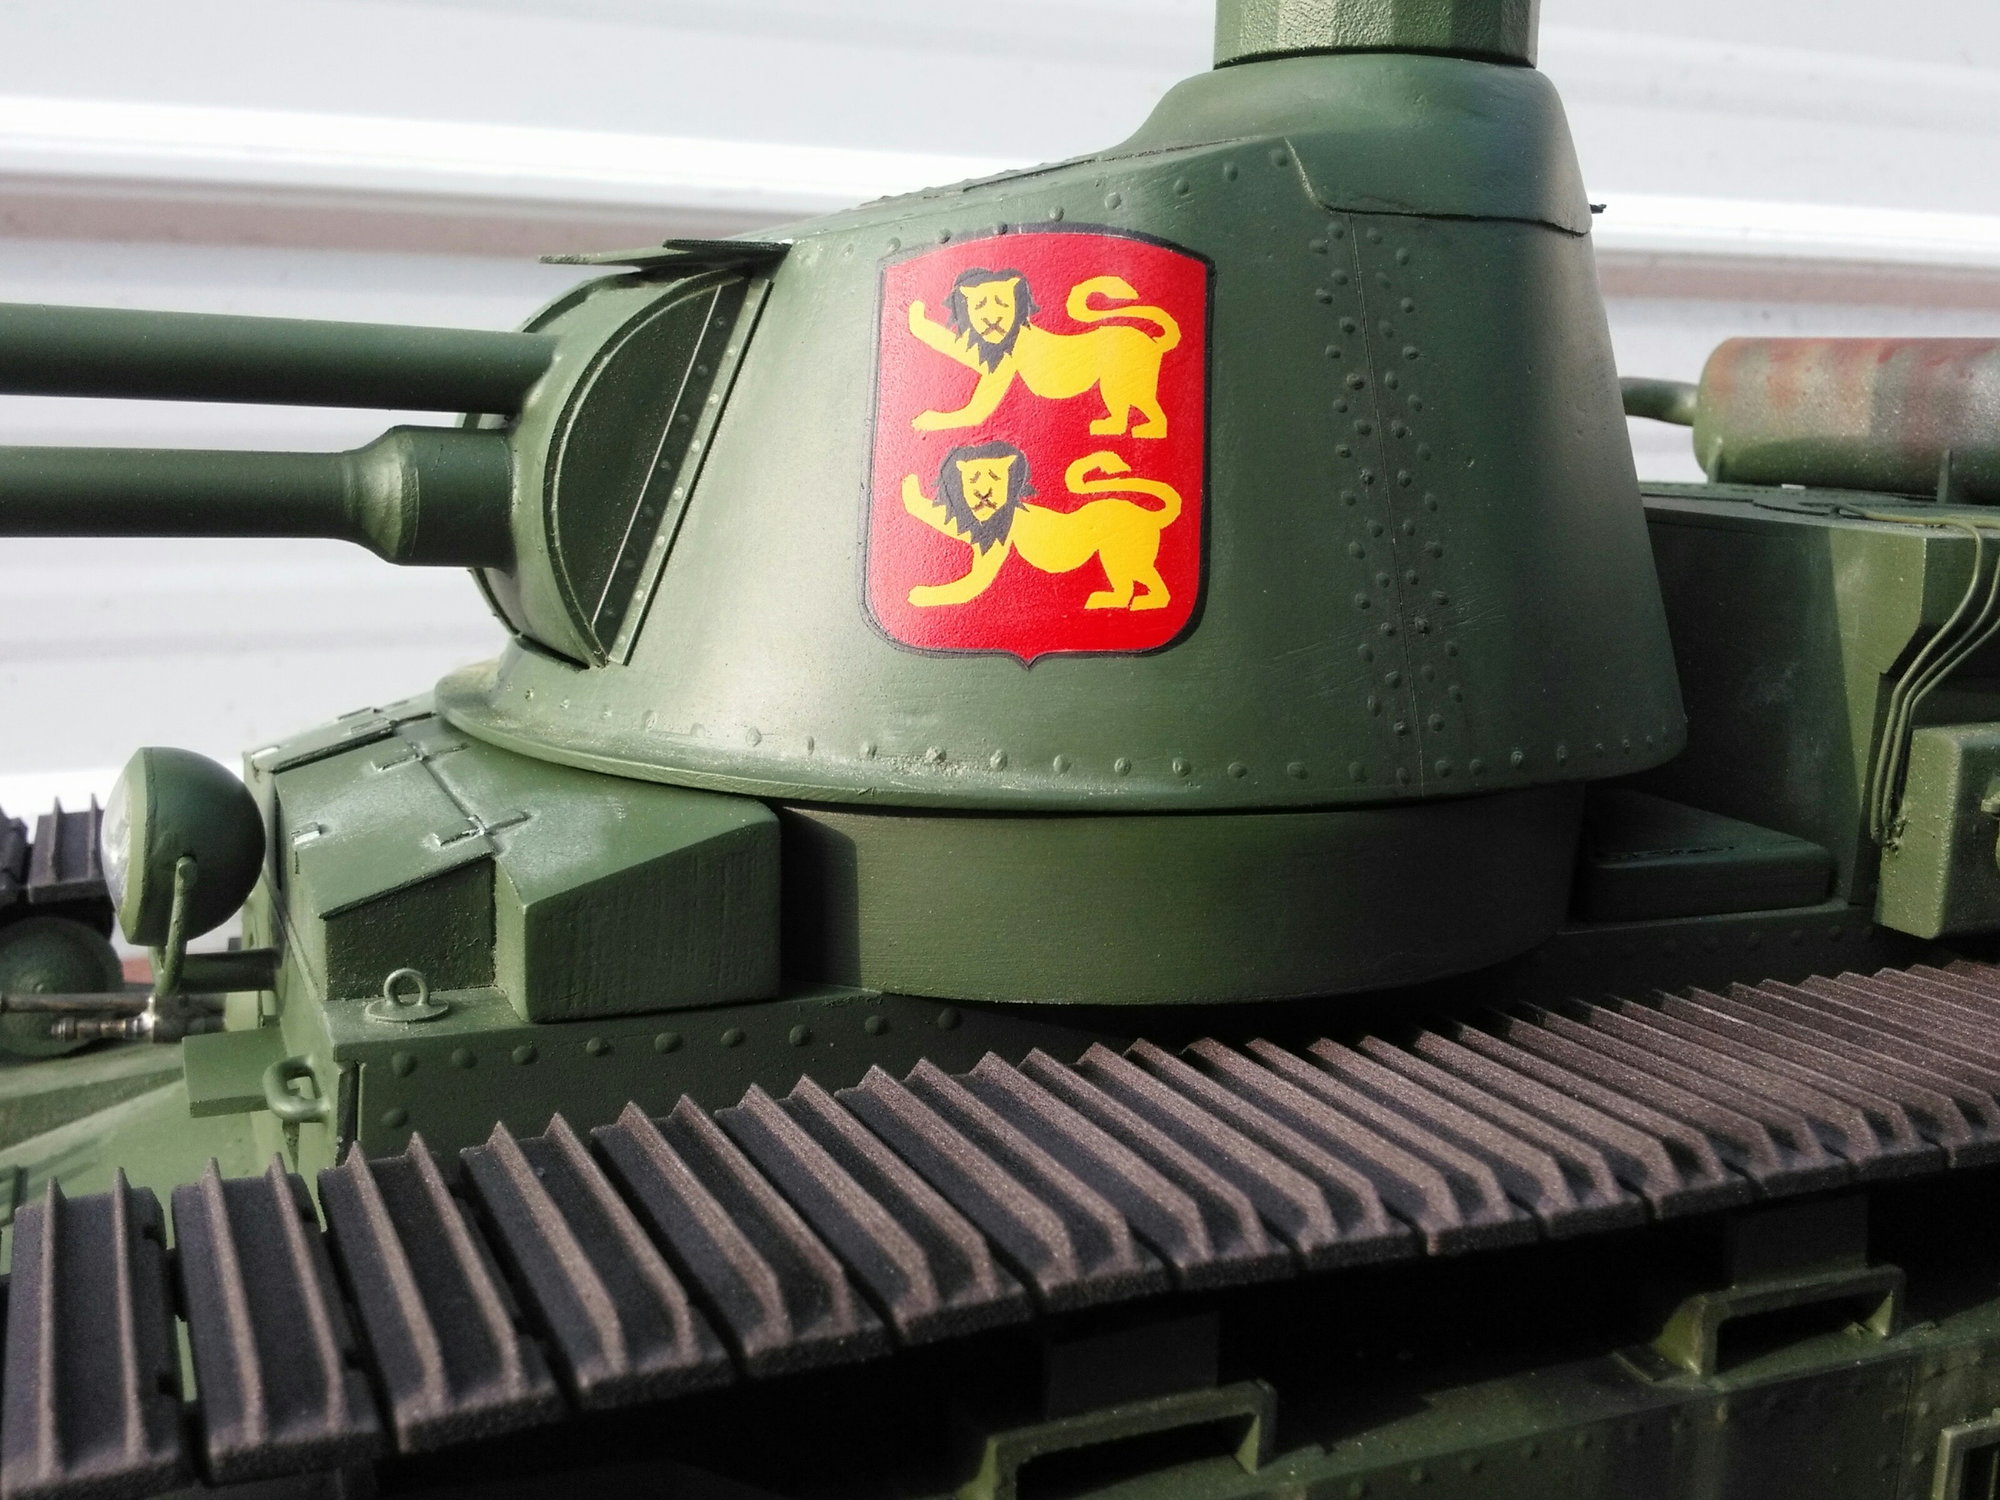
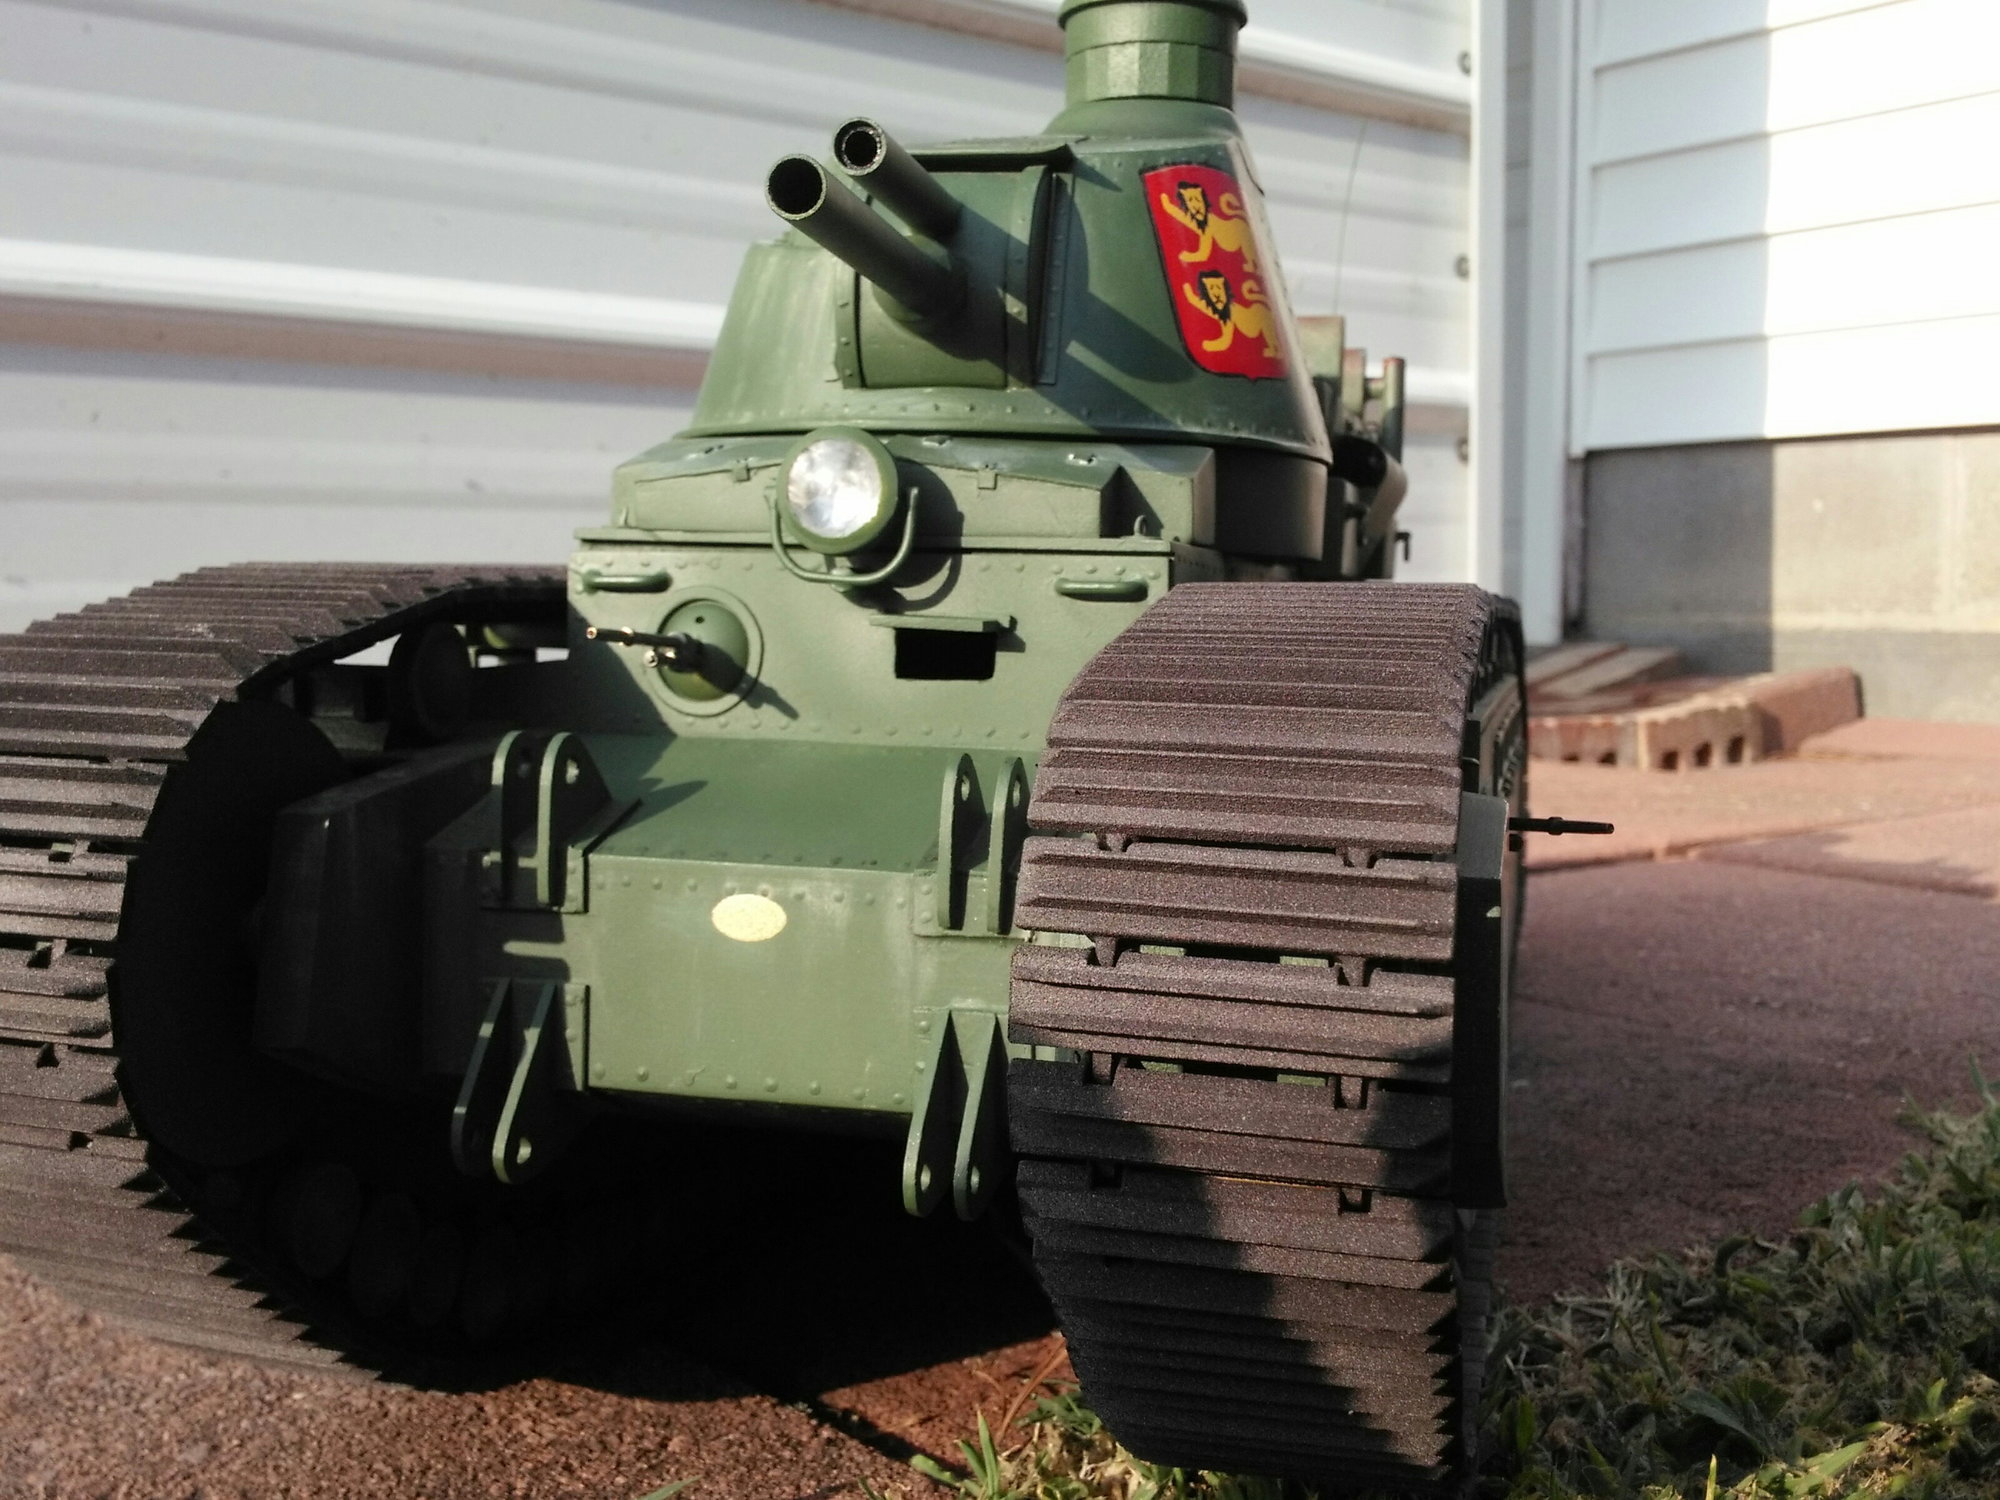
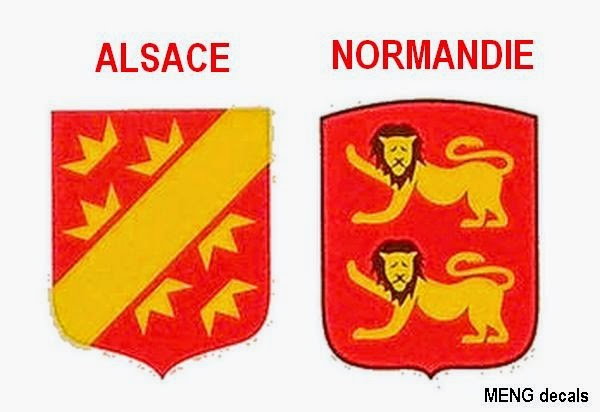
Finally it's finished, all except for a bit more weathering. Today I finished the headlight and did some of the insignia markings. Those lions on the turret were a challenge to paint! I ended up hand cutting stencils for them and I can't remember a more tedious job cutting the insignia in the past 50 years of modeling!
The "97" is also hand cut but that was not to bad.
Hopefully I will be getting my IBU2 board this coming week and I can get the electronic stuff done and make it a running model.
Now to ponder what the next project will be?
Last edited by 1qaz; 07-06-2019 at 03:09 PM.
07-06-2019, 06:01 PM
#18
That's really quite impressive. I like it. Great job. It's humbling when you make something from scratch just how much
work goes into it. Furthers one's appreciation for both kits and how much effort went into designing and implementing
the original item in the first place,,,
Jerry
work goes into it. Furthers one's appreciation for both kits and how much effort went into designing and implementing
the original item in the first place,,,
Jerry
07-07-2019, 05:02 AM
#19
THIS really raises the bar! Thanks for sharing and hoping to see it in some future videos.
07-07-2019, 06:06 AM
#20
Do you really want to see a video of the thing going 6 inches before shedding it's treads along with some other parts? Even if that happens it will be posted on a video for all to see!
If that happens the model will be relegated to the static model shelf If it does run good then it will be off to the Danville tank battles at the AAF museum.
If that happens the model will be relegated to the static model shelf
If it does run good then it will be off to the Danville tank battles at the AAF museum.
Last edited by 1qaz; 07-07-2019 at 06:08 AM.
07-07-2019, 03:06 PM
#21
1gaz Thanks for the details. It really is an impressive model. The versatile plastic is a Nylon, and should last forever. I use the Versatile, but also their Professional plastic, which is a sintered (baked, heat treated) nylon. It is extremely tough material. It makes great gears and track links, but is more expensive. Gears printed in this material run really quiet and wear well. I'd hate for that beauty to be a shelf queen though. At any rate, great project thanks for sharing. I like their detail plastic for periscopes and detail parts which are not subject to impact, or high loads. So far SW has been a good value for me - you do have to make sure to get your CAD just right before buying though. Been there - done that (on remaking parts) too.
B
B
07-13-2019, 01:34 PM
#22
As I promised all you fellow tankers, when it runs there will be a short clip. It does have tread issues and as a result I have changed the design of the flanged road wheels just a bit and I changed the main drive wheels in the back.
I am not sure if my re-design will do the trick or not but whats another hundred dollars in printed parts, I'm in to deep to quit now !!!!
I am not sure if my re-design will do the trick or not but whats another hundred dollars in printed parts, I'm in to deep to quit now !!!!
Last edited by 1qaz; 07-13-2019 at 04:30 PM.
07-13-2019, 04:33 PM
#23
And I added a bit of "mud" to give it that used look. I may take the model to the IPMS nationals in Chattanooga this August so I have to make it look good, nobody has to know that it is junk when it comes to actual running Maybe I should stick to building model airplanes and give up on tanks?

Maybe I should stick to building model airplanes and give up on tanks?
07-13-2019, 04:54 PM
#24
Keep building tanks.