


Question about gold metal dust shavings on my Sherman gearboxes
 04-17-2021, 12:48 PM
#1

Thread Starter
Join Date: Dec 2007
Location: Vienna, VA
Posts: 161
Likes: 0
Received 0 Likes
on
0 Posts
Hello there. I'm sure this is a rookie question, but I could not really find much about it using the search function on this forum. I notice that when I run any of my Taigen 1/16th tanks, gold metal dust shavings end up deposited on the gearboxes and surrounding floor of the lower chassis afterwards. This is especially true of my 75 mm metal Sherman (a lot of this gold stuff appears). My question is what causes these shavings and should I be concerned about them? And what adjustments do I need to make to keep it from happening (if it in fact is a problem)? Thanks in advance for maybe explaining a bit.
 04-17-2021, 06:19 PM
#2
Hello there. I'm sure this is a rookie question, but I could not really find much about it using the search function on this forum. I notice that when I run any of my Taigen 1/16th tanks, gold metal dust shavings end up deposited on the gearboxes and surrounding floor of the lower chassis afterwards. This is especially true of my 75 mm metal Sherman (a lot of this gold stuff appears). My question is what causes these shavings and should I be concerned about them? And what adjustments do I need to make to keep it from happening (if it in fact is a problem)? Thanks in advance for maybe explaining a bit.
Jerry
04-18-2021, 06:11 AM
#3
Thread Starter
Join Date: Dec 2007
Location: Vienna, VA
Posts: 161
Likes: 0
Received 0 Likes
on
0 Posts
OK, thanks for trying to explain to me, Tanque. Would you please elaborate: how can I determine if my motor is 'out of adjustment'? Is there a setting I can change? I've tried to make sure my motors are both bolted down tightly. I also noticed that one of the small screws bolting the right motor horizontally was loose; so I tightened that. For whatever reason, only the right gears make this slightly grinding sound at times (and it is also the right gearbox that is generating a ton of this 'gold dust' shavings. It's starting to perhaps become an issue because this gold dust is getting all over my speaker and a bit into my motherboard. I don't know if I am going to have even bigger problems, though as time goes on? Puzzled as to why only the right gearbox is shedding gold dust and not the left one...I've only run my Sherman a few times thus far.
04-18-2021, 06:56 AM
#4

The gold dust is brass shavings. If its a taigen sherman, then its from the pinion gear as thats the only brass gear unless you have a different tranny than I am aware of.
I use a teflon grease with ptfe applied lightly to all the gears and it sticks well. I have a lot of taigen shermans and I drive them alot and dont have piles of bras dust in them.
That is a bit concerning. Why dont you lift the upper hull off and take the nose off the tank with the 4 screws and take a look at your trannys. Take some photos and post them here,
Take views like straight down and at a 45 degree front inward and then straight on from the front where the nose would be. Also try to get a photo of teh amount of brass dust your finding.
04-18-2021, 08:28 AM
#5
A common way of checking for gear tooth spacing is to loosen the motor and put a thin piece of paper between the gears, puching the motor's pinion closer to the driven gear and tighten the motor screws. The paper should be able to be pulled out easily with only a little resistance. The trick is using the correct thickness of paper for the gear pitch you have. I believe all the Heng Long- like stuff uses what .7 or .8 Module gears? I wouldn't use anything thicker than a strip of telephone book page...
This other forum explains it better than I. Check gears
Jerry
This other forum explains it better than I. Check gears
Jerry
04-18-2021, 10:11 AM
#6
Thread Starter
Join Date: Dec 2007
Location: Vienna, VA
Posts: 161
Likes: 0
Received 0 Likes
on
0 Posts
t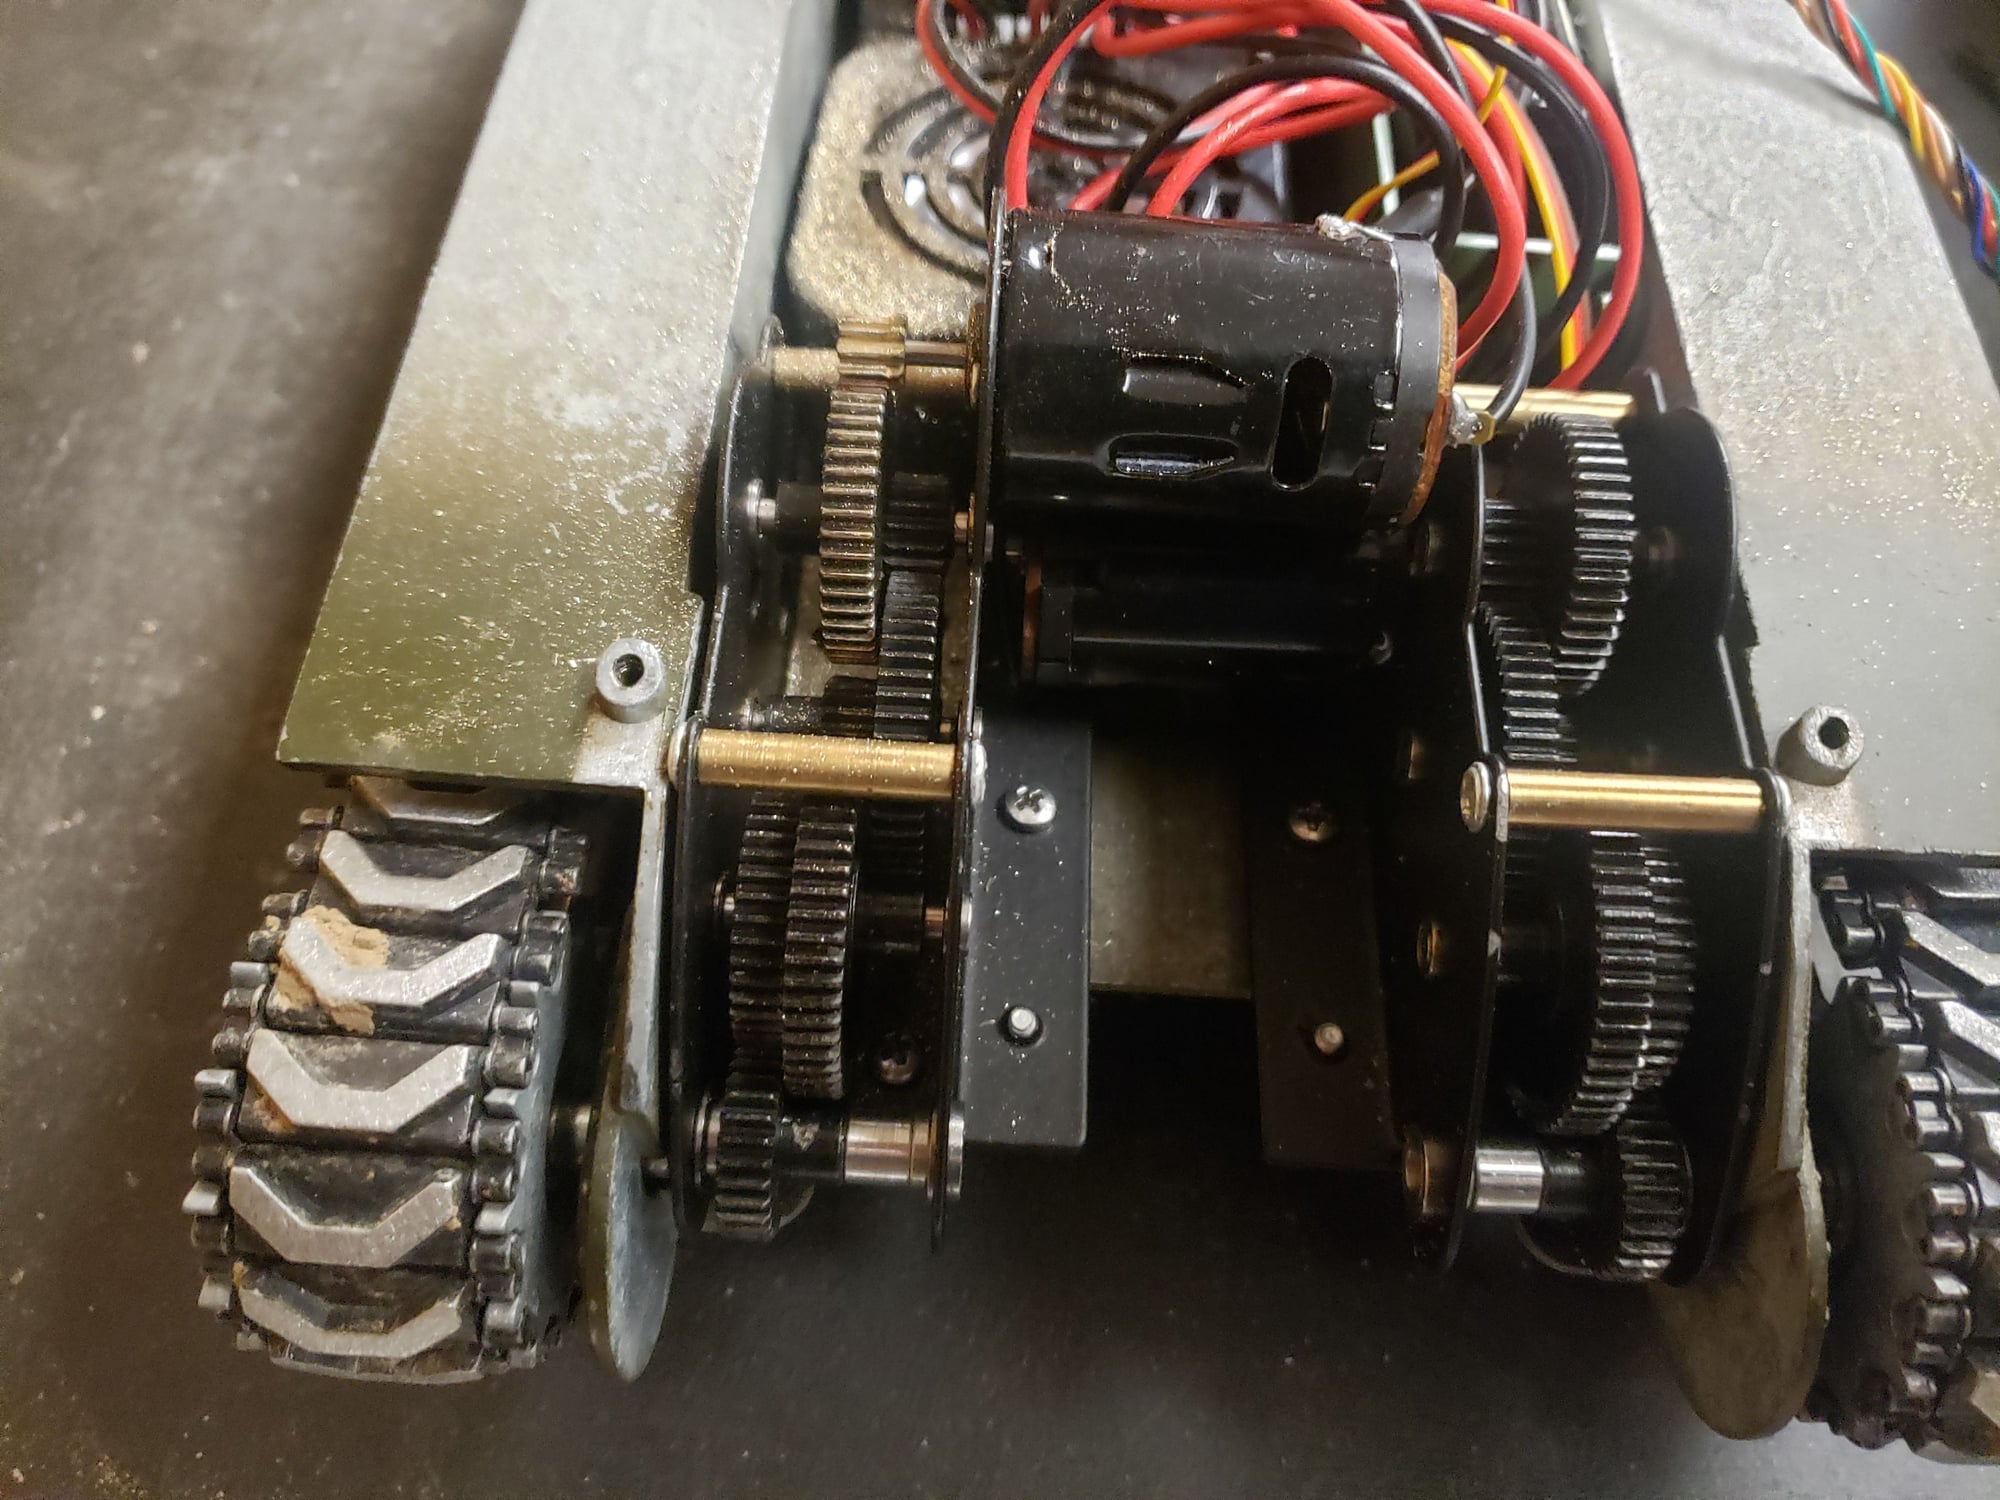
Sherman 75mm (45 degree angle view)

Tiger I Left gearbox
Tiger I left gearbox
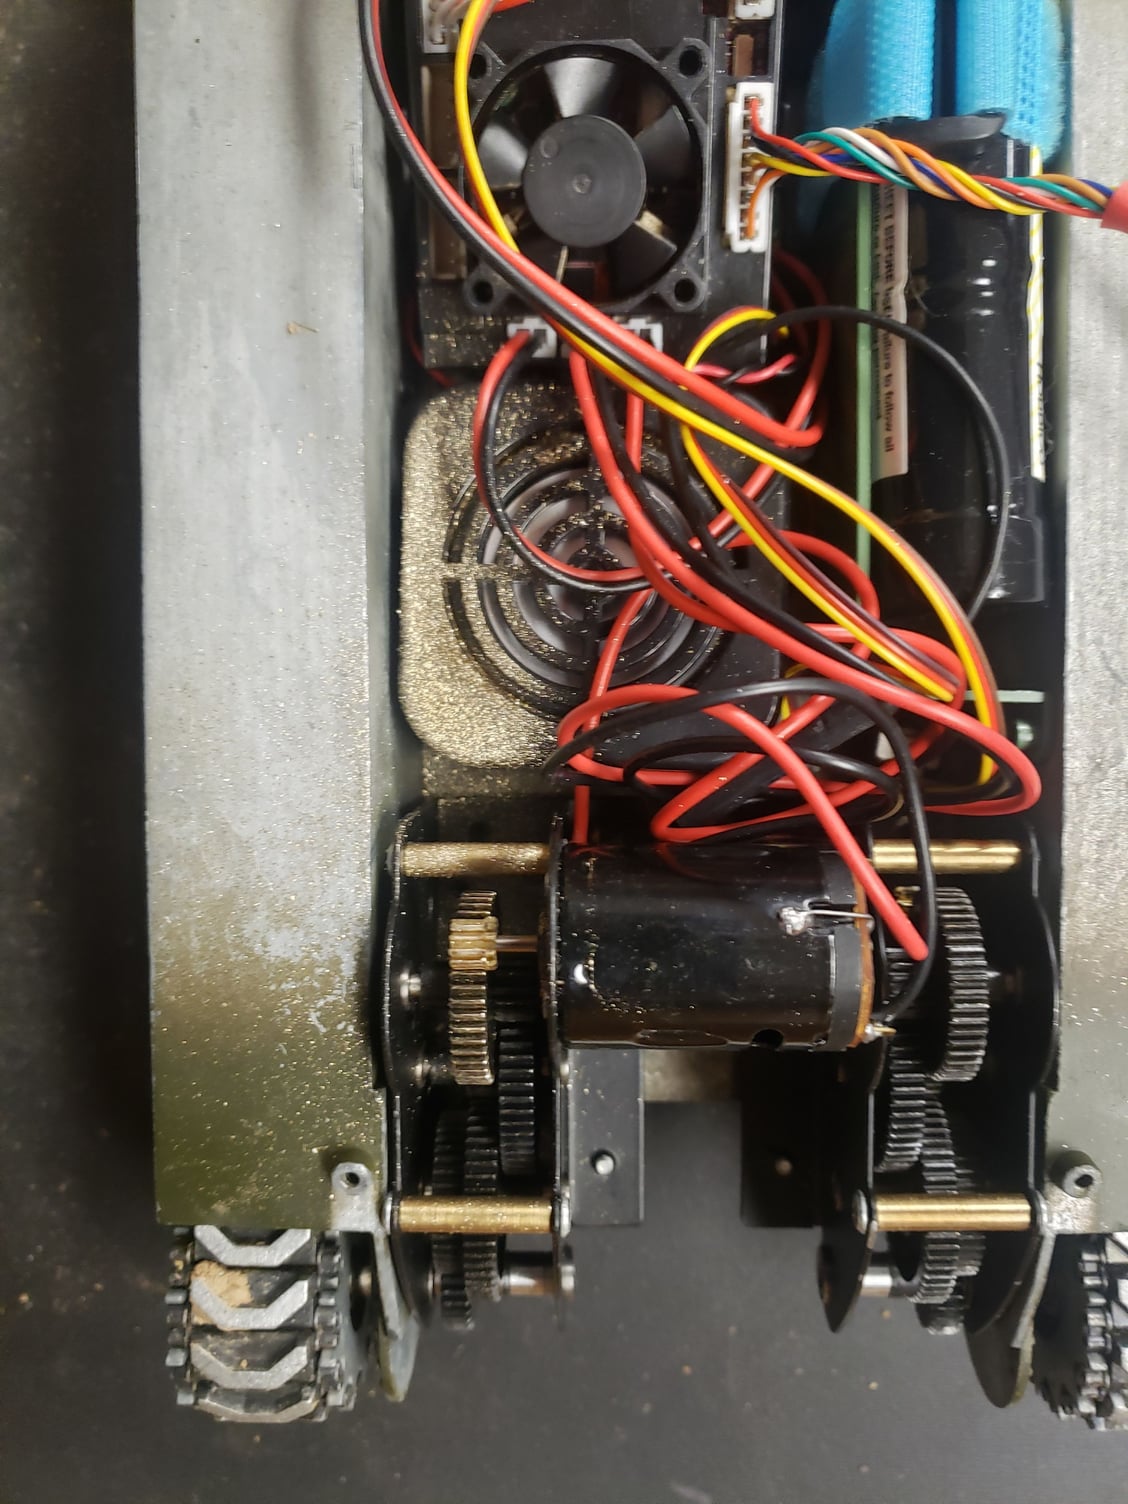
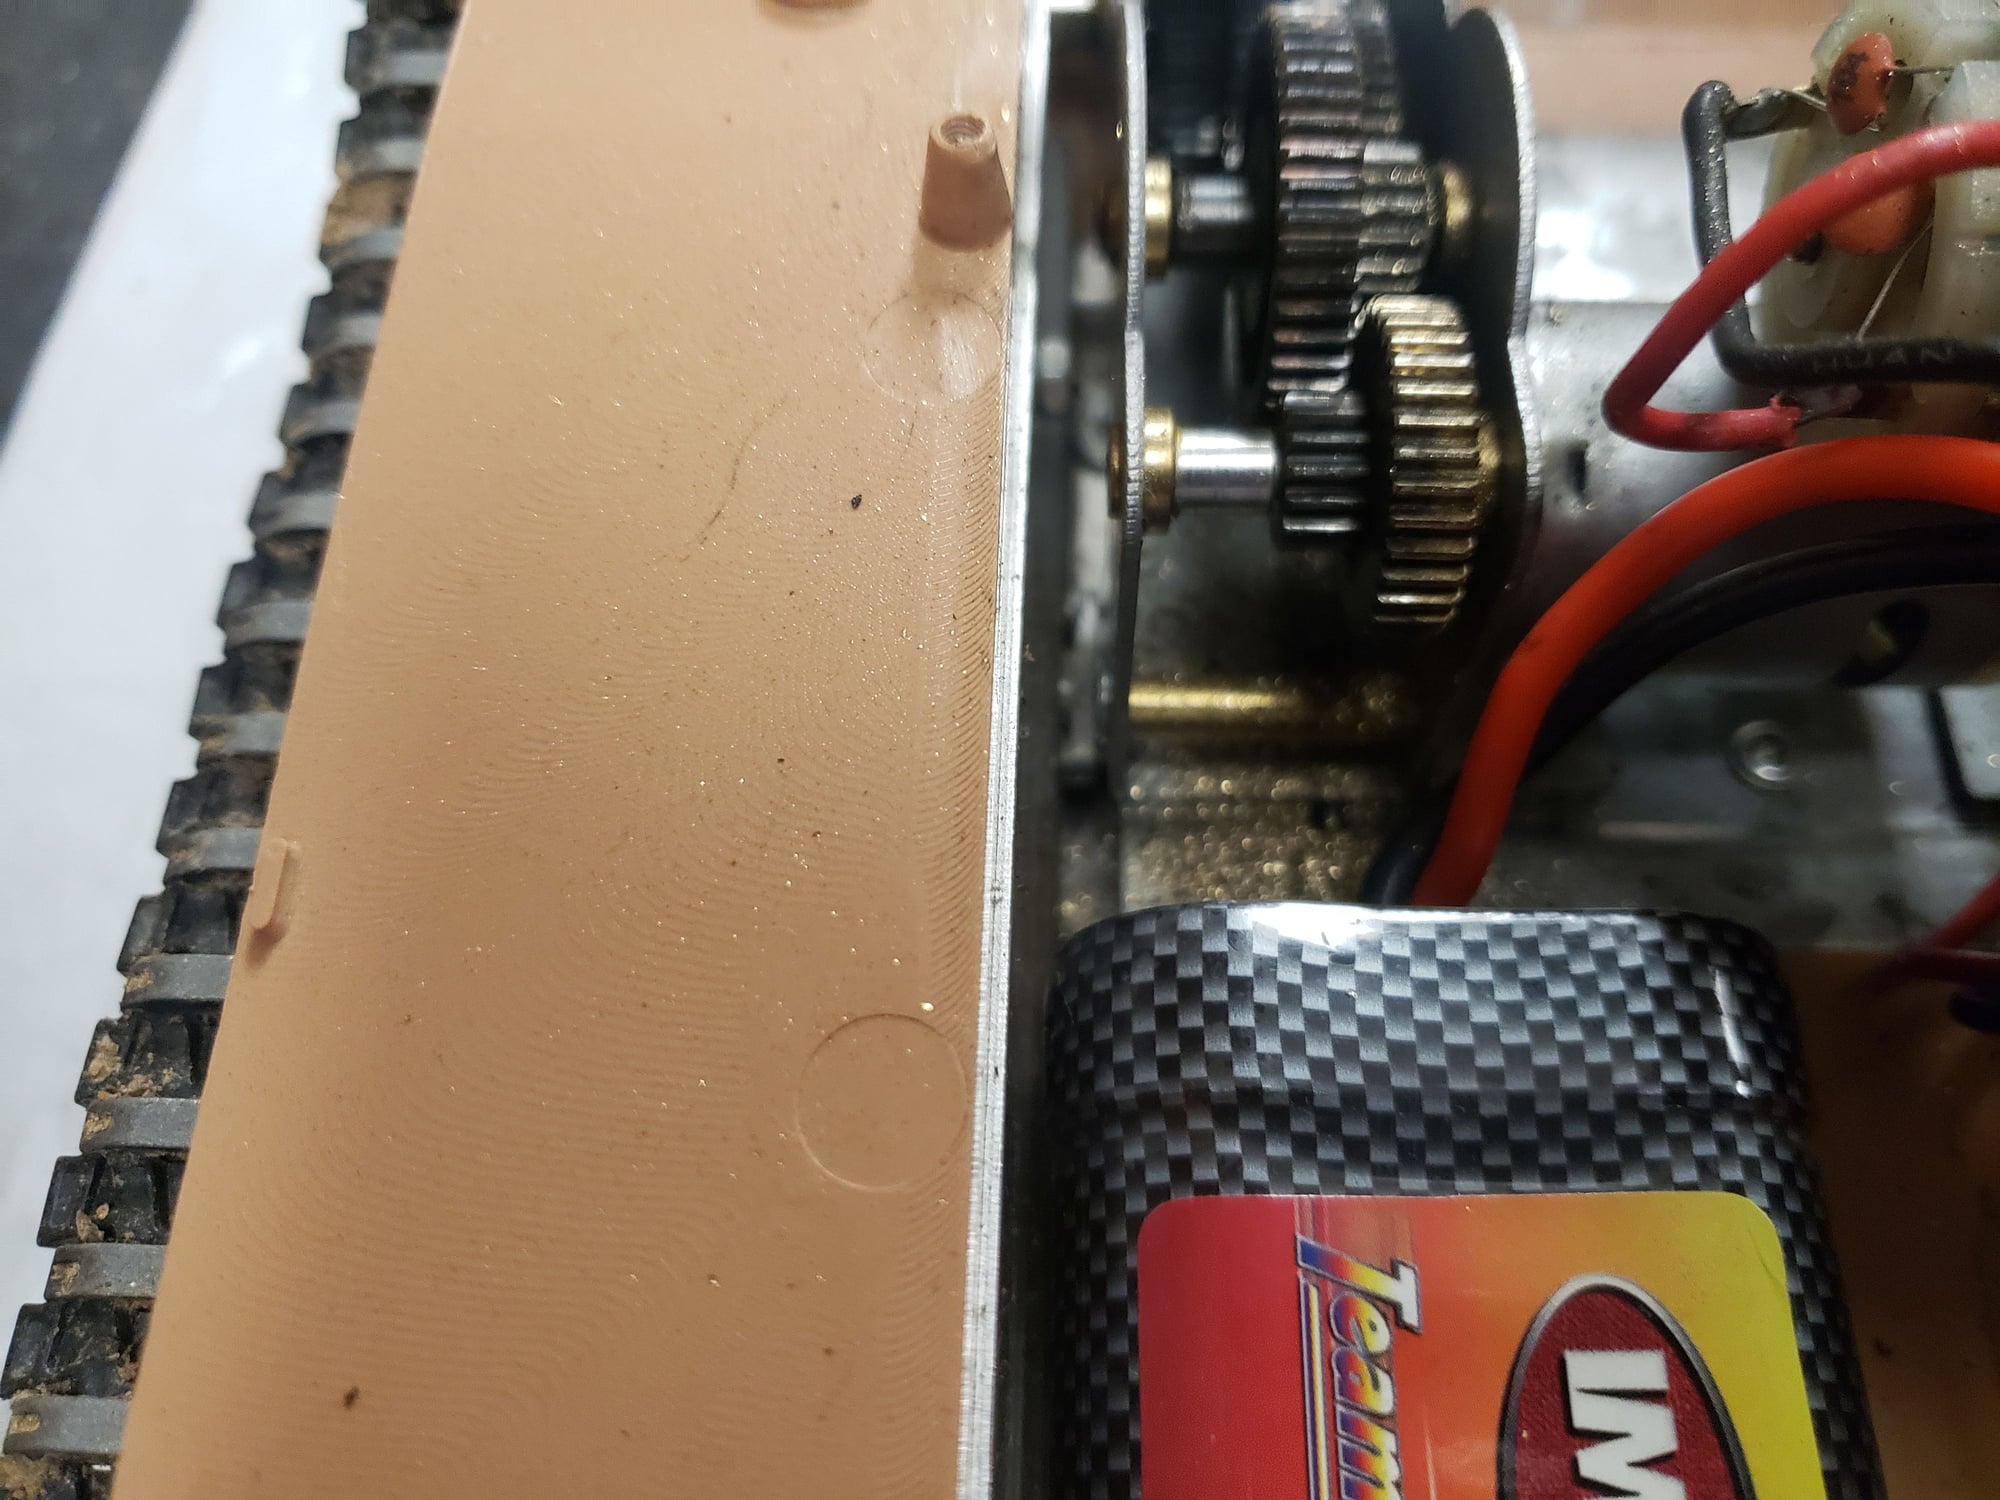
Sherman 75mm overhead
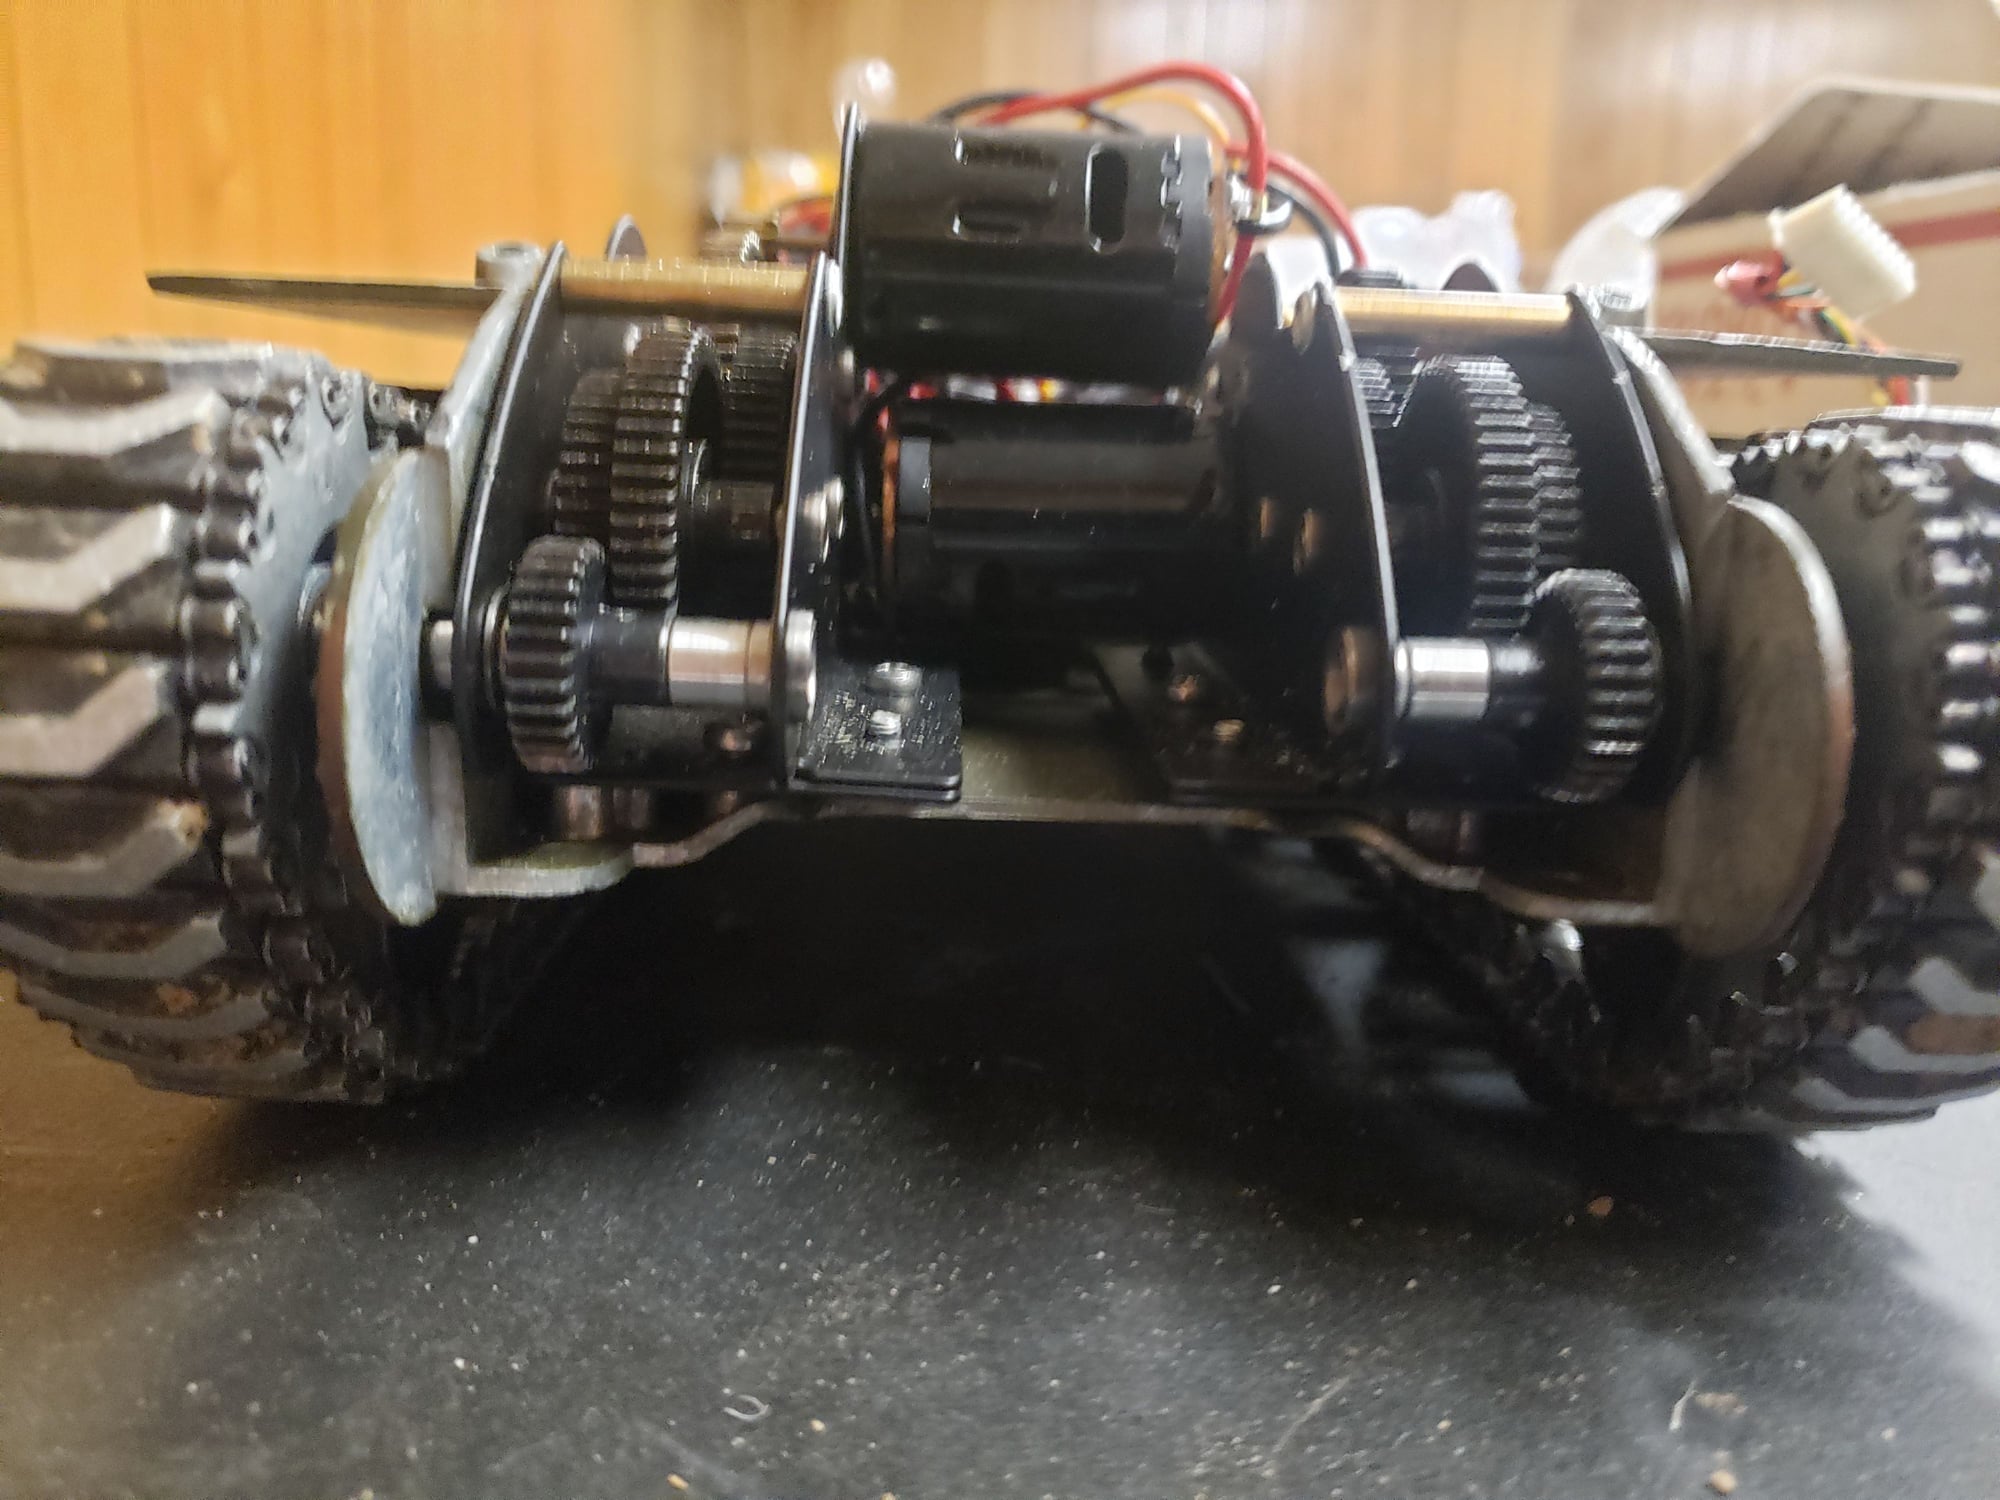
Sherman 75mm straight ahead view
Thank you for replying and for trying to advise me, guys. Please let me explain a bit more. I own both a Sherman 75 mm Taigen metal version and a Taigen Tiger I (early production) metal. I built both of these tanks through kits. I am having the same problem with the brass shavings on both tanks' gearboxes (right gears on the Sherman and left gears on the Tiger I (but it is somewhat worse on my Sherman tank, and as I mentioned, I have only driven the Sherman a few times). I am guessing that I did something wrong with building/maintaining these kits. I also own a RTR Taigen Panzer IV, and I don't have this problem with brass shavings on that manufactured tank. I should also explain that I really know very little about motors, gears, the nuts and bolts of running these tanks. I have removed and installed gearboxes, but I have never tried to 'adjust/tweak any of their settings'. I guess I am paying for my ignorance. I am all ears to hearing what I need to do to try and fix the brass shavings problem. I realize I might even need to buy new gearboxes for these two tanks. Three of the pictures I posted are of my Sherman and the other two are of the Tiger I. Thanks again for your time.
Sherman 75mm (45 degree angle view)
Tiger I Left gearbox
Tiger I left gearbox
Sherman 75mm overhead
Sherman 75mm straight ahead view
Thank you for replying and for trying to advise me, guys. Please let me explain a bit more. I own both a Sherman 75 mm Taigen metal version and a Taigen Tiger I (early production) metal. I built both of these tanks through kits. I am having the same problem with the brass shavings on both tanks' gearboxes (right gears on the Sherman and left gears on the Tiger I (but it is somewhat worse on my Sherman tank, and as I mentioned, I have only driven the Sherman a few times). I am guessing that I did something wrong with building/maintaining these kits. I also own a RTR Taigen Panzer IV, and I don't have this problem with brass shavings on that manufactured tank. I should also explain that I really know very little about motors, gears, the nuts and bolts of running these tanks. I have removed and installed gearboxes, but I have never tried to 'adjust/tweak any of their settings'. I guess I am paying for my ignorance. I am all ears to hearing what I need to do to try and fix the brass shavings problem. I realize I might even need to buy new gearboxes for these two tanks. Three of the pictures I posted are of my Sherman and the other two are of the Tiger I. Thanks again for your time.
04-18-2021, 11:01 AM
#7
Holy cow man. That brass pinion gear is ate up bad. Really bad. Now I understand how this happened. You assembled it from a kit.
I have never seen this happen in a taigen tank and I have about 12 shermans.
I suspect you have the gear box mounted in crooked and not seated properly on the mount and are creating pressure pushing up on the motor to make its brass gear mate tighter with the metal gear it turns. Im sorry but that brass gear is shot. You need to buy some new motors because they come with gears attached.
You should loosen up the screws that hold the tranys in place and try to re align them on the mounts. That would likely solve the cause but not the resulted damage.
04-18-2021, 11:11 AM
#8
Thread Starter
Join Date: Dec 2007
Location: Vienna, VA
Posts: 161
Likes: 0
Received 0 Likes
on
0 Posts
OK, thanks for explaining, Mr. Johnson. Not the news I had hoped for, but I appreciate knowing the truth. I actually am OK with investing in new gear boxes for both my Sherman and Tiger I. My only concern is how I can keep this from happening when I install the replacements gearbox sets? I didn't realize that my gearboxes weren't seated/installed properly I bolted the screws in as tight as I could. How to know if they are in there the right way? Would it help to lightly tap down on them with a hammer (not really hard, but enough to make sure they are sitting flat on the bottom of the chassis)? Thanks.
I bolted the screws in as tight as I could. How to know if they are in there the right way? Would it help to lightly tap down on them with a hammer (not really hard, but enough to make sure they are sitting flat on the bottom of the chassis)? Thanks.
04-18-2021, 11:57 AM
#9
Keep the hammer away. You could bend the metal easily with a hammer. There is such a thing as getting something too tight. When I install gearboxes I will start all the screws in every hold first to ensure they all line up. Then I will tighten each screw with light pressure just until it stops. After that I will snug them up. If you try to tighten it too much you will just strip the head of the screw or the screw threads. Will they loosen up over time? Sure they will, but it only take a few seconds to check the tightness every once and a while. Nothing on these tanks needs to be as tight as you can make them because eventually you may want to remove it for maintenance, upgrade, or repair. Over torqueing things will only end up stripping something, breaking the head of the screw off (leaving the shaft in hole to be drilled out), or misaligning something.
Last edited by tankme; 04-18-2021 at 12:00 PM.
04-18-2021, 01:01 PM
#10
What tankme said.
Its entirely possible to not get the trannys in perfectly level and square and get the screws in and tighten them up.
Put them in, wiggle them around a bit and make sure they are seated well and flat on the bottom. Then follow the process he said about screwing them down.
The pinion gear being eaten up is a result of the motor being too tight against the driven gear. Since I am very familiar with taigen trannys and know that they have the motor centered with a pilot hole for the motor bearing and then two perfect fit alligned screw mount holes, there is no way the motor could be installed two tight as there is only one way to install it, with the perfect gear lash. So my conclusion was the trannys are not seated properly and putting pressure on that motor creating the bind.
New trannys would serve you well. Then careful install.
04-22-2021, 12:48 PM
#11
Thread Starter
Join Date: Dec 2007
Location: Vienna, VA
Posts: 161
Likes: 0
Received 0 Likes
on
0 Posts
Hello. I ordered and received today replacement Taigen V2 Gearboxes/motors for both my Taigen Sherman and Tiger I tanks. I appreciate you folks having advised me. I must admit though that I am still really puzzled as to how to resolve this problem. Last evening, I looked at my Sherman and Tiger (each has one motor/gearbox that is ruined (pinion gear shredded) because I did not install the gearboxes correctly). In looking at them, though, I cannot tell that either of the two wrecked motors is crooked, misaligned, skewed in its placement? Should I be able to tell by 'eyeballing' my tanks' setups that these gearboxes are mis-installed? Or are motors so precise (with tiny tolerances) that we are dealing with small fractions of an inch that are not really visible with the naked eye? I'm confused because on both tanks, it looks like my gearboxes have been symmetrically/evenly installed... I just don't get why only one motor on each tank got damaged (or not both of them)? I am really concerned that if I install the replacement gearboxes on my own that I might end up damaging them (through subtly misaligning them) just like I did to my old ones. I could take my tanks into my local hobby shop, but I'm really the only customer I know of who brings tanks in from time to time. So I don't know if the techs there can help me properly install the replacement gearboxes. I'm thinking that I might need to travel the four plus hour drive to the tank museum in Danville on one of its tank battle weekends (would be really fun to see what goes on there, too). Do any experienced tankers in this region who have traveled to the Tank Museum in Danville know if folks also tinker with/repair their tanks before the battles start? I am hoping that I might find some experienced tankers who would be willing to demonstrate proper installation to this (respectful, enthusiastic, novice) tanker. I just would not want to ruin another set of gearboxes/motors.
04-22-2021, 02:28 PM
#12
Well, my conclusion of how your damage happened is a hypothesis based on your photos and my experience. I have a lot of Sherman’s and most have had their motors and pinions upgraded so the trannys have been in and out many times. I’m familiar with them.
That may not be the exact cause of your problem, it’s the most likely cause. If it’s not, I really can’t figure how your damage happened otherwise without the tank in my hands to investigate myself.
Let’s dig deeper and check a few more things. You say it’s only on one side. So, on the damaged side, how tight is the track on that side of the Sherman, take a pic and show me.
Next, with the nose removed, use a flashlight and try to determine if there is any airspace under that damaged tranny between its steel plate and the mounting pad of the tank hull.
Last, after you have checked these things, take a good look at that damaged tranny and see if the motor was by chance somehow not pushed into the tranny frame all the way, or squarely, so that the face of the motor sits flush and smooth up against the steel wall of the tranny where the two screws go through.
This is the best I can offer to diagnose your mechanical failure from afar. But something is very wrong there for sure, that is not normal.
So, when your ready to put the new trannys in, set them both in place gently, wiggle them down to the floor of the tank hull and put all the screws in about half way. Make sure they are all lined up and seated correctly and then tighten all screws.
then install sprockets and tracks and check tension.
Just wondering, on your new trannys, do they have ball bearings in the tranny instead of brass bushings?
04-22-2021, 02:46 PM
#13
Thread Starter
Join Date: Dec 2007
Location: Vienna, VA
Posts: 161
Likes: 0
Received 0 Likes
on
0 Posts
Hey, Mr. Johnson. Thanks for helping me to sleuth this further I know that without having my tanks there to see in person, it's more challenging to diagnose the cause of my problems. I know you are doing the best you can to advise me from afar (so thanks again for assisting). You've given me some concrete things to check on. My tanks are actually kept in my mother's basement (my workshop, haha), and I swung by for her birthday yesterday and took a peek at my tanks, too. I will be able to investigate and report back to you (including with more of the pictures you recommend) with what I have found this weekend, though. I will probably need to take pictures of my new trannys to answer your last question, because (and I say this with great embarrassment) I am so mechanically ignorant that I don't really know what the difference between ball bearings and brass bushings are. I will definitely get back to you.
I know that without having my tanks there to see in person, it's more challenging to diagnose the cause of my problems. I know you are doing the best you can to advise me from afar (so thanks again for assisting). You've given me some concrete things to check on. My tanks are actually kept in my mother's basement (my workshop, haha), and I swung by for her birthday yesterday and took a peek at my tanks, too. I will be able to investigate and report back to you (including with more of the pictures you recommend) with what I have found this weekend, though. I will probably need to take pictures of my new trannys to answer your last question, because (and I say this with great embarrassment) I am so mechanically ignorant that I don't really know what the difference between ball bearings and brass bushings are. I will definitely get back to you.
04-22-2021, 04:36 PM
#14
On close inspection again, it looks like your sherman has ball bearing trannys and your tiger has brass bushing trannys. I think the brass ones are V2 and the ball bearing ones are V3 or at least thats how I have referred to them.
04-23-2021, 01:50 AM
#15
That's correct, if it has a ball bearing on the axle shaft and Brass bushings on all the reduction gear shafts then it's a V2, if it has ball bearings on the axle shaft as well as ball bearings on all of the reduction gear shafts then it's a V3.
04-23-2021, 12:05 PM
#16
Thread Starter
Join Date: Dec 2007
Location: Vienna, VA
Posts: 161
Likes: 0
Received 0 Likes
on
0 Posts
Hey, Mr. Johnson. I am still going to systematically check the things you mentioned. But first let me tell you that I think that I might have found a cause of some of my damaged motor/gearbox problems with both my Sherman and Tiger: It's pretty negligent, and I didn't even realize/remember it until now but: I think that there should be three screws securing each Taigen motor to the chassis, correct? And I just noticed that I only have two screws bolting down the Tiger motor that got ruined (and oddly the empty third screw hole is blocked by a layer of metal-I would have to drill through it to be able to put the screw in place). And on my Sherman, I just have two screws holding down each motor. This is probably a really dumb question, but could the third missing screws be keeping the motors from being completely flat against the chassis underneath? I should have recalled/mentioned this (probably important) fact from the beginning I'm going to try taking a picture overhead of both of the ruined motors this evening. I actually have a fair amount of slack on my Sherman's tank tracks (maybe too much, because I can easily fit a few fingers between tracks and wheels). My Tiger has tighter tracks, but I will get the photo of both tanks' tracks and post by tomorrow morning. (And I'll also go through the checklist of other things to examine). Thanks for letting me consult you on this.
I'm going to try taking a picture overhead of both of the ruined motors this evening. I actually have a fair amount of slack on my Sherman's tank tracks (maybe too much, because I can easily fit a few fingers between tracks and wheels). My Tiger has tighter tracks, but I will get the photo of both tanks' tracks and post by tomorrow morning. (And I'll also go through the checklist of other things to examine). Thanks for letting me consult you on this.
04-24-2021, 01:31 AM
#17
Every Tank I build I fit a plasticard bulkhead with slots just big enough to allow cables through between gearboxes and the rest of the hull so that lubricant (As well as Swarf) does not get into the rest of the Tank,
It is easy, cheap and effective.
It will not solve your problem but it will stop it making matters worse.
It is easy, cheap and effective.
It will not solve your problem but it will stop it making matters worse.
04-24-2021, 01:44 AM
#18
Thread Starter
Join Date: Dec 2007
Location: Vienna, VA
Posts: 161
Likes: 0
Received 0 Likes
on
0 Posts
Hello. I've been trying to examine some of the possible problem areas suggested to me.
'Next, with the nose removed, use a flashlight and try to determine if there is any airspace under that damaged tranny between its steel plate and the mounting pad of the tank hull.'
I just want to see if you or someone can clarify this point for me: the steel plate of my gearboxes actually sit on three circular shaped screw mounts that protrude from the bottom hull. So there is plenty of air space to put a large screwdriver horizontally between the gearbox plate and the tank hull. Is this normal (as long as you have the gearbox plate moored securely on to the circular screw mounts)?
I noticed earlier that the two horizontal screws connecting the motor to the tranny frame were quite loose. I have since tightened them, but could this have been the cause of the pinion gear shredding? I guess maybe the squeaking I hear from turning the gears is the permanent damage that I caused by running my tank like that?
Also, on my other lower undamaged tranny/motor, how does one reach the horizontal mounting screws to ensure that they have not loosened and allowed the motor to jiggle free from the steel wall of the tranny over time? (The side hull blocks a screwdriver and view of the motor mounting screws).

Thanks for maybe answering these (beginner) questions.
'Next, with the nose removed, use a flashlight and try to determine if there is any airspace under that damaged tranny between its steel plate and the mounting pad of the tank hull.'
I just want to see if you or someone can clarify this point for me: the steel plate of my gearboxes actually sit on three circular shaped screw mounts that protrude from the bottom hull. So there is plenty of air space to put a large screwdriver horizontally between the gearbox plate and the tank hull. Is this normal (as long as you have the gearbox plate moored securely on to the circular screw mounts)?
I noticed earlier that the two horizontal screws connecting the motor to the tranny frame were quite loose. I have since tightened them, but could this have been the cause of the pinion gear shredding? I guess maybe the squeaking I hear from turning the gears is the permanent damage that I caused by running my tank like that?
Also, on my other lower undamaged tranny/motor, how does one reach the horizontal mounting screws to ensure that they have not loosened and allowed the motor to jiggle free from the steel wall of the tranny over time? (The side hull blocks a screwdriver and view of the motor mounting screws).
Thanks for maybe answering these (beginner) questions.
04-26-2021, 09:36 AM
#19
Ok that track is not too tight so that is good.
The loose screws in the motor would cause your damage. I’m surprised, that is a first I have heard of that problem.
you must take the trannys out to get access to the motor screws. Or at least in plug the wires, and remove the three mounting screws for each tranny. Then you can rotate the trannys up and get to the moto acres without taking the sprockets and tracks off. Just make sure you get them seated back down on the mounting plate snugly.
04-26-2021, 11:55 AM
#20
This could have been from a too tight fit between the pinion (first brass gear on motor) and the first stage gear on the transmission
1. I have experienced this on different maufacturers where loosening the motor mount and repositioning, or slightly 'slotting' one of the motor mount holes will allow for a little back-off of the gears so they dont grind each other.
2. Another experience I have had is the mounting plate of the transmission (which typically has three bolts) where the third bolt in some way warps the transmission housing just enough that the gears mesh ever so slightly skewed, which will also cause them to eat into each other
3. The potted 'cast' gear may have residue deposit that was not completely 'cut' out when formed, leaving a slight chunk like a pebble in a wheel to add grinding on the pinion
Solution for 1. Give a little play in the gear mesh distance if you can
Solution for 2. add some shims (thin washers) to 'level out' the gearbox to avoid warpage
Solution for 3. find the rough spot,use a jeweler's file to abraise out the obstruction
04-26-2021, 04:02 PM
#21
At this point just swap the trannys out and get the new ones into your Sherman, make sure they are seated firm down on the mounts on the floor of the tank, get it back together and give it a test run on the bench with a block of wood under it. If it runs nice and smooth, take it for a spin.
if you have some grease, put a small dab of grease on each gear in one spot and run it slow to spread the grease around.
if you have some grease, put a small dab of grease on each gear in one spot and run it slow to spread the grease around.
