


Torro 1/16 panther g
 11-23-2022, 03:18 PM
#1
Hello everybody,
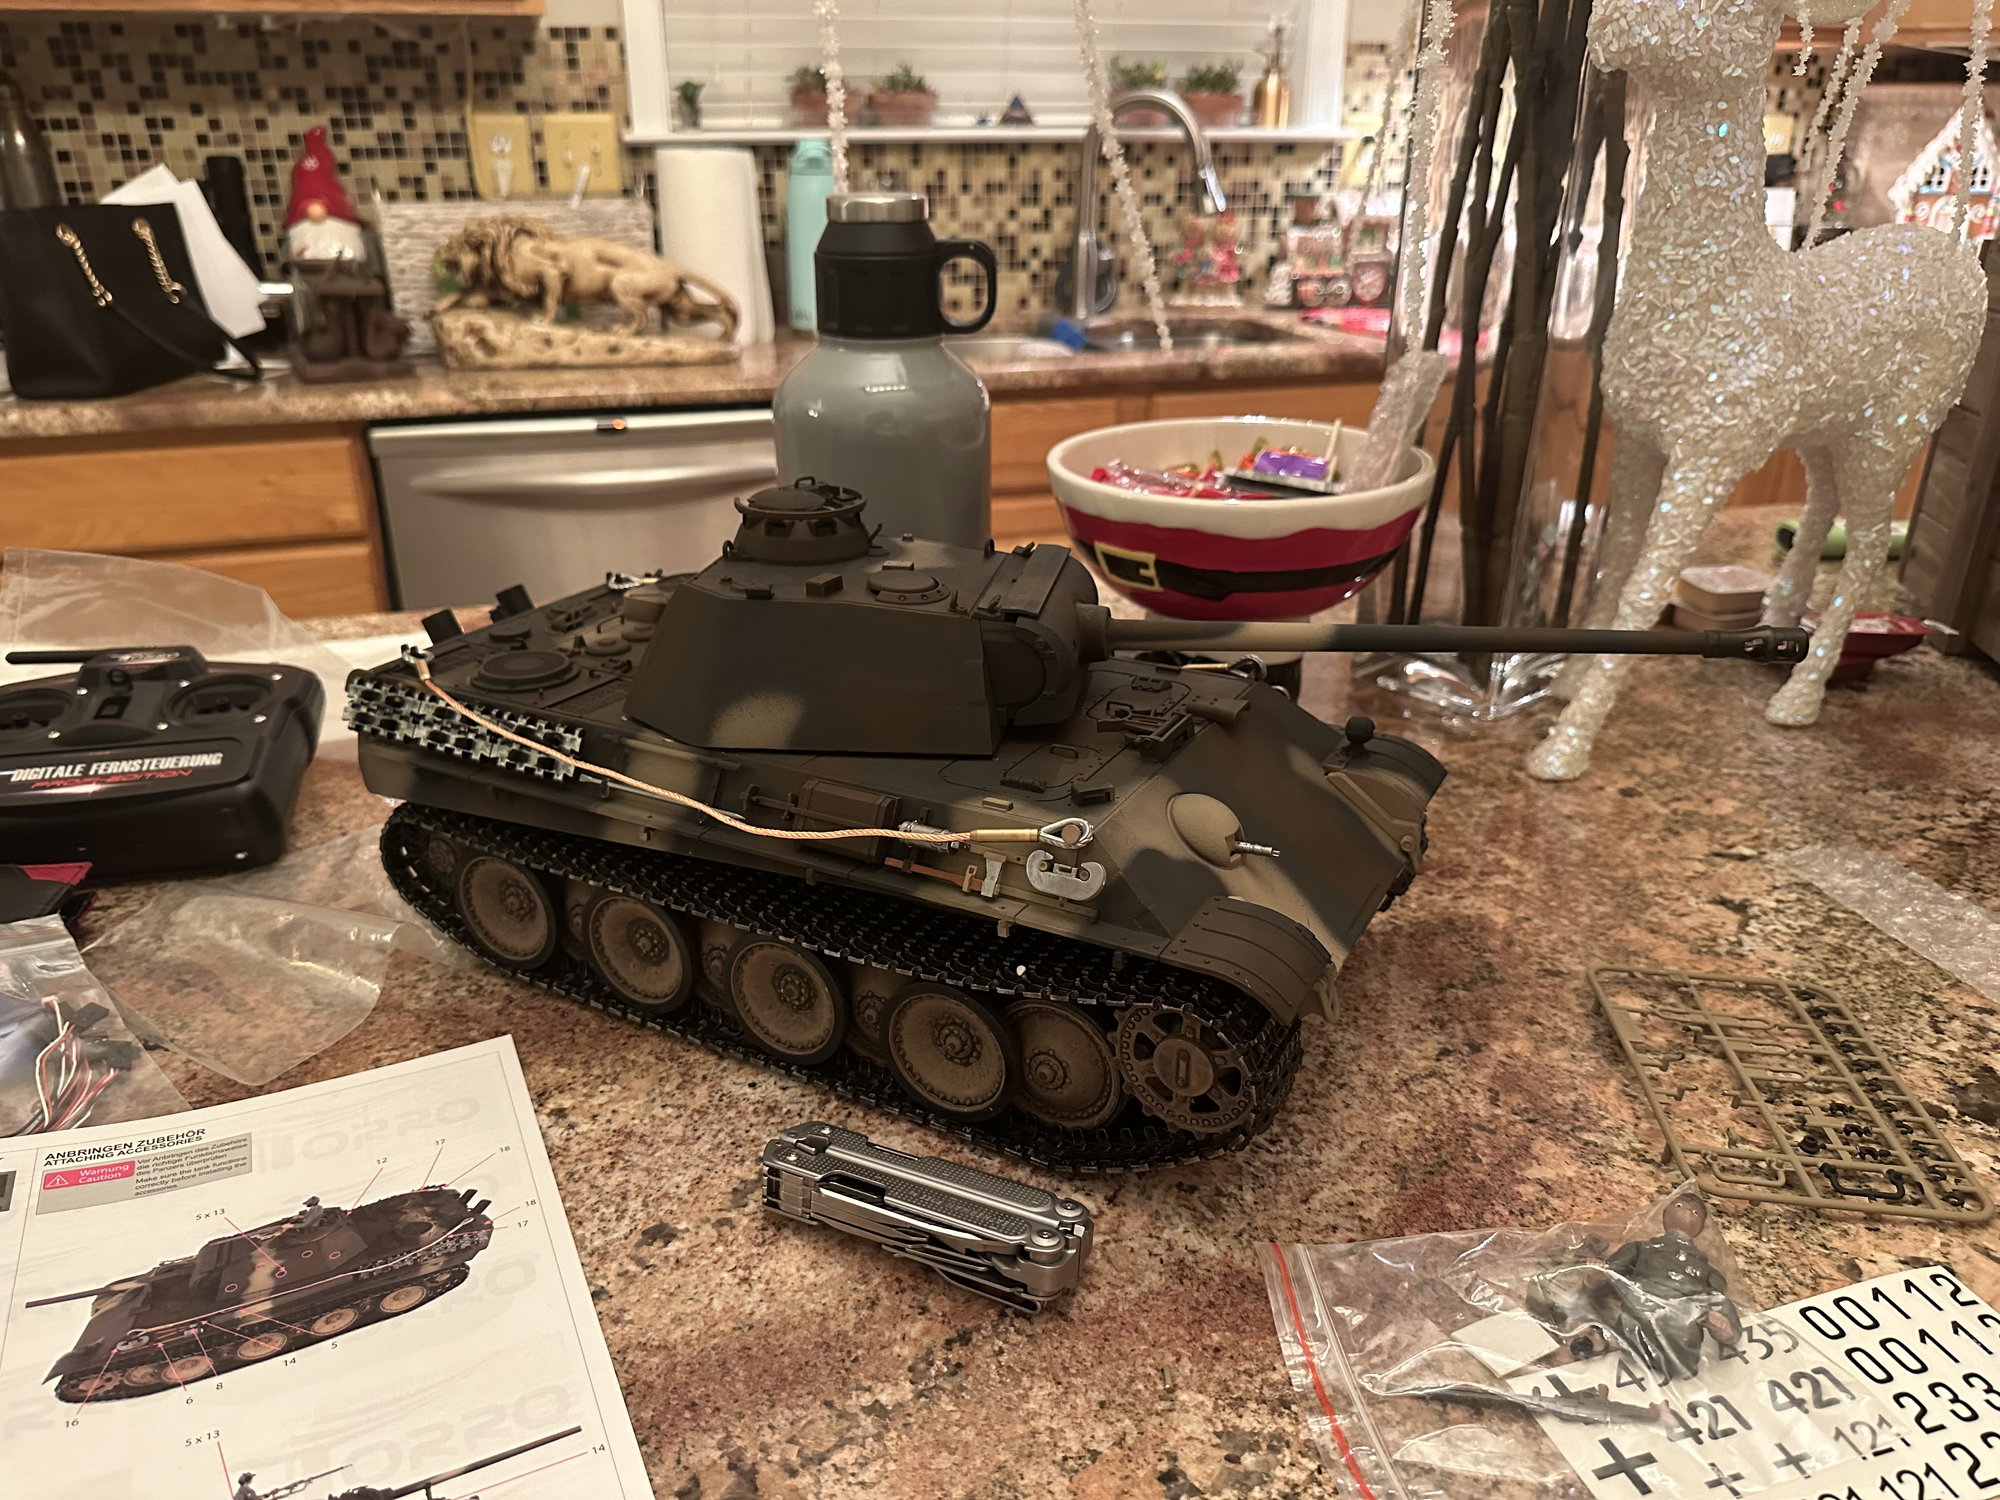
completely new to rc tanks. And really rc anything but planes in general. Just picked up this panther on a whim and the instructions are kinda bleh. I’m guessing upon opening I have to glue all these little plastic parts on? What would be the best glue? I think the body is mostly metal. Your expertise would be helpful.
edit: can’t seem to get the smoke to work either…. It says there is a switch on the bottom of the tank but where it is supposed to be is an empty slot.
edit edit: looking up tiegans instructions the upper flapper switch on the remote controls the smoke. In the meantime of trying to figure it out I’m pretty sure I overfilled the smoke tank. Opened it and got out what I could and now it’s smoking a little bit. Hope I didn’t damage it.
thanks!
Erik
Last edited by ErikElvis; 11-23-2022 at 05:28 PM.
 11-23-2022, 07:50 PM
#2
Welcome to the RC tank world. That's a nice looking Panther. I don't have a Torro tank, so I can't help you with the instructions, but lots of folks on this forum can help you. If you have a mystery part that you are not sure where it goes, post a picture of it and we can help you place it. You can also search historical Panther pictures to see how they mounted the equipment.
As for glue, I use super glue (CA) or rubber cement depending on what the part is and how long I want it to stay put.
As for glue, I use super glue (CA) or rubber cement depending on what the part is and how long I want it to stay put.
11-24-2022, 07:44 AM
#4
I suggest that you don't need to touch it up, and just roll with it, as tanks (especially WW2 ones) do get beaten up in the field. Depending on the nature of damage you can dab in some rust red primer or gun metal if it was a deep gouge. A lead pencil gives a nice metallic effect without too much trouble.
11-24-2022, 08:58 AM
#5
I did pick up some ammo paint by mig Jimenez for early and late war German tanks. I was going to try and keep it factory fresh. I’ll see how the paint matches. I might just do the pencil or marker method. We’ll see.
I did get some testors model glue. I’m assuming it will be ok for this.
I did get some testors model glue. I’m assuming it will be ok for this.
11-24-2022, 05:26 PM
#6


Mhh... Maybe consider giving it a little bit of a metallic sheen by rubbing some Graphite along raised edges and then smudging / spreading it from there all over the model with a finger followed by airbrushing a thin layer of Alcad Steel over it?
I mean you did mention that you'd rather prefer to keep it fresh out of the factory but IMHO that looks very boring - almost unnatural.
For Comparison - "Factory New" vs. Graphite & Alclad ( and weathering ) and the impression of heavy metal the sheen gives.
I mean you did mention that you'd rather prefer to keep it fresh out of the factory but IMHO that looks very boring - almost unnatural.
For Comparison - "Factory New" vs. Graphite & Alclad ( and weathering ) and the impression of heavy metal the sheen gives.
11-24-2022, 05:51 PM
#7
Mhh... Maybe consider giving it a little bit of a metallic sheen by rubbing some Graphite along raised edges and then smudging / spreading it from there all over the model with a finger followed by airbrushing a thin layer of Alcad Steel over it?
I mean you did mention that you'd rather prefer to keep it fresh out of the factory but IMHO that looks very boring - almost unnatural.
For Comparison - "Factory New" vs. Graphite & Alclad ( and weathering ) and the impression of heavy metal the sheen gives.
I mean you did mention that you'd rather prefer to keep it fresh out of the factory but IMHO that looks very boring - almost unnatural.
For Comparison - "Factory New" vs. Graphite & Alclad ( and weathering ) and the impression of heavy metal the sheen gives.
would love zimmerit coating but no way I�d get that right.
11-24-2022, 07:38 PM
#8
Yea... Weathering requires a little bit of a faith of leap... Been there done that... If you're not very experienced with Weathering maybe start with something less complicated but still worthwhile doing: Chipping based on this Tutorial by "Uncle" Night Shift
In his video he makes the Chips by first making them with a lighter shade of the tanks main color ( on his model it's the Dark Yellow while on mine it's the Dark Green 2 ) and THEN paints into them using his Chipping Grey™
I cannot stress enough how much better this looks than if you directly added the grey onto the Tanks main color. It's going to take a while doing it like that but man is it worth doing it like that.
On top of that you apply the Graphite / Alclad Steel followed by a Matte Clear Coat with the latter usually toning down the effect of the Graphite / Alclad ( but not the Chipping! )
IMHO, the worst you can do is going almost uniformly ham with the Sponge Chipping all over the place resulting in what happed to this L2A6 in this Video at 15:10:
12-07-2022, 12:47 AM
#10
Member

That Panther looks very good. Pretty good finish and camo straight out of the box!
I agree on using CA glue. Perfect use for glueing small parts as it sets fast as well.
I agree on using CA glue. Perfect use for glueing small parts as it sets fast as well.
The following users liked this post:
ErikElvis (12-07-2022)
12-07-2022, 02:53 AM
#11
Good choice for a first tank, I have that same tank myself. One of my favorites. I added metal tracks, sprockets and idlers and changed over to the four shaft gearboxes and it's a really great runner. I have a bunch of videos of that tank up on my YouTube channel. For a long while that tank was very overlooked and didn't seem to be very popular, but over the last few years it seems to have picked up and a lot of people are buying them, which I think is a very good thing.
Since you have the instructions it sounds like you bought the tank brand new. If that's the case, check the box and see if you can find the word Imex anywhere. Does your Panther have a metal turret? If the box says Imex and it has a plastic turret then you probably have a taigen panther, rather than a torro. Of course, there really isn't much difference. Taigen and Torro are pretty much the same tank and a lot of them are made right in the same factory.
As for the testors glue, that's made for styrene, which these tanks are not. As mentioned above, most guys use CA, or super glue, and for some pieces, especially stowage, I like a product called zap goo. You can find it on eBay pretty cheap and it will stick whatever you want to stick on the tank and it will stay there until you want it to come off. If you do ever want to come off, just apply a slow steady pressure and it will pull right off, it usually doesn't even damage the paint.
One thing that works very well for weathering is what they call a wash. You just lather it on all over the tank and then use a damp paper towel to remove the wash until you get it to the point where you want it. Personally I like the Flory Pro modeler washes, they come in several different colors and work very well. For weathering, a very good reference source is the finescale modeler website. They mostly concentrate on static models but those guys have come up with some really great techniques for paint and weathering that can easily be transferred over to our tanks.
Can't wait to see some video of that bad boy in action. Do you have the IR version, or does it shoot Airsoft BBs?
As for the smoker, if you're getting a little bit of smoke right now, just don't add any more fluid and it should get better. Those things can be kind of delicate and fail rather easily, so I guess it's a good thing that a replacement is only about 10 bucks. I went to the pharmacy and got one of those plastic syringes that they use for measuring children's oral medications , and I usually only put in a half a milliliter at a time. I think smokers and Airsoft units fail more often than any other part on the tank, but since they're both only 10 bucks each I used to automatically order a smoker and an airsoft unit every time I placed an order with imex, also known Taigen Tanks, down in Florida.
Welcome aboard, it's always good to see new members and I'm looking forward to seeing more photos and videos of your tanks.
The following users liked this post:
ErikElvis (12-07-2022)
12-07-2022, 07:42 AM
#12
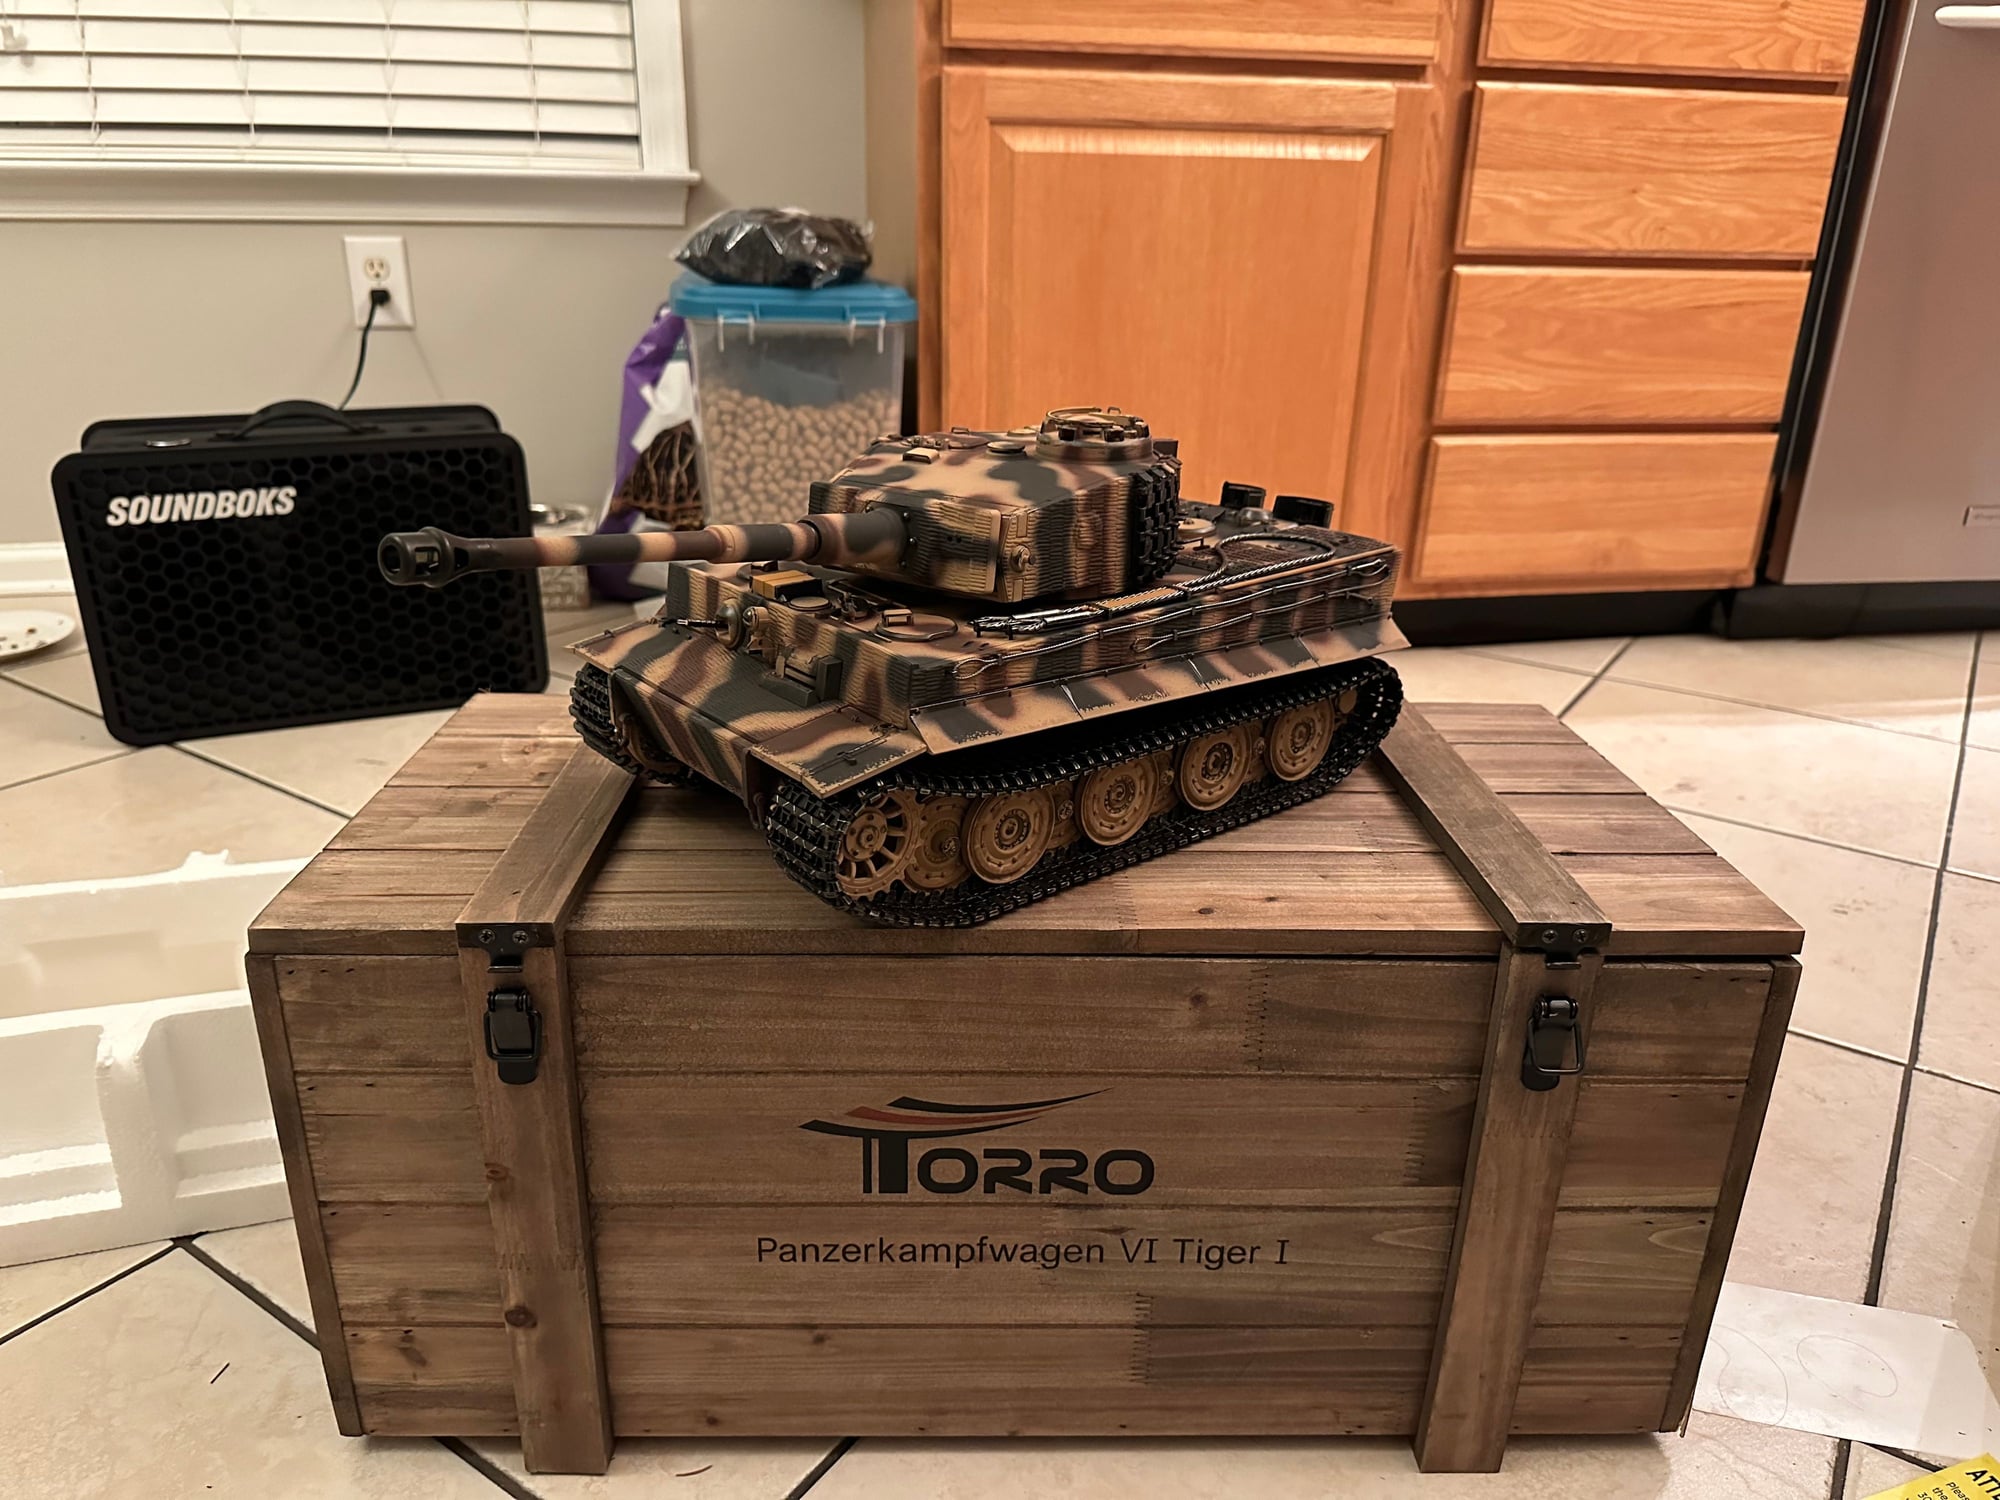
Definitely a Torro. I believe it has the metal turret. Can do IR or BB’s. I’ll def pick up some ca or zap glue then. Haven’t messed with it much and the tiger 1 will be here today so will probably be messing with that for a bit. A wash would be a good compromise. Likely less easy to mess up. I just ordered some taigen smoke units. Look different than the unit in my tank but hope they work.
12-13-2022, 05:00 PM
#13
Just opened the tiger earlier today. Just does IR. The panther will do both. I guess you can add bb�s if you wanted? Pretty tank but maybe regretting not getting an early version. Panther still has it beat with it�s hot rod look though.
do you guys use the thin or medium CA?
do you guys use the thin or medium CA?
Last edited by ErikElvis; 12-13-2022 at 11:49 PM.
12-15-2022, 12:54 AM
#14
Member
Just opened the tiger earlier today. Just does IR. The panther will do both. I guess you can add bb�s if you wanted? Pretty tank but maybe regretting not getting an early version. Panther still has it beat with it�s hot rod look though.
do you guys use the thin or medium CA?
do you guys use the thin or medium CA?
12-15-2022, 02:36 AM
#15
This is one of those times when you'll have to experiment and see what works best for you. Some guys like the thin, some guys like the medium, personally, I prefer the gel super glue. I find it a lot easier to work with. You'll also want to get some kicker. I like the stuff that comes in the liquid pump spray because I can take the top off and dip a Q-tip in there. A lot of times just waving a Q-tip soaked with kicker real close to the super glue will make it activate.
12-16-2022, 02:39 AM
#18
There are lots of places, many on ebay. One eBay seller that specializes in tanks is called RC Dynasty, which is really just mato on ebay. Then there's Mato themselves who not only sell mato tanks but they also sell a wide selection of heng long tanks. Then there are vendors like dklm, and RC tank.de, both good vendors that I've used before. Just put Google to work for RC tanks and you should find lots of options.
12-16-2022, 05:14 AM
#20
Torro has had a King Tiger for quite some time now, theirs is the production turret, the Taigen King Tiger has the pre-production, or Porsche turret, but only the Torro has the decent lower hull with the torsion bar suspension. The Taigen is basically just a heng long copy. I have one myself, if I ever get around to it, and I decided to combine the best of both. I'm using the Torro lower to get the metal tub and the torsion bar suspension, with the Taigen upper Hull and turret to get the pre-production turret on my tank. I think I did a thread or a video about that somewhere. Anyway, my plan is to reproduce the incorrectly painted King Tiger that was displayed in Bovington for a few years. That's pretty much the only King Tiger that ever had the pre-production turret, no zimmerit, and a three colored camouflage paint job.
12-16-2022, 06:41 AM
#21
Member
That said, always good to have a manufacturer to build an deliver pretty good tanks!
12-16-2022, 09:48 AM
#22
I was looking for a more foresty camo. Only ones I could find were more an Italian theatre tan. And I had to do an internet deep dive to find one from some oddball site. I did reply back asking what the camo scheme will be. We’ll see if they disclose that info to me.
 12-18-2022, 08:53 PM
#25
