


1/6 21st Century M5 Stuart Upgrades
 08-16-2023, 10:12 AM
#1
Member
Thread Starter
Hi Everyone,
I've been away from this hobby for far to long. I started a build thread for the 1/6 M5 Stuart on RC Groups (https://www.rcgroups.com/forums/show...t-Century-Tank). Anyone who has one of these Child's Toys know that the road and idler wheels are rotating plastic to plastic and must cause a considerable amount of drag. I've seen some guys bore out the wheels and insert a piece of brass tubing. For a long time, I've wanted to modify all the wheels to use ball bearings. The whole tank is made out of ABS Plastic. The wheels ride on molded in axles that add strength to the suspension parts. If the entire axle is removed, it will greatly weaken the suspension arms.
Here's a few images of one set of Bogie Wheels. I'm not trying to Accurize the 21st Century M5, I just want to improve it as an Adult RC Tank.
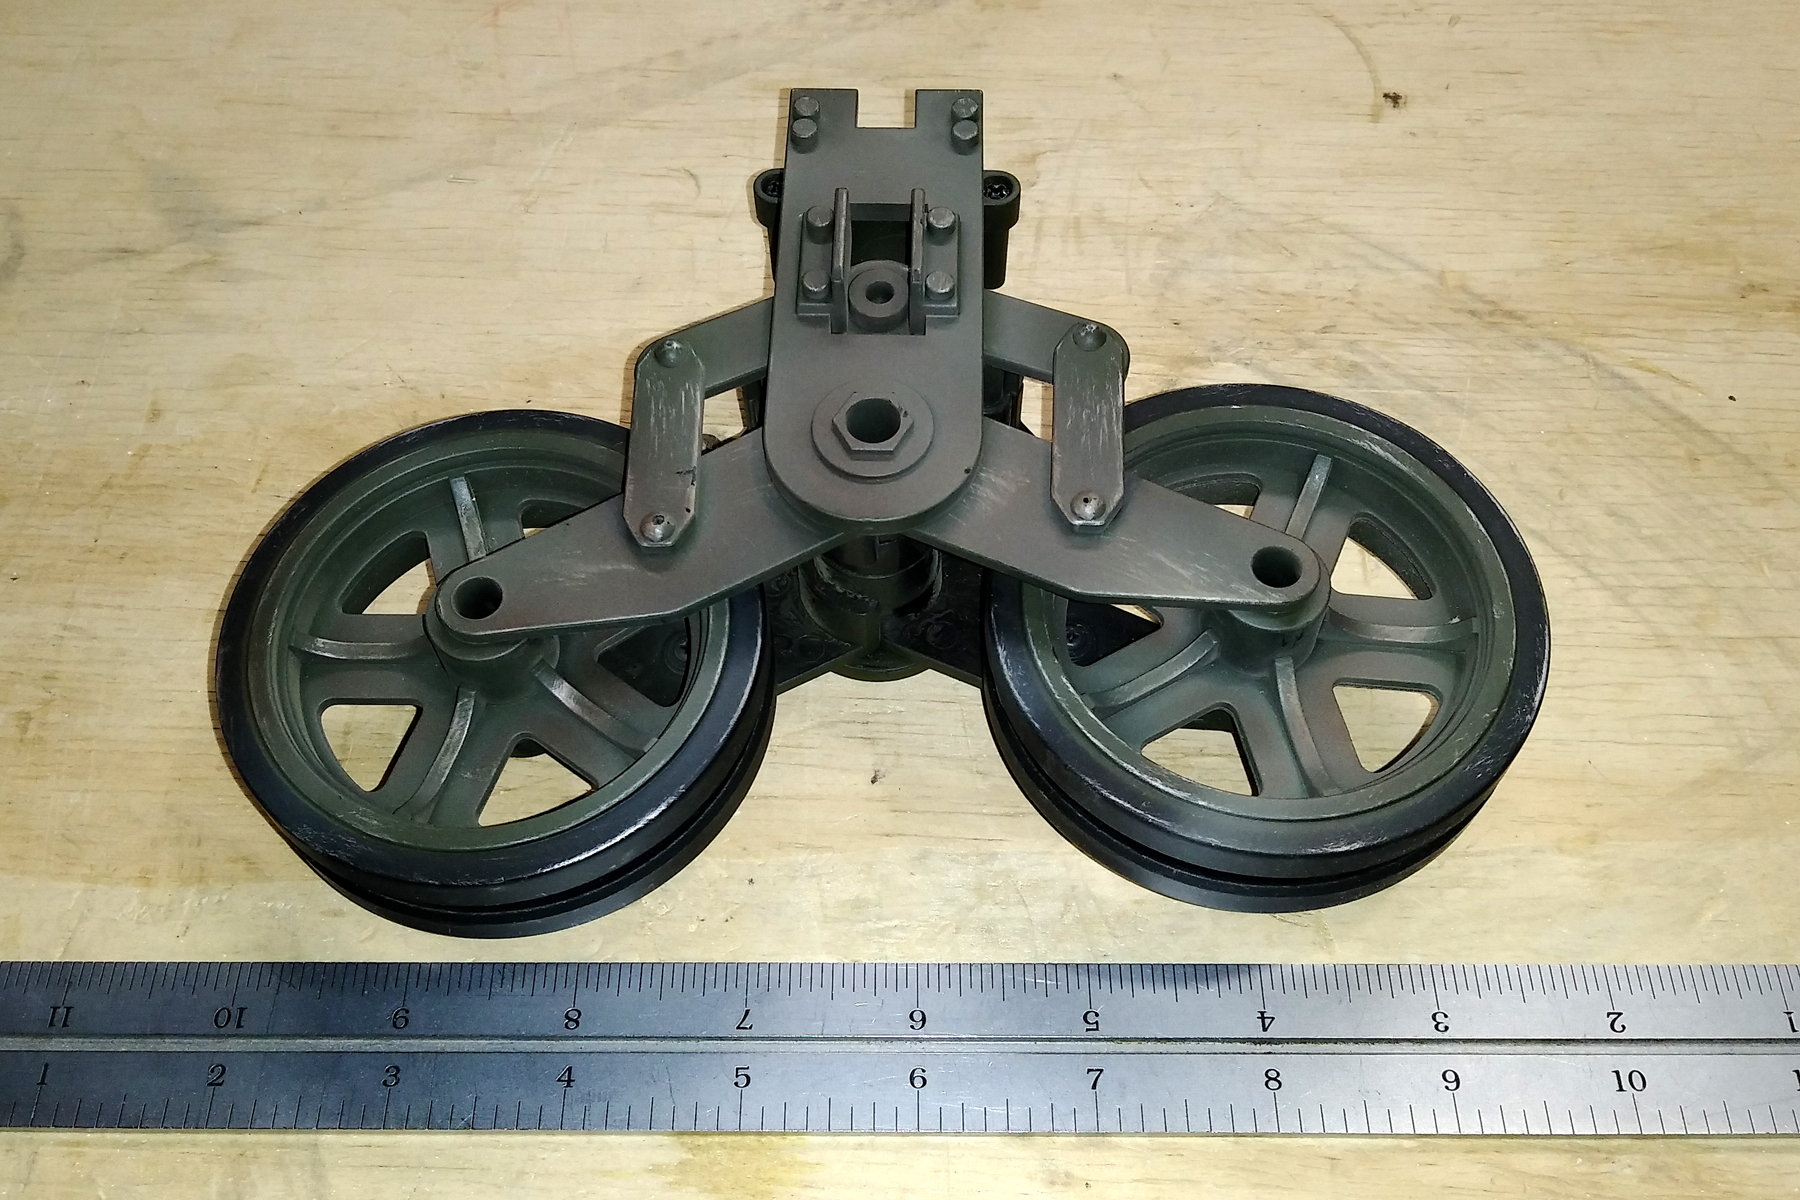
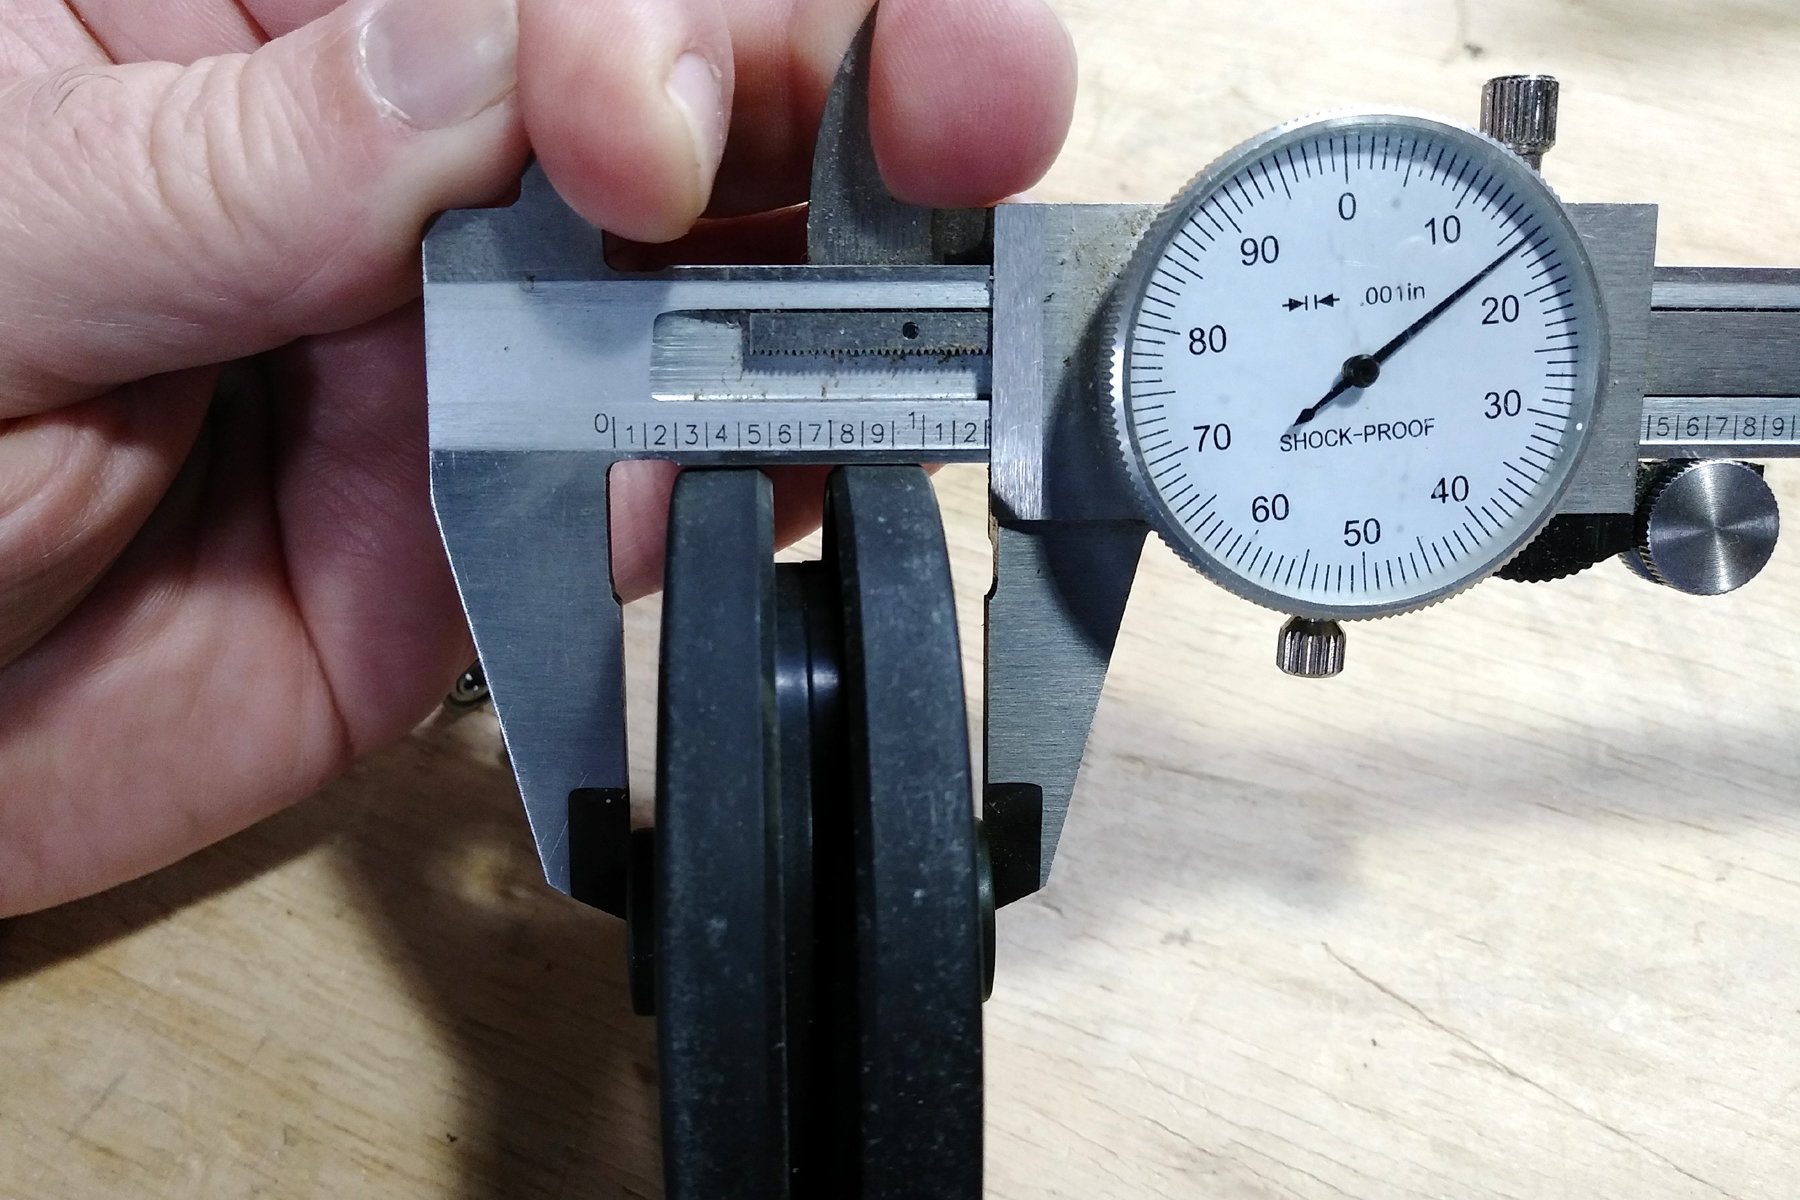
From the edge of one wheel to the other measures about 7 1/2 inches.
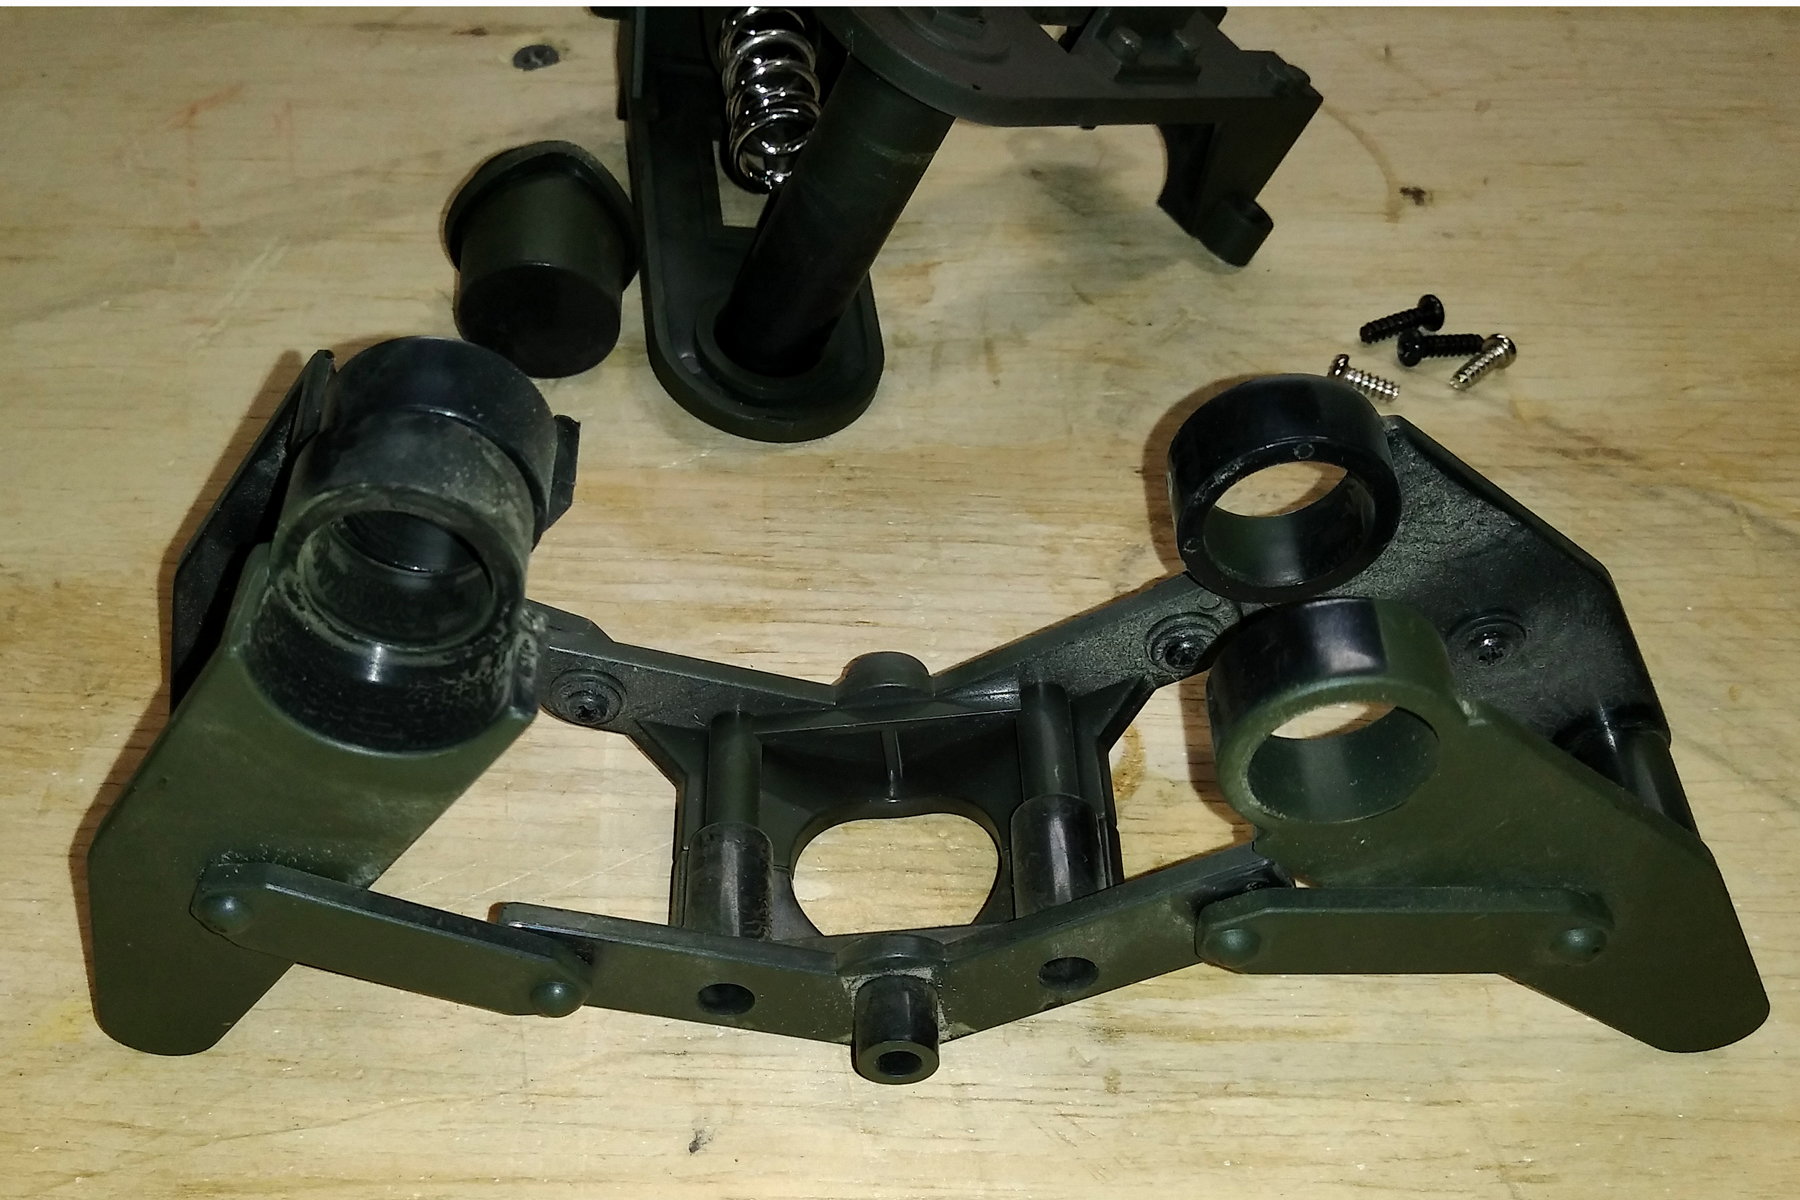
Each Bogie set is held together with 4 screws and the parts fit tightly together to add to their strength.
I've been away from this hobby for far to long. I started a build thread for the 1/6 M5 Stuart on RC Groups (https://www.rcgroups.com/forums/show...t-Century-Tank). Anyone who has one of these Child's Toys know that the road and idler wheels are rotating plastic to plastic and must cause a considerable amount of drag. I've seen some guys bore out the wheels and insert a piece of brass tubing. For a long time, I've wanted to modify all the wheels to use ball bearings. The whole tank is made out of ABS Plastic. The wheels ride on molded in axles that add strength to the suspension parts. If the entire axle is removed, it will greatly weaken the suspension arms.
Here's a few images of one set of Bogie Wheels. I'm not trying to Accurize the 21st Century M5, I just want to improve it as an Adult RC Tank.
From the edge of one wheel to the other measures about 7 1/2 inches.
Each Bogie set is held together with 4 screws and the parts fit tightly together to add to their strength.
Last edited by rb67mustang; 08-16-2023 at 10:33 AM.
 08-16-2023, 10:23 AM
#2
Member
Thread Starter
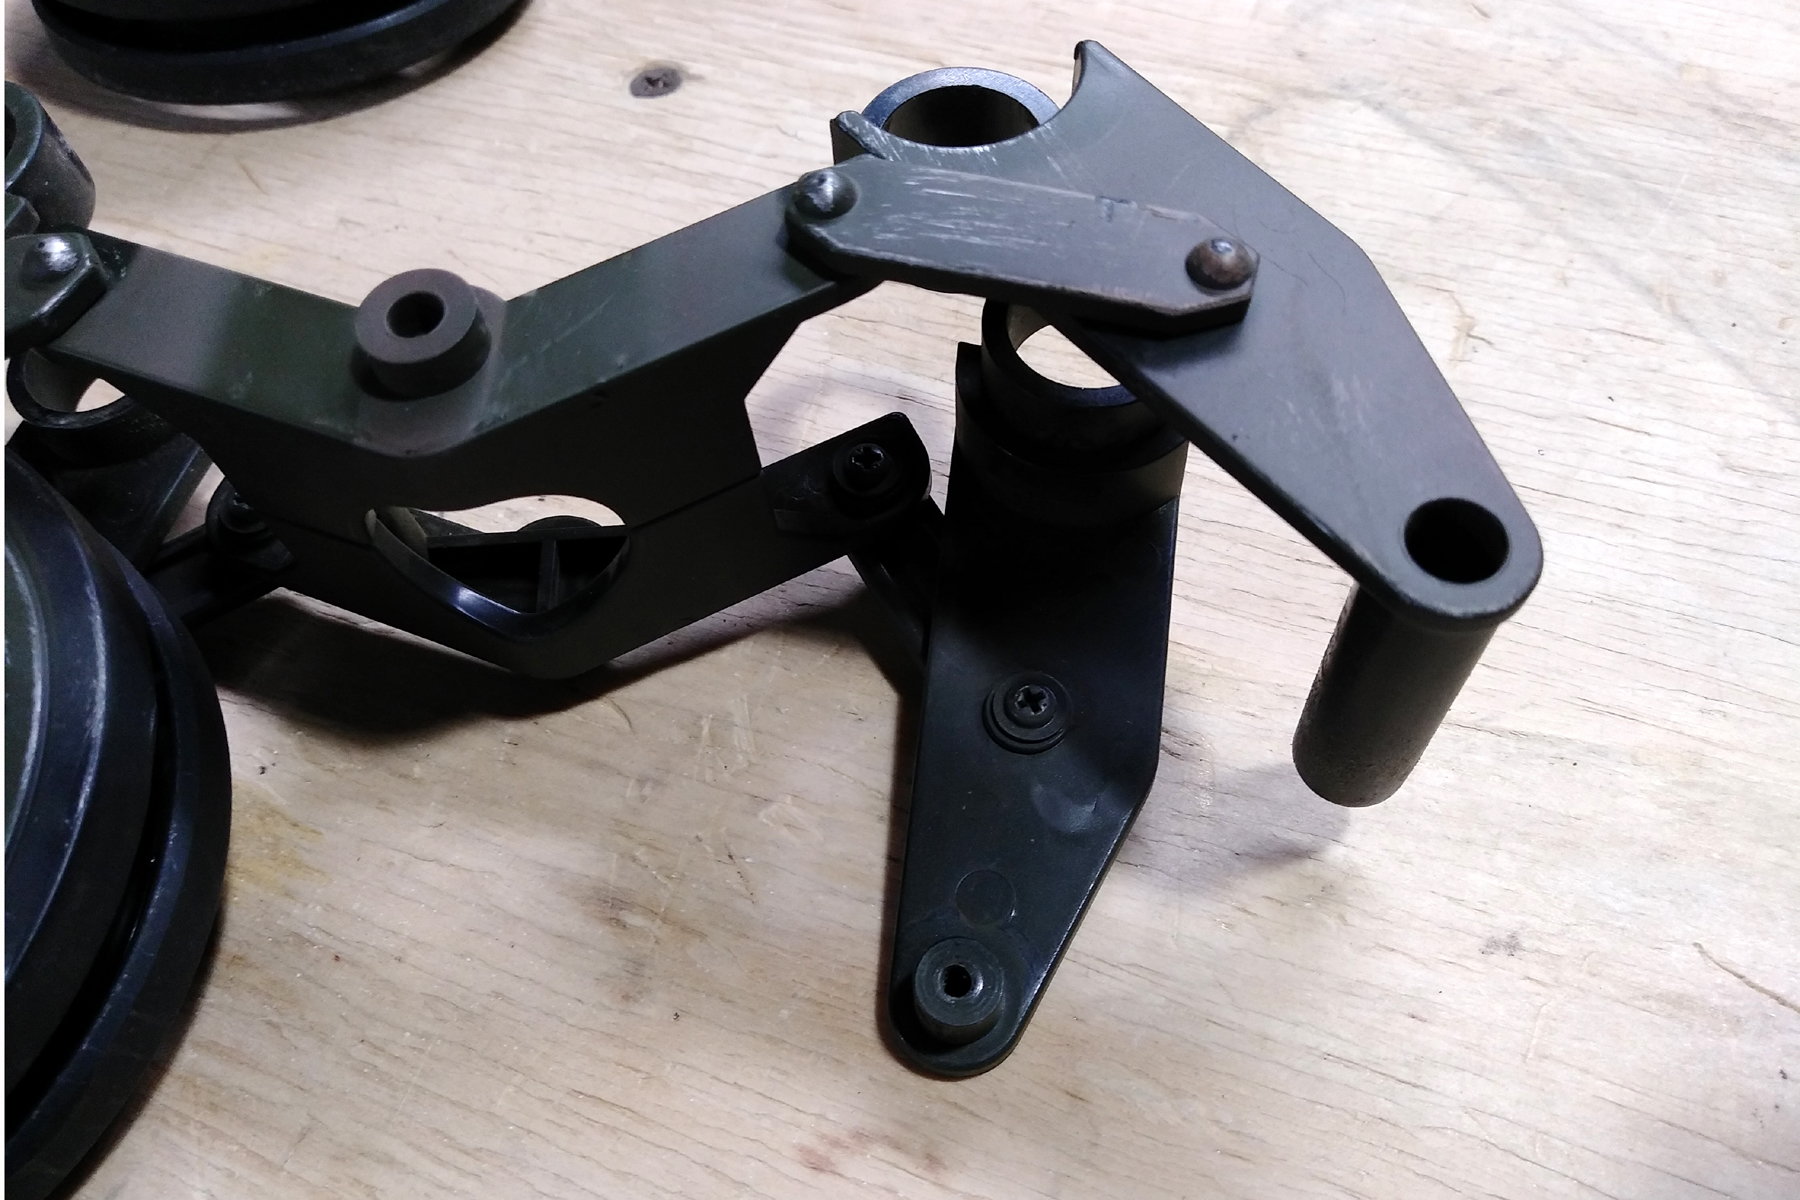
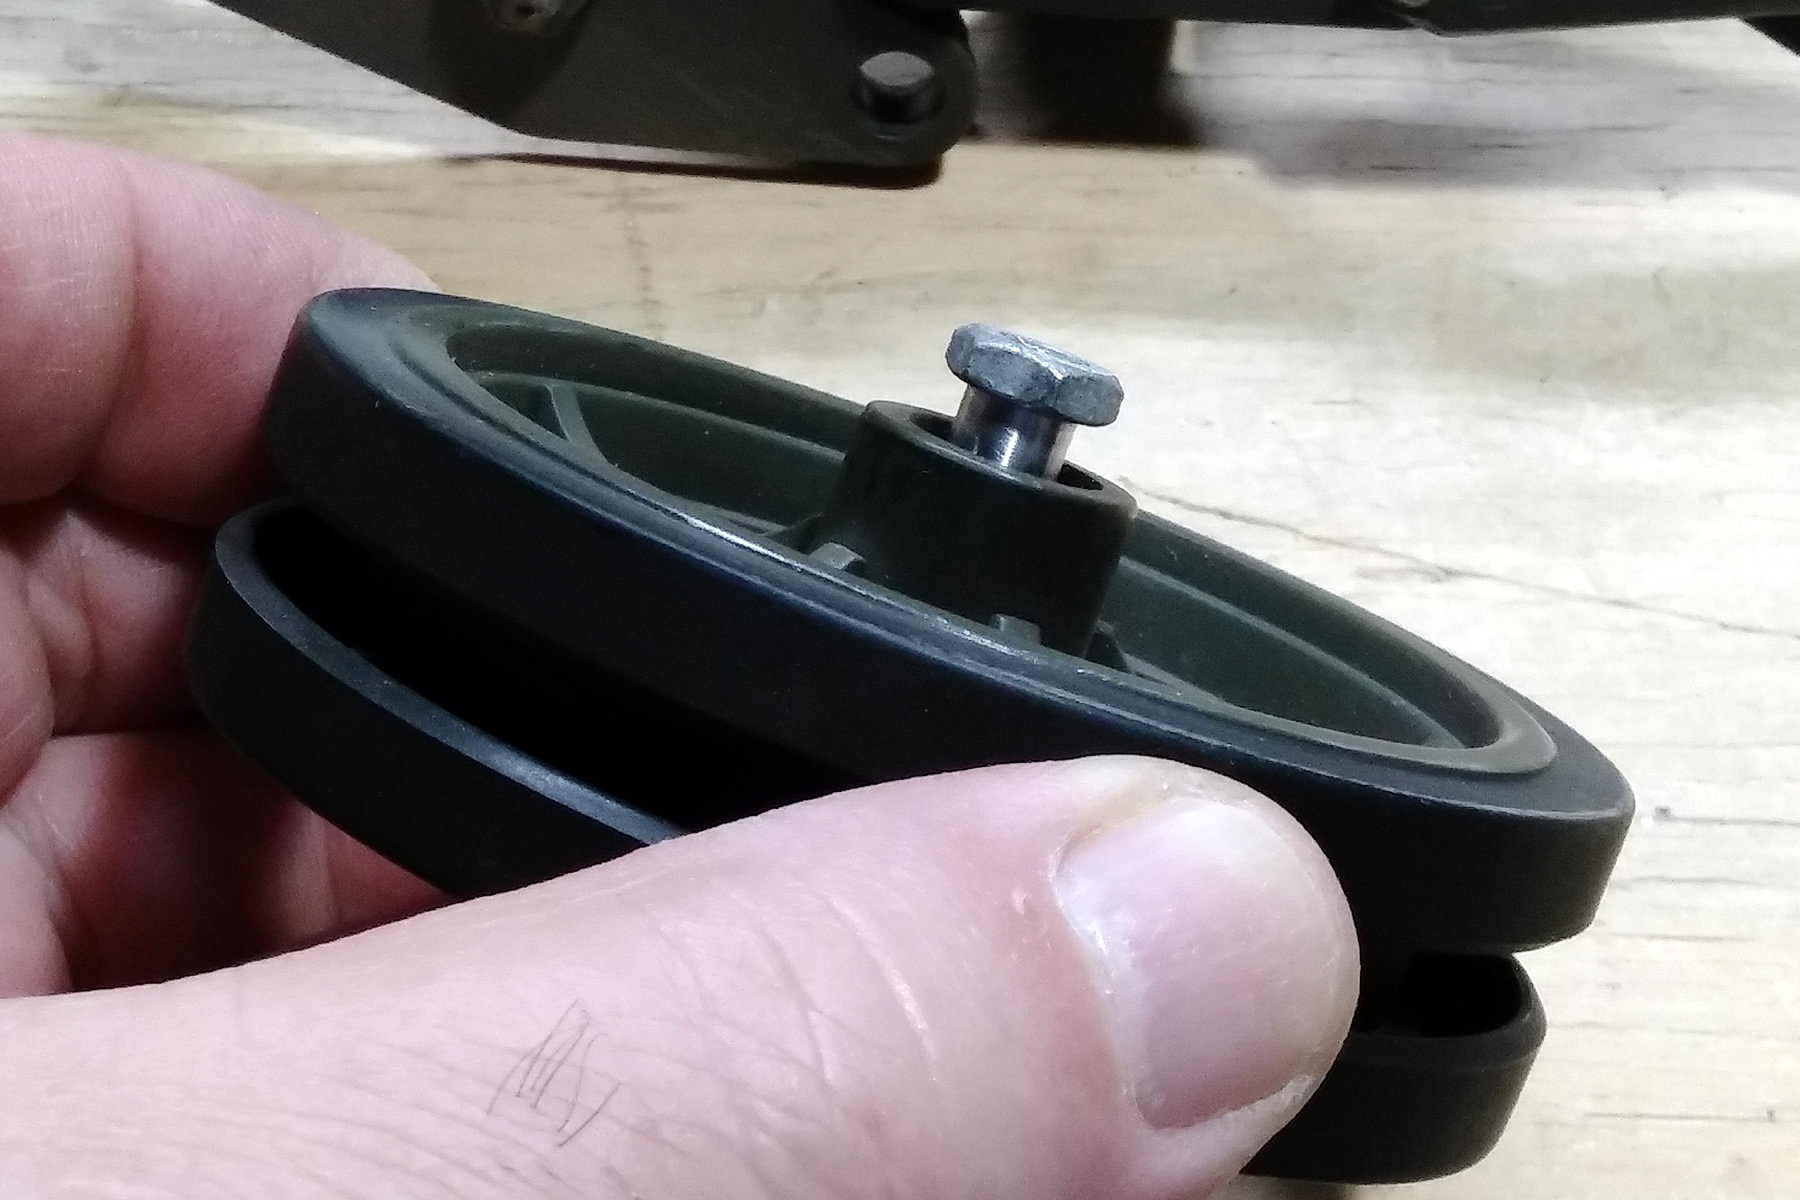
Let's look at this set taken apart.
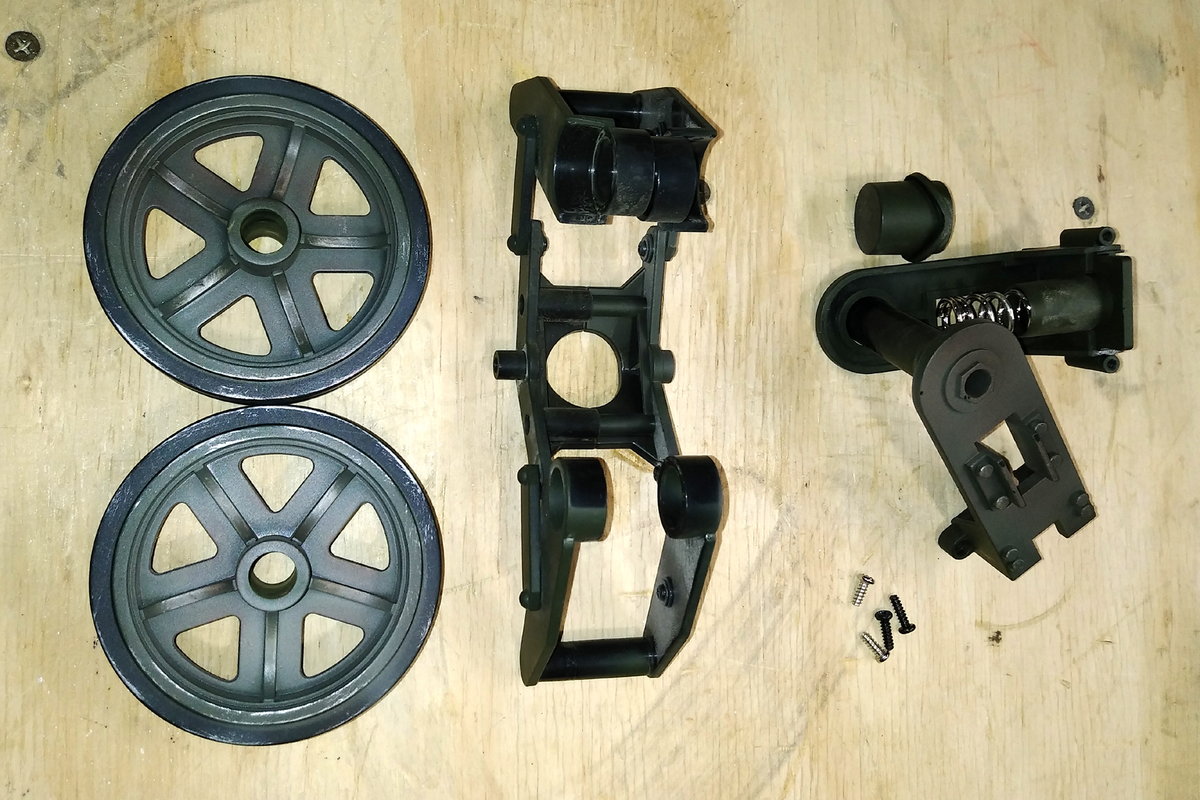
Next lets look at the axle the bogie/road wheels ride on. Most of the axle is molded onto the suspension arm with the big hole. Yeah, I need to take a better photo of it. The back arm has a boss that fits into the axle and there's one screw that holds the axle together. My plan is to leave a short piece of the existing axle to not weaken the arms. I'll counter bore each side of the road wheels 5 or 10 thousandths so the I.D. of the wheel no longer contacts it and two ball bearings will be fitted inside the wheel. I'll make axles out of aluminum rod stock in my lathe for the bearings to ride on. One screw will be inserted through the inside suspension arm to hold the new axle in place.
Next lets look at the axle the bogie/road wheels ride on. Most of the axle is molded onto the suspension arm with the big hole. Yeah, I need to take a better photo of it. The back arm has a boss that fits into the axle and there's one screw that holds the axle together. My plan is to leave a short piece of the existing axle to not weaken the arms. I'll counter bore each side of the road wheels 5 or 10 thousandths so the I.D. of the wheel no longer contacts it and two ball bearings will be fitted inside the wheel. I'll make axles out of aluminum rod stock in my lathe for the bearings to ride on. One screw will be inserted through the inside suspension arm to hold the new axle in place.
08-16-2023, 10:30 AM
#3
Member
Thread Starter
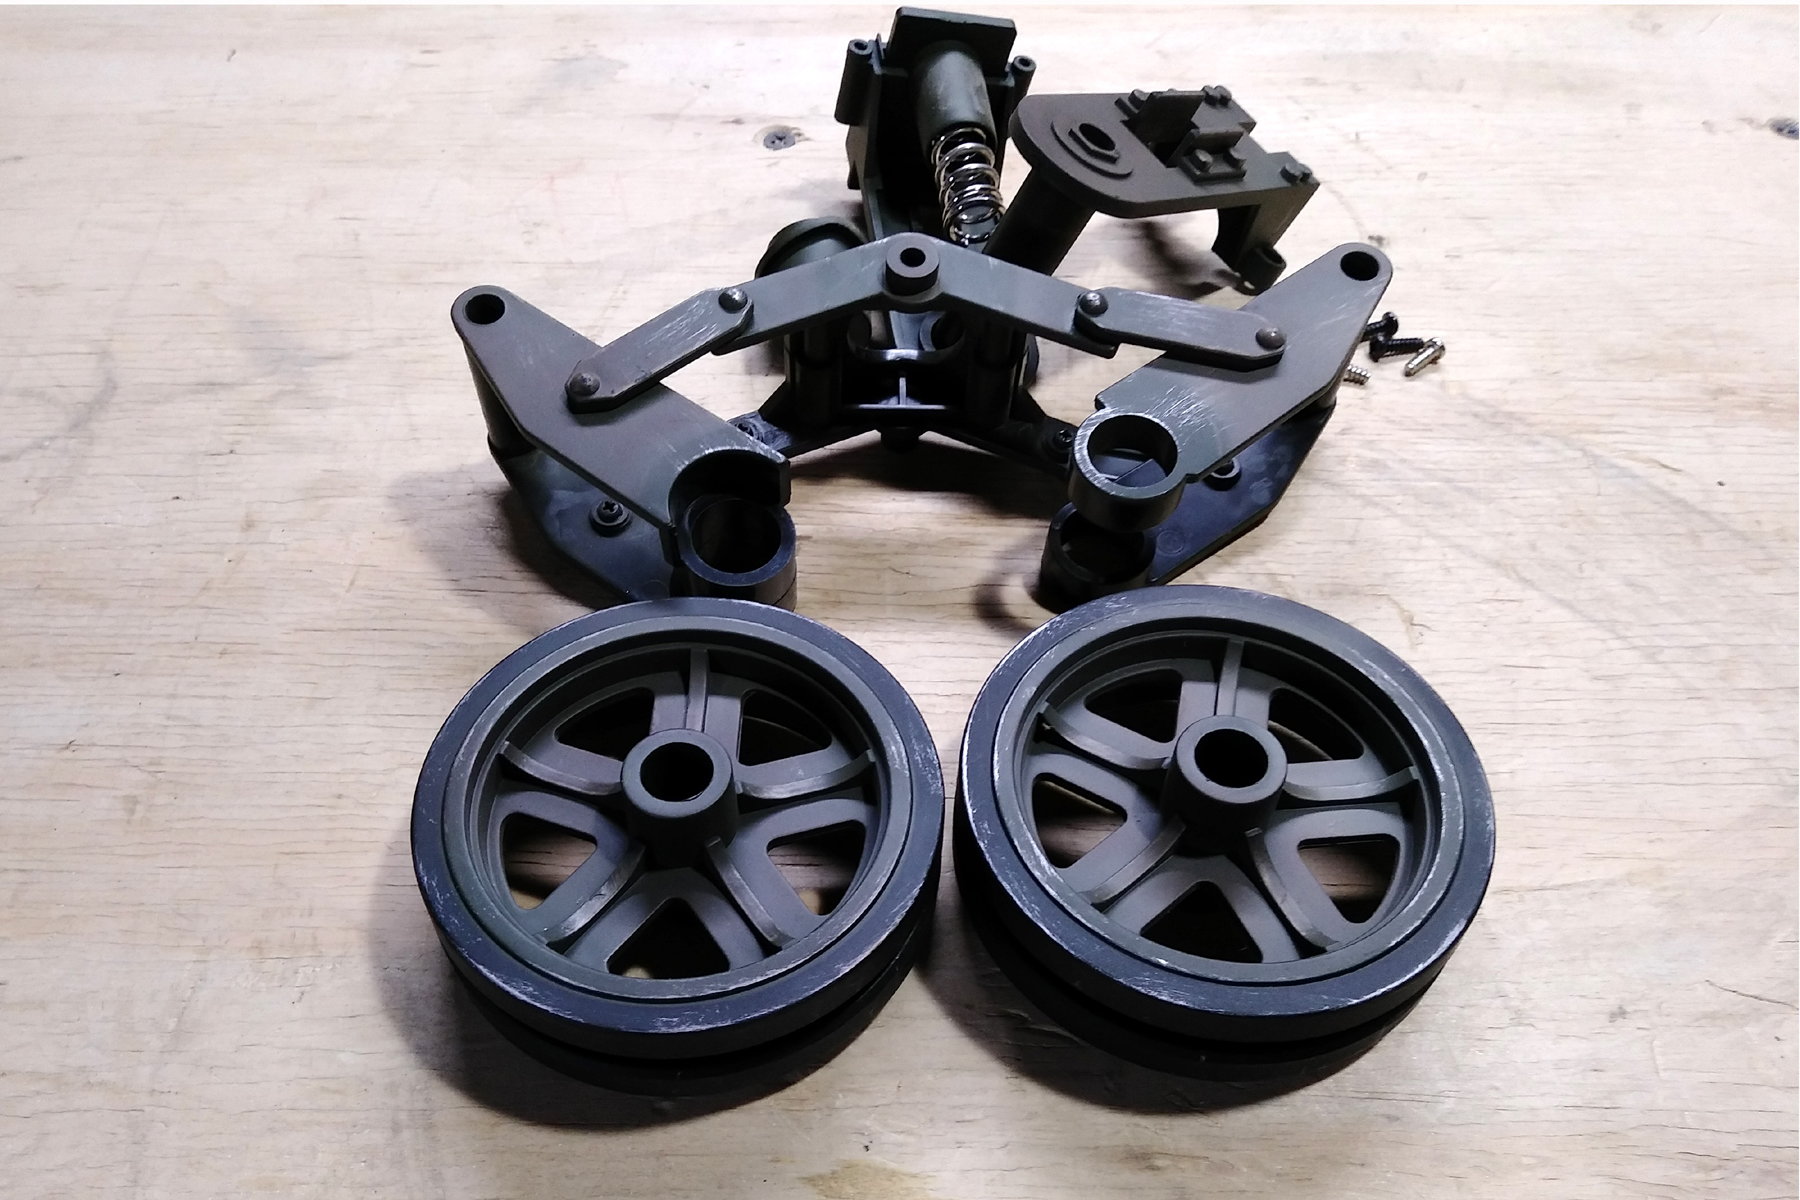
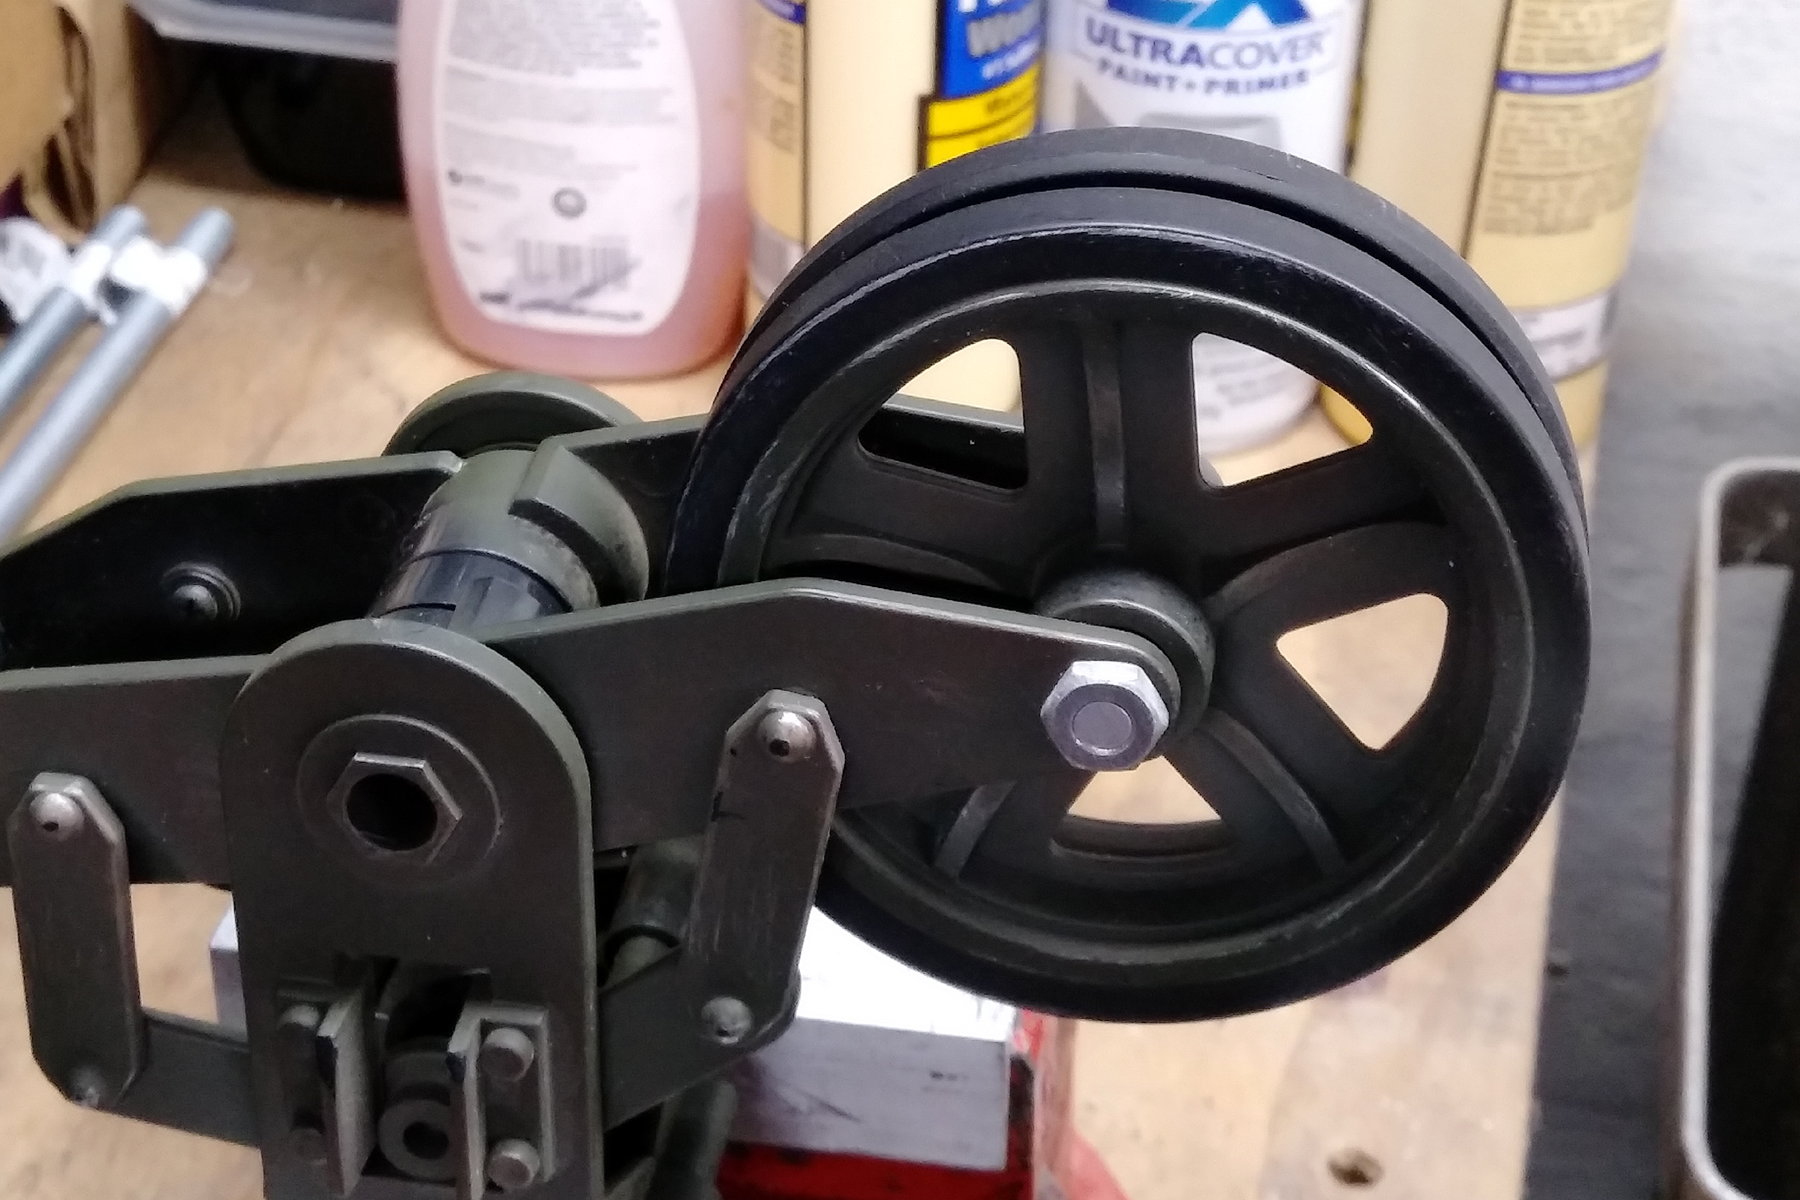
Here's a couple more photos. The springs are quite stiff. I might try a few different springs to ho,d the weight of the tank and allow the suspension to work better, but that's still a way off in the upgrade list of things to do. I'd also like to change out the 12 volt motors for something more powerful. If you've seen my M5 on the Beach video, you'll know it needs more power.
I'll take a few better images of the axle and I'll try and share a drawing of the axles I plan to make.
I'll take a few better images of the axle and I'll try and share a drawing of the axles I plan to make.
08-18-2023, 07:03 PM
#4
Member
Thread Starter
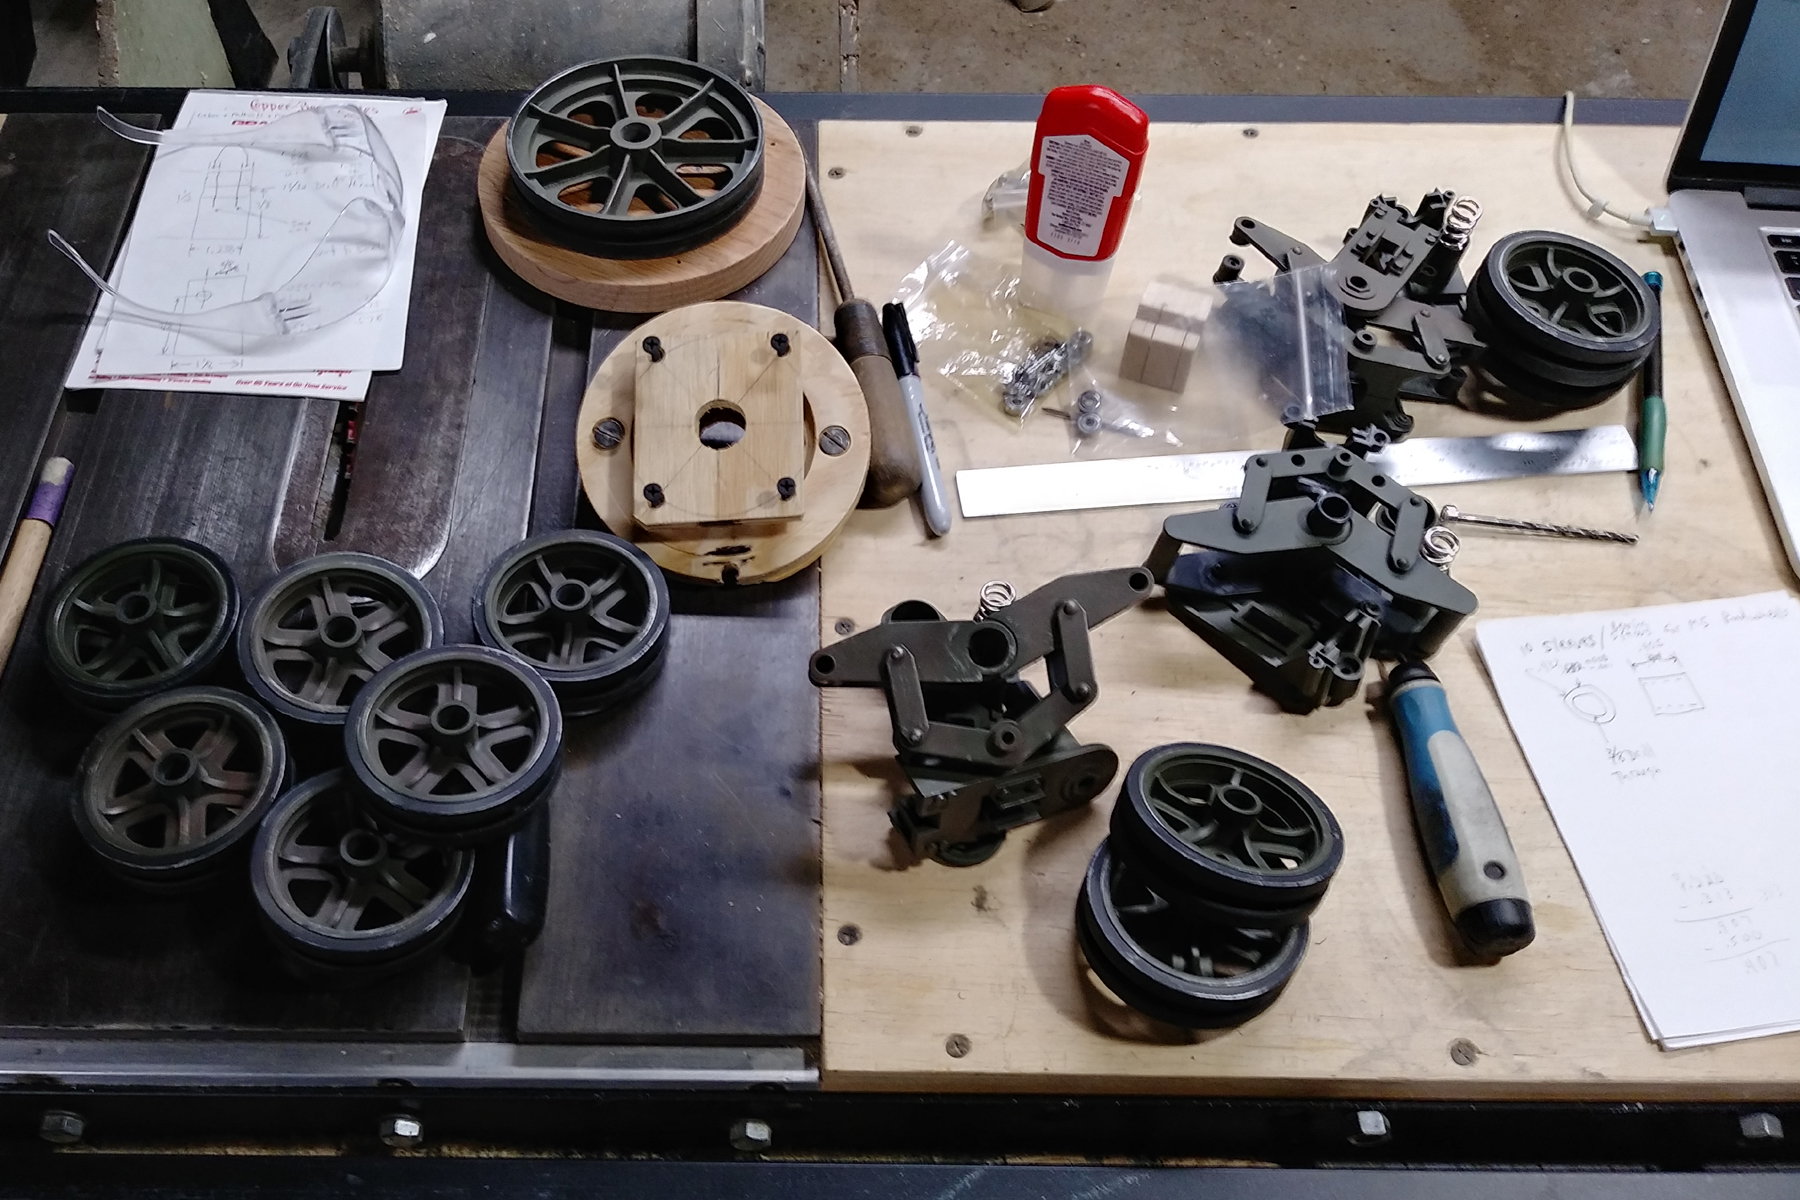
Here's more progress photos. I made a face plate to hold the road wheels in my 7 x 10 Harbor Freight Lathe. I am in the process of boring out all the road wheels so the bearing are a light press fit, and then, I'll do the counter bore on each side of the wheels as I mentioned.
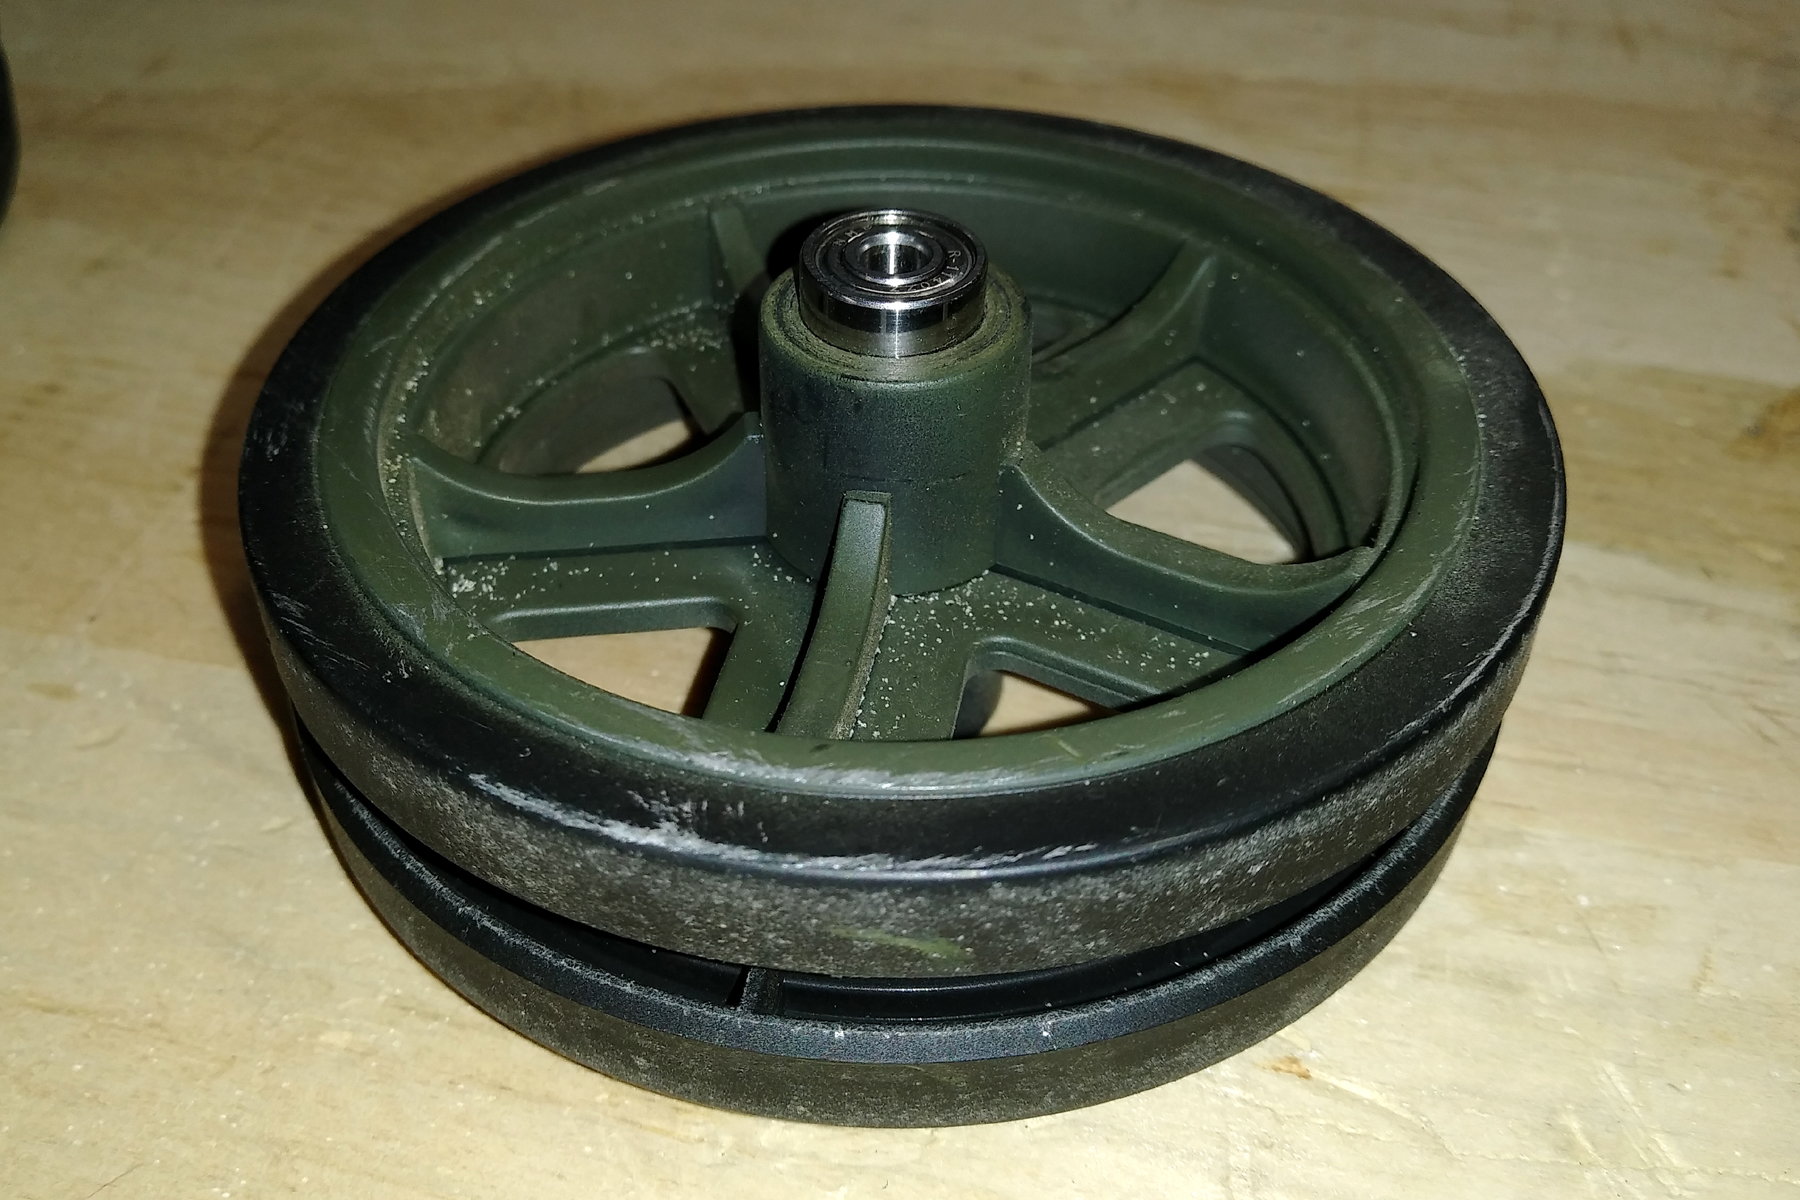
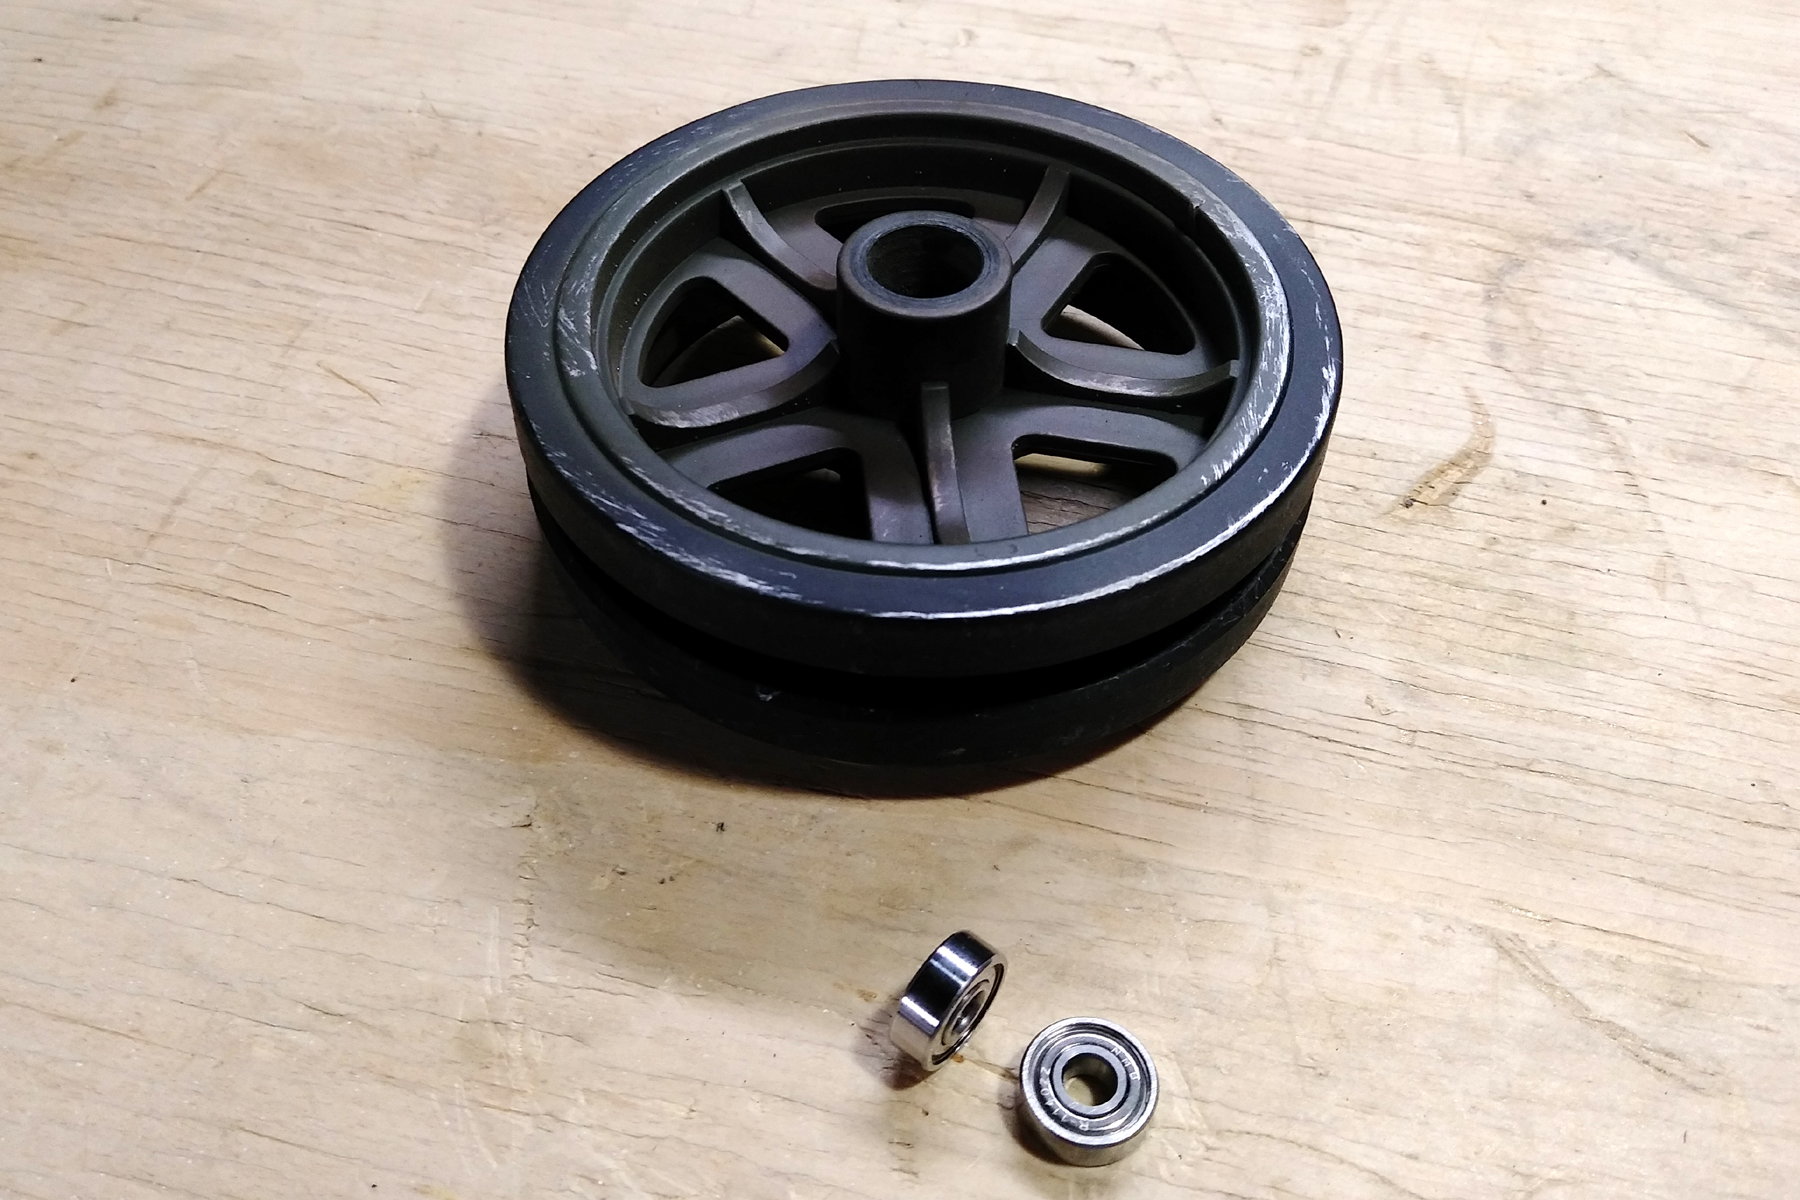
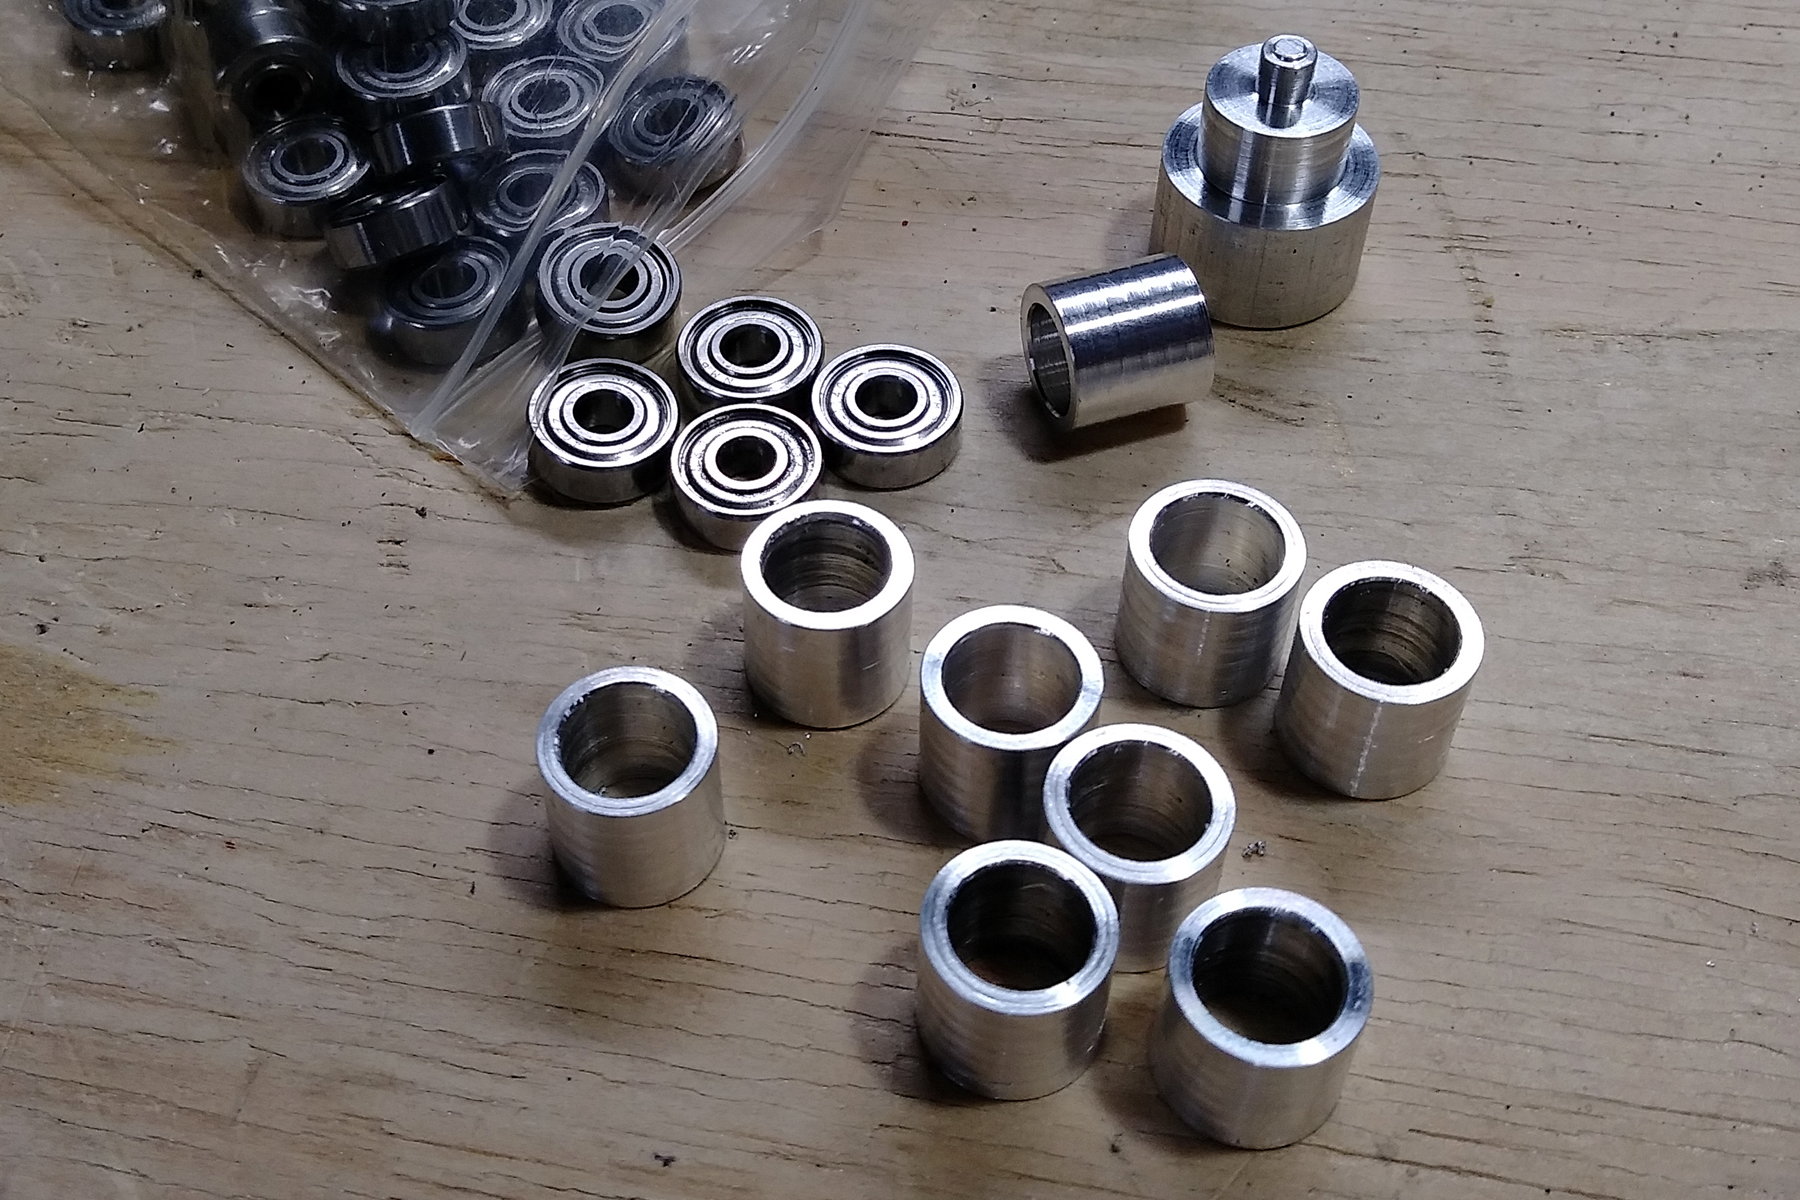
Here's two images that show the ball bearings I'm using.
Here's two images that show the ball bearings I'm using.
08-18-2023, 07:14 PM
#5
Member
Thread Starter
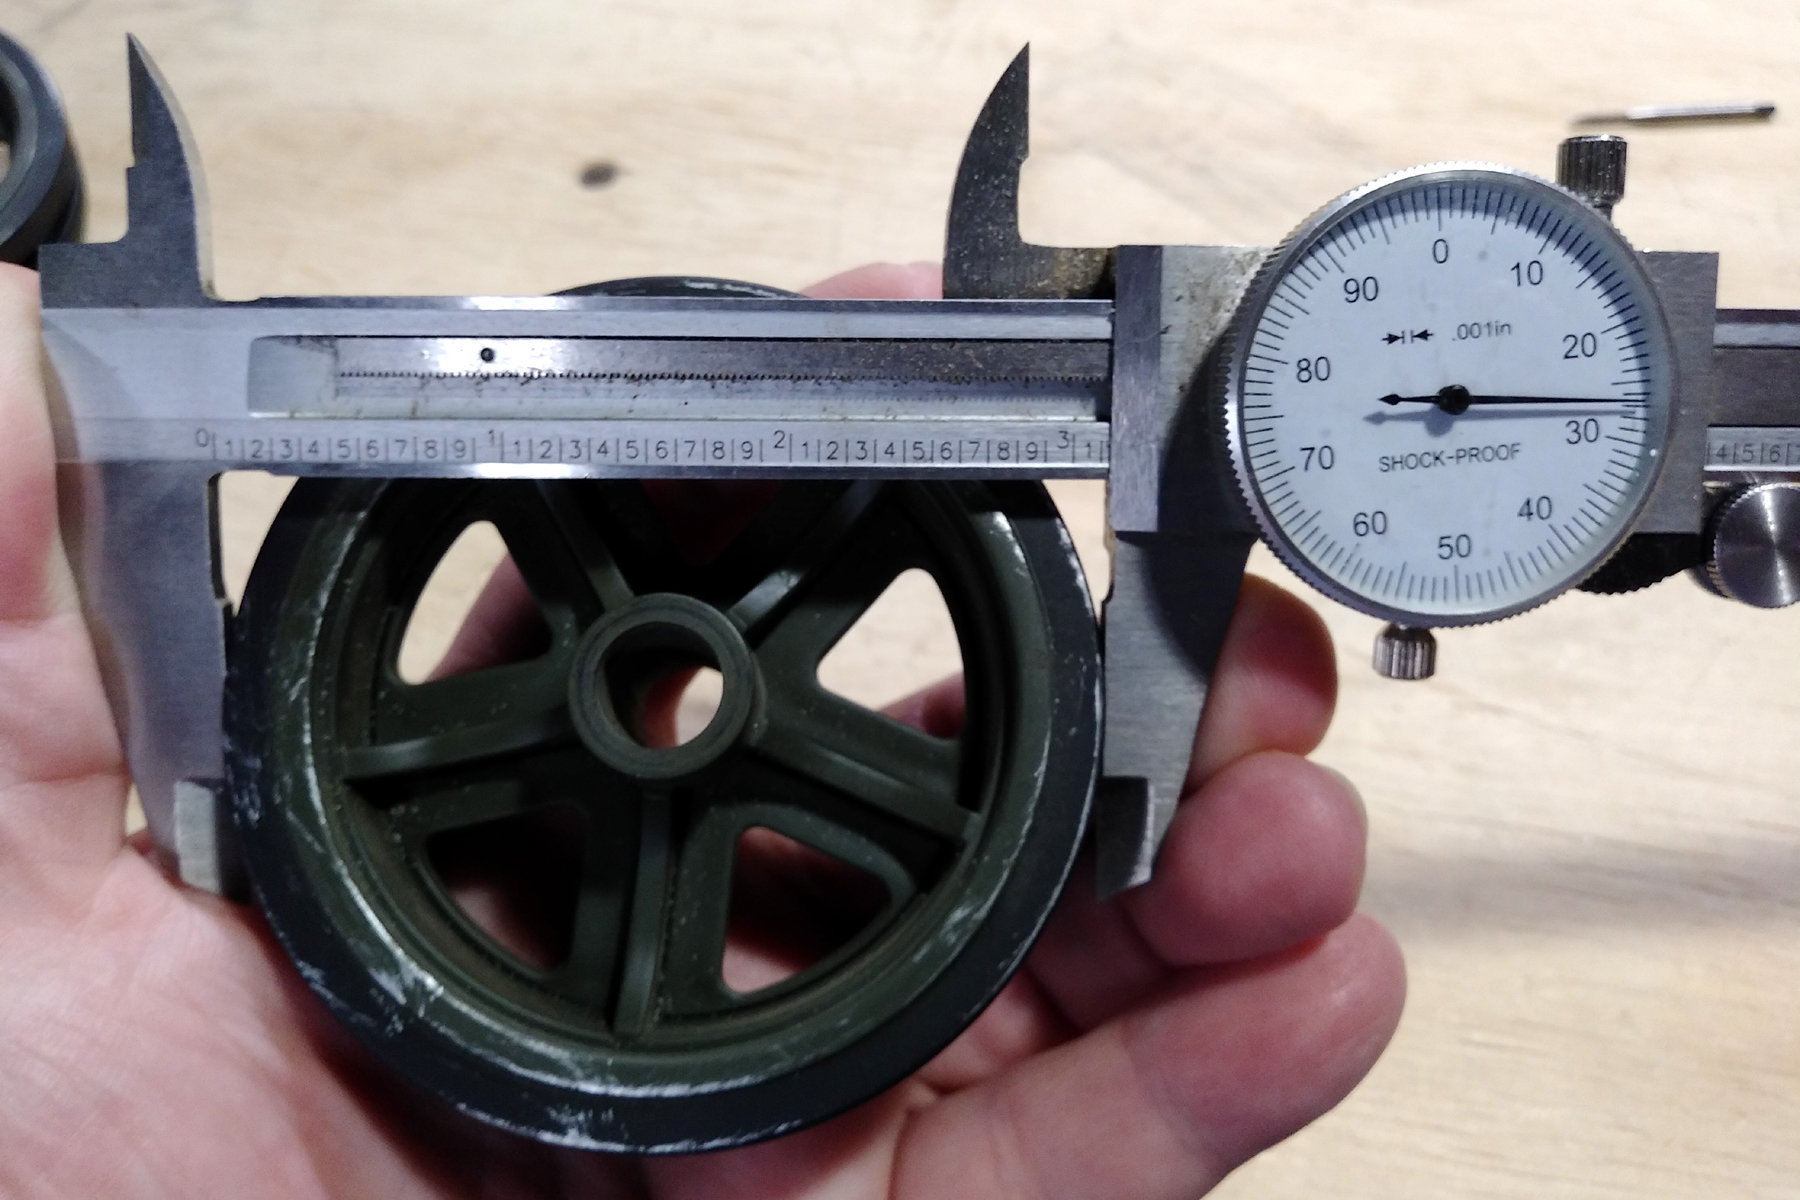
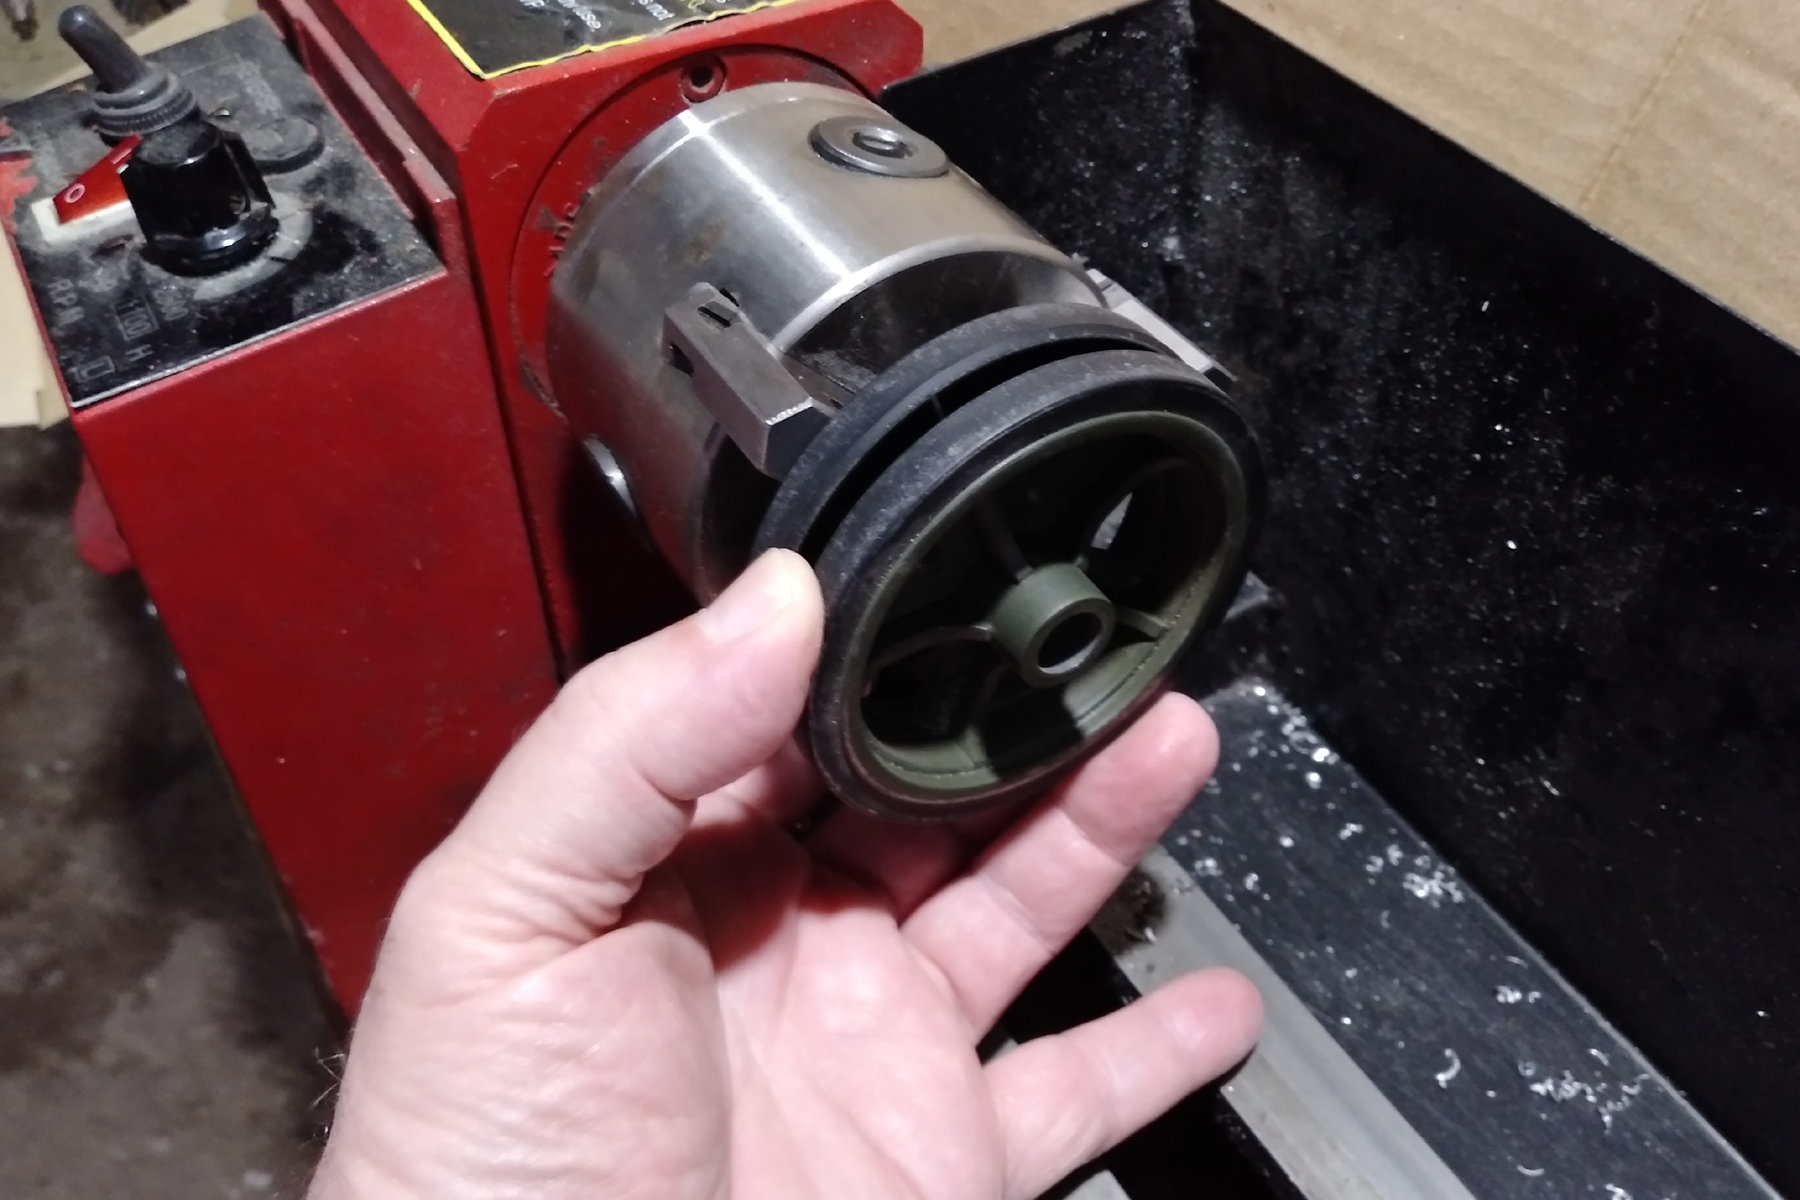
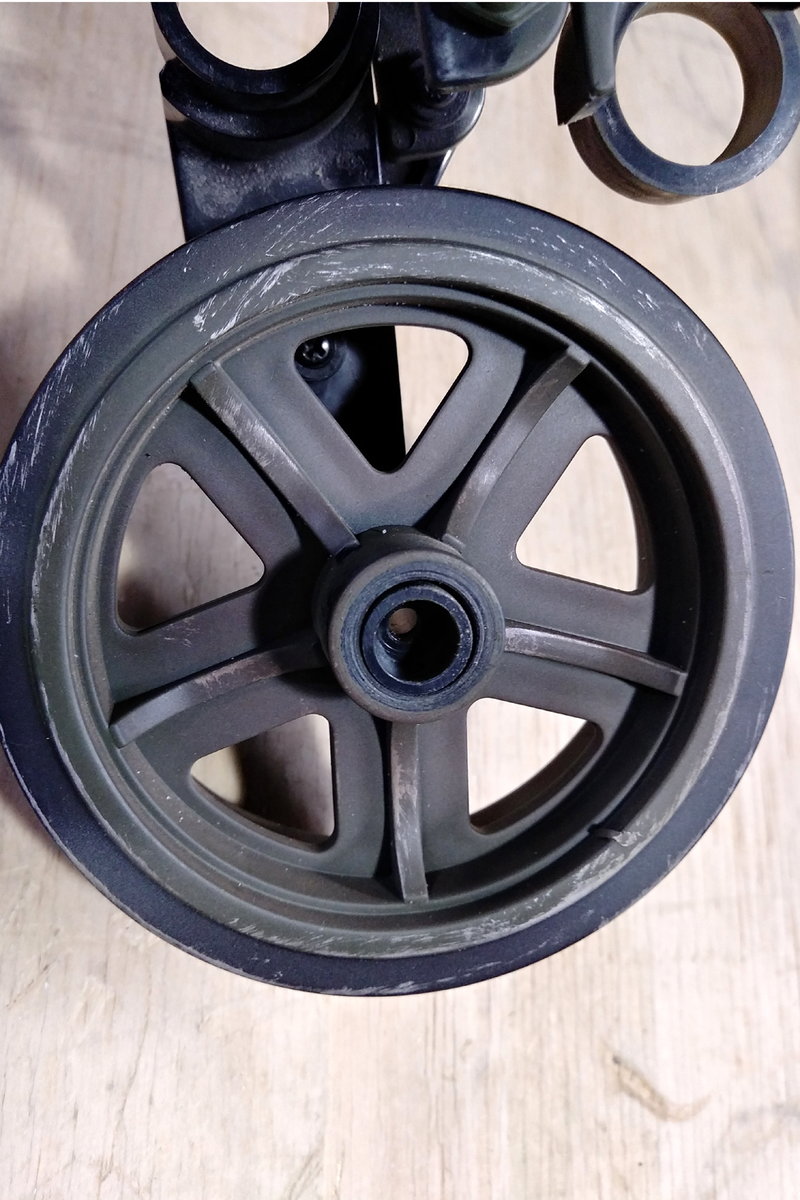
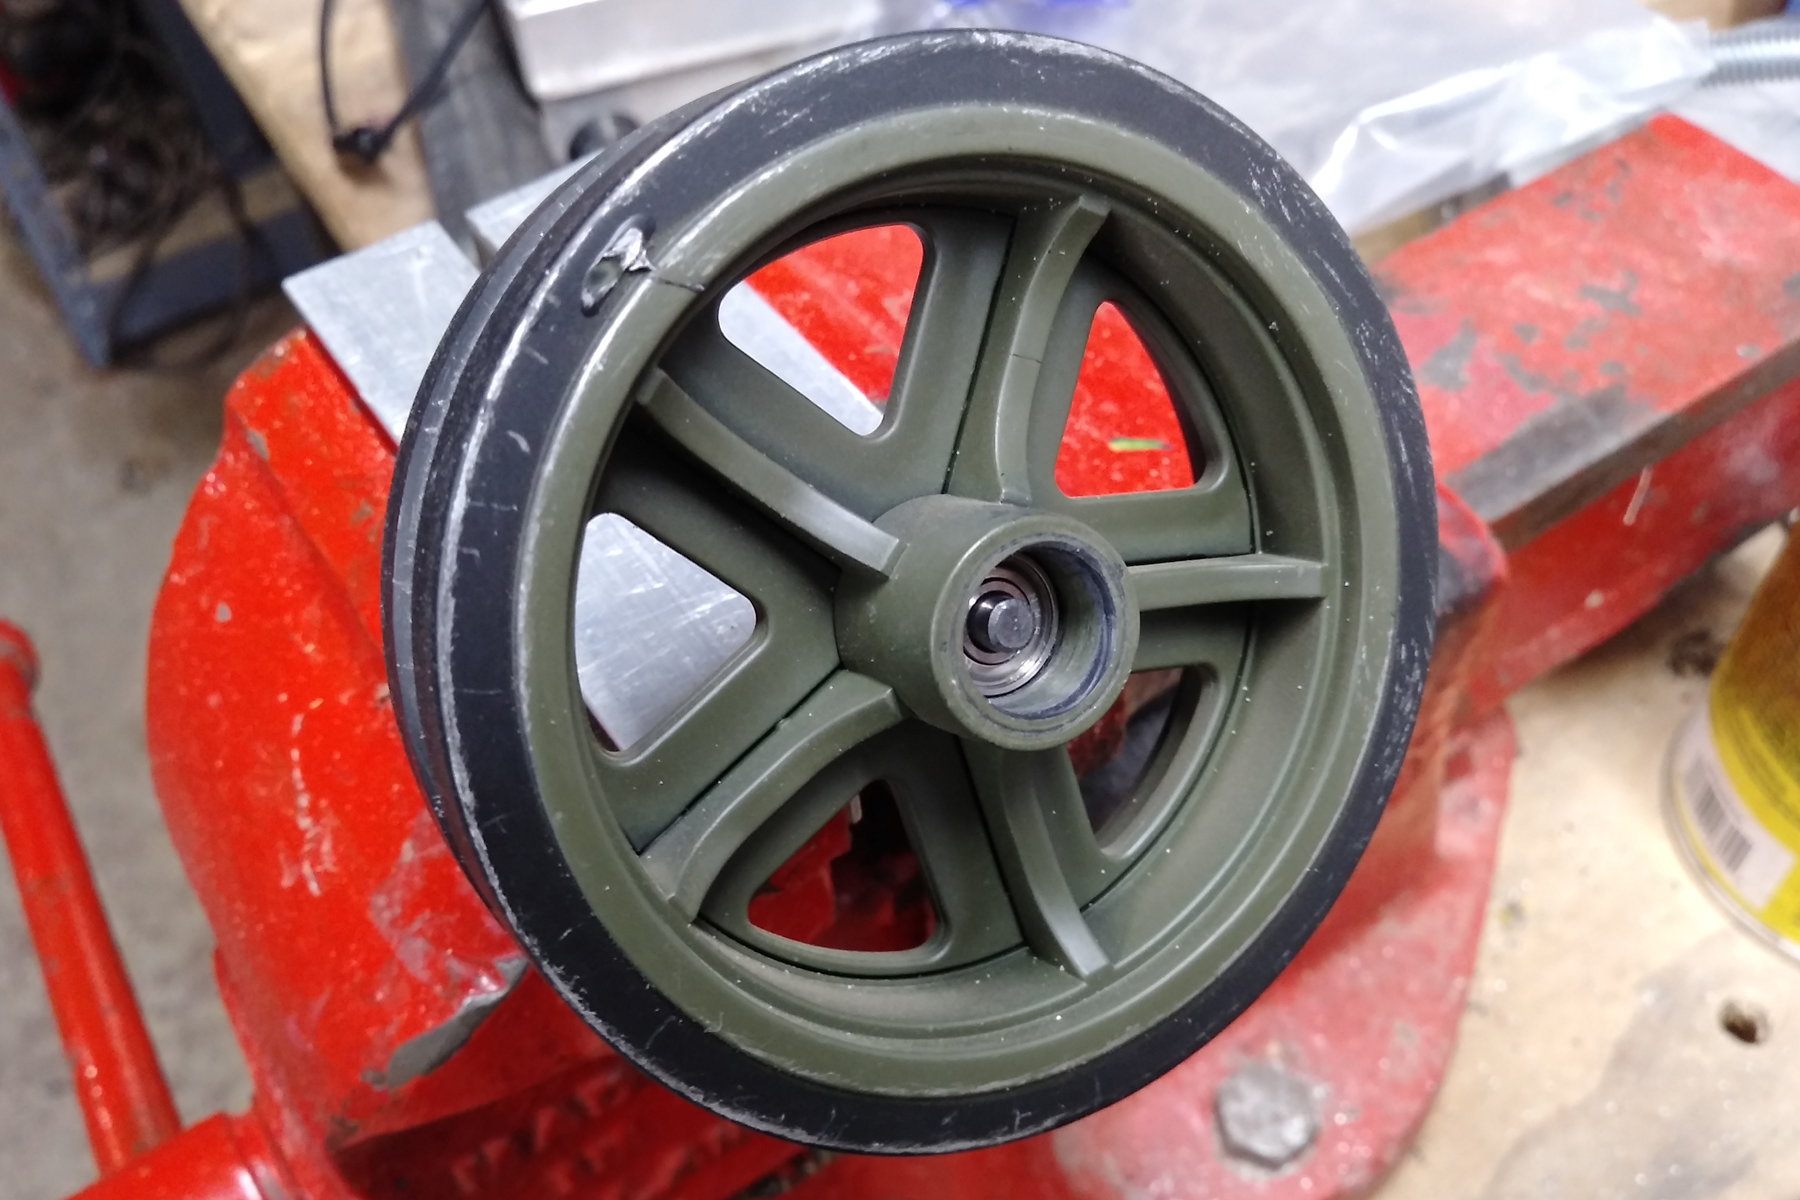
Next, I measured the road wheels. They are 3 1/8 inches in diameter and they are 1 7/32 inches wide. The wheels are to big in diameter for the 3 jaw chuck on my lathe to hold, so I have to make a fixture to hold them on a face plate I made a while back.
Here's a wheel in front of the 3 jaw lathe chuck. The Harbor Freight Lathe is capable of making many different things, but there's always something to big and most people wouldn't know what to do. I can say that I wish I had a bigger Lathe, but I know I can't afford it.
I have a few videos to share, but I have to upload them to my CommieTube Channel first.
08-18-2023, 07:50 PM
#6
Member
Thread Starter
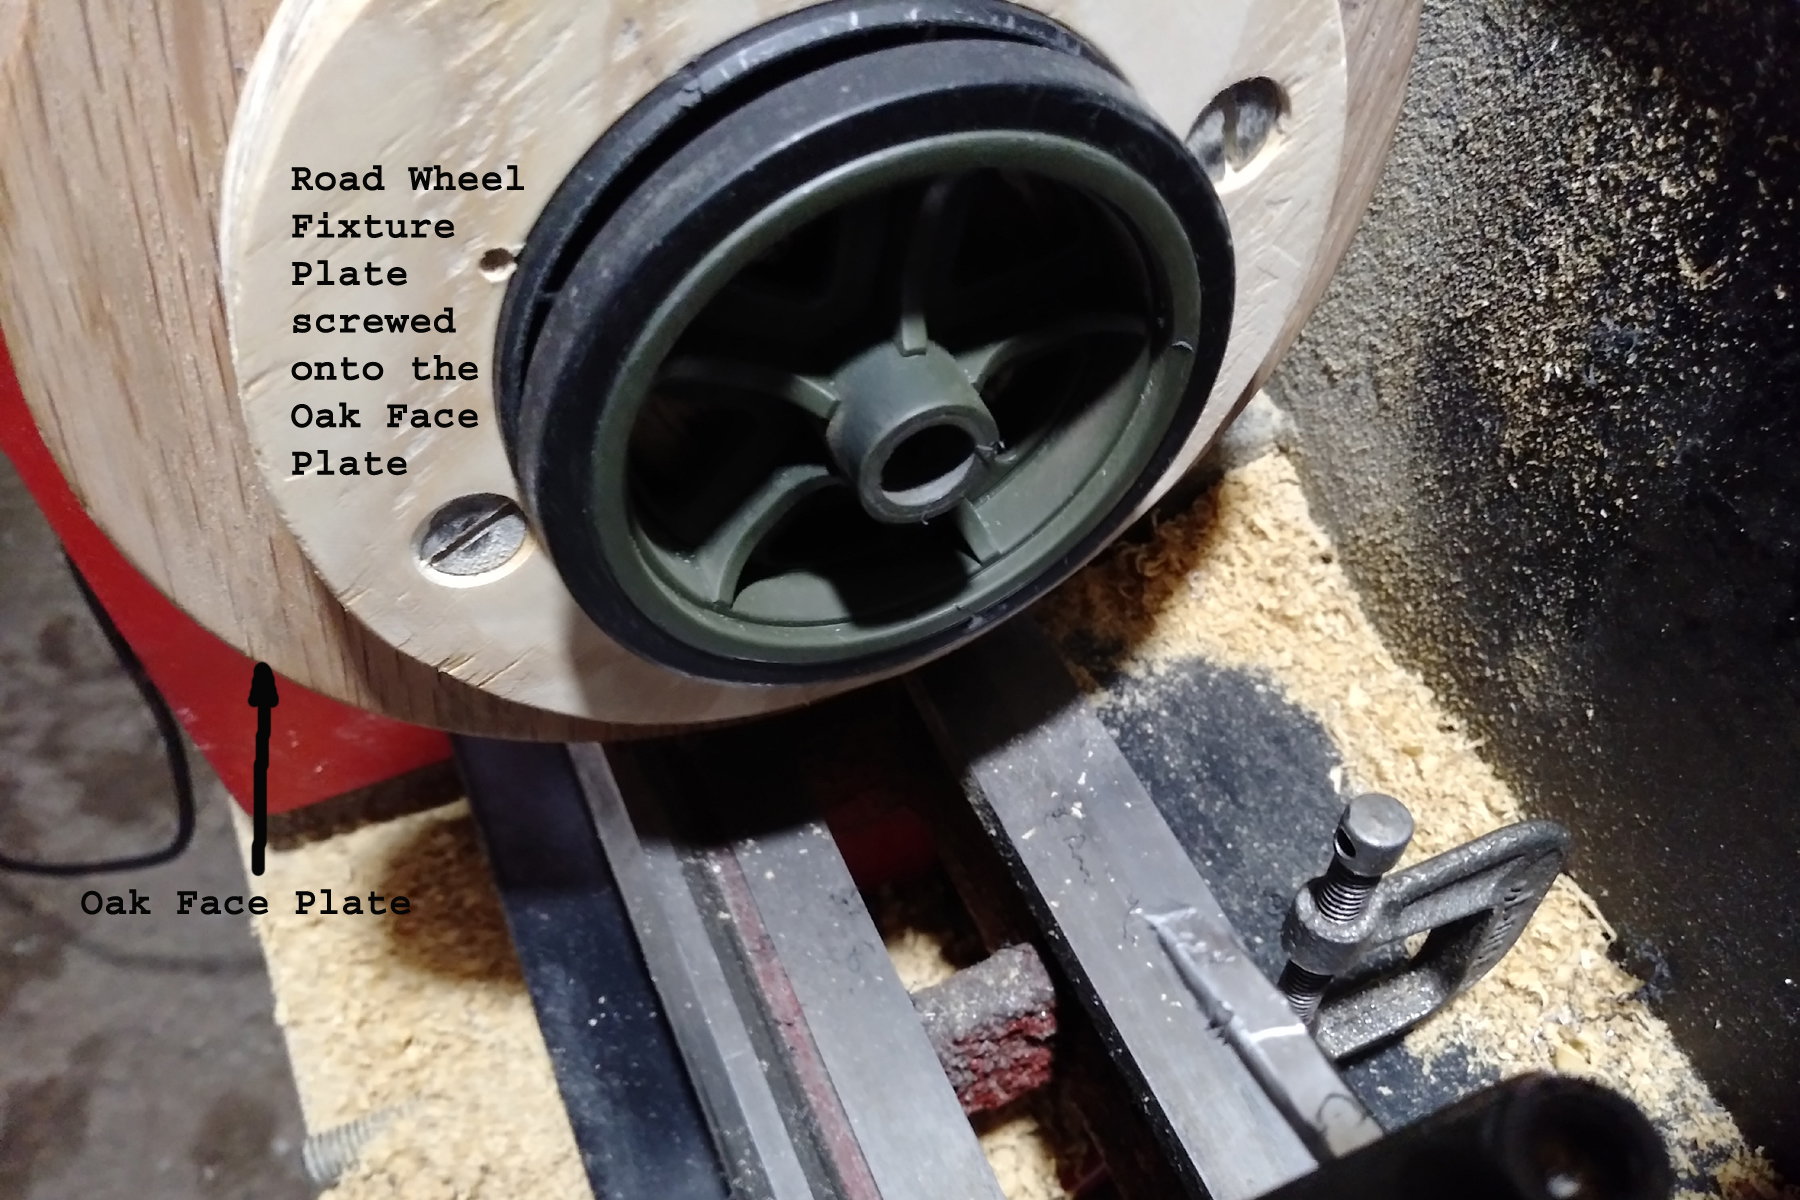
This is the fixture I made so I can bore out the road wheels in my lathe. Quite a while ago, I made an oak face plate that I only use for light duty machining. the back side of the face plate has a shallow counter bore that fits tight on the outside of the 3 jaw chuck with the jaws off. A piece of 1/2 inch threaded rod goes through the spindle of the lathe and threads into the face plate to secure it onto the chuck. Then the part that's being machines is screwed onto the oak face plate. Those who have operated machine shop equipment will know what I'm talking about. Here's a couple photos.
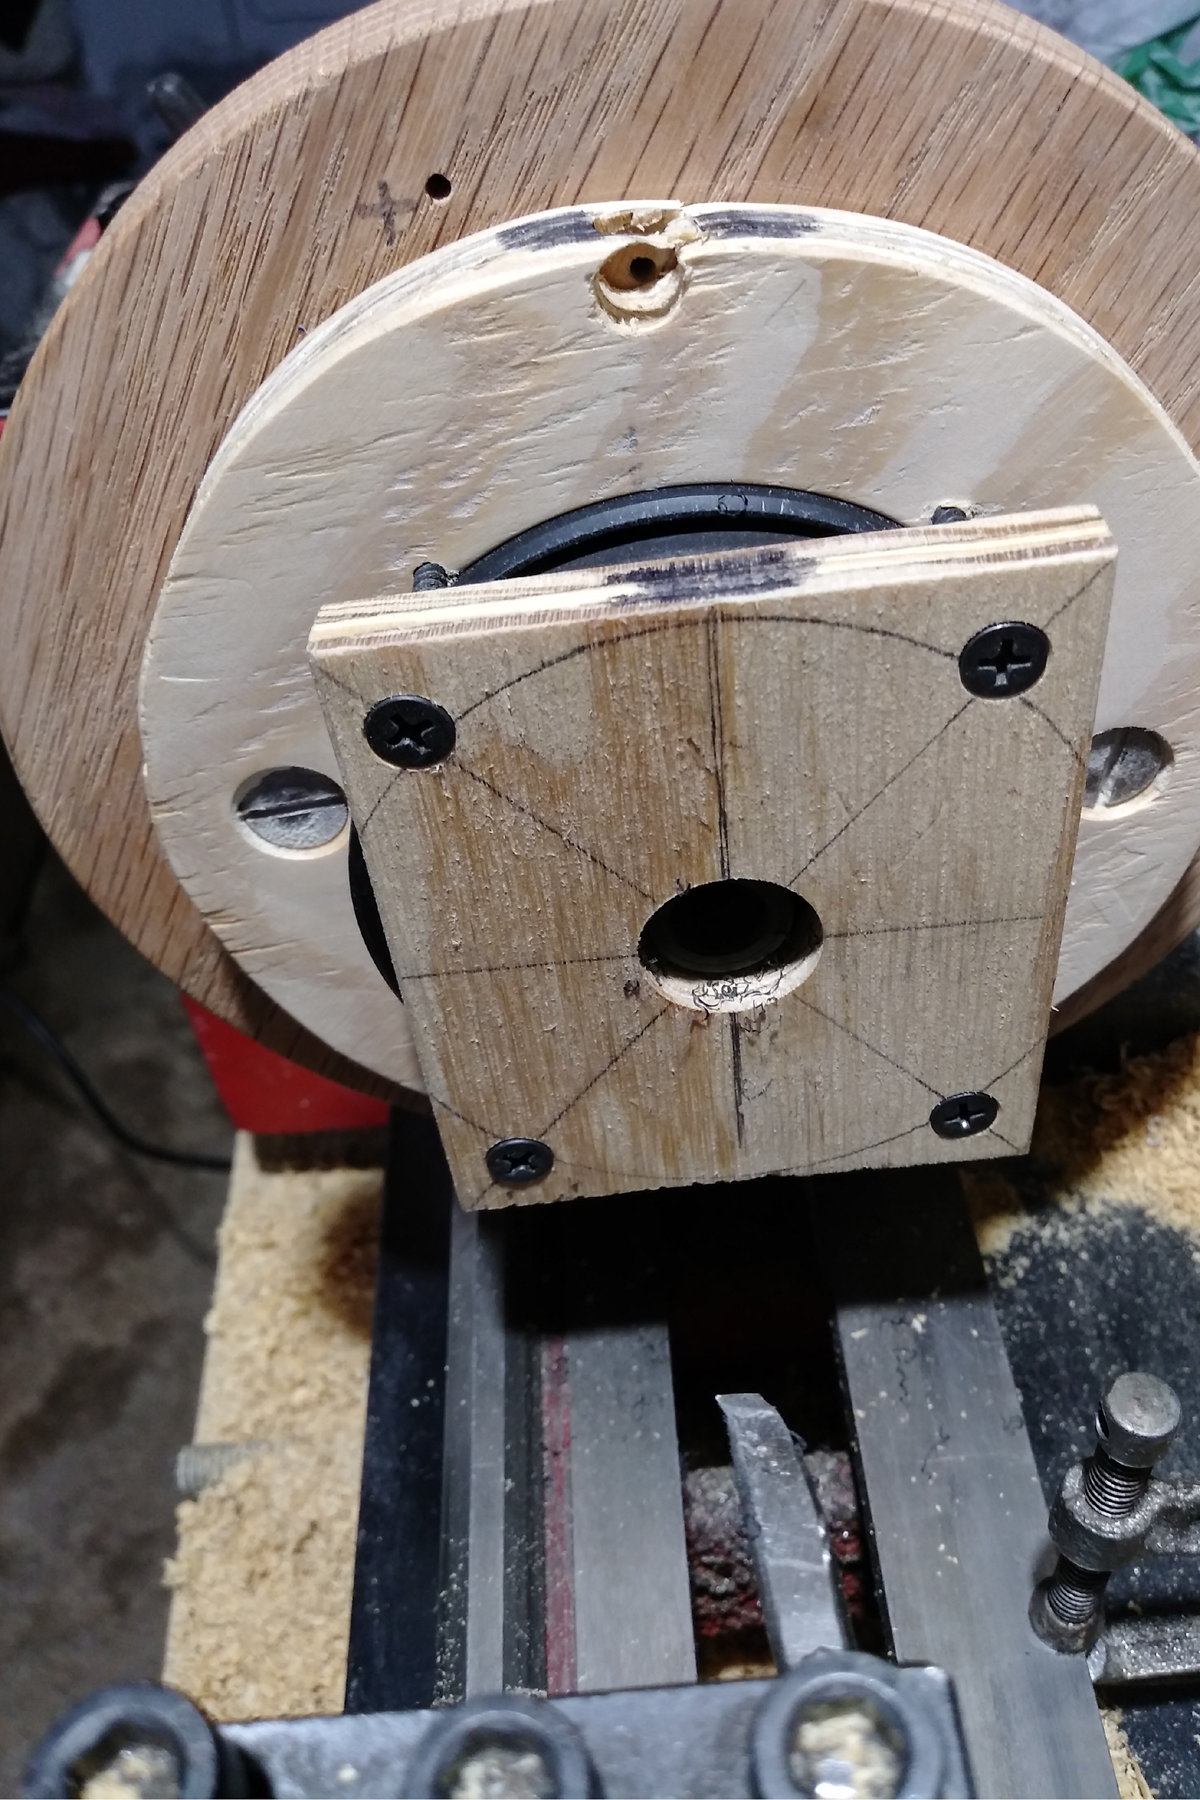
This image shows a piece of plywood that acts as a way to clamp the wheel onto the fixture plate. It looks scary, but it's safe.
This image shows a piece of plywood that acts as a way to clamp the wheel onto the fixture plate. It looks scary, but it's safe.
08-18-2023, 08:03 PM
#7
Member
Thread Starter
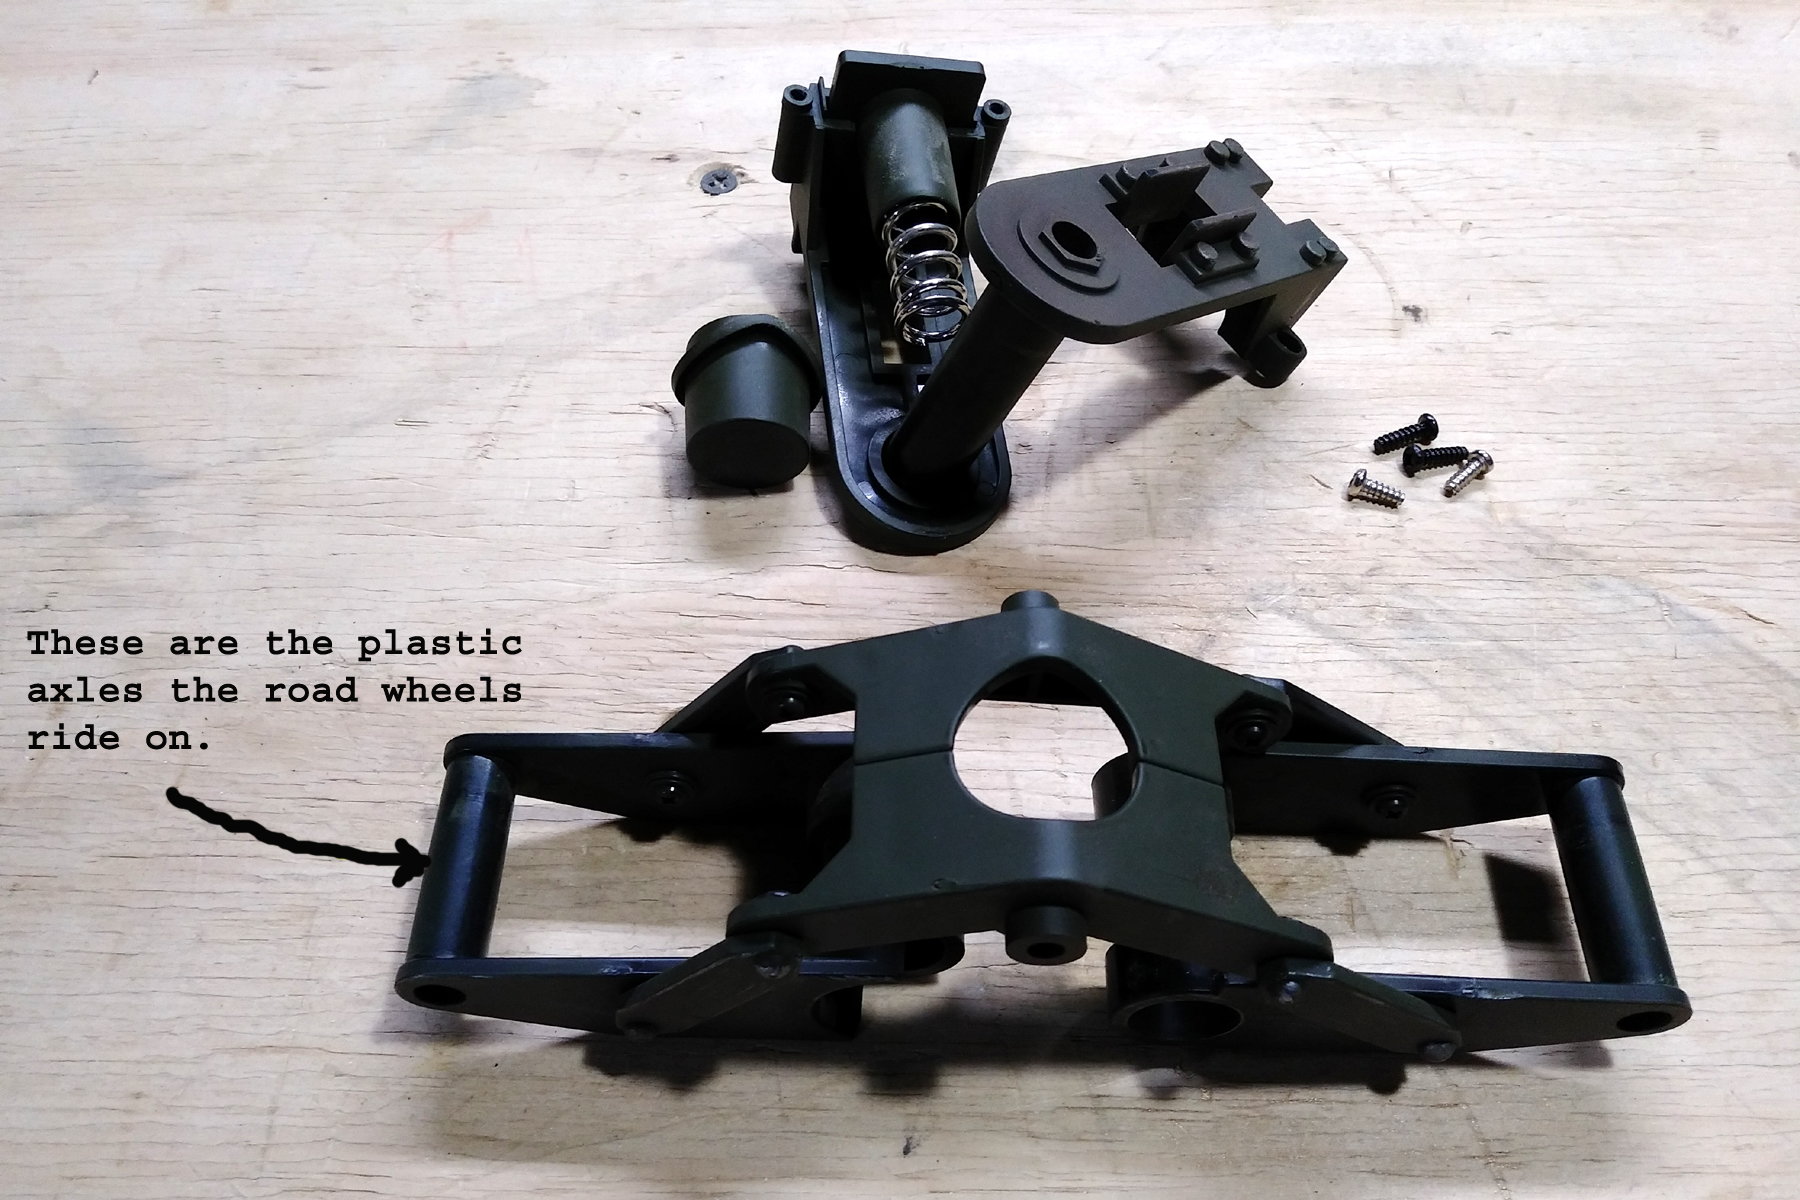
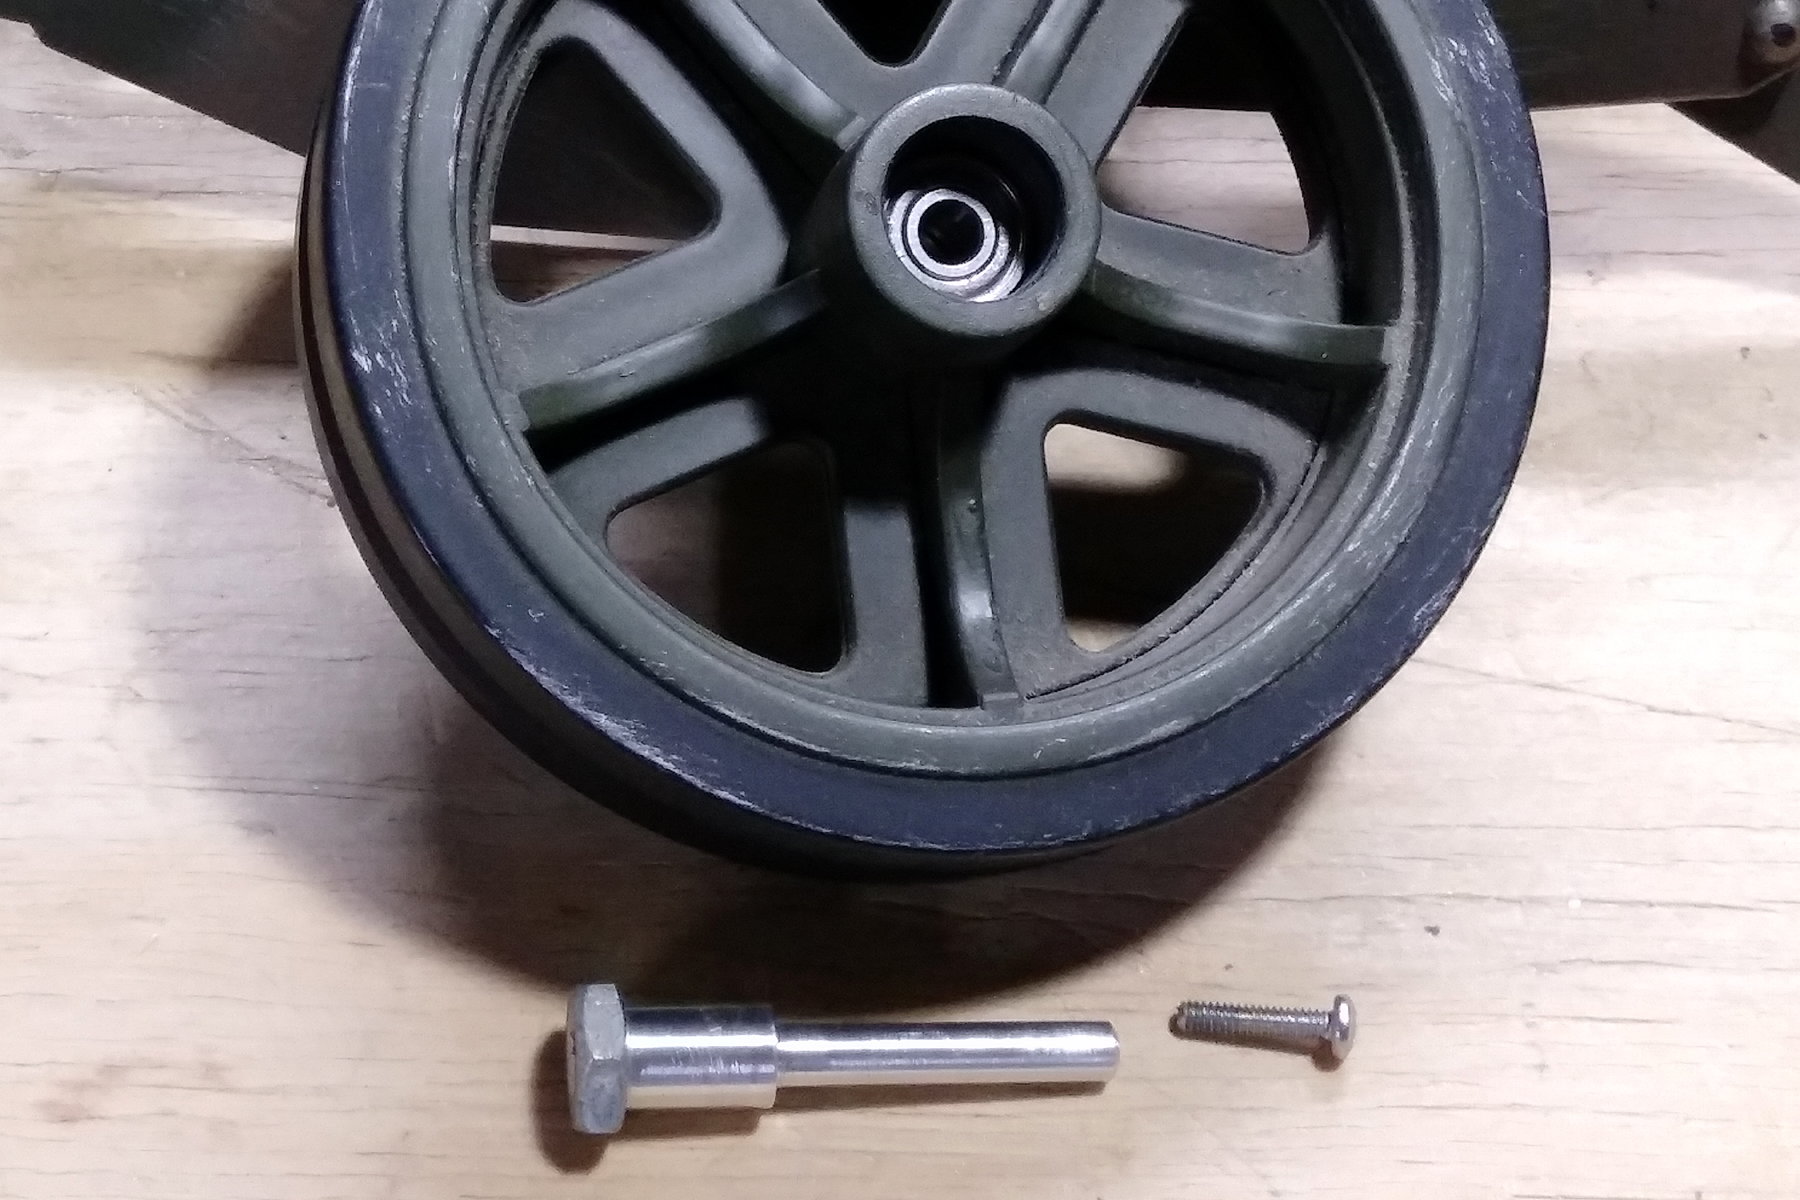
Lastly, here's a good look at the axle and how it's held together. The suspension arm with the hole in it faces out. That hole goes almost all the way through the axle. The hole is actually a deep counter bore that has a small hole through it for the screw to attach to the boss facing up from the inner suspension arm.
Here's the screw partially screwed into the boss.

Here's a better look at the side of the axle that fits onto the boss. The counter bore on this end of the axle bottoms out on the boss when the screw is tightened. It's getting late, so I'll upload a few videos to CommieTube and post them tomorrow.
Here's the screw partially screwed into the boss.
Here's a better look at the side of the axle that fits onto the boss. The counter bore on this end of the axle bottoms out on the boss when the screw is tightened. It's getting late, so I'll upload a few videos to CommieTube and post them tomorrow.
Last edited by rb67mustang; 08-18-2023 at 08:05 PM.
08-19-2023, 07:28 AM
#8
Member
Thread Starter
Good Morning Everyone, I have taken the time to upload new progress videos to my CommieTube Channel, and I made a Playlist of all the MR Upgrades I've done to my first 1/6 M5 Stuart. My videos are raw with no edits and therefore are not professional grade, but they show what I've done. The work began on this tank in 2016 and I haven't done anything to it until I restarted my Road Wheel Updates here at RCU. I have a lot of images on my RC Groups Build thread that I will not be adding to this new thread at RCU. The three new videos of upgrading the Road Wheels could've been better quality if I had used a tripod to hold my cell phone. I will make use of a tripod as I continue to finish all the planned upgrades to my M5 Stuart. This is a link to the complete video play list: https://www.youtube.com/playlist?lis...WL220YNrEftij5
The three newest videos I will post here and now, but they are in the playlist. I thank everyone who is interested in this thread.
Roger rb67mustang/Rebel 1
The three newest videos I will post here and now, but they are in the playlist. I thank everyone who is interested in this thread.
Roger rb67mustang/Rebel 1
08-21-2023, 12:31 PM
#11
Member
Thread Starter
Hi Everyone,
I finished the bores on all the Road Wheels yesterday. Here's a short video taking a better look at the face plate I made for the Harbor Freight Lathe.
I finished the bores on all the Road Wheels yesterday. Here's a short video taking a better look at the face plate I made for the Harbor Freight Lathe.
08-21-2023, 12:59 PM
#12
Member
Thread Starter
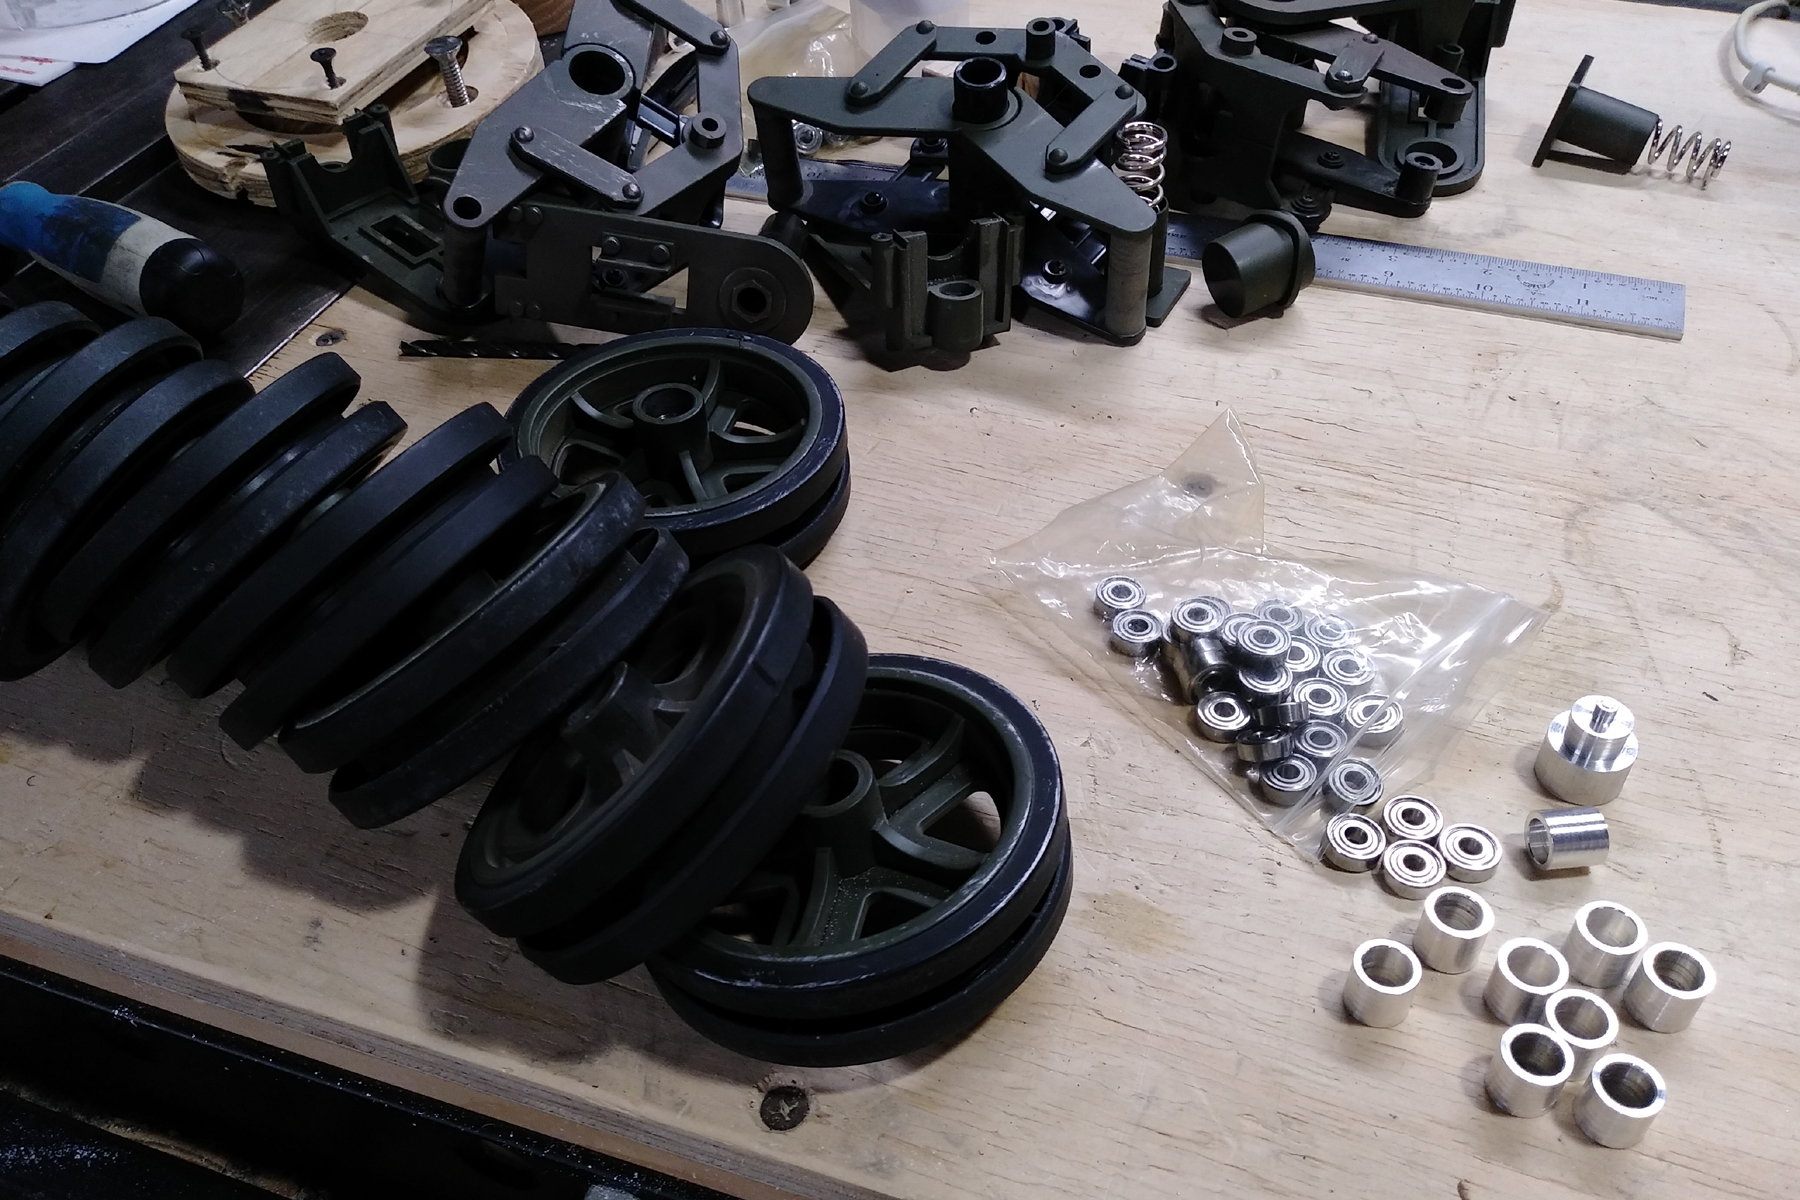
Earlier today I finished making the bearing spacers and an inserting tool. I installed the dual bearing in the first M5 Road Wheel and I made a spin test video.
The following 3 users liked this post by rb67mustang:
08-21-2023, 01:21 PM
#13

Posts like this make me sad I screwed up my M5 and ended up selling it for parts. If I had the skills I have now back then when I owned it, I would have one fine looking Stuart. All wasn't lost as I made more parting it out than the whole tank was worth.
Derek
Derek
08-21-2023, 05:09 PM
#14
Member
Thread Starter
Thanks, Derek, for following my M5 Upgrades. I've always wanted to get into 3DP like what I see you and so many others here doing. I use my skills as a machinist to do things the old hands on way. Thanks again, and I hope you watch my early M5 upgrades I've done in my Commietube M5 Playlist.
BTW, with the last stimulus check, I went and bought an old Bridgeport and I've been working on it to bring it back to life. I just hope to get a bigger lathe.
BTW, with the last stimulus check, I went and bought an old Bridgeport and I've been working on it to bring it back to life. I just hope to get a bigger lathe.
Last edited by rb67mustang; 08-21-2023 at 05:12 PM.
08-21-2023, 06:50 PM
#15
I have an Enco 9x21 lathe that the previous owner buggered up. Been trying to get it fixed for a while now so I can sympathize. I guess I really need to find a machine shop around here that will fix the top slide.
08-22-2023, 05:41 AM
#16
I have one of these 1/6 M5s, still in the box when I got it and it's already RC. The part I don't like is that the main gun doesn't elevate. I'll be watching closely to see what you do with the turret on this one. I've heard that someone, maybe ECA, was making a replacement turret for these, But I haven't been able to find any place where I can buy one. Keep up the good work, I'll be watching closely. 
08-22-2023, 05:45 AM
#17
I run a lathe everyday for a living. It's an old Clausing-colchester (sp?) but it's a pretty good lathe. Having a fully equipped machine shop at my disposal has saved my butt on more than one project. You guys may have seen the 15 cm howitzer I built from the merit kit and I did a turned metal barrel for that and it came out pretty good.
08-22-2023, 07:44 AM
#18
Member
Thread Starter
I'll have to check it out. I have already upgraded the turret on my M5. All that was done on my RC Groups thread almost 7 years ago. I was fooled to think it's a good idea to have many projects in the works at one time, so when you get timed of one, then go and work on something else. I got burned out and I walked away from everything I was doing for a long time. In the process, I got back into a hobby that I had quit, and then the PanDEMic hit us.
I added an Airsoft cannon to my M5 because there are no RC Tank Groups where I live. I made the two piece gun barrel out of aluminum tube and it has recoil by servo. The turret traverse is also by servo. When I set this project aside, the electronics were not done. I still need a sound card of some type that will also control the recoil. One thing I can say is this tank needs more power, the 12volt motors don't cut it. The tracks don't have much traction as well. Watch the video of it on the Beach in Newport, RI.
I recently created a play list on CommieTube with all my M5 videos. Check it out using this link: https://www.youtube.com/playlist?lis...WL220YNrEftij5
Here's a link to my RC Group build thread to see progress photos. https://www.rcgroups.com/forums/show...t-Century-Tank
Last edited by rb67mustang; 08-22-2023 at 08:36 AM.
08-22-2023, 07:54 AM
#19
Member
Thread Starter
I'm sorry to hear about your Lathe needing to be fixed. Many years ago when I thought I knew everything, but didn't, I tipped a Lathe over not once, but twice. The first time just a couple handles were broken. The second time there was some major damage that at the time I wasn't able to repair. Then some years later, at the last machine shop I worked at, I was able to repair it myself during the 2nd shift. That place was great to work for. They allowed us to use their equipment during lunch, or on 2nd shift as long as the machine we wanted to use open. I hope you find a place to repair your Lathe for a fair price.
08-22-2023, 08:14 AM
#20
I did a quick skim through those videos and I'll give them a more thorough going over when I get home from work, but I think there's a lot of stuff there that's really going to help out. Of course, I still have several projects to complete before I get to the M5, But it seems to run pretty well on a 3S lipo, so the plan is to operate it with an IBU2 on 12 Volts. It will be almost the same as wiring up a 1/16th tank. I'll probably stick with the stock rotation motor, I just need to get the turret sorted out. The Ibu has pretty much everything I need, like lights, sound, etc.
08-25-2023, 03:44 PM
#21
Member
Thread Starter
Hi Everyone,
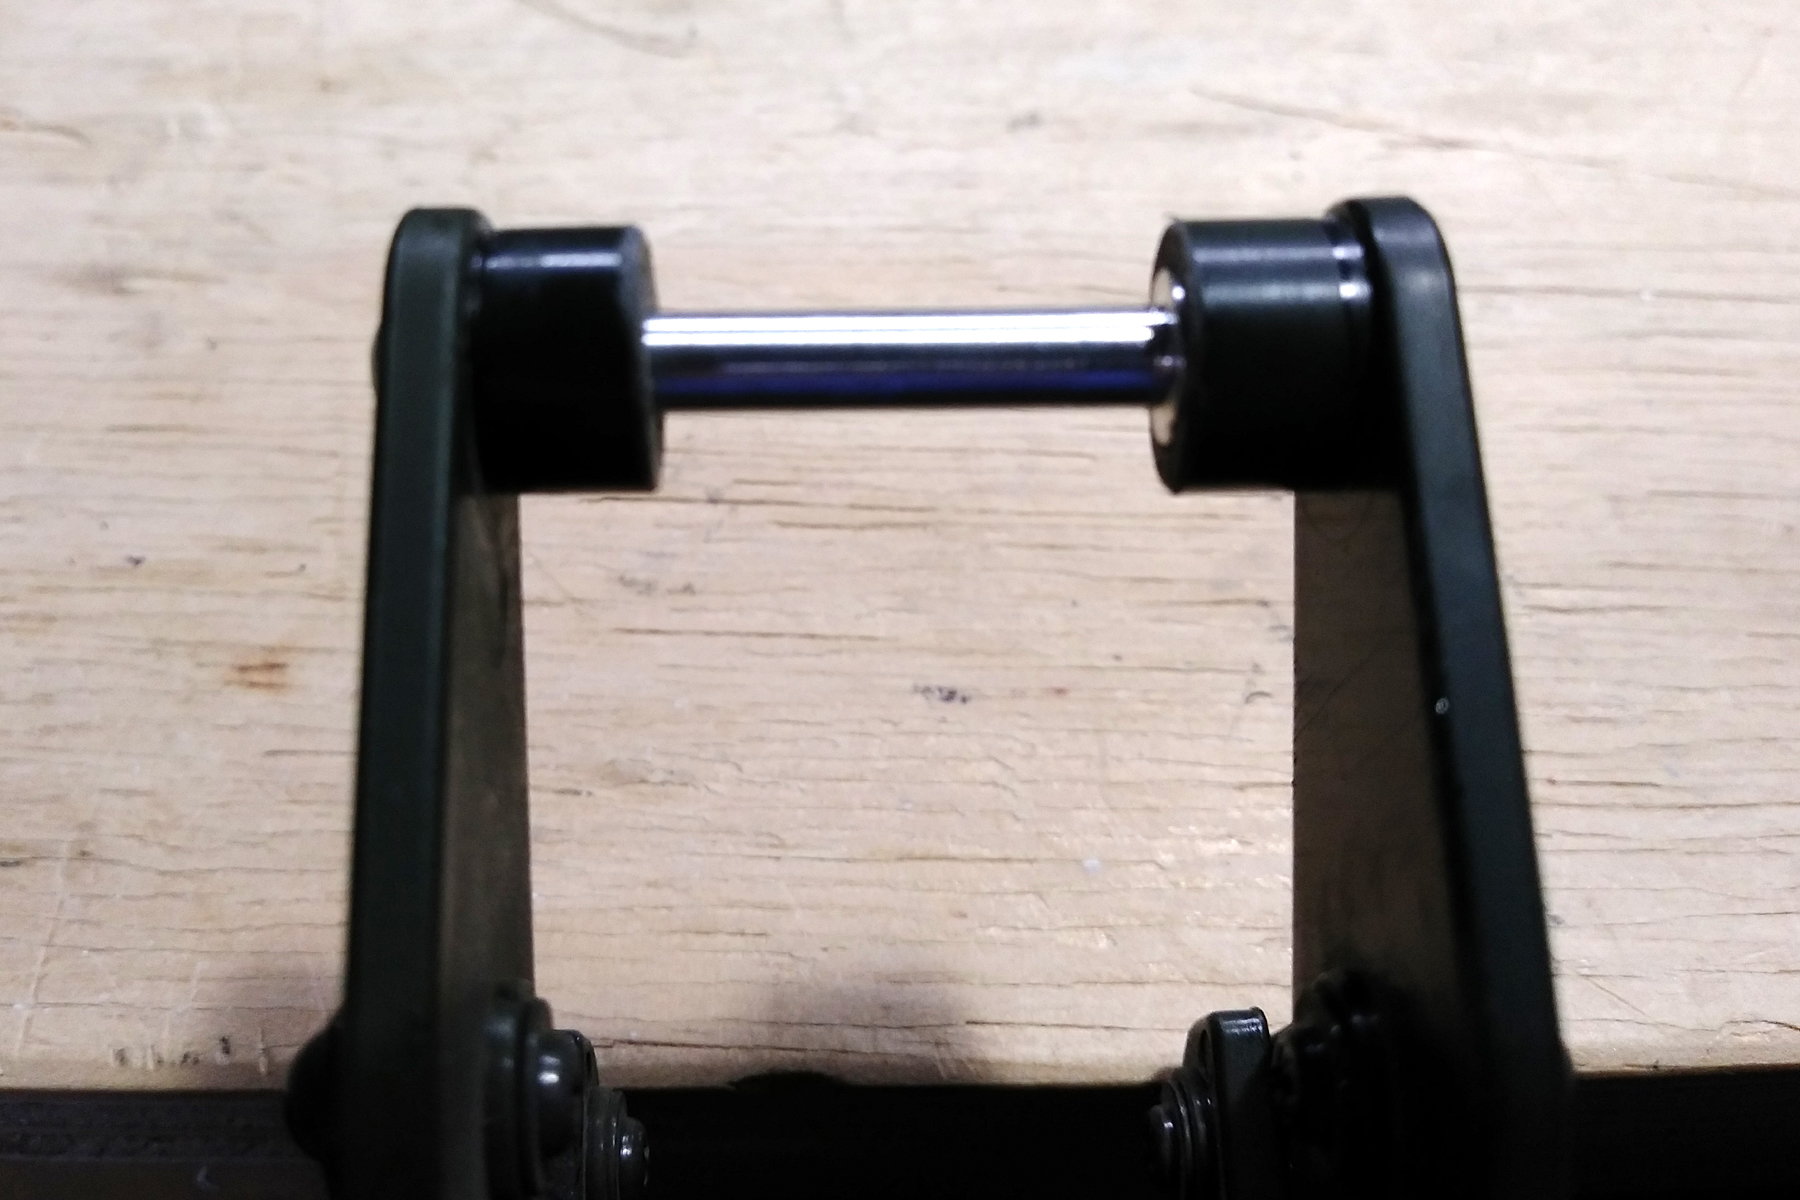
The suspension upgrades continue with the first aluminum axle. Here's a few images and then I have a video as well.
The suspension unit is in my vise being held by the pieces the coil spring is housed; it kept the suspension arms flopping around. I will be using a 10-32 hex bolt that's threaded into the outer side of the axle. In the video I should have said that I don't want any round head screws visible on the outside of this RC Tank. It would degrade the child's toy it is as it;s being upgraded to Adult full function status.
Here's a look at the axle and the ball bearings being used in the road wheels.
The outboard end of the axle sticks out the thickness of the suspension arm. The inward end of the axle fits into a 1/8" drilled hole in the rear suspension arm boss and so, it doesn't protrude out of the rear face of the road wheel.

This shows the axle seated in the boss of the rear suspension arm.
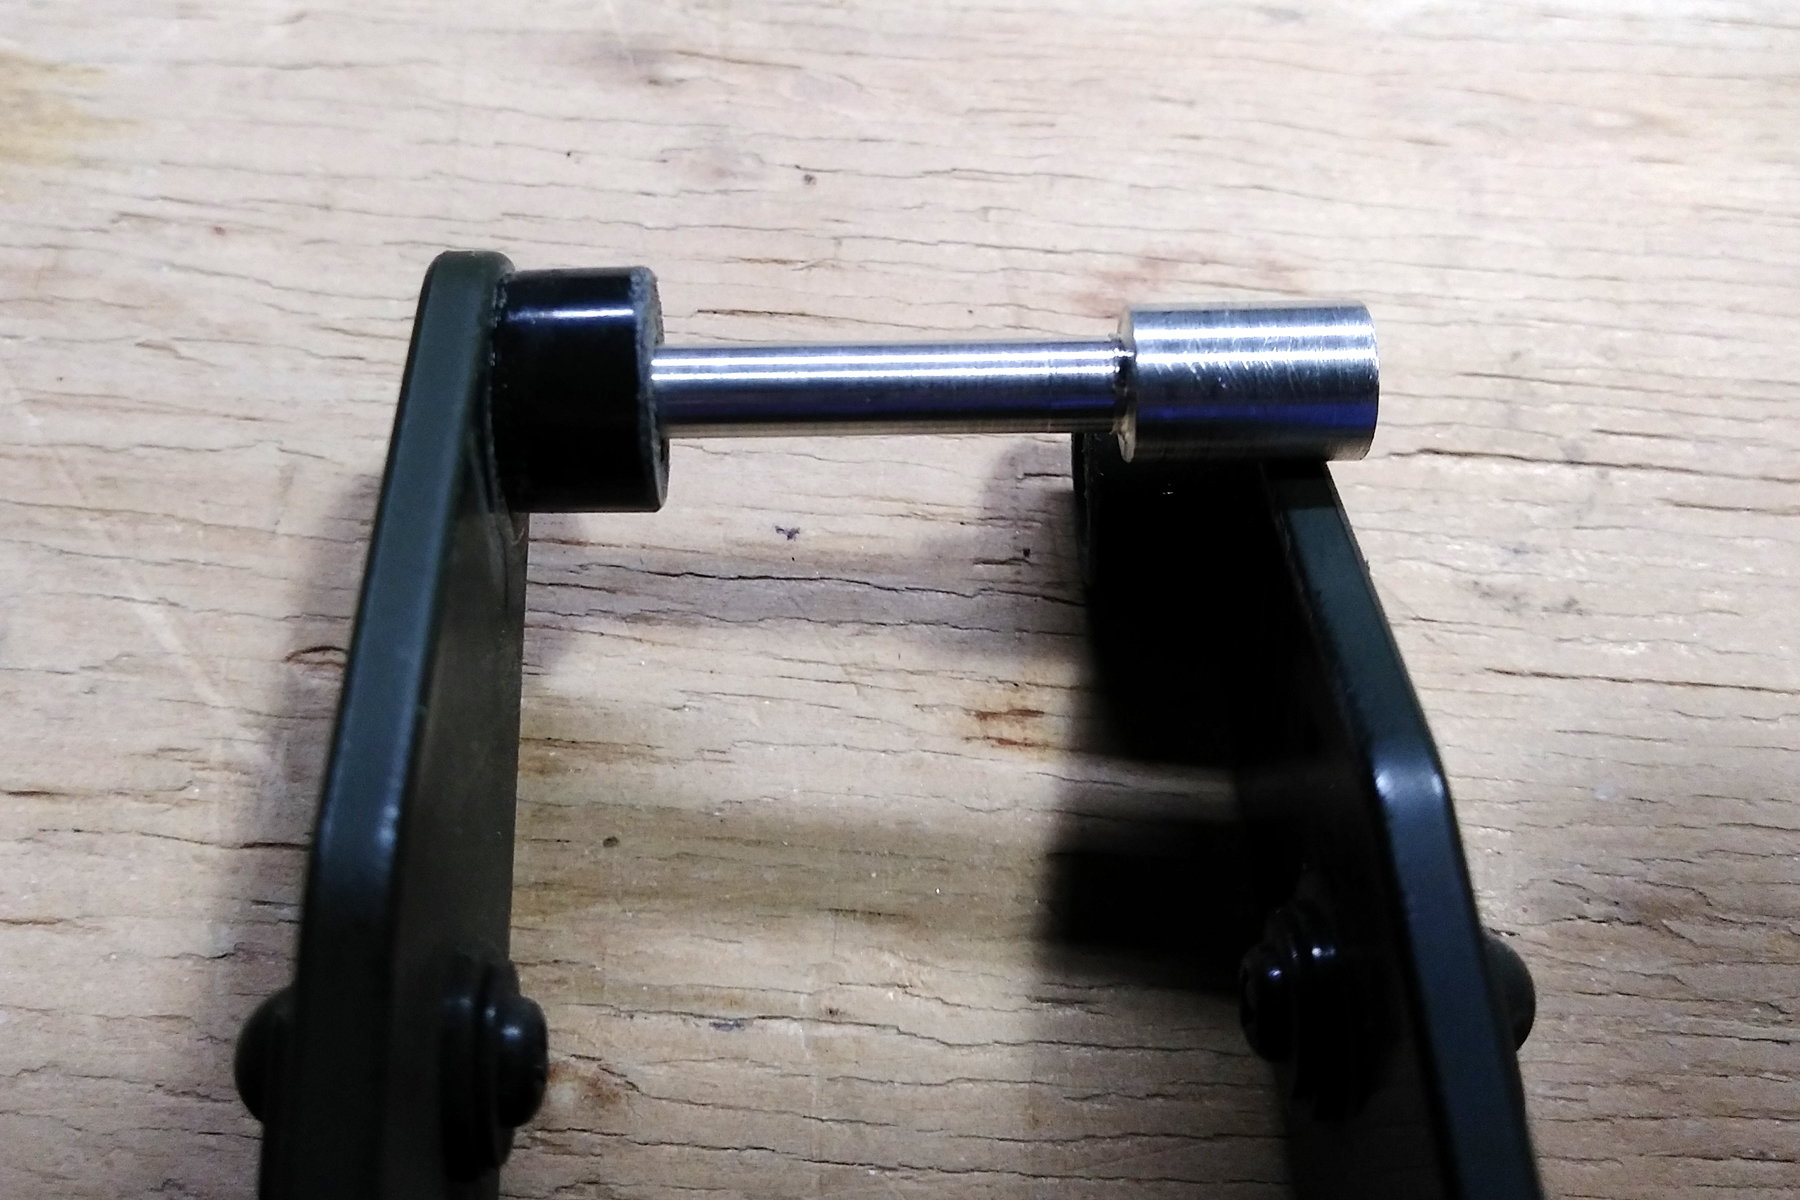
I had mentioned in an earlier post that I retained a short piece of the original abs axle so the suspension arms were not weakened.
The suspension upgrades continue with the first aluminum axle. Here's a few images and then I have a video as well.
The suspension unit is in my vise being held by the pieces the coil spring is housed; it kept the suspension arms flopping around. I will be using a 10-32 hex bolt that's threaded into the outer side of the axle. In the video I should have said that I don't want any round head screws visible on the outside of this RC Tank. It would degrade the child's toy it is as it;s being upgraded to Adult full function status.
Here's a look at the axle and the ball bearings being used in the road wheels.
The outboard end of the axle sticks out the thickness of the suspension arm. The inward end of the axle fits into a 1/8" drilled hole in the rear suspension arm boss and so, it doesn't protrude out of the rear face of the road wheel.
This shows the axle seated in the boss of the rear suspension arm.
I had mentioned in an earlier post that I retained a short piece of the original abs axle so the suspension arms were not weakened.
Last edited by rb67mustang; 08-26-2023 at 03:40 PM.
The following 2 users liked this post by rb67mustang:
Tanker1966 (04-01-2024),
Tankhobby (08-25-2023)
03-24-2024, 09:19 AM
#23
Member
Thread Starter
Hi Everyone,
I haven't done anything with this build in a while. My work area is in an unheated basement, but my main problem is a bad back and I can't stand as long as I once could in my working days. The hobby lathe I have works very good. But for multiple parts that require an amount of precision; it's frustrating because the lathe isn't the quality of the industrial machine I used daily at work. I have a Bridgeport in my also unheated garage, but I don't have very much tooling for it yet. But, I recently got a small set of V-blocks that will greatly shorten the time to drill & tap the ends of the axles I'm working on. So, I plan to mill the axle blanks to length, drill & tap the holes, and then go to the Lathe to turn the OD of the axles.
I hope to have more progress on the 1/6 21st Century M5 soon.
BTW, I still have the Dragon 1/6 M4 Kit & the Turret for sale. I will lower the kit price to $500 dollars Firm, but there's nothing I can do about the shipping cost. I will put a new comment about the price reduction in the for sale thread today.


