


HL Tiger re-rebuilding -updated with new pics
 03-27-2007, 04:49 PM
#1

Thread Starter

I've done some more rebuilding of my HL T1
All the switches and the recharge plug have all been moved to a panel at the back (I can recharge the battery without taking it out of the tank).
Added some foam window draught excluder around the inside edge of the hull to stop any water getting in (should I take it for a swim).
The curcuit boards have been moved and a bigger heatsink and fan to the drive motor transistors.
I've also fitted some screw posts so I can get the top off without having to take the tracks off.
The Smoke Gen has gone. It looks good for photo shoots but I never used it when I was running it about. The smoke was too faint to see and it needed topping up every couple of minutes.

 The screws will be painted black so they look like part of the tank and the front hatches hide the front screws.
 I've redone the turret ring and added some L shaped brackets to make the hull stiffer.

Update
I've painted the commander and replaced the commanders hatch with the one off the Panther and I've also added rust to the exhaust
More Pics-


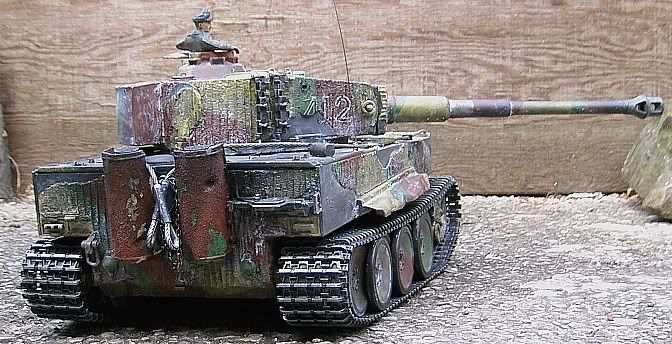

Just need to touch up some paint and I'll be able to get on with my next project-


All the switches and the recharge plug have all been moved to a panel at the back (I can recharge the battery without taking it out of the tank).
Added some foam window draught excluder around the inside edge of the hull to stop any water getting in (should I take it for a swim).
The curcuit boards have been moved and a bigger heatsink and fan to the drive motor transistors.
I've also fitted some screw posts so I can get the top off without having to take the tracks off.
The Smoke Gen has gone. It looks good for photo shoots but I never used it when I was running it about. The smoke was too faint to see and it needed topping up every couple of minutes.
Update
I've painted the commander and replaced the commanders hatch with the one off the Panther and I've also added rust to the exhaust
More Pics-
Just need to touch up some paint and I'll be able to get on with my next project-
 03-27-2007, 07:02 PM
#3
Senior Member

Great ideas and I like the idea of the control switches under the engine grille. Did you cut it loose from the bottom? Hard to remove some of those without damaging the part.
Nice work
Bill
Nice work
Bill
03-28-2007, 03:49 AM
#4

Join Date: Jan 2007
Location: San Paolo Solbrito, ITALY
Posts: 1,537
Likes: 0
Received 17 Likes
on
15 Posts
Nice job on the Tiger.
I also put some filtering paper to protect the motor grills: too much dust was getting inside from there when running the tank in the sand.
The Panzer III is even worse from that point of view, since its back is well open and every kind of dust and dirt gets inside on rough terrain.
I also put some filtering paper to protect the motor grills: too much dust was getting inside from there when running the tank in the sand.
The Panzer III is even worse from that point of view, since its back is well open and every kind of dust and dirt gets inside on rough terrain.
03-29-2007, 07:45 AM
#5
Senior Member

Join Date: Mar 2007
Location: Newark, UNITED KINGDOM
Posts: 157
Likes: 0
Received 0 Likes
on
0 Posts
Nice Job. I'm planning to move all my switch gear, I was thinking of placing them under my drivers hatch since I've already replaced them with metal opening hatches. Looking at your switches... You have the power on/off switch, the volume control, what is that other switch I see - the red one? Is that the BB Gun switch?
Also thinking of your battery, have you hard wired the battery in, removed the connector and paralleled a pair of wires off it to the connector at the rear? Is it that simple or do you need a switch to disconnect the battery supply from the boards whilst charging?
I notice you have covered your motors/gearbox up, why is that? Also, is that an aluminium plate on the bottom? If so why did you need that? Is your tank really heavy now? How does that effect the performance?
Sorry, lots of questions :-)
cheers
Con
03-29-2007, 09:13 AM
#6
Thread Starter
pattoncommander-
Not sure what you mean? I just unsoldered the switches and reconnected them with wires. The grilles were just cut out with a knife and hinged using a couple of trackpins and some milliput.
50Kaliber -
The Red switch is for the LED's (no need to have it's lights on in the day)
The battery is hardwired to the on/off switch (both +ve and -ve) so that when it's switched off the battery is isolated from the circuit board. I've left the connector on, these means I can recharge the battery without disconnecting anything and I don't run the risk of damaging the circuit board.
The gearbox cover is to stop the grease off the gears from splashing up inside the tank and possibly onto the electronics.
The tank is very heavy but seems to run OK. It's not as fast as my stock Panther but it looks more tank like when it's running about. The stock tanks seem to glide over grass but my Tiger really does run through it and leaves good track marks.
borealis- Champion idea
I've added some filters today and I'll post some pics later.
04-16-2007, 12:40 AM
#8
Senior Member
Join Date: Dec 2006
Location: Richmond,
BC, CANADA
Posts: 525
Likes: 0
Received 0 Likes
on
0 Posts
For the fan I wired mine directly to the on off switch... well actually a power bar I have installed, it has 6 terminals.. 4 for + and two for -ve.
Now as for dust for teh fan... I am in the middle of creating a suspened support for my fan, to hang from the grill. I have left a place to slide a filter.. the trick will be to find a material that is fine enough to do the job but not too fine to get clogged... Once I am done I will post it under my Gruppe Fehrmann build thread....
KT
04-16-2007, 02:50 AM
#9
Join Date: Jan 2007
Location: San Paolo Solbrito, ITALY
Posts: 1,537
Likes: 0
Received 17 Likes
on
15 Posts
Since I have recently opened the Tiger again to repair and reinforce the stock suspension with metal axles, here is the latest filtering solution adopted:
- inside hull, in correspondance of suspension windows: single transparent plastic card 'box', fixed with tape. Very light, flexible, easily removable and replaceable. Same material is used for oil guards on gearboxes. This is the PRIMARY dirt intake area, since it captures not only dirt but also wood fragments of all sorts.
- in correspondance of motor sprockets: small piece of foam, approx 2x2 cm, with a hole in the middle for the motor axle. It is put between the gearbox side and the inner hull side. Not a big gap here, but next to tracks.
- motor grills: "Swiffer" dust-cleaning tissue. I don't know any other commercial name, but it has dust-level filtering and capturing ability. It's that tissue used on a broom-like pole to capture dust (or even by hand for furniture). Fixed with tape from the inside for quick removal when it gets glogged (but it lasts a lot).
- side, connection between upper and lower hull: 'L' shaped aluminium tape, all along the side. This is also a critical point since it's right over the tracks (which catch and bring up all sort of dirt) and the two hulls seldom seal the gaps with screws only.
- The switches: if not moved, the main and smoke generator switches under the hull need a bit of sealing, which can be accomplished with a tiny 'frame' of silicon from inside the hull: remove the board, lay the silicon around the switch holes, wait at least for the silicon peel to harden then mount the board again. Also have a look at the 'Heng Long' mark on the bottom, since it's a separate piece and might not seal well the bottom hull. The volume knob is better sealed.
The above are the critical gaps to seal if you plan to run the tiger outside. I always run mine in sandy environments (which are the most amusing, since the tank runs fine and effortless, leaves tracks, rises dust behind etc.).
On the panzer III there are ALOT more holes and gaps to fill: the front track holders holes, the side motor air exausts, the HUGE rear opening, the side gap between upper and lower hull, the driver window, the side smoke switch (which I suggest to move elsewhere), the motor door covers, and a couple smaller gaps (motor sprockets, rear lower plate holders).
04-17-2007, 04:17 PM
#10
Senior Member
Join Date: Dec 2006
Location: Richmond,
BC, CANADA
Posts: 525
Likes: 0
Received 0 Likes
on
0 Posts
Borealis,
Do you have a picture of your suspension windows... I assume... the idea is if you slow the flow of teh air down... you still get air into the hull but as a result the dust drops out?
Thanks KT
Do you have a picture of your suspension windows... I assume... the idea is if you slow the flow of teh air down... you still get air into the hull but as a result the dust drops out?
Thanks KT
04-21-2007, 04:58 PM
#12
Join Date: Jan 2007
Location: San Paolo Solbrito, ITALY
Posts: 1,537
Likes: 0
Received 17 Likes
on
15 Posts
Sorry for the late answer KT, I just read your request. Unfortunately I have no picture of the suspension boxes.
However, the principle is that the Tiger suspension has the wheel pins which penetrate the hull, sometimes for a couple of mm's (depending on how the wheels have been aligned), and they need that clearance in order to operate freely.
That is why they cannot be sealed directly with silicon (which can be done, for instance, on the Panzer III).
So I made a 'box' which is about 7 mm deep, 3,5 cm high and long as from the back of the hull to the gearboxes. It encloses all of the suspension pins, except the first one which have their own single box.
The box is fixed with tape to the bottom and to the side of the hull. The bottom sealing is the most important, since the dirt must not get inside. The top one is critical to dust only.
The suspensions can moove freely, the dirt can get inside but is gathered inside the box, and after a certain level gets out by itself through the suspension pin holes.
From the inside, the box is transparent, allowing for visual inspection before deciding if manual removal of dirt is required.
It is not really water-tight (meaning you cannot cross rivers) if fixed with tape, it just can wave off some drops of water, but could be made watertight if sealed with silicon (but you lose the chance to dismount it quickly). The choice is yours.
I prefer easy maintainability over everything else.
It would also be possible to make it as to let air flow but dust not, making the upper side of the box using some kind of filtering tissue.
04-28-2007, 11:04 PM
#15
Senior Member

I've got to relocate a post in the back of my tank and like your idea of using the fuel caps for the screws. I'm going to use the radiator caps instead. What size screw did you use? I want to match the original head/cap as close as possible.
Thanks!
Thanks!
04-29-2007, 01:00 PM
#16
Senior Member
Join Date: Dec 2006
Location: Richmond,
BC, CANADA
Posts: 525
Likes: 0
Received 0 Likes
on
0 Posts
James,
check my "Gruppe Fehrmann F01 BUILD" post for my solution of relocating the hull posts... NO NEW holes in the upper hull required.
KT
check my "Gruppe Fehrmann F01 BUILD" post for my solution of relocating the hull posts... NO NEW holes in the upper hull required.
KT


