


1/16 Tamiya RC Porsche King Tiger Full Option
 10-14-2009, 01:57 PM
#1

Thread Starter

Hello,
The model started out as a second hand one that I restored and refitted and repainted.
Before Painting
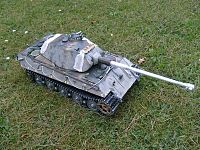
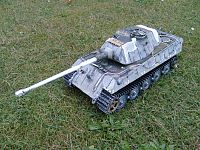
After Painting


Here are some movies of it in action
[youtube]http://www.youtube.com/watch?v=TwlCGrzHKxk[/youtube]
[youtube]http://www.youtube.com/watch?v=jjGYCfXW4yQ[/youtube]
Details in no particular order.
Home made recoil installation out of alu tubes and plastic angle bracket based around a tamiya KT recoil unit. It is ok but it has limited the elevation range due to its size.
HL Turret turn motor and ring.
HL 3/1 gearboxes and motors braced with bearings.
Kenny Kong metal transport tracks. Just for something different.
Zimmerit with Apoxie Sculpt material and the little stamp from Imperial Modellbau.
Axels tow cable clamp set and tow cables.
Asiatam metal road wheels. I had to shave down each suspension arm 2mm to make them fit.
Axels track tensioner.
Stiffened the suspension and made a floor out of 1cm square profile wood.
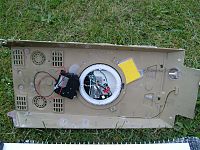
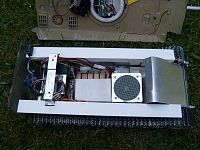
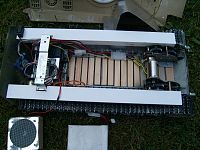
Located the electronics as far from the dirty Gearboxes and motors as possible.
Installed a computer fan on the back wall to cool the electronics.
Used plastic angle bracket to make the side sponsons (not present in the old kit) to seal out dust and so on.
Made a motor and gearbox cover out of alu plate.
Put plugs on all the cables to the DMD/MFU so that it can be quickly removed if necessary for maintenance. Note the big 4 pin plug going to the motors.
At the moment it has no elevation unit, instead I have counter balanced the gun with weights so that it stays roughly level. This does not work all that well due to the turret cables and I plan in install a HL elevation unit in the future.
Lots of little extra details out of plastic card (mostly yellow and white in the unpainted pics).
Armour plate texturing with a Dremel.
Weld seams made with Vallejo 401 putty.
Engine grill mesh out of alu fly wire.
Battle unit diode is in the muzzle brake located in a brass tube and the receiver apple mounts in the commanders cupola.
The on off switch is located under the left sponson above the idler wheel, out of sight but easy to reach.
Since taking these pics I have reinforced the back plate with epoxy resin.
Cheers
Alan
The model started out as a second hand one that I restored and refitted and repainted.
Before Painting
After Painting
Here are some movies of it in action
[youtube]http://www.youtube.com/watch?v=TwlCGrzHKxk[/youtube]
[youtube]http://www.youtube.com/watch?v=jjGYCfXW4yQ[/youtube]
Details in no particular order.
Home made recoil installation out of alu tubes and plastic angle bracket based around a tamiya KT recoil unit. It is ok but it has limited the elevation range due to its size.
HL Turret turn motor and ring.
HL 3/1 gearboxes and motors braced with bearings.
Kenny Kong metal transport tracks. Just for something different.
Zimmerit with Apoxie Sculpt material and the little stamp from Imperial Modellbau.
Axels tow cable clamp set and tow cables.
Asiatam metal road wheels. I had to shave down each suspension arm 2mm to make them fit.
Axels track tensioner.
Stiffened the suspension and made a floor out of 1cm square profile wood.
Located the electronics as far from the dirty Gearboxes and motors as possible.
Installed a computer fan on the back wall to cool the electronics.
Used plastic angle bracket to make the side sponsons (not present in the old kit) to seal out dust and so on.
Made a motor and gearbox cover out of alu plate.
Put plugs on all the cables to the DMD/MFU so that it can be quickly removed if necessary for maintenance. Note the big 4 pin plug going to the motors.
At the moment it has no elevation unit, instead I have counter balanced the gun with weights so that it stays roughly level. This does not work all that well due to the turret cables and I plan in install a HL elevation unit in the future.
Lots of little extra details out of plastic card (mostly yellow and white in the unpainted pics).
Armour plate texturing with a Dremel.
Weld seams made with Vallejo 401 putty.
Engine grill mesh out of alu fly wire.
Battle unit diode is in the muzzle brake located in a brass tube and the receiver apple mounts in the commanders cupola.
The on off switch is located under the left sponson above the idler wheel, out of sight but easy to reach.
Since taking these pics I have reinforced the back plate with epoxy resin.
Cheers
Alan
 10-14-2009, 08:38 PM
#4
Senior Member
Join Date: Mar 2007
Location: Brea, CA
Posts: 1,751
Likes: 0
Received 0 Likes
on
0 Posts
Outstanding Porsche KT work and really fun videos. Will your video sequel include blowing up the Panther? LOL. John
10-14-2009, 09:07 PM
#5


Nice looking cat! [sm=thumbs_up.gif]
