


SNFF 03 21 2010
 03-21-2010 | 06:18 PM
#1

Thread Starter
Senior Member
Well get your cookies and milk, and get ready for another Sunday Nite Foto Fun thread. Here is your chance to post that one picture of something you worked on this past week. This is not a contest, just simply the "guys" getting together to show what they got accomplished this week. Not everyone has the time or interest to take a host of pictures and prepare a build thread, however to take one simple shot of something and post it here is within reach of most of us, and it goes along way to promote and motivate the hobby and this board.
Work continues on my Firefly, as I start the weatheirng and detailing process.

[link=http://www.rcuniverse.com/forum/m_9560131/mpage_1/key_/tm.htm]Firefly build thread[/link]
Work continues on my Firefly, as I start the weatheirng and detailing process.
[link=http://www.rcuniverse.com/forum/m_9560131/mpage_1/key_/tm.htm]Firefly build thread[/link]

 03-21-2010 | 06:31 PM
#3

Looking good, YHR [8D]
I made a mess this weekend! (a friend told me his wife took one look at the pics and told him he would be a dead man if he tried anything like that )
)


I also started on some storage boxes so that I can transport all this stuff to the shows the Detroit club attends during the summer months:


One of these days I might even get back into making tanks... [X(]
I made a mess this weekend! (a friend told me his wife took one look at the pics and told him he would be a dead man if he tried anything like that
)I also started on some storage boxes so that I can transport all this stuff to the shows the Detroit club attends during the summer months:
One of these days I might even get back into making tanks... [X(]
03-21-2010 | 06:37 PM
#4
Senior Member
Joined: May 2009
Posts: 471
Likes: 0
Received 0 Likes
on
0 Posts
From: woodbridge,
VA
Just getting started i have moded the bogies the barrel, textured the hull and turit with thinner and a stipple brush and cut the turit. Still a long way to go
03-21-2010 | 07:01 PM
#7
1:18 - mostly 21st Cent stuff, with some Dragon, FOV, and Team Bravo figures, and the diecast jeeps are by UT Models (my Mato SturmTiger made a cameo appearance, but that shot came out a bit blurry [&o])
Just a little too small to stand right next to the 1:16 stuff, but looks pretty good as 'background decoration'
The trees are 2ft, from Bed Bath & Beyond's post Christmas sale ($1 each) - not the best looking, but its a start 
Just a little too small to stand right next to the 1:16 stuff, but looks pretty good as 'background decoration'
The trees are 2ft, from Bed Bath & Beyond's post Christmas sale ($1 each
) - not the best looking, but its a start
03-21-2010 | 11:19 PM
#9
Thread Starter
Senior Member
Yes I have noticed the board is very quiet. I guess people aren't doing much. We will have to just keep plugging away, and hope the silence is only temporary.
03-21-2010 | 11:47 PM
#10
Well I'm prepared to help keep this spot going - I shall endevour to have something more R/C tank related on show next weekend [ ]
]
In the meantime, carry on [8D]
]In the meantime, carry on [8D]
03-21-2010 | 11:55 PM
#11
Too busy doing a research paper for school[:@] But the gears were turning, thinking of getting a HL Panther an elmodding it. The KT is still in limbo, deciding if I want to mod the hull for the pershing gearbox or order the drop in 3:1 gears. Also I really want to buy a Tamiya Panther, but since I have decided on a Tamiya Pershing, might not have money leftover to get the Tam Panther decisions decisions. BTW does anyone know if the elmod can be connected to the rx-18 board? and if so is there a pdf file for the connections? because if I go with the HL Panther I was thinking get all the parts needed for a tamiya lower hull, 3:1 gears and the elmod. cheaper than the tamiya, since I already have the elmod.
Cheers,
Wade
Cheers,
Wade
03-22-2010 | 12:16 AM
#12

Senior Member
Joined: Dec 2009
Posts: 2,647
Likes: 0
Received 0 Likes
on
0 Posts
From: Fort Walton Beach, FL
Well, I've been moving at a snails pace. I've gotten myself so sidetracked with getting the side elevation unit functioning properly in my Tiger that I've been neglecting to get the exterior modifications done. Frankly, I've almost had my fill with this tank. I told myself I wouldn't get the KV1 until I've finished this tank.....knowing that once I get the KV1 I'd start cutting that up too. So it's a constant battle to keep from cutting corners. AAaaaannnny wwaaayyyy....
I've finally settled on what I think the extended field modified exhaust would have looked like from the upper view. Instead of using a screen to emulate a grill/grate or using a fan. I went with a simplified everted "V" shape flapper. It does swivel, but it's pointless that it does because there's not enough pressure to make it function! lol I'm going to have to tighten it anyhow...I don't like how it dangles a bit when I drive the tank. The exhaust is actually in 2 segments although you may see three segment lines. The lowest is to depict the weld seam that existed on the exhaust. The extended portion is removable which I intend to create the real flapper modification hidden underneath that was later installed on the tanks exhaust during commission. Basically, I can choose at will whether I want extended or not by simply removing the piece.
The front fenders....meh, not happy with them. I can't get a sharp angle bent without warping the edges or the diamond shapes on the tread plates. I may need to find a different solution. Thefender length shown in the pics hasn't been cut down yet nor hinged.
I've corrected the barrel, also created the mushroom vent, shaved down most of the tools,created a new front glacis, fabricated thedriver vision block,cut out the hatches (I don't know why) now I need to drill out the gun and createnew headlamp coversand fix the gosh darn elevation set up!!!!!!
.
03-22-2010 | 12:57 AM
#13
Senior Member
Joined: Mar 2007
Posts: 1,751
Likes: 0
Received 0 Likes
on
0 Posts
From: Brea, CA
Well, I am installing a Futaba 4YF 2.4GHz FHSS in my Tamiya Pz4J (less than a 100 bucks delivered), I'll let you know how it works out next week. But enough about my stuff.
For all the new people here, I wanted to use this thread to introduce one of the long time members. He just recently emailed me some cool photos and I wanted to share pattoncommander's work with you all. I have gotten to know him a little over the last few weeks via some US Army TD History Research.
pattoncommander's is a fine military history resource and has US Army Museum access to a gold mine of info. Anyway, I enjoyed his museum open house photos so much, I thought you guys would too.
Anyway, as most of us know, he is a Pershing enthusiast, builds rc tanks and is well versed on all things Pershing. Most do not know he is a retired US Army Warrant Officer; works as a master musician; a past US Army NCO tank commander; and volunteers his free time helping to restore and maintain his two favorite government issued tanks: the M26 Pershing and the T30 Heavy Tank at Fort Jackson, SC.
Enjoy pattoncommander's 1/16 rc tank and 1/1 tank photos, I certainly did, John


 03-22-2010 | 08:27 AM
#16
Thread Starter
Senior Member
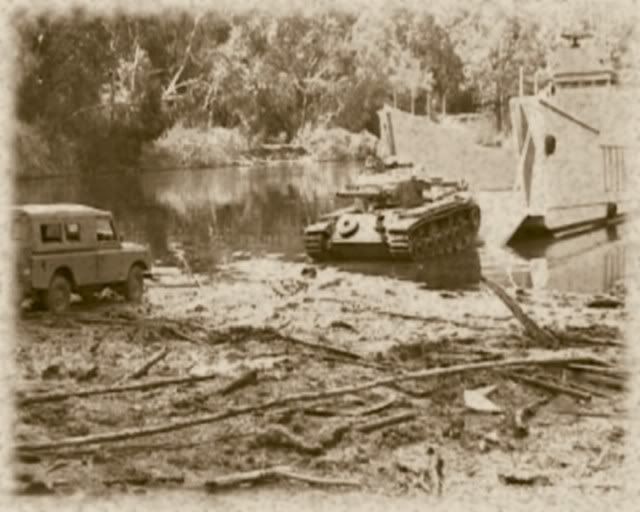
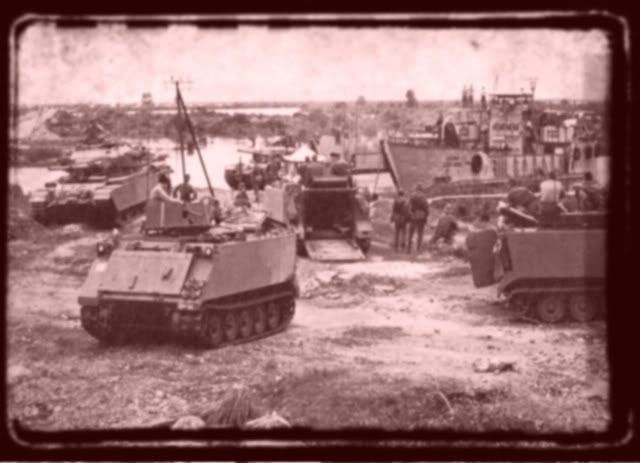
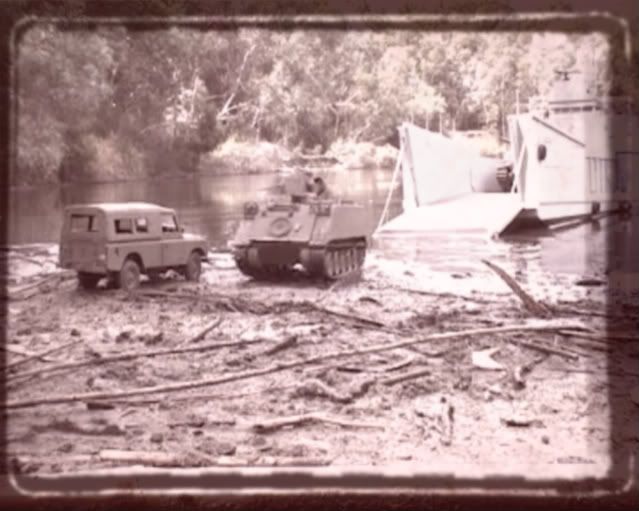
Some good weathering and battle damage shown there Sollie.
Oz
Hard to tell the difference bewteen the protoype and model. You just needed more guys standing around watching!!!!!
John
Thanks for posting pattoncommanders stuff. Now there is a guy who is active in the hobby.
Oz
Hard to tell the difference bewteen the protoype and model. You just needed more guys standing around watching!!!!!
John
Thanks for posting pattoncommanders stuff. Now there is a guy who is active in the hobby.
03-22-2010 | 05:12 PM
#19
Senior Member
Joined: May 2009
Posts: 471
Likes: 0
Received 0 Likes
on
0 Posts
From: woodbridge,
VA
A little more on the sherman. The mato plastic is very soft and easy to work with maby that explaines why all the stuff is not glued but melted on.
03-22-2010 | 06:41 PM
#20
I'm currently working on an M4A3, based on the Mato Sherman chassis. Sorry, no pictures yet as I am just now cutting the upper hull for details and fitting the turret for the M34A1 mantlet.
Just taking a break from the bolt-a-mania I was going through on my WECOHE road wheels for the Final Production Late Tamiya Panther G.
- Jeff
Just taking a break from the bolt-a-mania I was going through on my WECOHE road wheels for the Final Production Late Tamiya Panther G.
- Jeff
03-23-2010 | 05:31 PM
#21
Senior Member
Joined: Mar 2007
Posts: 1,751
Likes: 0
Received 0 Likes
on
0 Posts
From: Brea, CA
ORIGINAL: fynsdad
hi all
just been messing around with my airbrush on my panzer III and working on my super-pershing
hi all
just been messing around with my airbrush on my panzer III and working on my super-pershing
fynsdad, Beautiful work, show us more, like walk around photos and close up detail photos.
03-23-2010 | 06:54 PM
#23
hi,
Yes the super-pershing was a real machine. Basically a pershing with a bigger gun and a lot of added armour. I'll leave it to the better informed members to give you the full specs.
Heres a few pics of the build.
Frank
Yes the super-pershing was a real machine. Basically a pershing with a bigger gun and a lot of added armour. I'll leave it to the better informed members to give you the full specs.
Heres a few pics of the build.
Frank
03-23-2010 | 08:06 PM
#24

Senior Member
Joined: Jan 2007
Posts: 751
Likes: 0
Received 0 Likes
on
0 Posts
From: Green Bay,
WI
03-23-2010 | 08:08 PM
#25
Senior Member
Joined: Dec 2009
Posts: 2,647
Likes: 0
Received 0 Likes
on
0 Posts
From: Fort Walton Beach, FL
Thanks, I finally figured out it actually called the "Super Pershing!!" lol
I was thinking it had a totally new variant model number. DUH!!!
I was thinking it had a totally new variant model number. DUH!!!

