


Another Ziroli 101" B-25 thread
 12-09-2016, 07:12 PM
#26

Thread Starter
Think the Fg-40 will be the perfect power for this plane. Lots of power, yet good economy. I heard from others who used the DLE 35RA that it has just the right amount of power, but I just can't get myself to put two chainsaws on a warbird. Ideally a pair of FG-36 will be the perfect match, but those are rare to find, and not cheap when I do.
 12-10-2016, 07:16 AM
#27

I agree, not my favorite noise, but after nearly losing my B-25 because it was under powered (especially on one engine) I decided that power was more important then sound in this case. And 2 chainsaws going at the same time don't sound to bad. Looks like the FG40 spins the same prop size as the 35, so power should be close. Also for me, you can get both DLE's for the price of one FG40, so at the time my budget did allow it.
12-10-2016, 07:46 AM
#28
Thread Starter
True. I have an FG-11 and it is a very good running, great sounding engine that sips fuel. Can fly for an hour on 12 ounces of gas. I have a DLE30 on a P-47 and am not liking the low end on it, and the DLE 20 I have in a 4*120 has been giving me fits over the past couple years. One day runs great, a week later runs like crap. All my Saitos have been good running engines, and they fall under that, you get what you pay for category.
So this is why I am considering the more expensive FG-40's for this one.
So this is why I am considering the more expensive FG-40's for this one.
12-10-2016, 04:41 PM
#30
Thread Starter
Got the top planking on, and working on the belly. One thing I noticed when installing stringers is the nose twists, so going to need to run a straight edge across the crutch to keep it level until I get the planking on. I need to do a few internal things then I can glue in the stringers and plank. Then cut the middle out and fit the wing.


12-18-2016, 05:27 PM
#31
Thread Starter
Whoever said planking is a PITA, De's was RIGHT!
Got the forward portion of the fuse planked, still have to do some interior work before I put the rest of the stringers and planking on the aft end. Starting to look like a B-25.


Got the forward portion of the fuse planked, still have to do some interior work before I put the rest of the stringers and planking on the aft end. Starting to look like a B-25.
12-23-2016, 04:56 PM
#32
Thread Starter
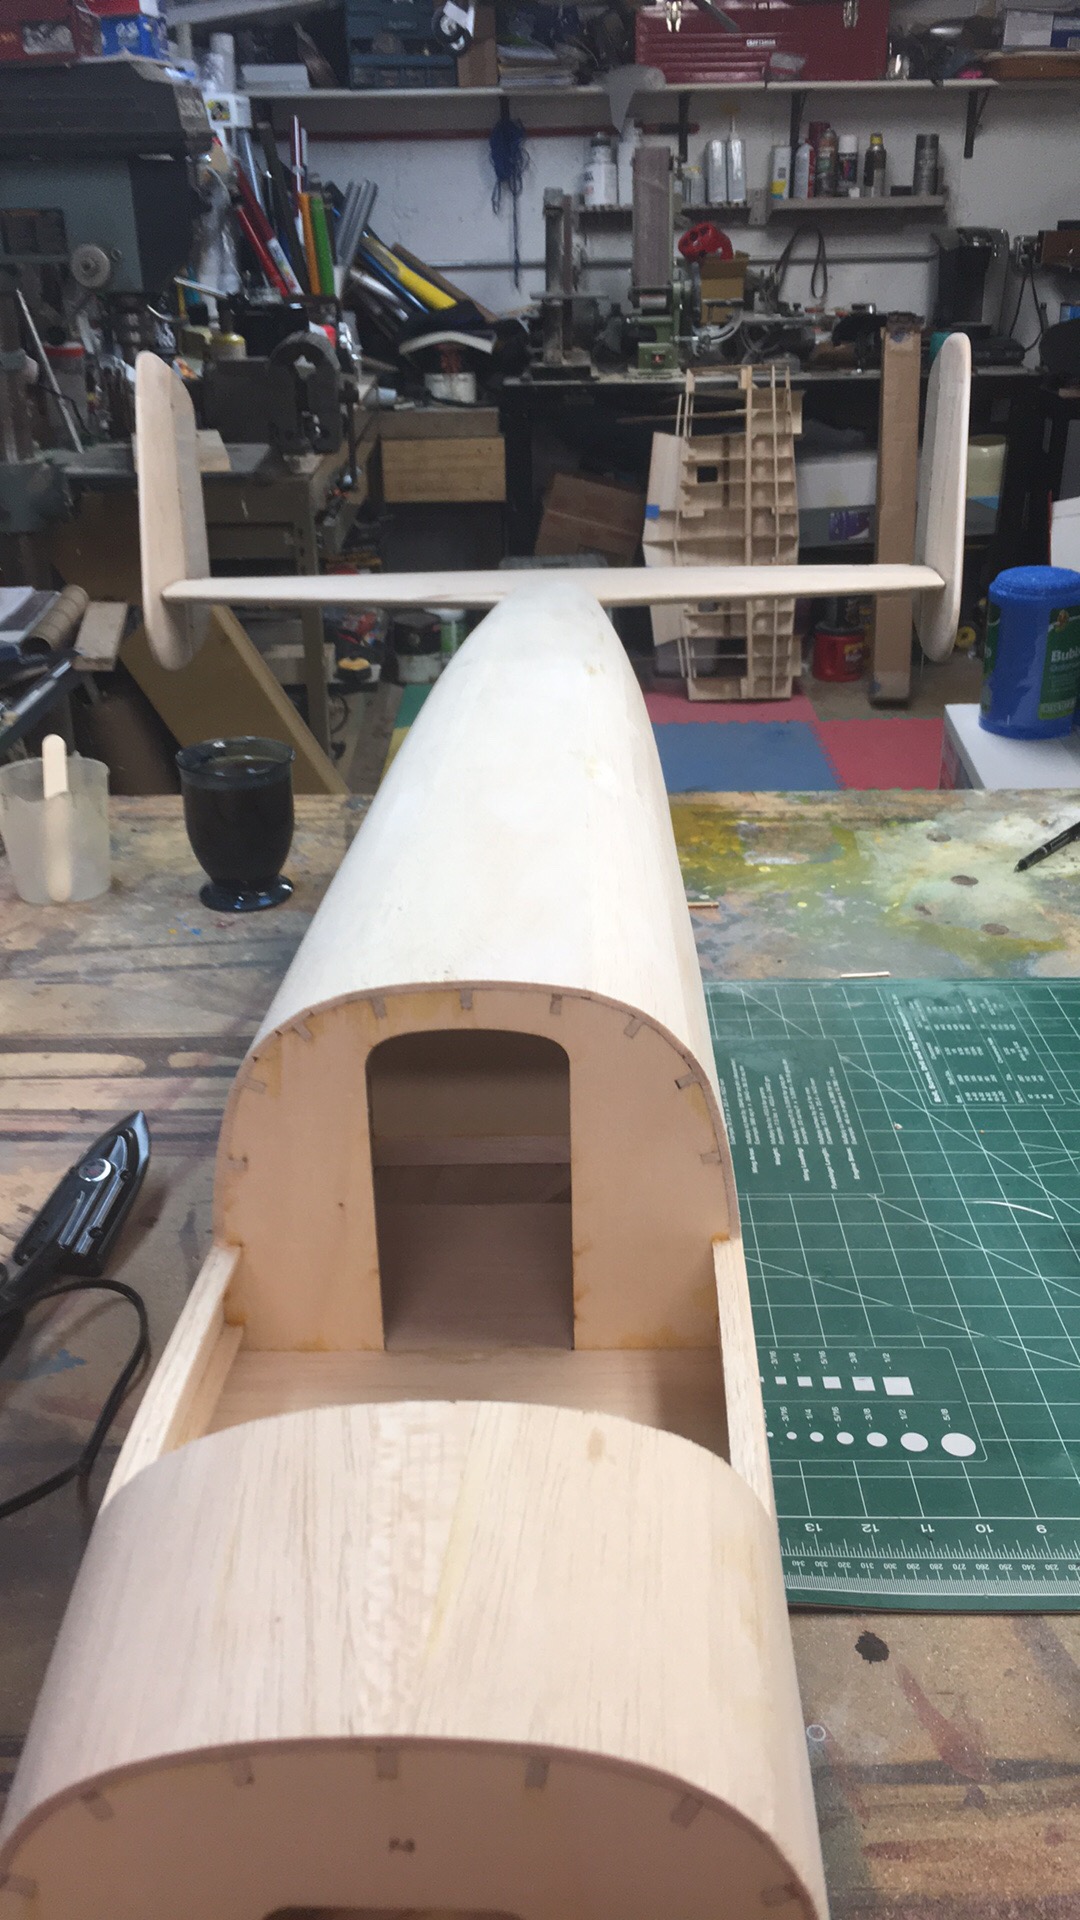
Coming along nicely. Fuse sheeting done, got the bottom cut out so I can now fit the wing, so stuck the parts together to see how it looks. Its big. That is a 50" by 72" work bench. Going to put the tail pieces together next so all major parts will be done, then I can start on the tedious part of building and planking the nacelles.


So for the rudder controls, going to get some G10 and make control horns and control arms, and use a pull-pull to a servo above the wing, and put an elevator servo in the tail behind the stab, under the gunner canopy. With 4-40 ball links and rods and cable there will be very little slop for the rudders and elevator.
I have the nose gear rails done, and was going to put a servo right under it to control the steering, and when I assembled everything I forgot to compensate for the height of the servo so the gear hits it. I should have put the plywood on top of the crutch, but too late now. I will just mount the servo in the wheel well instead.
Need to order 1oz cloth too so I can glass the door areas to make molds. Going to make fiberglass doors for the gear. The nose gear uses a flap at the strut so the door can close when the gear is down and locked, so I figured I can use a spring type hinge that will allow the flap to close when the gear is up. Haven't figured out what to do with the main gear doors yet, they also have a small section that remains extended when the gear is down so they can close. I also have to find the correct location for the nose door since it is offset to the right.
The bomb bay is part of the section that comes out to install the wing, and I have to decide how I want that to work too. The real plane uses a hydraulic jackscrew to open and close them and it is located at the front of the bay, but with the section being removable, it will be difficult to add the scale details for that, so maybe with some trickery I might be able to scale it up. Not sure what servos I will need for the gear and bomb bay doors, want to use micro servos, but I don't know how strong they will need to be in order to function while in flight. They may work just fine on the ground, but with the plane moving the air pressure may bee too much for a too low torque servo to open them.
01-10-2017, 07:17 PM
#33
Thread Starter
Held up on this for a little bit waiting on some G-10 for the tail. Once I get that in I will start constructing the stab since I need it for the bellcrank and control arms that go inside the stab, and for the hinges. I also found 1.4 oz cloth and will get the nose glassed in so I can mold up the gear door, and get the nose gear installed and working.
01-22-2017, 08:26 PM
#34
Thread Starter
Got the G-10, and cut the elevator hinges, and started making the control arms out of it, got one assembled and discovered it is too big to fit between the sheeting. Guess going to 4-40 rods and ball links wont work, so scaling it down to 2-56 instead. Been tied up on other things too, so only a few hours have been spent on it, hopefully I can get back into swing and get the tail feathers built.
01-25-2017, 02:37 PM
#35

Damn! I just found your build! coming along nicely! You should start a B25 Brotherhood..Lol. I ordered my retracts today. Look like your a bit further ahead that I. Lookin good!
01-25-2017, 05:17 PM
#36
Thread Starter
Thanks. Trying to get back to it, but ambition and energy have waned. I did work on my Citabria last night at my friends, got the pushrods installed, its the most that has been done on it in months.
01-28-2017, 11:27 AM
#37
Thread Starter
Got back to the work bench and got the hinges cut out of G-10, one fin framed up, and dry fitted the stab.
On the fence about how to do the rudder controls. A pair of slim wing servos, or linkages with a pull pull servo in the fuse. Weight in the tail is my concern.


On the fence about how to do the rudder controls. A pair of slim wing servos, or linkages with a pull pull servo in the fuse. Weight in the tail is my concern.
01-29-2017, 04:55 PM
#38
Thread Starter
Changed my mind on the tail and got a pair of thin wing servos. Spectrum 7020 metal gears 50oz@6v. 1/2 ounce each. I think the weight will be a wash compared to the linkages I was planning to use. The right fin is assembled, just need to frame up around the servo for a hatch and then skin it.

 02-02-2017, 09:46 AM
#42
Thread Starter
I think the cowl is 6" at the front, so it most likely will work. Any standard 1/8th scale dummy should fit. that reminds me, I have to check the Corsair I have to see if it has the same dimensions as the B-25. I know the length is not correct, but the diameter might be.
02-02-2017, 10:40 AM
#44
Thread Starter
Still undecided. I want to use 4 strokes for this. For me 2 strokes in a warbird just ruins the overall picture. If I can find a pair of FG-36 or FG-40 that I can afford, or go with the NGH 338CC 4 stoke from HK. Since I have no rush for engines just yet, I am still looking.
02-19-2017, 03:52 PM
#45
Thread Starter
Work is slowly progressing. Working on the tail still. Have the stab built, both fins and rudder built, now in the process of shaping them. Almost finished with the right side one, still have to glue the top block on and shape it, then give it an overall profile sanding, and get the rudder to move freely both directions. Once I have them both ready to glue to the stab, I will cover the area where the servos are located and make some molds for the servo covers. I am holding off on gluing in the control horns on the rudders until I have the fins mounted and to servos exposed so I can line them up properly to they don't bind. GOing to use metal clevis internally and 2-56 ball links externally. Then I can move on to making the elevators.
The Fuse and Wing was easy compared to the tail, so many little details and discovered too late that the design is off scale, the trailing edges are supposed to line up between the fin and stab, and the fins are set back 1/2". Too late to do anything about it now unless I build new fins, and I am not about to do that. Not like its going to be in a contest or anything.
Still haven't gotten word on if the later models had skin or fabric on the rudders.
03-05-2017, 05:07 PM
#46
Thread Starter
Well, been a while since I updated this, so here goes. Stab is done, one fin completed, the other in progress, and one rudder completed including the fabric covering. Working on the elevator now, made the 1/4" joiner with control arm today.
For rudder control I decided to use a pair of Spectrum thin wing servos. So I made a mold of the right fin to make a hatch for the servo. Have a couple coats of wax on it, one more and I can make the hatch. Then once I have the other fine done, I will make a bold for that sides hatch.


For rudder control I decided to use a pair of Spectrum thin wing servos. So I made a mold of the right fin to make a hatch for the servo. Have a couple coats of wax on it, one more and I can make the hatch. Then once I have the other fine done, I will make a bold for that sides hatch.
03-19-2017, 04:34 PM
#47
Thread Starter
And the build continues. All the pieces are assembled for the tail, just some fine tuning the hinges, and I can glue the tail together. Then I can move back to the center section and fit the wing to the fuse, set the incidence and then set the tail.
Big sucker.


Big sucker.
03-26-2017, 06:41 AM
#48
Looking good...! Retracts finally came in, installed. Starting to hinge things. ailerons in, setting up to do flaps (Yikes!) Can you tell me whats wrong with my varient yet? Lol...

03-26-2017, 03:22 PM
#49
Thread Starter
So far so good. Got the wing fully sheeted, and now the hard part, fitting it to the fuse so it's square, and verify the saddle incidence is on target, but need to get an incidence meter first. I got all the main pieces built, except the nacelles, so now I know how big this bird will be when done.


04-08-2017, 06:04 PM
#50
Thread Starter
Finally! I found the engines for this beast. I wanted 4 stroke gas from the start, and Saito's were just not in the pocketbook, and found the NGH 38CC as a decent alternative, but without seeing one, or knowing anyone who uses it, I was reluctant to buy them. I came across one at the Toledo Swap and it was practically brand new, just a couple tanks of gas run through it on a stand. The guy selling it likes them and flies one in his plane and it runs great. It just so happens that he had not one, but two of them. So I now have a pair of new 4 stroke Gas engines, and they are the updated design with a solid mount instead of the standoff type they originally came with.
Thanks Rick(in case you find this post)

So All I need now is a servo for the elevator, going to use a Hitec 645mg for this, all the rest will be Futaba S3010, which I now have, with spares. I need small servos for the gear and bomb bay doors, and then the plastic parts and the cowls. The one other thing I have yet to find are the 5 1/4-1/2 wheels.
Thanks Rick(in case you find this post)
So All I need now is a servo for the elevator, going to use a Hitec 645mg for this, all the rest will be Futaba S3010, which I now have, with spares. I need small servos for the gear and bomb bay doors, and then the plastic parts and the cowls. The one other thing I have yet to find are the 5 1/4-1/2 wheels.