


TBM 93" Zero ARF Build
 04-13-2014, 05:21 PM
#876

My Feedback: (49)
Trevor, cool. My take on flaps is two DOWN settings, and of course completely UP. 1st is about 20 - 25 degrees. 2nd is 40 - 45 degrees. And add some DOWN ELEVATOR to each setting. If you add 6 DN Elevator units to the 1st Flap setting, then add 12 units to the 2nd setting. All this is approximate and there are no absolute right settings. Just try it and change if you think it needs changing. As far as "exact" measurements of degrees, I just set the full down flaps as to what I think looks good, and then I try to eyeball what looks like half of that setting. But, until you get the hang of full flaps, I wouldn't go beyond 45 degrees down. I have Fowler flap hinges on my CMP Zero and they will drop straight down, so gotta watch that setting.
As far as using the flaps, I always use full flaps as that's how I fly full scale planes. You can slow the plane down and still have control as long as you don't get too slow and ALWAYS keep some power on till touchdown. She will flat quit flying if you try to land with full flaps on IDLE power.
On the CG balance, I would use 25 percent MAC as a starting point. That is calculated thusly. If the wing chord at the fuselage is say, 20 inches, then take 25 percent of that number which is 5 inches. Measure back 5 inches from the Leading Edge at the fuselage and that is your balance point. You can go from 25 to 30 percent MAC on the first flights and be safe. Don't worry if she needs lots of lead as what ever she needs, she gets. I have 4 lbs lead in my Zeke. She's a big girl and has lots of wing area so a few extra pounds isn't a worry. Just do not fail to get the proper CG on the first flight or it may be your last.
On takeoff, no need to immediately hit full power, just keep feeding in throttle while keeping her straight down the runway and she will fly off when ready. Her tail will come up and then stay with her with a smidgen of back pressure (to keep from nosing over) on the elevator and that's about it. Happens pretty quick. Keep adding power after liftoff if not already there, to be safe, and go from there. If you did the CG correctly, you should have a fun first flight. Pulling the gear up on first flight is a personal matter. If she's feeling good, then do it. CG should not change after you raise the gear, so trim her out and enjoy.
Looking forward to hearing the results and maybe a few pics.
Last edited by LBJ; 04-13-2014 at 05:34 PM.
 04-13-2014, 05:58 PM
#877

Join Date: Dec 2010
Location: Regina, SK, CANADA
Posts: 48
Likes: 0
Received 0 Likes
on
0 Posts
LBJ
Thanks for the info.
I will set up my flaps as you described. I will also set up the elevators as you described. I will not go more then 45% on the flaps.
As for the balance. I will do it as you described. I measured the Cord at the fuse. Its 20". So I will go at 30% for the first few flights, which would put it at 6". And that would put it at the front of the Spar.
I'm really looking forward to flying the Zero. Its been a long time coming. I bought the plane in April 2011. I would start working on it and another project would come up that would push the Zero aside for a few months.
I will defiantly get some good pics once I get the plane outside. Maybe even get some flight pics or a video!!
Thanks Again
Ultimateflying
Trevor
05-10-2014, 04:12 PM
#881
My Feedback: (49)
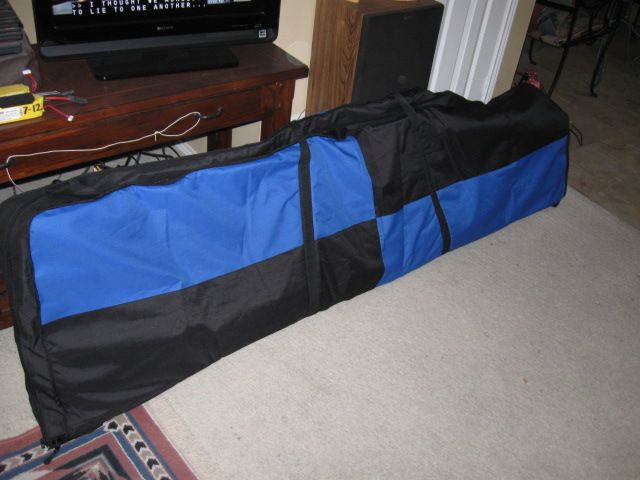
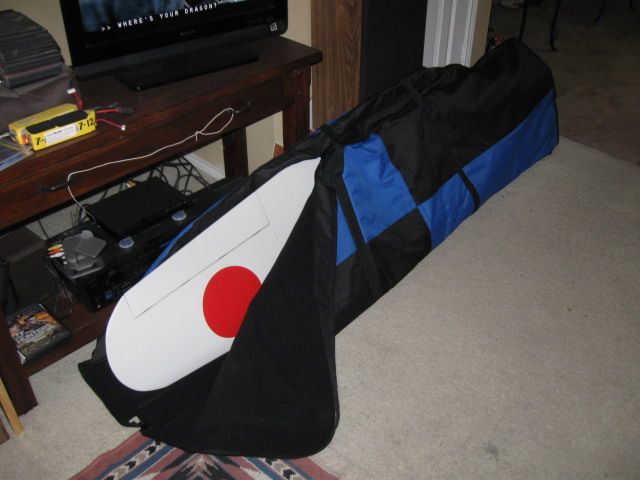
Update for those who have a one piece wing now. I ordered a Hobby Pak wing bag for my latest project, an 85" ESM Corsair. The bag is rated at 88" but just for grins I tested the TBM Zeke wing to see how close it was to a fit. Wow, it fits TOTALLY in the bag! Not an inch to spare either. But it fits. I have been looking for a bag for the TBM Zeke and no one makes one off the shelf. Custom bags are quite pricey. This one is on Sale now at $75 plus $15 (or so) shipping.
http://www.hobby-pak.com/index.php/i...3a84de31379b6#
http://www.hobby-pak.com/index.php/i...3a84de31379b6#
 05-11-2014, 09:56 AM
#886
I hope to maiden in the next couple of weeks. I still have a little tweeking to do.
Casey
Last edited by glazier808; 05-11-2014 at 12:02 PM.
05-11-2014, 07:25 PM
#888
AI-102 was flown by Lt. Saburo Shindo, the flight leader of the second wave. He famously reported "Tora Tora Tora" back to his commanders. Here are some known pics of him launching first off the deck of the Akagi with the second wave of attackers.
 One of his tail.
Last edited by glazier808; 05-11-2014 at 07:49 PM.
05-12-2014, 08:33 AM
#889
Join Date: Jan 2008
Location: PannawonicaWestern Australia, AUSTRALIA
Posts: 606
Likes: 0
Received 0 Likes
on
0 Posts
Nice looking Zero Glazier !!, good to see some action on this thread.
Got a quick vid of my zero from a mates iphone, pretty short and quality not great but hey !! worth a look.
Cheers.
https://www.youtube.com/watch?v=KpRk...ature=youtu.be
Got a quick vid of my zero from a mates iphone, pretty short and quality not great but hey !! worth a look.
Cheers.
https://www.youtube.com/watch?v=KpRk...ature=youtu.be
05-13-2014, 09:40 AM
#892
Join Date: Dec 2010
Location: Regina, SK, CANADA
Posts: 48
Likes: 0
Received 0 Likes
on
0 Posts
I finally had time to balance my Zero. I have a Evolution 58 for power. I was kind of dreading doing the balance because I hate adding extra weight to a plane. I did do a couple mods as I was assembling the plane. I removed the lite ply under the engine box and replaced it with 1/4" ply. The original lit ply was falling apart. I also moved my engine as far forward as I could, as well as mounting the ignition on top of the engine.
It must have helped. I don't need any extra weight added. I was able to get a perfect C/G with my battery packs!! I'm balanced right at the Front of the Spar. Now I'm Happy!!!
Just to be sure that it was balancing correct we did it a few ways to double check. I built a Vanessa CG Balancer. (Works Great. Easy for one person to balance a big plane on there own). Set it on a Great Planes balancer, Lifted at Wing Tips, Lifted at outter edge of Center Section. All those locations balanced perfect!!
Now I just have to set up the radio and its ready to maiden. I can't wait!!
Ultimateflying
Trevor
Last edited by Ultimateflying; 05-13-2014 at 09:46 AM.
05-26-2014, 04:06 PM
#896
My Feedback: (18)
Join Date: Sep 2008
Location: Strongsville,
OH
Posts: 265
Likes: 0
Received 0 Likes
on
0 Posts
Got the maiden in on the Zero today. The ZDZ 60 with the 3 blade 22 x 10 Mezjlik prop worked great. Pulled the plane nicely. No issues at all and the plane flew very smooth and easy. Takeoff and landing were a breeze. There seems to be many thoughts on the correct CG for this plane on this thread. I can tell you mine was balanced exactly on the main spar. This is about 7-1/2" back from the leading edge at the sides of the fuse. Others are balancing their planes at 5" back and adding lead to the nose. I added no weight up front, the plane is 26 lbs. and when flying inverted, I had to push down elevator pretty hard. If anything I would categorize my plane as slightly nose heavy. At least compared to my aerobatic planes that require little to no down elevator to maintain level inverted flight. Only one flight because my wing connector wires worked their way out about 3-4 inches. They were so tight that I would not have imagined that would happen. I'll have to figure out a way to keep them in place.
06-02-2014, 10:24 PM
#898
My Feedback: (18)
Join Date: Sep 2008
Location: Strongsville,
OH
Posts: 265
Likes: 0
Received 0 Likes
on
0 Posts
Simple but effective solution to the wing connector wire problem. I threaded the end of the gun about 3/8" long. 1/4-20 thread. Screwed that into the leading edge. Put a few drops of thin CA on the threads of the LE. Repeated the threading of LE / CA three times. Now the threads in the wing are good and solid. The rod doesn't budge anymore. Had to shorten the wire about because it goes in farther now. The wire goes right up to the TE when fully threaded in. Three more flights all good. Never used the flaps yet. New issue however. The gear doors flap violently in the breeze during a high speed pass. Removed them for now, but need to stiffen / secure them better.
