


Miss Ashley Development | Warbird Racing
 07-20-2022 | 09:09 AM
#1

The molds for the next generation of warbird racing planes have arrived. Earlier this year we started to design a warbird race plane specially for warbird racing. That means it must have a short building time, it also needs to be competitive on the course, and it has to be expendable. We believe that this Miss Ashely short kit will fit that need. In this article we will discuss some of the design features and where we are in the development and production of this kit.
Design features: We have employed a �fishbone and rib� design for the fuselage. Think of it as a profile plane with full length, fiberglass, cheeks attached to it. When building the airframe you will install the tail feathers (balsa wood and covering), servos, control rods, linkages, radio gear, batteries, fuel tank, fuel lines and all other items before attaching the fiberglass cheeks. This will allow you to modify the locations of said items for balance. This also allows you to cut hatches where you need them or even seal everything inside without service access. Once the fiberglass cheeks are installed you can seal the seams, paint or stripe as needed. The engine installs to a double walled firewall and is covered with a fiberglass cowl. The wing is hollow with a triangular 1/8� plywood spar. The ailerons will use a skin hinge. The lower wing skin fits inside the upper wing skin making the assembly easier. There are hard mounts for landing gear. This system also allows you to choose landing gear type and design. You can use fix gear or cut into the lower wing skin and install retractable gear. Wheel wells are provided with the kit. One key feature in the model is that the wing mounts flush and flat to the fuselage. This allows for smaller and lighter wing bolts. It also locks the wing into place to ensure the wing is straight and true to the thrust line of the engine. One last item to note, all if the wood pieces of this kit are laser cut and have pins, keys, or locks. This allows everything to lock into place. There is no need to cut, trim or measure.
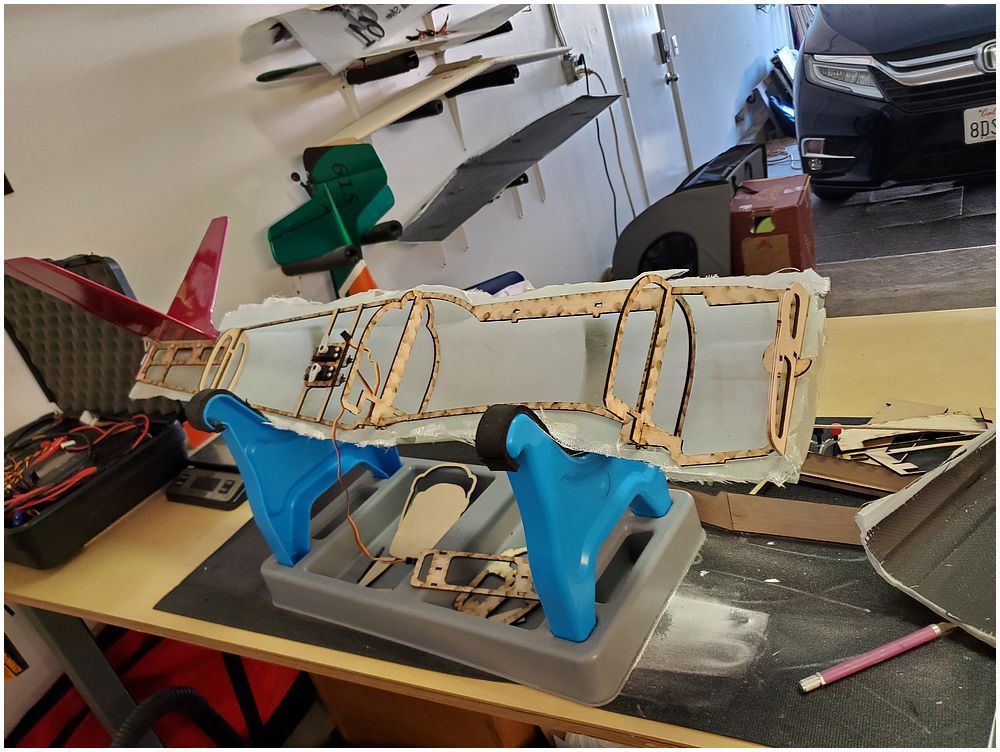
Current development stage: After creating a 3d model of the Miss Ashely, we designed and created the laser cut wood and cam cut molds needed. Currently we have the 1st set of laser cut wood pieces and as of this week the molds are in hand. The molds are cut from solid aluminum blocks. Attached are photos of the molds placed on the work benches. We have place some of the wood structure in the molds to check for fit. By the way, the fit is perfect. We will soon have the molds polished, waxed, and ready to produce its first fiberglass skins. It is our plan to have the 1st flying prototype by the end of July 2022. Depending on what changes and updates we will need to make, we are hoping to have kits ready sometime in late August.
As we make progress on the Miss Ashley short kit, we will update you. Pricing, build videos and instructions will also be release soon.


Design features: We have employed a �fishbone and rib� design for the fuselage. Think of it as a profile plane with full length, fiberglass, cheeks attached to it. When building the airframe you will install the tail feathers (balsa wood and covering), servos, control rods, linkages, radio gear, batteries, fuel tank, fuel lines and all other items before attaching the fiberglass cheeks. This will allow you to modify the locations of said items for balance. This also allows you to cut hatches where you need them or even seal everything inside without service access. Once the fiberglass cheeks are installed you can seal the seams, paint or stripe as needed. The engine installs to a double walled firewall and is covered with a fiberglass cowl. The wing is hollow with a triangular 1/8� plywood spar. The ailerons will use a skin hinge. The lower wing skin fits inside the upper wing skin making the assembly easier. There are hard mounts for landing gear. This system also allows you to choose landing gear type and design. You can use fix gear or cut into the lower wing skin and install retractable gear. Wheel wells are provided with the kit. One key feature in the model is that the wing mounts flush and flat to the fuselage. This allows for smaller and lighter wing bolts. It also locks the wing into place to ensure the wing is straight and true to the thrust line of the engine. One last item to note, all if the wood pieces of this kit are laser cut and have pins, keys, or locks. This allows everything to lock into place. There is no need to cut, trim or measure.
Current development stage: After creating a 3d model of the Miss Ashely, we designed and created the laser cut wood and cam cut molds needed. Currently we have the 1st set of laser cut wood pieces and as of this week the molds are in hand. The molds are cut from solid aluminum blocks. Attached are photos of the molds placed on the work benches. We have place some of the wood structure in the molds to check for fit. By the way, the fit is perfect. We will soon have the molds polished, waxed, and ready to produce its first fiberglass skins. It is our plan to have the 1st flying prototype by the end of July 2022. Depending on what changes and updates we will need to make, we are hoping to have kits ready sometime in late August.
As we make progress on the Miss Ashley short kit, we will update you. Pricing, build videos and instructions will also be release soon.

The following users liked this post:
SoCalErv (07-28-2022)
07-22-2022 | 05:50 PM
#2

Looks very interesting, Ben!
I love the CNC accuracy of everything; and applaud your efforts in helping racers, that don't like to build, to have some alternatives towards "staying in-stock" with airplanes.
Looking forward to future updates.
Best of luck with the prototype!
Ollie
I love the CNC accuracy of everything; and applaud your efforts in helping racers, that don't like to build, to have some alternatives towards "staying in-stock" with airplanes.
Looking forward to future updates.
Best of luck with the prototype!
Ollie
07-28-2022 | 03:38 PM
#3
Member
Ben: Was able to view some of the kit manufacturing processes with you a couple of weeks ago. This post really brings your efforts and the finished plane into focus. Kit seems very simple and with a rattle can no two planes would look the same.
I do not have any experience with fiberglass. What you have outlined seems fiberglass tasks to be completed require a low building level.
Waiting.
I do not have any experience with fiberglass. What you have outlined seems fiberglass tasks to be completed require a low building level.
Waiting.
08-24-2022 | 02:11 PM
#6
Attached are pictures of the right side of the fuse being pulled out of the mold today.

Here is the right side in the bag under vacuum

This is after removing the bag and the peel ply.

This is the fuse right out of the mold.
---------------------------------------------------------------------------------------------------------------------------------------------------------------------------------------
Note the detail in the corners... We added filler and chop to prevent "Bridging"


Here is the right side in the bag under vacuum
This is after removing the bag and the peel ply.
This is the fuse right out of the mold.
---------------------------------------------------------------------------------------------------------------------------------------------------------------------------------------
Note the detail in the corners... We added filler and chop to prevent "Bridging"


 10-14-2022 | 07:40 AM
#9


All of the internal parts are in and the left side of the fuse is attached. I attached the engine and mount with a holding screw for pictures. One thing to note is, the weight of the fuse. The World Models Vendetta without a prop; weighs about 78oz. Currently this fuse weighs 55oz. It still missing the muffler, cowl, spinner and paint. It�s my belief that the Miss Ashely will weigh between 20 to 12oz less than World Model�s Vendetta when completed.
The following users liked this post:
gtm3323 (10-23-2022)
10-28-2022 | 01:17 PM
#10
Sorry, I did not take a picture of the completed airplane.
The Miss Ashely flies! Today we put the first flight and trim the airplane. It was a short flight as the engine was too lean. I can say that it flies just like the Vendetta. There were many lessons learn on the first airplane.
Some lessons learn:
1st the most obvious, is that it will need a gel coat added in the molds before laying up the rest of the fiberglass. After a quick layer of paint, we had �Pin Hole City�.
2nd is the location of the servos and radio equipment. The airplane proved to be tail heavy with the servos install behind the wing. Relocating the equipment to just above the wing will solve this problem. That means that the servos can be mounted horizontally and you will have access to them once the wing is removed.
3rd Motor mount system. The wooden motor mount works well but it needs just a longer gusset to remove any engine flex.
Conclusion:
The Miss Ashely will make for a good race plane. Its easy to build, very easy to customize and flies just like the World Model�s Vendetta. And best of all it is lighter than the Vendetta. Even after paint and adding 4oz to the front of the airplane it weighs in at 7lbs-6oz.
Changes for the next airplane:
By moving the radio equipment, we removed the need to add weight for balancing (-4 oz). We have already removed 6ozs of wood from the wing and additional 2ozs out of the wing skins. Also, we will be using a different glue to assemble the wing. I believe that the next airplane, with a YS115 engine, will be under 7lbs. In addition, the next airplane will have some better body work and finishing.
 12-15-2022 | 02:33 PM
#12
1st Production run of 10 airplanes has begun. We currently have 3 of 10 kits completed. The following 7 kits will be produced at a rate of 2 a week. Our next step is to create assembly instructions, a purchasing page on the warbirdracing website, and start shipping kits. We are looking forward to the continued development of the Miss Ashely warbird race plane.
One question that everyone has be asking is �what is the cost?�. I have a detailed costing sheet with everything needed to produce the kit. The kit cost will fluctuate with each production run. Currently the cost will be $600.00 plus shipping if needed. (Shipping is estimated at $100 with fedex).


One question that everyone has be asking is �what is the cost?�. I have a detailed costing sheet with everything needed to produce the kit. The kit cost will fluctuate with each production run. Currently the cost will be $600.00 plus shipping if needed. (Shipping is estimated at $100 with fedex).
01-21-2023 | 08:05 PM
#13
Junior Member
Joined: Aug 2022
Posts: 12
Likes: 0
Received 0 Likes
on
0 Posts
We needed to put the new Miss Ashley in the air to make sure it has great flying characteristics. Even though we opted for previously used parts like an old 2 stroke engine. The airplane flew fast and straight with very little trim needed. All signs are good that his will add another competitive warbird for all the racers looking for an easy to build and cheap way to fly fast.
Sorry for the poor quality video. I simply took it with my phone and it was hard to keep up with the airplane while it was flying.
VIDEO LINK:
Sorry for the poor quality video. I simply took it with my phone and it was hard to keep up with the airplane while it was flying.
VIDEO LINK:
02-27-2023 | 12:48 PM
#14
Junior Member
Joined: Aug 2022
Posts: 12
Likes: 0
Received 0 Likes
on
0 Posts
I have been building a new Miss Ashley airplane for the silver class. Surprisingly, it�s very easy to build and it came out light weight. Currently this composite airplane weighs only 6lbs 2oz before painting it. I have attached some photos�


 03-11-2023 | 01:04 PM
#16

 03-22-2023 | 11:08 AM
#17
We entered 2 airplanes at the Phoenix race on March 18th. Our goal was to see how it competed with current airplanes racing in Gold and Silver. To our delight the Miss Ashley held its own. Even though we had a strong cross wind most of the day the airplane was fast, easy to fly and looked good in the air. Andy�s airplane (Silver) was powered by YS 80 with 30% nitro and was able to breakout without any problems. My airplane (Gold) had an old worn-out YS 115WS running on 50% nitro and was competing with all of the other Gold airplanes at the race.
We brought along 2 kits for others, and both were taken home. In conclusion this air frame is a viable solution to the airplane shortage. More kits will be available soon and we are sure that in time the airplane will only get better.
We brought along 2 kits for others, and both were taken home. In conclusion this air frame is a viable solution to the airplane shortage. More kits will be available soon and we are sure that in time the airplane will only get better.


