


Drake george seaplane
 09-12-2014, 03:34 PM
#1


I have been looking to find a large seaplane to take to the next seaplane meet in the Michigan area or surrounding state. I have had no luck in finding what I want on RC Universe, Ebay or any of the other usual places.
What I decided on was a mini Drake kit from Hobby king, for $39+ shipping I got a bag with a few sheets of balsa with the parts cut out and a instruction manual, no prints come with the kit.
I traced all the parts out on a 12" wide paper and took it to Fedex/Kinco and ran it through their plotter printer at 3x enlarge setting. I ordered some 1/8" x12" x 48" lite ply along with some balsa from National Balsa and started my own version of the drake, attached couple photos of the project start.
Last edited by rcwarbirdbuilder; 09-13-2014 at 08:58 AM.
 09-12-2014, 03:43 PM
#2
So far...
1.. I have redrawn all parts outlines and made changes to the part shapes and made up the working print.
2.. Cut 2 lite ply fuselage sides.
3.. Cut 1/8" hard ply sheet into 11/8" wide strips.
4.. Cut the ply strips into proper length and epoxied them into two main formers.
5.. Epoxied the two formers to one side of the fuselage, let dry than epoxy the second fuselage side.

 09-16-2014, 12:19 PM
#5
The wingspan is going to be 80".. I am thinking of a DLE/AGM 30cc engine.. I am not familiar with airplanes with the power pods on top of the wing, this is a first for me with a gasser on top of the wing. I have had gliders with electric motors on top but this is a totally different animal and hope the gas engine will not vibrate or stress the wing center since I plan on making the wings detachable.
09-18-2014, 04:19 AM
#7

The wingspan is going to be 80".. I am thinking of a DLE/AGM 30cc engine.. I am not familiar with airplanes with the power pods on top of the wing, this is a first for me with a gasser on top of the wing. I have had gliders with electric motors on top but this is a totally different animal and hope the gas engine will not vibrate or stress the wing center since I plan on making the wings detachable.
You'll need to think prop clearance also, the bigger the motor, the big the prop, the taller the pod, the more incidence offset needed,,
good luck
09-18-2014, 07:37 AM
#9
I have started the wing showing the details of the sectional wing. The main spar 1/4"x3/4"' was cut on a table saw from a clear 1"x6"x6' pine. The main spar is pinned to over the plan with the wing joiner placed on top of it, than the pocket spar is layed on top of the joiner and the ribs are glued in carefully to avoid getting glue on the joiner so it can be pulled back out.
I use this method successfully on sectional wing construction on almost all of my large 100cc powered warbirds.


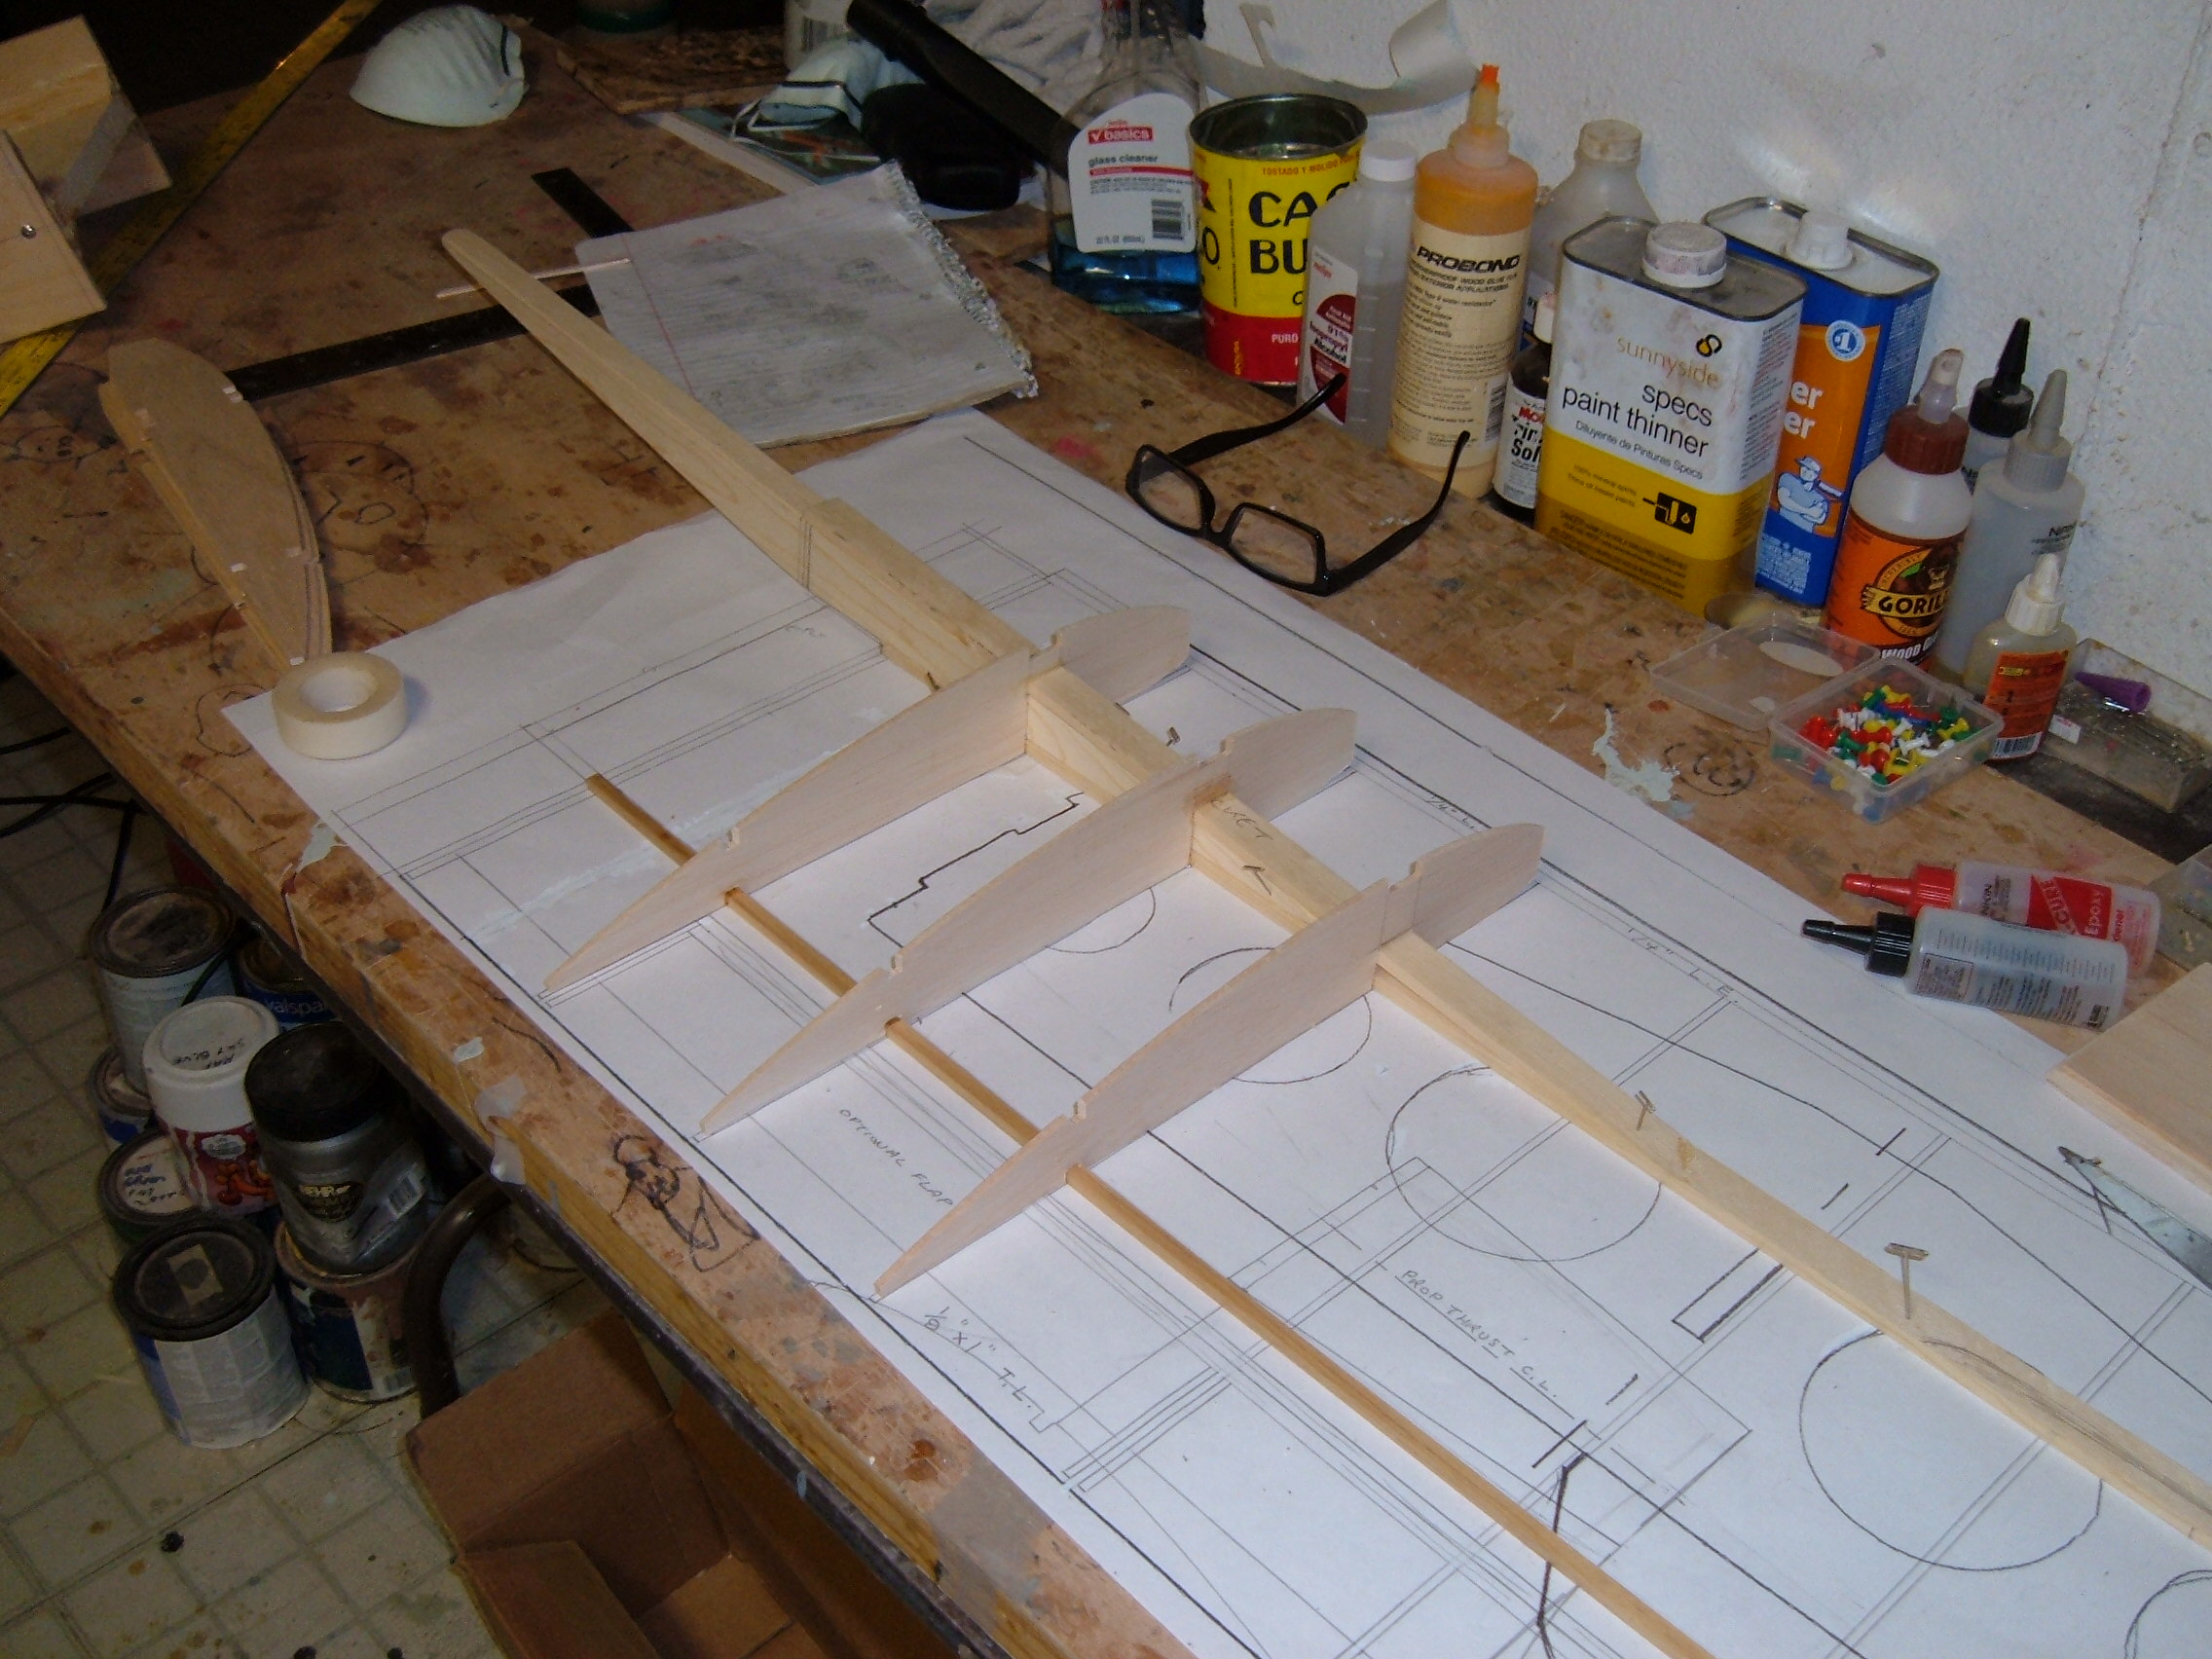


I use this method successfully on sectional wing construction on almost all of my large 100cc powered warbirds.
Last edited by rcwarbirdbuilder; 09-19-2014 at 06:25 AM.
09-18-2014, 12:26 PM
#10
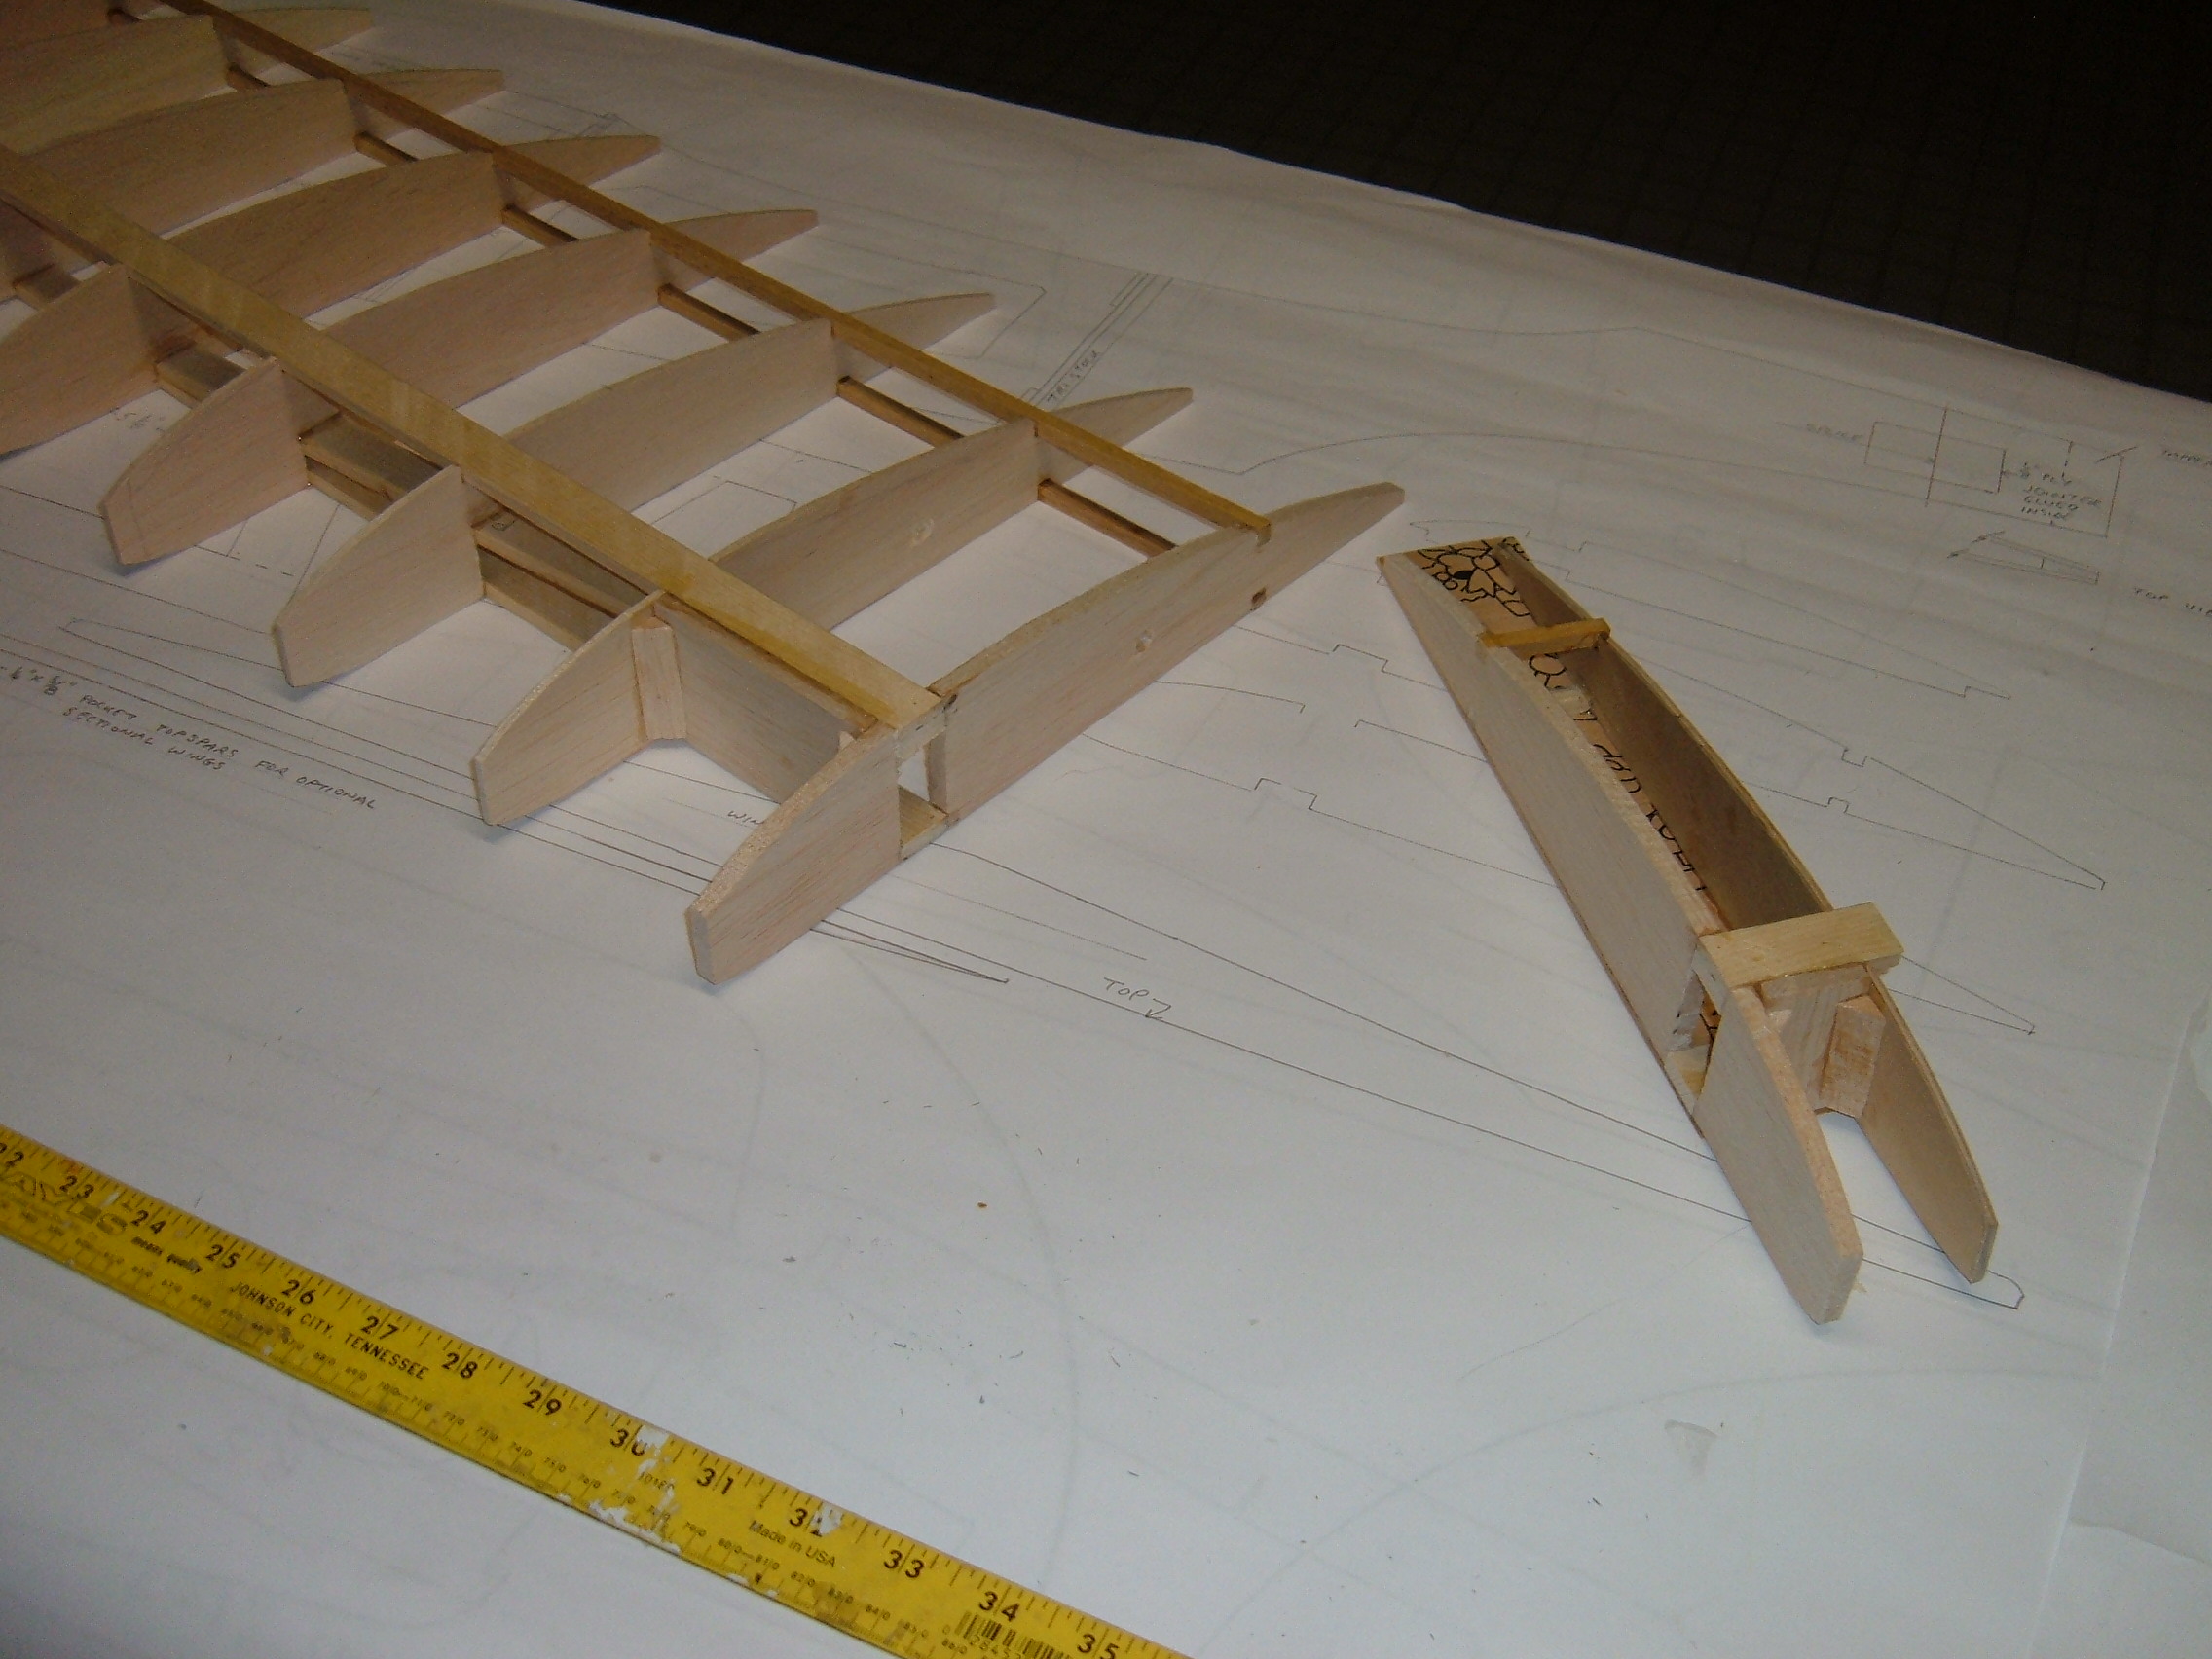
Not sure yet if I am going to mount the power pod to the center section of the wing than glue the center section to the fuselage or use blind nuts and bolt the center section to the fuselage.
The first wing rib in the photo is 1/8" hard ply which the power pod will glue to,,, the second wing is double 1/4" balsa the spars will be cut between the two 1/4" balsa to make for a 3 section wing.
Once the epoxy sets on the 1/8" ply rib the area between the top and bottom spar will be taken out for the wing joiner to fit through.
09-28-2014, 03:38 PM
#11
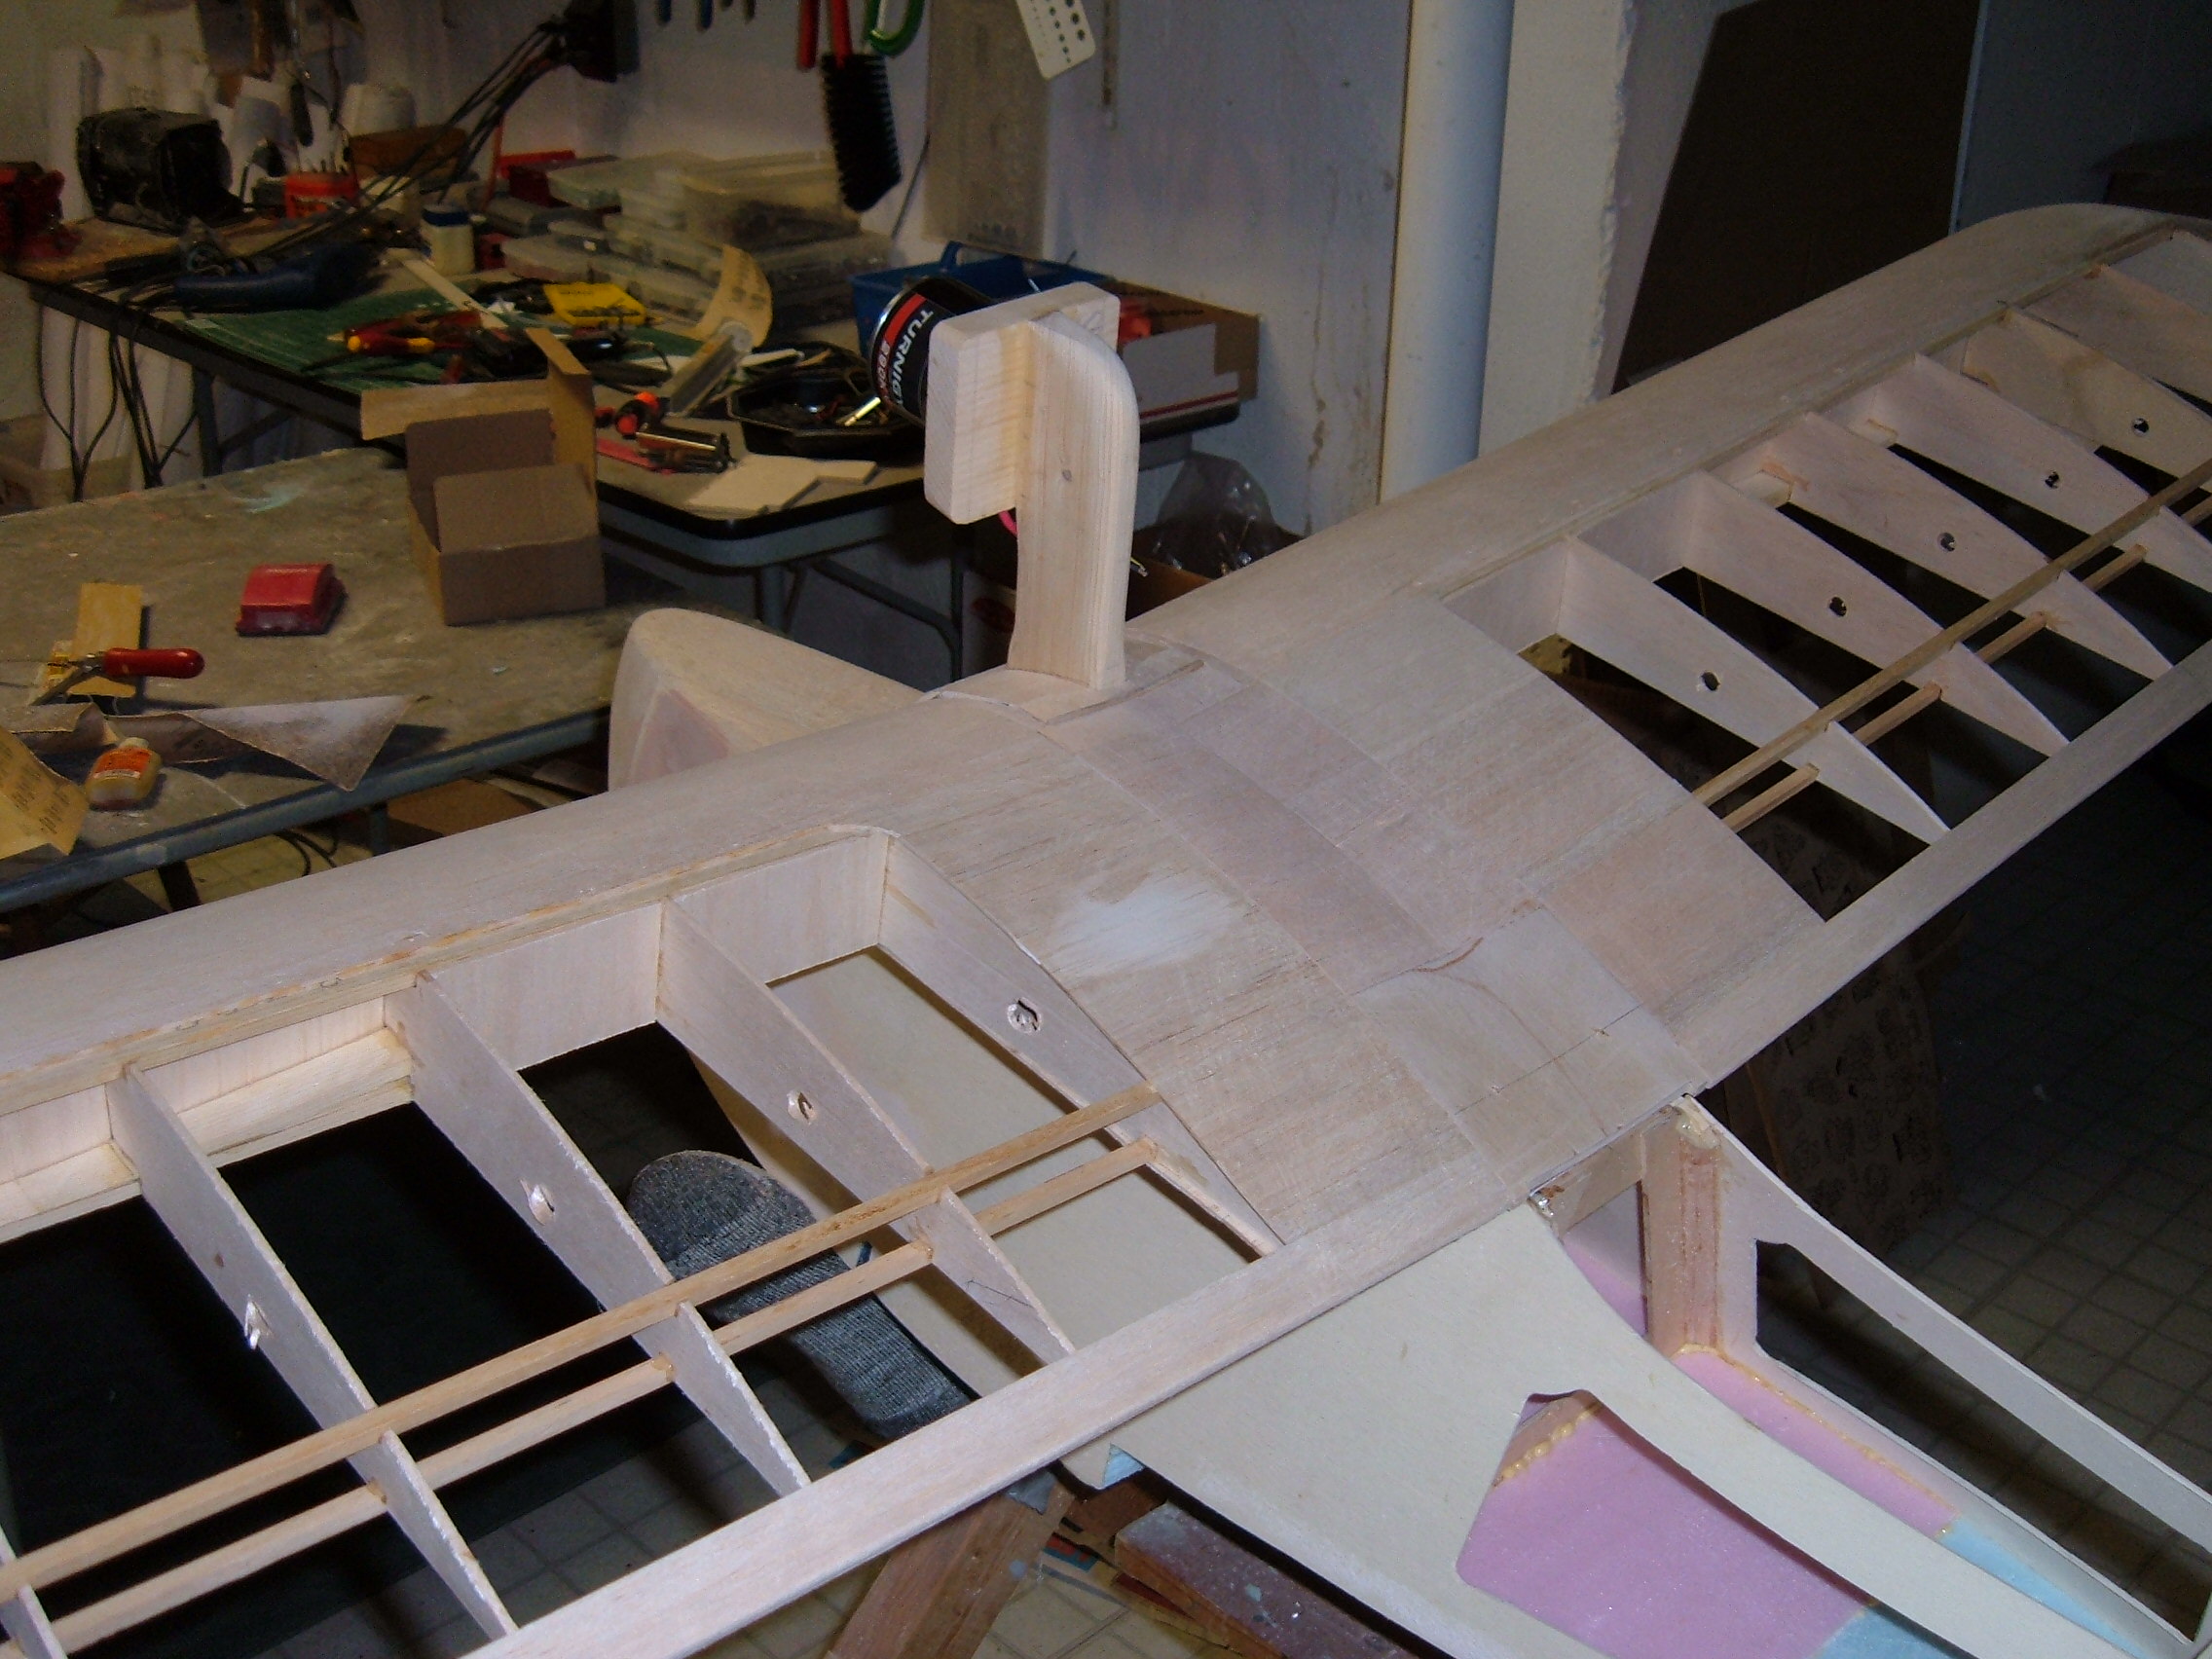
The above photo shows 1/2 of the wing, the spars extend just under 3/8" beyond the first rib to leave room for the engine pod to drop into, the bottom center section has been sheeted with 1/8" ply..
The first rib is 1/8" ply, the next rib is (2) 1/4" balsa ribs side by side and the spars will be cut between the 1/4" balsa ribs to make the center wing section.
The ribs at the front spar section has been removed for the wing joiner to fit into, also the front portion of the 1/8" ply rib will be cut off, I built the wing using full ribs to aid in alignment of the wing construction.
Last edited by rcwarbirdbuilder; 09-28-2014 at 03:46 PM.
10-06-2014, 07:56 AM
#12
Back working on the fuselage, cut 1/4" and 3/8" balsa sheeting to shape to build up the nose and top deck so I have lot of material to sand and shape the front fuselage.. Took some 1" blue foam and using Gorilla Glue to set it to the bottom of the fuselage and shaping it to a shallow V bottom.


Last edited by rcwarbirdbuilder; 11-06-2014 at 08:58 AM.
10-13-2014, 09:52 AM
#14
(1)- I have cut the left center wing section from the wing panel shown, and also cut the the right wing center section out from the right wing panel. (2)- Glued the left and right wing center section together along with the wing brace. (3)-The last photo shows the left and right wing panel plugged into the center wing brace to make up the three piece wing.


Last edited by rcwarbirdbuilder; 10-13-2014 at 09:59 AM.
10-25-2014, 03:39 PM
#16
The sheeting on the wings are about complete, next is the cap strips on the ribs... I have planed on using a gas engine for power but thinking of going electric on this airplane, just ordered a G160 electric, 100 amp speed control and two 3 cell 5000 ma lipos to turn a 16x10 three blade prop.


11-05-2014, 08:42 PM
#17

Hi rcwarbirdbuilder,
Looks like it ought to be a nice fun flyer. My only suggestion is to make really sure you water proof the spar and spar socket area. If water gets into any bare wood it will swell and cause all kinds of interesting things to happen. It will definitely expand your vocabulary of colorful metaphors!
Good luck with the build and keep good notes. You may have a line of people wanting plans for your Great Drake.
Carlos G.
11-14-2014, 12:44 PM
#18
I finally got the G160 electric motor from Hobbyking. They sent the motor but did not include the motor mount or the prop adapter, I contacted them about the incomplete order and missing parts, what a hassle going back and forth with them for the parts.. Finally I placed another order for parts which I hoped would fit on the G160 since they did not have anything listed specifically for the G160.
I got the motor mount which aligns and fits, the prop adapter bolts are to short, I am hoping it will work just a matter of getting longer metric screws.
The prior photo shows the engine pod I was going to use with the 30cc gasser, I have replaced it with another pod which will fit further forward for the electric since it has a shorter prop shaft. I ordered couple different replacement cowls from TowerHobbies to see which would make a good fit, as it turned out the cowl for their TwinStar should work with the front cut off.
