Aircraft Tail Trap
 11-02-2017 | 08:57 AM
#1

Thread Starter

I've been wanting to fabricate one of these for a while now. Had scrap in the shop and a little bit of time. So I got started. One upright done and it came out half way decent. Looking forward to see how the final product will come out.
 11-03-2017 | 05:20 AM
#2

I am guessing that is to hold the plane before launching. We have to use a holding device too. I use the table, and a lot of my stuff is hand launched. Sometimes I bring a string like most of the guys. It is pretty clumsy that way. Fortunately, I only have one bigger plane that needs the lasso. The monster plane guys sometimes use a couple stakes that they step on to push into the grass. At my old field there was a guy made a U shape fork that had a foot pedal to disengage the plane. It was pretty fancy aluminum that was CNC machined I think.
11-03-2017 | 10:35 AM
#3
Thread Starter
I thought Fall was finally arriving in Texas. Had a cold front arrive but I only got to fire the wood stove 2 � days. Now it is back to the 80�s and warm and humid. I guess I have to wait for winter. Almost back to using AC again.
aspeed, you are correct. This device holds the airplane tail end. I made it for my airstrip at home. I made a starting station that I mount on a small trailer. Then trailer the plane and equipment to the runway. I start the plane and make any adjustments on the starting station then carry plane to runway. There I do a final run up before takeoff. I don't like to use my feet to hold the plane. Also at times the engine may shutdown. Then I either carry it back to the starting station or start it on the ground. I've done both. I rather restart it on the ground but working alone, it is not a safe operation. So I build this tail trap. It should help a lot. I favor the larger model airplanes so it will be very useful.
I have the second upright done. So the worse of the fabrication is over. Now I need to assemble parts and weld, paint and cover with foam. I have to dig around to find the other parts needed. This is a scrap pile build.
11-07-2017 | 03:38 PM
#4
Thread Starter
I got a little more work done. The uprights are installed. I was checking for a foam covering for the uprights. I'm limited to a ⅜� to �� thick piece. I tried pipe wrap with some paint. That did not work well. The paint started coming off during testing. I found some old pool noodles in the garage. They are thick and will provide good cushioning but I have to cut it to size. I'm thinking the lime green will be good. Just have to set up my foam cutter to slice it down to size. Next step will be adding the anchor points.
11-08-2017 | 11:56 AM
#5
Thread Starter
I inserted the uprights into the pool noodle. Only a small piece left over. This will allow me to more easily trim the pool noodle to the size I need. I can also cut the upright to the planned height. After this I can start on the anchor points. So far looking good.
11-12-2017 | 09:38 AM
#6
Thread Starter
Progress is slow. I cut the upright and pool noodle to size; 17". I could not use my large foam cutting bow so I made this smaller one. It is just assembled and not glued together. It worked pretty good. I used a couple of practice pieces to try to get a square pool noodle. It was a challenge.
11-12-2017 | 09:51 AM
#7
Thread Starter
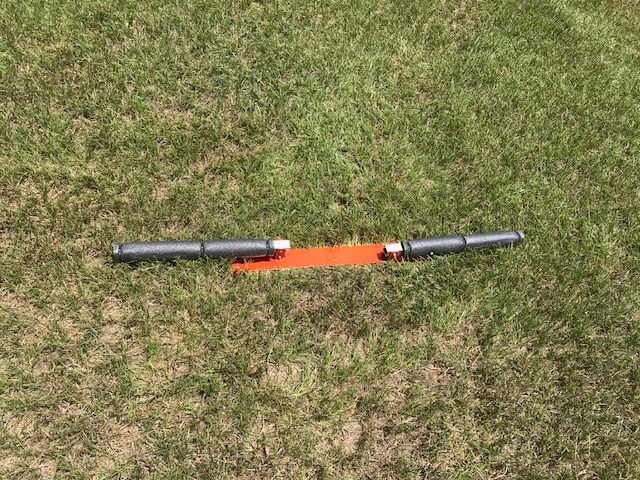
Here are the sort of square pool noodles. Lol. Those noodles are tough stuff. It may not look good, but I think it will work good. The uprights will lay to the outside to allow the plane to taxi forward. They will rest to the inside for easy transport. An airplane needs more than 2.25" stabilizer height to clear the uprights when folded over. You can do both uprights or just one. Doing just one , you lift the tail to work it around the other upright. It should work good. If more stability is needed I can add 2 folding arms that can extend forward for more stability of the tail trap. Just have to see how it works. I end this here. I can't finish welding the anchor points now. I have a tractor that needs TLC maintenance.
Last edited by ETpilot; 12-09-2017 at 10:59 AM. Reason: spelling
12-03-2017 | 01:47 PM
#8
Thread Starter
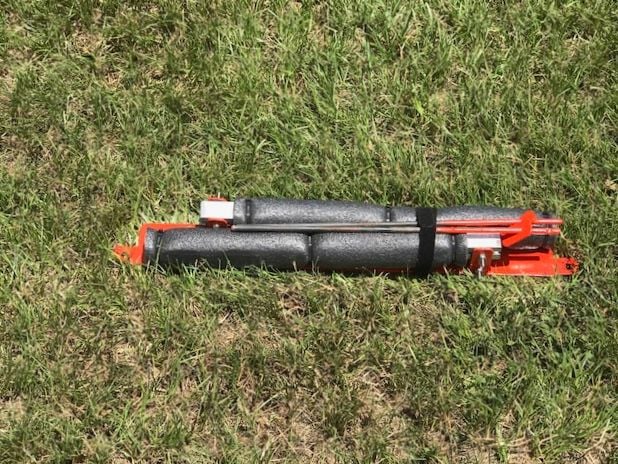
I finally got around to welding the anchor points. This is plan �B�. Plan �A�, using a pipe didn't work out. Anyway nice and compact for transport. One or both uprights can be lowered. I have only one airplane that cannot clear the uprights when lowered. In that case I will lower one upright then lift the tail and work it around the other upright.
12-09-2017 | 06:59 AM
#10
ET.. Take a look at this, if you want to speed up the process for 'noodles'.
Link: https://www.amazon.com/s/ref=nb_sb_n...s=pool+noodles
Another one: https://www.ebay.com/sch/i.html?_fro...&_sacat=159136
This should help things along.
Mike
Link: https://www.amazon.com/s/ref=nb_sb_n...s=pool+noodles
Another one: https://www.ebay.com/sch/i.html?_fro...&_sacat=159136
This should help things along.
Mike
12-09-2017 | 10:58 AM
#11
Thread Starter
Thanks Mike, I have to place an order with Amazon so I will order one from there. Wrapping the uprights on 4 sides is not working out. It makes it difficult to lower for transport. So I will just do a 3 sided wrap. That will work better.
I haven't gotten to welding the rods that will anchor this to the ground. Just busy busy plus I'm starting a new AC build. I just need to weld on a head that will let me pound the rods into the ground and then easily pull them out. This has been a scrap from the shop build. LOL.
I haven't gotten to welding the rods that will anchor this to the ground. Just busy busy plus I'm starting a new AC build. I just need to weld on a head that will let me pound the rods into the ground and then easily pull them out. This has been a scrap from the shop build. LOL.
07-19-2018 | 01:59 PM
#12
Thread Starter
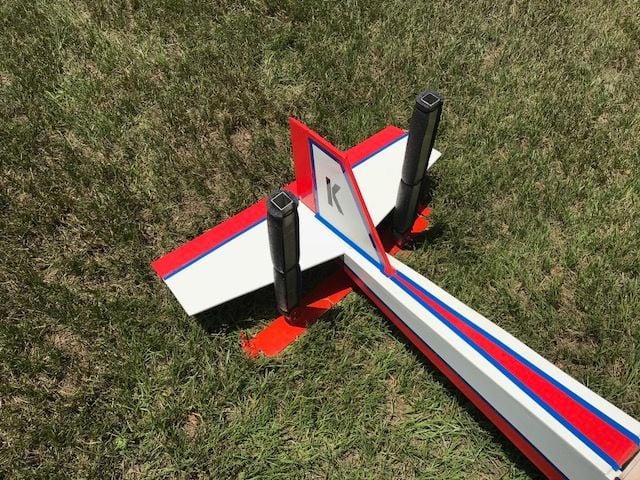
I never posted a picture of the final product. So here are some FWIW. Overall it works pretty good. Has good holding power. The pool noodle was too thick for my needs so I used pipe wrap instead. I can taxi the plane over the trap.