


Finding CG on Biplane
 03-30-2007 | 06:00 PM
#1
Thread Starter
Member
Joined: Dec 2006
Posts: 42
Likes: 0
Received 0 Likes
on
0 Posts
From: Red Bluff,
CA
I have an Utimate Biplane purchased from another pilot, already constructed. I have a CG Machine, but don't know how to utilize it with this plane. The only thing I could think of is to remove the bottom wing, rest the CG machine's arms on the underside of the top wing, then rest the unattached lower wing on top of the upper wing, so the weight is distributed reasonably close.
Does anyone have a better idea on this? The instructions for the CG Machine do no address this, and maybe it's not designed to work on biplanes.
Does anyone have a better idea on this? The instructions for the CG Machine do no address this, and maybe it's not designed to work on biplanes.
 03-30-2007 | 08:54 PM
#2

Joined: Oct 2005
Posts: 157
Likes: 0
Received 0 Likes
on
0 Posts
From: Amityville,
NY
Let's hope someone with more experience chimes in here but I believe you should mount both wings and balance the plane upside down on the cg machine.
You could do a search for the Vanessa cg setup. That one is sweet .
You could do a search for the Vanessa cg setup. That one is sweet .
03-30-2007 | 09:18 PM
#3
Senior Member
My Feedback: (40)
Joined: Dec 2001
Posts: 1,597
Likes: 0
Received 0 Likes
on
0 Posts
From: Merrimack,
NH
Vanessa or any of its simpler variations (sling & plumb bob) will do the trick. Just hang it, adjust it to straight & level, adjust the plumb bob so it comes to rest just above the surface of the model. Mark the desired CG. Plumb bob will point to actual balance point. Just move things around on the hanging model, rest them on top or tape them or hang them in position, and keep doing that until the plumb bob points to your desired CG point. Does lengthwise and lateral CG simultaneously. It is important to have everything (as in both wings) in position to get accurate results.

 03-31-2007 | 04:39 AM
#6
Senior Member
Joined: Dec 2001
Posts: 3,305
Likes: 0
Received 0 Likes
on
0 Posts
From: Brantford, ON, CANADA
Try this. For the chord use the distance from the LE of the forward wing to the TE of the rearward wing. If the wings are staggered. This will establish the chord line along which the CG should be placed, 25%, 30%, etc, etc.
Ed S
Ed S
04-01-2007 | 05:21 AM
#8
Senior Member
My Feedback: (44)
Joined: Sep 2004
Posts: 1,095
Likes: 0
Received 0 Likes
on
0 Posts
From: Wichita, KS
I don't think you are giving enough information. If you know what model it is, you should be able to get a manual on-line for it. Then just follow the manufacturers recommendation for CG. If it is a small airplane such as .60 to .90 size, you should just be able to use your fingers (placed per manufacturers recomendation) to see if the CG is correct.
I have flown everything from .40 size trainer to 33% giant scale and have never owned or needed a CG machine. If you get near the midrange of manufacturers recommendation the airplane should fly fine. Then slowly change the CG forward or aft for your flying style.
Reference post #6: Squaring the wing and calculating CG is not that simple since it is a bi-plane, you have to take into consideration that it is a ultimate and has 2 wings and the wings are staggered.
04-01-2007 | 05:42 AM
#9
Senior Member
My Feedback: (40)
Joined: Dec 2001
Posts: 1,597
Likes: 0
Received 0 Likes
on
0 Posts
From: Merrimack,
NH
Actually, that link shows the Vanessa rig. It's a fine rig, and I have no quarrel with it, other than it's just a bit more complicated than it needs to be. My 'sling' is two lengths of nylon strap from Home Depot, which come with buckle to adjust the length of the loop. These are connected by a short length of nylon cord (nylon slides easily over the skyhook). Slip the loops around the model, either fuselage or wing, just so they surround the CG. Hoist the loops and hang everything by the nylon cord connector over the skyhook. You should have it adjusted so the model is just a couple inches over the ground/floor/table, just for peace of mind that if anything goes wrong the model doesn't have far to fall. (Never happens, but peace of mind is nice.)
So now your model is swinging in the breeze. Slip and slide the model inside the loops, and maybe the loops over the hook, so the plane is straight and level. If it looks straight and level, that's close enough. No spirit level needed.
Your plumb bob needs to hang from the same skyhook by a cord with a slipknot, so you can slide it down to where the pointer is very close, like a quarter or half inch from the model. On the model you will have placed a piece of masking tape or whatever, on which you have marked a little 'X' for your desired CG. When everything stops swinging, if the pointer is directly over the X, you're golden! If not, put a weight somewhere on the light end of the model, and it will swing the X closer to the plumb bob, pretty much instantaneously. Steady the swinging, and see how close you've come. If you went too far, move your weight closer to the CG. If not far enough, move the weight away from the CG, or increase the weight.
'The weight' is maybe your battery, which you've saved as the last component to install. If the battery is not heavy enough, consider using a bigger pack, or dual batteries. Or if you don't want to fool with it any more, just use lead. You can assess the fine tuning of CG by using wood vs CF prop, spinner or no, heavy or lightened backplate on spinner, light or heavy tailwheel, move servo from radio compartment to tail or vice versa. I often find myself putting the battery somewhere along the tail of the fuselage, which means cutting a hatch. That's what happens when you 'over-power' with a big engine, or succeed beyond your expectations with keeping the tail light in construction.
The Vanessa essentially does all the above, but with a few refinements--which are nice, but not necessary. The twisting of the dowel is a fancy way to adjust the model so it's hanging straight & level. I find it easier to just ease the weight of the model with two hands and rotate it in the sling to where I want it. The Vanessa shows lengths of cord around the model. Cord works fine for smaller models, but for bigger planes the nylon strap avoids any tendency to cut into a wing trailing edge, or otherwise bruise tender balsa.
04-01-2007 | 07:12 AM
#10
Senior Member
Joined: Dec 2001
Posts: 3,305
Likes: 0
Received 0 Likes
on
0 Posts
From: Brantford, ON, CANADA
Reference post #6: Squaring the wing and calculating CG is not that simple since it is a bi-plane, you have to take into consideration that it is a ultimate and has 2 wings and the wings are staggered.
That is why I wrote this in my post
For the chord use the distance from the LE of the forward wing to the TE of the rearward wing.If the wings are staggered. This will establish the chord line along which the CG should be placed, 25%, 30%, etc, etc.
04-01-2007 | 07:28 AM
#11
Senior Member
My Feedback: (44)
Joined: Sep 2004
Posts: 1,095
Likes: 0
Received 0 Likes
on
0 Posts
From: Wichita, KS
I guess the reading side and interpreting graphics side of my brain did not mesh, somehow I missed that. Back to the topic though, according to the original post he is trying to figure out how to use a CG machine on this airplane, so I assume he knows what model airplane he has and probably has the manual, so with that information he knows where the CG should be. So why make it so difficult, stick 2 fingers under the wing at the points the manufacturer suggests and see if it balances OK.
04-01-2007 | 09:29 AM
#12
My Feedback: (1)
I've tried several types of balancing machines, and I settled on a Vanessa type. I spent a good deal of time setting it up properly, and I now think I have perfected it. But one thing I've yet to be able to understand:
How does one determine straight and level?
I usually get the horizontal stab level, and use that. But I have serious doubts on my Byron Originals Christen Husky. When the horizontal stab on it is level, the plane's angle of attack looks wrong; the tail seems way too high.
The Husky's horizontal stabilizer is built up, but is flat. And my ARF warbird's horizontal stab is built up and fully airfoil shaped (not flat) and I have no idea how to find straight and level on it.
Mike
04-01-2007 | 11:17 AM
#14
Senior Member
My Feedback: (40)
Joined: Dec 2001
Posts: 1,597
Likes: 0
Received 0 Likes
on
0 Posts
From: Merrimack,
NH
The practical difference between having the plane 'exactly' straight & level, and having the nose down a few degrees, is pretty small. The absolute error woud depend on how big your model is, and how far inside the fuselage the three-dimensional balance point is. (Which in most cases we don't know.)
Consider this: if your model is hanging nose down by five degrees (which is way down, from a visual point of view), and you have a big model, let's say a Cub, with 12" height from bottom of fuselage to top of wing (where you have your Desired CG marked), and if the center of the overall mass of the model is vertically halfway in the height dimension (probably close to that in most models, a bit lower for a low-wing type), then the error resulting from not being straight & level will be about a half-inch. (I worked it out; if you know trigonometry, you can check me on that.) The good news is, the actual, physical balance point will be forward (i.e. on the stable side) of where the indicator (plumb bob) is pointing.
My PT-19 flew with its tail way up. Lots of scale planes are configured that way, so that when you add throttle, you not only get more power, but the plane climbs by itself.
So what I'm saying is, if you're hanging at what looks like nose somewhat down, just know that your CG determination will not be far off, and the error will be on the side of safety. As someone pointed out above, all you're after in this initial stage is coming up with a safe CG for first flight, after which you will move the CG based on how it flies, not how it hangs or balances on your machine.
This points up what is to me the real advantage of the sling, which is facilitating the quick and dirty balancing involved in placement of heavy components (batteries & servos) so you get close to final balance without using lead ballast, or very little of it, one hopes.
04-03-2007 | 06:48 PM
#16
Thread Starter
Member
Joined: Dec 2006
Posts: 42
Likes: 0
Received 0 Likes
on
0 Posts
From: Red Bluff,
CA
ORIGINAL: rcairflr
I guess the reading side and interpreting graphics side of my brain did not mesh, somehow I missed that. Back to the topic though, according to the original post he is trying to figure out how to use a CG machine on this airplane, so I assume he knows what model airplane he has and probably has the manual, so with that information he knows where the CG should be. So why make it so difficult, stick 2 fingers under the wing at the points the manufacturer suggests and see if it balances OK.
I guess the reading side and interpreting graphics side of my brain did not mesh, somehow I missed that. Back to the topic though, according to the original post he is trying to figure out how to use a CG machine on this airplane, so I assume he knows what model airplane he has and probably has the manual, so with that information he knows where the CG should be. So why make it so difficult, stick 2 fingers under the wing at the points the manufacturer suggests and see if it balances OK.
I DID pull the manual off the World Models Website and know the CG measurement. I have also used my fingers to hold it up, which I found to be very awkward, trying to look UNDER the wing for the measured dots and place fingers on either side of the fus. I'm not a teenaged contortionist, but a stiff boned 57 years old. I was therefore unsure of the accuracy of this method. However, it looks like this is the best method if I want to keep it simple, and I'll just have to check the flight once it's airborne and trim it out. Forget the CG machine on the biplane.
Thanks for all your input, gentlemen.....it's way more than I expected, but very much appreciated.
04-05-2007 | 06:19 PM
#18

Joined: Sep 2002
Posts: 512
Likes: 0
Received 0 Likes
on
0 Posts
From: C-Ville,
VA
I remounted the arms of my GP CG onto a longer wooden base ( wide enough for my Skybolt ) I can take it apart and reinstall the original rods when I need to.
04-15-2022 | 07:07 PM
#19


Joined: Mar 2002
Posts: 1,013
Likes: 0
Received 0 Likes
on
0 Posts
From: Smithfield,, VA
Ok folks, I already know how to determine where my model's CG is now by using a sling and plumb bob. The quickest and simplest and most accurate by far. My question is, where SHOULD the CG be? I bought an older model of a Waco Cabin biplane. While not a giant scale model, the upper wing has a 56" span. I can't find any reference to a kit of this plane with that span, so instructions are not available.
The diagram by khodges is helpful, but his diagram shows both wings having the same chord. My model's lower wing is much smaller than the top wing with probably half the area and a good 10 less span. The chord is obviously much smaller as well. I saw a piece online several days ago on how to determine the proper location of the CG, but now I can't find it. Any suggestions welcome.
Joe
04-16-2022 | 03:50 AM
#20

Ok folks, I already know how to determine where my model's CG is now by using a sling and plumb bob. The quickest and simplest and most accurate by far. My question is, where SHOULD the CG be? I bought an older model of a Waco Cabin biplane. While not a giant scale model, the upper wing has a 56" span. I can't find any reference to a kit of this plane with that span, so instructions are not available.
The diagram by khodges is helpful, but his diagram shows both wings having the same chord. My model's lower wing is much smaller than the top wing with probably half the area and a good 10 less span. The chord is obviously much smaller as well. I saw a piece online several days ago on how to determine the proper location of the CG, but now I can't find it. Any suggestions welcome.
Joe
The diagram by khodges is helpful, but his diagram shows both wings having the same chord. My model's lower wing is much smaller than the top wing with probably half the area and a good 10 less span. The chord is obviously much smaller as well. I saw a piece online several days ago on how to determine the proper location of the CG, but now I can't find it. Any suggestions welcome.
Joe
Bipes are difficult to CG. I have found over the decades of flying and having own several bipes, that I have observed two things that have worked for me.
- Treat the top wing and bottom wing as one wing. Measure the distance the the LE of the top wing to the bottom wing trailing edge. This distance now becomes the "Cord" of the two wings. Now you have a total distance to use the same theory of using 25%to 33% for the CG center point. What I have observed is the the CG on most bipes, like the Pitts, Christian Eagle, and other bipes that I have helped, is that the CG usually ends up close to the LE of the bottom wing.
- The Pendulum affect creates another issue. With the aircraft upright, the tail off of the ground so that the wings' cords are parallel to the table for measurements. If you use the CG point on the top wing, the aircraft becomes a pendulum and doesn't act as a teeter totter. Using the CG in the bottom of the bottom wing, it is now just like a low wing plane. The problem is that the CG point is normally on the LE of the lower wing. This makes it difficult to lift for the check.
- If you use the technique of testing inverted. Again starting with the wing cords parallel to the ground. The plane is now too top heavy and more sensitive balancing forward and aft. So, I normally test upright.
- The best you can do is get it close. Don't go any further forward the 25% of the total cord forward. This will make it too nose heavy. Which will make it tip forward on take off and landings. Don't go aft past 33%, because tail heavy flies once. Because the lower wing has less area on the cabin Beechcraft, I would be closer to 25%. Most maidens that I have witness on the Cabin Beechcraft, they are tail heavy and only fly once. It is a squirrelly plane tail heavy. When you get it "about close". The rest of the balancing will be trimmed in the air.
- Trimming in the air, after the maiden, on the ground, with radio ON, look at the elevator to the horizontal stab. If the elevator is UP, then the plane is nose heavy. Down trim is tail heavy. This is provided both wings are properly mounted with angles of incidence. After making adjustments to the Wt/Bal, the other trim method that I look at, rather then inverted at a 45� angle. I use the knife edge. If it pulls to the canopy, the plane is nose heavy. Pushes towards the gear, tail heavy. Again, this is if wing incidences are correct.
Bipes are a pain to trim, but once trimmed, they are beautiful flying. Especially in a stall turn.
Good Luck! Dan
Last edited by RCFlyerDan; 04-16-2022 at 04:01 AM.
04-16-2022 | 04:28 AM
#21
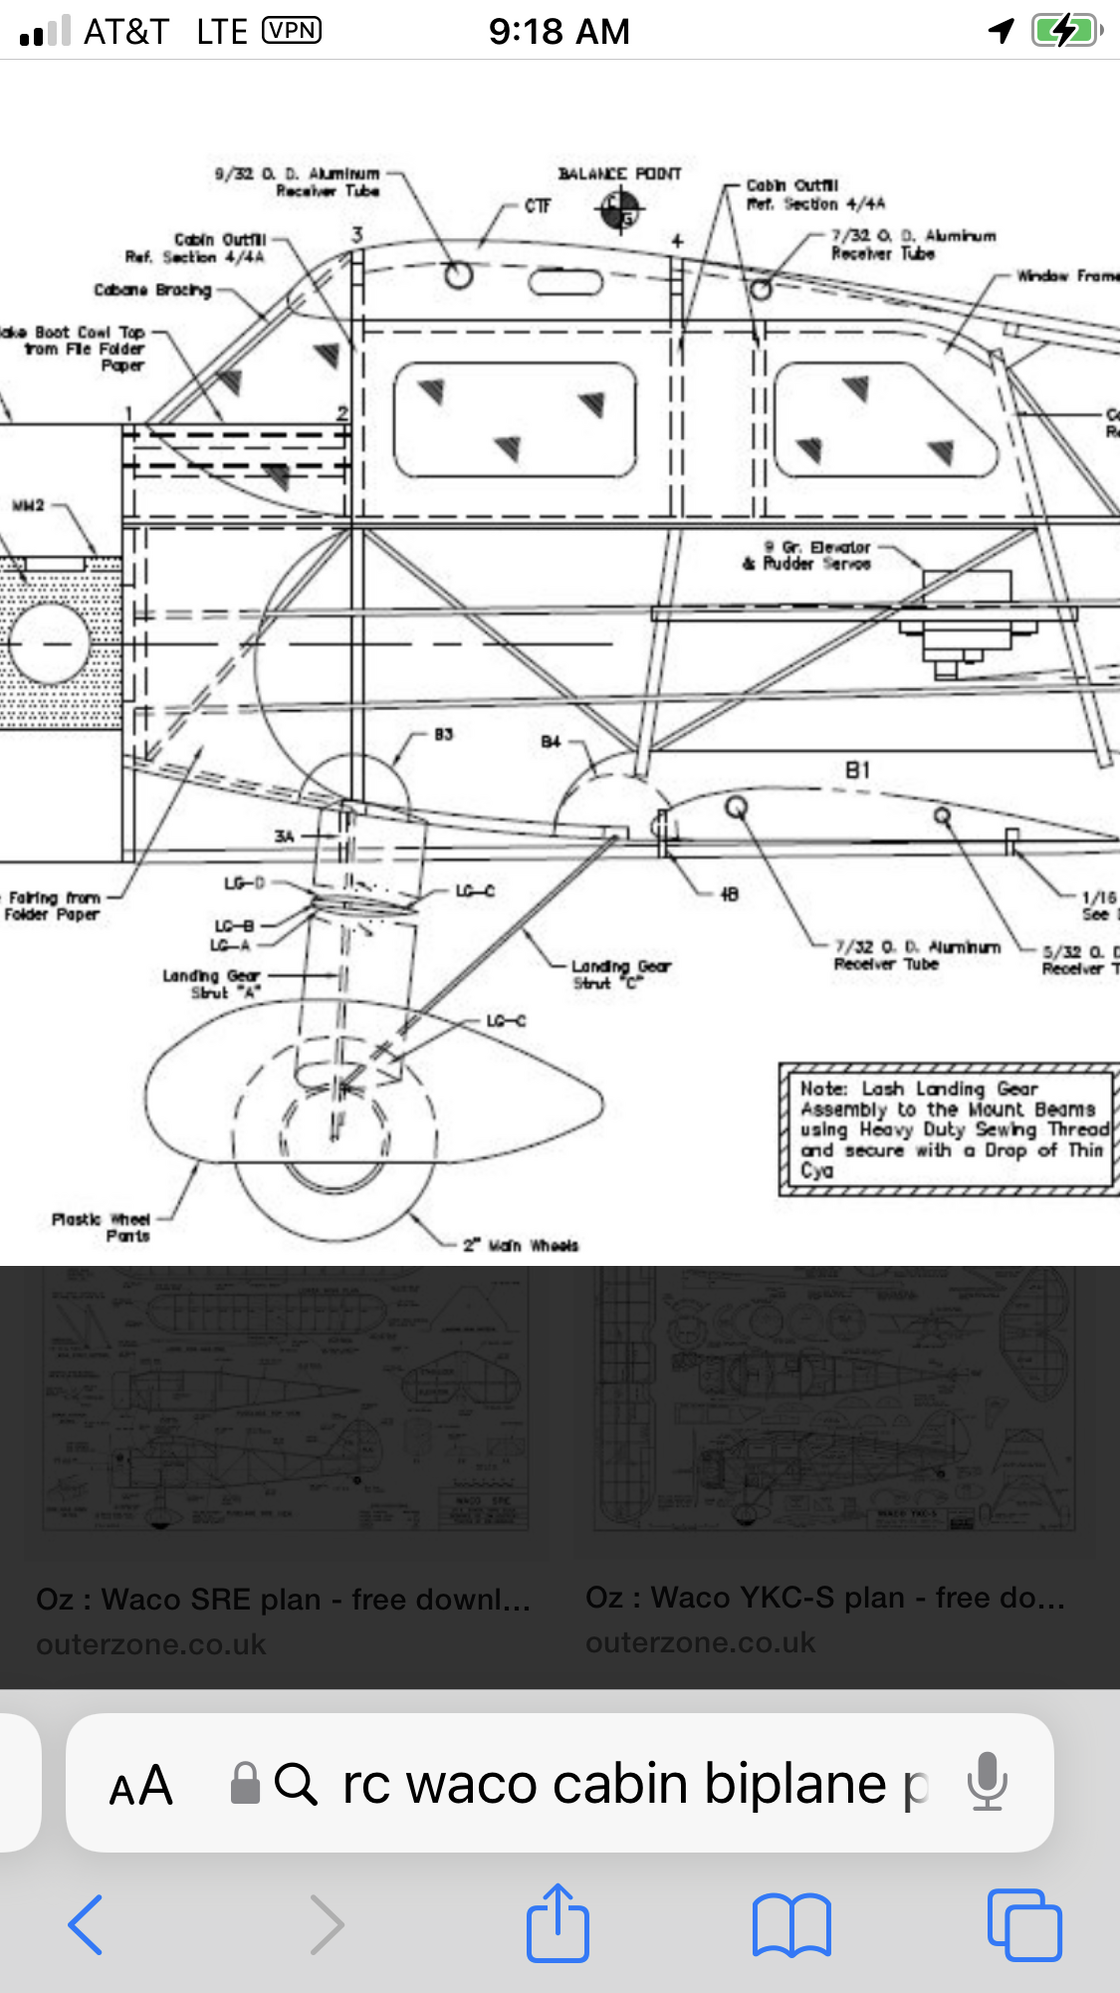
Joe,
I just figured out that I think you are talking about the Staggerwing Beechcraft Bipe.
Here are plans.
https://outerzone.co.uk/download_fil...-67_oz4574.pdf
The CG is still close to the LE of the aft wing.
I just figured out that I think you are talking about the Staggerwing Beechcraft Bipe.
Here are plans.
https://outerzone.co.uk/download_fil...-67_oz4574.pdf
The CG is still close to the LE of the aft wing.
04-16-2022 | 05:22 AM
#22
Hey Joe,
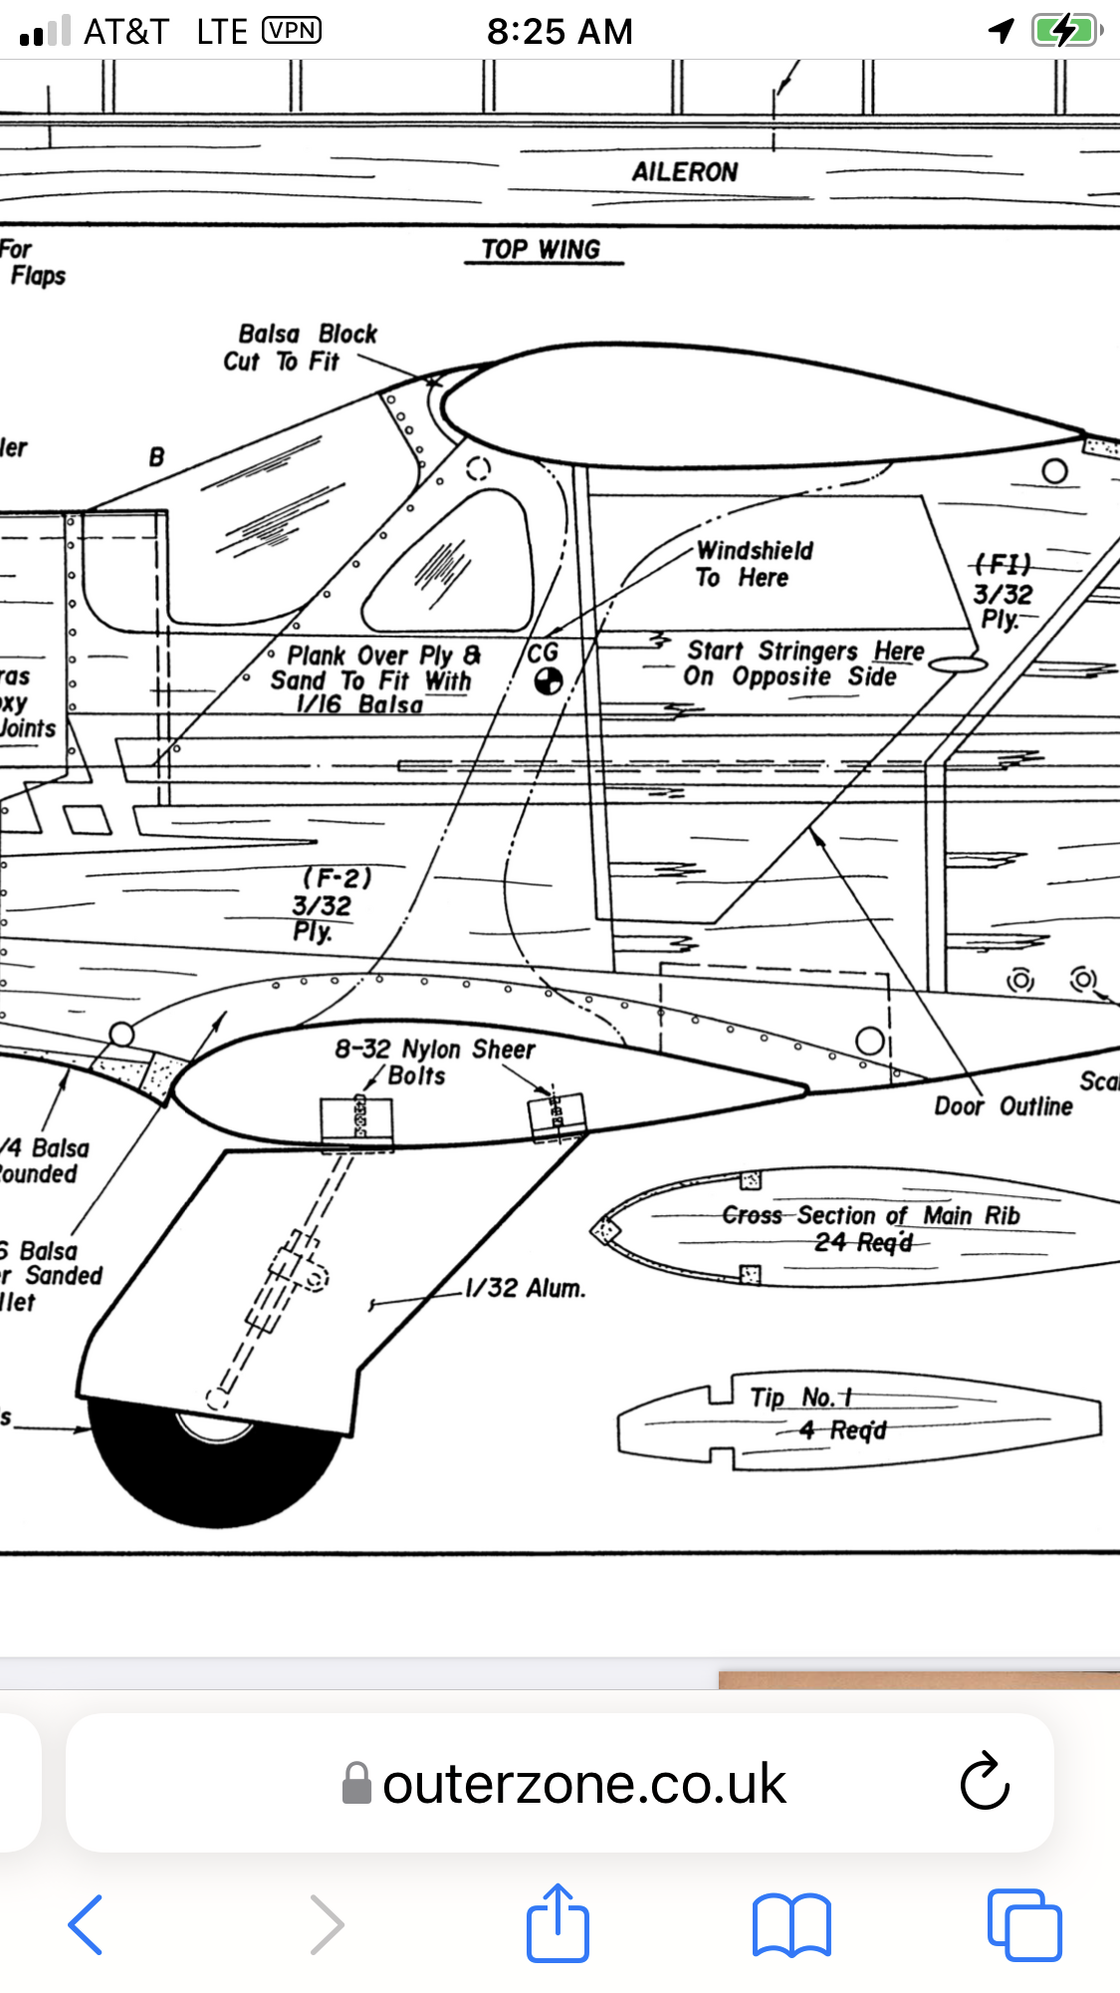
I wasn't awake when I read your problem. Here is the CG for cabin class Waco bipe.
Again, the CG is close to the LE of the bottom wing. A little further forward, probably because of the smaller lower wing.
I wasn't awake when I read your problem. Here is the CG for cabin class Waco bipe.
Again, the CG is close to the LE of the bottom wing. A little further forward, probably because of the smaller lower wing.


