


Ultra Stick 10cc - Jumping into Twins
 06-28-2019, 10:21 AM
#1


I have been reading this forum for a while, Thank You all for the posts and information.
I had started my Top Flite DC-3 a couple years ago, but it has continually been delayed due to Life.. However, I realized there is sage advice here with starting on a sport plane before I try to fly my scale twin.
Therefore, I'm taking the two Saito FA-40a's I have ready for the future C-53 and putting them onto a sport airplane. Since the Twin Stick is gone from the books, I went looking for another ARF to bash. Thought about the HobbiStar 60 Sport Utility Twin bash and also looked into the Big Stick 60, but you cannot find those any longer.
Then I saw the Ultra Stick Lite bash by ExperimentalAviator and decided to jump on into my own bash.
The 'new' Ultra Stick 10 cc has a little shorter wing than the Big Stick did and it is set up as a taildragger, where I do know that good advice has been offered to start with tricycle gear. However, It had a couple of benefits such as split flaps and a larger rudder already built into the airframe. Since I want to use this as my step into the DC-3 project, I wanted to have the flaps and taildragger as part of the setup, so we're giving this a try.
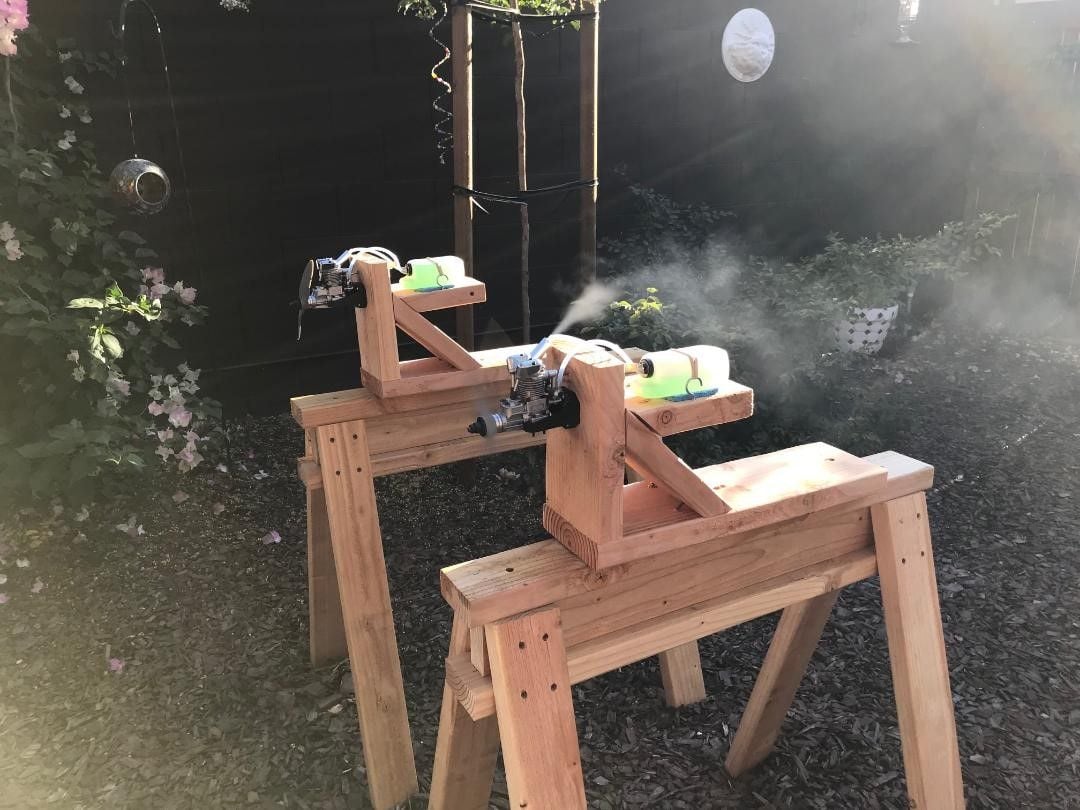
I broke the Saito engines in on test stands the last couple of weeks. I did get the chance to run them side-by-side and boy do they sound sweet together. I'm using 11X5 props on them and they each peaked around 10K RPM. I'm planning that my operating max will be right around 9,500 rpm.
Then I went ahead and made the final commitment to bashing the ARF - I measured and marked the wing for the cutouts.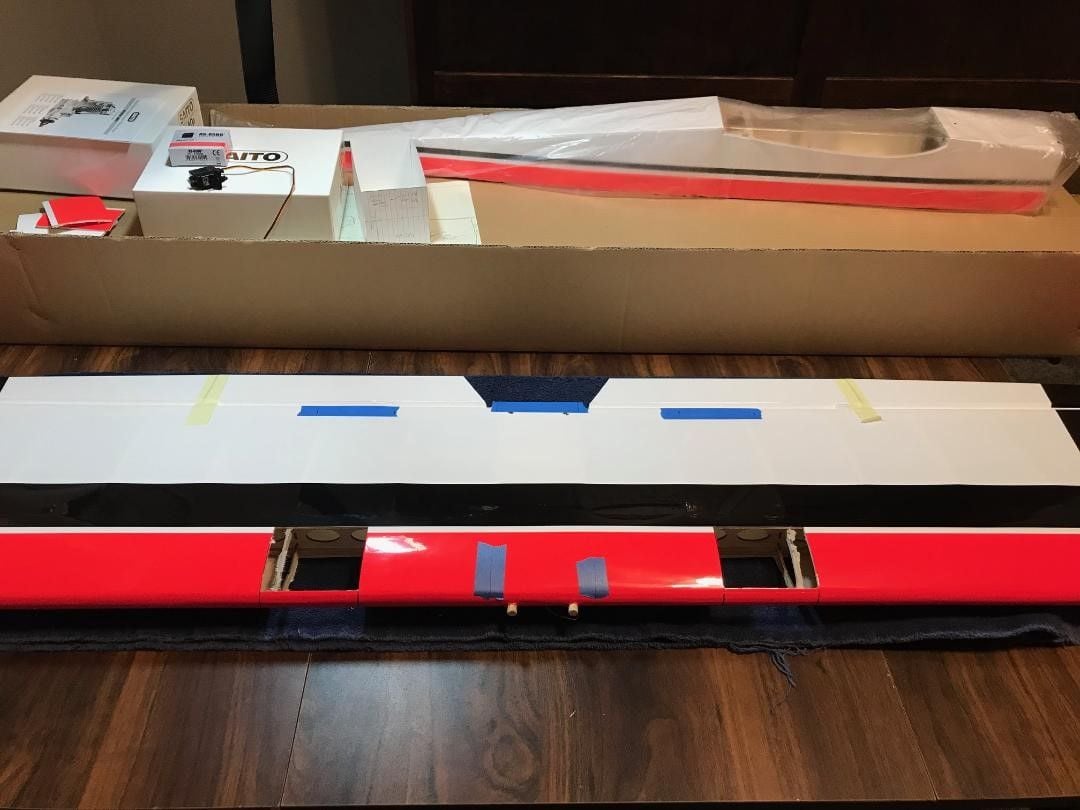
Marked up and sheeting removed.
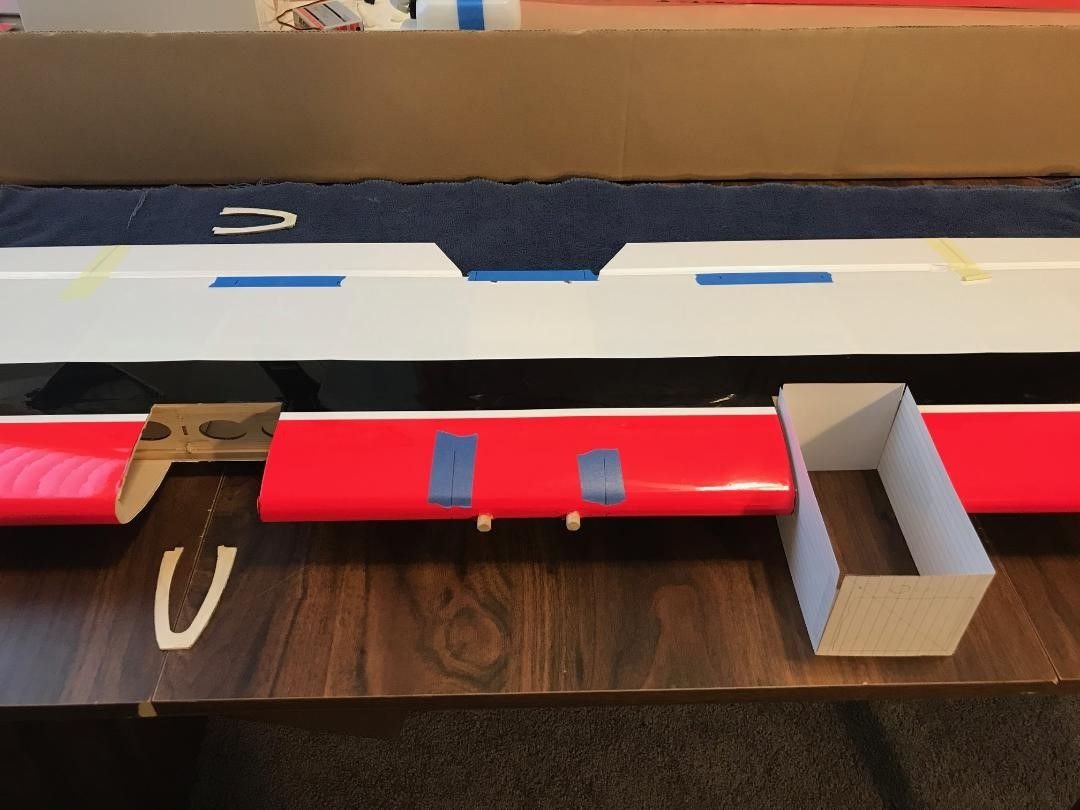
Cutouts complete, Rib tip salvaged and the paper box for planning.
I decided not to go between two ribs because that was going to push the nacelles too far out on the wing for my comfort. The second photo shows the rib tip I saved. I'll install that tip back into the final cutout and just have to make one more rib tip out of balsa for the other side; just to provide some support for the sheeting and a little more 'grab' for the nacelles.
The paper box was based on my firewall size and the length adjusted to fit the fuel tanks. They are a little longer and place the engines a little farther forward then I wanted, but I decided that keeping the spars in tact and mounting everything forward just fit better than trying to hang the nacelle under the wing (which I also drew out).
Hope to have a few more things completed this weekend.
Blue Skies.
I had started my Top Flite DC-3 a couple years ago, but it has continually been delayed due to Life.. However, I realized there is sage advice here with starting on a sport plane before I try to fly my scale twin.
Therefore, I'm taking the two Saito FA-40a's I have ready for the future C-53 and putting them onto a sport airplane. Since the Twin Stick is gone from the books, I went looking for another ARF to bash. Thought about the HobbiStar 60 Sport Utility Twin bash and also looked into the Big Stick 60, but you cannot find those any longer.
Then I saw the Ultra Stick Lite bash by ExperimentalAviator and decided to jump on into my own bash.
The 'new' Ultra Stick 10 cc has a little shorter wing than the Big Stick did and it is set up as a taildragger, where I do know that good advice has been offered to start with tricycle gear. However, It had a couple of benefits such as split flaps and a larger rudder already built into the airframe. Since I want to use this as my step into the DC-3 project, I wanted to have the flaps and taildragger as part of the setup, so we're giving this a try.
I broke the Saito engines in on test stands the last couple of weeks. I did get the chance to run them side-by-side and boy do they sound sweet together. I'm using 11X5 props on them and they each peaked around 10K RPM. I'm planning that my operating max will be right around 9,500 rpm.
Then I went ahead and made the final commitment to bashing the ARF - I measured and marked the wing for the cutouts.
Marked up and sheeting removed.
Cutouts complete, Rib tip salvaged and the paper box for planning.
I decided not to go between two ribs because that was going to push the nacelles too far out on the wing for my comfort. The second photo shows the rib tip I saved. I'll install that tip back into the final cutout and just have to make one more rib tip out of balsa for the other side; just to provide some support for the sheeting and a little more 'grab' for the nacelles.
The paper box was based on my firewall size and the length adjusted to fit the fuel tanks. They are a little longer and place the engines a little farther forward then I wanted, but I decided that keeping the spars in tact and mounting everything forward just fit better than trying to hang the nacelle under the wing (which I also drew out).
Hope to have a few more things completed this weekend.
Blue Skies.
 07-01-2019, 09:17 AM
#2
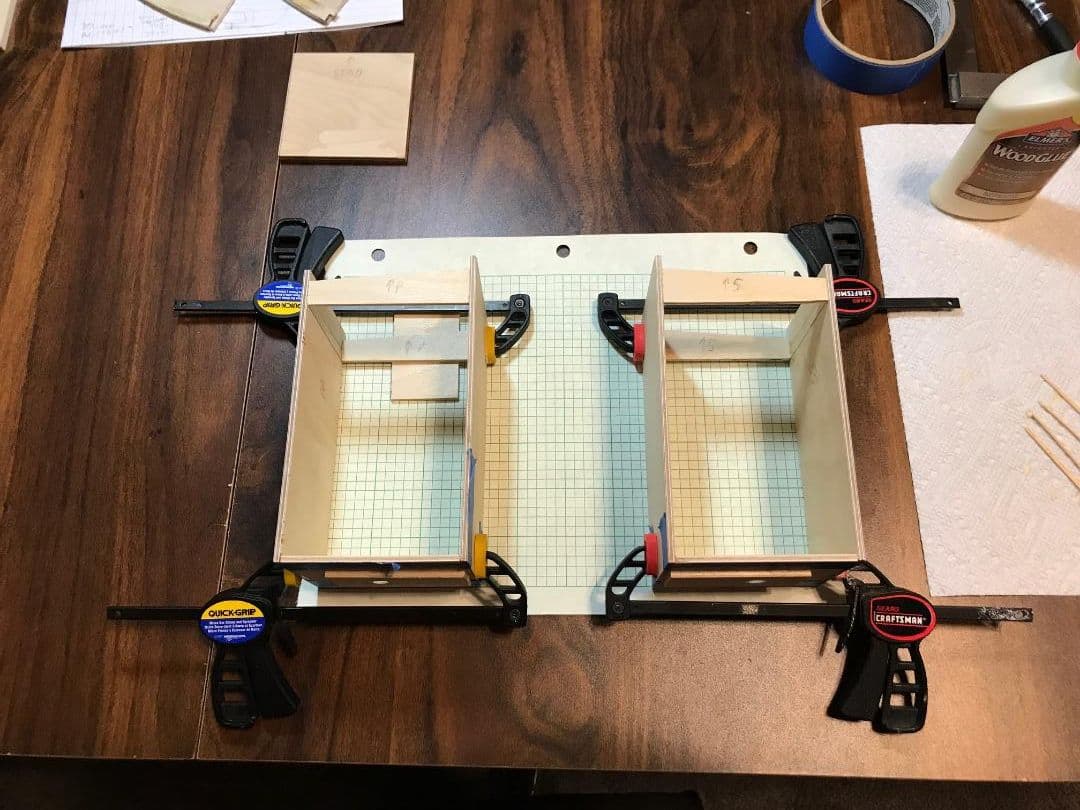
I just got a little more done through the weekend.. I cut the nacelle parts. I have a little MiniCraft table saw, but it's a under-powered for cutting a lot of plywood.
So, I picked up a blade for my DIY tile saw.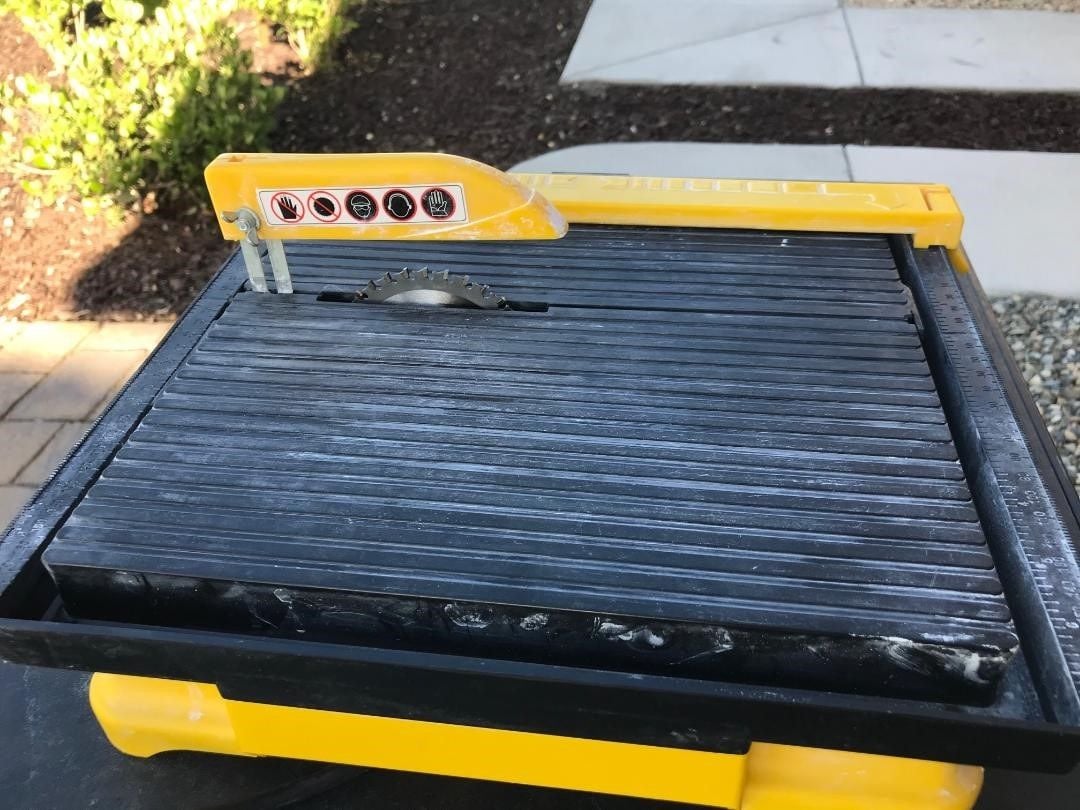
It is only a 32-tooth blade and it did leave a little chipping along the hard plywood edge and a little fraying left with the lite ply. But very minor imperfections and it did a good job.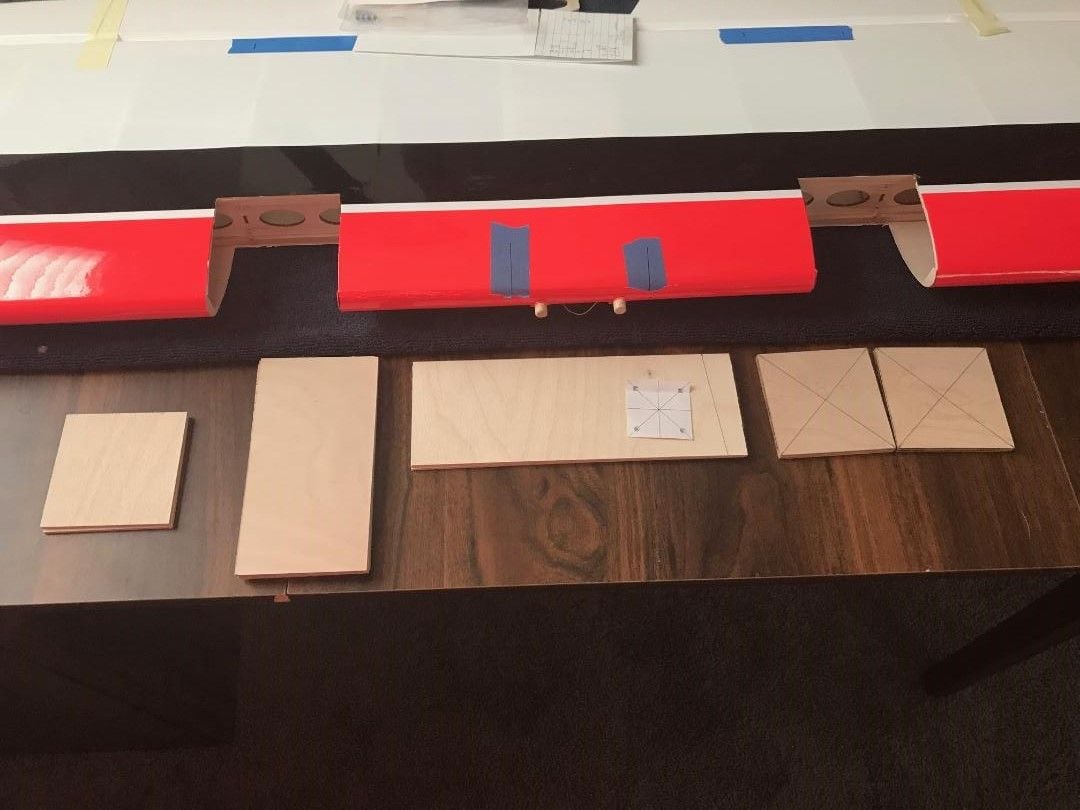
The parts are cut. I probably will drill some lightening holes into the plywood before assembly. Just holding 40's on the plane should not need all of the extra bulk.
 07-12-2019, 07:15 PM
#5
Just a bit more done this evening.. It seems like all of the other tasks in life keep slowing me down..
I put a plywood doubler on the back plate of the nacelle box that fits between the stringers and will glue to the shear web between the spar. I wanted to 'tie' everything together to transfer load into the wing.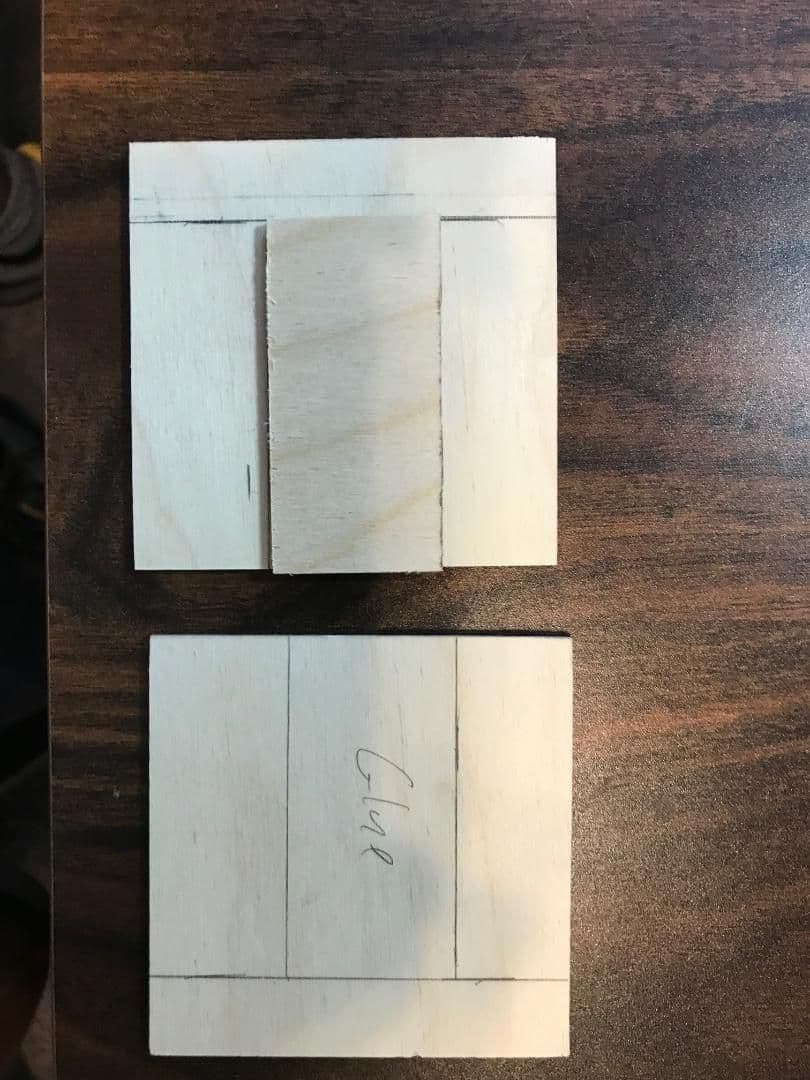
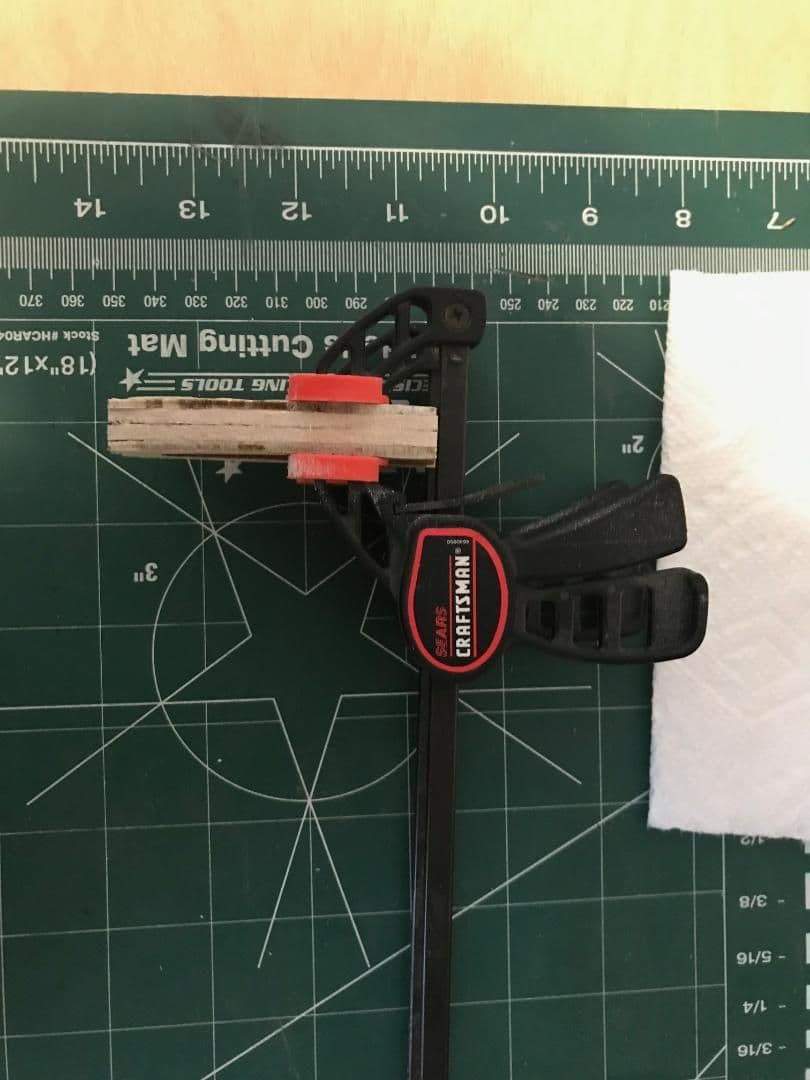
I cut and sanded a couple of balsa tip ribs. These will go in the sides opposite the plywood tips I salvaged. This should give me a little extra gluing surface for the nacelle sides and keep the leading edge sheeting solid.
On to gluing the nacelles next.
I put a plywood doubler on the back plate of the nacelle box that fits between the stringers and will glue to the shear web between the spar. I wanted to 'tie' everything together to transfer load into the wing.
I cut and sanded a couple of balsa tip ribs. These will go in the sides opposite the plywood tips I salvaged. This should give me a little extra gluing surface for the nacelle sides and keep the leading edge sheeting solid.
On to gluing the nacelles next.
Last edited by TEBerg; 07-12-2019 at 07:19 PM.
07-15-2019, 05:19 PM
#6
I cut a cardboard firewall, marked and mounted one of the Saito 40s for accurately locating the throttle, fuel and pressure lines.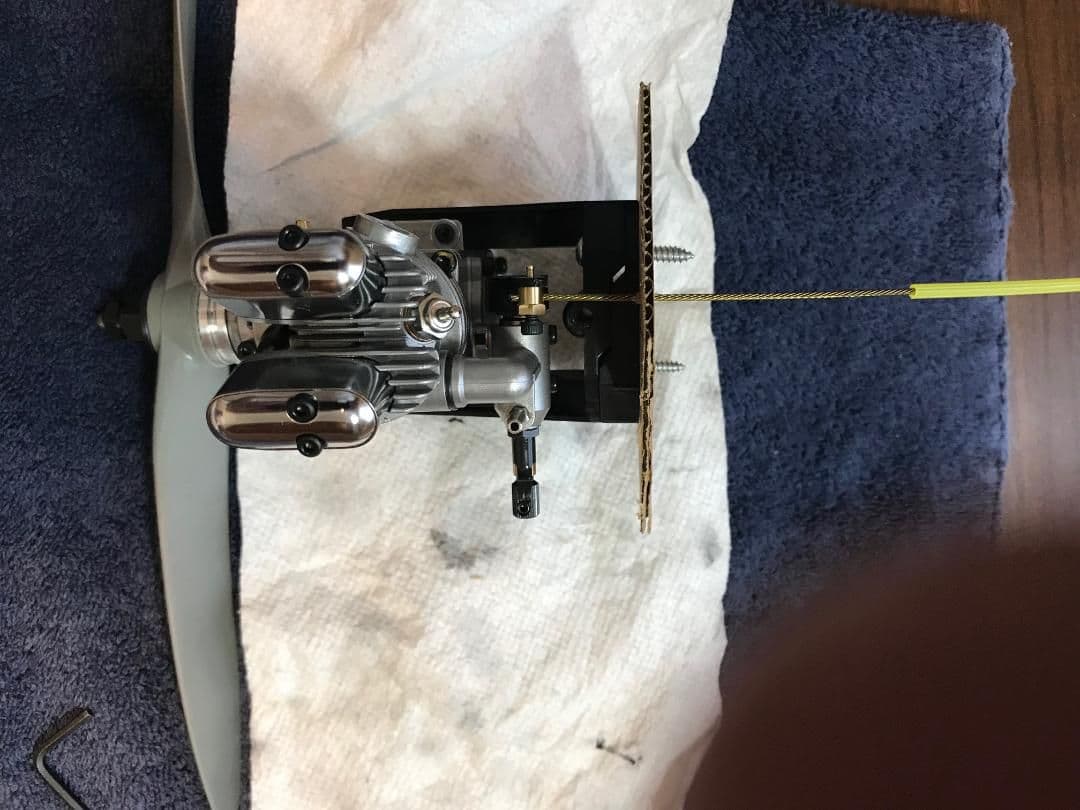
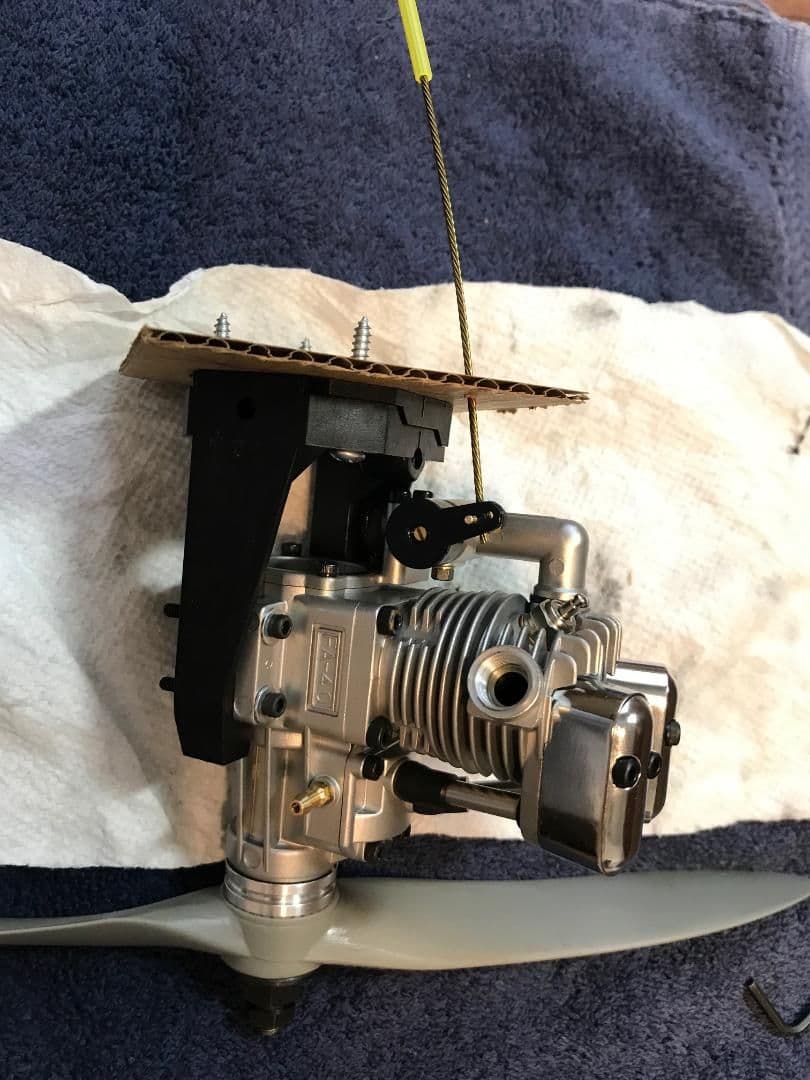
After it looked good, I transferred to the firewall and drilled the holes.
Then I assembled the boxes and mounted the firewalls.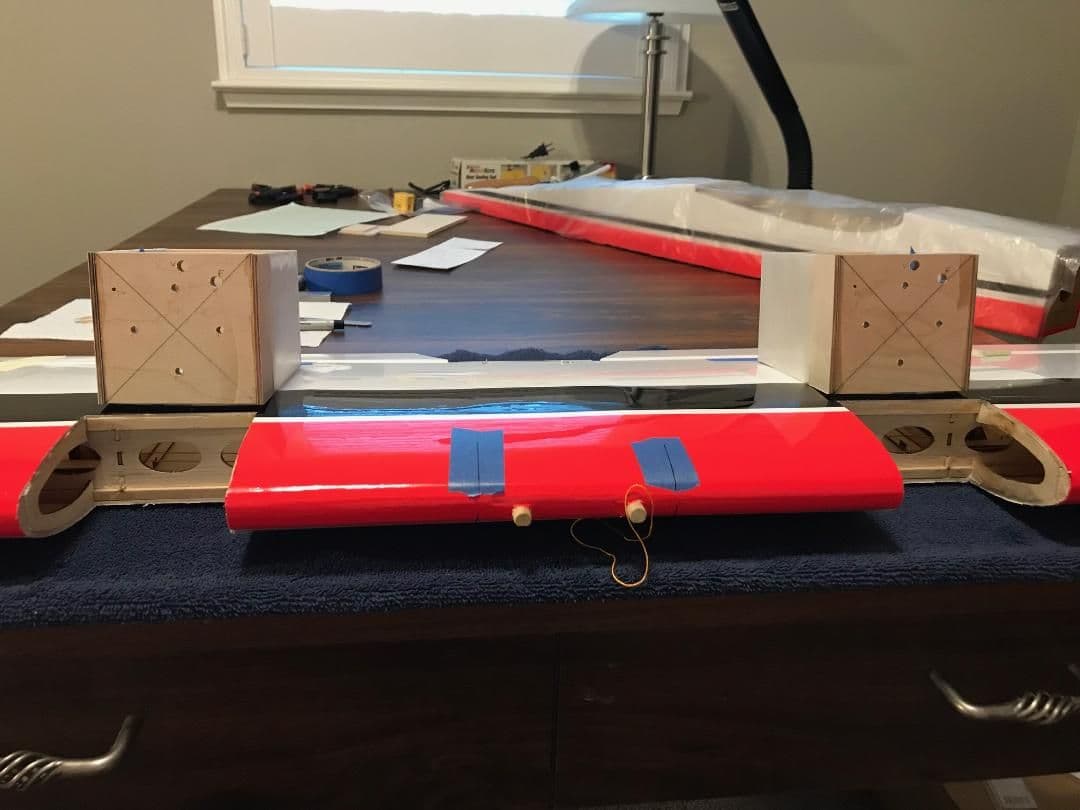
After it looked good, I transferred to the firewall and drilled the holes.
Then I assembled the boxes and mounted the firewalls.
 07-18-2019, 08:48 AM
#8
I made the nose cone last night. It is built up out of 1/8 balsa.
It's not going to be glamorous, just trying to make the fuselage pointy.
I had UltraCote left over from a previous project, which is the Ultra Stick factory covering.
It's not going to be glamorous, just trying to make the fuselage pointy.
I had UltraCote left over from a previous project, which is the Ultra Stick factory covering.
Last edited by TEBerg; 07-18-2019 at 01:56 PM.
07-21-2019, 05:52 PM
#10
Ok.. I about have a Twin Ultra Stick 10cc.
I spent the morning setting up the throttle servos and flex pushrods. They seem to be working nice and smooth with little play..
Then, glued the Nacelles onto the wing.. Kinda a trick to 'clamp' things, so I just set up the fuselage as a jig and fit the nacelle boxes back into their spots..
I spent the morning setting up the throttle servos and flex pushrods. They seem to be working nice and smooth with little play..
Then, glued the Nacelles onto the wing.. Kinda a trick to 'clamp' things, so I just set up the fuselage as a jig and fit the nacelle boxes back into their spots..
Last edited by TEBerg; 07-21-2019 at 07:17 PM.
07-24-2019, 08:34 AM
#11
Last items on my Ultra Stick Twin modification.
I glued 1/2-inch triangle stock fairings behind the nacelles. I glued them in with canopy glue just to clean up the look a little and make the modification less LEGO like.
Next I'm going back to the ARF manual and completing the airplane per their guide.
The setup will be a "sport" plane/throws. I'm also going to include the gyro for rudder. This is going to be my trainer for the Top Flite DC-3 project, therefore I want to test out as many options (gyro, flaps, tail dragger, etc.) as possible.
08-05-2019, 10:12 AM
#13
Finished up getting the Tail Feathers on the project. First photo is probably what the Twin Ultra Stick would look like taking an ARF out of the box...
Then, I went back to the wing and installed the engines, fuel tanks, and set up the throttles.
The throw came up matched for both servos to the carbs; adjusted the travel down to 90 percent on full and 98 percent on idle/cut. Both servos stopped 'buzzing' at the same travel adjustments, so I hope that will leave me with well matched throttle curves.
I did a preliminary balance with the engines on the plane. I was guessing that it would take two servos in the tail to balance the twin engines. However, I need to place the battery all the way to the very front of the fuselage to balance two servos in the back (fourth photo).
So, I installed the elevator servo and did another balance check with the rudder servo mounted under the wing. The extra weight of the 3mm elevator pushrod and clevises seems to add enough that both servos in the tail may be too much.
It looks like keeping the rudder servo under the wing will give me some extra flexibility moving electronics around up front..
I also ended up mounting the mufflers with an angle down. With the engines at 45%, I could not get the mufflers to aim up and over the wing to keep the exhaust clear of the servos.. I'll have to wait and see how much mess it makes.
Last edited by TEBerg; 08-05-2019 at 10:22 AM.
 08-06-2019, 01:32 PM
#15
Thanks Scott.. I think I'm looking forward to flying it [laugh]..
Couple more little fiddly things to work around getting the electronics in. Like the rudder servo wire up against the former; which isn't a big deal, but one more thing to clear out with the Dremel tool.
With luck I may be trying a test flight this weekend..
Couple more little fiddly things to work around getting the electronics in. Like the rudder servo wire up against the former; which isn't a big deal, but one more thing to clear out with the Dremel tool.
With luck I may be trying a test flight this weekend..
08-08-2019, 07:21 AM
#16
Spent some time getting a couple of decorations on the plane.
I thought about leaving it 'clean' but decided I liked putting the name on it, it helps me remember [laugh]. I also wanted to get it done before final balance.
Besides the factory stickers, I cut my own stencil to help complete the Bash. The stencil is out of some MonoKote I had on hand from a previous project (Goldberg Super Chipmunk) and I used the Windex technique to cut and place it on the plane.
The last photo is a little bit of History. It is blurry and small, but the photo is showing my old Little Stik and the Goldberg Super Chipmunk. The Little Stick was the second one I built; the first one was disassembled during a Lesson in Aerodynamics - Tip Stall Spin [bummer]. These two planes are gone now, but I loved the Stik and the Chipmunk (which I built with retracts), they were super fun planes to fly.
With luck the Twin Ultra Stick will be as fun...
08-12-2019, 08:26 AM
#17
I got her out to the field and made three flights yesterday (Sunday, August 11, 2019). I must say she flies different than any other plane I have..
The photos below include a quick catch up on the final location of the electronics for balance at the recommended 4-1/2 inches. The switch was not mounted yet, because I put her on the balance/CG machine one more time before I drilled the hole through the fuselage.
I spent the rest if the evening outside with the twin on a run-up table working on checking the high-speed needles and setting the low-speed needles. I got everything close, but was having some bubbles show up in the right engine. So I called it a day and replaced the internal fuel pickup line in that tank.
The next morning I spent about two hours setting up the throttle curves to match. Idle at 2,500, mid-stick at 6,000 and full about 9,500-9,700. I also went through the curve and matched the remaining points/rpm (7-point curves) through the stick movement.
The maiden flight went pretty well.. I had someone there to help hold the plane for startup, checking the throttle setting/rpm and to check the engines holding the plane straight up. No lean run aiming straight up, but I did end up seeing some bubbles in that orientation.. I think there is possibly some vibration or cavitation going on at the max throttle. I don't see any bubbles before full throttle. And, I don't see bubbles when the plane is level at full throttle (most of the time).. I'll keep looking at that.
taking off she did not track straight by any means.. I definitely had to keep working the rudder both directions to keep the plane going close to the center of the runway.. Ok, I was actually using more like 2/3 of the runway width for my take off runs [laugh].. In flight only took a couple clicks of aileron to keep the wings level.. However it did take several clicks of up elevator..
She is NOT overpowered by any means [laugh].. She will fly, but it is going to be a very "scale" flying plane.. Most of the flight is at 3/4 throttle and she will loop from level at full throttle.. Definitely a little heavy; the loop looks more like a 'Figure 9'...
Back on the ground I adjusted the control linkages to re-center the servos. The elevator sits up about 3/16-inch to provide level flight. However, inverted it just needs a little down elevator to fly level.. Not too bad for a 'scale' flying airplane..
After the three flights; I'm pretty happy with how the plane is flying. It was meant to teach me how to fly the future DC-3 (C-53) project; and it should do that well.
The last couple of photos are at the flying site After the first flight was done - Proof of Life [laugh]..
10-16-2019, 01:24 PM
#20
I've been flying the Twin Stick for a while.. Still want to add a gyro onto the rudder just to figure out how it will work on the DC-3 project.
I can't say this is my "favorite" flying plane. It definitely takes a different touch.
Into a turn and she starts to drop the nose very fast, you must be ready on the elevator right away.
The plane seems very 'pitchy' in flight. I'm slightly nose heavy and have just a little up elevator to keep it flying level at 3/4 throttle. However, it just feels sensitive on the elevator.
I was originally planning to hang the engines under the wing with the nacelles, but went with the direct mount instead.
I wonder if moving the engine thrust line up to the center of the wing has changed the aerodynamics across the horizontal stab and elevator. For example; the Sweet-N-Low Stik moves the horizontal stab to on top of the fuselage when the wing is on the bottom (compared to the regular Sweet Stik). Therefore, I'm wondering if I'm getting bad air from the wing and the lower position of the stab is not optimal.
I'm not planning to modify this plane just for the feel. I'll keep flying her until the DC-3 is ready for the engines.
But, if someone wants to try this in the future - you may want to hang the engines back down to the original thrust line.
Any Way - We were at the Lemoore NAS Airshow last month.
I stopped and got a picture with her "Big Sister" [laugh]..
