


New Seagull A6M Zero
 11-17-2013, 05:20 PM
#26

Join Date: Sep 2002
Location: Missoula,
MT
Posts: 307
Likes: 0
Received 0 Likes
on
0 Posts
Hey Handyman
If you don't care much about how "SCALE" it is, it is a great flying model. The finish is Gloss olive drab. the cowling is way too long, the gear are too short, and it has an open frame work wing. Do not use the stock gear, they break on the first landing. But, if you fly it by about two hundred feet high an squint your eyes, it does kinda look like a Zero. It is a great sport model, but it will never win Top Gun.
Ron
 11-17-2013, 05:44 PM
#27
My Feedback: (54)
Join Date: May 2008
Location: East Hartford,
CT
Posts: 445
Likes: 0
Received 0 Likes
on
0 Posts
Hey Black Drape
I went ahead and ordered it. I can use flat clear to dull the gloss, that was on the must do list anyway. Glossy just doesn't look right on a warbird. As for it looking scale I use the 50/50 rule. From 50 feet away at 50 mph it resembles a Zero. I'd rather have a nice flying model than one that you have to struggle to keep it flying. The retracts will be replaced with e-flite electrics, no linkage just plug and play. Can I ask what engine you used? I'm thinking of a DLE 20 for power, that should add a little weight to the nose(if the structure can handle it). I'll have to see how it would fit in the cowl. I do have a Saito 120 FS if the DLE doesn't fit, but I don't like the muffler hanging out of the cowl, have to see what I can come up with.
Paul
I went ahead and ordered it. I can use flat clear to dull the gloss, that was on the must do list anyway. Glossy just doesn't look right on a warbird. As for it looking scale I use the 50/50 rule. From 50 feet away at 50 mph it resembles a Zero. I'd rather have a nice flying model than one that you have to struggle to keep it flying. The retracts will be replaced with e-flite electrics, no linkage just plug and play.
Can I ask what engine you used? I'm thinking of a DLE 20 for power, that should add a little weight to the nose(if the structure can handle it). I'll have to see how it would fit in the cowl. I do have a Saito 120 FS if the DLE doesn't fit, but I don't like the muffler hanging out of the cowl, have to see what I can come up with.Paul
11-17-2013, 09:29 PM
#28
Join Date: Sep 2002
Location: Missoula,
MT
Posts: 307
Likes: 0
Received 0 Likes
on
0 Posts
Hey Handyman
I have an OS 120 FS in mine. I think I had to add some nose weight, would look but it is hanging in the garage now and I can't get to it. E Flites should be nice, I just ordered a set for an ESM P38. I got it new in box at an estate sale. Everything was there except the retracts, but for a hundred bucks, I'm not complaining. From what I've read the factory ones were junk anyway. Wait until you see the way Sea Gull wanted you to mount the retract servos, what a circus. I did it, bought the extra servo, and the gear broke on the first flight. Of course the broken gear collapsed and that smashed the drop tank. It is paper thin. I glued it back together and put a layer of glass cloth over it, looks pretty good now.
Ron
05-06-2015, 05:08 PM
#29

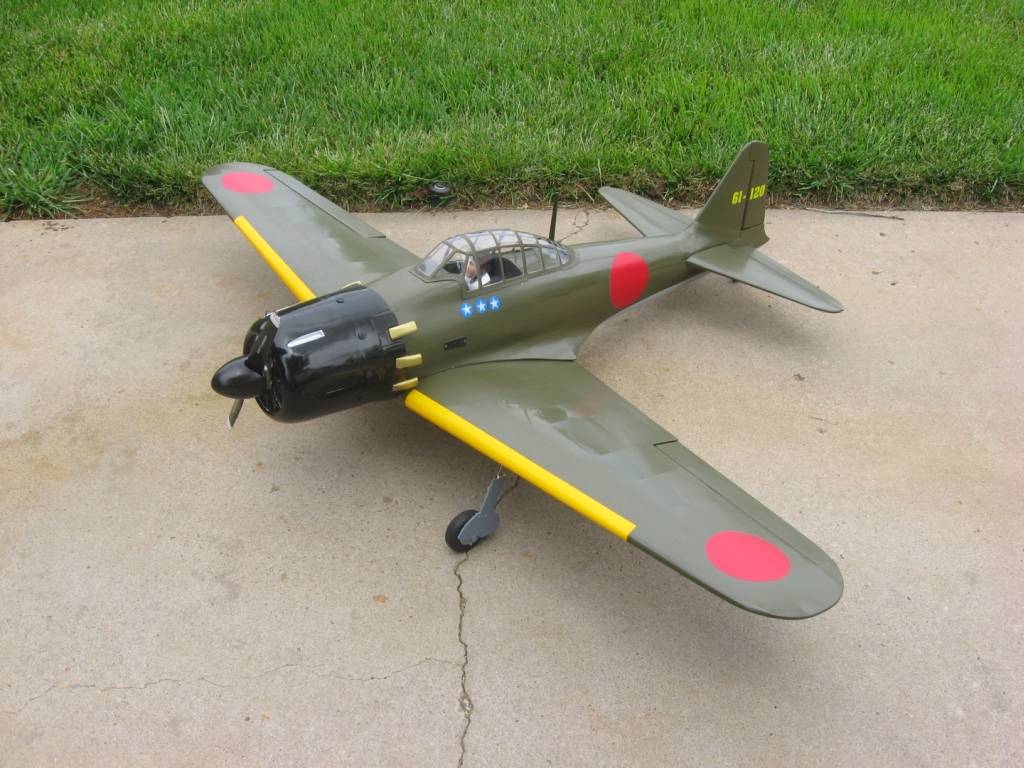
My Seagull Zero is ready for the maiden flight. Just need the weather to cooperate.
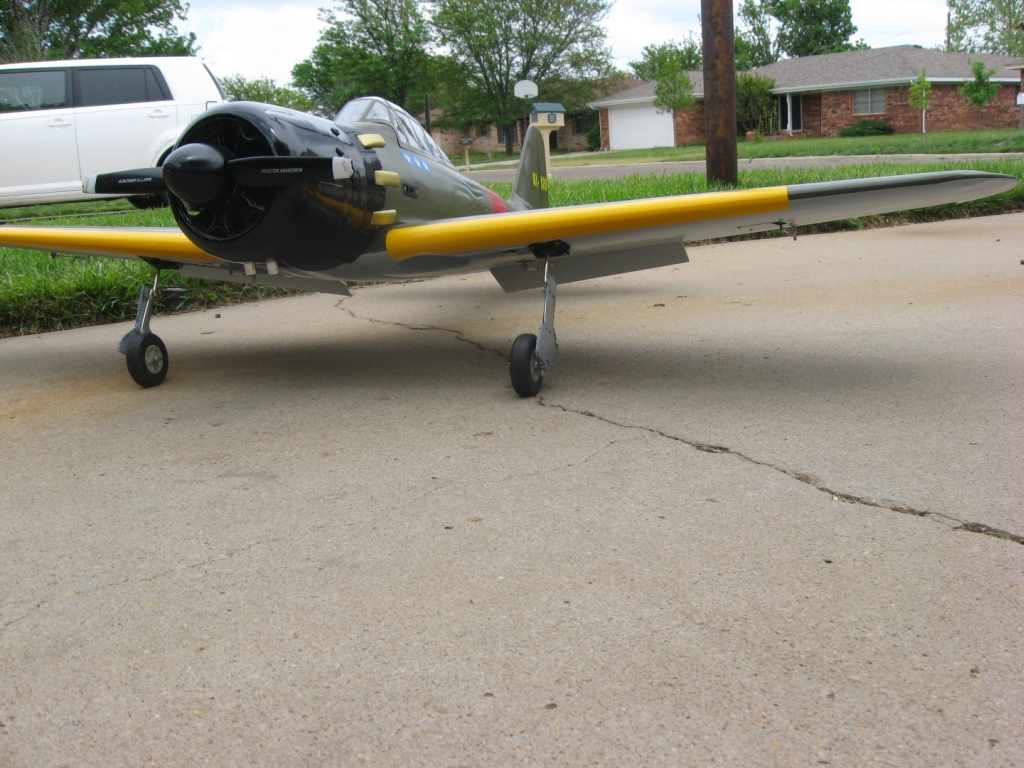
The engine is an OS 108 FSR. The plane weighs about 10.5 lbs. This includes about 6 oz of lead in the front of the cowl and another 5 oz over the motor box.
I felt this ARF needed some extra work and took about 40% more time to assemble than other warbirds of a similar size I have done in the last year or two. If it flies as nicely as reported it will more than make up for extra work.
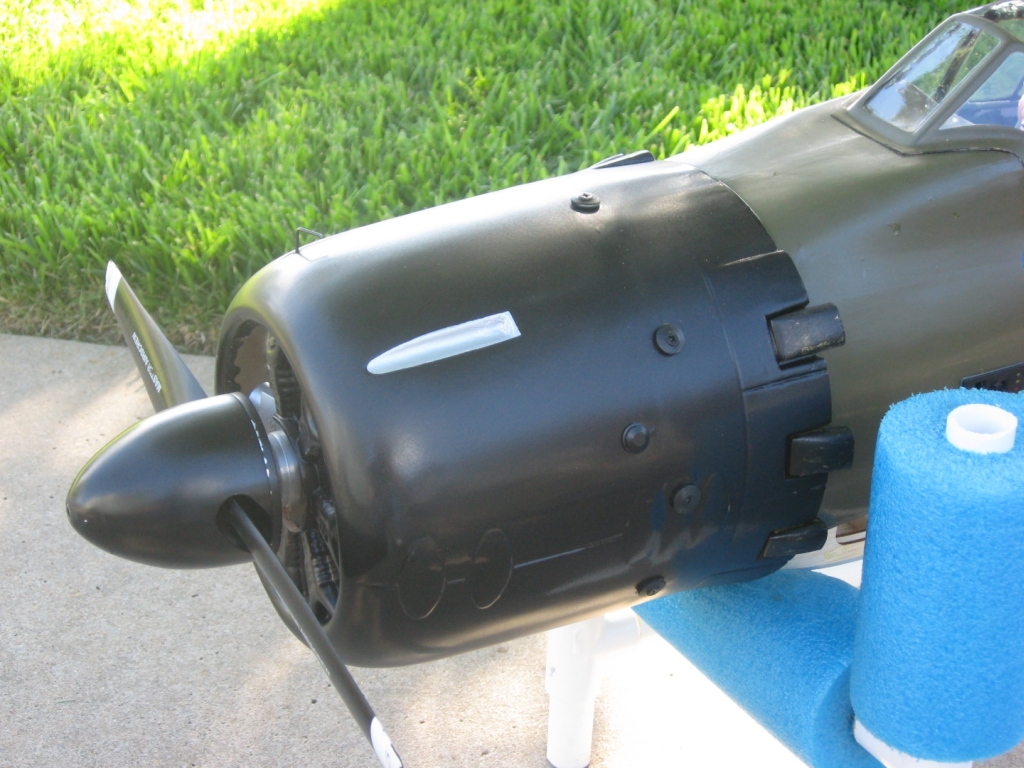
After glueing the exhaust ports on the fuse I decided they were too big and bright (garish) as compared to the full scale. I cut off about 5/8" off each exhaust and put a coat of flat black on them. The pictures show the difference.
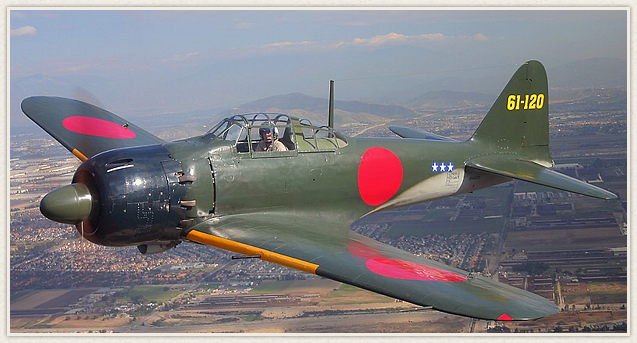
The full scale Zero pictured here is from the Planes of Fame Museum in Chino.
Brian
The engine is an OS 108 FSR. The plane weighs about 10.5 lbs. This includes about 6 oz of lead in the front of the cowl and another 5 oz over the motor box.
I felt this ARF needed some extra work and took about 40% more time to assemble than other warbirds of a similar size I have done in the last year or two. If it flies as nicely as reported it will more than make up for extra work.
After glueing the exhaust ports on the fuse I decided they were too big and bright (garish) as compared to the full scale. I cut off about 5/8" off each exhaust and put a coat of flat black on them. The pictures show the difference.
The full scale Zero pictured here is from the Planes of Fame Museum in Chino.
Brian

 05-07-2015, 03:47 PM
#33
wash with soap and water.
lightly sand with 300 grit
couple of coats of primer - Dupli-Color Filler Primer High Build Formula
couple of light coats of paint - Dupli-Color Acrylic Enamel Premium Automotive Formulation (high gloss)
heavy coat of the same paint, maybe two.
It dries to the touch within a couple of hours, but needs 7 days or so to fully cure.
then a couple of light coats of LustreKote Flat Clear
I have used my starter on it to start the engine. Holding up OK, at least for now.
05-11-2015, 05:50 AM
#34
Maiden my Zero and got in a second flight Sunday afternoon. I like this plane. It handled well as most folks have reported. I do have a problem with it climbing as I increase the throttle. I had enough down trim available to trim it level at half throttle or so. Landing with 10 degree of flaps and faster than necessary with some bounces. That should go away with a little experience on this plane.
This morning I am going to add about 2% downthrust and maybe get in a test flight or two this afternoon. I did not add any shims to the motor mounts during the original assembly, just flat against the firewall.
Looks like the OS 108 is going to be a good engine for this plane.
Brian
This morning I am going to add about 2% downthrust and maybe get in a test flight or two this afternoon. I did not add any shims to the motor mounts during the original assembly, just flat against the firewall.
Looks like the OS 108 is going to be a good engine for this plane.
Brian
05-15-2015, 11:35 AM
#35
My Feedback: (3)
Join Date: Mar 2011
Location: sacramento, CA
Posts: 45
Likes: 0
Received 0 Likes
on
0 Posts
This morning I am going to add about 2% downthrust and maybe get in a test flight or two this afternoon. I did not add any shims to the motor mounts during the original assembly, just flat against the firewall.
Looks like the OS 108 is going to be a good engine for this plane.
Brian[/QUOTE]
Brian,
Thank you for your post and updates on this Zero
I have one up next on my bench going to use a DLE 20 RA question did you use the stock retracts ?
Ken
Looks like the OS 108 is going to be a good engine for this plane.
Brian[/QUOTE]
Brian,
Thank you for your post and updates on this Zero
I have one up next on my bench going to use a DLE 20 RA question did you use the stock retracts ?
Ken
05-16-2015, 06:24 AM
#36
I did not use the stock retracts. I had a set of TF P-47 mechanical retracts (crashed on maiden). A little dremelling on the rails and bent the struts a little to fit. Looks OK with gear doors and seems to work OK. The TF retract trunion and case looked a little stouter than the Zero stock retracts.
Regarding the downthrust. My additional downthrust helped. still need to do some elevator adjusting, but its a reasonable amount now. My measurements seem to show the firewall comes with a 2% downthrust built-in. My addition made the total downthrust almost 4%.
Brian
Regarding the downthrust. My additional downthrust helped. still need to do some elevator adjusting, but its a reasonable amount now. My measurements seem to show the firewall comes with a 2% downthrust built-in. My addition made the total downthrust almost 4%.
Brian
05-16-2015, 07:57 AM
#37
An additional note about retracts. If I was installing retracts again I would seriously consider electrics. This ARF has cutouts and supports for micro retract servos. Personally I don't think they will hold up. I went with Spektrum 7040s, one for each side. It took some serious mods to the stock supports to get them installed. Just barely got them in.
Brian
Brian
11-10-2015, 09:10 AM
#39

My Feedback: (20)
Join Date: Aug 2011
Location: Mesquite, Nevada
Posts: 122
Likes: 0
Received 0 Likes
on
0 Posts
What measurement did you end up with from the extended firewall to motor drive washer 150mm or 138mm?
What to install E-Flite electric retracts. Question, 85 or 90 degree?
What to install E-Flite electric retracts. Question, 85 or 90 degree?
Last edited by dawhale; 11-10-2015 at 09:44 AM. Reason: typo
11-14-2015, 03:15 PM
#41
Dawhale: Sorry, running late on the firewall to drive washer measurement. For my Zero it is about 143 mm. My prop clearance around the cowl is about 9 mm. I think the motor/drive washer could be moved to 139 mm from the firewall. The 150 mm would be way to far forward in my estimation.
Brian
Brian
11-21-2015, 11:42 AM
#42
My Feedback: (20)
Join Date: Aug 2011
Location: Mesquite, Nevada
Posts: 122
Likes: 0
Received 0 Likes
on
0 Posts
Thank you aghost..
Working on the tailwheel / tail assembly today. Does another hole need to be drilled in the tail wheel control horn? It does not look like the clevis will reach/ connect to the horn. The current alignment does not look like its going to work.
I also am having to shim the tail wheel bracket as the rod going to the rudder binds when the attach screw are drawn tight.
Just curious if you all worked around these defects?
11-22-2015, 07:53 AM
#43
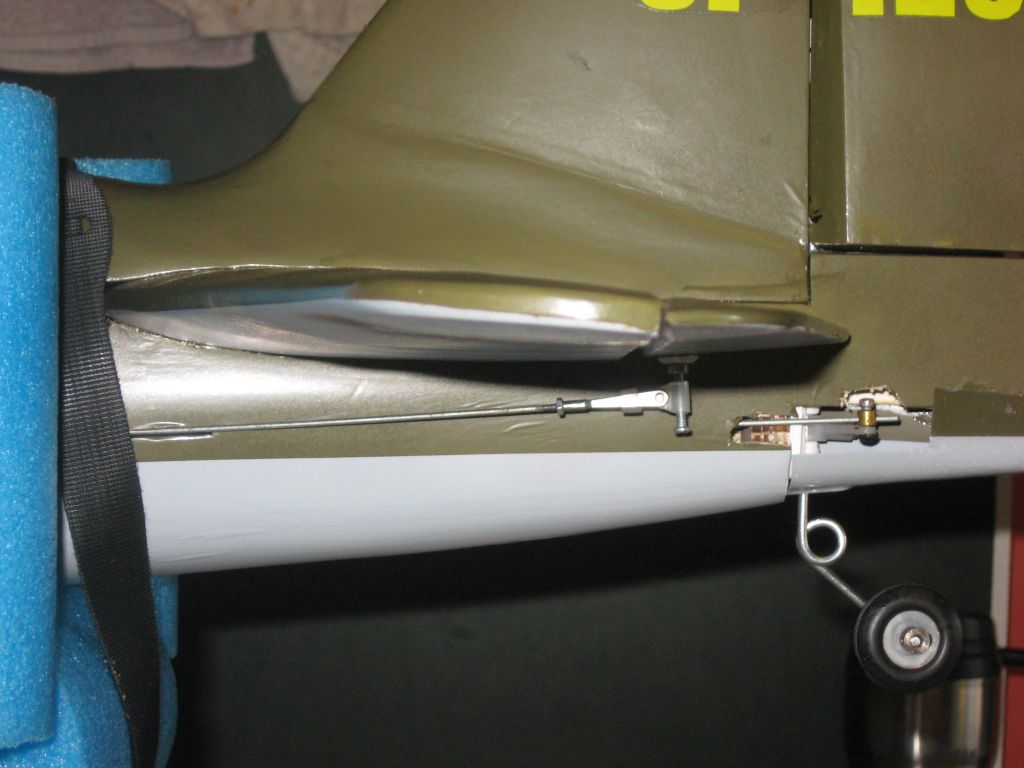
I did have (and still have some) binding problems with the rudder/tailwheel. Not totally happy with my results, but it is working reasonably well. I did not have to shim the tailwheel bracket.
As I remember on left rudder, the clevis hit the tailwheel support or the fuse. On right rudder the pushrod hit the tailwheel support or the fuse.
I put in a new pushrod and ran it through a brass connector on the rudder control horn. The connector is at the end of the control horn to get the pushrod as far away from the tailwheel support as possible. Still had to cut and hack to get clearance. See the pictures.
The left rudder throw is not quite as far as the manual calls for. The right rudder is maybe half. That's the part I am not happy with.
good luck,
Brian
 06-19-2023, 09:40 AM
#45
Join Date: Oct 2014
Posts: 8
Likes: 0
Received 0 Likes
on
0 Posts
Hello Guys,
Can some give me an indication what CG this model has. In the manual it say 95mm but as KaP2011 observed it is way out. I have a standard built with a Saito FA100. To bring balance at 95mm I need to add more than a kilo.
Thanks in advance for your help.
Manvel
Can some give me an indication what CG this model has. In the manual it say 95mm but as KaP2011 observed it is way out. I have a standard built with a Saito FA100. To bring balance at 95mm I need to add more than a kilo.
Thanks in advance for your help.
Manvel
