


Phoenix Models 1/4 scale Lysander
 07-17-2017, 04:44 PM
#51

My Feedback: (2)

Join Date: Mar 2003
Location: Ferndale, MI
Posts: 244
Likes: 0
Received 0 Likes
on
0 Posts
Custom silenced Bisson muffler for DLE 61 installed. Exhaust stacks only require a small cut out in the lower cowling. Removable horizontal tail surfaces are complete. Needs final wing control alignment and balancing before putting some run time on the engine.

 09-04-2017, 10:55 AM
#53
My Feedback: (2)
Join Date: Mar 2003
Location: Ferndale, MI
Posts: 244
Likes: 0
Received 0 Likes
on
0 Posts
Been having a lot of trouble getting the DLE 61 to run right. Lately it just snorts and backfires. I have a timing kit coming, but on just a visual check, the timing seemed rather retarded. Upon removal of the drive hub I found only a bit of powdery substance in the drive hub keyway and no other trace of a Woodruff key. No wonder timing was off! The key is on backorder from Horizon. I managed to find one from Amazon of all places, and have a box of 100 that seem to be close from McMaster-Carr on order. The McMaster order was $8.00 for a box of 100, so if they fit, I'll have a supply to spread around. Hopefully I can get this thing in the air before Winter!
09-07-2017, 04:21 PM
#54
My Feedback: (2)
Join Date: Mar 2003
Location: Ferndale, MI
Posts: 244
Likes: 0
Received 0 Likes
on
0 Posts
The correct Woodruff key for the DLE 61 is available from McMaster-Carr. Item number: 98490A180, Metric Steel Woodruff Key for 16mm Keyway Diameter, 3mm Wide, Pack of 25.
Cost is $8.03 for a pack of 25 plus shipping, compared to $10.00 each and backordered from Horizon.
Cost is $8.03 for a pack of 25 plus shipping, compared to $10.00 each and backordered from Horizon.
03-28-2018, 10:32 AM
#56
Hey Totto, I'm also putting a FG90 in mine. Can you tell me what you did for getting the CG to be reasonable without adding a bunch of weight? Also, where did you get the lighting kit? Thanks, Jerry.
03-29-2018, 03:23 AM
#57
Join Date: Jan 2007
Location: Tvedestrand, NORWAY
Posts: 56
Likes: 0
Received 0 Likes
on
0 Posts
Hello,
CG... i reinforced the CG measurment tool as it was a bit thin woodplate in the bottom area. It ballances out at 1400 gram (1,4kg). I put a box in the back of the cockpit with lead bullets inside. The lights are from unilight.at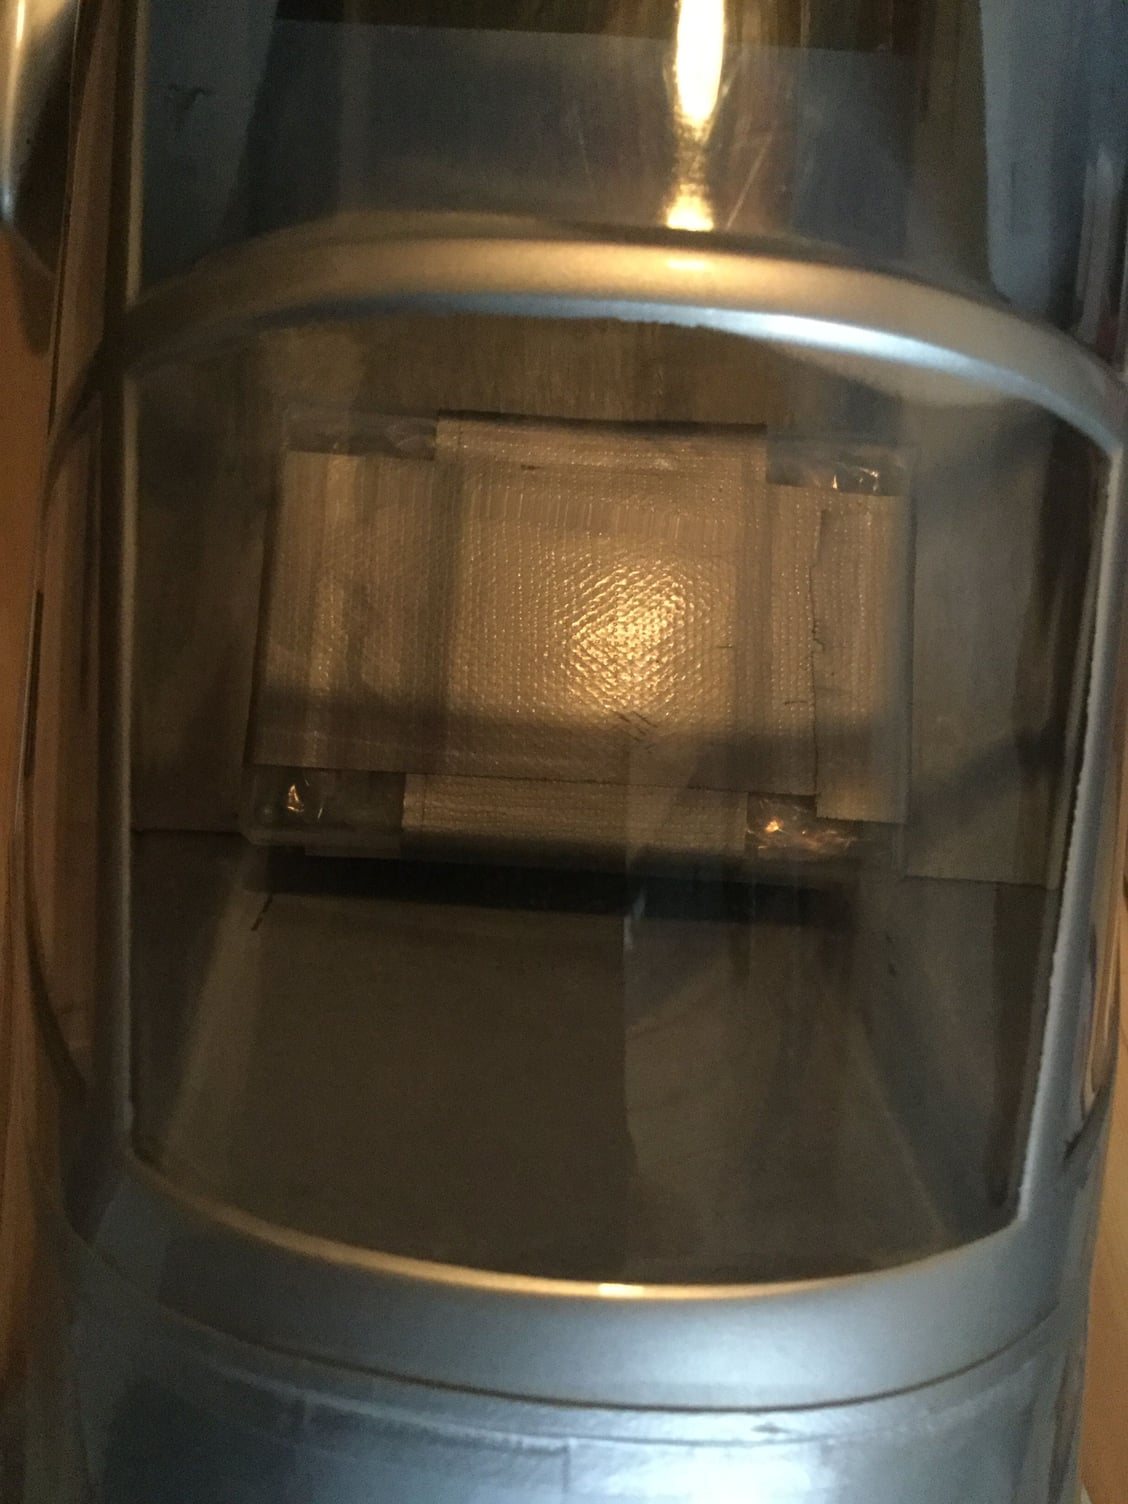
CG... i reinforced the CG measurment tool as it was a bit thin woodplate in the bottom area. It ballances out at 1400 gram (1,4kg). I put a box in the back of the cockpit with lead bullets inside. The lights are from unilight.at
03-29-2018, 06:49 AM
#58
Thankyou for the quick reply. I'm thnking of moving the rudder servo to the tail. Dont' know if there will be room or not. I noticed you have the kelo exhaust on your bird. Did the exhaust fit in the cowl without modifications? Also, mounting the engine to the firewall. Did you have to make any major adjustments to get the motor to mount to it? Thanks, Jerry.
03-29-2018, 10:58 AM
#59
Join Date: Jan 2007
Location: Tvedestrand, NORWAY
Posts: 56
Likes: 0
Received 0 Likes
on
0 Posts
Hello Jerry,
Rudder servo back:
Well...Maybe you are thinking of more weight back, but its a very minor effect with a lot of work. I think its ok the way it is, but that is just my opinion :-)
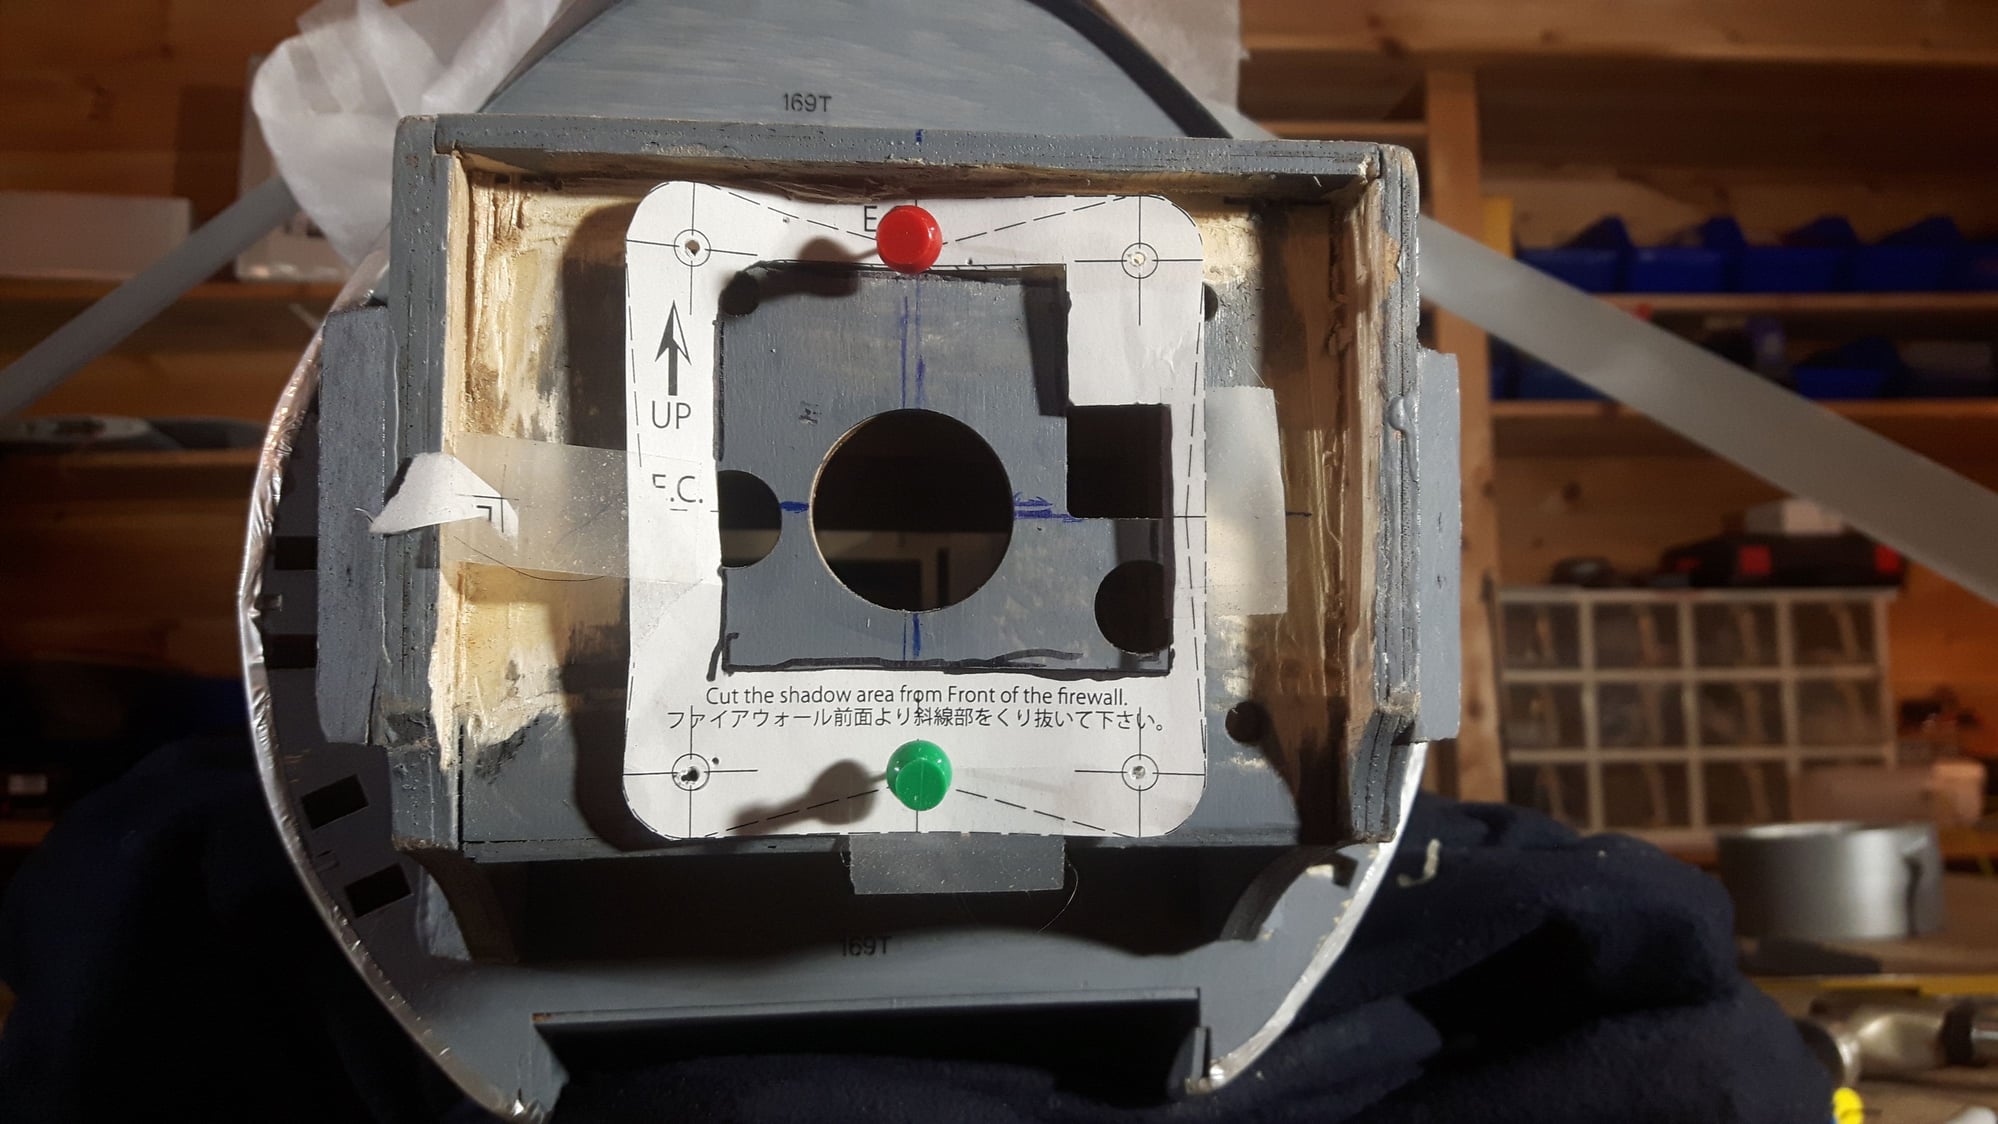
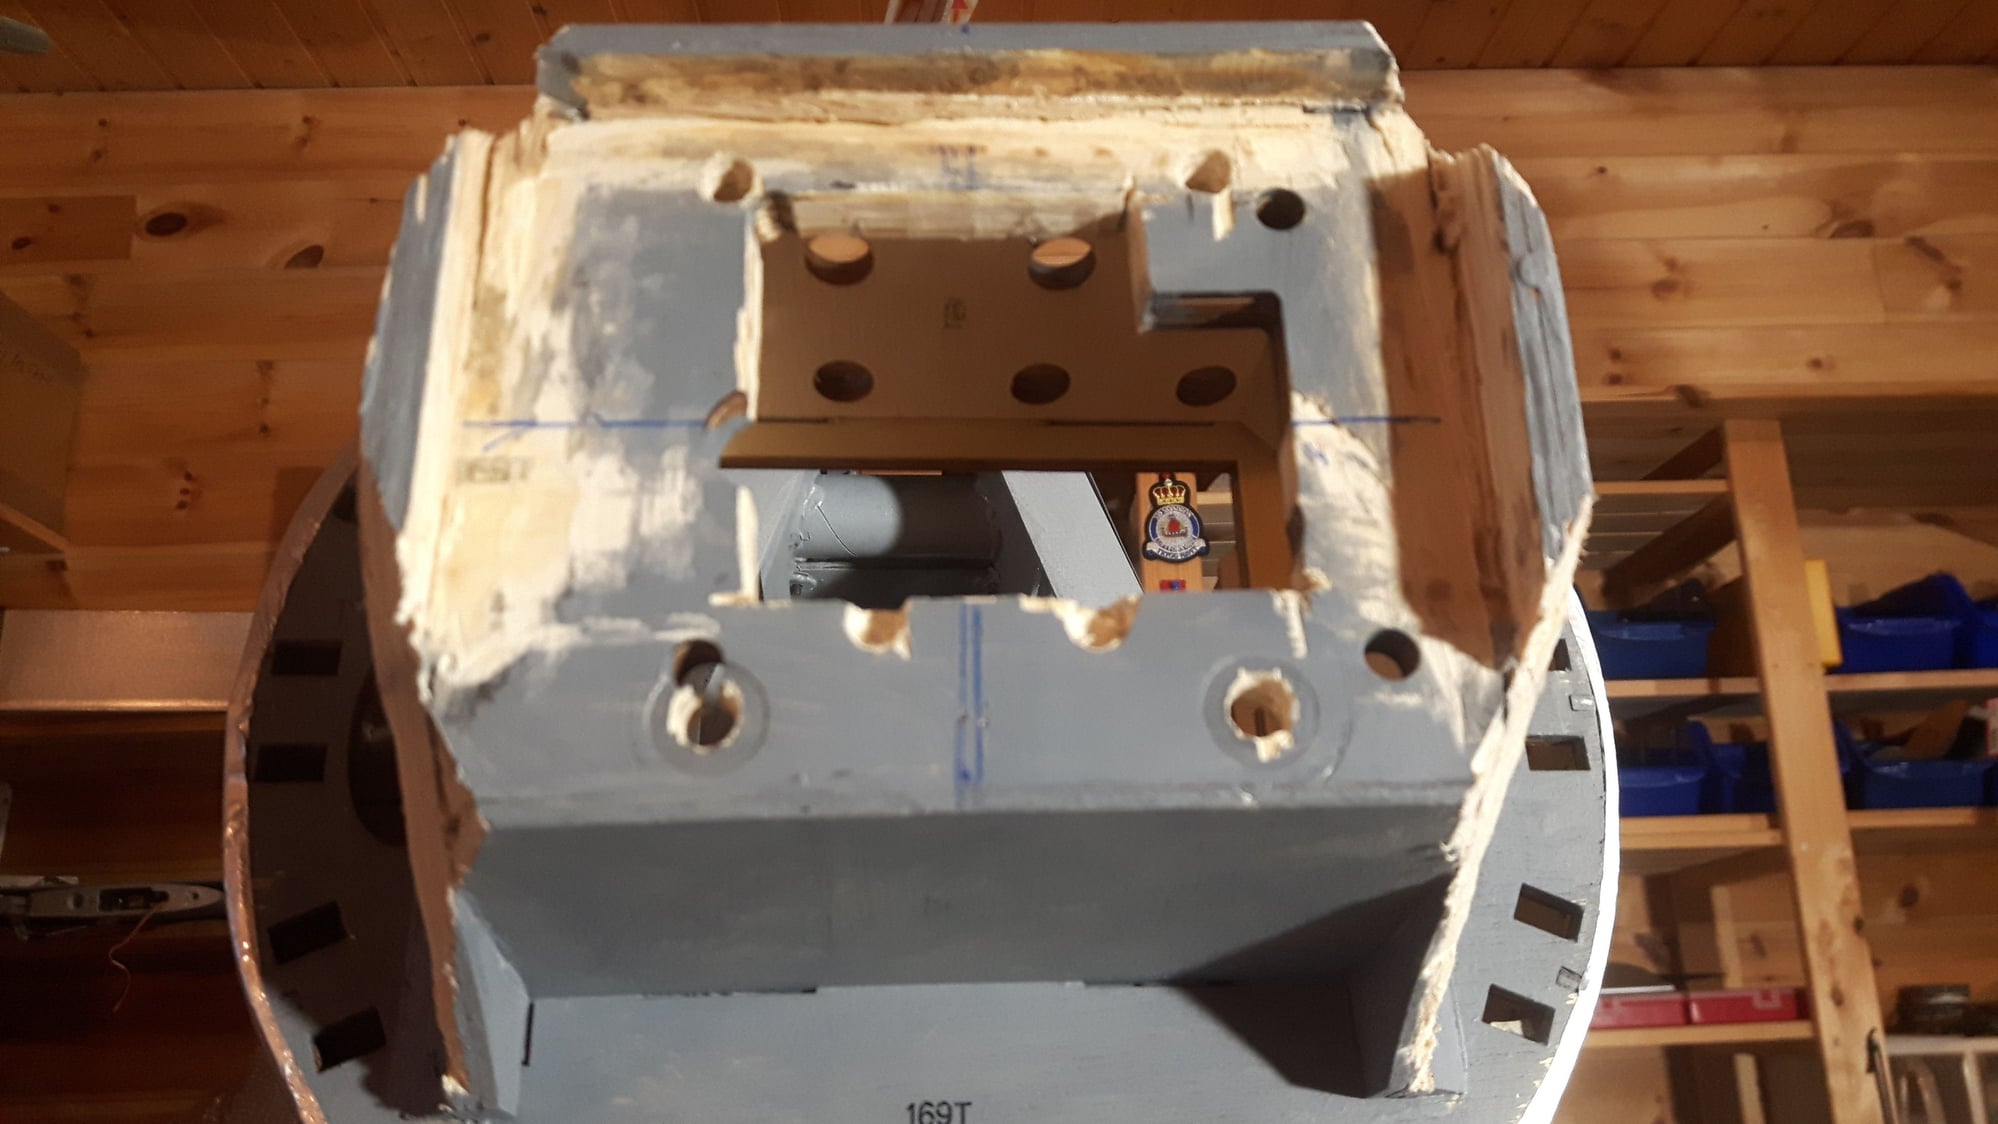
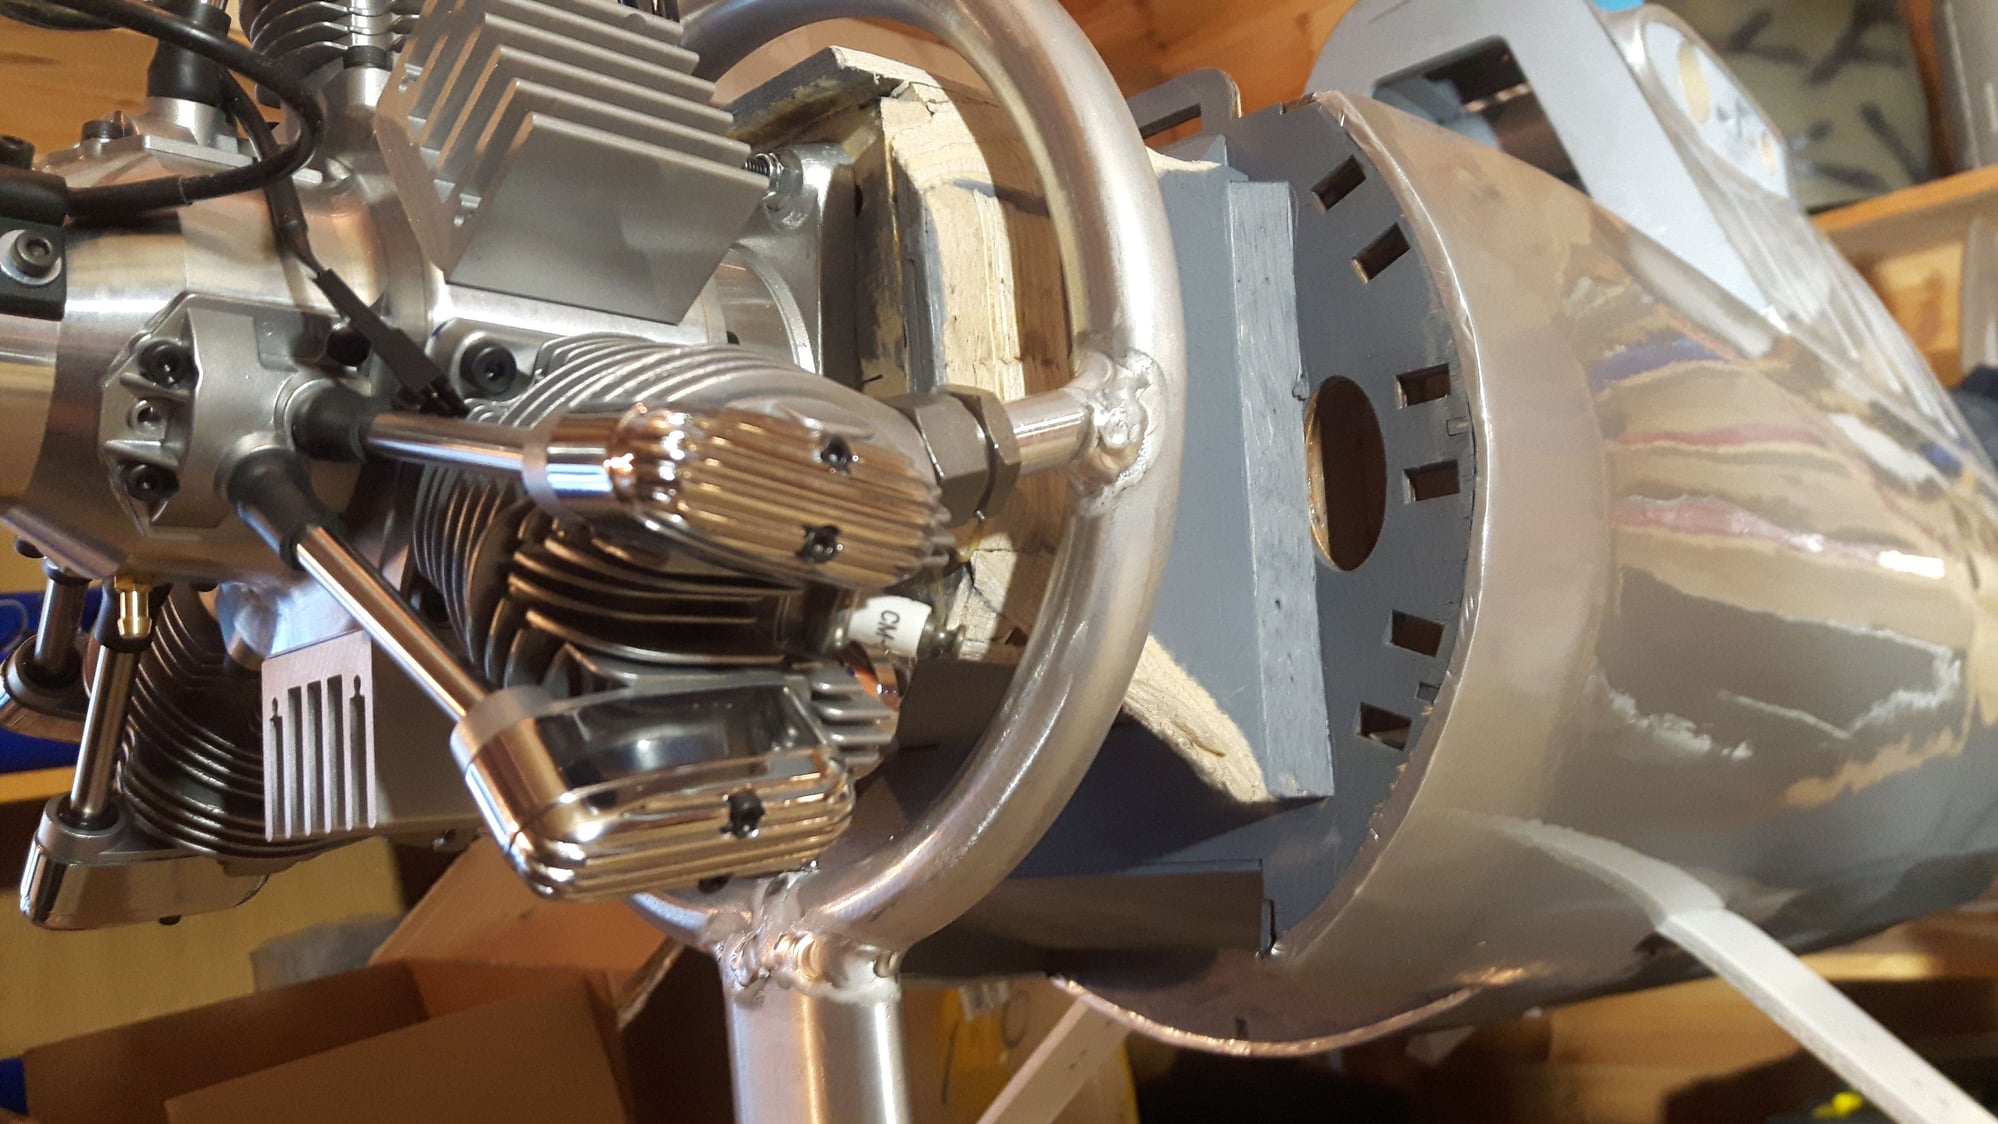
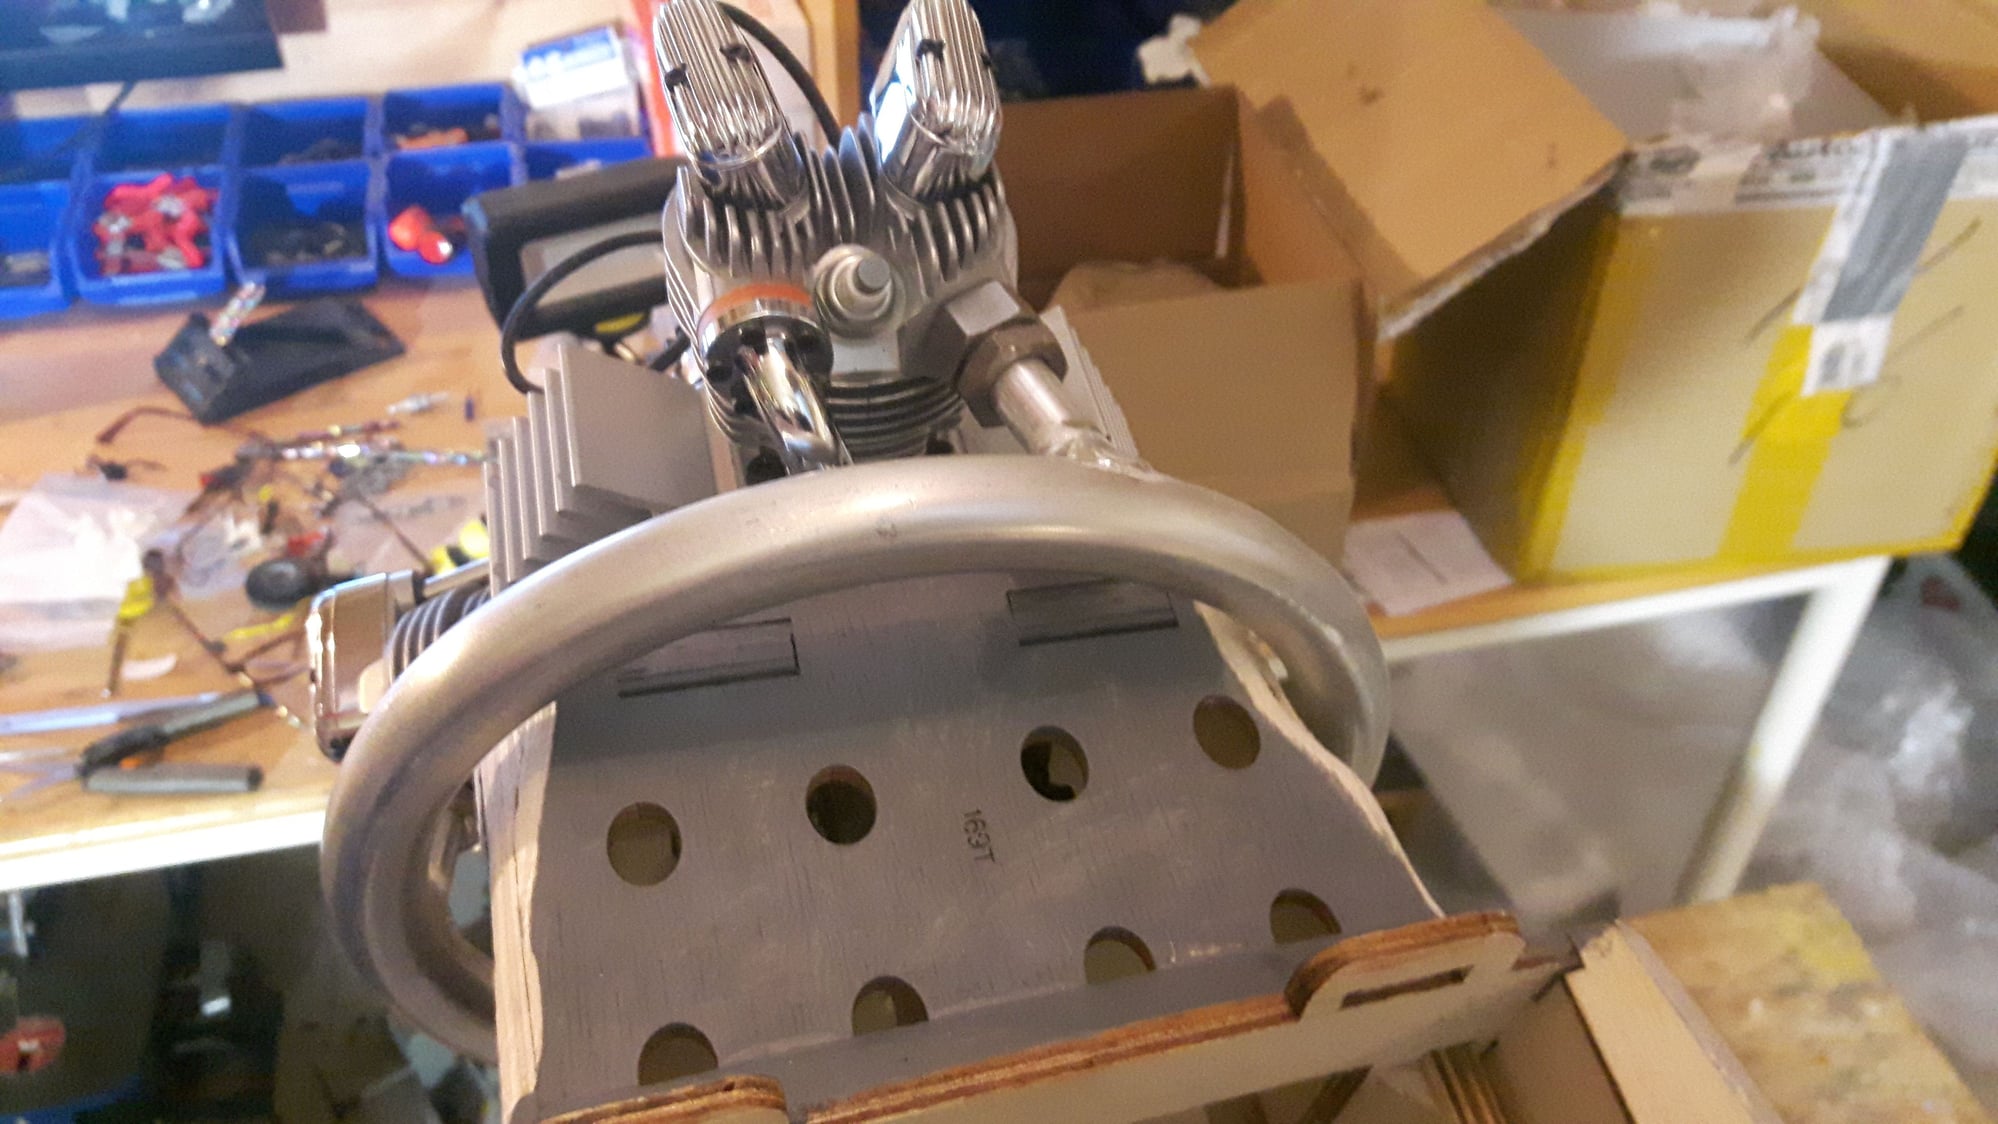
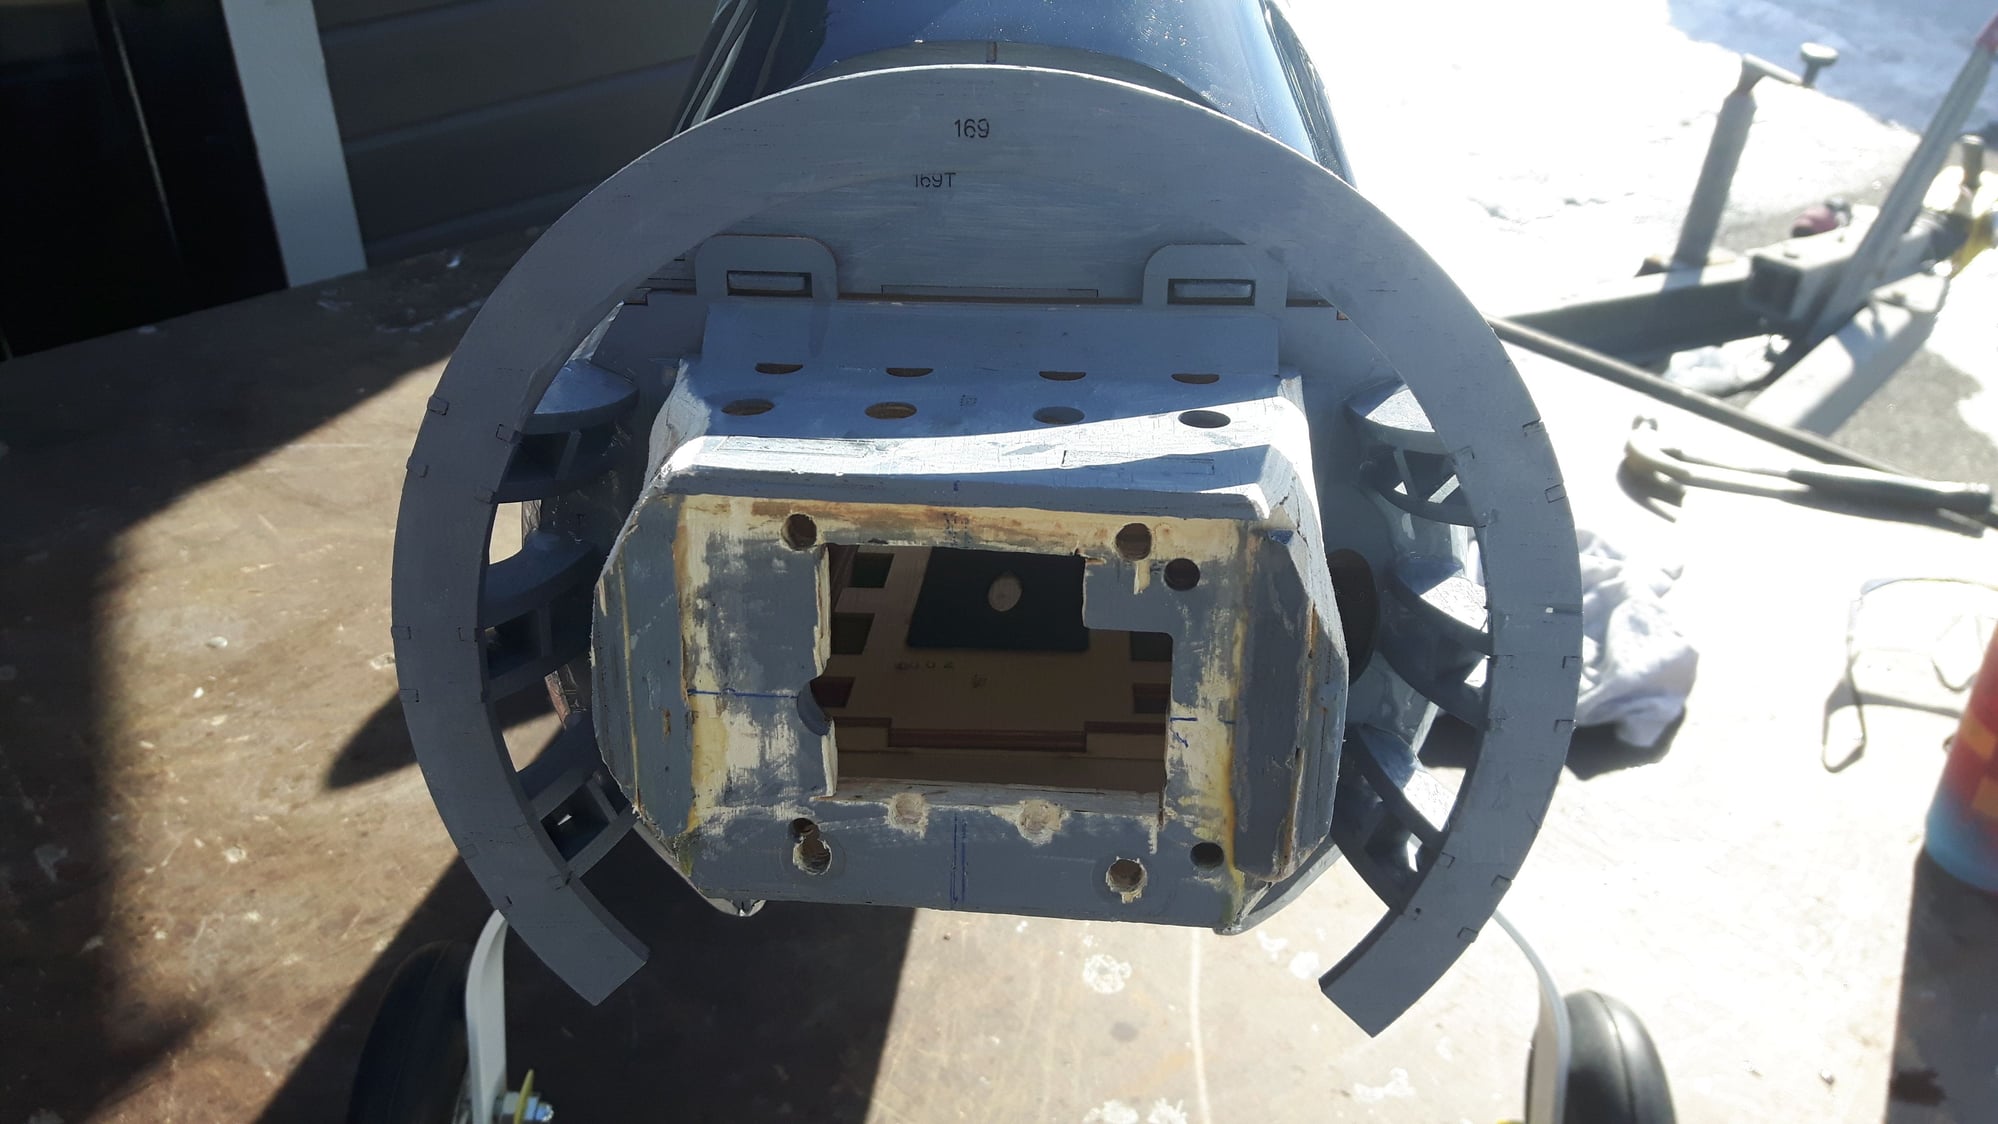
Keleo exhaust / Engine mount:
The mounting goes strait on without any standoffs. I adjusted the paper mal for the engine to center and drilled 4 new holes for the screws and took away the rest of the wood.
To have the Keleo exhaust fit, i needed to do some cutouts on the 4 corners. Quick work and fits fine. After all done i used som small grey paint to cover everything.
Here is some pictures...

Rudder servo back:
Well...Maybe you are thinking of more weight back, but its a very minor effect with a lot of work. I think its ok the way it is, but that is just my opinion :-)
Keleo exhaust / Engine mount:
The mounting goes strait on without any standoffs. I adjusted the paper mal for the engine to center and drilled 4 new holes for the screws and took away the rest of the wood.
To have the Keleo exhaust fit, i needed to do some cutouts on the 4 corners. Quick work and fits fine. After all done i used som small grey paint to cover everything.
Here is some pictures...
03-29-2018, 12:49 PM
#60
Thaknyou for the detailed pictures. Very nice. I've found that the motor requires a electric starter to get started on the first flight of the day. I'm concerned the supplied spinner is not going to work with an electric starter. Are you able to start your motor without the starter? Did you figure out a good way to choke the motor? Thanks again for the pictures, Jerry.
03-29-2018, 01:32 PM
#61
Join Date: Jan 2007
Location: Tvedestrand, NORWAY
Posts: 56
Likes: 0
Received 0 Likes
on
0 Posts
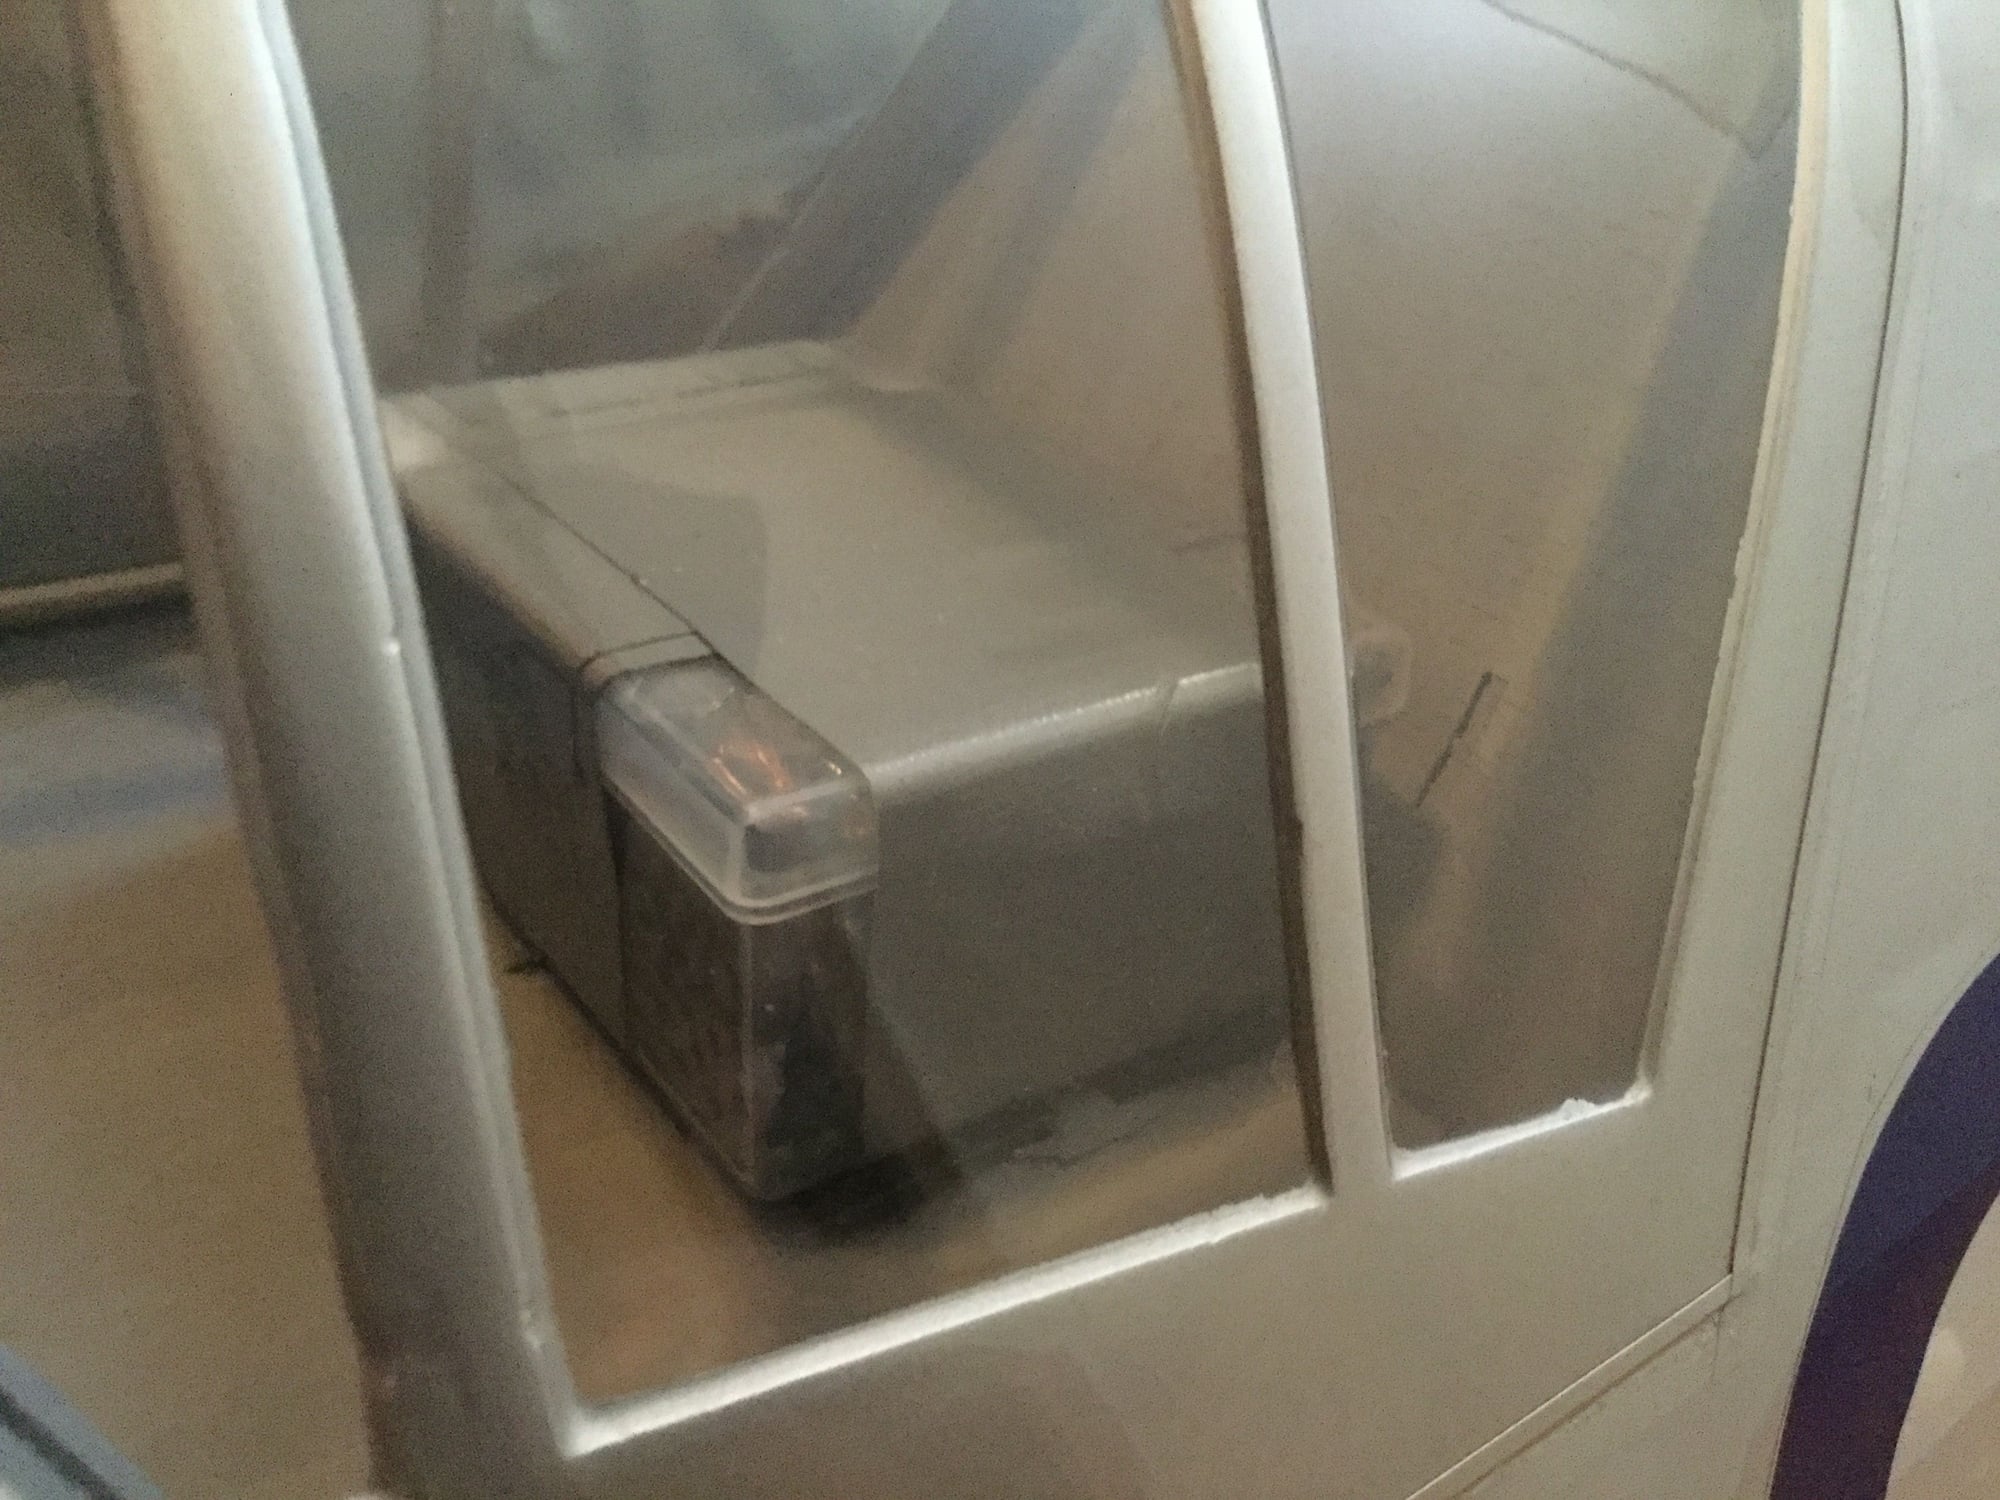
Supplied spinner/Electric starter:
My engine starts fine without a starter and even without choke it. Just flipping the propeller some time and it fires up. I am sure that also the electric starter will work fine.
For the choke...Normally i make a couple of cutouts for the H and L needles to enter with the adjustment Saito screw/rod and uses 2 pcs carbon tubes that runs out from the carb adj area.
A small hole in the cowling and then just to enter the adjustments screw through the H hole and L hole. Just use a little bit bigger dia carbon tubes than the rods so it slides directly into the holes for H and L.
So far i have not done that installation myself. Only made the holes for it (ref pict)
 03-30-2018, 10:03 PM
#64
My Feedback: (24)
Join Date: Aug 2002
Location: Novi, MI
Posts: 884
Likes: 0
Received 0 Likes
on
0 Posts
Totto, it looks like they are these lights, then?:
https://www.dreamworksrc.com/uniligh...-10mm-red.html
https://www.dreamworksrc.com/uniligh...0mm-green.html
https://www.dreamworksrc.com/uniligh...0mm-white.html
If so, did the ones in the wheel pants stick out far enough to interfere with the tires at all?
Do you have any problems with them overheating, or damaging the surrounding surfaces (especially the wing reflector and lens)?
03-31-2018, 12:02 AM
#65
Join Date: Jan 2007
Location: Tvedestrand, NORWAY
Posts: 56
Likes: 0
Received 0 Likes
on
0 Posts
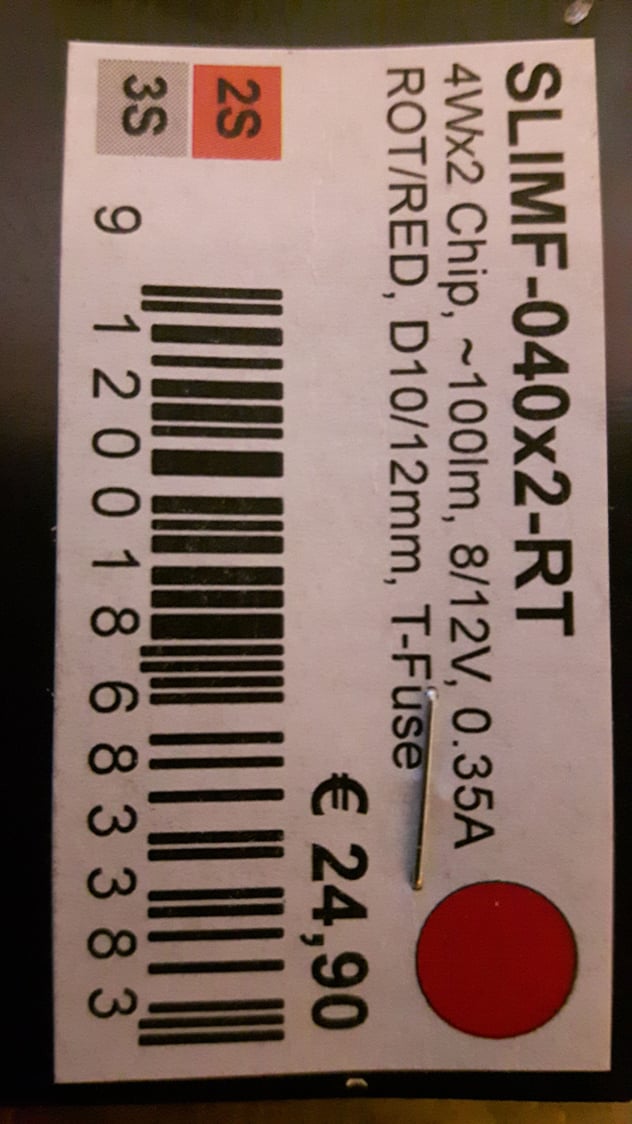
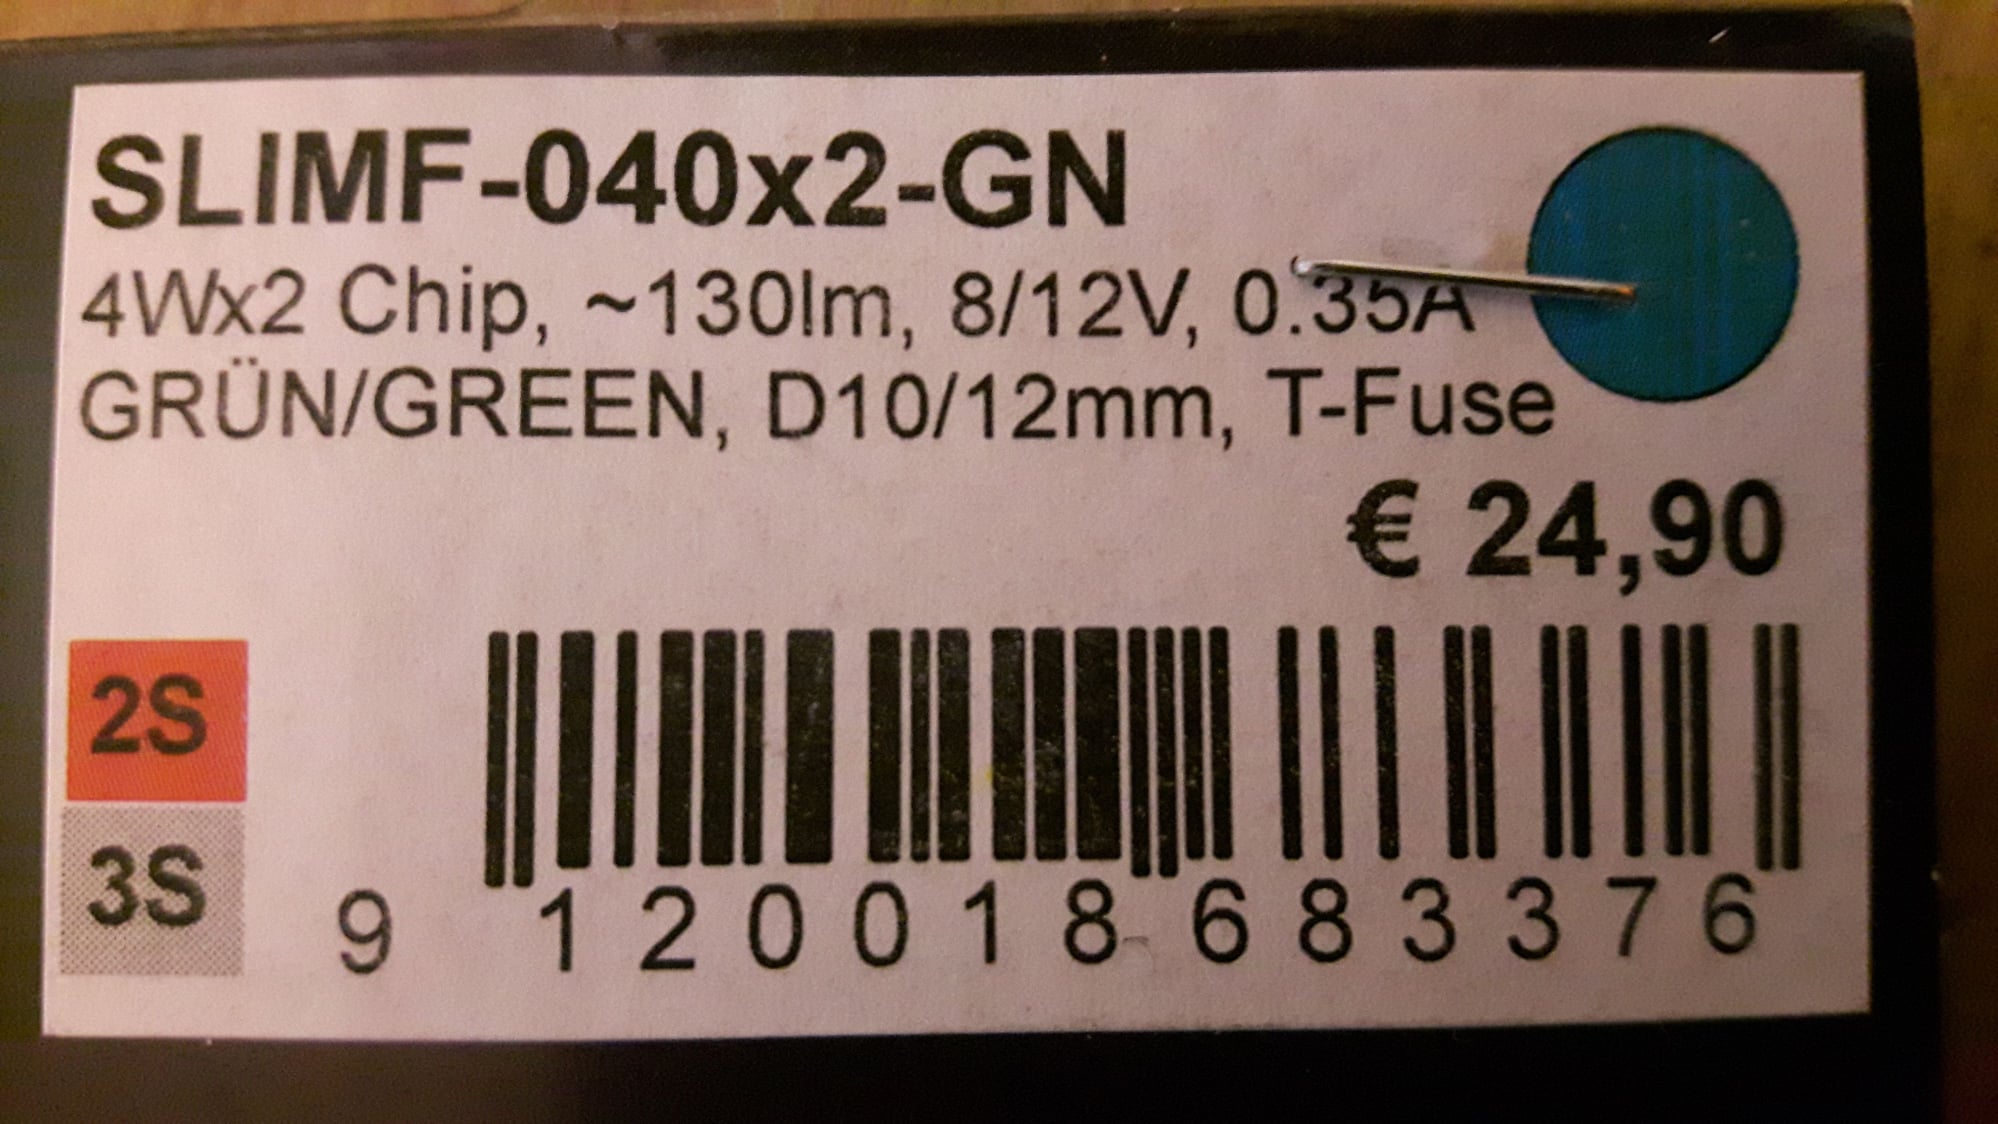
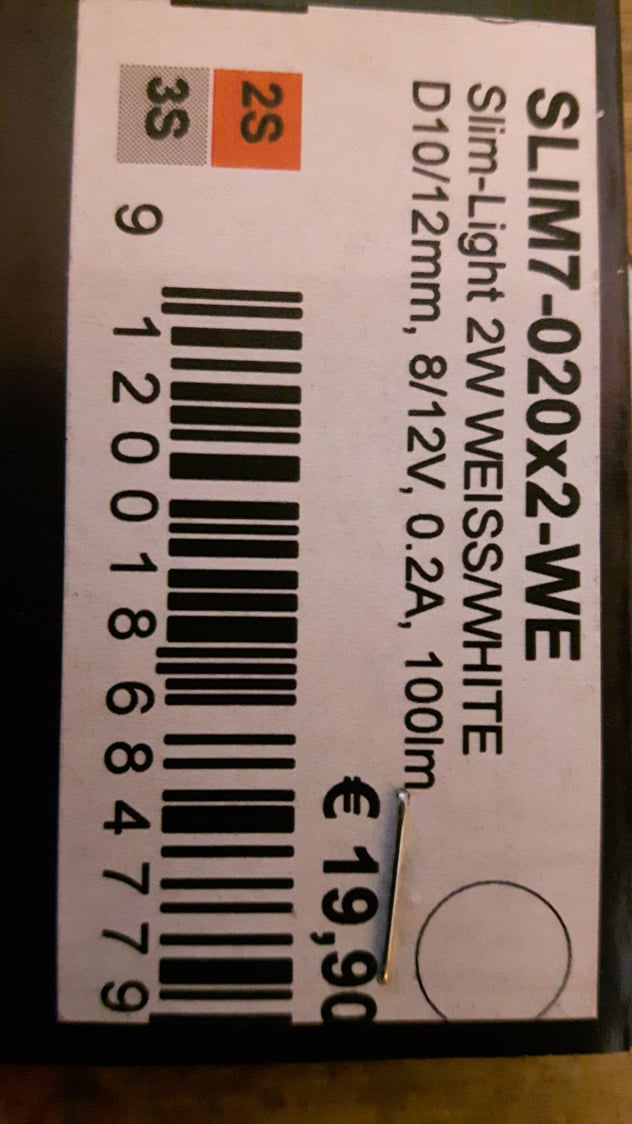
Hello Rick,
The white one does not look the same. Seems to big. Red and green looks the same, but since mine is just leftovers i used them.
Those i have are not in conflict with the tires.
So far i have not have any problems with damaging the area and overheating.
If i was going to buy new ones i would have gone for this sets:
You could use this Dia 7/30mm bolt dimensions all over.
Green wing
https://www.dreamworksrc.com/uniligh...ght-green.html
Red wing
https://www.dreamworksrc.com/uniligh...light-red.html
White landing
https://www.dreamworksrc.com/uniligh...ght-white.html
No conflict on the tires.
Last edited by totto; 03-31-2018 at 12:07 AM.
04-03-2018, 04:06 PM
#66
My Feedback: (24)
Join Date: Aug 2002
Location: Novi, MI
Posts: 884
Likes: 0
Received 0 Likes
on
0 Posts
Thanks for the advice, Totto. Did you insert these into the wing tips from the outside? Also, did you pop the plastic light units out of the wheel pants to install the lights, or did you just work through the wheel opening?
04-04-2018, 11:32 AM
#68
Join Date: Jan 2007
Location: Tvedestrand, NORWAY
Posts: 56
Likes: 0
Received 0 Likes
on
0 Posts
RickVB
Did you insert these into the wing tips from the outside?
Wing tips:
Firstly i removed the tape holding the plastic on the tip. Ok to use a sharp knife and carefully take all off. Then to get the wire for the lights through. I use a 4-5 mm nut and fasten it to a tread. Drop it through the "channel" until i came out. Cut the lightwire to the length you prefer. I solder the connections on the light first. Make a hole through the plastic and fasten the light with glue. Then glue the wing tip glass on. I use a silicon based glue.
Also, did you pop the plastic light units out of the wheel pants to install the lights, or did you just work through the wheel opening?
Landing lights:
Same thing with the plastic on the wheel. Take off the plastic with a sharp knife carefully. Then open up for the lights. I drill out a wood piece for the lights so it sits better inside and glue it. Then when done just glue the glass back on with silicon glue or something else.
04-21-2018, 02:47 PM
#69

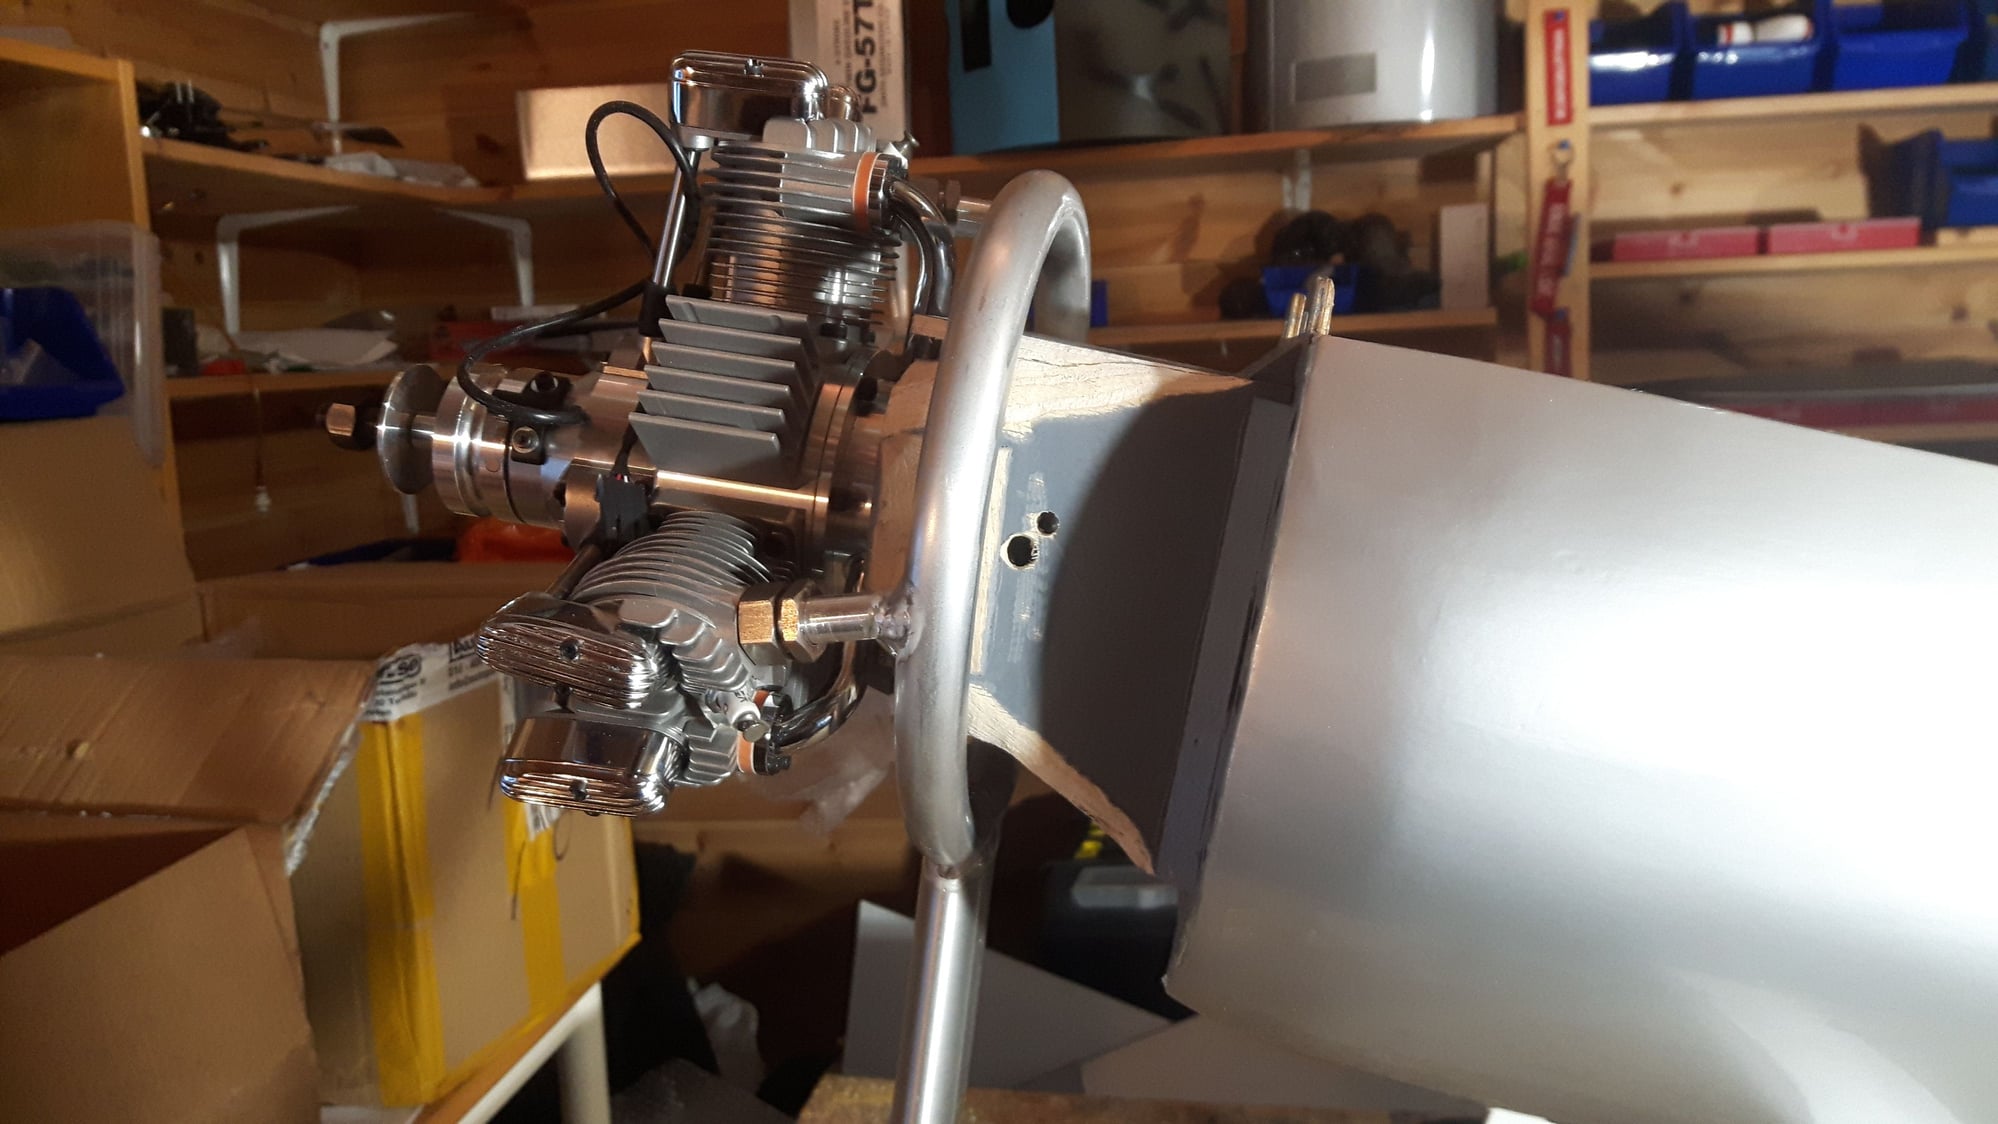
Whose flying it?? Do we have any flight reports? I'm just about finished with mine. I decided I didn't like the silver finish so I repainted over the winter to the yellow/black trim scheme. Finally had a day in WI to run the engine for the first time, it's a RCGF 60 twin, ran good in the garage so I'm getting close. Balance is next then check things over and I'm ready for a maiden flight.
04-22-2018, 09:11 AM
#70
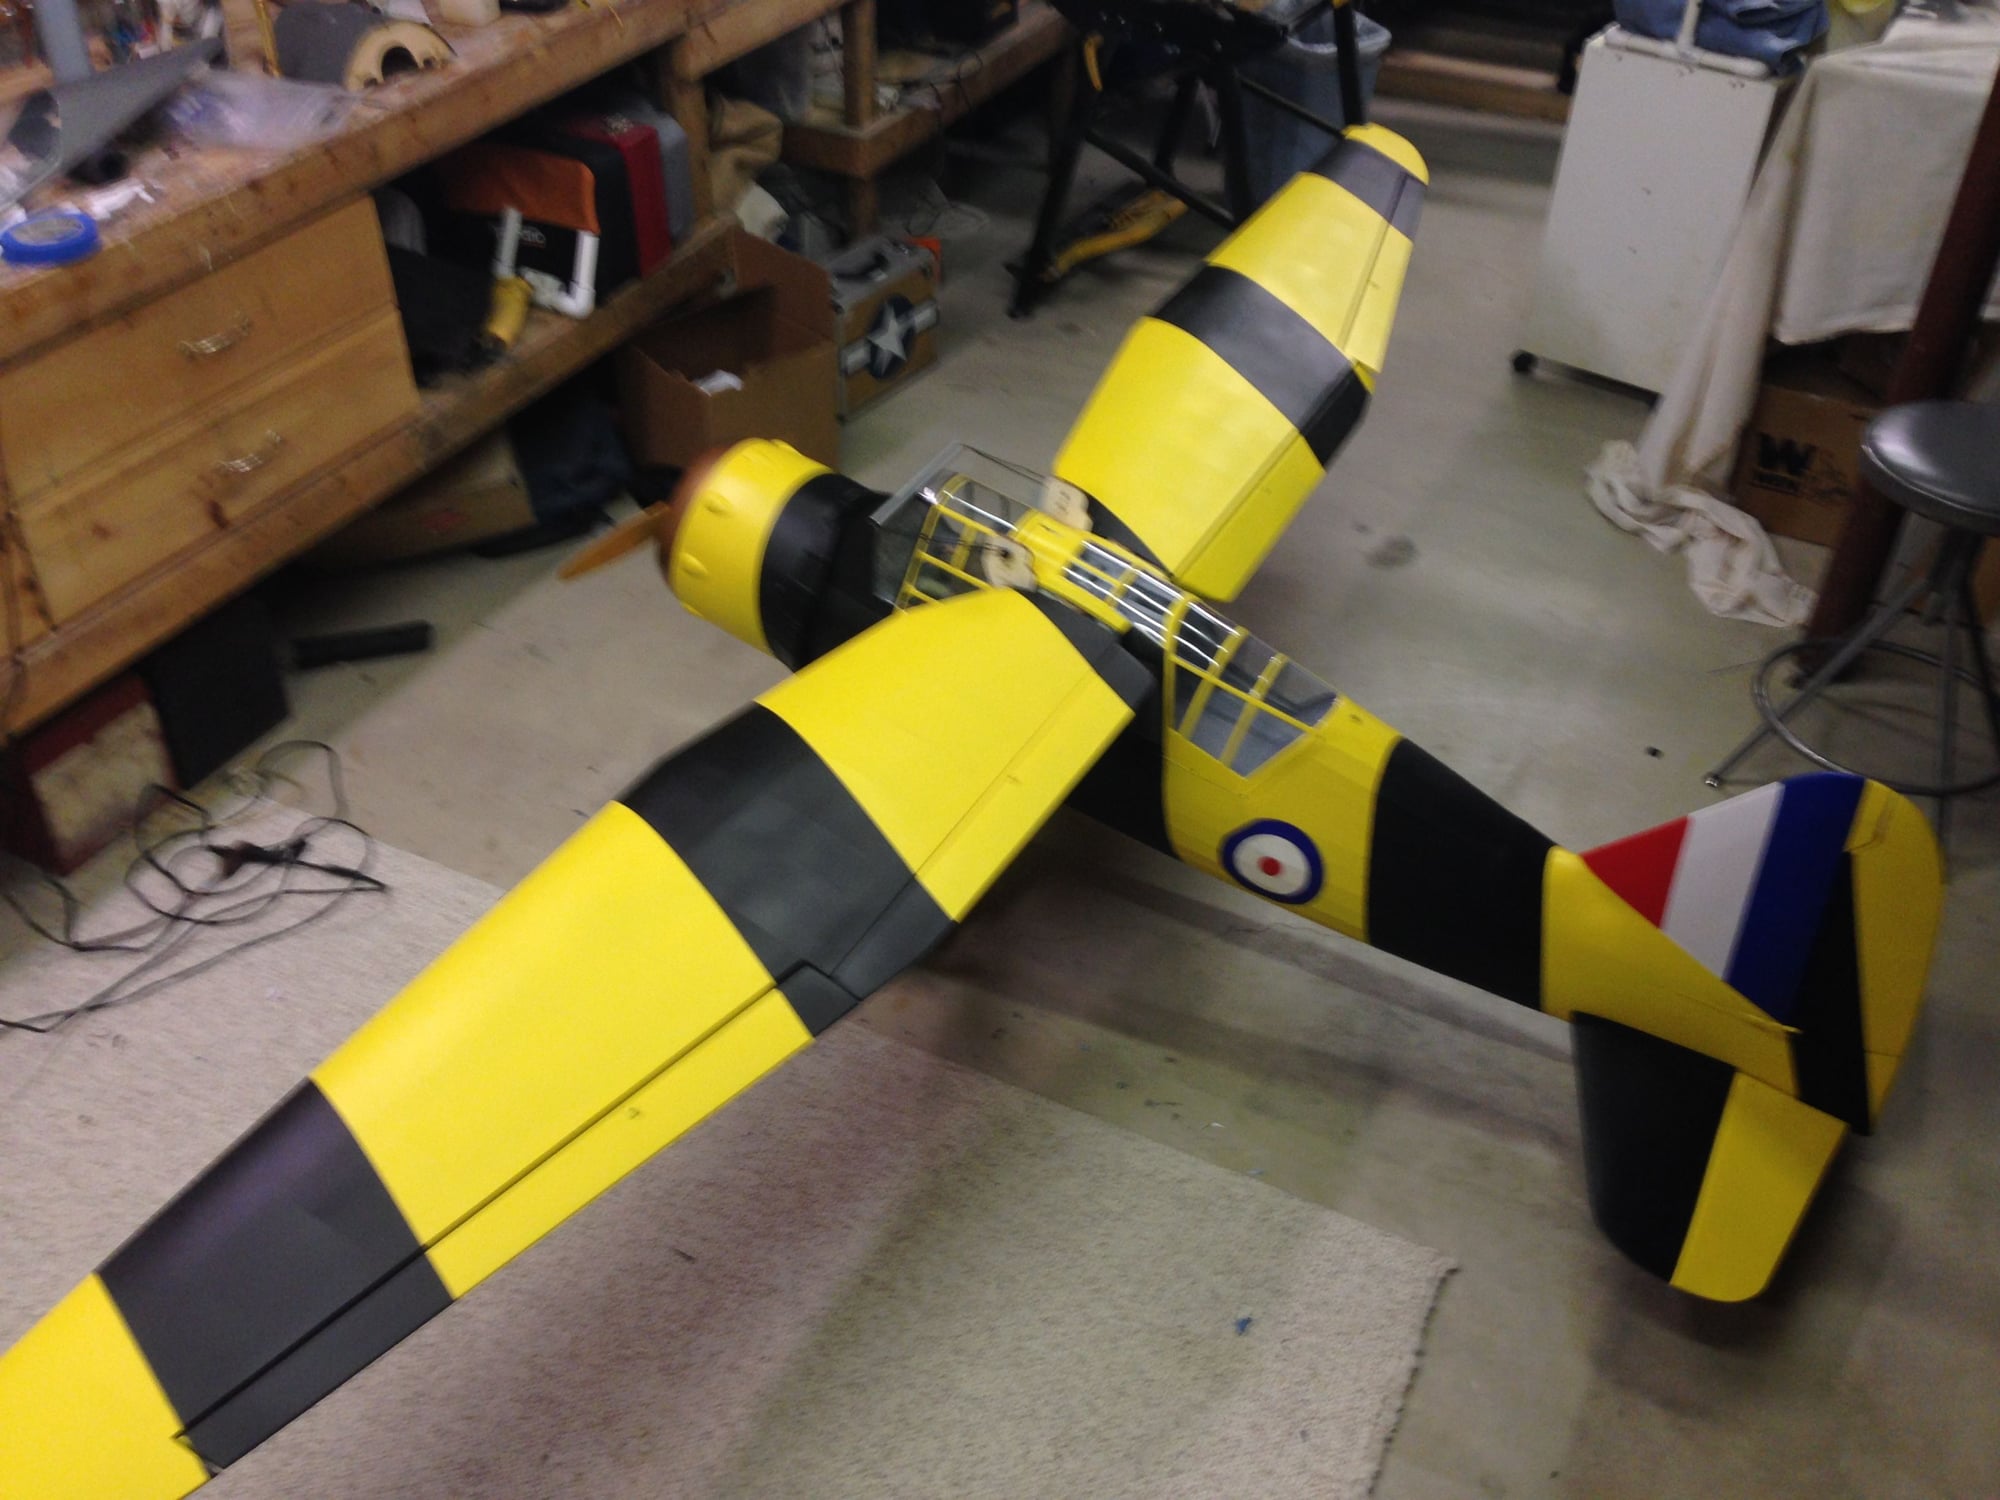
Whose flying it?? Do we have any flight reports? I'm just about finished with mine. I decided I didn't like the silver finish so I repainted over the winter to the yellow/black trim scheme. Finally had a day in WI to run the engine for the first time, it's a RCGF 60 twin, ran good in the garage so I'm getting close. Balance is next then check things over and I'm ready for a maiden flight.
Photo attached.
 04-22-2018, 12:04 PM
#73
i had to add 6.5 0z in the tail. Love the way it flies.
https://www.youtube.com/watch?v=m0YCBGGeLzc&t=5s
https://www.youtube.com/watch?v=m0YCBGGeLzc&t=5s