


DOH!! TopFlite Screw up!!
 04-26-2003, 08:04 PM
#1

Thread Starter
My Feedback: (28)

Join Date: Apr 2003
Location: Heath,
TX
Posts: 3,886
Likes: 0
Received 0 Likes
on
0 Posts
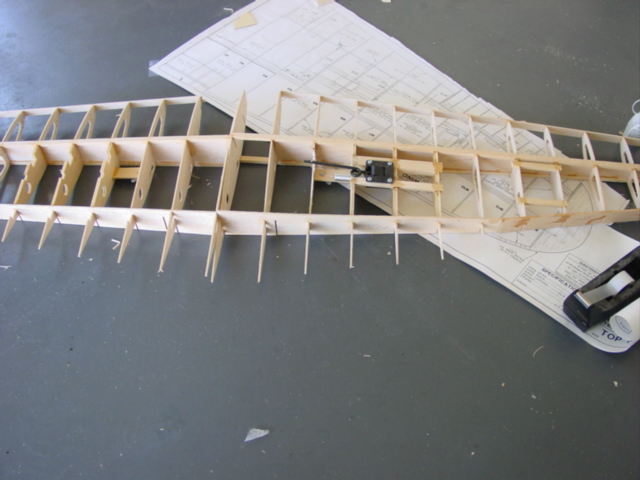
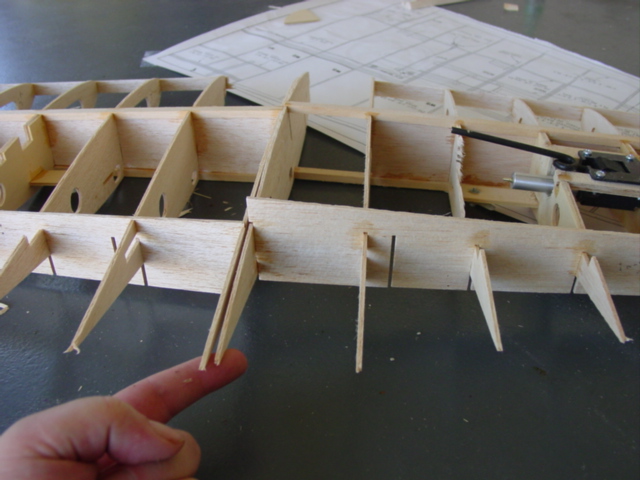
Ok, man I just made the stupidest screwed up my TF P-39.
Need opinions on what to do here.
I was busy talking on the phone and framing up the left wing panel (on the right in the pics) and totally messed it up. By the way, the panels are not joined yet, thank goodness.
I started the spar web one rib too far down. I started it on the #2 rib instead of the number 1 rib.
This is what happens when you havent built a wood kit in 8 years I guess.
Take a look at the pics below to see the screw up.....any ideas on what to do?
Or do I need to just re-order that whole panel and start from scratch from TF?
 04-26-2003, 08:32 PM
#2

Shok,
I do think you can save the wing.
Looks like you used CA if so patiently dissolve the CA joints with acetone and free them with your X-acto 11 blade. If the spar web is undamaged (doubt) then reuse. If the spar web is damaged then try to keep its outline as intact as possible and cut a new one from stock balsa of the same thickness. You really need to go slow and not break any of the ribs while cleaning them up.
Wing was looking good otherwise. Good luck, Pete
04-26-2003, 10:59 PM
#3
Senior Member
Join Date: Jan 2003
Location: Spring Hill,
FL
Posts: 4,734
Likes: 0
Received 0 Likes
on
0 Posts
I would basically scrap the web. I wouldn't use any kind of debonder. Just cut it off between the ribs and leave a little still attached. Then using a small, flat block sand off the excess.
Also, CA is the perfect choice for making mistakes like this. No chance to correct it. I suggest you consider using a good carpenter's glue in the future.
Also, CA is the perfect choice for making mistakes like this. No chance to correct it. I suggest you consider using a good carpenter's glue in the future.
04-27-2003, 12:03 AM
#4

My Feedback: (41)
Cut the number 2 rib front part out. Put a web in, in front of the one that is there, right to the center. Add a section behind it where the web should have been. Put the rib front section back in and carry on. Or you can cut the rib at the rear also and add some support there across. Who's gonna know! Should be strong.
04-27-2003, 02:09 AM
#5
My Feedback: (21)

Join Date: Feb 2002
Location: Portland, Oregon
Posts: 5,966
Likes: 0
Received 0 Likes
on
0 Posts
If I were you I would probably buy another kit or reorder the wing panel.... It might be cheaper to just buy the kit. That way, as long as you don't mess up on the wing, you will have spare parts for the rest of the plane.
05-07-2003, 03:38 PM
#6
Thread Starter
My Feedback: (28)
Join Date: Apr 2003
Location: Heath,
TX
Posts: 3,886
Likes: 0
Received 0 Likes
on
0 Posts
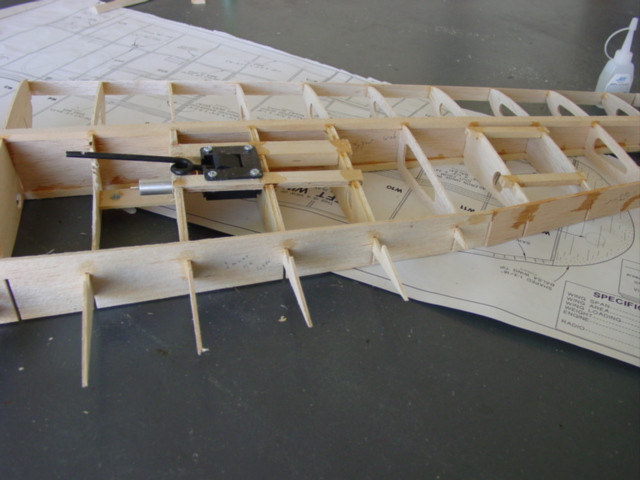
Ok I went ahead and ordered another wing panel from GP, got it in 2 days!
The new wing came out good, just about time to join them.
Things are moving along, but I have to say, man the P-39 instructions really crap out once you get near the final building stages.
It starts off great with lots of photos, then after you mount the engine....it basically just says finish it up.
I have tons of parts left.
Anyone built this plane?
Whats the big cardboard tube for???
05-10-2003, 10:45 PM
#7
Senior Member
Join Date: Nov 2002
Location: Ft. Myers,
FL,
Posts: 119
Likes: 0
Received 0 Likes
on
0 Posts
I saw on another post that you plan to glass your P-39. I am just starting mine and I want to glass mine too. What weight of glass are you going to use, and how are you going to treat the rudder and elevator?
Looks to me that they are supposed to be silk and dope. I don't want to go that route.
The tube is to run the aileron ext. though the wing. I haven't got that far yet.
Looks to me that they are supposed to be silk and dope. I don't want to go that route.
The tube is to run the aileron ext. though the wing. I haven't got that far yet.
05-10-2003, 11:54 PM
#8
Thread Starter
My Feedback: (28)
Join Date: Apr 2003
Location: Heath,
TX
Posts: 3,886
Likes: 0
Received 0 Likes
on
0 Posts
Actually I just found out the tube is to put between the wing sheeting and the ribs for the wing bolt guide.
Im using 3/4oz cloth on the fuse and and wing.
Im mixing up zpoxy finishing resin with a bit of alcohol and painting it on the ailerons, elevators and rudder.
Then im mixing primer with microbaloons and coating them and lightly sanding.....I will do that a few times then paint them.
Im using 3/4oz cloth on the fuse and and wing.
Im mixing up zpoxy finishing resin with a bit of alcohol and painting it on the ailerons, elevators and rudder.
Then im mixing primer with microbaloons and coating them and lightly sanding.....I will do that a few times then paint them.
05-13-2003, 05:45 PM
#10
Senior Member
Join Date: Jan 2003
Location: Spring Hill,
FL
Posts: 4,734
Likes: 0
Received 0 Likes
on
0 Posts
I'm not real familiar with the P-39. Were the flight surfaces maybe fabric covered? If not then you'll have to sheet them. Check the plans and instructions carefully. It has to indicate what to do somewhere.
05-13-2003, 05:49 PM
#11
Thread Starter
My Feedback: (28)
Join Date: Apr 2003
Location: Heath,
TX
Posts: 3,886
Likes: 0
Received 0 Likes
on
0 Posts
My plan was to leave the control surfaces like they are after being built...no covering of any sort.
Just brushing on finishing epoxy, priming and painting....thats the plan at least.
Just brushing on finishing epoxy, priming and painting....thats the plan at least.
05-16-2003, 01:11 AM
#12
Senior Member
Join Date: Nov 2002
Location: Ft. Myers,
FL,
Posts: 119
Likes: 0
Received 0 Likes
on
0 Posts
I've given this some thought, the real plane had fabric tail surfaces. I think I will just cover the elev. and rudder with monocoat and scuff it up and paint it like the rest of the plane. That way it will keep the fabric look and for the rest of the plane using glass and resin. What do you think?
05-16-2003, 03:58 AM
#13
Thread Starter
My Feedback: (28)
Join Date: Apr 2003
Location: Heath,
TX
Posts: 3,886
Likes: 0
Received 0 Likes
on
0 Posts
good point, I may do the same, I'm still on the fence though. I think I can make it look nice with it just epoxied and painted, we will see. But monokote and paint seems simple enough.
