


Install Asiatam Recoil in Panzer 3
 09-28-2010, 01:29 PM

When I decided to replace the airsoft gun in my Heng Long Panzer 3 with an Asiatam recoil unit and Tank-Modellbau barrel, I really had no idea how many missteps I would take learning all the tricks and pitfalls in this project. I hope this modest thread will provide some helpful tips.
<o ></o>
></o>
The Asiatam recoil unit comes packaged with the items you see here: the two-motor recoil unit (one motor is for gun elevation, the other returns the barrel to the forward position after firing), the barrel clamping parts, a connected muzzle flash LED, a small switch to install in the HL transmitter, and an optional high-intensity flash unit (which I did not use). Asiatam no longer provides installation instructions or a CD.
<o></o>
The first thing you need to do is open your Pz3 hull, unplug the top deck from the RX18 board, and unsolder these topthree wires from the small PCB (printed circuit board) which controls the airsoft gun and motors.
<o></o>
Next remove the two screws from the turret ring gear, lift off the turret, and remove all the screws from the bottom. Once the bottom of the turret is open you should have no trouble removing the airsoft gun and elevation motor behind it. In this pic I haven’t yet removed the airsoft ammo tray, which will also need to be removed. The wires you see in the turret are from the DIN9 connector I installed to mount the DBU IR receiver “apple” which you can learn more about in my thread “Install DBC/DBU in Pz3”.
<o></o>
The main recoil unit fits in the turret quite easily with modest pressure, though I found it curious to see it’s held in place by a single screw. I considered adding some epoxy or CA glue to a tab on the opposite side to more firmly anchor it to the turret, but decided to first evaluate this mounting configuration. Much to my surprise the one-screw mounting scheme actually seems to work. Incidentally, I’m sure you’ve already noticed the extra wires protruding from above the recoil unit; the black-sleeved ones are for the DBU DIN9 connector and the heavy-gauge red/black wires are from the old airsoft on-off switch which I now use to turn my Pz3’s headlights on-off. The light-gauge wires are from the recoil unit. Please note the white and blue wires to the right of the unit which I strung into the bustle; Asiatam apparently intends us to connect these into the former airsoft switch so you can turn the recoil on-off. In my opinion this is simply silly. Since I’m going through the cost and effort to install their recoil unit in my tank I certainly want it available all the time! I soldered the blue and white wires together to allow the recoil unit to always be “on” and ready for use when I power up my tank.
<o></o>
The front gun mount was a very interesting and tricky piece to work with. To remove the airsoft barrel you had to remove a square mounting block from the gun mount, but you must then put the square mounting piece back in so you can install the two gun pivots provided with the recoil unit. This is how it should look.
The metallic thing you see in these pics is the Tank-Modellbau barrel sleeve, which I’ll discuss later. It needed to be trimmed shortso it does not protrude into the gun mount.
<o></o>
Here is everything put together with the original airsoft barrel mounted in the Asiatam barrel clamp. You’ve probably noticed that the unit arrives in the recoil position which keeps tension off the recoil spring during shipping.
Here’s an important bit of information: THE RECOIL UNIT WON’T WORK! Yes, I said that in ALL CAPS! As designed and delivered the Asiatam recoil unit for the Panzer 3 cannot bring the barrel back to its fully forward position (a.k.a. back into battery), which means it will never, ever, ever, ever recoil. Never. To add insult to injury the elevation pivots are molded in such a way as to ensure your gun’s barrel will always point up in the air giving your tank the appearance it has overdosed on “the little blue pill”. Fear not gentle readers, for I have discovered some simple solutions.
<o></o>
To fix the problem with my barrel always in the “high salute” position I removed the elevation pin pieces and trimmed them as in this pic. I recommend slightly shaving the tabbedpiece which connects to the elevation motor’s rotating bar until you get the amount of gun depression you desire. Of course your mantlet will be uneven unless you then likewise trim the oppositepivot pinpieceto match. I also applied CA glue to ensure nothing would move out of place after final trim and assembly.
<o></o>
To fix the problem with the barrel not being able to return to it’s fully forward position I had to trim the barrel clamping pieces back to the forward-most clamping screw.
<o></o>
I then drilled a small hole in the side of the clamp to secure the barrel. This pic shows my Tank-Modellbau barrel, but you can also secure the airsoft barrel in this manner if you also drill and tap into the barrel to accommodate an appropriate screw.
<o></o>
If you’re going to install the Tank-Modellbau barrel as I did, you’ll need to trim the barrel sleeve to ensure it does not extend back beyond the square gun mounting bloc (see the pre-mod pic above). A metal grinder comes in handy.
<o></o>
I first mounted the new barrel flush to see how it would fit and was not surprised to learn it was a bit far forward. I put everything together and measured the amount of excess barrel extension then disassembled everything to drill a new screw mounting hole the same distance up the barrel. The aluminum is very soft so the screw can easily self-tap into the new mounting hole.
<o></o>
This is how everything finally fit together allowing the Asiatam recoil unit to properly function. Trimming the barrel clamp allows the mechanism to push the barrel fully forward into battery (thus resetting for the next firing/recoil sequence) and the trimmed elevation pins allows the barrel to depress to horizontal elevation.
<o></o>
SPECIAL NOTE: If you are using a barrel similar to mine you must remove the Asiatam flash LED and connect the wires the new barrel’s LED (in my case red/red and blue/black). You MUST solder a resistor no less than 150 ohms in series with one of these wires to prevent damage to the barrel’s flash LED. The Asiatam flash LED is a high current component and does require the otherwise necessary current-limiting resistor.
<o></o>
We next need to solder the green/red/yellow wires to the top deck PCB. These wires control elevation and trigger recoil.
<o></o>
The final connection in the tank is splicing the black wire into the black power lead between the main power switch and the RX18. I added a quick-connector in this power lead (the white connector directly about the center of the battery box) to allow for easier disassembly for maintenance.
<o></o>
Now to the HL transmitter. This was the only part which did not require modifications. Simply open the back of your transmitter and install the provided switch as below. This switch is wired parallel to the “K” button and allows the left-up toggle to simultaneously activate the “K” functions (cannon sound, IR, etc.)
<o></o>
So to sum up: The Asiatam recoil unit does not come with installation instructions or a CD, it mounts in the turret with a single screw (which seems to work well), the elevation pins and barrel clamp need to be trimmed, the barrel needs to be mounted to the clamp with a screw, ensure you use at least a 150 ohm resistor to prevent destroying the replacement flash LED, and installing the transmitter switch allowing the left-up toggle to concurrently activate the “K” button was easy.
<o></o>
Yep, this was easy peezy lemon squeezy.


 10-29-2010, 03:53 PM

I'm performing the same Asiatam recoil install, except in my Pz IIIH. I've been following Hondobob's install, plus the Asiatam instructions for the recoil unit and the "short barrel" 50 mm. I've got everything together but have not energized any of the circuits (see attached photos). The only known issue I can see is that as things stand now the barrel will not extend the full amount because the plastic collar that is attached to the barrel interferes with the gun mount block (interestingly, in my situration its not bottoming on the barrel sleeve). I checked the travel in the slots in the recoil mechanism, and I estimate that there could be another ~ 0.150" forward travel before the screws bottom in the slots. Installing the turret and looking at the gun in plan view relative to the hull it looks like the 0.150" is about the added distance the gun should extend to be correct. Looks like I could remove another 0.150" from the collar, which would bring that edge of the collar up to about flush with one of the screws which clamps the two halves of the collar together. Any recommendations?
BTW, in the Asiatam recoil, what causes the gun to stop moving in the forward direction? Is it the microswitch in the attached photo with the yellow and red wire going to it?
One more item. My Asiatam recoil unit did not come with the microswich that is shown installed in the transmitter. Is there another way to achieve the same effect?Does the mod with the diode in the RX-18 or in the tank wiring result in the same effect?
Frank
10-29-2010, 05:58 PM
 11-01-2010, 01:22 PM
01-30-2011, 02:42 PM
11-01-2010, 01:22 PM
01-30-2011, 02:42 PM
a) When I had completed the install, the first thing I noticed is that the main gun is shifted downwards (see1st attached photo) To be correctly aligned the curvature in the mantlet should match up with the curved portion of the turret front (see3rd attached photo). On mine the two are offset by 0.1-0.2 inches. I'm wondering now if this is what Hondobob was referring to above about how he needed to modify the trunnion mounts.
b) The gun fired initially, recoiling under the spring force of the Asiatam recoil, but the gun did not fully return to the fully extended length. I was able to grab the barrel and pull itto the fully extended position and fire it again,but it would not return to the full extended position by itself. For background, I had installed a 22 ohm resistor in the recoil motor ground lead per another series of posts (see2nd attachment), with the goal of slowing down guns return to the fully extended position. Now if I am wondering if this is unnecessary for the Asiatam recoil, or perhaps if there is some mechanical resistance I am not aware of. I did check the slotted grooves and guides in the recoil to see if that is the problem, but does not appear so.
Any help is appreciated.
Frank
01-30-2011, 03:15 PM
 01-30-2011, 03:20 PM
01-30-2011, 03:50 PM
01-30-2011, 03:20 PM
01-30-2011, 03:50 PM
Everything is working electrically/eletronically as it should. Its possible the 22 ohm resistor was not a good idea. The other problem is the geometry of the gun installation. I was only asking for some technical assistance.
I am not afraid to try new things to expand my experience in this hobby. If I make a mistake, it will become a learning experience.
Frank
01-30-2011, 05:37 PM

It's never a perfect fit when you put those in and takes some fine tuning ; but that's the fun part of the hobby ...
Get rid of the resistor ; the recoil motor needs all its power to push the gun at its initial place ....
If you have to pull on the gun to be able to fire again ; something is preventing the gun to sit in its place ...Check for the clearance between the inside of the gun mantlet and the Asiatam bracket holding the gun ; I had problems with that ....
Good luck and keep us posted ....
01-30-2011, 06:11 PM
Yeah, I'm gonna pull the resistor. Pretty sure thats the problem. Then when I have her opened up again I'll decide how to correct the gun geometry. The PZ IIIH Ihave is a little different inside the turret from the Pz IIIL. Maybe there some small differences in the dimensions for the gun mounts/trunnions.
Frank
01-31-2011, 03:10 PM
02-02-2011, 07:32 PM
02-02-2011, 08:16 PM
Please look at the 1st picture on the left from my post on 1/30. Will trimming the trunions similarly to what you did raise the gun and close the gap between the mantlet and turret? Thanks for the input.
Frank
02-03-2011, 01:45 PM
Ah, I now see the alignment issue you’re describing. I had a similar problem with my mantlet-to-turret alignment in that my barrel looked like it was always in the “high salute” position. My solution was to trim the elevation tabs/trunnions and slightly enlarge the screw holes in the tabs, then fiddle with their alignment front/back, up/down until everything was even and level. I then very carefully removed the mantlet, marked the positions of the tabs/trunnions, and then secured them with a spot of CA glue to supplement the screw. It wasn’t fast or easy, and it took a bit of luck, but in the end I think the time fiddling with trimming and repositioning paid off. I wish I had an easier and quicker way to do this, but I was experimenting quite a bit as I went along.
02-03-2011, 05:25 PM
This might not be directly relevant to this thread ; but I've been working on a "smoking gun " project using my Asiatam recoil unit ...
In the following experiment ( which didn't produce the expected results ) ; I was using the recoil tray to operate a mechanical shutter for the blower fan ...As you will see in the following video ; the recoil system has plenty of power in reserve ...
www.youtube.com/watch
02-03-2011, 06:07 PM
 02-04-2011, 07:19 PM
Let me explain this statement ...
If you are using the left upper stick to trigger the recoil , like most peoples are ; the accepted knowledge is that this is switching the signal to the ground ....But if you follow the signal on the RX -18 board ; it goes to R 22 ( 2.2 Ohms 1/2 Watts ) before connecting to pin # 8 of IC 2 ...
So in fact ; you already have a 2.2 Ohms resistor at the leads of your motor ...If you add an extra 22 Ohms resistor in the line ; your total resistor is now 24.2 Ohms ....
As for myself ; I'm using a set up like I proposed in this thread :http://www.rcuniverse.com/forum/m_10302660/tm.htm
So I'm switching the signal directly to the ground ...
I still think that your problem is more mechanical than electrical ; but if you have to compensate for extra friction ; it would help to have all the power available to the recoil motor ....
09-20-2011, 05:27 PM
Andrew
09-20-2011, 10:30 PM
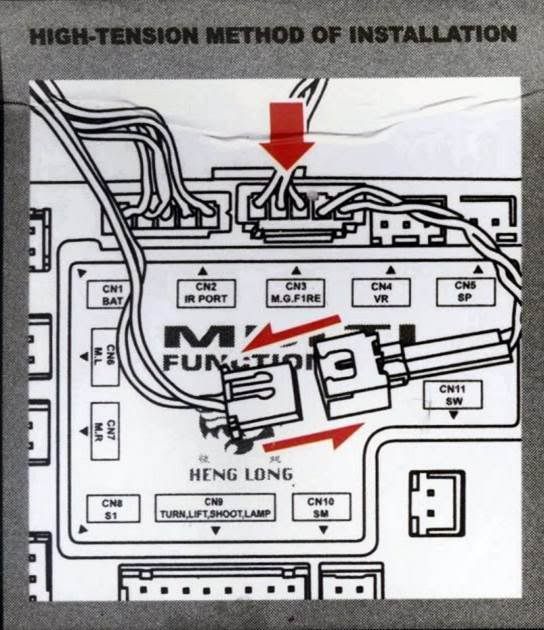
This next picture shows how to connect the flash unit.Thankfully there is just one way to plug it in to the RX18: simply pull out the 2-pin plug at the top, plug in the 5 pin plugfrom the flash unit, then plug the 2-pin plug into the muzzle flash 2-pin.I believe the upper left joystickshould nowtrigger the recoil, cannon firing sound, the flash unit, and the famous HL track recoil “happy dance”.
<meta content="text/html; charset=utf-8" http-equiv="CONTENT-TYPE" /><title></title><meta content="OpenOffice.org 2.0 (Linux)" name="GENERATOR" /><meta content="20110921;21544600" name="CREATED" /><meta content="16010101;0" name="CHANGED" /> <style type="text/css"> </style>
Edit:
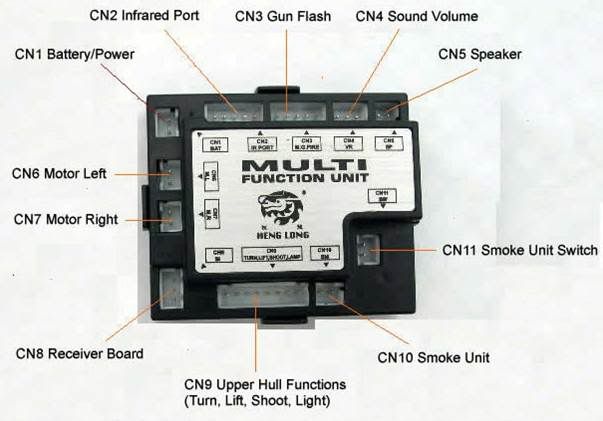
The pin-out for CN3 (left to right) is:
B+ voltage
Strobe Trigger (output)
B- voltage
Track Recoil and Sound Trigger (input)
B- voltage
The left three pins are for the flash/strobe and the right two pins are for the track recoil and cannon firing sound trigger. My Pz3 didn’t have any plugs in CN3 and I’m using the flash that came with the Asiatam recoil, but I have a thought which might help. Since the HL transmitter left stick tells the Rx18 to switch the recoil motor to ground and the flash unit is separately triggered by the strobe trigger output, your best bet might be using a small switch which will be closed by the recoil unit to trigger the flash by connecting the switch to the right two pins of CN3 (track recoil/sound trigger and B- voltage). The recoil unit already has a micro switch mounted to trigger its own flash which you can repurpose by connecting it to the right two pins of CN3.
05-26-2012, 01:48 PM
05-26-2012, 04:23 PM
They should have used a black wire as to avoid any confusion ...
The small red wire bring the power (7.2 Volts ) to the elevation and the recoil motors ...
The green wire triggers the elevation and the yellow wire triggers the recoil while the thick red wire ( when connected to the ground ) completes the recoil cycle ....
Hope this helps ...Norm.