Originally Posted by
kizwan
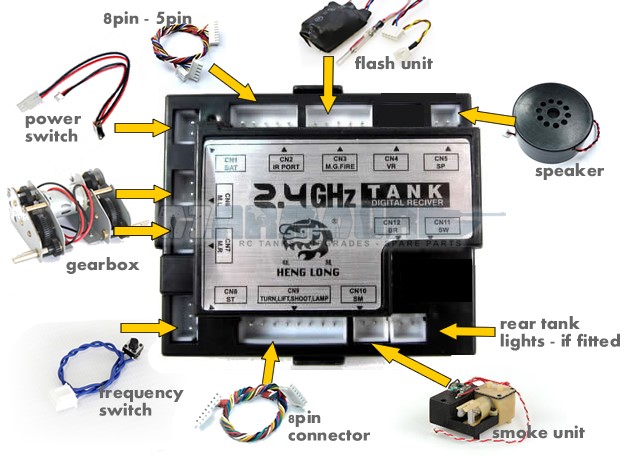
No need to solder anything. You can disconnect all wires from current transmitter & connect them to new transmitter. I'm not sure about the wires for ON/OFF button though. I changed from FM to 2.4GHz & the ON/OFF wires are soldered on the FM transmitter board. The 2.4GHz 2013 rev4 transmitter I have here use connectors for everything (see pic below). Just plug & play. Basically just need to plug in all the connectors (female connectors) to the appropriate socket (male connectors). I don't know whether the old version of 2.4GHz transmitter also use the same approach. I have extra female connector with the appropriate size. I just wired the ON/OFF switch wires to it & secured it with electrical tape. You can see in the picture in my previous post. I can do better if I have crimping tool.
On the left is 2.4GHz 2013 rev4 transmitter. On the riight is FM transmitter.
Do you know how to bind the transmitter with the receiver? If you don't bind them, you won't be able to use them. I don't know for sure whether you can use current transmitter with ver 2 receiver. If it doesn't want to bind then you'll need new transmitter.
Hi Kizwan,
That looks good. I prefer plug and play rather than messing around with wiring etc... but yours a bit tricky for On/Off connection.. hurrmmmmm
Talking about binding, i'm yet to check my manual on HOW TO bind the controller....
This is what Mark response to my question which im going to try on. (thanks for the direction)

.
================================================== ==============
Hi Min,
Thanks for your email.
Have you tried the binding procedure with your current controller? I have attached the set up diagrams with the binding instruction. You can also find the binding instructions in your Leopard 2A6 manual.
If you have tried this and it does not work then the controller you need to go with the version 2 board is:
http://www.ozarmour.com/store/heng-l...-rc-tanks.html
If I can be of any further assistance, please do not hesitate to ask.
Regards
================================================== ==============
which is....
Wiring & Binding Instructions
For Heng Long 2.4ghz Conversion Set (version 2)
Binding Proceedure:
- Ensure tanks battery is charged and plugged in.
- Ensure radio has fresh batteries.
- Press and hold the frequency switch on the tank.
- Press and hold the �Engine Start Up� button on the radio.
- Now turn on tank and then turn on radio
- Hold for 3 secs and then release.
- Tank should now start up and your radio is bound.