


GP .60 Reactor Bibe
 11-10-2009 | 09:36 AM
#76

Senior Member
Joined: Feb 2008
Posts: 487
Likes: 0
Received 0 Likes
on
0 Posts
From: Newmarket,
ON, CANADA
For .40 and .60 size planes, these cheap chinese motors are doing pretty good. Lots of positive feedback.
For a larger high dollar investment like the Giant Reactor or any other 50cc bird, I went with a proven platform in the Castle HV110 and Hacker A60. The larger ( 50cc ) size cheaper electric motors are still having issues with throwing magnets. Also quite a few have a bad design in how the prop is bolted on. Its to easy to overtighten the prop bolt and pull the shaft in the motor causing the bearings to take a side load they were not designed to take. Ultimately, causing failures in a very very short time.
With the price of LiPo's falling faster than our economies, .40 and .60size planes are now more cost effective to set up electric than with glow engines and fuel.
 11-10-2009 | 12:11 PM
#77

My Feedback: (1)
Oh, ok. You had me confused. I dind't realize the "giant" reactor was this plane: (NOT the bipe):
http://www.chiefaircraft.com/rcmsec/...ReactorGP.html
That's why I was curious why you picked such a big (and expensive) motor for what I thought was this 60 size bipe.
I just saw your other thread and note you you were running two of your 6S packs in series on that Giant reactor.
http://www.chiefaircraft.com/rcmsec/...ReactorGP.html
That's why I was curious why you picked such a big (and expensive) motor for what I thought was this 60 size bipe.
I just saw your other thread and note you you were running two of your 6S packs in series on that Giant reactor.
11-10-2009 | 12:55 PM
#78
Senior Member
Joined: Feb 2008
Posts: 487
Likes: 0
Received 0 Likes
on
0 Posts
From: Newmarket,
ON, CANADA
ORIGINAL: wind junkie
Oh, ok. You had me confused. I dind't realize the ''giant'' reactor was this plane: (NOT the bipe):
http://www.chiefaircraft.com/rcmsec/...ReactorGP.html
That's why I was curious why you picked such a big (and expensive) motor for what I thought was this 60 size bipe.
I just saw your other thread and note you you were running two of your 6S packs in series on that Giant reactor.
11-12-2009 | 07:47 PM
#79
Junior Member
Joined: Oct 2008
Posts: 4
Likes: 0
Received 0 Likes
on
0 Posts
From: Johnson City,
FL
Anyone have any pix or know how an OS 75 + slimline Q Pitts muffler fit in this plane? I want to minimize chopping the cowl.
I have tried to extrapolate by looking at pix on these forums but, man, it is a close call.
TIA,
Carlos
I have tried to extrapolate by looking at pix on these forums but, man, it is a close call.
TIA,
Carlos
11-12-2009 | 10:54 PM
#80
Senior Member
Joined: Nov 2005
Posts: 107
Likes: 0
Received 0 Likes
on
0 Posts
From: San Diego, CA
Here is what I have on my Reactor with a Saito 82. Did not have to cut much.
http://www.pspec.com/results.asp?category=4
http://www.pspec.com/results.asp?category=4
12-14-2009 | 10:05 AM
#82
Senior Member
Joined: Feb 2008
Posts: 487
Likes: 0
Received 0 Likes
on
0 Posts
From: Newmarket,
ON, CANADA
Got my Reactor Bipe all done this weekend.
I did it as an electric setup. So far it worked out good. Have not had a chance to maiden it yet. Work has been busy and with the holidays fast approaching, other things are taking priority.
I used some relatively inexpensive components from Hobby King for this.
The motor is Turnigy SK 50-65-380. Similar to the Rimfire 80 but less Kv. So I will have to use a bigger prop than the manual suggests.
ESC Is a new Turnigy 85 amp
Batteries are 6S 5000mah 20c
I ended up using some aluminum stand offs I had laying around to mount the motor. They just happened to be the perfect length with this motor.
Here are a few pics of the motor install.
12-14-2009 | 10:10 AM
#83
Senior Member
Joined: Feb 2008
Posts: 487
Likes: 0
Received 0 Likes
on
0 Posts
From: Newmarket,
ON, CANADA
The ESC is an enclosed unit. It has a nice heat sink on the top with a plastic case. The bottom of the case is ventilated.
When I mounted it I cut out a hole in the ESC mount to take advantage of the case ventilation.
When I mounted it I cut out a hole in the ESC mount to take advantage of the case ventilation.
12-14-2009 | 10:22 AM
#84
Senior Member
Joined: Feb 2008
Posts: 487
Likes: 0
Received 0 Likes
on
0 Posts
From: Newmarket,
ON, CANADA
I had to modify the battery cradle slightly. The battery had to sit further back to get the correct CG.
The first photo shows the stock recomended location. But since I was using a bigger battery I had to slide it back.
The 2nd photos show how far back it had to go. The last photo is a cradle I made that the tail end of the battery slides into.
The forward half of the battery still sits on the original battery mount with velcro etc. It works good. I can get the battery in and out with the plane fully assembled without issue.
12-14-2009 | 10:37 AM
#85
Senior Member
Joined: Feb 2008
Posts: 487
Likes: 0
Received 0 Likes
on
0 Posts
From: Newmarket,
ON, CANADA
For servos I used Hitec 225's on the ailerons and 225MG's on the elevators.
For the rudder I used a Hitec 985. Overkill I know, but it was sitting there.
Linkages, I went with Dubro locking clevices and ball links just because thats what I like to use.
2/56 rod on the ailerons and 4-40 on the tail group
For the rudder I used a Hitec 985. Overkill I know, but it was sitting there.
Linkages, I went with Dubro locking clevices and ball links just because thats what I like to use.
2/56 rod on the ailerons and 4-40 on the tail group
12-14-2009 | 10:48 AM
#87
Senior Member
Joined: Feb 2008
Posts: 487
Likes: 0
Received 0 Likes
on
0 Posts
From: Newmarket,
ON, CANADA
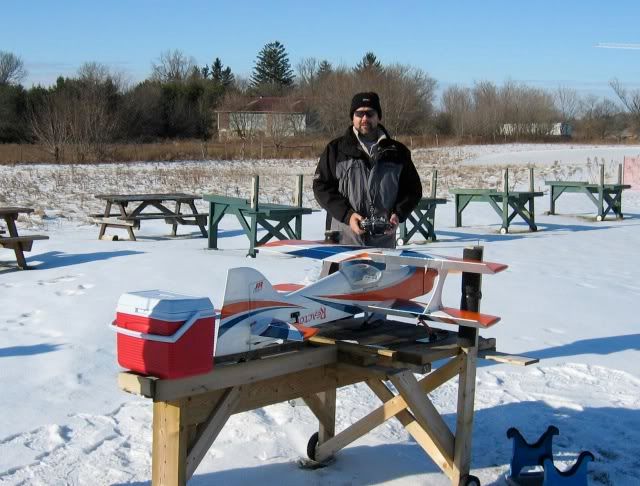
Here it is all done.
I have since added some decals, but I don't have the plane assembled at the moment for a photo.......
All up weight with the battery is 8 lbs 1 oz. A bit heavier than a Nitro install. But my wing loading is still 16.23 oz/sqft.
I plugged in the watts up meter for some readings.
With a 17x8 E-prop this is what I got.
1427 watts at 60 amps
Translates to 178 watts/lb
Digital fish scale tied to the tail gave me 12 lbs 7 ozs static thrust.
I have a 16x10 to try and see what kind of numbers that produces.
Overall I think it should fly nicely. Hover and pull out should also be good.
12-14-2009 | 12:49 PM
#88
My Feedback: (1)
Lots of good info. Thanks Bdegan.
My schedule is also getting crowded, but I did pick up that motor while I could (never know the stock forecast with HC these days).
I love the look of that big prop. Wonder if it will make the snaps a little wilder?
My schedule is also getting crowded, but I did pick up that motor while I could (never know the stock forecast with HC these days).
I love the look of that big prop. Wonder if it will make the snaps a little wilder?
12-14-2009 | 01:41 PM
#89
Senior Member
Joined: Feb 2008
Posts: 487
Likes: 0
Received 0 Likes
on
0 Posts
From: Newmarket,
ON, CANADA
ORIGINAL: wind junkie
I love the look of that big prop. Wonder if it will make the snaps a little wilder?
I love the look of that big prop. Wonder if it will make the snaps a little wilder?
It may also require more aileron to counter the torque during hovers. But at the same time there will be lots of air travelling over those surfaces. We will have to see what happens.

 12-20-2009 | 04:08 PM
#91
Senior Member
Joined: Feb 2008
Posts: 487
Likes: 0
Received 0 Likes
on
0 Posts
From: Newmarket,
ON, CANADA
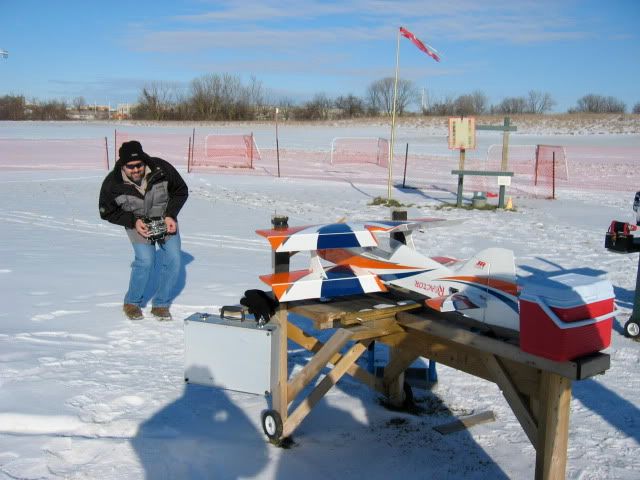
Did the Maiden today
Everything went well. The plane flew very good. The motor, prop, esc combo give it lots of power. Hover and pull out was impressive.
It took a couple clicks of aileron and elevator to have it go straight. Flew inverted hands off. So I think it is a hair tail heavy....but I am going to leave it. It didn't exhibit any bad habits .
On the second battery another fellow flew it a couple of minutes, then handed the radio over to another who flew it around for a minute or 2.
On the third battery I set the timer to 8 minutes. Did some hovers, some extended up lines. Lots of Harriers and touch and go's to get the feel for how it slowed down and landed. The timer went off and it was time to land.
I ended up with 8 1/2 minutes in the air and it still felt like it had full power.
The battery is currently on the charger re-charging. I will see what those 8 1/2 minutes used.
The 4th flight was lets see what she can do
Flew knifeedges, flatspins, harriers right down to the deck. Some low hovers
Then one guy yells out " Make some snowangels with the rudder !"
Well I didn't go that low.
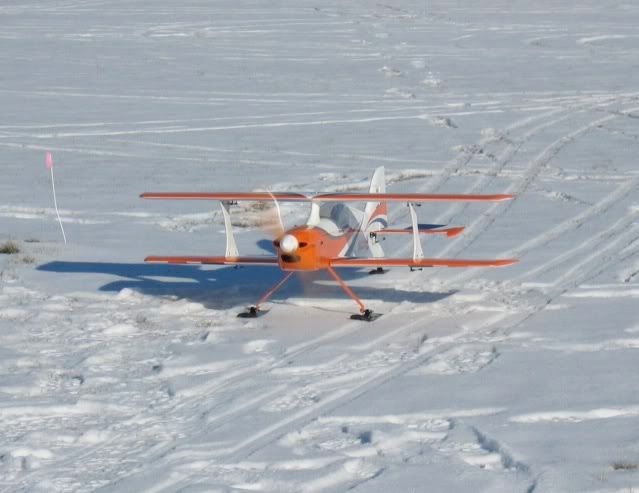
Oh in case you were wondering. The maiden was done with skis off of snow.
A couple of tail first landing.
One thing that was fun was to take off,turn and come around and land all within the length of the runway.
Overall, I am very very happy with this plane
[8D][8D][8D]
Everything went well. The plane flew very good. The motor, prop, esc combo give it lots of power. Hover and pull out was impressive.
It took a couple clicks of aileron and elevator to have it go straight. Flew inverted hands off. So I think it is a hair tail heavy....but I am going to leave it. It didn't exhibit any bad habits .
On the second battery another fellow flew it a couple of minutes, then handed the radio over to another who flew it around for a minute or 2.
On the third battery I set the timer to 8 minutes. Did some hovers, some extended up lines. Lots of Harriers and touch and go's to get the feel for how it slowed down and landed. The timer went off and it was time to land.
I ended up with 8 1/2 minutes in the air and it still felt like it had full power.
The battery is currently on the charger re-charging. I will see what those 8 1/2 minutes used.
The 4th flight was lets see what she can do
Flew knifeedges, flatspins, harriers right down to the deck. Some low hovers
Then one guy yells out " Make some snowangels with the rudder !"
Well I didn't go that low.
Oh in case you were wondering. The maiden was done with skis off of snow.
A couple of tail first landing.
One thing that was fun was to take off,turn and come around and land all within the length of the runway.
Overall, I am very very happy with this plane
[8D][8D][8D]
12-20-2009 | 04:18 PM
#92
Senior Member
Joined: Feb 2008
Posts: 487
Likes: 0
Received 0 Likes
on
0 Posts
From: Newmarket,
ON, CANADA
The Charger just finnished.
The battery took back 2221 mah's. Its a 5000 mah pack.
So in 8 1/2 minutes I used less than 50%
I am going to recharge the other 3 batteries and see what average I come up with.
Some flights were less another may have been close to 8 minutes.
Hmmm, next time out I might have to up the timer to 10 minutes and see what that uses.
 12-20-2009 | 06:46 PM
#95
Senior Member
Joined: Feb 2008
Posts: 487
Likes: 0
Received 0 Likes
on
0 Posts
From: Newmarket,
ON, CANADA
Battery numbers from all 4 packs....
Batt 1: 870 mah ( First maiden and trim flight ) Kept it short
Batt 2: 2405 mah ( No timer, 3 of us flew it )
Batt 3: 2221 mah ( Timed 8 1/2 minutes in the air )
Batt 4: 2542 mah ( No Timer ) Just felt like a good flight
So I have plenty of mah's left to stretch the flights to 10 minutes easily.
The 17x8 prop worked well. But I am going to try a 16x10 then a 17x10.
12-20-2009 | 06:54 PM
#96
Senior Member
Joined: Feb 2008
Posts: 487
Likes: 0
Received 0 Likes
on
0 Posts
From: Newmarket,
ON, CANADA
The ailerons are ridiculously effective.
I want to get some more elevator deflection. It did elevators really good, but I want to try what a little more throw will do.
I want to get some more elevator deflection. It did elevators really good, but I want to try what a little more throw will do.
12-20-2009 | 07:10 PM
#97
Senior Member
Joined: Feb 2008
Posts: 487
Likes: 0
Received 0 Likes
on
0 Posts
From: Newmarket,
ON, CANADA
Couple of quick low rez videos from the first 2 flights
Nothing compared to Jason's
http://smg.photobucket.com/albums/v6...1220135930.flv
http://smg.photobucket.com/albums/v6...1220135842.flv
Nothing compared to Jason's
http://smg.photobucket.com/albums/v6...1220135930.flv
http://smg.photobucket.com/albums/v6...1220135842.flv
12-20-2009 | 10:24 PM
#98
My Feedback: (1)
Great job Bdegan. Thanks for the info. You have a bit more snow than we do now.
I'd like to try to get away with not opening up the bottom because I want to drive the plane around when the snow is still fluffy, and I know it would stick to the ESC and freeze. Maybe for summer months, but I think (and hope) the cheek cowl holes will be enough to cool the motor and ESC in the winter months. What do you think about leaving the bottom closed?
I'd like to try to get away with not opening up the bottom because I want to drive the plane around when the snow is still fluffy, and I know it would stick to the ESC and freeze. Maybe for summer months, but I think (and hope) the cheek cowl holes will be enough to cool the motor and ESC in the winter months. What do you think about leaving the bottom closed?
12-21-2009 | 09:21 AM
#99
Senior Member
Joined: Feb 2008
Posts: 487
Likes: 0
Received 0 Likes
on
0 Posts
From: Newmarket,
ON, CANADA
ORIGINAL: wind junkie
Great job Bdegan. Thanks for the info. You have a bit more snow than we do now.
I'd like to try to get away with not opening up the bottom because I want to drive the plane around when the snow is still fluffy, and I know it would stick to the ESC and freeze. Maybe for summer months, but I think (and hope) the cheek cowl holes will be enough to cool the motor and ESC in the winter months. What do you think about leaving the bottom closed?
The battery was just luke warm coming out of the plane. If I get a chance next time and remember
 , I will put a temp gun on everything as soon as I land.
The hole in the fuse behind the wing could easily be covered with a piece of monocote or left closed until the spring when warmer weather comes.
The big opening at the front could be left smaller until the warmer weather rolls around. The opening on the bottom could be a bit smaller as well. But there should be some air flow through the cowl.
The motor and ESC staying cool is a good thing. But you do want the battery to warm up a bit, or it won't give you full power.
The temperature yesterday was around -2 C or 28 F at the first flight and about -7 C or 19 F by the 4 th flight 2 hrs later.
12-21-2009 | 09:29 AM
#100
Senior Member
Joined: Feb 2008
Posts: 487
Likes: 0
Received 0 Likes
on
0 Posts
From: Newmarket,
ON, CANADA
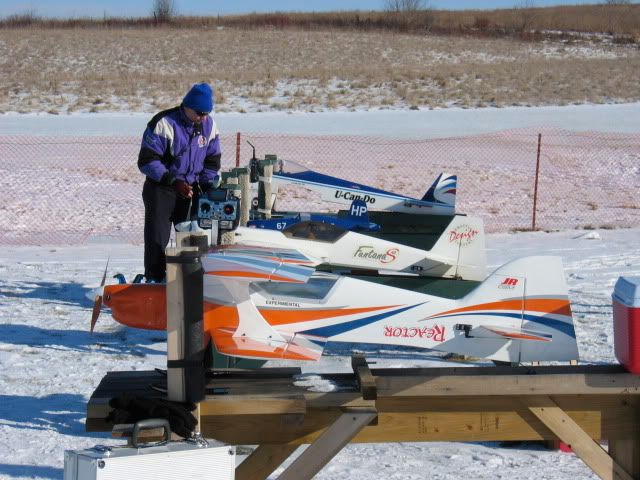
When Flying electric in the cold, you need to keep the batteries warm.
In the photo, on the back of the starter bench I had a red cooler. No Beer, sorry [ ].
].
Thats what my batteries are in. I preheat the cooler with the batteries in it by placeing it on the floor of the van as I drive to the field.
I have hot air blowing under the dash directly into the cooler. The internal of the cooler ( or warming box ) for now is warmed up as well as the batteries. Then when I arrive at the field I drop in a couple of those hand warmer packs you can use inside your gloves when you do stuff outside in the winter.
One of the guys I fly with buys them in bulk because he raises snakes. Uses them when he transports them.
Anyway I get them from him for about .10 cents a piece. They last up to 7 hours. Home depot sells the same thing in pairs or boxes of 12 pairs.
A couple of them maintain the internal temp of the cooler. The batteries go into the plane at just above room temperature.
In the photo, on the back of the starter bench I had a red cooler. No Beer, sorry [
].Thats what my batteries are in. I preheat the cooler with the batteries in it by placeing it on the floor of the van as I drive to the field.
I have hot air blowing under the dash directly into the cooler. The internal of the cooler ( or warming box ) for now is warmed up as well as the batteries. Then when I arrive at the field I drop in a couple of those hand warmer packs you can use inside your gloves when you do stuff outside in the winter.
One of the guys I fly with buys them in bulk because he raises snakes. Uses them when he transports them.
Anyway I get them from him for about .10 cents a piece. They last up to 7 hours. Home depot sells the same thing in pairs or boxes of 12 pairs.
A couple of them maintain the internal temp of the cooler. The batteries go into the plane at just above room temperature.

