


GP Patty Wagstaff - Building & Flying

 05-25-2004, 03:18 PM
#1702
Senior Member
My Feedback: (20)
Join Date: Dec 2001
Location: Clayton,
NC
Posts: 2,249
Likes: 0
Received 0 Likes
on
0 Posts
ORIGINAL: jappie993
Yes, i read about waxing, but do you really mean waxing the monocote ??
Like with a carwax ?? [X(]
Yes, i read about waxing, but do you really mean waxing the monocote ??
Like with a carwax ?? [X(]
 05-25-2004, 07:29 PM
#1703
Senior Member
My Feedback: (7)
Join Date: Dec 2001
Location: Glen Robertson, ON, CANADA
Posts: 3,453
Likes: 0
Received 0 Likes
on
0 Posts
ORIGINAL: jappie993
Yes, i read about waxing, but do you really mean waxing the monocote ??
Like with a carwax ?? [X(]
Yes, i read about waxing, but do you really mean waxing the monocote ??
Like with a carwax ?? [X(]
Well, I haven't waxed monokote before, but I can't see why not, give it a try, it should be OK
Roger
05-26-2004, 01:27 AM
#1704

My Feedback: (2)
Join Date: Jul 2002
Location: Hawthorne, CA
Posts: 5,839
Likes: 0
Received 0 Likes
on
0 Posts
Jappie,
Don't put on the decals till after you fly it a few times. You are gonna want to tighten the Mono after it has seen some weather and the decals make that difficult. When you do put on the decals clean the surface with window cleaner and paper towels. Then spray on more window cleaner and lay down the decal on the wet surface. Slide it into position and use a soft peice of balsa to squeegee out the excess liquid and allow to dry overnight.
Don't put on the decals till after you fly it a few times. You are gonna want to tighten the Mono after it has seen some weather and the decals make that difficult. When you do put on the decals clean the surface with window cleaner and paper towels. Then spray on more window cleaner and lay down the decal on the wet surface. Slide it into position and use a soft peice of balsa to squeegee out the excess liquid and allow to dry overnight.
05-27-2004, 07:43 PM
#1705
Junior Member
Join Date: Jan 2003
Location: Justice, IL
Posts: 18
Likes: 0
Received 0 Likes
on
0 Posts
Hey Bum,
you gave me some good advice on my control trows about a month ago, and I was wondering if I can pick your brain for some more. We finally have so good weather here in Chicago and she is going up Fri. afternoon. She came in at 17 1/4 pounds with a FPE3.2 that seems a little heavy from what I have been reading but I have a smoke system on her so that must be where the weight is. At any rate what can I expect Fri when I fly her at that weight? I am mostly concerned with landings should I try a high approach or low approach any thoughts?
Are field is very big so I dont need to land her on a dime. Any advice you can give me sure would be appreciated.
Thanks
Flyinlow
you gave me some good advice on my control trows about a month ago, and I was wondering if I can pick your brain for some more. We finally have so good weather here in Chicago and she is going up Fri. afternoon.
She came in at 17 1/4 pounds with a FPE3.2 that seems a little heavy from what I have been reading but I have a smoke system on her so that must be where the weight is. At any rate what can I expect Fri when I fly her at that weight? I am mostly concerned with landings should I try a high approach or low approach any thoughts?Are field is very big so I dont need to land her on a dime. Any advice you can give me sure would be appreciated.
Thanks
Flyinlow
05-27-2004, 10:31 PM
#1706

Greetings G.P. Patty fans,
My G.P. Patty's cowl came loose during the second run of my gasser and first run with the cowl attached and secured or so I thought,that being said I had tapped the cowl mounting blocks for 4-40's thinking this would be a secure set up as opposed to the self tapping screws shown on page(s) 18 & 19 . I skimmed through the two forums thus far on the Wagstaff Extra and did not see any thing on securing the cowl. So should I just use the [16mm] screws as INSTRUCTED or is there a better way. If you made it through this mumbo jumbo I thank you and would be curious indeed as to the method used to keep the cowl secured with a '50' inside... [8D]
[8D]
My G.P. Patty's cowl came loose during the second run of my gasser and first run with the cowl attached and secured or so I thought,that being said I had tapped the cowl mounting blocks for 4-40's thinking this would be a secure set up as opposed to the self tapping screws shown on page(s) 18 & 19 . I skimmed through the two forums thus far on the Wagstaff Extra and did not see any thing on securing the cowl. So should I just use the [16mm] screws as INSTRUCTED or is there a better way. If you made it through this mumbo jumbo I thank you and would be curious indeed as to the method used to keep the cowl secured with a '50' inside...
[8D]
05-27-2004, 11:09 PM
#1707


I usually use the wood screws but drill a slightly larger hole in the cowl and insert a round servo gromet with a little ca on the inside to secure it. Then i use a flat washer on the wood screw and then through the gromet. It stays tight and the cowl is shock mounted so the holes don't enlarge from vibration. I have also used 4-40s and blind nuts with the same system with equaly good results. A cowl ring is another option that works very well and has been nicely pictured in this thread a while back.
ORIGINAL: ramcfarland
Greetings G.P. Patty fans,
My G.P. Patty's cowl came loose during the second run of my gasser and first run with the cowl attached and secured or so I thought,that being said I had tapped the cowl mounting blocks for 4-40's thinking this would be a secure set up as opposed to the self tapping screws shown on page(s) 18 & 19 . I skimmed through the two forums thus far on the Wagstaff Extra and did not see any thing on securing the cowl. So should I just use the [16mm] screws as INSTRUCTED or is there a better way. If you made it through this mumbo jumbo I thank you and would be curious indeed as to the method used to keep the cowl secured with a '50' inside...[8D]
Greetings G.P. Patty fans,
My G.P. Patty's cowl came loose during the second run of my gasser and first run with the cowl attached and secured or so I thought,that being said I had tapped the cowl mounting blocks for 4-40's thinking this would be a secure set up as opposed to the self tapping screws shown on page(s) 18 & 19 . I skimmed through the two forums thus far on the Wagstaff Extra and did not see any thing on securing the cowl. So should I just use the [16mm] screws as INSTRUCTED or is there a better way. If you made it through this mumbo jumbo I thank you and would be curious indeed as to the method used to keep the cowl secured with a '50' inside...
[8D]
05-27-2004, 11:51 PM
#1708
My Feedback: (2)
Join Date: Jul 2002
Location: Hawthorne, CA
Posts: 5,839
Likes: 0
Received 0 Likes
on
0 Posts
Flyinlow,
When you do the maiden after it's trimmed, take it up high and do a stall test. You'll get an idea of how slow you can get it on final and if it has any tipping tendancies.
When you land it keep the nose down untill your a foot off the ground and ease back on the stick slowly till it settles. That's describes landing just about anything but with an aerobat you need to keep some speed especially if the weight is forward. Depending on your prop and idle it may slow down more than you are used to. I have a lot of bounced landings but the few deadsticks or when I lost a wheel (and killed the engine) have been really good landings so I think prop braking has been my problem.
05-30-2004, 05:27 PM
#1711
Member
My Feedback: (2)
Join Date: Feb 2004
Location: st.george,
UT
Posts: 72
Likes: 0
Received 0 Likes
on
0 Posts
The cowl ring is the only way to go. I'm sooo glad I let myself get talked into trying it even though it meant cutting off nine cowl blocks I had already installed. The cowl feels like it's part of the fuse, nice & solid.. Mine looks just like cap-tains.
I plan to maiden my 1st Patty tomorrow with a ZDZ 50 NG turnin' a 22x8. Wish I had a digi cam to post a pic. Do you guys think that a 1/4 oz. on a wing tip to balance laterally is worth worrying about? If so, Where is the best place to install it?
Let ya know how the date turns out............
OH MAN!........, I just realized tomorrow is..... Memorial Day [X(]
05-31-2004, 01:34 AM
#1712
Senior Member
My Feedback: (6)

Join Date: Dec 2003
Location: babylon,
NY
Posts: 1,001
Likes: 0
Received 0 Likes
on
0 Posts
BASIN BUM, How do you like those Du-Bro 4-40 kwick links with the locking tab. I'm using them for the first time. If the lock gets "bumped" open then the brass pin might vibrate out!?!? Have you used them for a while with out any problems? They do fit nicely into the holes on the control horns.
mustangflyboy, 1/4 oz weight on the the wing tip is nothing to lose sleep over, but if you do wish to install it, locate the weight on the side of the wing tip at the CG.
Thanks,
Gunny
mustangflyboy, 1/4 oz weight on the the wing tip is nothing to lose sleep over, but if you do wish to install it, locate the weight on the side of the wing tip at the CG.
Thanks,
Gunny
05-31-2004, 06:09 AM
#1713
Member
Join Date: Sep 2003
Location: Nieuwdorp, NETHERLANDS
Posts: 76
Likes: 0
Received 0 Likes
on
0 Posts
About the decals.. Are the letters all "cutout" or do I have to cut out all around the Goodrich logo's ?
Can you see the clear edges good on the plane ?, or is it worth the money to go for some better decals??
Thanks and greetings from Holland !
Can you see the clear edges good on the plane ?, or is it worth the money to go for some better decals??
Thanks and greetings from Holland !
05-31-2004, 06:50 AM
#1714

Mustangflyboy,
Can you move anything inside the fuse to lateral balance. I was able to lateral balance by moving the position of the Rx and voltage regulators. If not use some tape to temporarily attach the weight test by flying inverted if neither wing dips your there. Hide the weight by using a nail of equal weight inserted and epoxied at the CG point and cover with monokote.
jappie993,
Cut around the lettering NOT each individual letter. I left about a 1/2 inch all the way around. then use the Windex method Bum mentioned. You can't see the edges unless your a foot away so save your cash.
Pete
05-31-2004, 06:56 AM
#1715
Senior Member
My Feedback: (11)

Join Date: Jun 2002
Location: Las Vegas,
NV
Posts: 1,713
Likes: 0
Received 0 Likes
on
0 Posts
Jappie,
As far as the decals are concerned, throw the ones you got with the plane away. I've tried it two ways. Cutting out the entire logo section leaves quite a bit of clear decal area. I don't know where you live, but here, with the Las Vegas sun, after a couple of weeks, the clear portion of the decal yellows and really looks ugly. On my second Patty, I took the time to cut out each and every letter. That looked pretty good when I put them on but it only took a couple of flights for the lettering to start coming off. I spent more time trying to keep them on than doing regular maintenance to the airplane.
If you're insistant on putting on the logos, then look through this thread. There's a guy that sells the vinyl lettering package for about $35.00. Don't quote me on the exact price, but it's in that range.
As far as I'm concerned, I kind of like the plain look of the plane. So, I'm just running her with my AMA number on the right aileron.
05-31-2004, 09:25 AM
#1716
My Feedback: (2)
Join Date: Jul 2002
Location: Hawthorne, CA
Posts: 5,839
Likes: 0
Received 0 Likes
on
0 Posts
Gunny,
I havn't had a problem with the clevises. In fact they were intact after my crash and I never had a lock get bumped open. I think it's a more secure method than fuel tube on metal, others may disagree.
Jappie, maybe I don't understand part of your question....do you have a Patty already or are you getting one in the future?
05-31-2004, 09:47 AM
#1717
Member
Join Date: Sep 2003
Location: Nieuwdorp, NETHERLANDS
Posts: 76
Likes: 0
Received 0 Likes
on
0 Posts
Basinbum,
He is ready to go !!, only the decals left..
Da-50
Slimline pits
DPSI-regulator Emcotec
2x 1500 Lipo safe Emcotec
Smoke slimline
Futaba digi servo's
21x11 3-blade
7,8 kg
He is ready to go !!, only the decals left..
Da-50
Slimline pits
DPSI-regulator Emcotec
2x 1500 Lipo safe Emcotec
Smoke slimline
Futaba digi servo's
21x11 3-blade
7,8 kg
05-31-2004, 09:53 AM
#1718
Senior Member
My Feedback: (11)
Join Date: Jun 2002
Location: Las Vegas,
NV
Posts: 1,713
Likes: 0
Received 0 Likes
on
0 Posts
Jappie,
What a beautiful setup. Very, very cool. What was the final weight? I can tell that you've put a lot into this airplane. Don't ruin it with the supplied decals. Let us know how she flys with the 3 bladed prop. Good Job!
What a beautiful setup. Very, very cool. What was the final weight? I can tell that you've put a lot into this airplane. Don't ruin it with the supplied decals. Let us know how she flys with the 3 bladed prop. Good Job!
05-31-2004, 11:02 AM
#1720
Senior Member
My Feedback: (11)
Join Date: Jun 2002
Location: Las Vegas,
NV
Posts: 1,713
Likes: 0
Received 0 Likes
on
0 Posts
That's 17.2 lbs. with a smoke system. She's a tad on the heavy side, but not by much. Did you relocate your fuel and smoke tanks over CG? I've got the 20 oz. tank and get four sequences with about 3 minutes of flying time left. So, the three bladed prop will take a little off the power and the Pitts style muffler will cut back on the RPM's a couple hundred, but overall, you should have a great flying airplane. I've never seen one with a smoke system fly. I'd love to have one but I'm saving every ounce that I possibly can. Again Jappie, you've done a teriffic job and I think you'll be very happy with the flight characteristics.
 05-31-2004, 12:36 PM
#1723
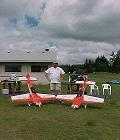
Langing Patty. There has been some discusion about this and i have been experimenting with flaperons and spoilerons and here are my conclusions. Spoilerons are the way to go. The tendancy is to carry too much speed to the runway causing bounces or landing very long or worse. With spoilerons, wherever you touch down, she stays down, even with a little too much speed. Also, the roll out slows down faster because of the added down force on the wing. For those who tend to approuch a little too slow, you can, with spoilerons, now carry a little more power with no worries about overshooting. You hold more up on approuch so the flare is simply a relaxing at the right time and, as i mentioned, she plants solidly on the ground with no bounce. Looks perfect every time. Here are a couple shots off the deflection i found works best for me.
05-31-2004, 01:36 PM
#1724
Member
Join Date: Sep 2003
Location: Nieuwdorp, NETHERLANDS
Posts: 76
Likes: 0
Received 0 Likes
on
0 Posts
Ram;
Can you please give me more info about the spoilerons?
I will maiden my patty soon, and I am a heli man, and don't no very much about those mixes..
I am using Futaba t9zap, and NOT using Y-cables..
Thanks !!
Can you please give me more info about the spoilerons?
I will maiden my patty soon, and I am a heli man, and don't no very much about those mixes..
I am using Futaba t9zap, and NOT using Y-cables..
Thanks !!
05-31-2004, 05:07 PM
#1725
Member
My Feedback: (2)
Join Date: Feb 2004
Location: st.george,
UT
Posts: 72
Likes: 0
Received 0 Likes
on
0 Posts
Well,.. she survived the Memorial Day maiden! I guess we were ment to be. Although, it wasn't with out a cuople of complications. My choke is manually operated and it wasn't closing all the way, just slightly open, but enough not to draw fuel. Got that squared away and tried again,..WOW, my heart jumped when she growled to life. Everything checked out after taxi runs so I put her in her element. Flew great after a little trimming but when I made a practice approach it sounded funny at low rpm so I brought it in, landing wasn't too bad, just one little bounce. Checked everything and my muffler was lying in the bottom of the cowl, no bolts or gasket to be found. I blue lock tight on them and didn't last half a flight. They were installed days ago so the stuff should have been set up. I know this has happened to some of you guys, so what is the remedy. And anyone kow what size the bolts were? Those you running smoke, what tubing do you have attached to the muffler yellow or black?
Here is my list
ZDZ 50 NG w/ pitts muff.
sullivan smoke pump
4 Hitec 945 coreless
1 JR 8611 digital (pull-pull rudder)
1 Hitec 525 thr.
JR 700 PCM Rx
dual Rx switches
dual 6V 1650 mAh nimh (Rx)
4.8V 1650 mAh nimh (ign)
smart fly "Bat Share"
smart fly "fiber optic kill"
vinyl graghics
robart hinges
Rocketman, yes both batt. are on the light side and it did help a little. I only got one short flight in, so I'll do some more testing and see how it does a 1/4 oz. off
Tips the scales @ 18 pounds,....I know she's a little heavy, but it's what 's inside that really counts,..right? I can hardly wait to try out the smoke. You smokers, what brand oil are you using? How well does it burn? completely or leaves alot of mess?
I'm going to try to upload some images.
[img] [/img]