


A Few Building Ideas To Chew On
 03-08-2014 | 10:40 PM
#26
Thread Starter
Senior Member
The recipe will vary depending on how the covering does. I have mixed as little as half the volume of Baby Powder to 1 volume of nitrate, (thinned about 50:50) and as much as 1:1 or a bit more. A good all around recipe is about 3/4 volume of BP to 1 Nitrate. There's quite a bit of room here and it's relatively non-critical. There was one time I applied so much BP (at least 2:1), it mixed into a slurry. After brushing, it looked like it was applied with a broom. But it dried fine and sanded and feathered easily. I decided the BP mess at sanding was too much so I reduced the ratio.
Yes the final two coats are with the sanding sealer, sanding dry with 320 well used paper between the coats..
My new design hasn't seen any action in weeks. It's been too cold and snowy and I just didn't feel like freezing in the garage. But as weather gets better, I will get cracking...
 03-15-2014 | 07:34 AM
#27

My Feedback: (6)
I knew you'd like it better over here Matt. It would be nice to have a pattern building forum where builders could post because I think for most of us flying takes a back seat to the build.
I'm still considering a 2 M build but I've just had too much fun with classic pattern. Maybe I need to build a Derivative...
Tim
I'm still considering a 2 M build but I've just had too much fun with classic pattern. Maybe I need to build a Derivative...
Tim
03-19-2014 | 08:49 AM
#28
Thread Starter
Senior Member
I knew you'd like it better over here Matt. It would be nice to have a pattern building forum where builders could post because I think for most of us flying takes a back seat to the build.
I'm still considering a 2 M build but I've just had too much fun with classic pattern. Maybe I need to build a Derivative...
Tim
I'm still considering a 2 M build but I've just had too much fun with classic pattern. Maybe I need to build a Derivative...
Tim
Well, the Derivative (renamed Delta) is as good all around model as any I've seen. I made some changes to wing location to accommodate the much lighter OS GT33 (originally set-up for a DLE55). Regardless, I have the fuse mold of course so getting a fuse for you is no big deal. Time is the only drawback, of which I have very little these days.
Plus with all the cold weather and long winter this season, projects just pile up.
11-20-2015 | 10:39 PM
#29
Thread Starter
Senior Member
Is there any interest on the latest wing tooling I developed? Short description: My favorite foam wing was sacrificed by cutting it into 15 sections, producing the precision needed for ribs. This wing was extremely accurate and the foam husks will serve as cradles for producing built up wings. The weight savings is the only reason to do it, of course... I can follow up with some photos if there is interest.
 11-22-2015 | 07:36 AM
#32
Thread Starter
Senior Member
It started with a very accurately cut, perfectly symmetrical foam core. I had purchased 4 sets of cores from the guy who cut them to my specs back around 2000. The workmanship was exceptional, the best I ever saw. Two sets were built into wings for projects, I sold one and I still had one set remaining. I flew one of the wings in my Temptress for about 10 years. I loved the way the wing flew.
I honeycombed and sheeted the last set of cores a few years ago and just held on to the wing waiting for the right project. The wing was light enough at 10 ounces per panel (honeycombed cores, light wood, carbon veil inside) and super strong. But I've been thinking about getting panels even lighter from discussions with Dean Pappas and Bob Hunt. Bob especially has been talking about built up, 700 square inch wings that weigh in at 7 ounces. He also suggested the "lost foam" technique of building the wings. I tried the technique on a stab for my Delta last year and it worked well. If Bob could build a 700 square Control Line Stunt wing at 7 ounces, why couldn't I build a 500 square panel for Pattern at 6-7 ounces?
The idea of converting the last set of cores into tooling for built up panels was hatched. I proceeded to glass one panel with 2 ounce glass, which produced a good durable surface to sand against. I then cut the 15 stations at 2 1/4" width and sanded the balsa rib relief into each panel. I used a stiff bladed, 14 tooth per inch hack saw for the cutting and more teeth would have been better; the results were good.
If one decides to build tooling in similar fashion as me, he should use heavier foam 2-3 pound stock, and not necessarily sheet the foam. Simply glassing the foam with 2-3 ounce glass is all that's needed. In addition, it won't appreciably change the wing thickness. In my case, adding the extra 1/8" of balsa thickness increased the wing thickness from 11% to 11.5 % which is in the right direction for Pattern wings (I tried very thin, 9 1/2%, wings in my Delta and don't really care for them). Of course, overly thick wings make certain maneuvers more difficult to execute so for current F3A pattern, a thickness of around 11-12% is perfect.
Last edited by MTK; 11-22-2015 at 07:54 AM.
11-23-2015 | 09:30 PM
#33
Thread Starter
Senior Member
Lets see if I remember how to upload photos


The second half of the original wing. The other panel of course is the subject of this latest scribble
The whole wing cut into 15 stations after the glassing is done. Lots of care needed here of course. A radial arm saw would have made this chore super easy but I don't have one, So I used the next best thing, my hands
A couple stations with ribs in between
Several stations. Note how the ribs nest in between. Getting the precision needed is the whole point of the tool
Last edited by MTK; 11-23-2015 at 10:04 PM.
11-23-2015 | 09:33 PM
#34
Thread Starter
Senior Member
More


First rib
A couple stations with ribs
The rib stack for the second panel. Sixteen ribs per panel may seem too many and based on how we built wings before, I might agree. But this is a very light structure and in order to be durable, the rib bays should not be any wider. Poking a finger through a surface over years of use can be avoided with a little forethought
Every rib marked for orientation
Last edited by MTK; 11-23-2015 at 10:09 PM.
11-23-2015 | 09:54 PM
#35
Thread Starter
Senior Member
more


Tube sockets are super easy to build from 1/32" soft stock that's been glassed on one side. Kevlar tow (glass, or carbon may be used also) is doped on the outside producing a very strong, stiff and light socket. The second photo shows how light exactly
Third photo shows the second panel being used to mold the LE from 1/16" balsa. The best thing about molded leading edges is their excellent fidelity and radius accuracy. Also, making two identical LEs becomes a trivial matter.
The fourth photo shows sheeting and spars. Spars are bass capped balsa. I didn't have carbon sheet but had 1/32" bass. A little heavier but not terrible
The final photo shows the lightened rib stack. The saving in weight is about 15 grams per rib stack which doesn't sound like much. But when you consider the uncut stack weighed 34 grams, it's about a 40% saving. Ribs 1 and 6 will also take a 1/32" ply cap surrounding the socket.
At this stage, I've got the first set of sheets sanded and ready for the carbon tissue inside. Then I will assemble the first panel.
Taking a quick weight tally I think the panel will build at about 150 grams. Then there are aileron facings and LEs/TEs to add. We'll see where we end up. My plan is to cover with Esaki and paint
12-03-2015 | 12:09 PM
#36
Thread Starter
Senior Member
I have all wing parts ready for assembly. The skin weight is shown on the skin. The skins are first sealed using nitrate dope before assembly. This tends to eliminate skin buckle between the bays over time. The bays are 2 1/4" wide which also tends to reduce skin buckle.
The wing kit weighs just over 300 grams before assembly for both panels. Glue and sheer webbing will add maybe 20 more grams per panel.
Note the marked thicknesses along the skin: root is about 0.078", mid section is around 0.070" and tips are just under 0.060". Taper sanding the skins is straight forward with a few sanding blocks, each with different paper grades on. I start with 60 grit, then 120, then 180, then 320 and end with 400, making the surface ready for covering. It takes maybe 15 minutes per skin. It's messy but fast.
I first mark the surface with a Marks A Lot. The ink penetrates about 5 thou so when the ink is sanded off, I stop and measure. QED
Last edited by MTK; 12-10-2015 at 10:25 AM.
12-04-2015 | 09:38 PM
#37
Thread Starter
Senior Member
The tool provides the base on which the wing is constructed... Weight to this point is 130 grams.
Wing tube treatment. Shear webs on both sides to rib 6. Single Shear webs everywhere else
Thumbnails below show the ply rib for the adjuster and aileron servo and hard point
Last edited by MTK; 12-04-2015 at 09:41 PM.
12-05-2015 | 03:04 PM
#39
Thread Starter
Senior Member
Jim, I'm glad someone is reading some of this scribble.
Typical for model building. CA thin and medium in a few places where quick hold was needed, very small amount of gorilla for spar lamination and tube socket install, and mostly yellow carpenter's glue, thinned enough to flow through a syringe easily. CA is pretty heavy like epoxy so I use it sparingly. So is gorilla but the foaming aspect is useful when small gaps around the socket needed a little fill.
BTW- when gluing the top skin last night I wanted to see what sort of contact it made to the ribs. I pulled the skin back and was happy to see that just about every mm was touching. The precision paid off.
I pulled the panel off the jig and got a weight of a hair over 180 grams. After the aileron facing and LE and tip block are added the panel should be ready for covering at around 210-220 grams. The panel is large at 470 squares compared to most so this weight (around 7 1/2 ounces) is pretty fair. Finished weight of 11 ounces should be achievable unless I screw up the covering and painting. We'll see......
12-07-2015 | 04:54 AM
#42

My Feedback: (7)
Joined: Aug 2002
Posts: 236
Likes: 0
Received 0 Likes
on
0 Posts
From: Pasadena, Tx
Matt,
Great to see your stuff in this forum. I agree that the 2 meter forums are just empty of any creativity with building nowadays. Keep it coming as I plan a new 2 meter build soon and will try your wing build method.
maustin
Great to see your stuff in this forum. I agree that the 2 meter forums are just empty of any creativity with building nowadays. Keep it coming as I plan a new 2 meter build soon and will try your wing build method.
maustin
12-07-2015 | 08:22 AM
#43
Thread Starter
Senior Member
Thanks guys. We know who the builders/creators are. The thing is that at least half of the folks in Pattern today were in Pattern 25 years ago when we all had to build our own. People know how to build but choose not to.
ARFies have their place and I've purchased them also. But if one wants better, one has to make it himself.
Example, I purchased a Griffin ARF from F3AU last year which is electric strictly. Well, I don't do large electric so I converted it to IC. Also changed the rinky dink landing gear mounting. My method is stronger and lighter. Reason for tackling the project is, this particular model is very lightly built for a full composite so it was worth the effort.
Here are a couple more snaps of the completed panel:
 I've cut through most of the aileron but I leave it in until after the carbon tissue is on. It maintains aileron stability. I've decided to bed the carbon tissue first and follow it up with light weight Esaki Japanese tissue. The Esaki has a much finer, easier to fill surface. Both combined are lighter than 3/4 oz glass and epoxy.
 Note how the molded LE was fitted. It's considerably lighter than working on a hunk of balsa. Plus it is easier to produce identical left and right LEs
ARFies have their place and I've purchased them also. But if one wants better, one has to make it himself.
Example, I purchased a Griffin ARF from F3AU last year which is electric strictly. Well, I don't do large electric so I converted it to IC. Also changed the rinky dink landing gear mounting. My method is stronger and lighter. Reason for tackling the project is, this particular model is very lightly built for a full composite so it was worth the effort.
Here are a couple more snaps of the completed panel:
12-07-2015 | 07:33 PM
#45
12-07-2015 | 09:43 PM
#46
Thread Starter
Senior Member
It took about 2 1/2 weeks but the carbon tissue and Esaki rice paper arrived today, yeay! I got the lightest carbon tissue (0.2 ounce) and all flavors of the Esaki available. Interestingly, the light and medium Esaki weigh the same at about 7 grams per 3/4 sq meter. The heavier grade weighs 13 grams. If you've never worked with Esaki, try it....
Sig carries it and calls it Plyspan (not Polyspan which is a nonwoven heat shrinkable plastic; great for open bays). BTW- for what it's worth, silkspan was slightly lighter grade for grade. But I've not been able to source silkspan anywhere. Regardless, Esaki from Sig is rather inexpensive at 2$ a sheet and is a little stronger than silkspan
I just completed bedding the carbon tissue using nitrate thinned about 75%. That's after prepping the wood with two coats of nitrate thinned 50%. I tried using blue tinted nitrate this time and I must confess that it was easier to see where I applied and where I had not. One can of tinted will always be in my shop from now on.
I also tried using the old credit card trick on the nitrate. We all have used this with glass and resin so it should be a familiar technique. It worked rather well, much better than I imagined. See, I had generally thought that nitrate just penetrates the wood and then flashes too fast. But my shop temp has been in the mid fifties so flashing was slowed enough to allow this age old technique. Doctor blading really saved a lot of brushing time and weight.
I actually doctor bladed the carbon tissue on too and that worked even better than any of my earlier trials on other projects. I'll post photos tomorrow. So far, after the tissue application, weight gain has been minimal. The panel weighs 210 grams or about 25 grams ahead of where I thought it would be.
12-08-2015 | 07:28 AM
#47
My Feedback: (7)
Joined: Aug 2002
Posts: 236
Likes: 0
Received 0 Likes
on
0 Posts
From: Pasadena, Tx
Matt,
May have missed this but what do you do if your foam wing core has the flat leading edge? Can you still make a LE mold from this or do you have to make a mold before forming? I have a old EU1A kit that I was contemplating trying your built up method on.
Thanks,
maustin
May have missed this but what do you do if your foam wing core has the flat leading edge? Can you still make a LE mold from this or do you have to make a mold before forming? I have a old EU1A kit that I was contemplating trying your built up method on.
Thanks,
maustin
12-08-2015 | 08:07 AM
#48
Thread Starter
Senior Member
Matt,
May have missed this but what do you do if your foam wing core has the flat leading edge? Can you still make a LE mold from this or do you have to make a mold before forming? I have a old EU1A kit that I was contemplating trying your built up method on.
Thanks,
maustin
May have missed this but what do you do if your foam wing core has the flat leading edge? Can you still make a LE mold from this or do you have to make a mold before forming? I have a old EU1A kit that I was contemplating trying your built up method on.
Thanks,
maustin
I highly recommend that the foam be glassed with substantial glass and epoxy (2 ounce, but if you have 4 ounce on hand, fine; 3/4 ounce is likely too light to survive more than once or twice).
The ribs will need to have the LE contour cut when using each station, while the second intact panel will be used for LE molding.
BTW- LE molding that I did was done exactly this way. The first panel was cut into stations while the second was left intact and is used as the LE mold. To mold, I just wet the balsa sheet very well and carefully formed it around the panel LE. If you plan to use 3/32 balsa, use a medium 8 lb. stock and wet it for at least 30 minutes or it will crack. I hold the LE to shape using masking tape. 1/16" balsa forms easier than 3/32 as you would expect.
Or you may buy an LE forming tool for your specific wing from Bob Hunt. The tool Bob has created is a heavier grade foam block that has the precise LE shape cut out. He ends up with both the female cavity and the male plug. The male plug has been relieved of the balsa thickness.
The wet balsa is laid into the cavity and the male plug is fitted on top of the balsa. The whole thing is wrapped with an ACE bandage and allowed a couple days drying time. Cost is probably around 30$ give or take.
Yet another possibility, send the whole panel to Bob and have him cut you a complete foam tool from 2 lb foam. That is, the foam wing cut into as many stations as you want, each station relieved of the balsa rib thickness. You will also get the husks which will be the base onto which you will build the panels. Don't know what he might charge for this but at least tell him I sent you and he may cut you some slack.
EDIT: Mike something to think about is model speed and wing stress at that speed. 2 meter types fly at about 80 top speed since they are larger and power set up is for low rpm but high volume from the prop. They weigh 11 lbs tops so wing construction is designed to withstand that load.
Classics fly at around 110 top speed and weigh around 8 lbs give or take a lb. Wing loading is possibly a little greater for them. At minimum you want to cap the spars with 0.007 carbon strips or use larger spars than I used in mine (1/4 x 1/2" capped with 1/32 bass).
Last edited by MTK; 12-08-2015 at 04:26 PM.
12-08-2015 | 08:39 AM
#50
Thread Starter
Senior Member
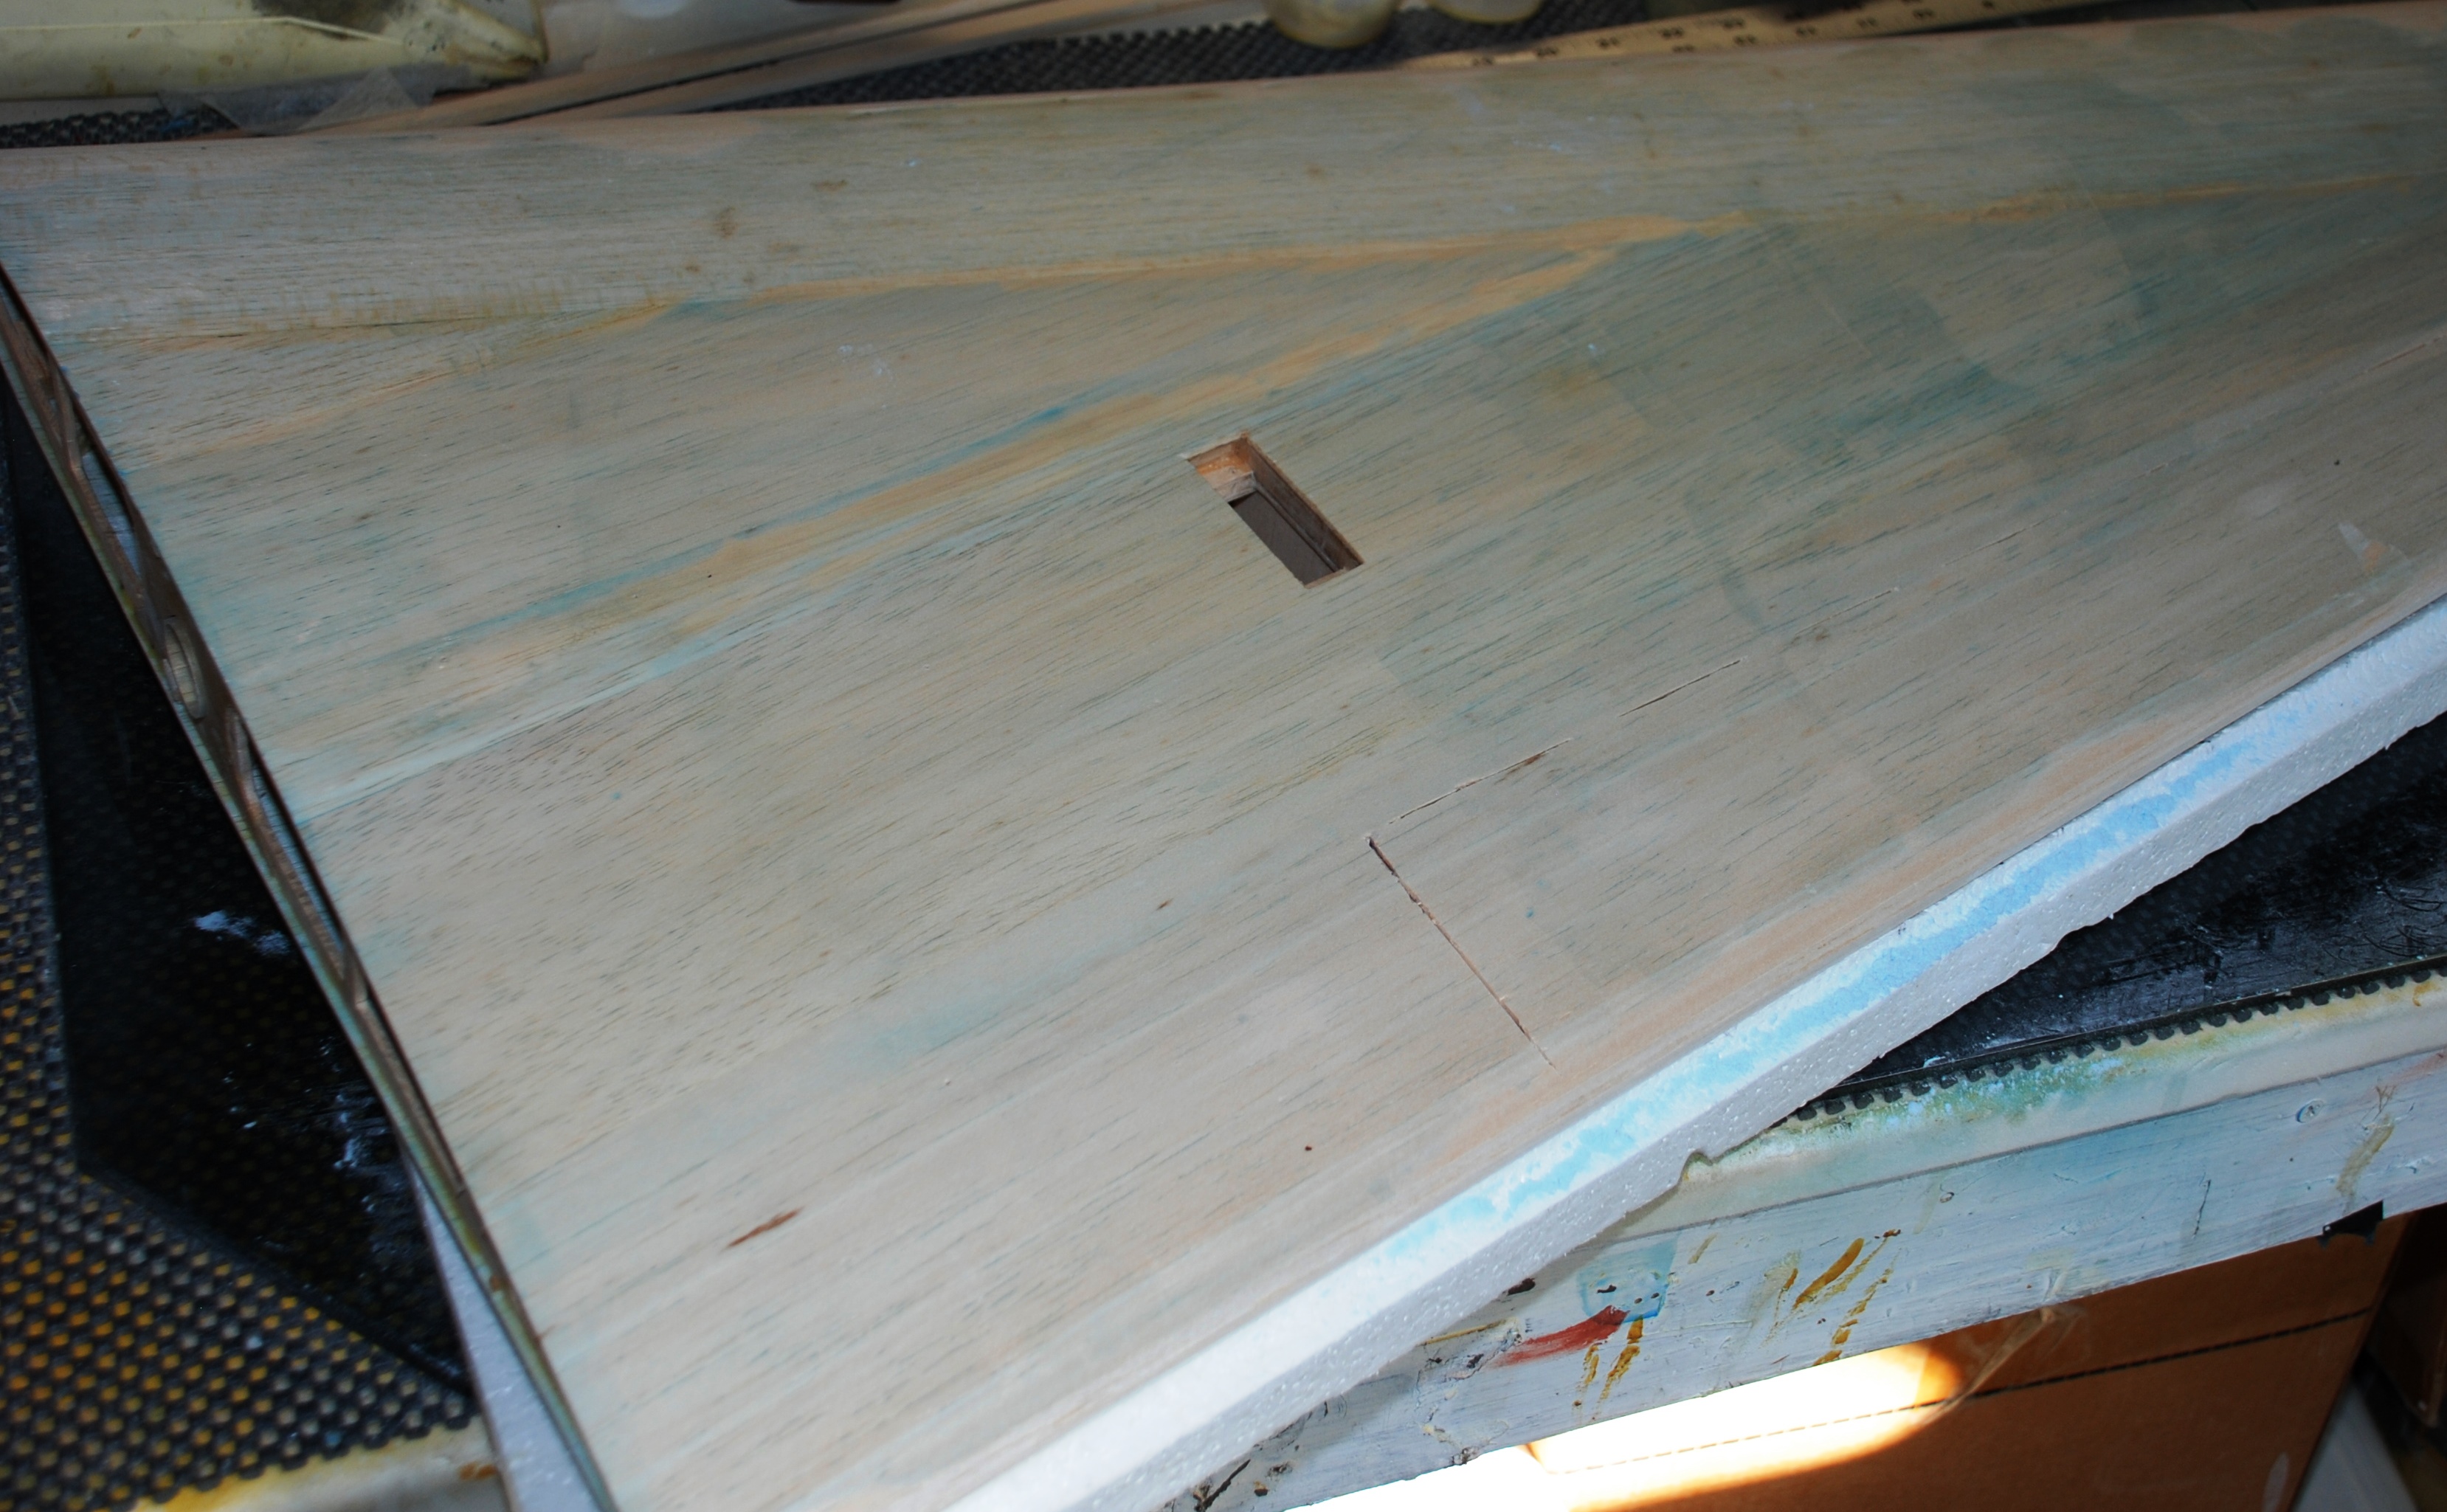
The panel with the carbon tissue applied. Two coats of 75% thinned nitrate down to this point. Esaki medium paper is next.


I am also starting the second panel build today. I am using a very thin coat of epoxy on inside of the skins to seal from moisture. I used only nitrate on the first panel but got a little bit of skin buckle between the bays (note the blue blotches under the carbon tissue; that's nitrate and microballoons mixed into a syrupy slurry and painted onto the wing to raise the surface slightly. Nitrate and microballoons has got to be the easiest sanding and feathering filler for larger areas I've even concocted; adds nearly no weight and feathers beautifully)
I am also starting the second panel build today. I am using a very thin coat of epoxy on inside of the skins to seal from moisture. I used only nitrate on the first panel but got a little bit of skin buckle between the bays (note the blue blotches under the carbon tissue; that's nitrate and microballoons mixed into a syrupy slurry and painted onto the wing to raise the surface slightly. Nitrate and microballoons has got to be the easiest sanding and feathering filler for larger areas I've even concocted; adds nearly no weight and feathers beautifully)

