


1/4 scale Skybolt from Bob Dively kit plans
 10-01-2023, 06:49 PM
#1

Thread Starter
Hello in the mid 1980's I bought a Bob Dively Skybolt kit. after spending more than a year building it it flew beautifully. For 1 1/2 flights, It flew so well on the first flight that I was flying inverted on the 2nd flight and went to loop out of it and pushed my thumb the wrong way. Now I roll out of inverted flight. But Hey we took pictures to document the flights, too bad we didn't have any film in the camera!!!
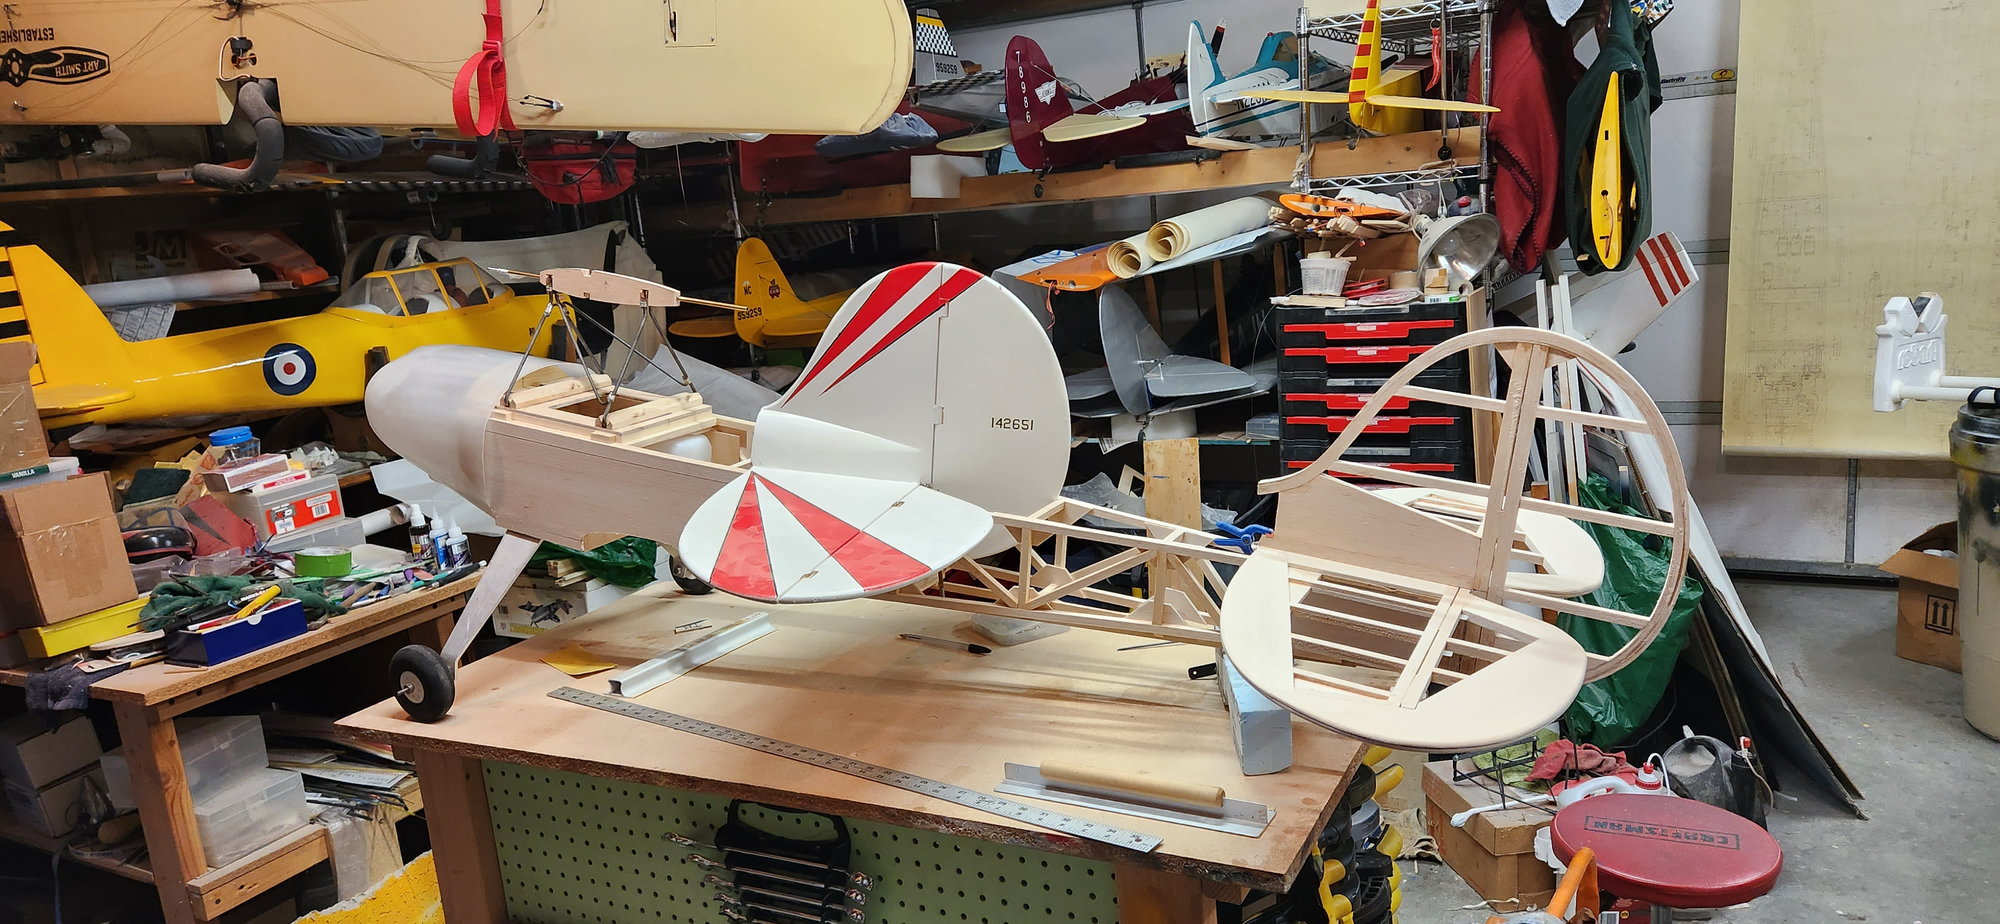
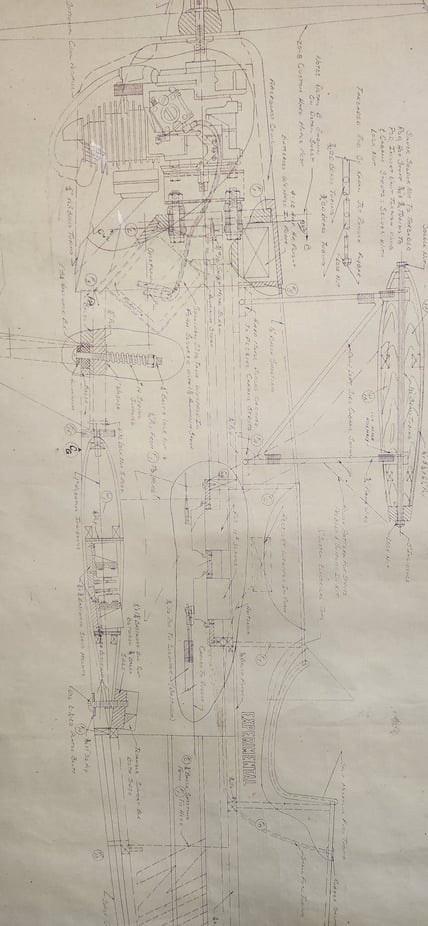
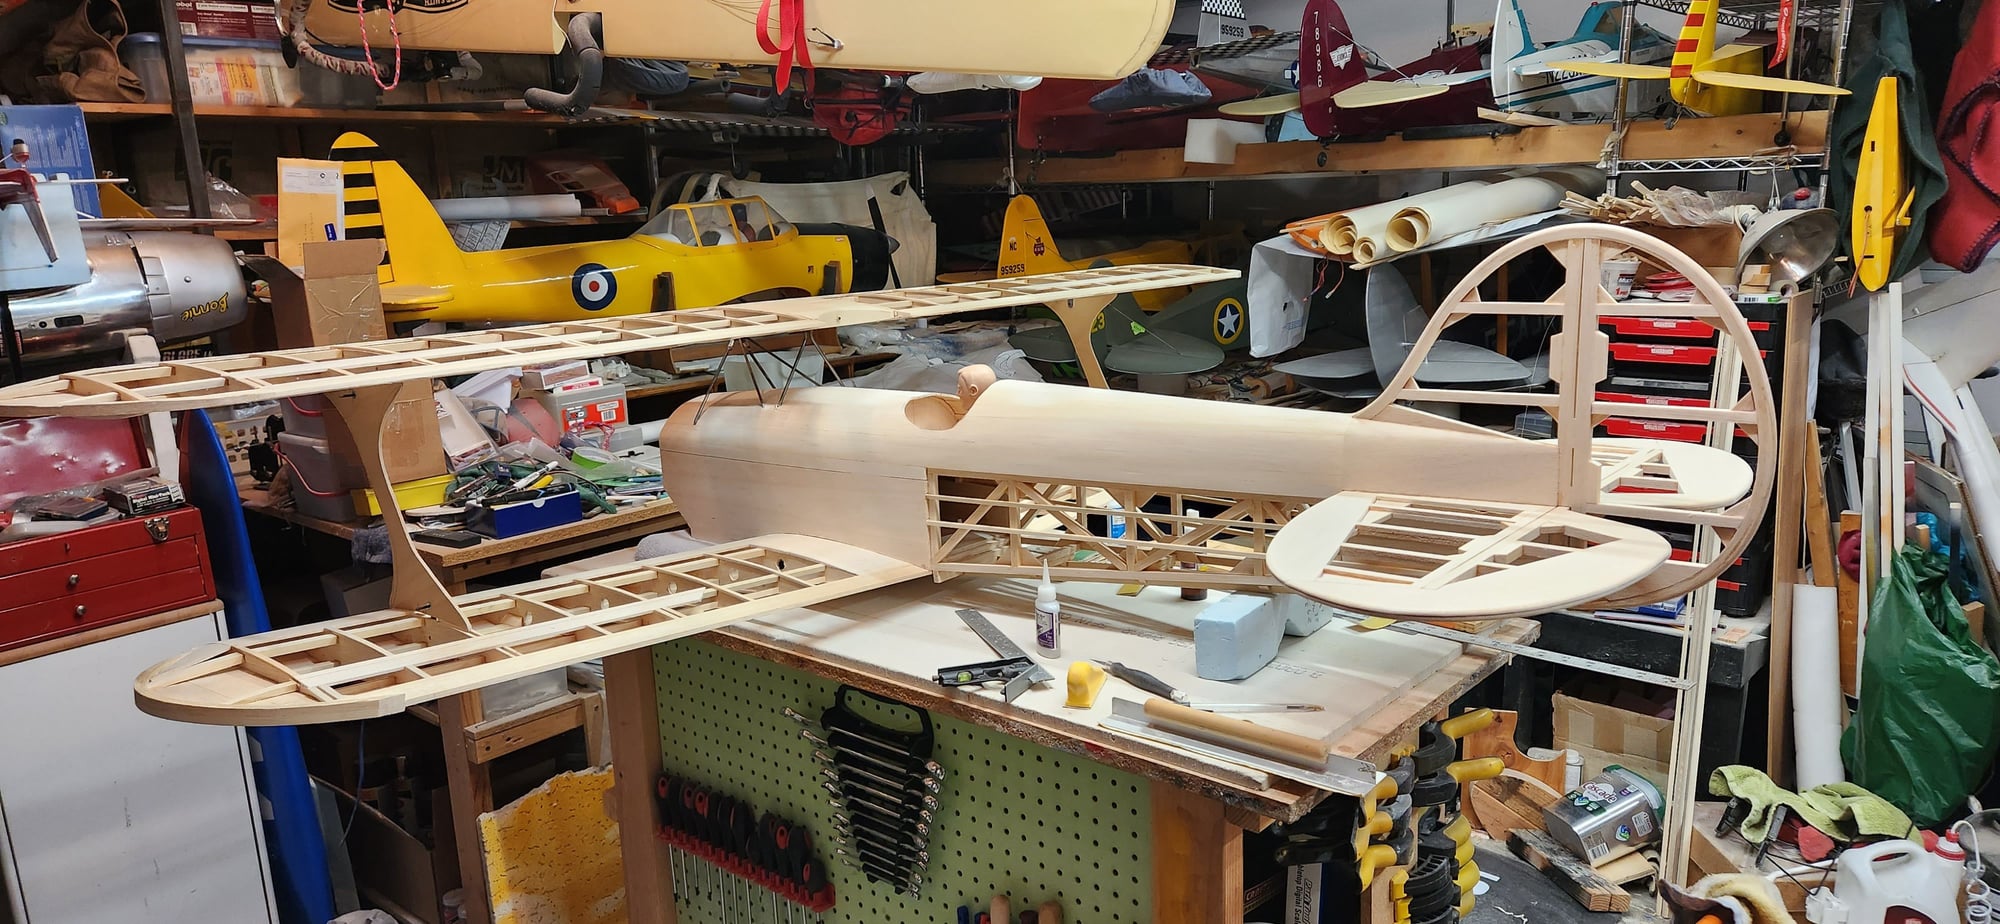
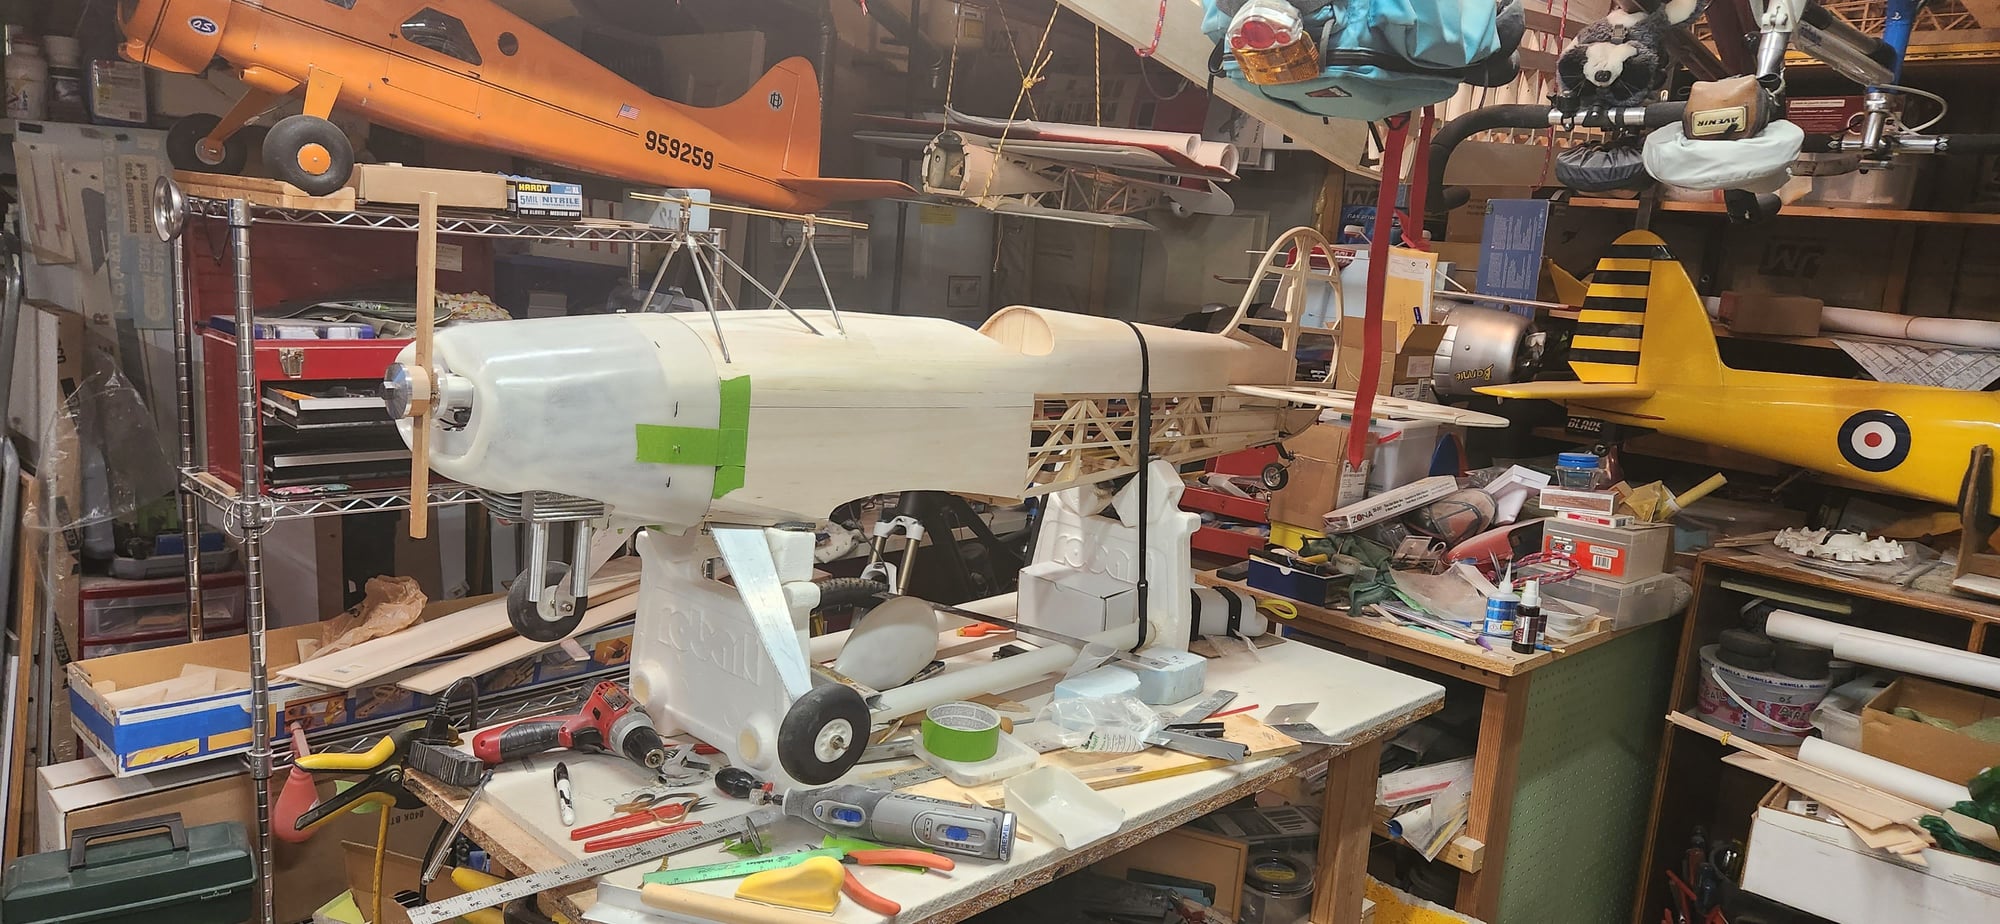
back then 1/4 scale was HUGE, now it's not that big. had a Quadra 50 in the original with some large servos and batteries. My new build has a Zenoah g62 for power and an airtronics radio. the plans don't have all the stuff that i need, but they have enough. I will make some modifications to lighten the plain and keep strength where it is needed. The original was way over built. this is the same size as the Wendell Hostetler version so fiberglass specialties has a cowl and wheel pants.
I started building on 8-6-2023 so there will be some catching up
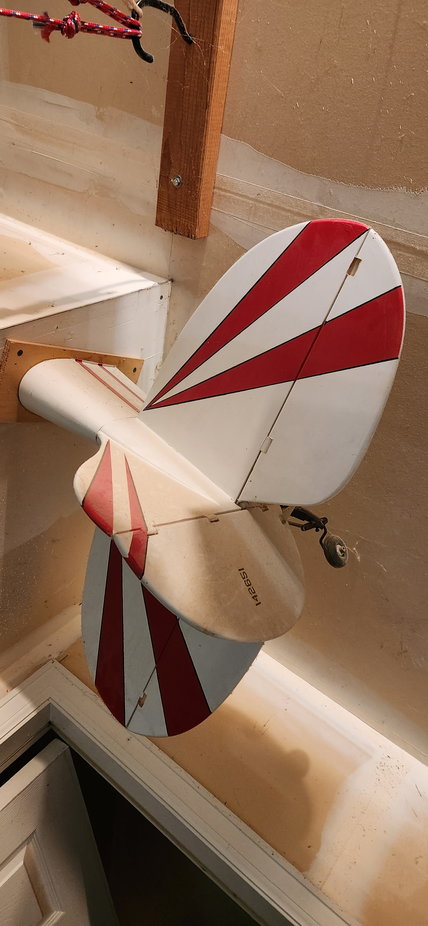
tail from original about 1987
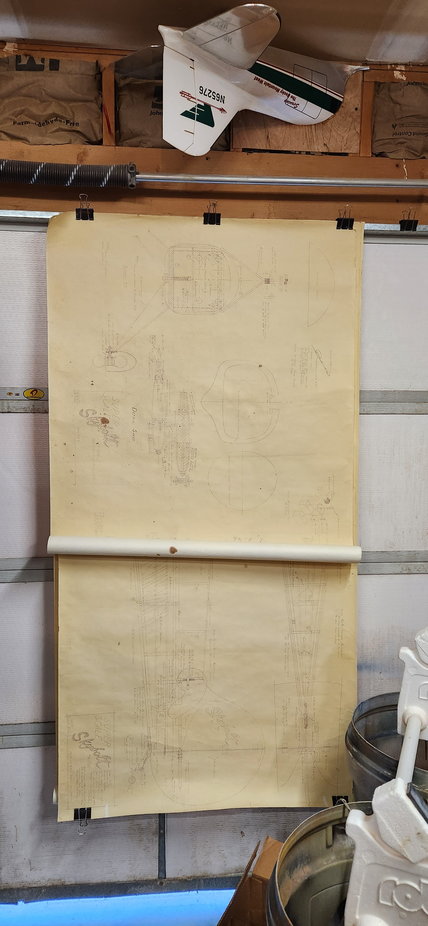
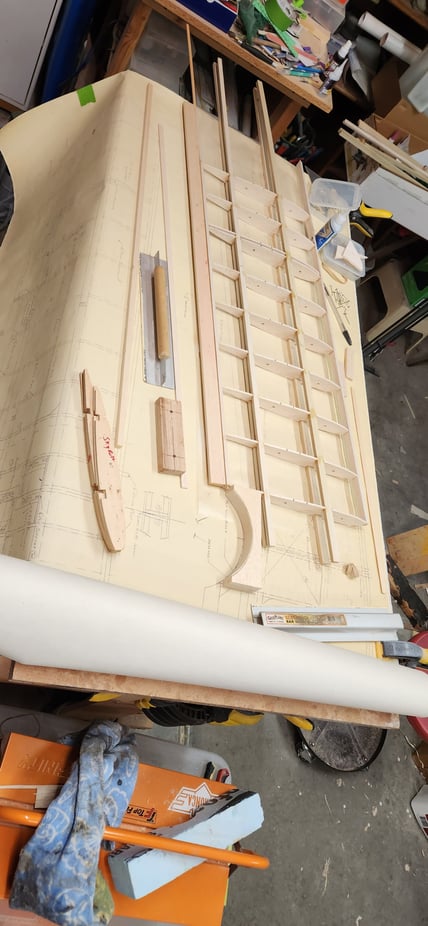
3 sheets of plans on garage door
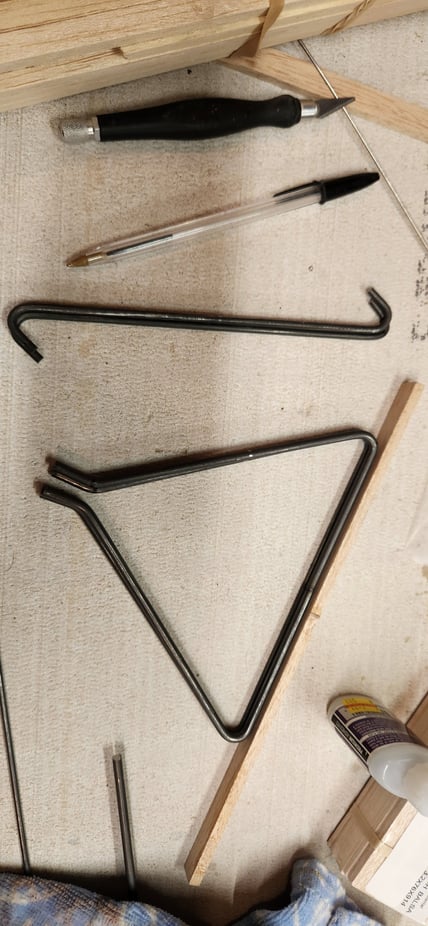
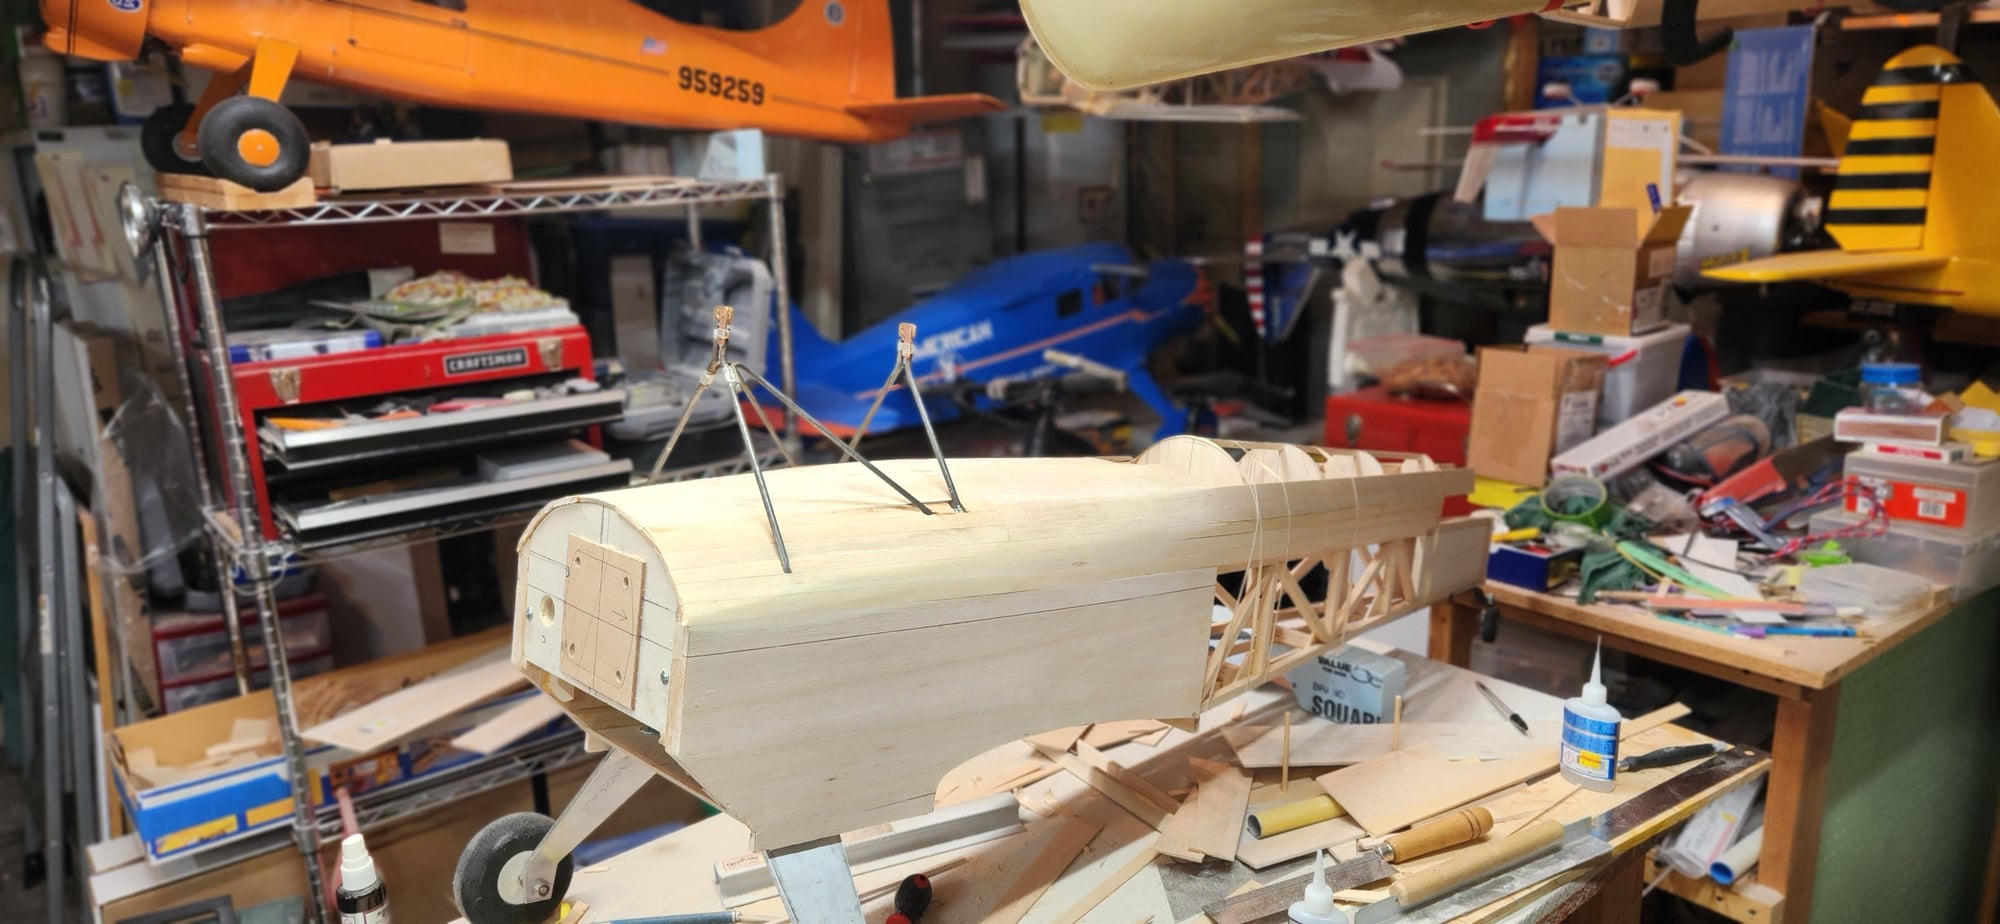
I started by bending the cabane wires for the upper wing
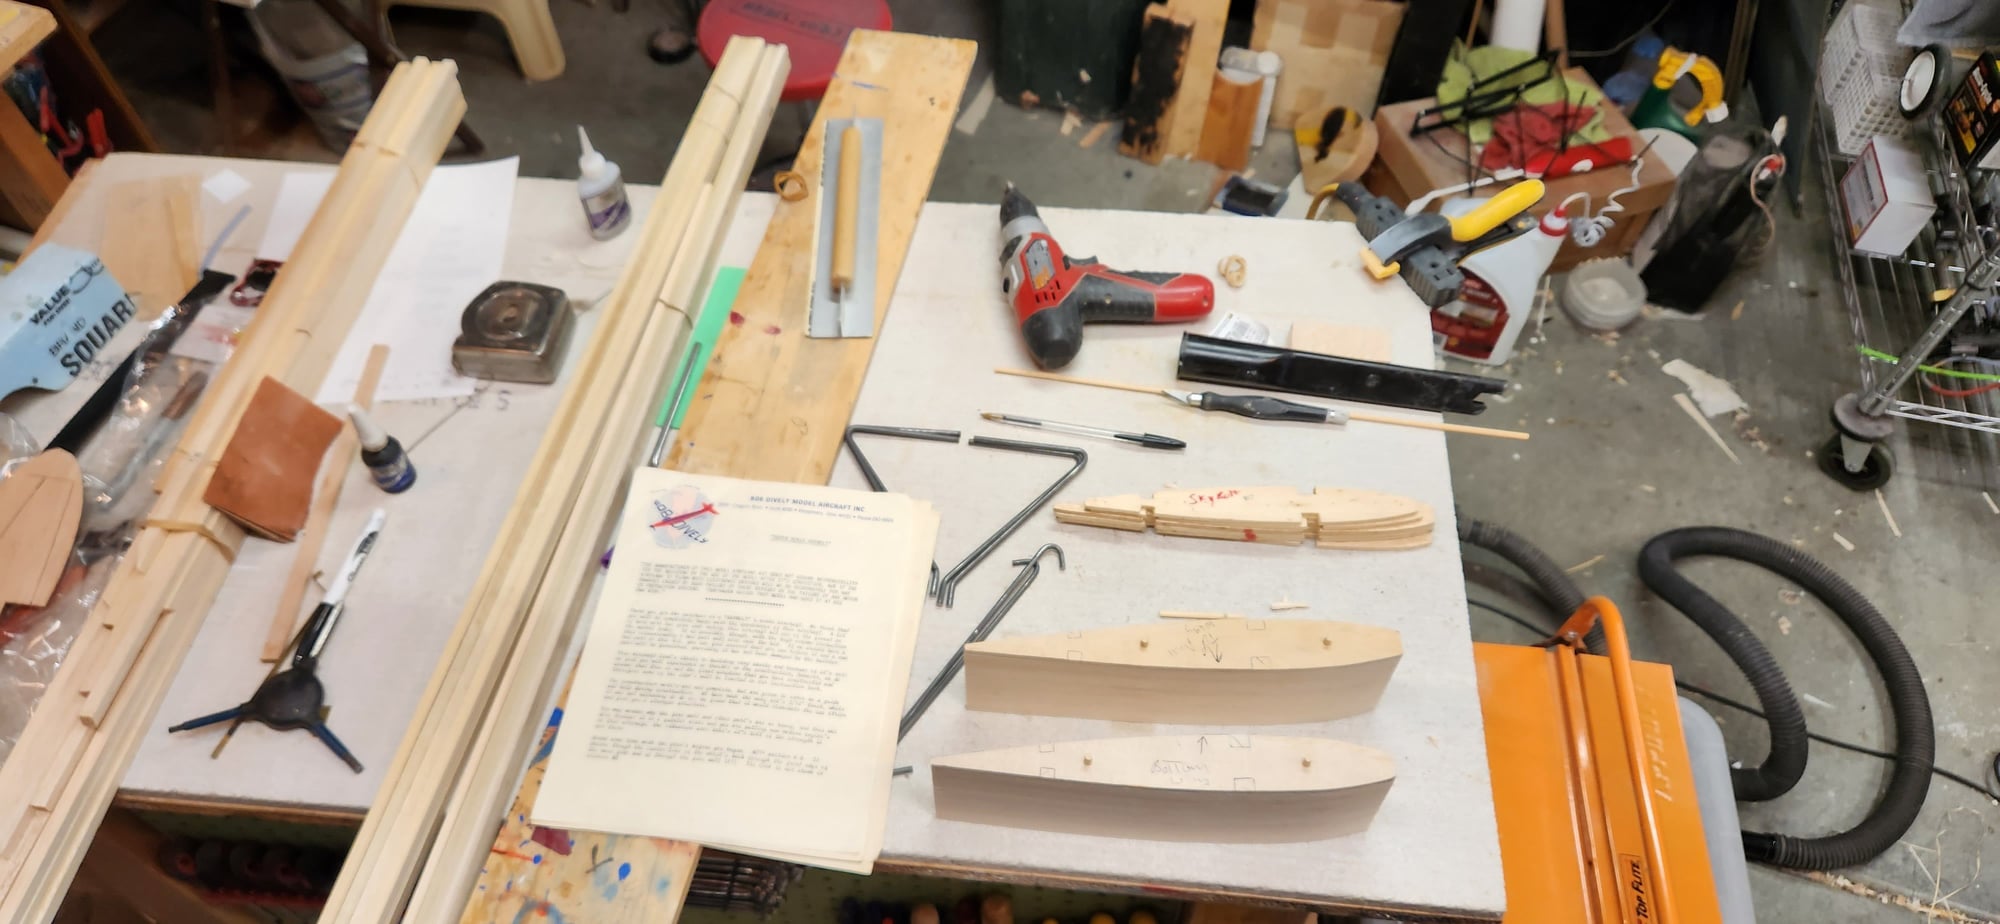
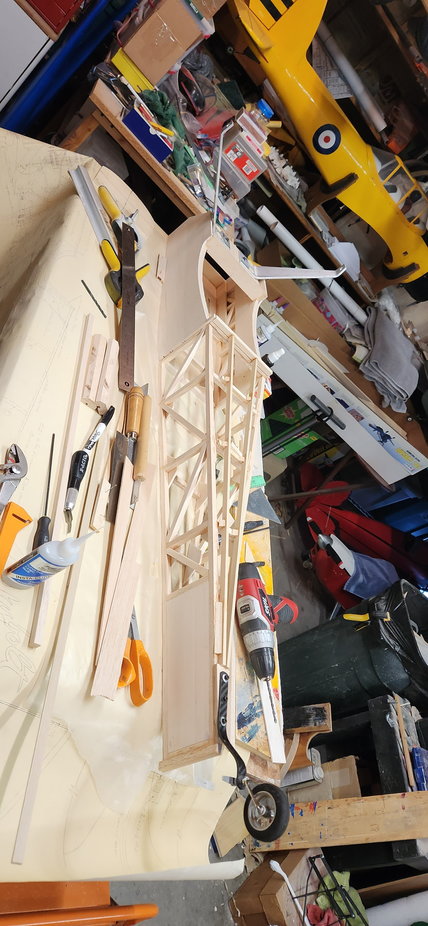
all the ribs are the same, I used some of the leftover originals as a pattern, spars are cut from poplar from Lowes. original Dively instructions also
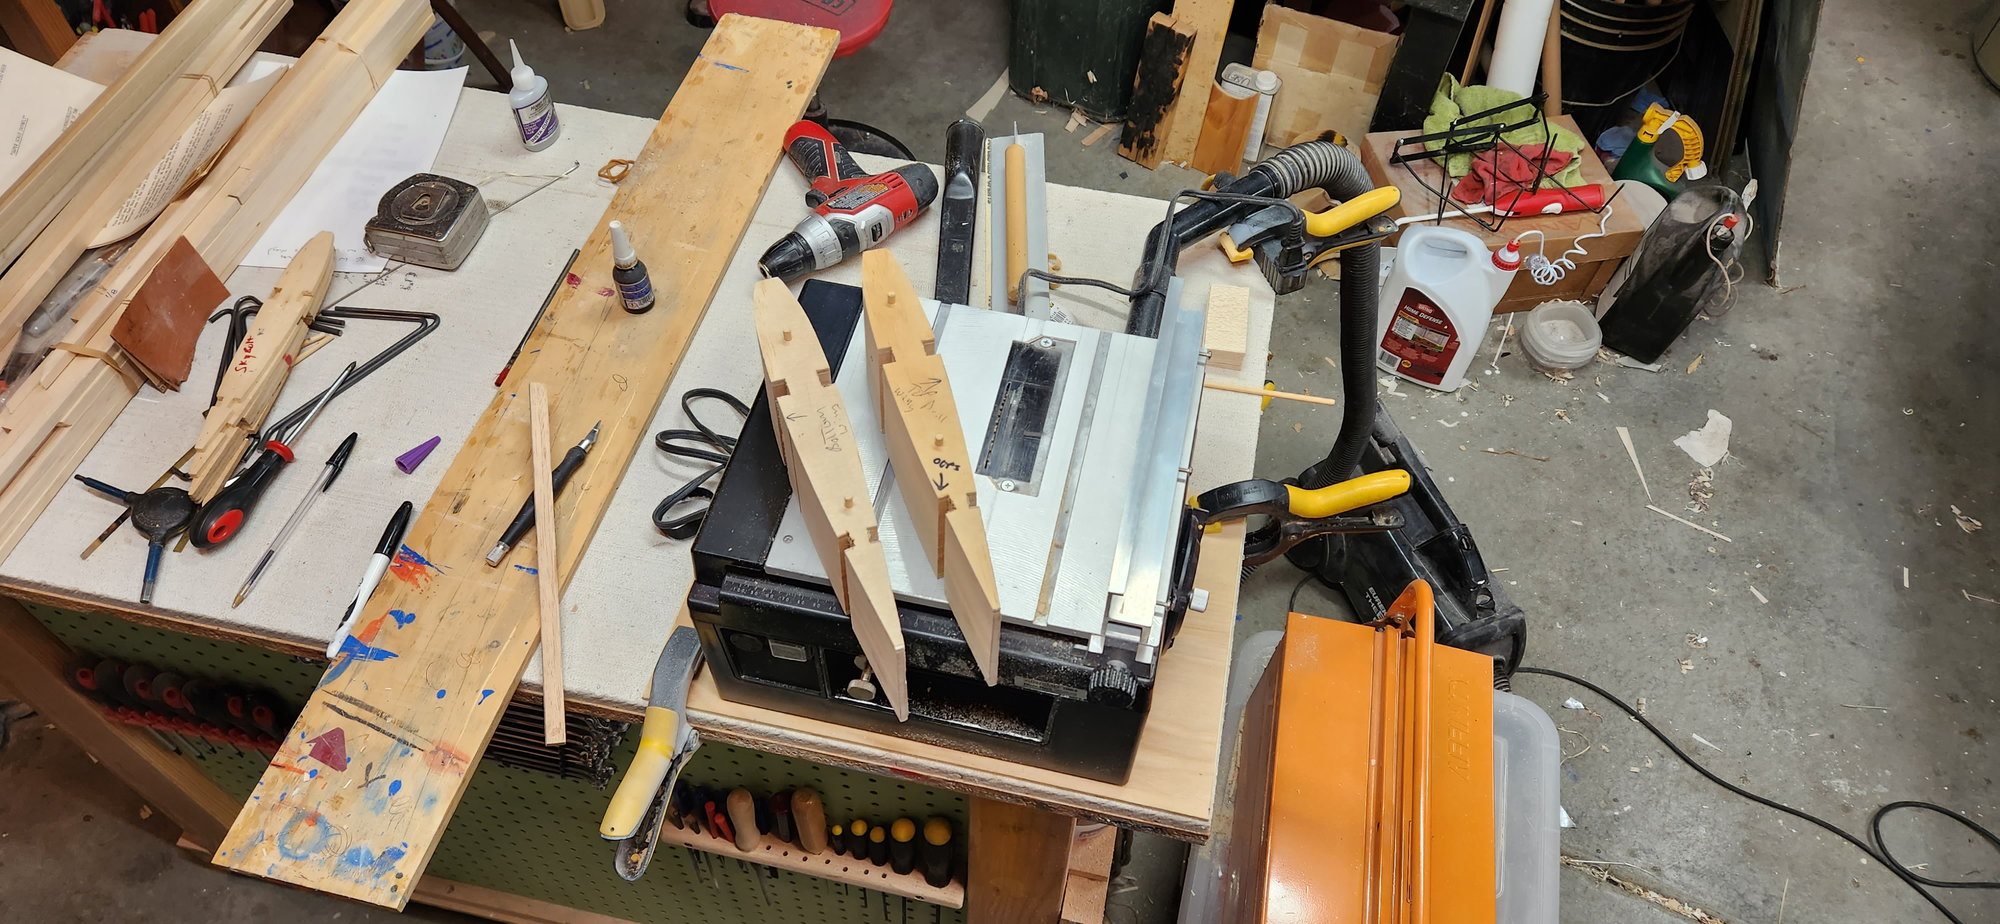
Micro Mark table saw is my friend, also allowing me to use scraps for stuff like cap strips and stringers. also good for spar slots in ribs. (ribs on left are originals 1/8" new ones are 3/32)
back then 1/4 scale was HUGE, now it's not that big. had a Quadra 50 in the original with some large servos and batteries. My new build has a Zenoah g62 for power and an airtronics radio. the plans don't have all the stuff that i need, but they have enough. I will make some modifications to lighten the plain and keep strength where it is needed. The original was way over built. this is the same size as the Wendell Hostetler version so fiberglass specialties has a cowl and wheel pants.
I started building on 8-6-2023 so there will be some catching up
tail from original about 1987
3 sheets of plans on garage door
I started by bending the cabane wires for the upper wing
all the ribs are the same, I used some of the leftover originals as a pattern, spars are cut from poplar from Lowes. original Dively instructions also
Micro Mark table saw is my friend, also allowing me to use scraps for stuff like cap strips and stringers. also good for spar slots in ribs. (ribs on left are originals 1/8" new ones are 3/32)
 10-02-2023, 05:41 PM
#3
Thread Starter
thanks, KS wire bender I think it was under $20.

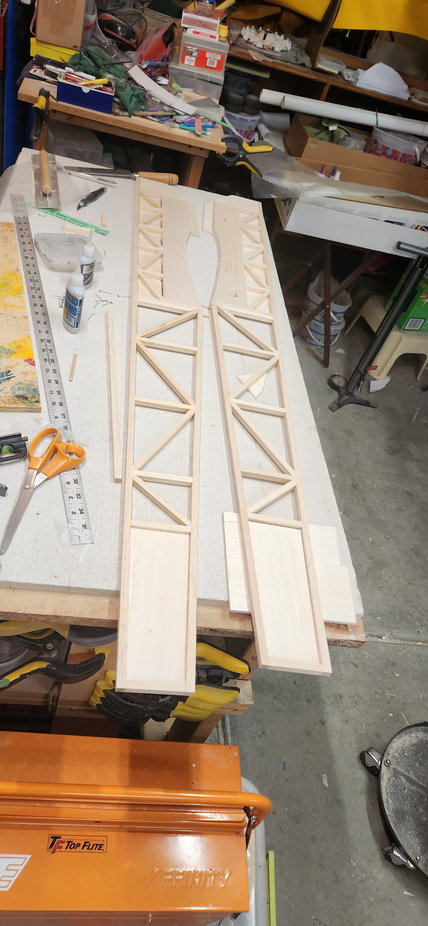
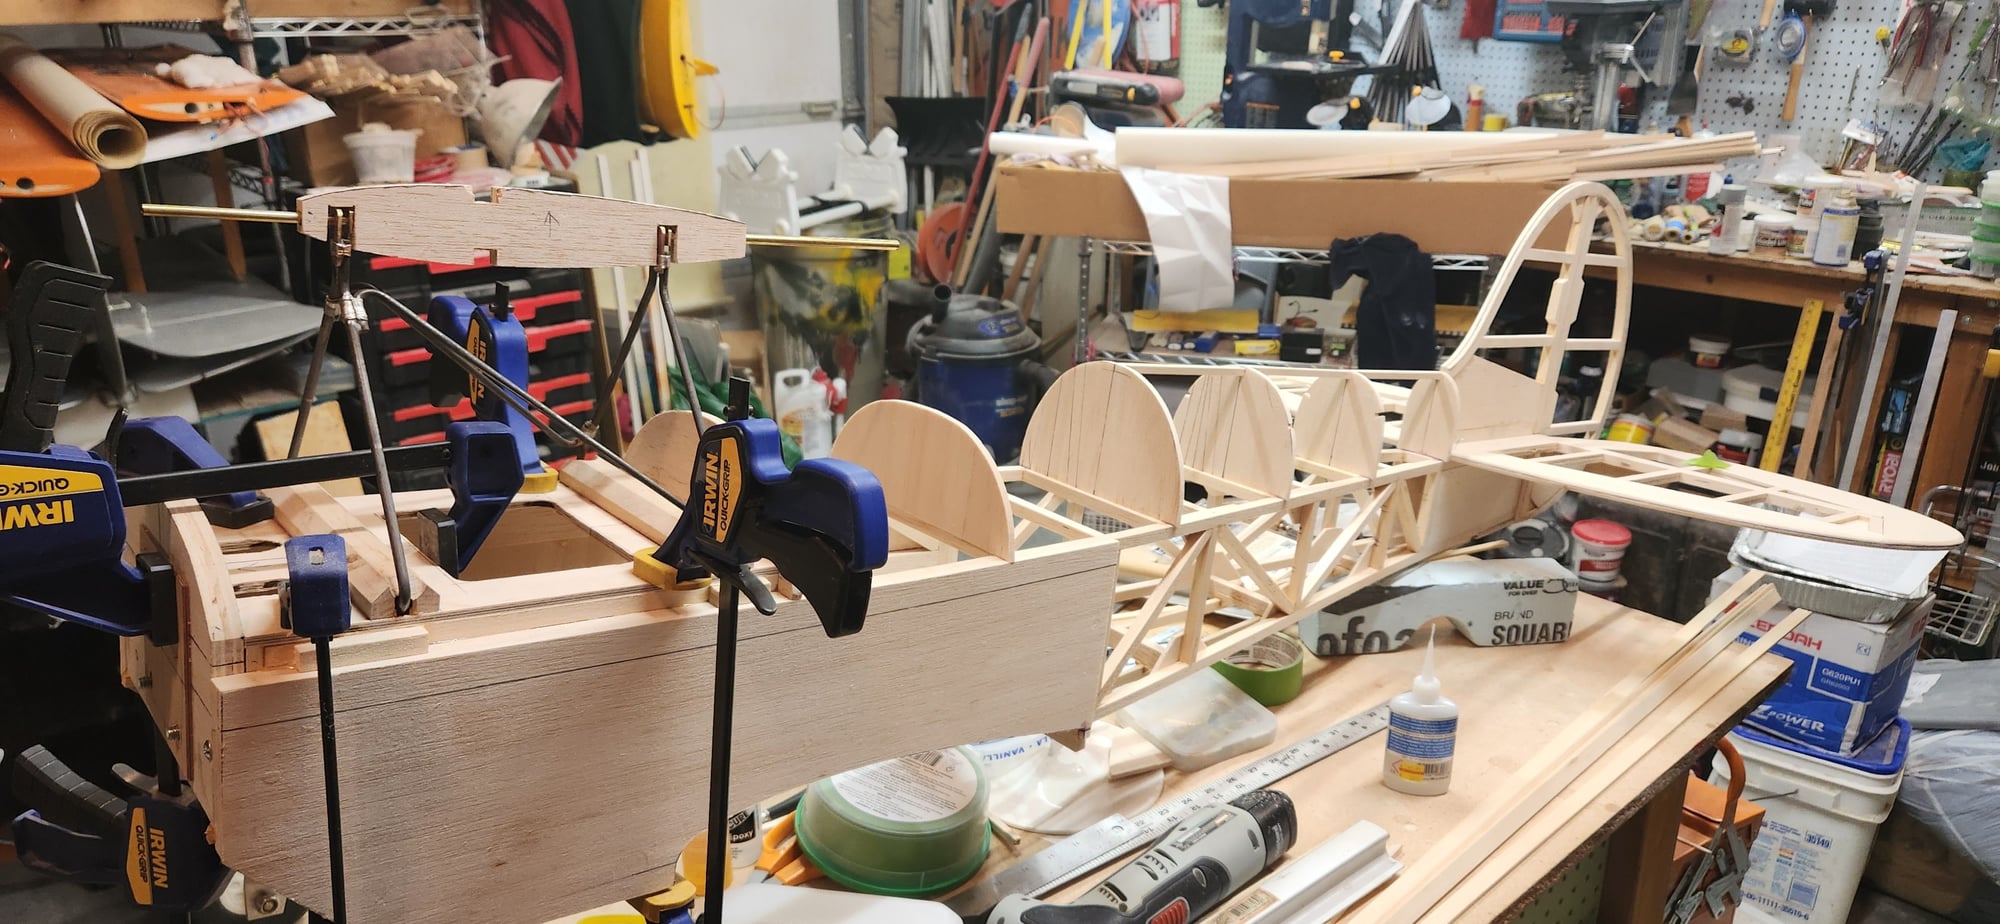
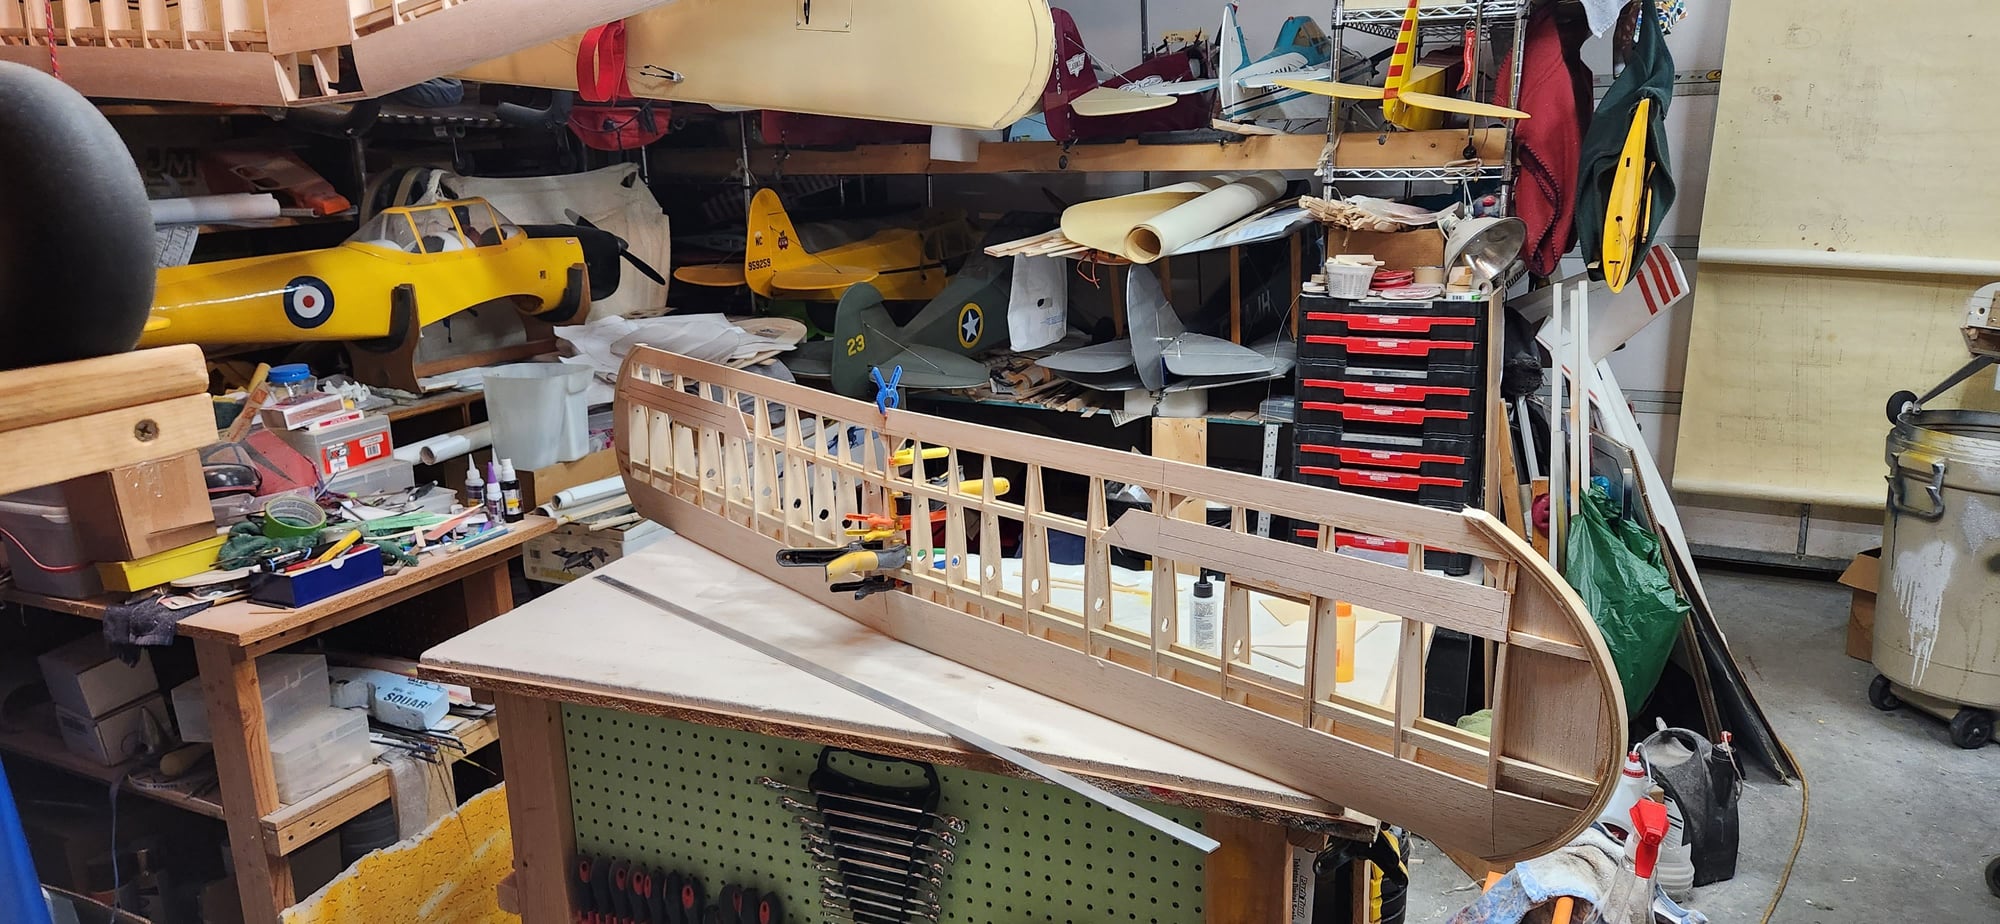
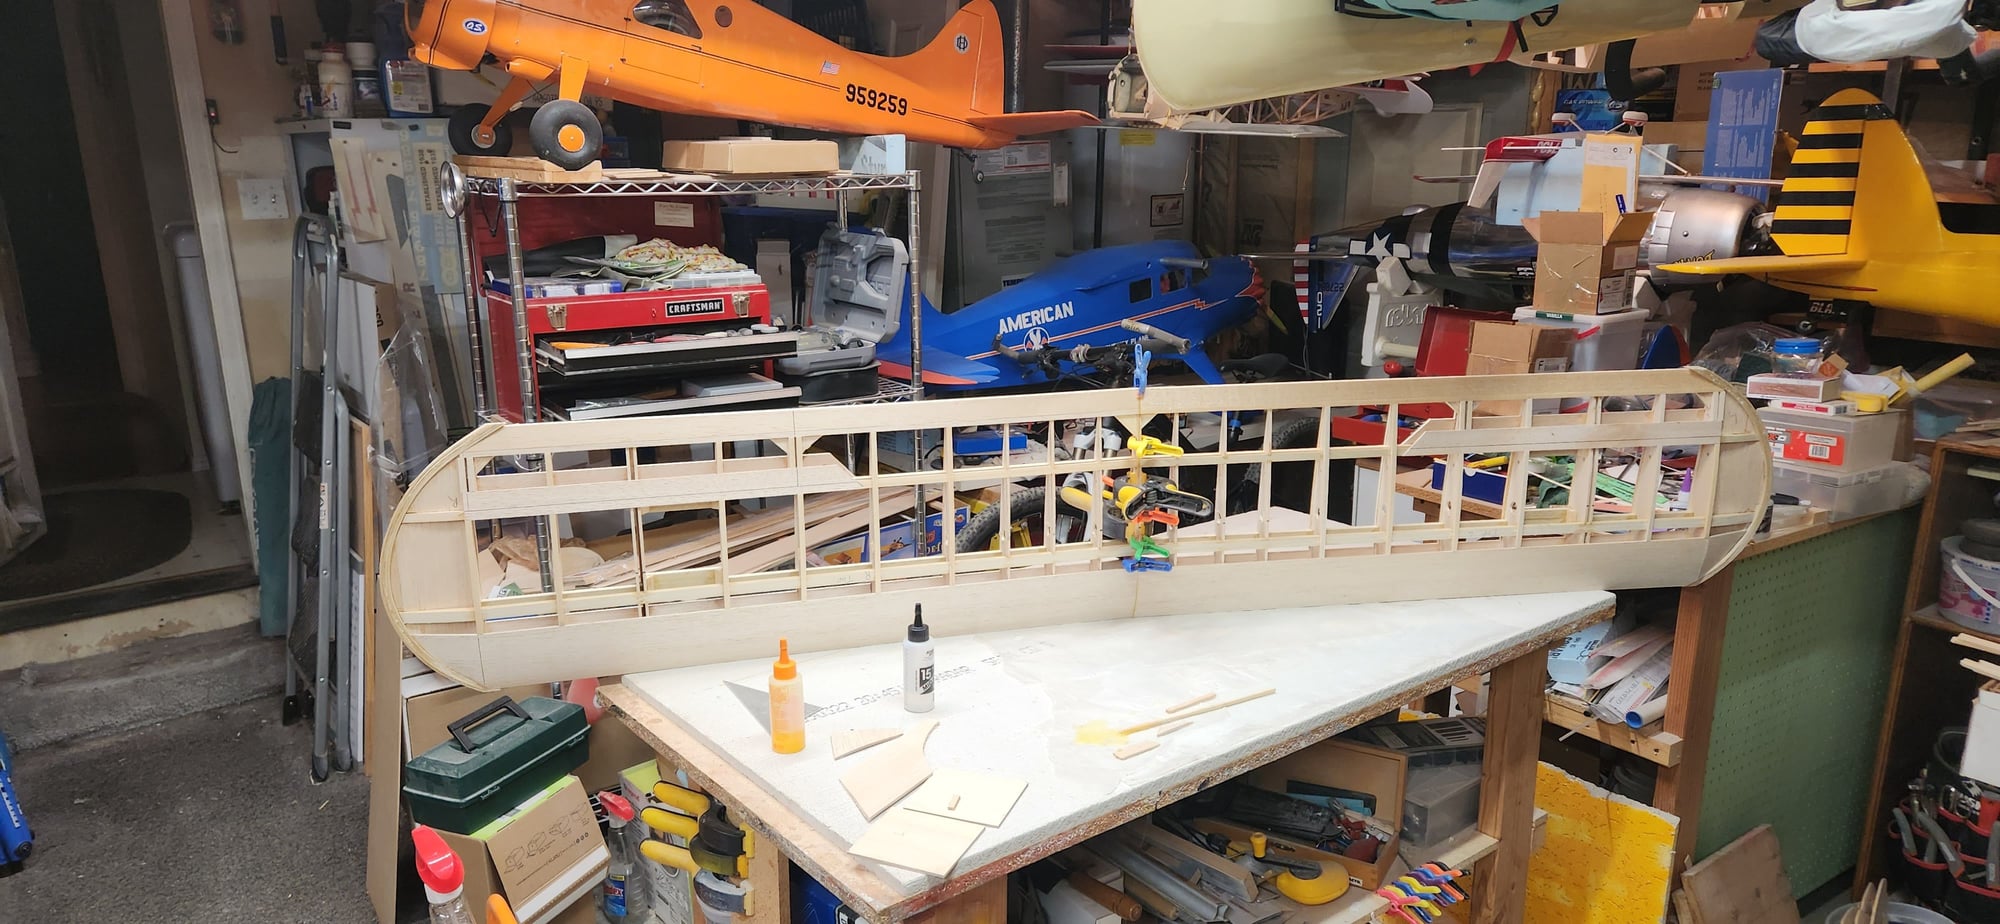
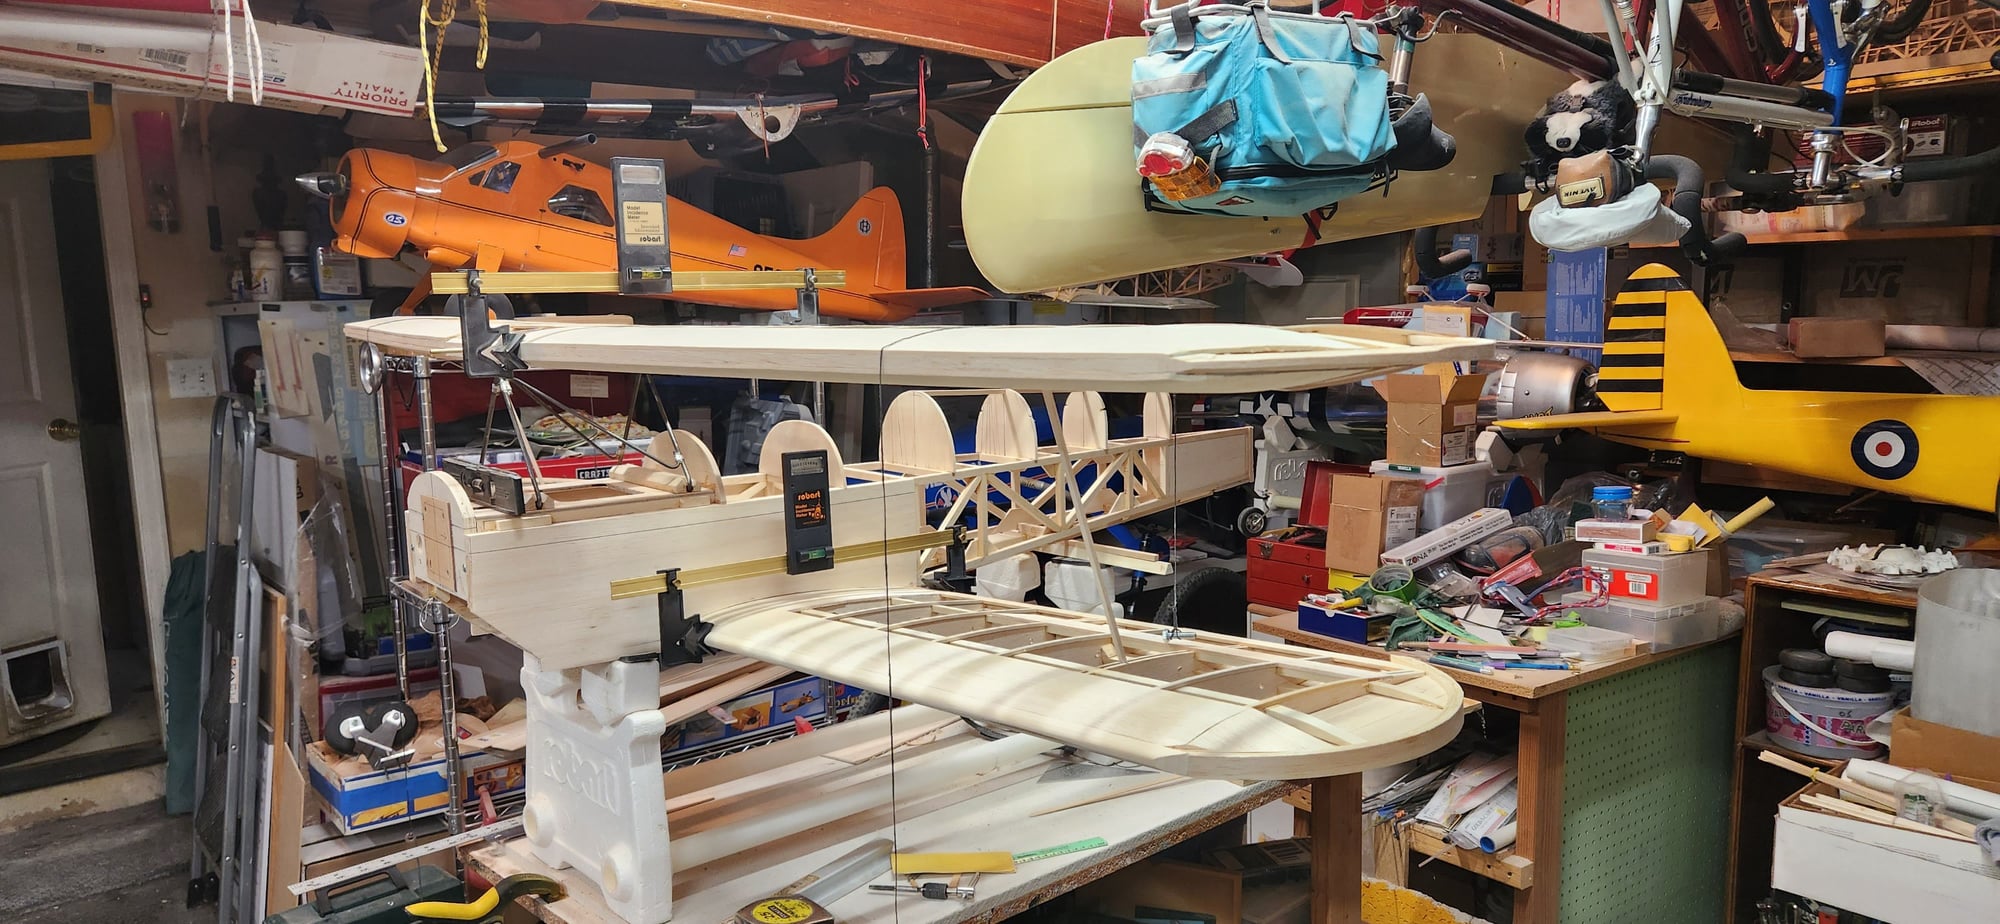
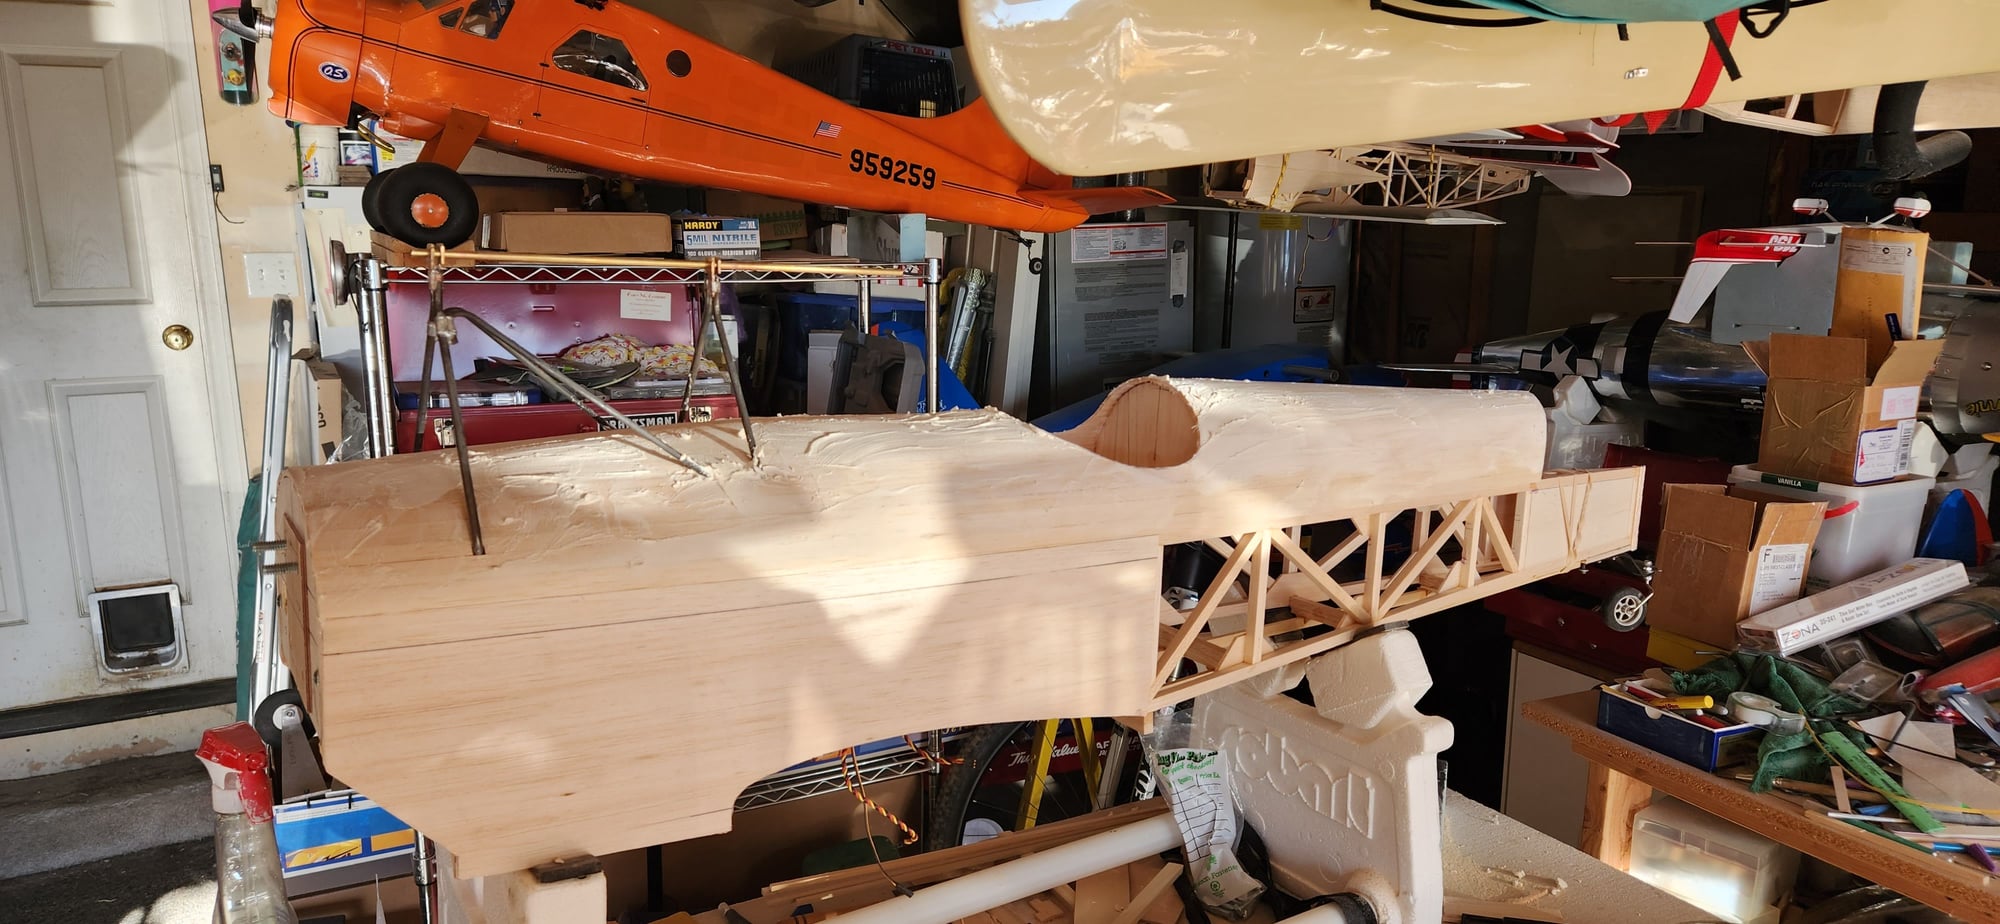
first side being built. The plans show this with solid 1/8" sheet, I decided to save some weight and just use an open structure similar to several of the other 1/4 scale kits I have done. I did adjust the firewall position for G62 engine, about 1/2" shorter than plans.
2nd side-- be sure to make right and left-- after I make them I pin them together and sand them so that the outside shape is the same The table top is 2' X 4'
aligning and gluing over top view on plans
tailwheel mounted on 1/8" ply and bottom stringers cut from Lowes poplar board
I found a bonus here. as I was going flying I ran across some landing gear that a friend had given me. It came from a Top Flite Stinson kit that he put TNT gear on. It is a perfect match to the plans, Hope I never need it for my Stinson because it is gone now...
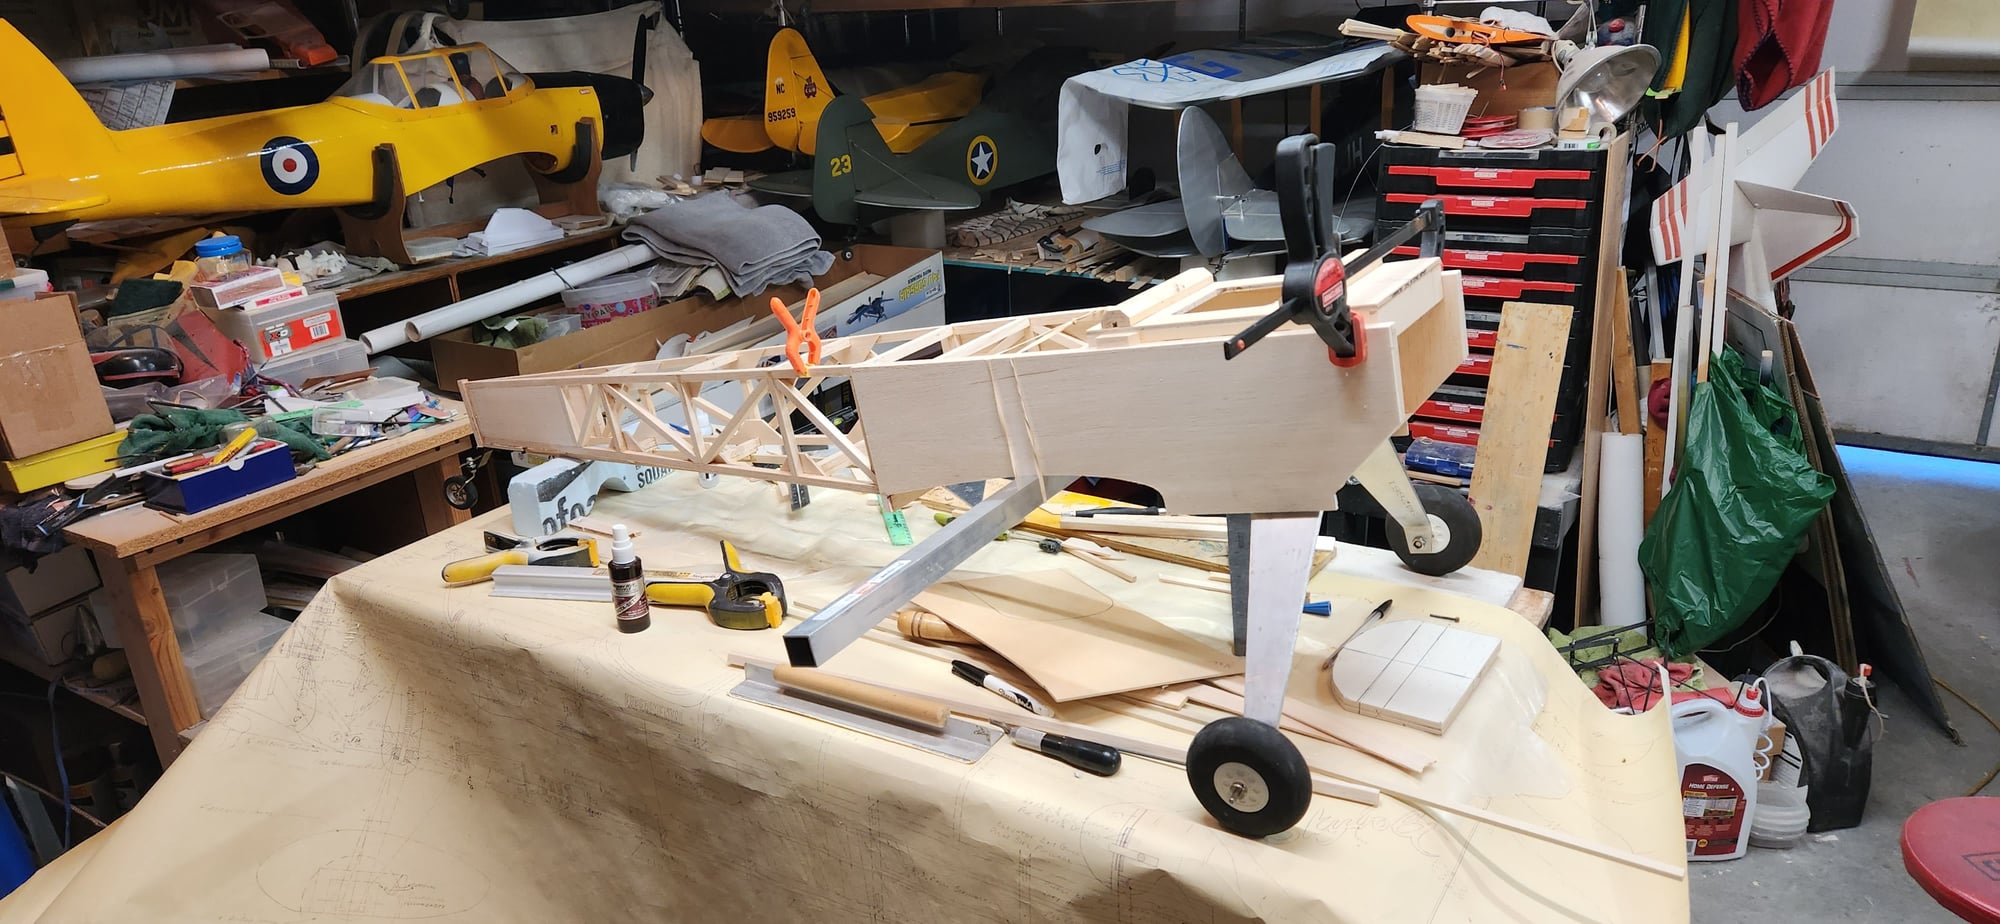
Up on wheels, the square tube is to check the level on the wing. The top has the cabane mounting plate setting in place to get some interior bracing. the gussets can be seen in the open structure.
first side being built. The plans show this with solid 1/8" sheet, I decided to save some weight and just use an open structure similar to several of the other 1/4 scale kits I have done. I did adjust the firewall position for G62 engine, about 1/2" shorter than plans.
2nd side-- be sure to make right and left-- after I make them I pin them together and sand them so that the outside shape is the same The table top is 2' X 4'
aligning and gluing over top view on plans
tailwheel mounted on 1/8" ply and bottom stringers cut from Lowes poplar board
I found a bonus here. as I was going flying I ran across some landing gear that a friend had given me. It came from a Top Flite Stinson kit that he put TNT gear on. It is a perfect match to the plans, Hope I never need it for my Stinson because it is gone now...
Up on wheels, the square tube is to check the level on the wing. The top has the cabane mounting plate setting in place to get some interior bracing. the gussets can be seen in the open structure.
10-04-2023, 07:24 PM
#4
Thread Starter
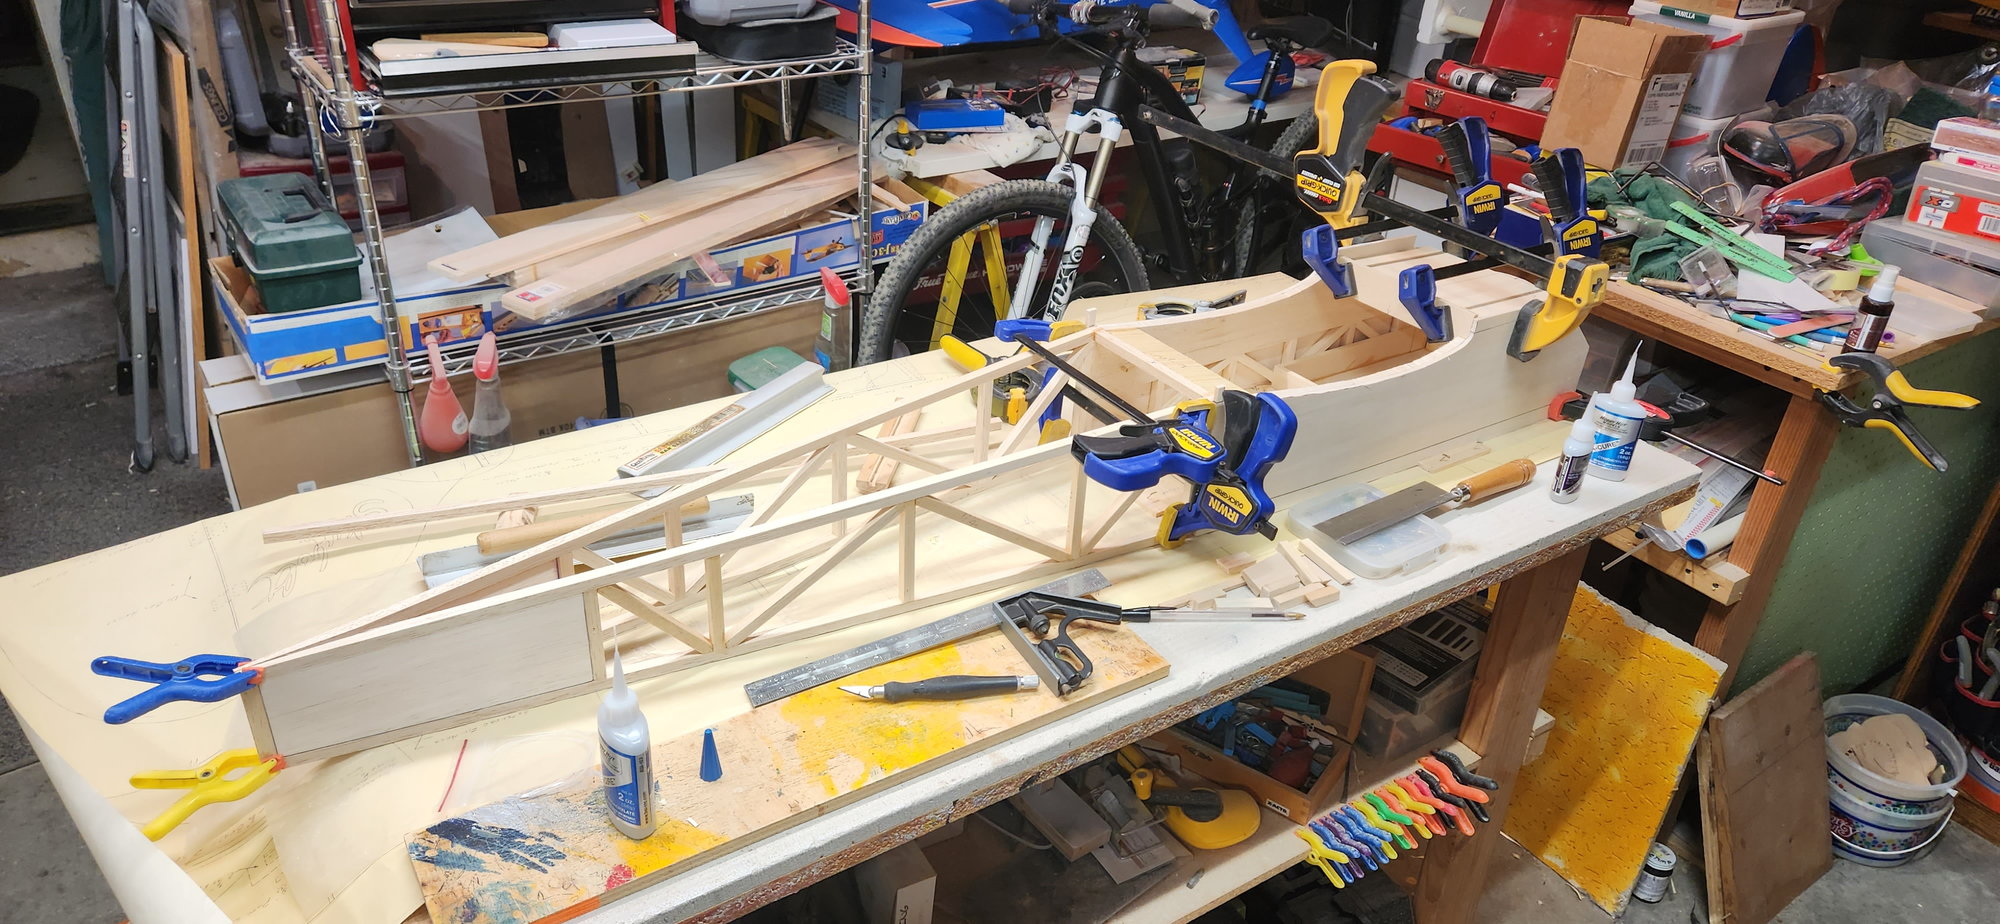
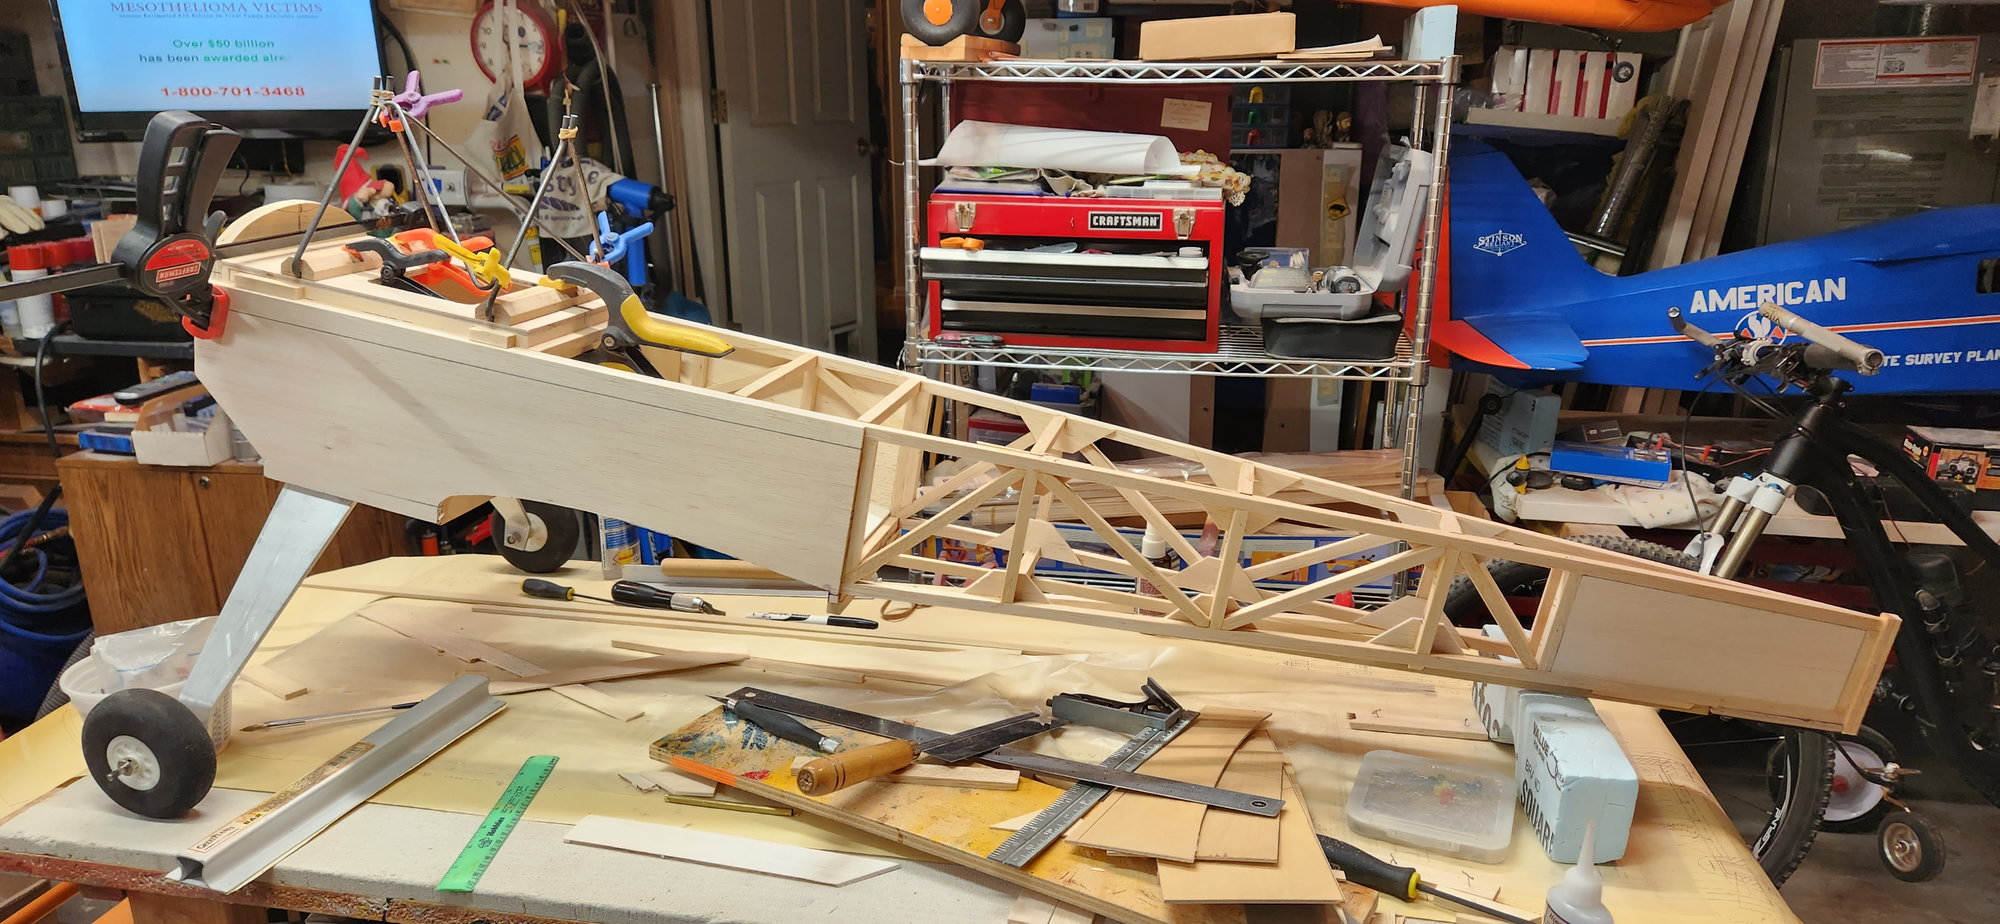
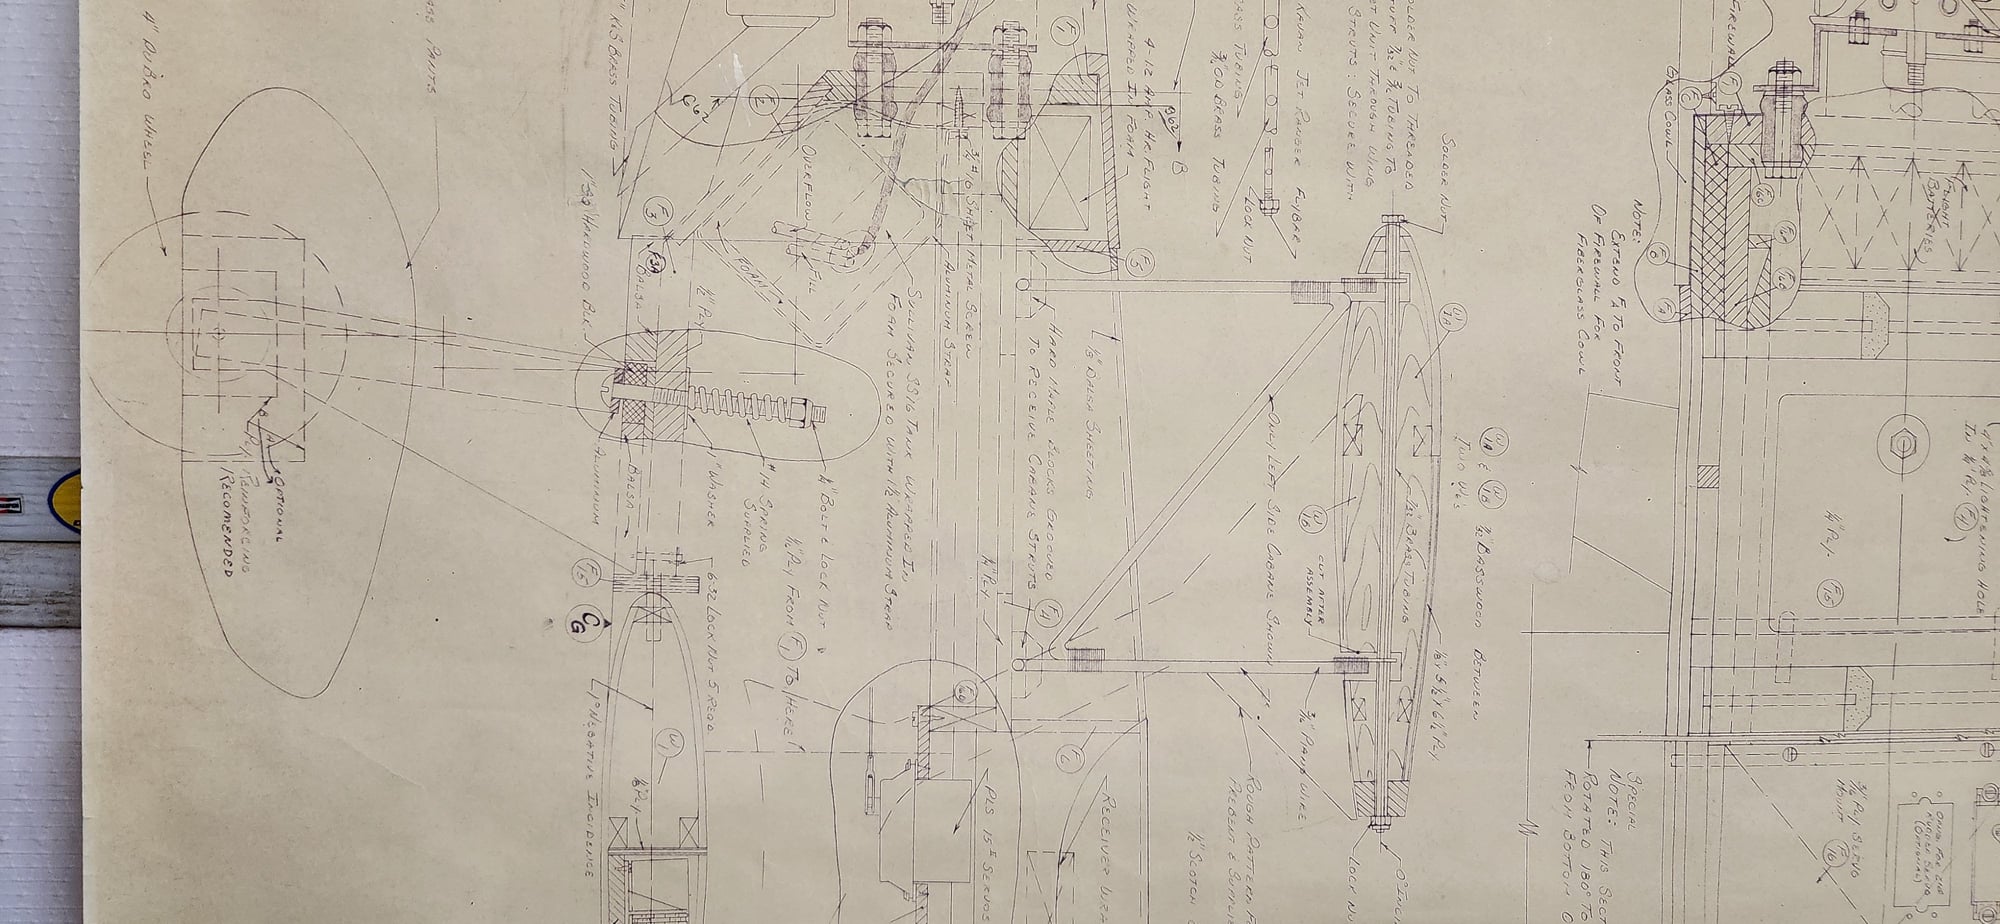
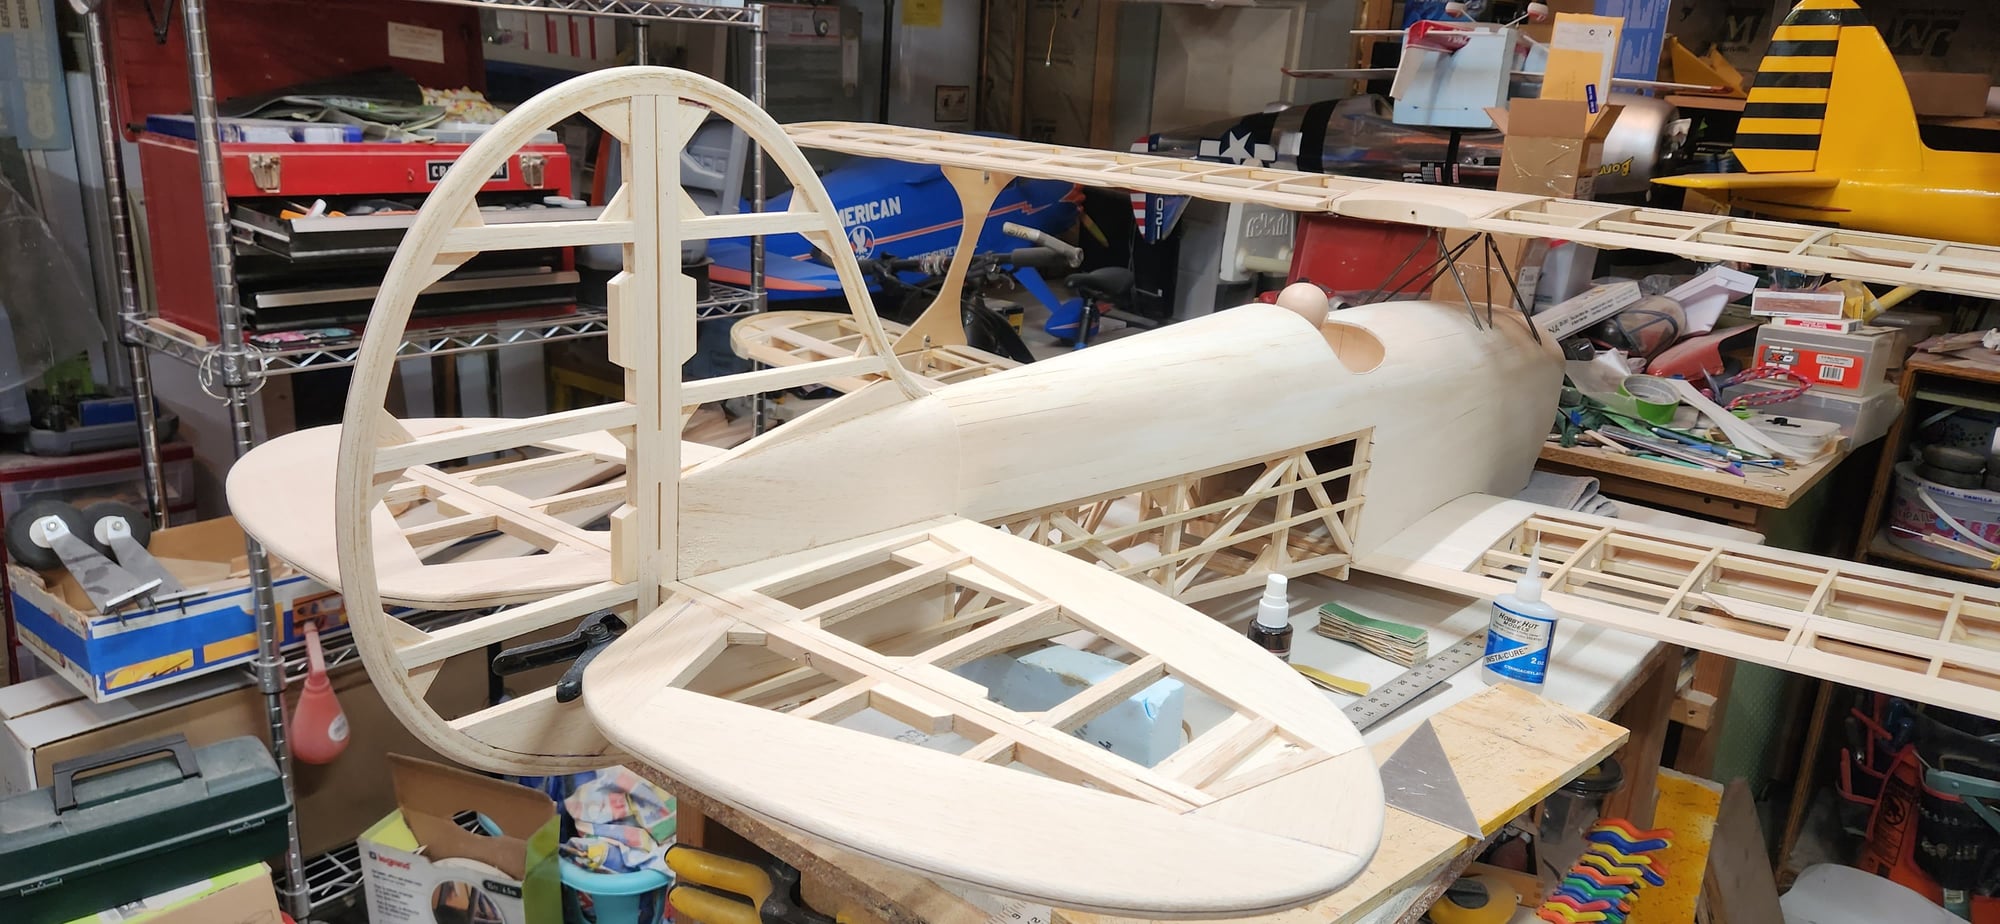
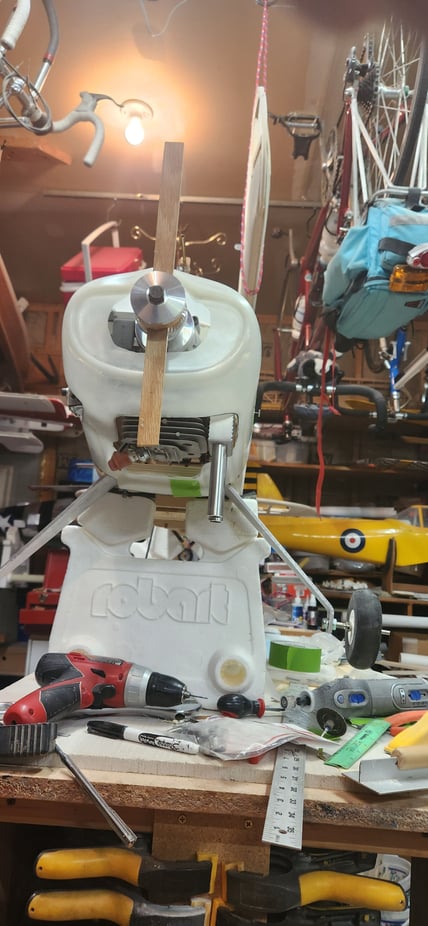
The next thing I did was to attach the cabane wires
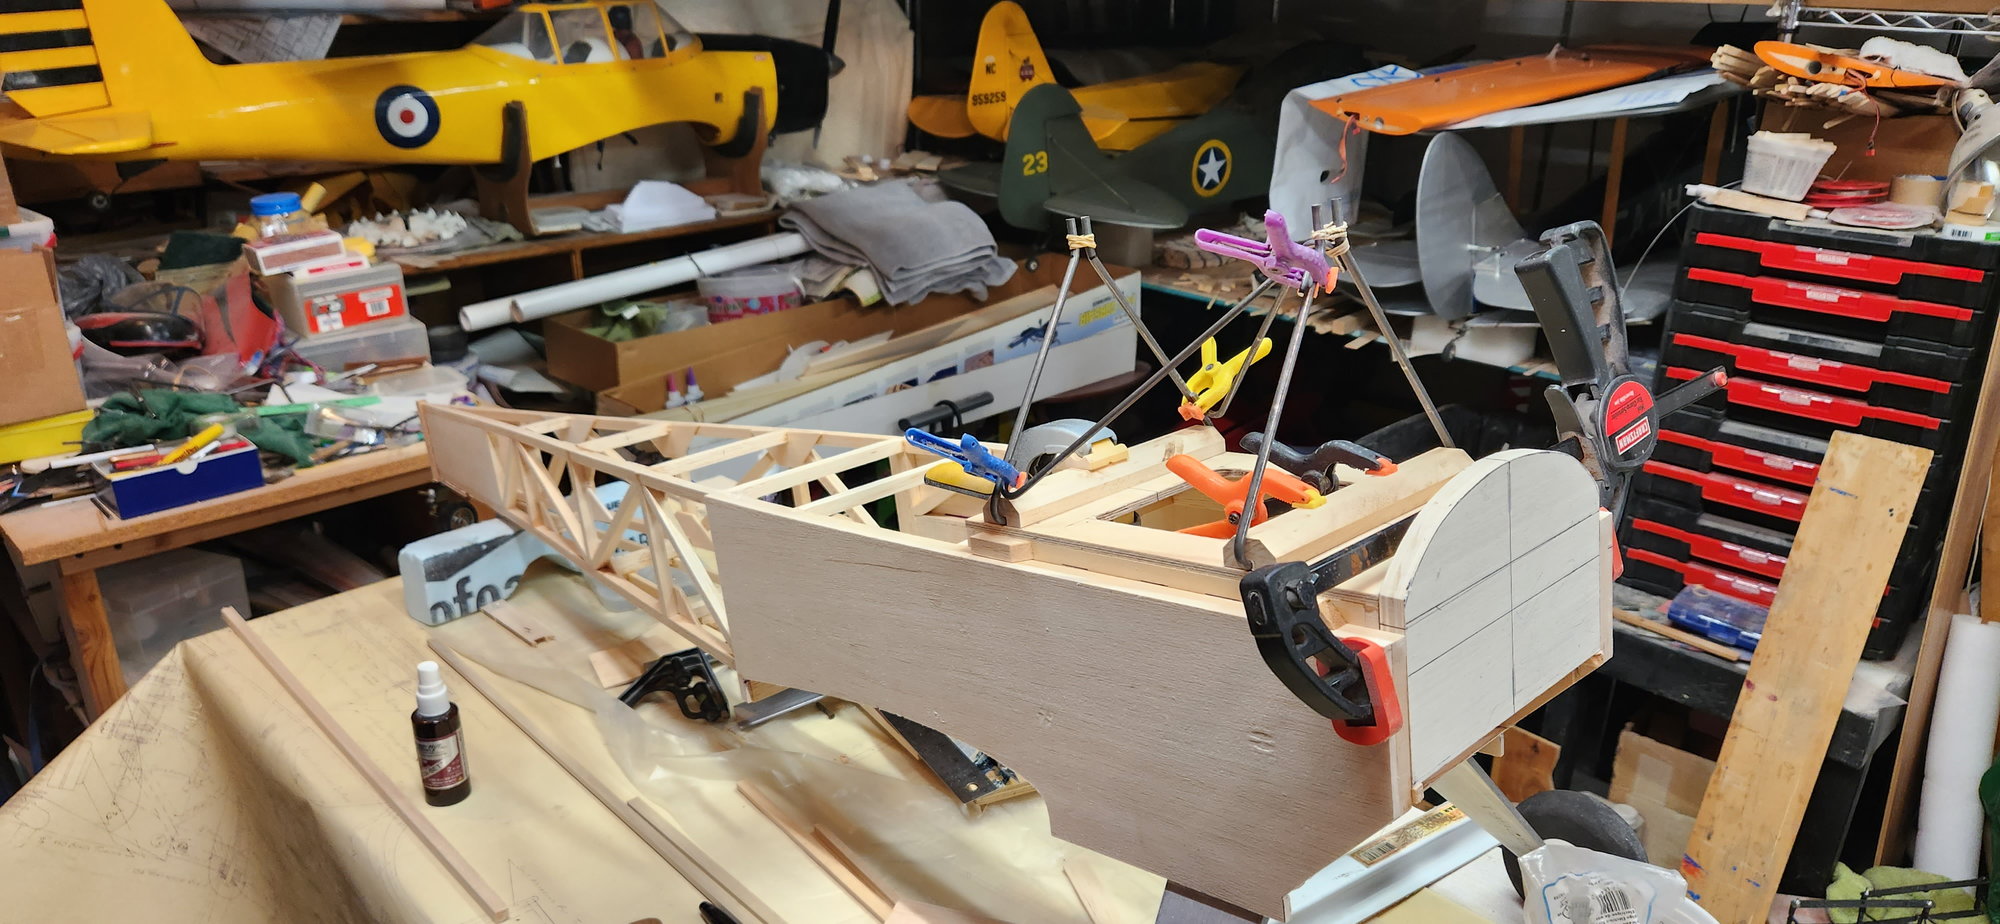
the cabanes are mounted to a box that is set into the top of the fuselage sides. I glued some blocks on the side of this to hold it's position as I worked on it. this will be glued in place later to set the alignment of the top wing. the firewall is not glued in yet either.
a few clamps hold everything in place so I can wire together and solder.
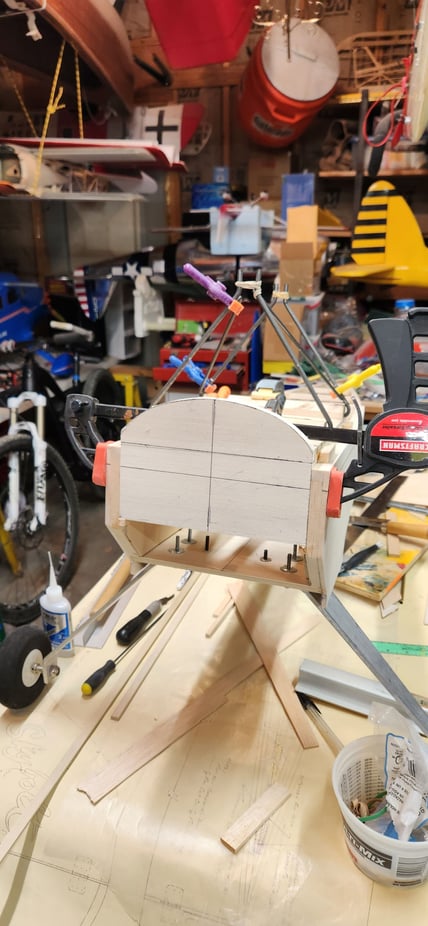
front view
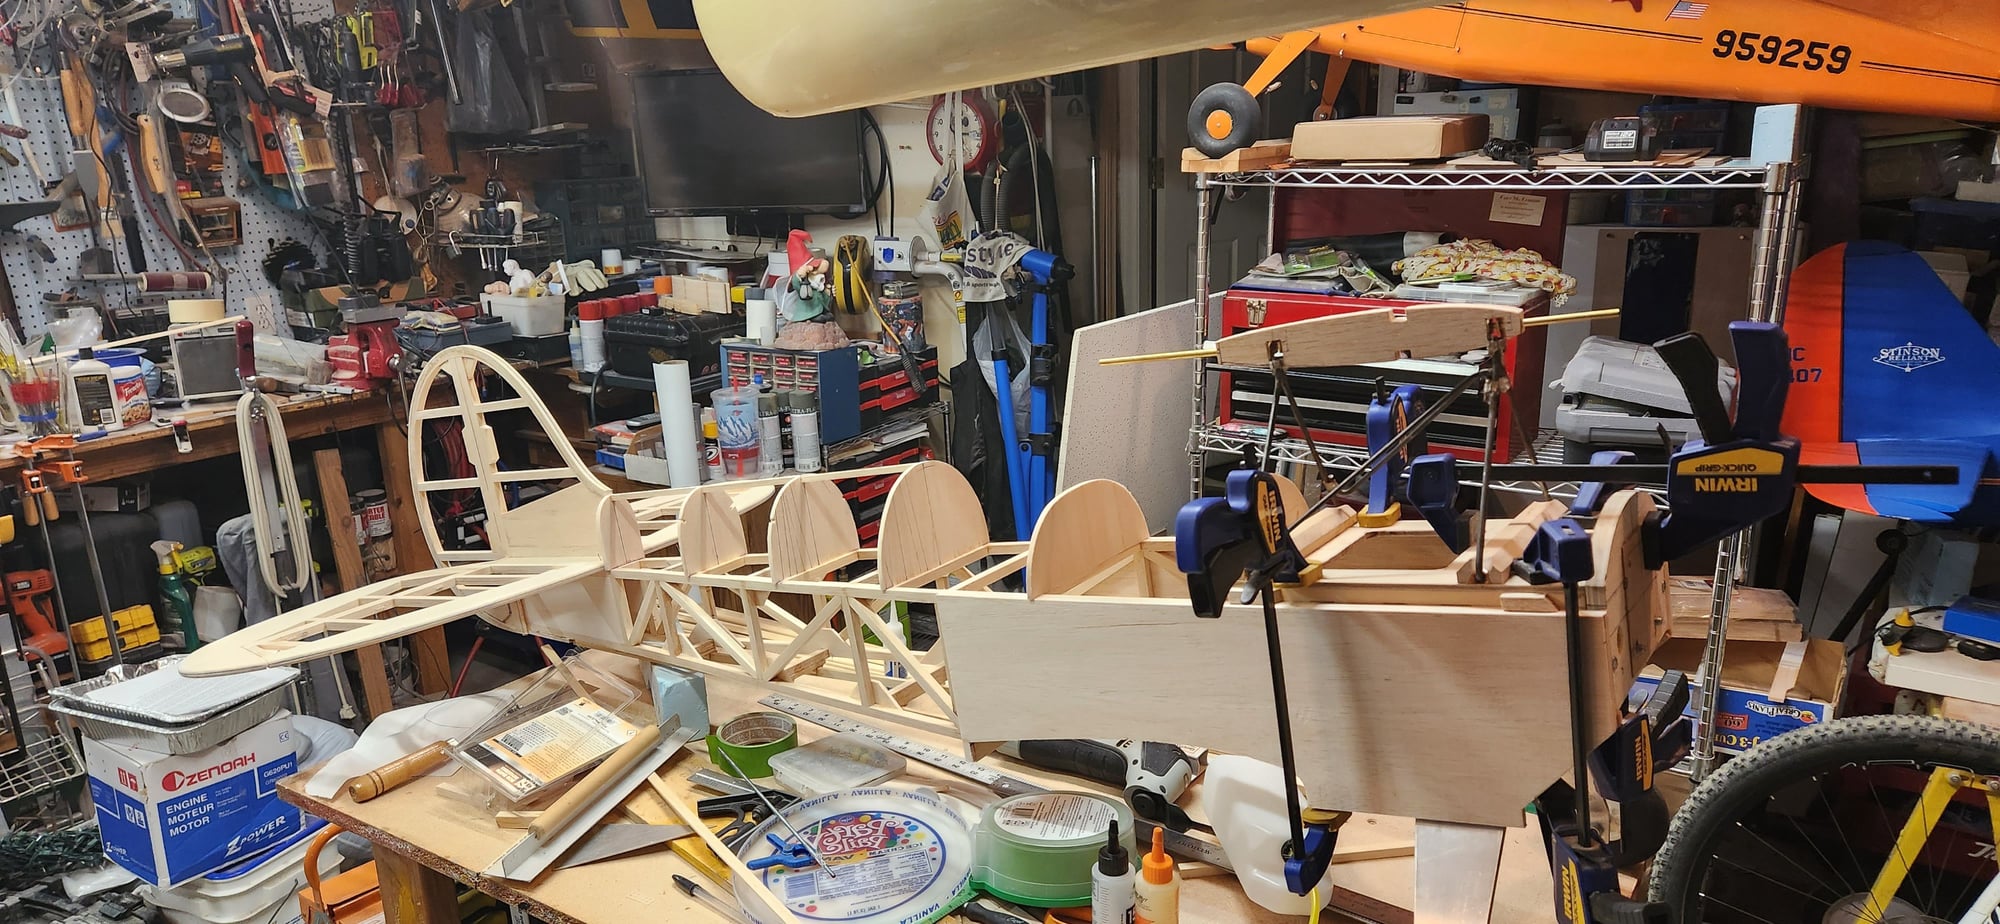
wires are soldered, incidence is set at this point. firewall is glued in place. cabane box is still removable. The brass tube will hold the top wing on. It pulls out to remove wing
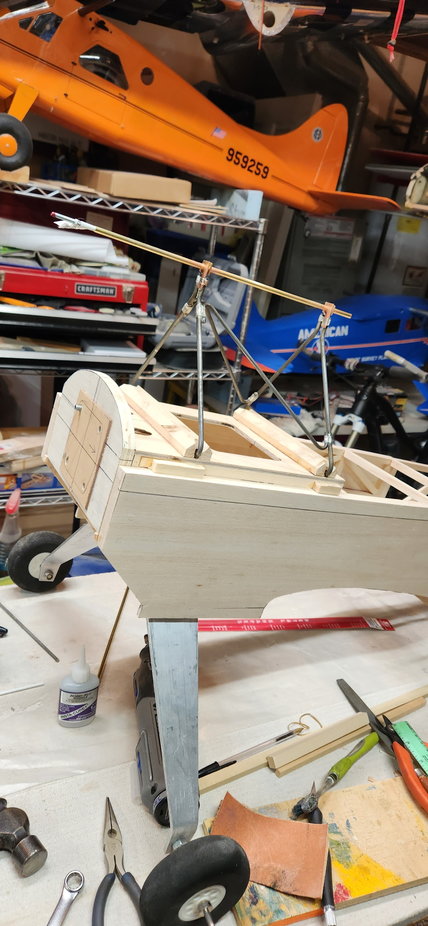
firewall has a beveled plywood spacer to set 2 deg right thrust. the plans did not have this but experience tells me it's a good idea
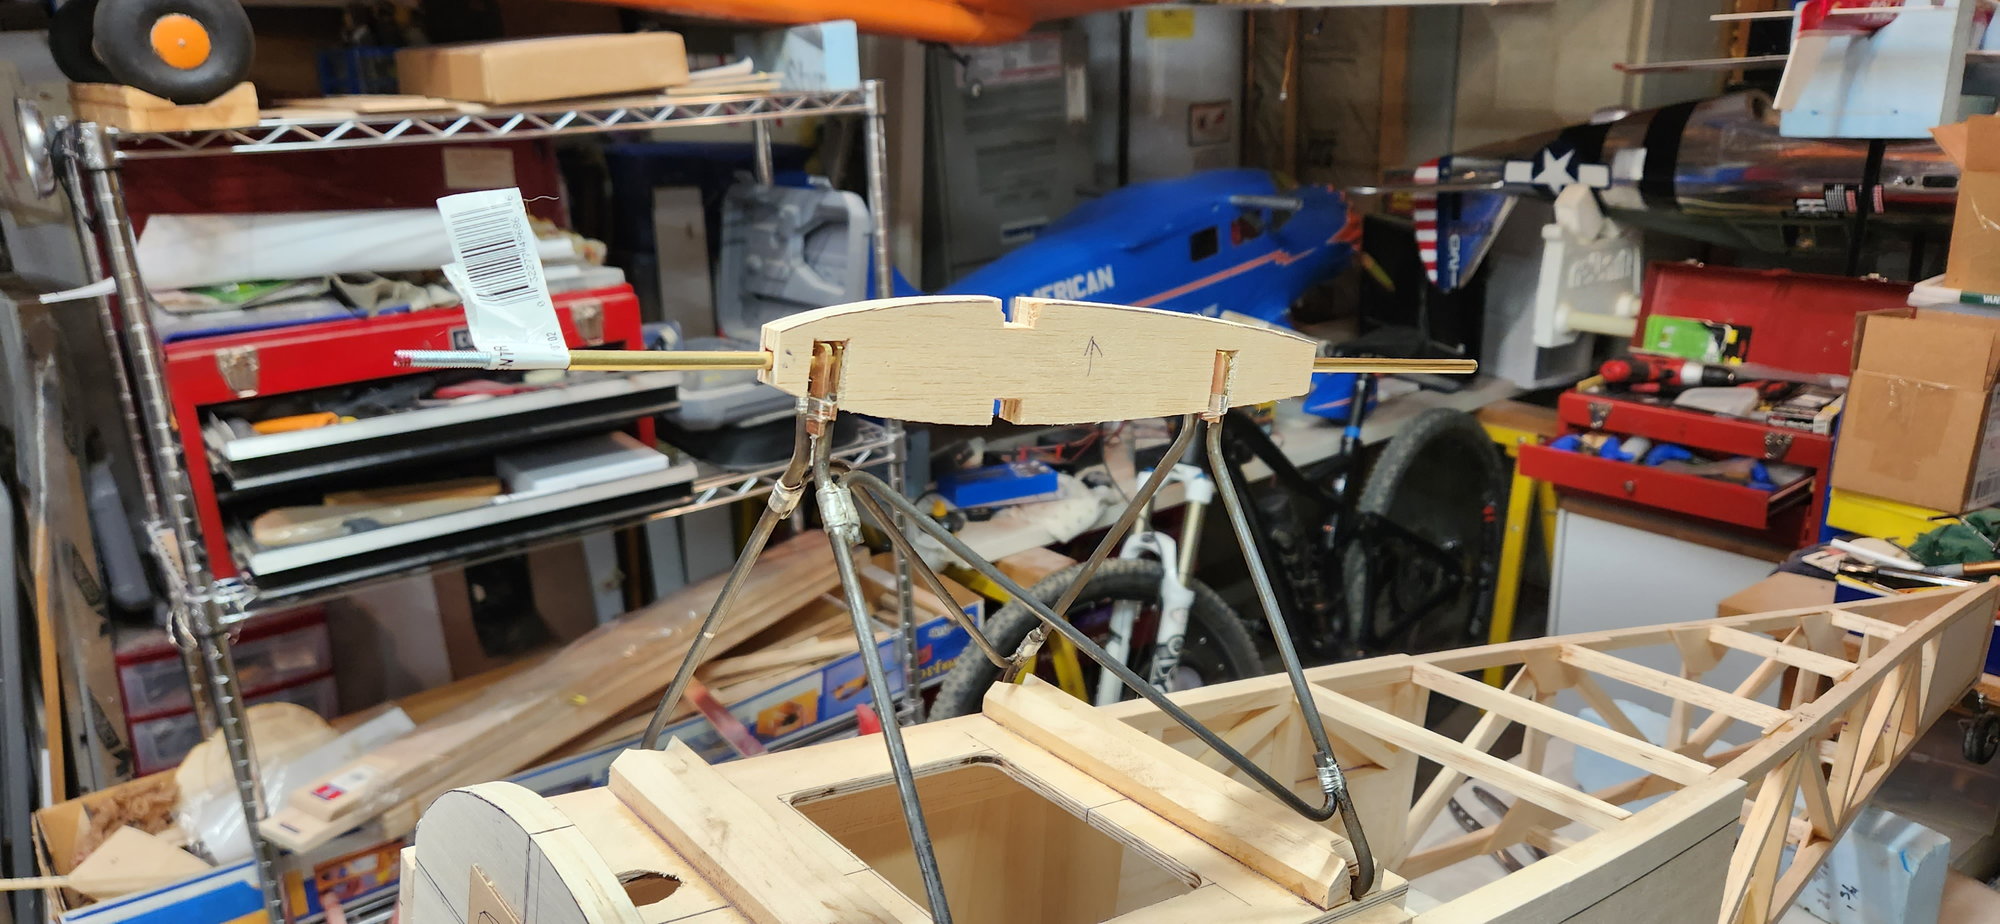
This center rib is a sandwich of ply and balsa with a brass tube thru the center that aligns and attaches the top wing. The inner tube gets a threaded rod glued into it with a nut to hold the top wing on. incidence and front to back alignment are double checked and cabanes are epoxied in their hardwood mounting blocks. the whole box will be epoxied when the wings are on just to double check alignment.
the cabanes are mounted to a box that is set into the top of the fuselage sides. I glued some blocks on the side of this to hold it's position as I worked on it. this will be glued in place later to set the alignment of the top wing. the firewall is not glued in yet either.
a few clamps hold everything in place so I can wire together and solder.
front view
wires are soldered, incidence is set at this point. firewall is glued in place. cabane box is still removable. The brass tube will hold the top wing on. It pulls out to remove wing
firewall has a beveled plywood spacer to set 2 deg right thrust. the plans did not have this but experience tells me it's a good idea
This center rib is a sandwich of ply and balsa with a brass tube thru the center that aligns and attaches the top wing. The inner tube gets a threaded rod glued into it with a nut to hold the top wing on. incidence and front to back alignment are double checked and cabanes are epoxied in their hardwood mounting blocks. the whole box will be epoxied when the wings are on just to double check alignment.
10-07-2023, 09:52 PM
#5
My Feedback: (1)
Hii Byran. I purchased an original hand me down Divley Skybolt at a swap meet here in FLA. about a year ago built by Andy Sheber himself. Still in great solid shape. Have been slowly trying to gather info on it to do some old school upgrades and then came across your build log today. I will greatfully follow along with your rebuild and hope to gain some knowledge and pointers along the way. Mine is as expected/built a little heavy at original weight of almost 25 lbs with a G-62. Was that close to your original build weight in mid 1980's and what do you think your rebuild can be lightened to? I finally found a short video of one from the early 2000's and it appeared well behaved in the air like you said yours was. Thanks for posting your build and hope we can confer along the way. Retired now so i got plenty of time to watch and see if this ole dog can learn new tricks.
Dan.... AKA Gottabeme
Dan.... AKA Gottabeme
10-08-2023, 05:38 PM
#6
Thread Starter
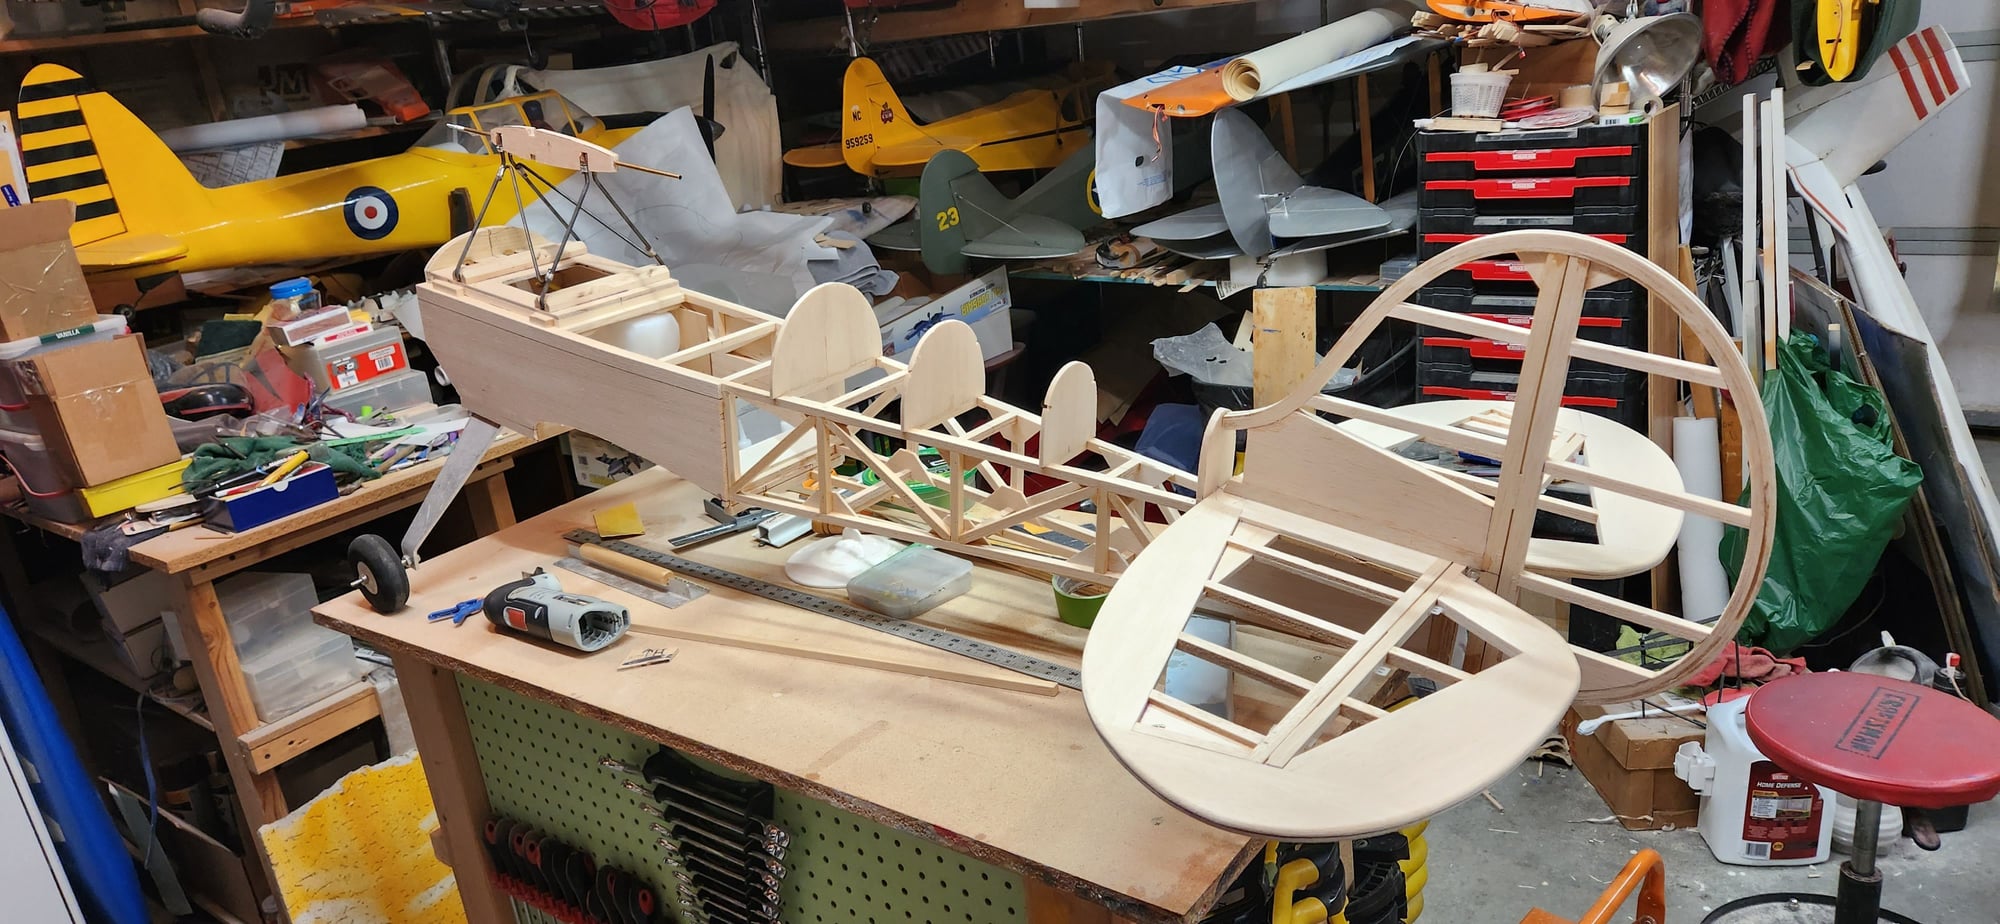
Neat to here that there are still a few around. I don't remember what the original build weight was, but in the mid 80's it was a monster, not that big compared to some of the stuff today. It seems like it would have been around 25 lbs but I don't remember. It did have a large nicad to run the huge servos. I think it had 4 D size cells in it and the elevator servo was about 4" long and sucked juice. Probably only 50 oz of torque. it was covered with koverall and dope. most of the lightening I have done is in the tail. The original had the fuselage made with a solid sheet and then reinforced with 3/8 sticks instead or open structure the tail was also removable and made from solid 3/8" balsa sheet wood. I think that the engine weight will be similar to the Quadra 50 that I used. I am also using a little thinner wing ribs since they are cap stripped.
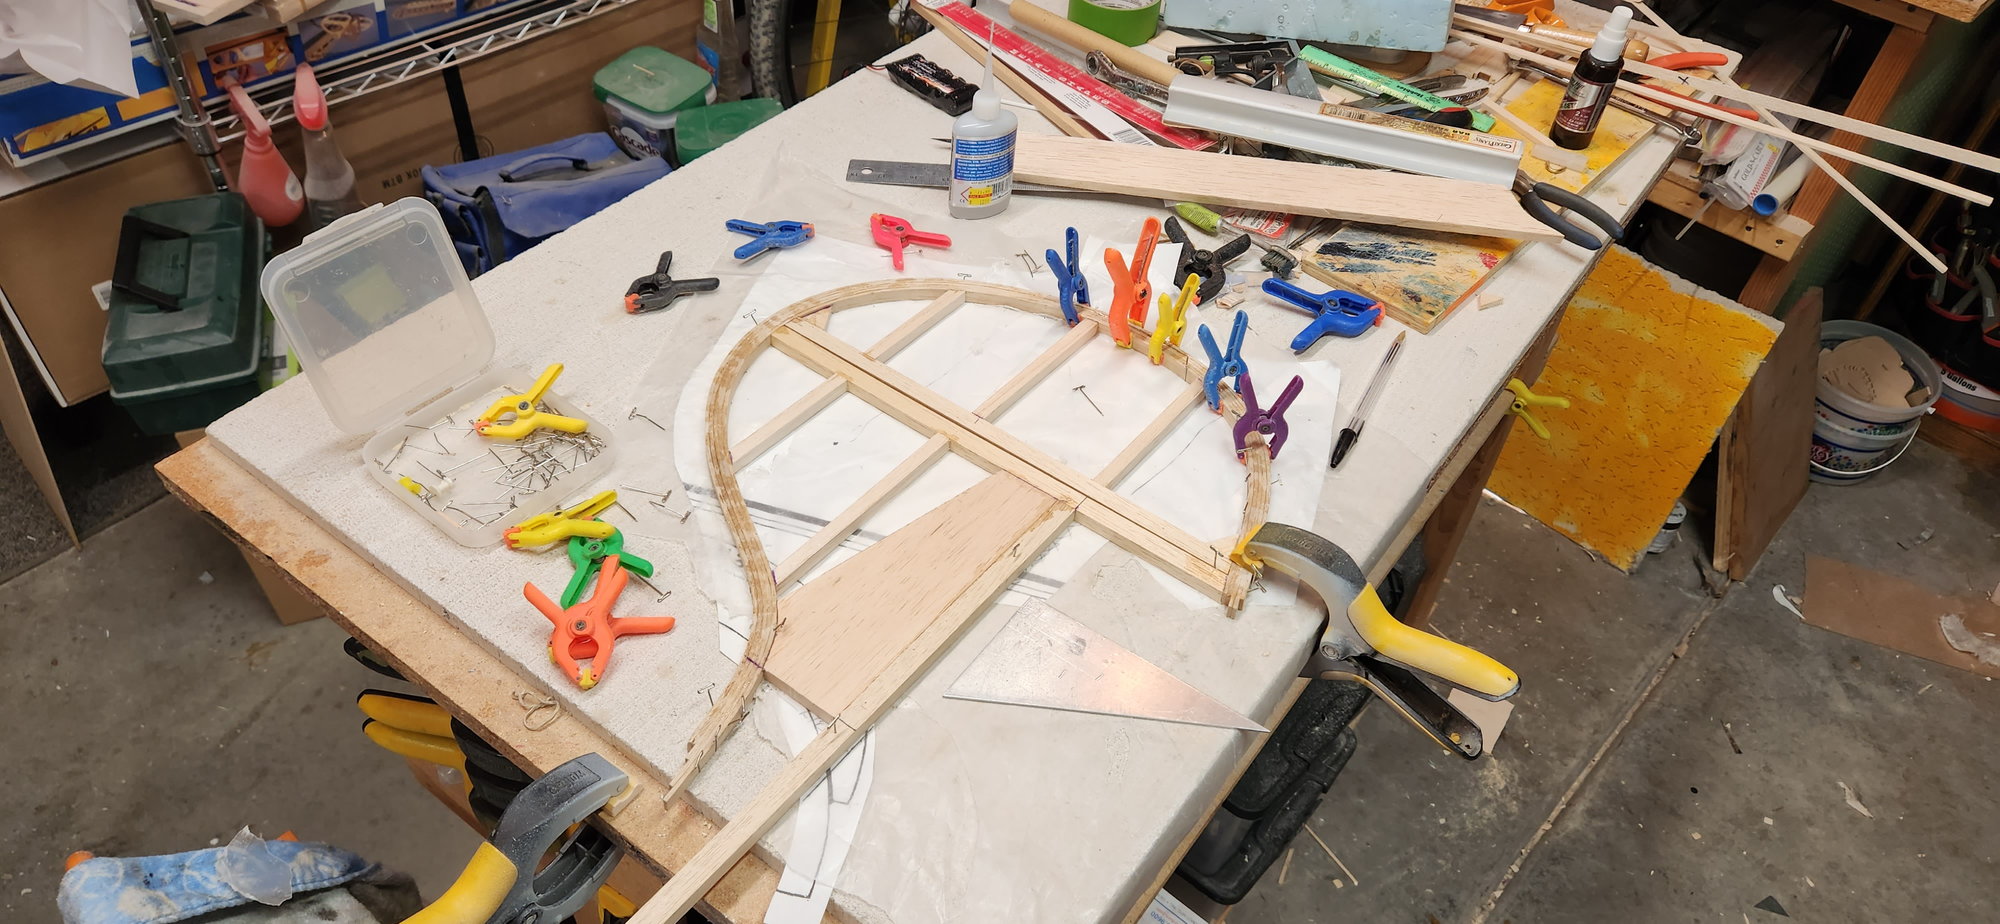
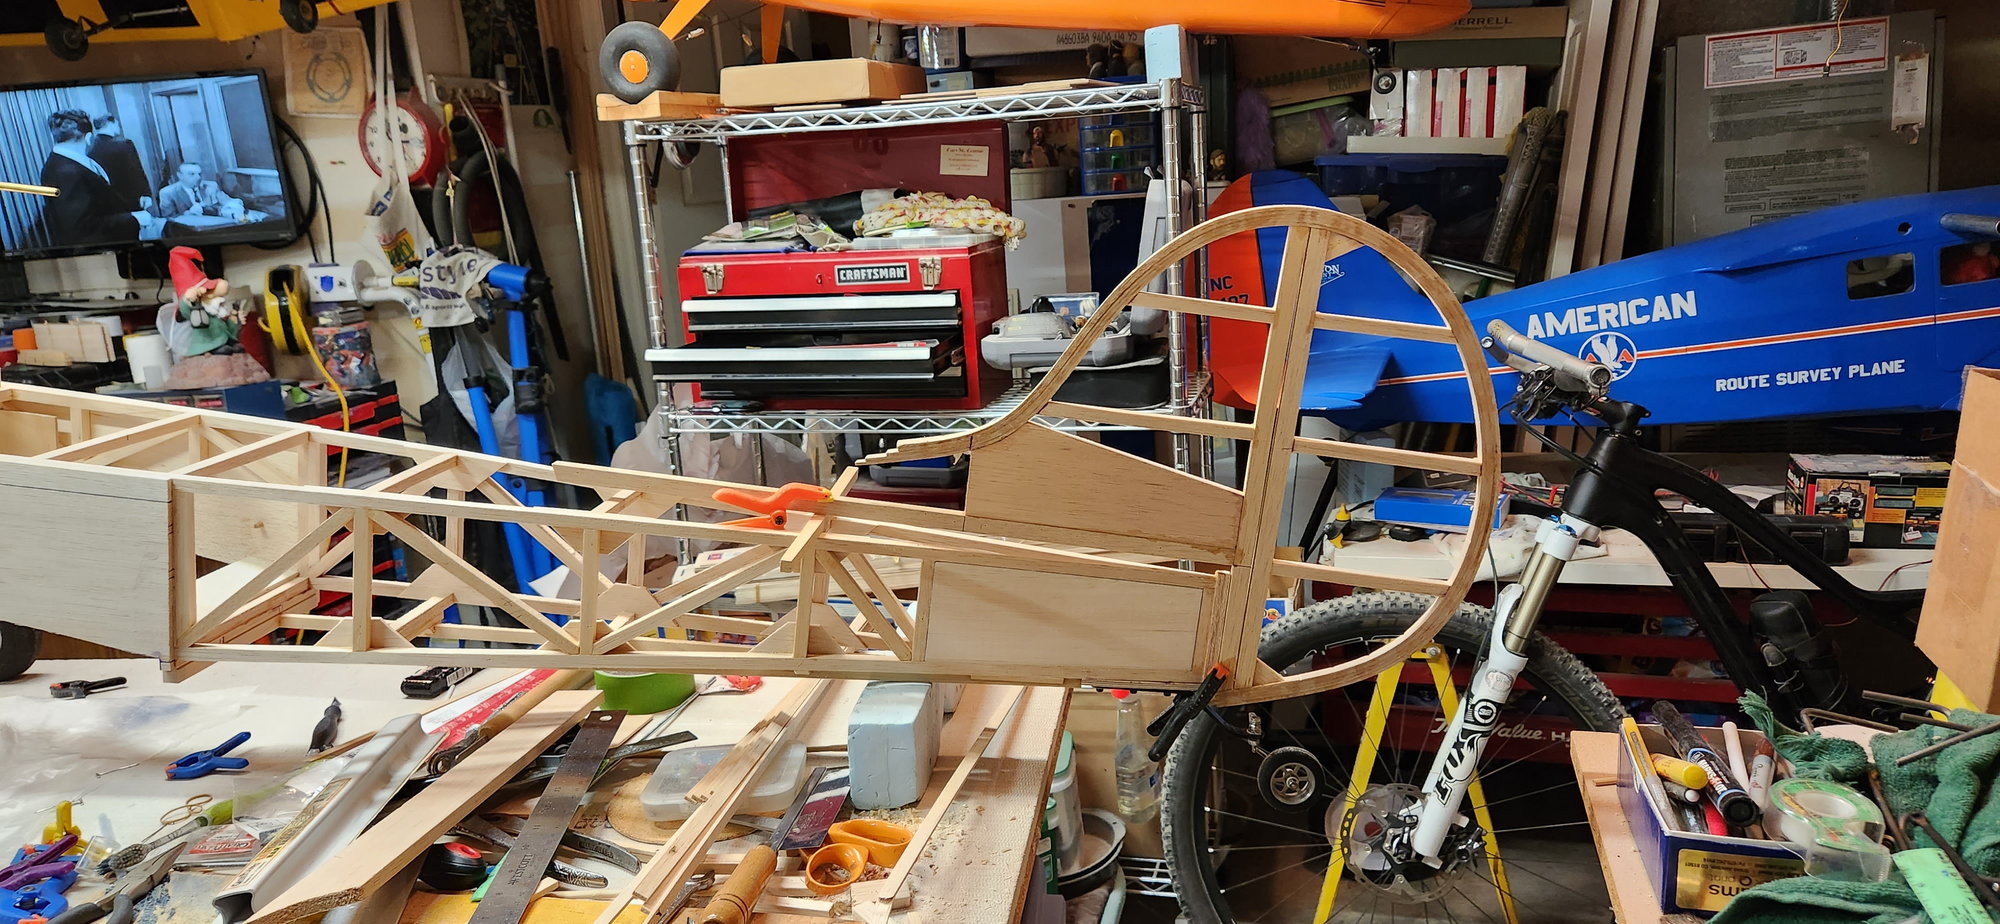
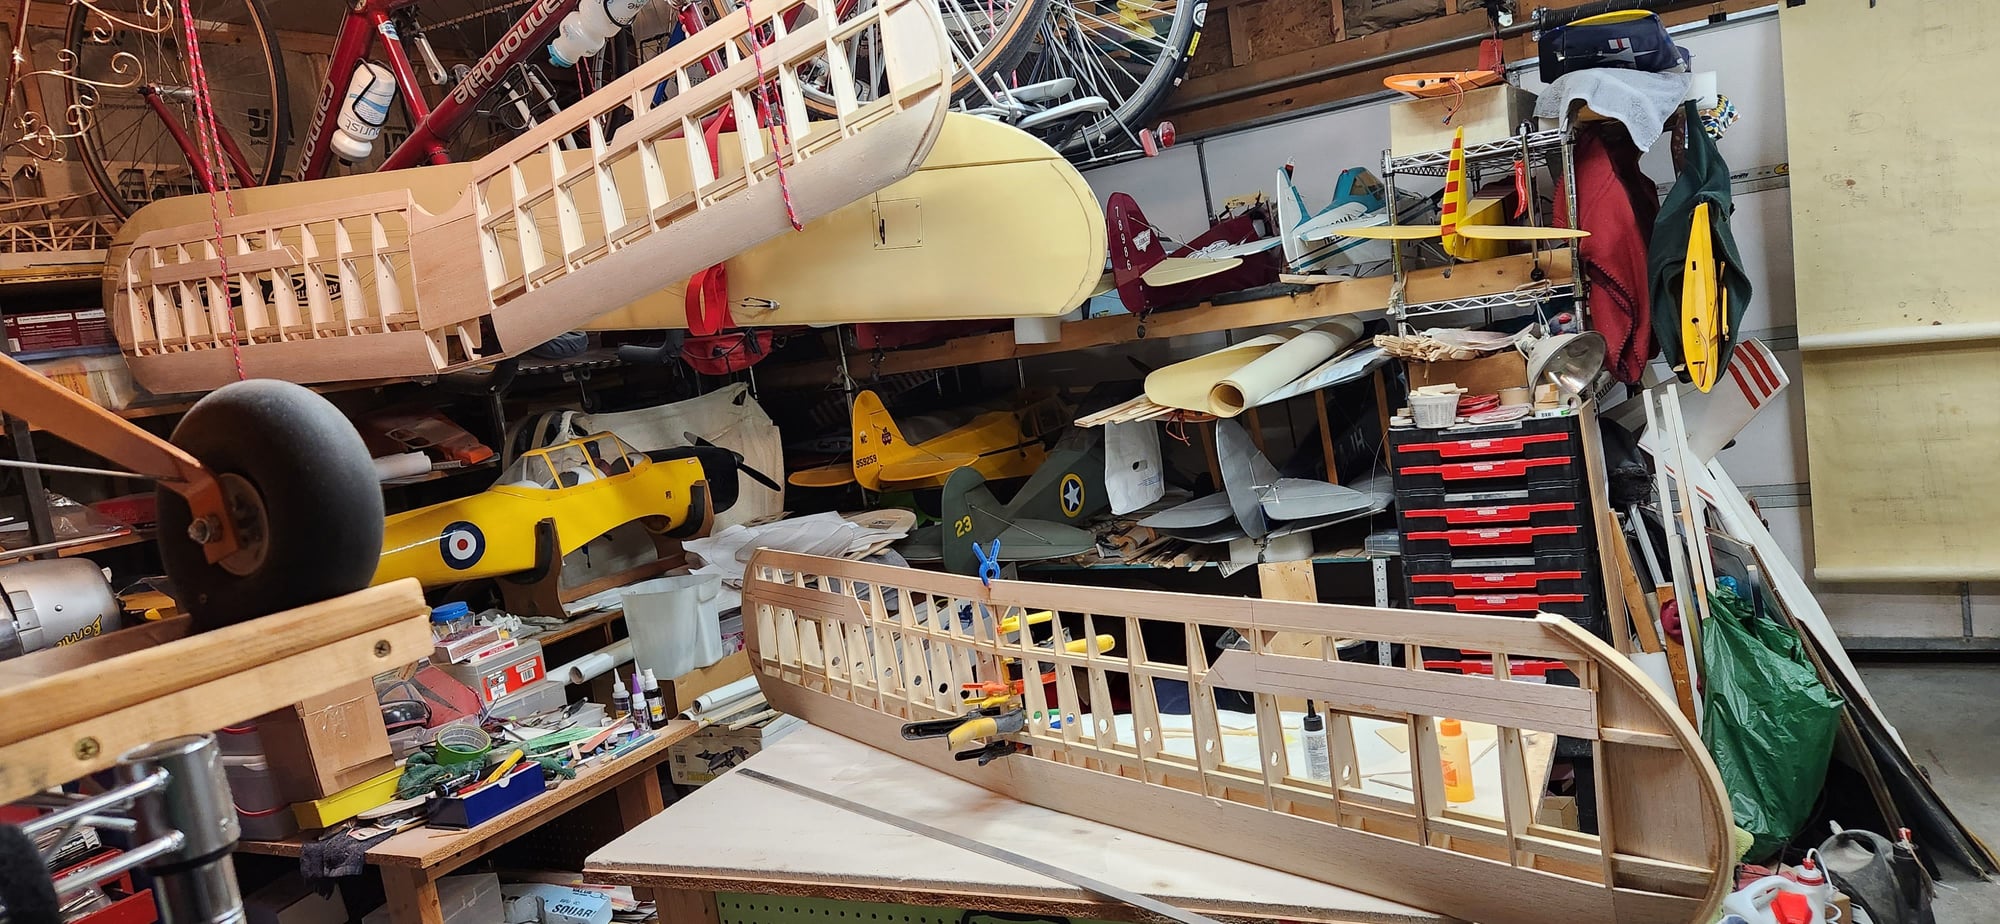
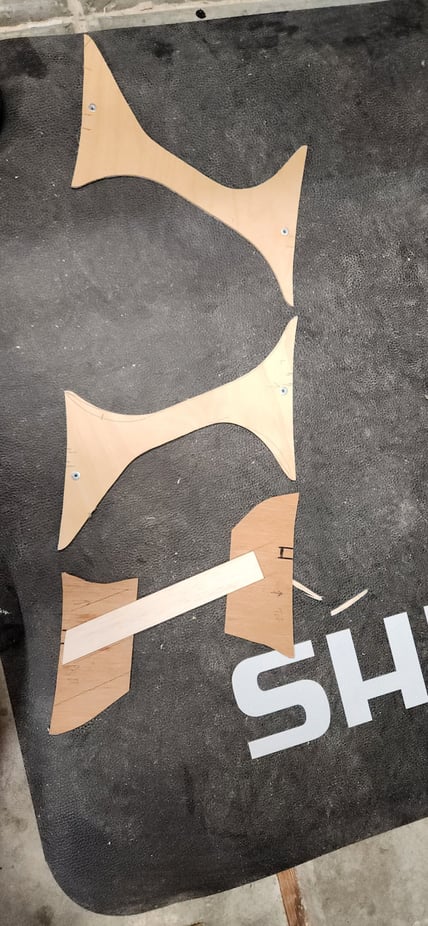
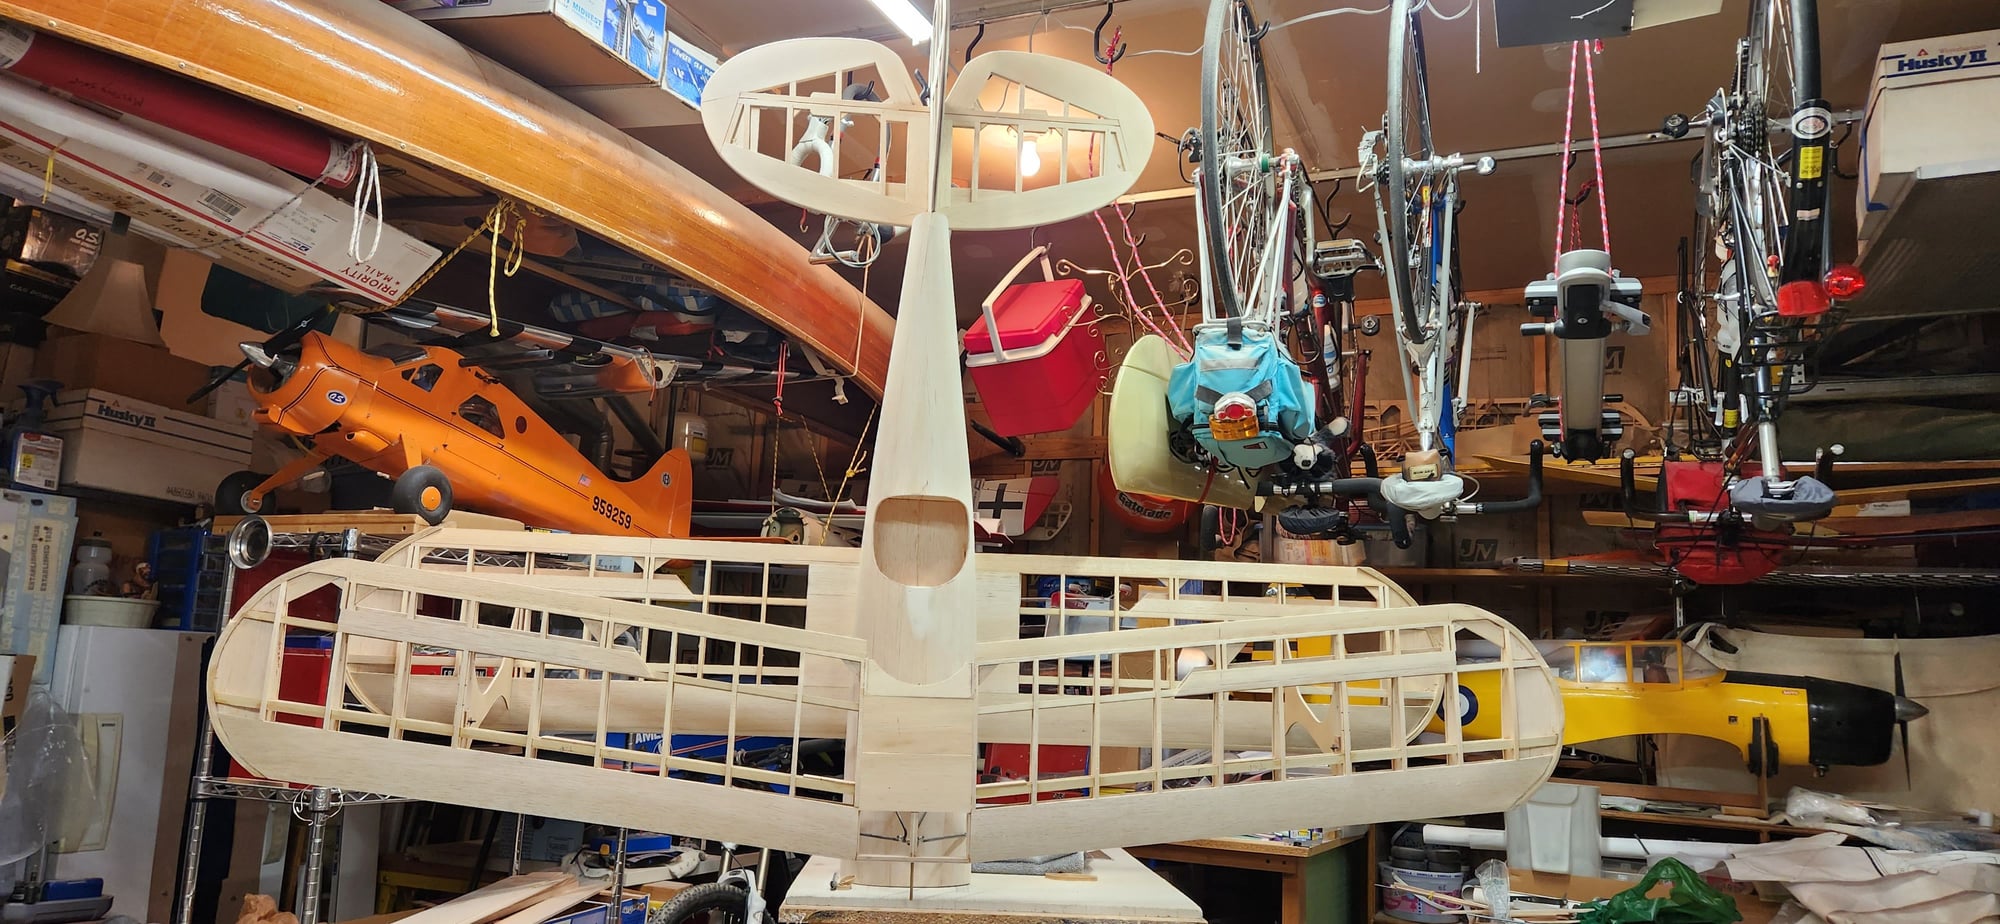
fin and rudder, outside is laminated balsa strips. bracing and hinge reinforcements will be added later. a lot lighter than solid sheeting on original.

cowl from Fiberglass Specialties, it will need to be cut down 1" to fit.
all open structure was sheeted on plans.
stab and elevator, made from 2 layers of 3/16 sheet laminated together because that's what I had around the house. Joints are offset for more strength. I may drill more holes in it later but it is still a lot lighter than the original
Original and new tail. the original has a 3" wide tang on the bottom that slides into a socket on the fuselage and is secured by a 1/4 x 20 nylon bolt. A lot of weight that this one won't have as I regularly fly planes with big tails.
fin and rudder, outside is laminated balsa strips. bracing and hinge reinforcements will be added later. a lot lighter than solid sheeting on original.
cowl from Fiberglass Specialties, it will need to be cut down 1" to fit.
all open structure was sheeted on plans.
stab and elevator, made from 2 layers of 3/16 sheet laminated together because that's what I had around the house. Joints are offset for more strength. I may drill more holes in it later but it is still a lot lighter than the original
Original and new tail. the original has a 3" wide tang on the bottom that slides into a socket on the fuselage and is secured by a 1/4 x 20 nylon bolt. A lot of weight that this one won't have as I regularly fly planes with big tails.
10-09-2023, 05:36 PM
#7
My Feedback: (1)
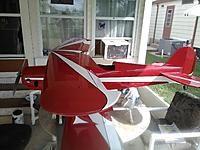
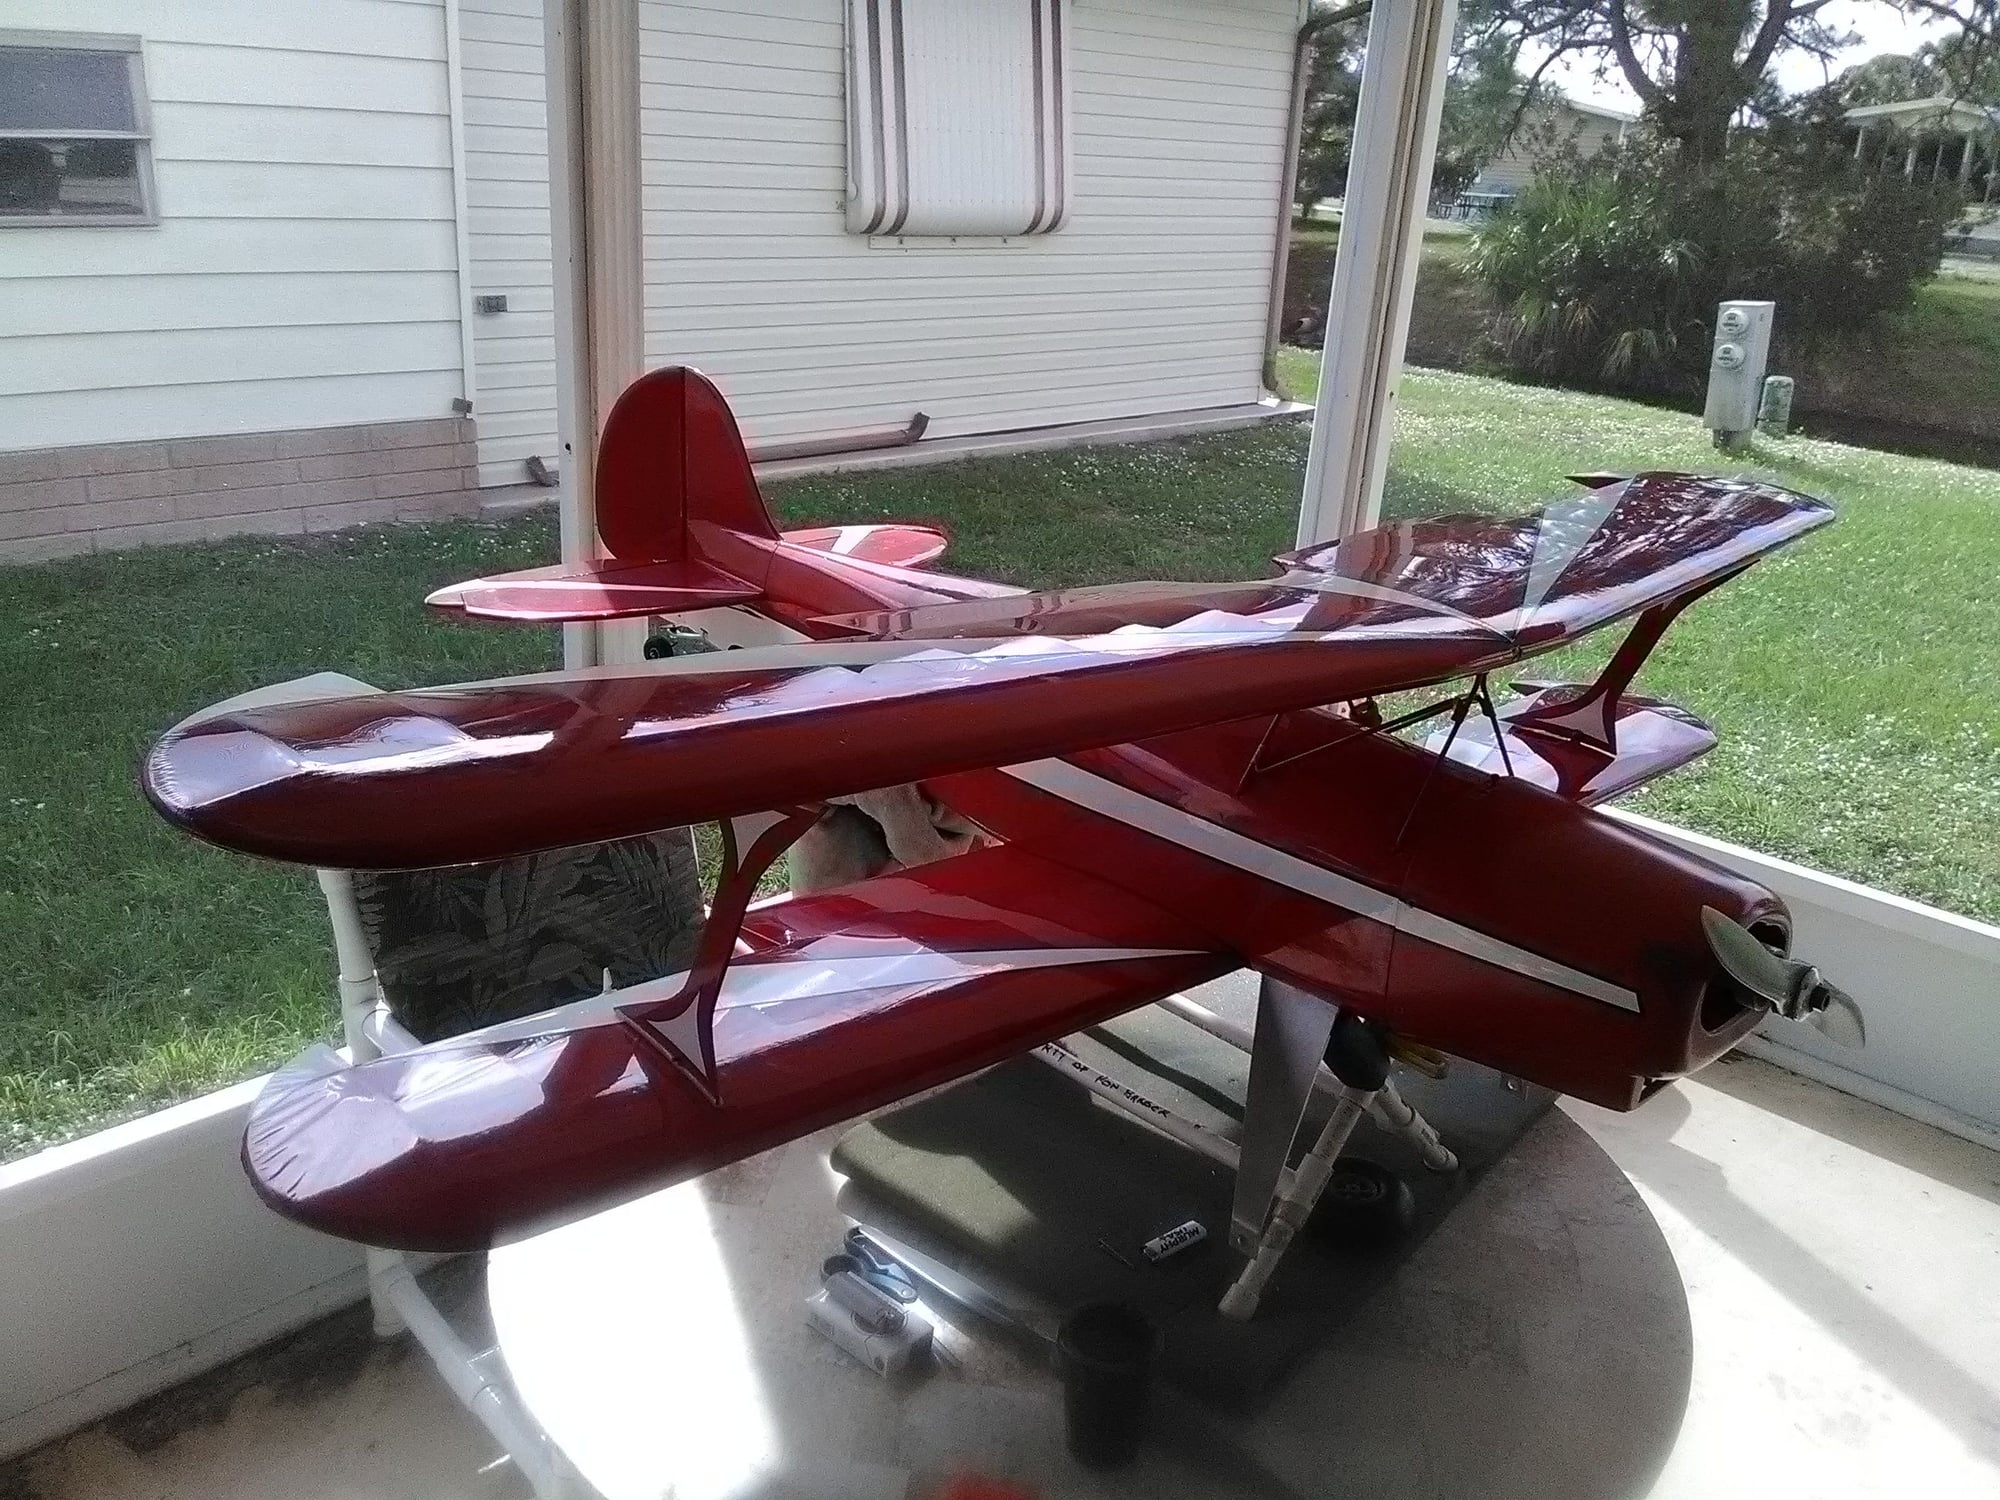
Much thanks for info. My Skybolt is exactly as you described. Andy built it to his own plans/specs i'm told with the removable tail, solid sheeting, 1/4 scale servos and an inner shock absorbing center spring landing gear. Plane was recovered in ultracote film. A few pic's here of the plane with a Supertigre 45cc glo engine i had planned to use but now switching to a DLE 61 i have with 22" Vess prop. Since plane is already built i guess i will take your idea of lightening tail with holes and maybe remove tang and steel bolt then glue on tails. I have no set of plans to go by to check wing incidence or engine thrust line. but assume it is correct since it has flown many times over the years. I believe the CG is just forward of the rear cabane struts but not sure. If correct i still need about a pound of weight at firewall to balance out. I don't like the tandem elev. servo setup. Should i worry much about it. I have Hitec 645mg servos to replace the old ones seen in pic. one servo ea. per aeliron also.
Any help/ advice much appreciated. Really enjoying watching what i concider a master builder at work. At 66 y/o now i still have much to learn from true builders like yourself, so much thanks for posting your build log.

Any help/ advice much appreciated. Really enjoying watching what i concider a master builder at work. At 66 y/o now i still have much to learn from true builders like yourself, so much thanks for posting your build log.
Last edited by gottabeme; 10-09-2023 at 05:56 PM.
10-09-2023, 07:12 PM
#8
Thread Starter
Looks nice, the ultracote probably saves a couple of pounds. the thrust line is at 0 degrees, the top wing is also at 0, the bottom wing says -1 degree. cg is just behind front of lower leading edge. hopefully these pictures will help. I was going to use 1 hitec 645 for the rudder and 1 for the elevator but I decided to do 1 servo for each elevator half. I will probably use 2 422 standard servos at 6 volts on them with a 645 on the rudder. I also will use 1 servo in each wing half on the lower wing with a pushrod to the upper wing. on a crazy thought I could use 4 servos and program the lower ones to also act as flaps. the servos in your plane are plenty strong, and the double set up is not a bad idea though it might be overkill with those servos. they have over 180 oz of torque and look to be in good shape. looks like the 645 is smaller so will weigh less and possibly use less juice. when i get mine set up I will check the elevator servos and may use 645s on both elevator half's
.
https://servodatabase.com/servos/hitec?page=4
.
https://servodatabase.com/servos/hitec?page=4

The following users liked this post:
Tony Hallo (10-11-2023)
10-11-2023, 07:38 PM
#12
Thread Starter
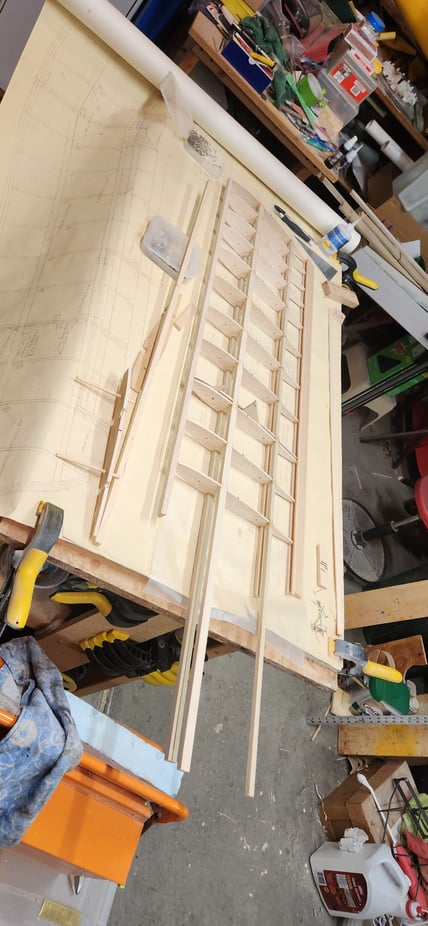
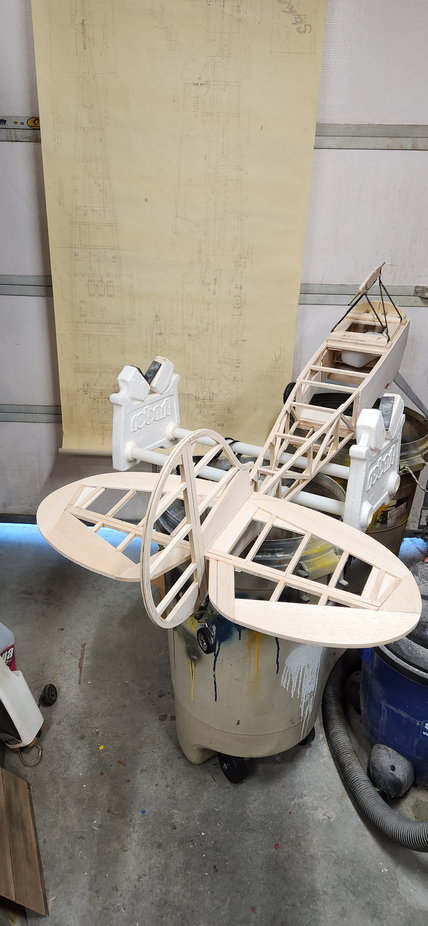
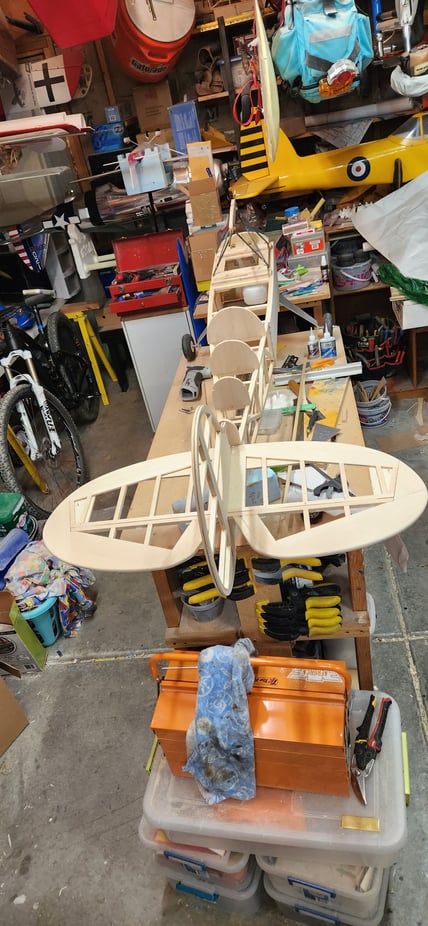
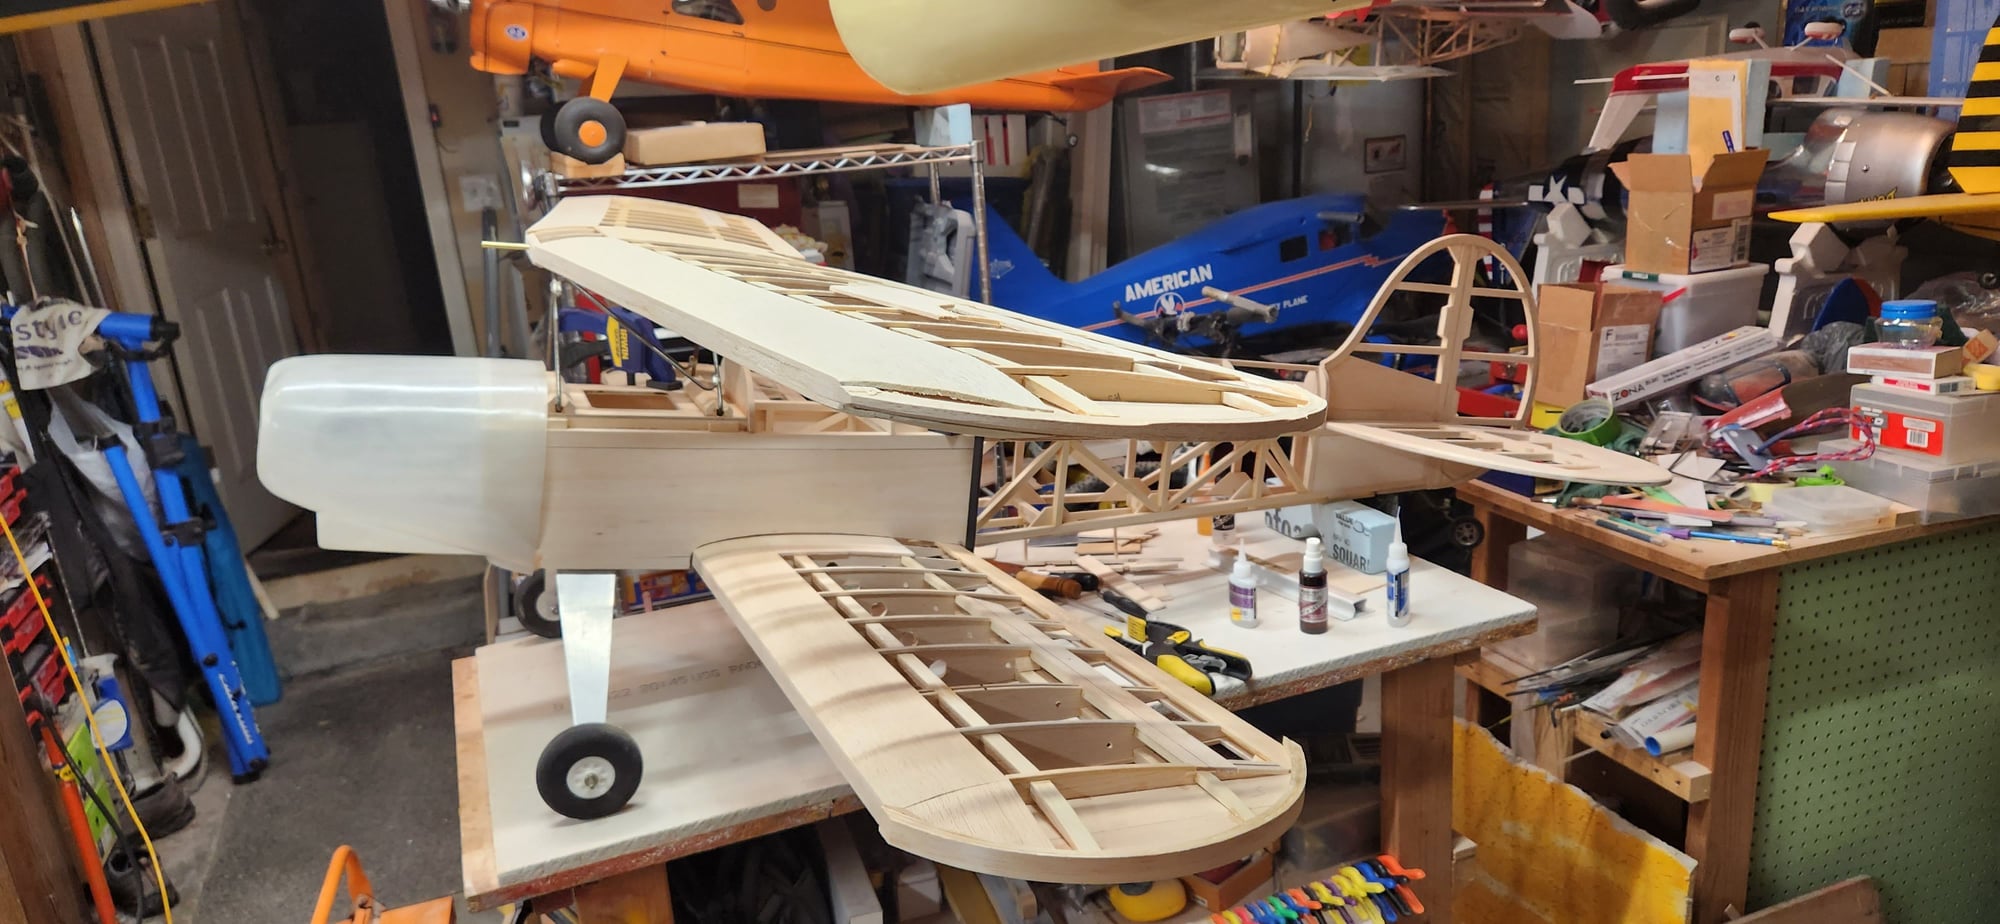
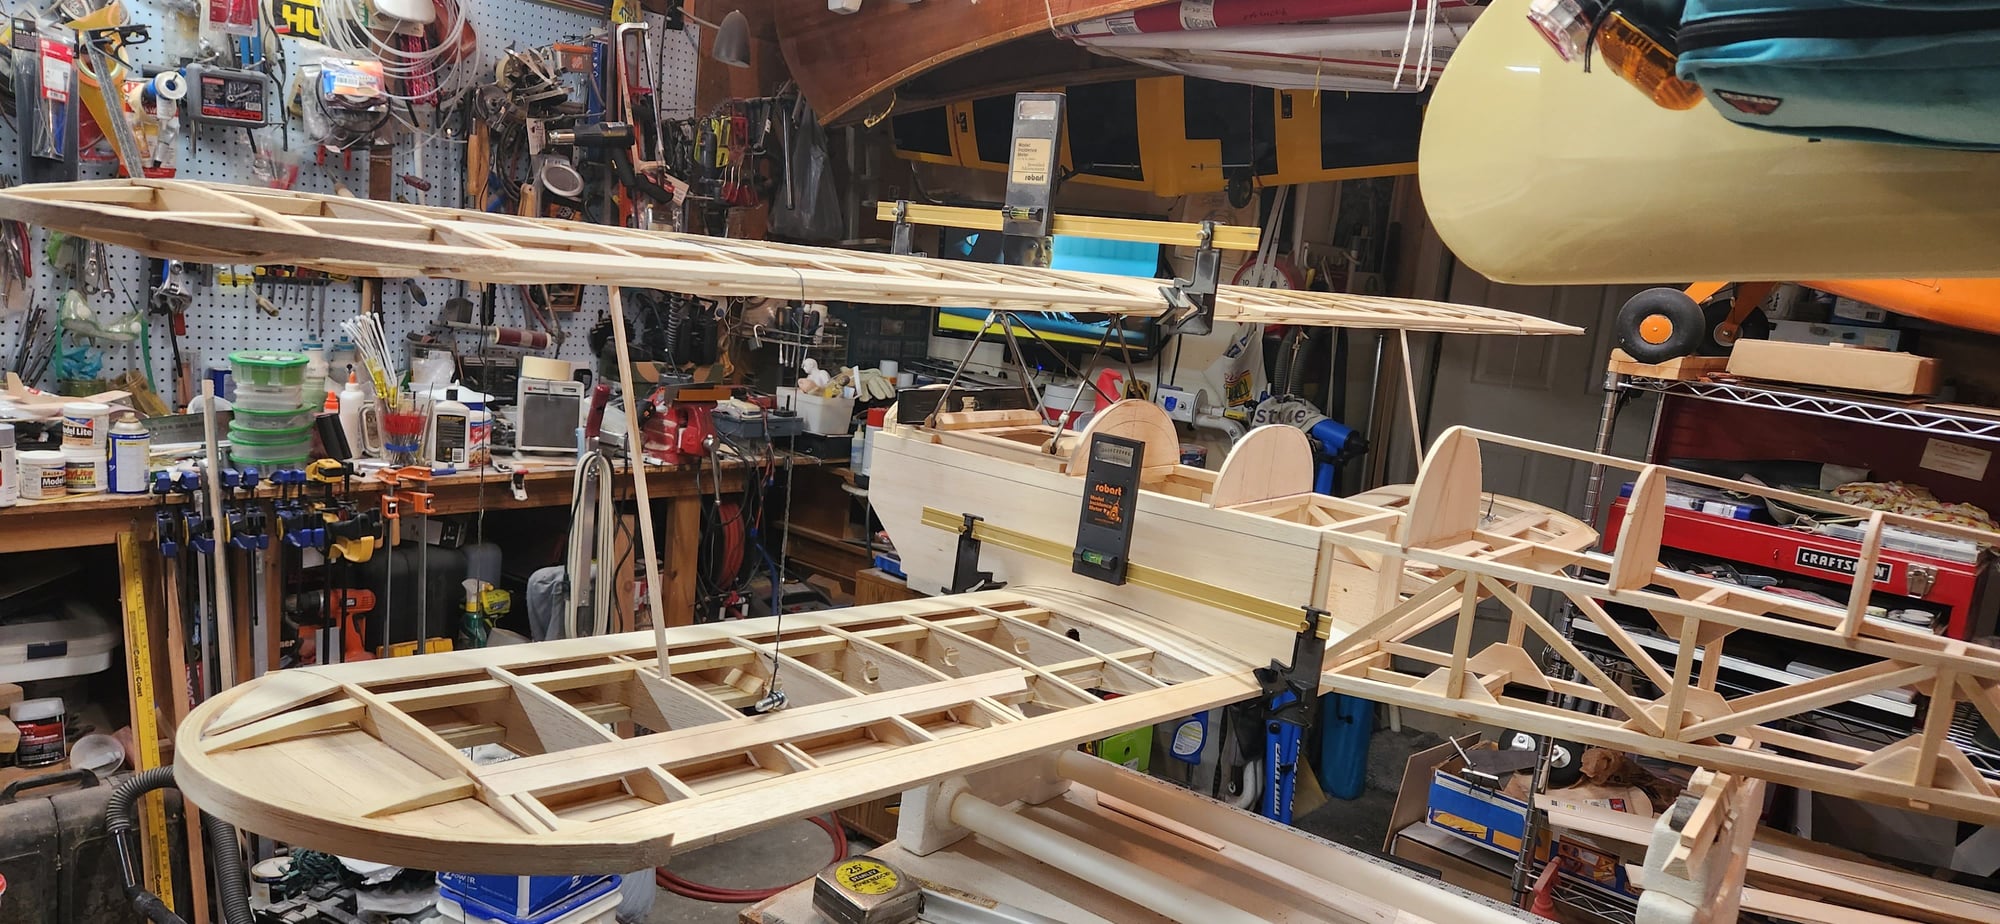
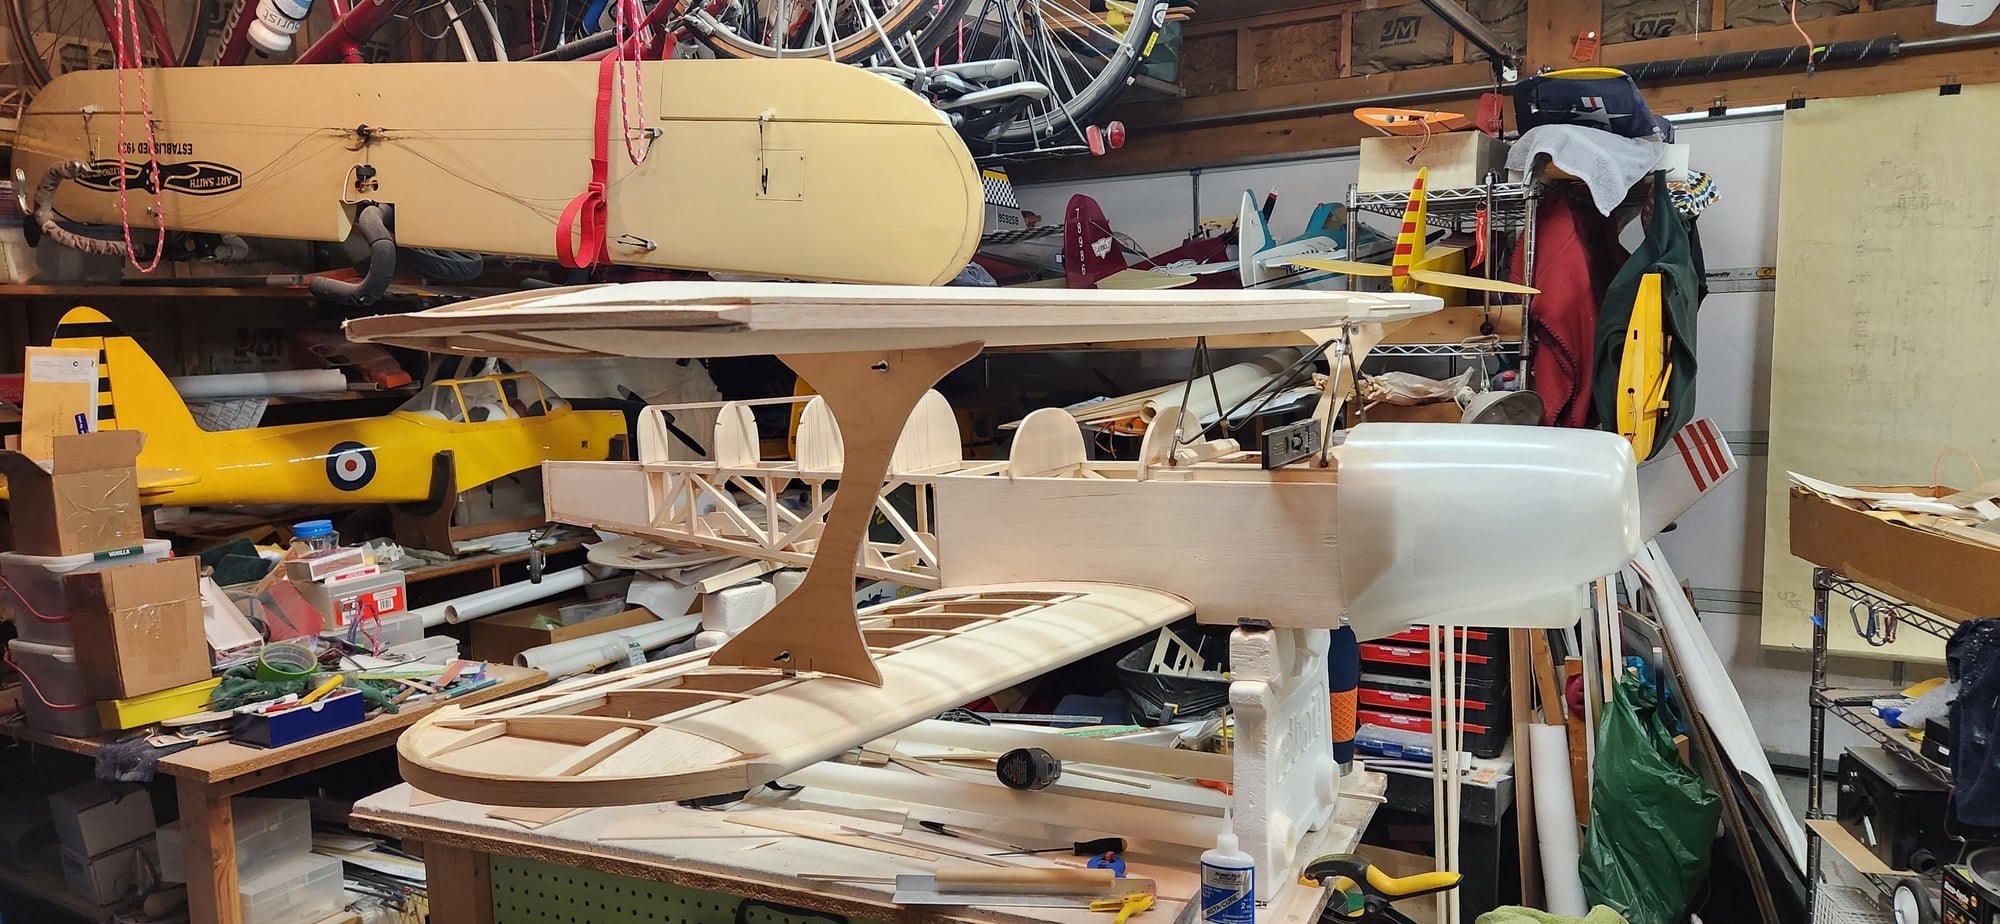
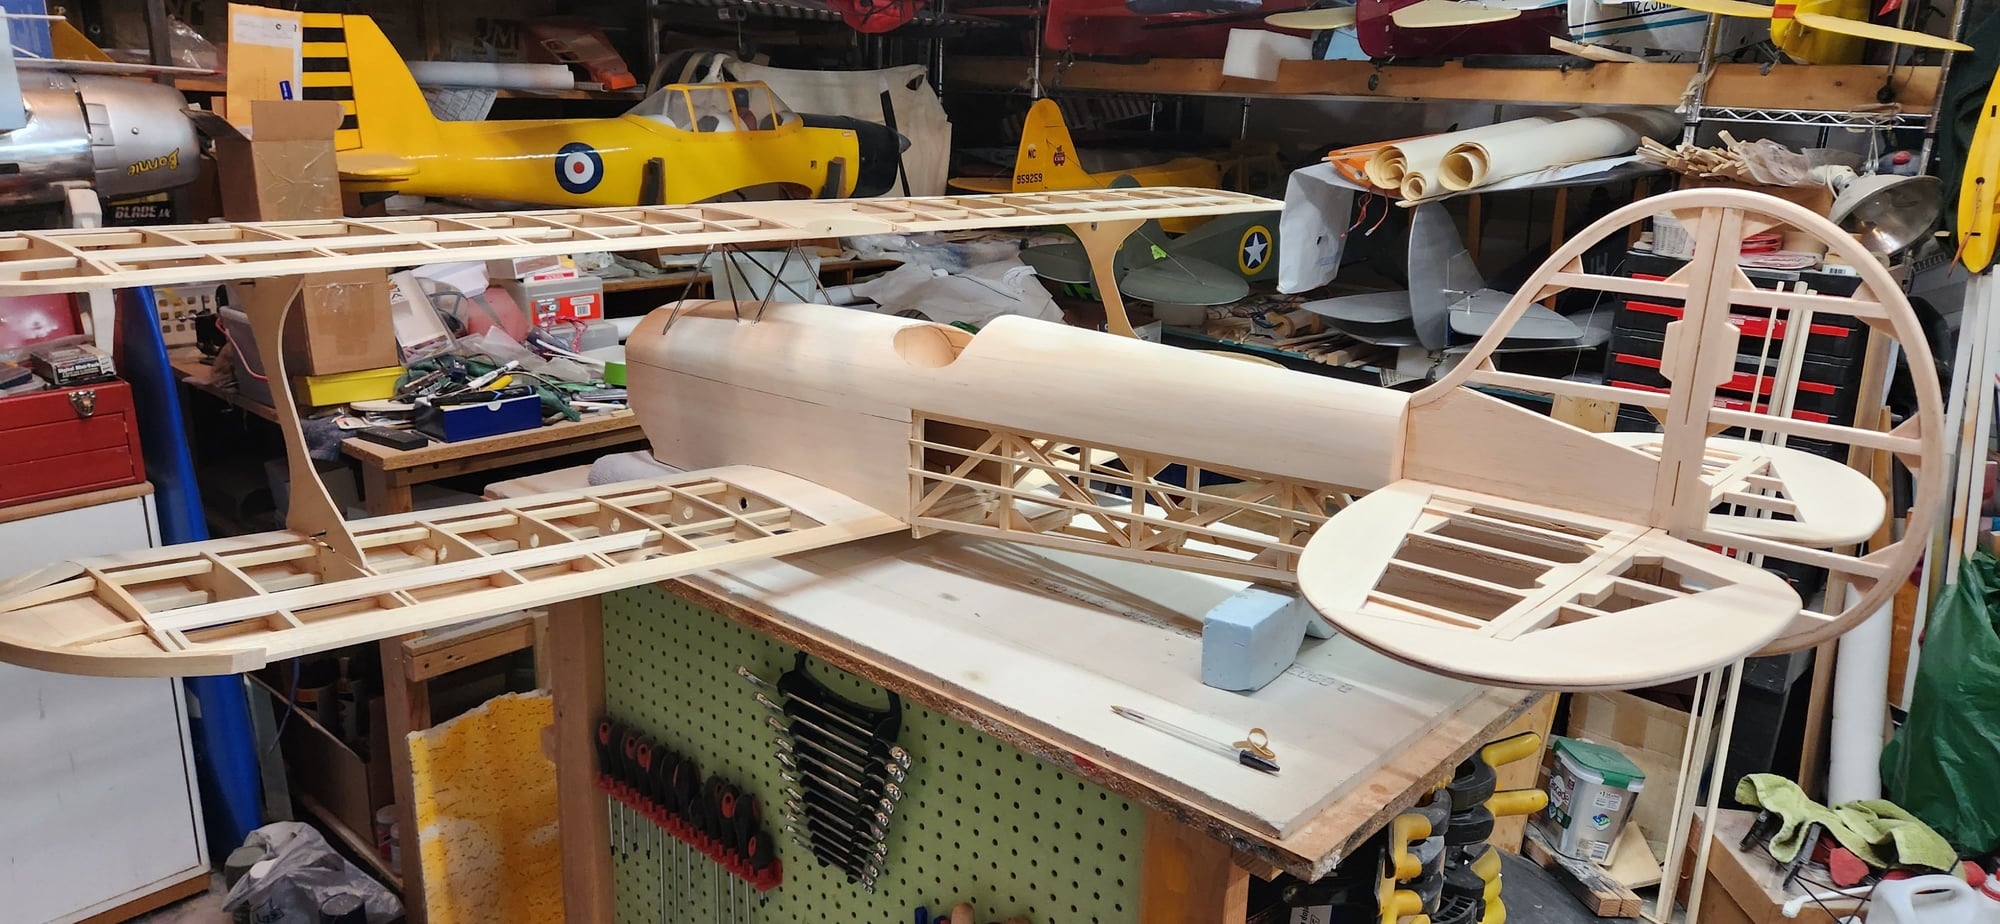
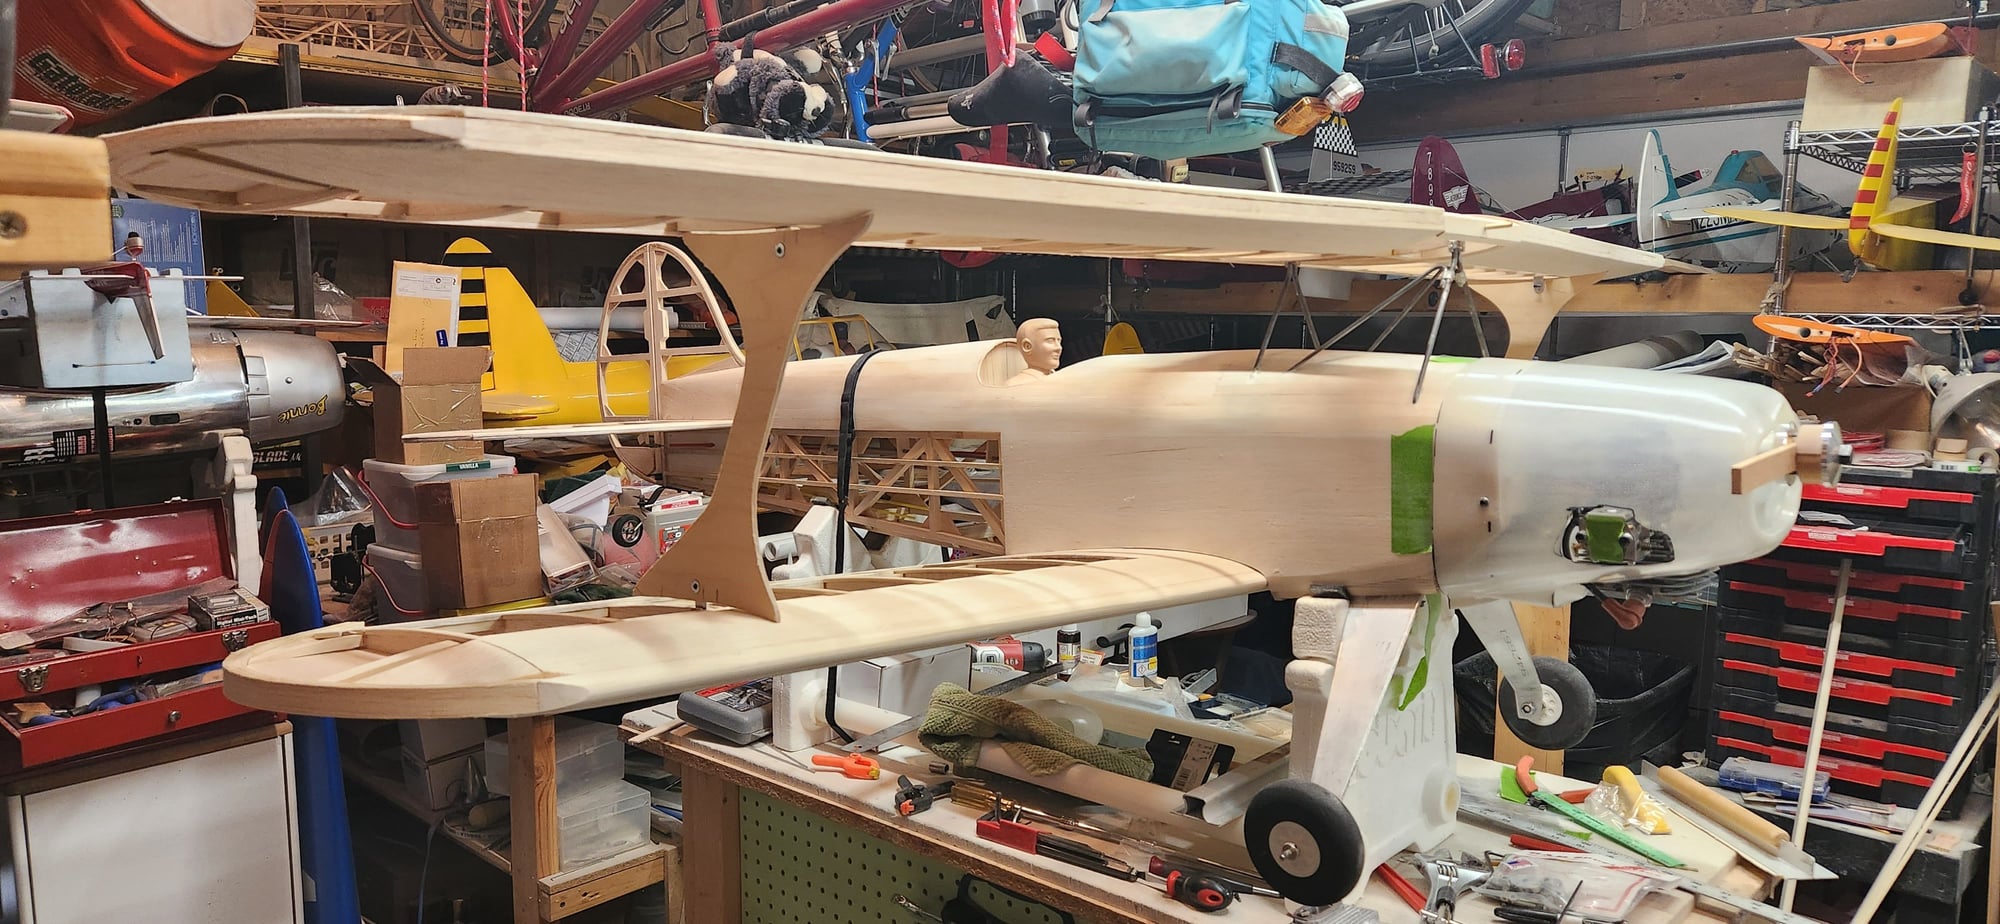
bottom wing panel
bottom wings
top wing
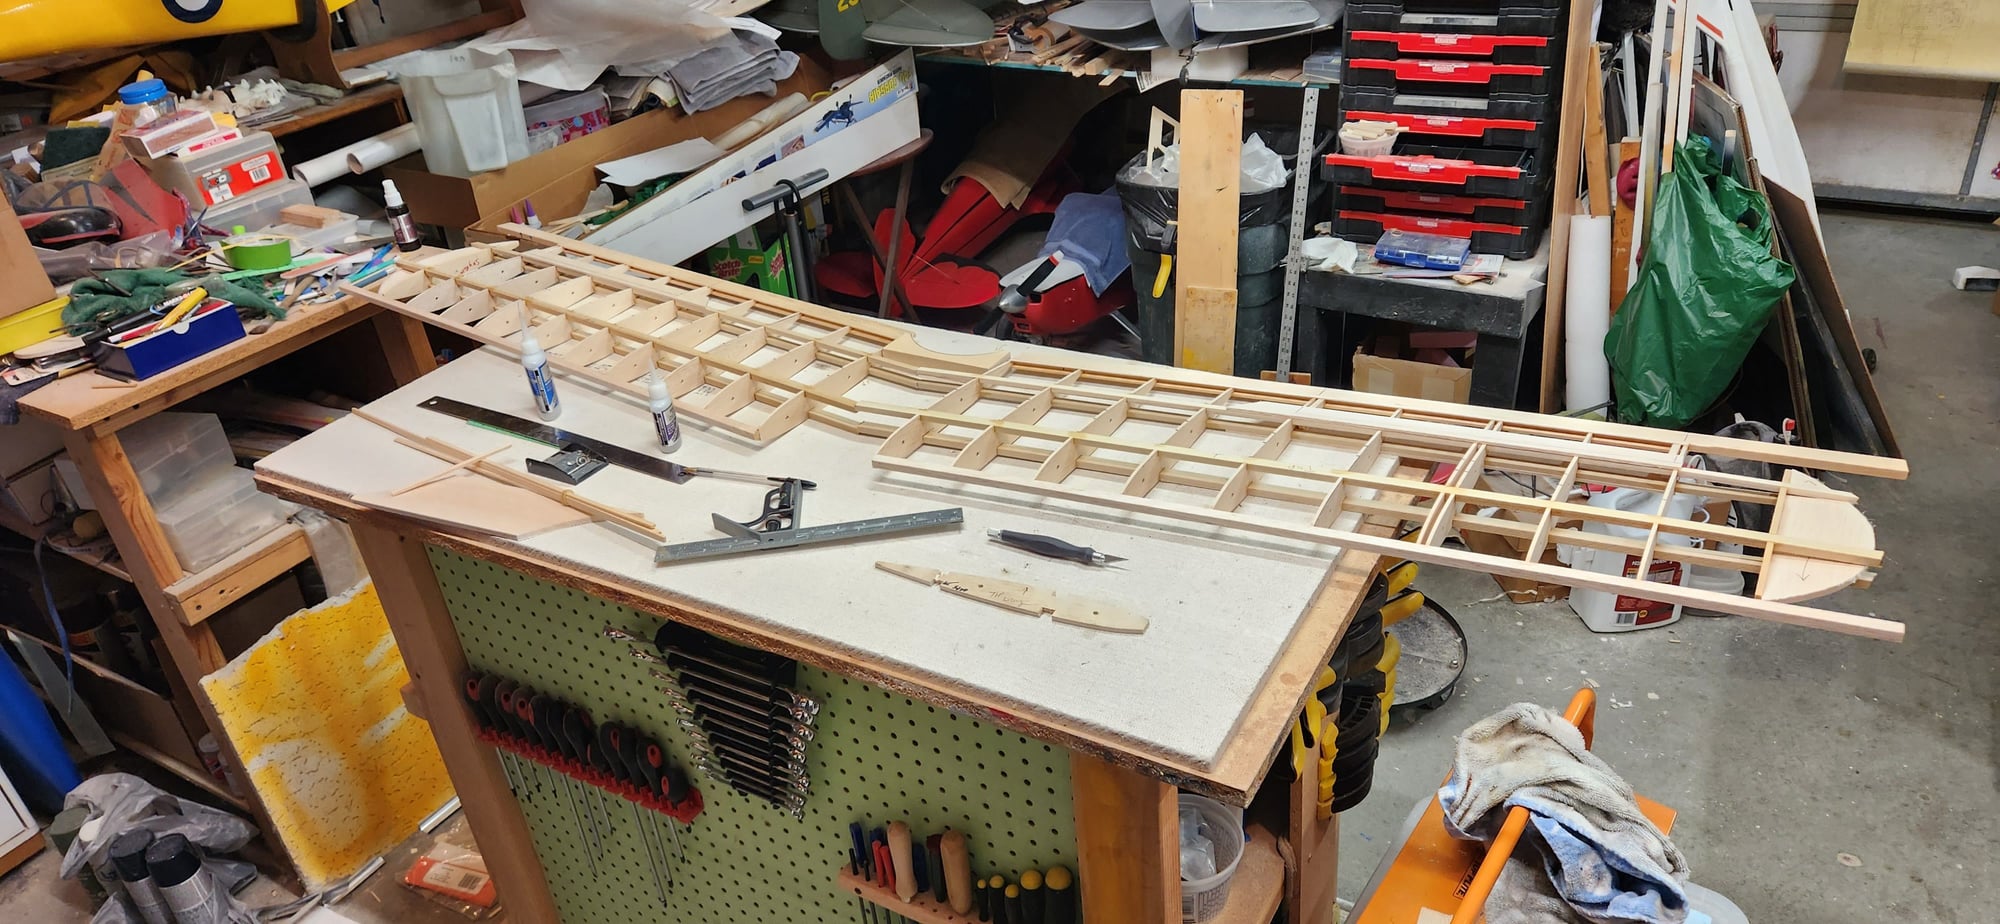
top wings are swept back but built flat
laminated wing tips and leading edge sheeting
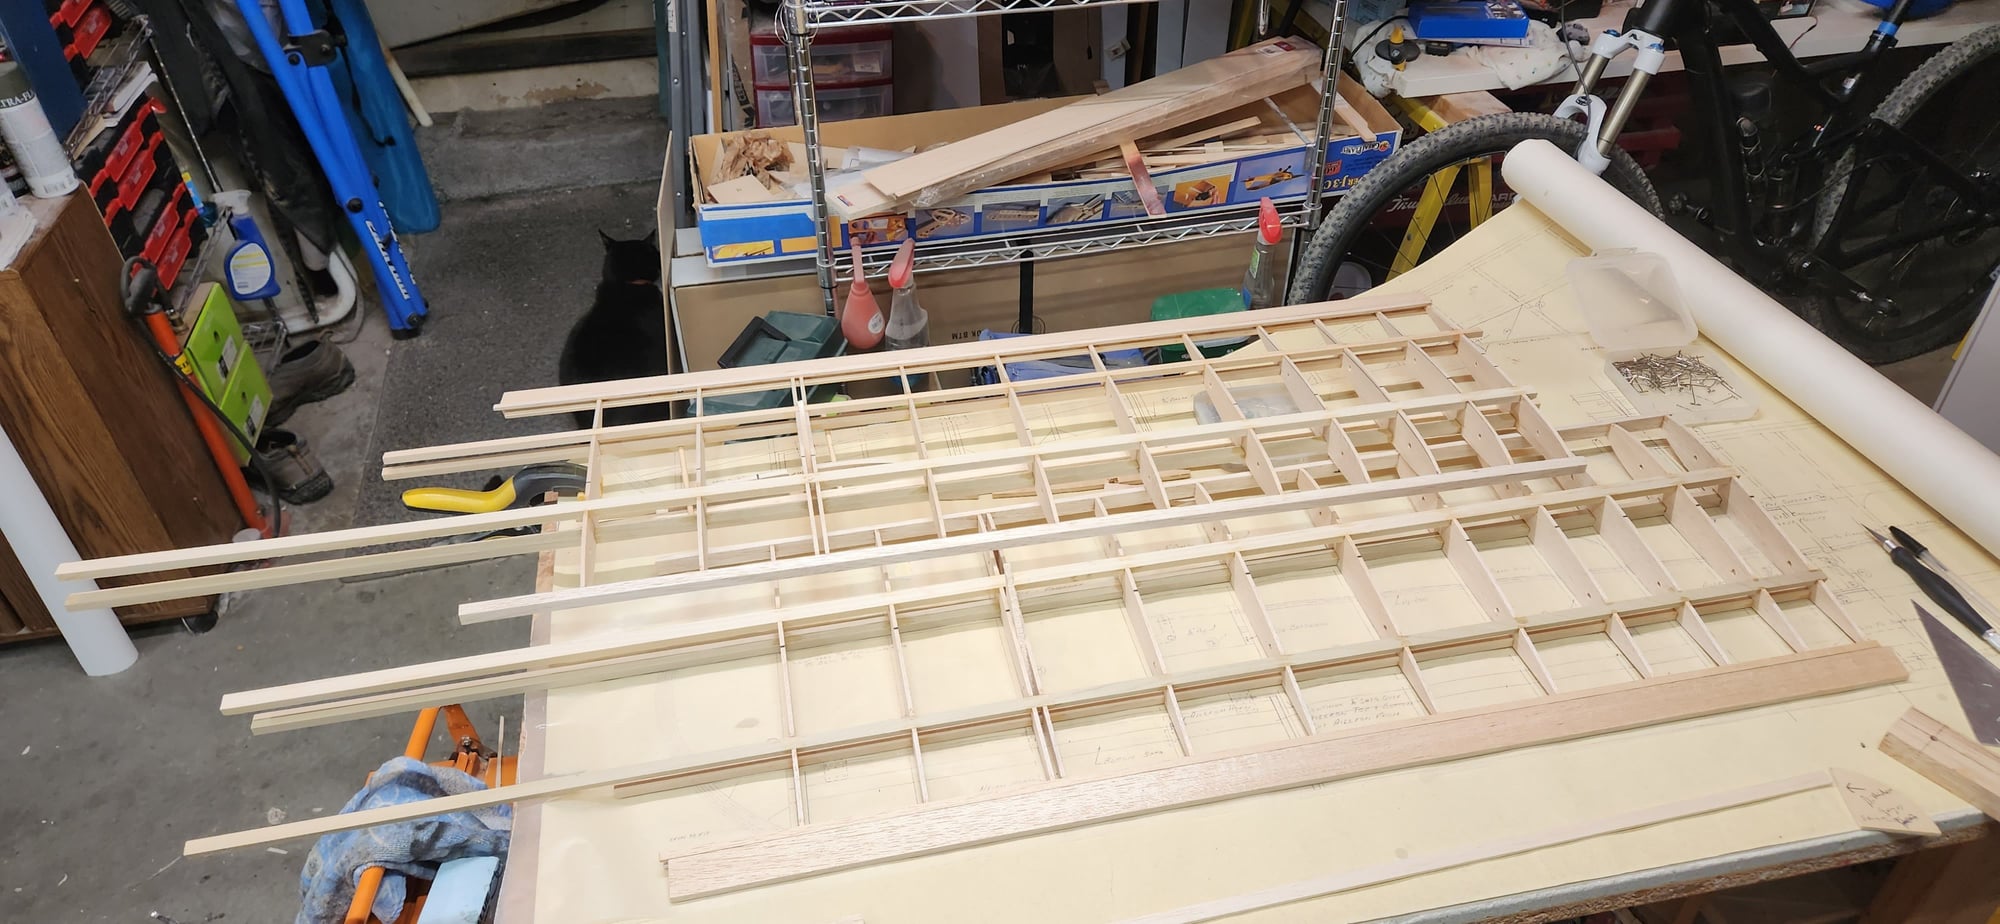
top wing glued together with laminated center rib in place
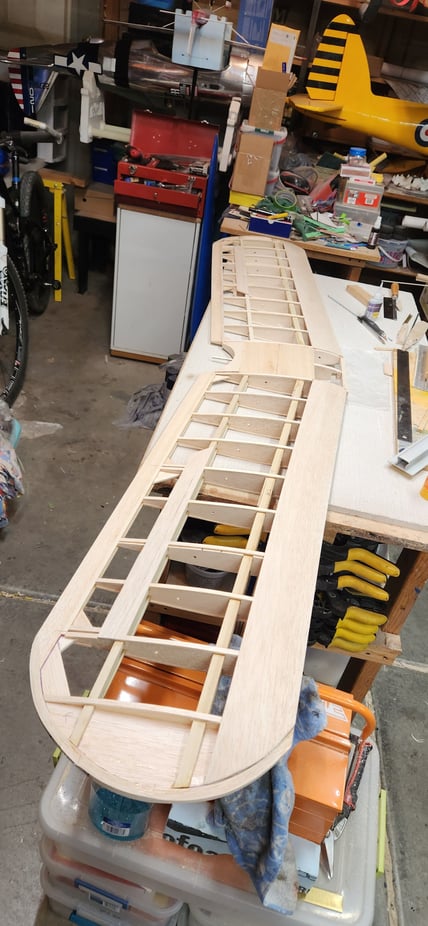
partly sheeted center section
attached to plane to see what it looks like, still needs sheeting finished and sheer webs and other stuff done to finish wing.
10-11-2023, 07:59 PM
#13
Thread Starter
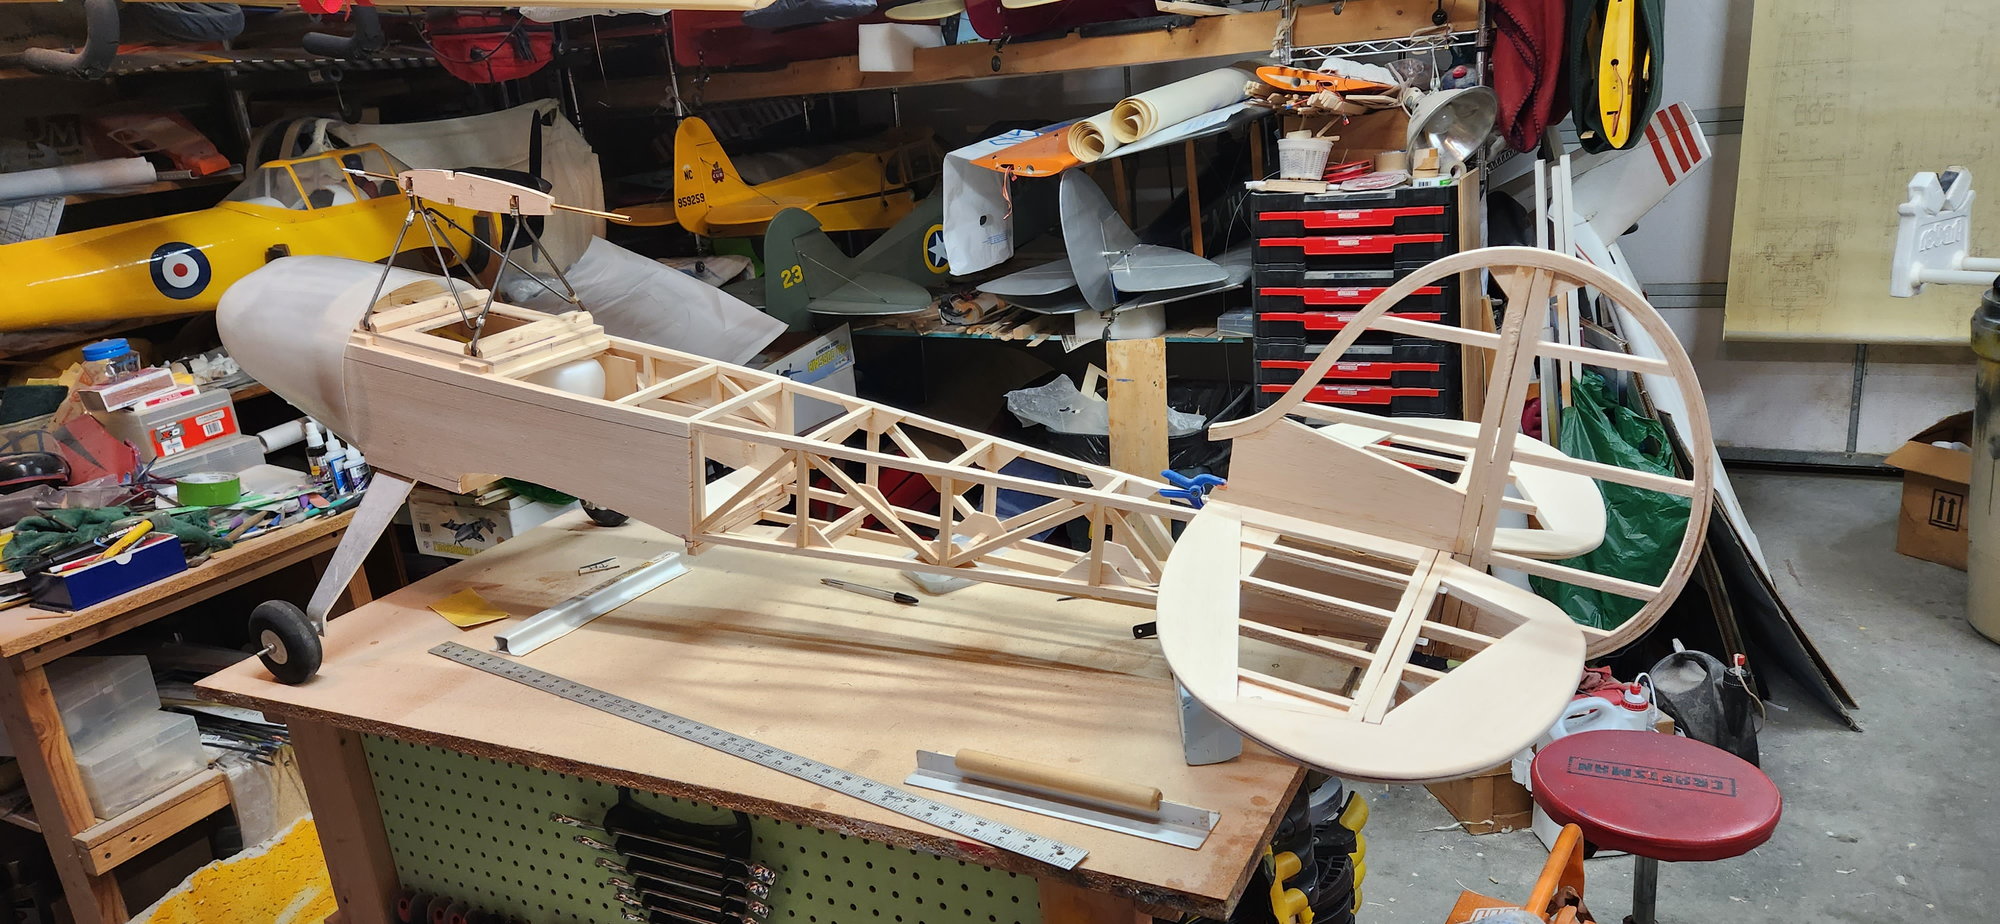
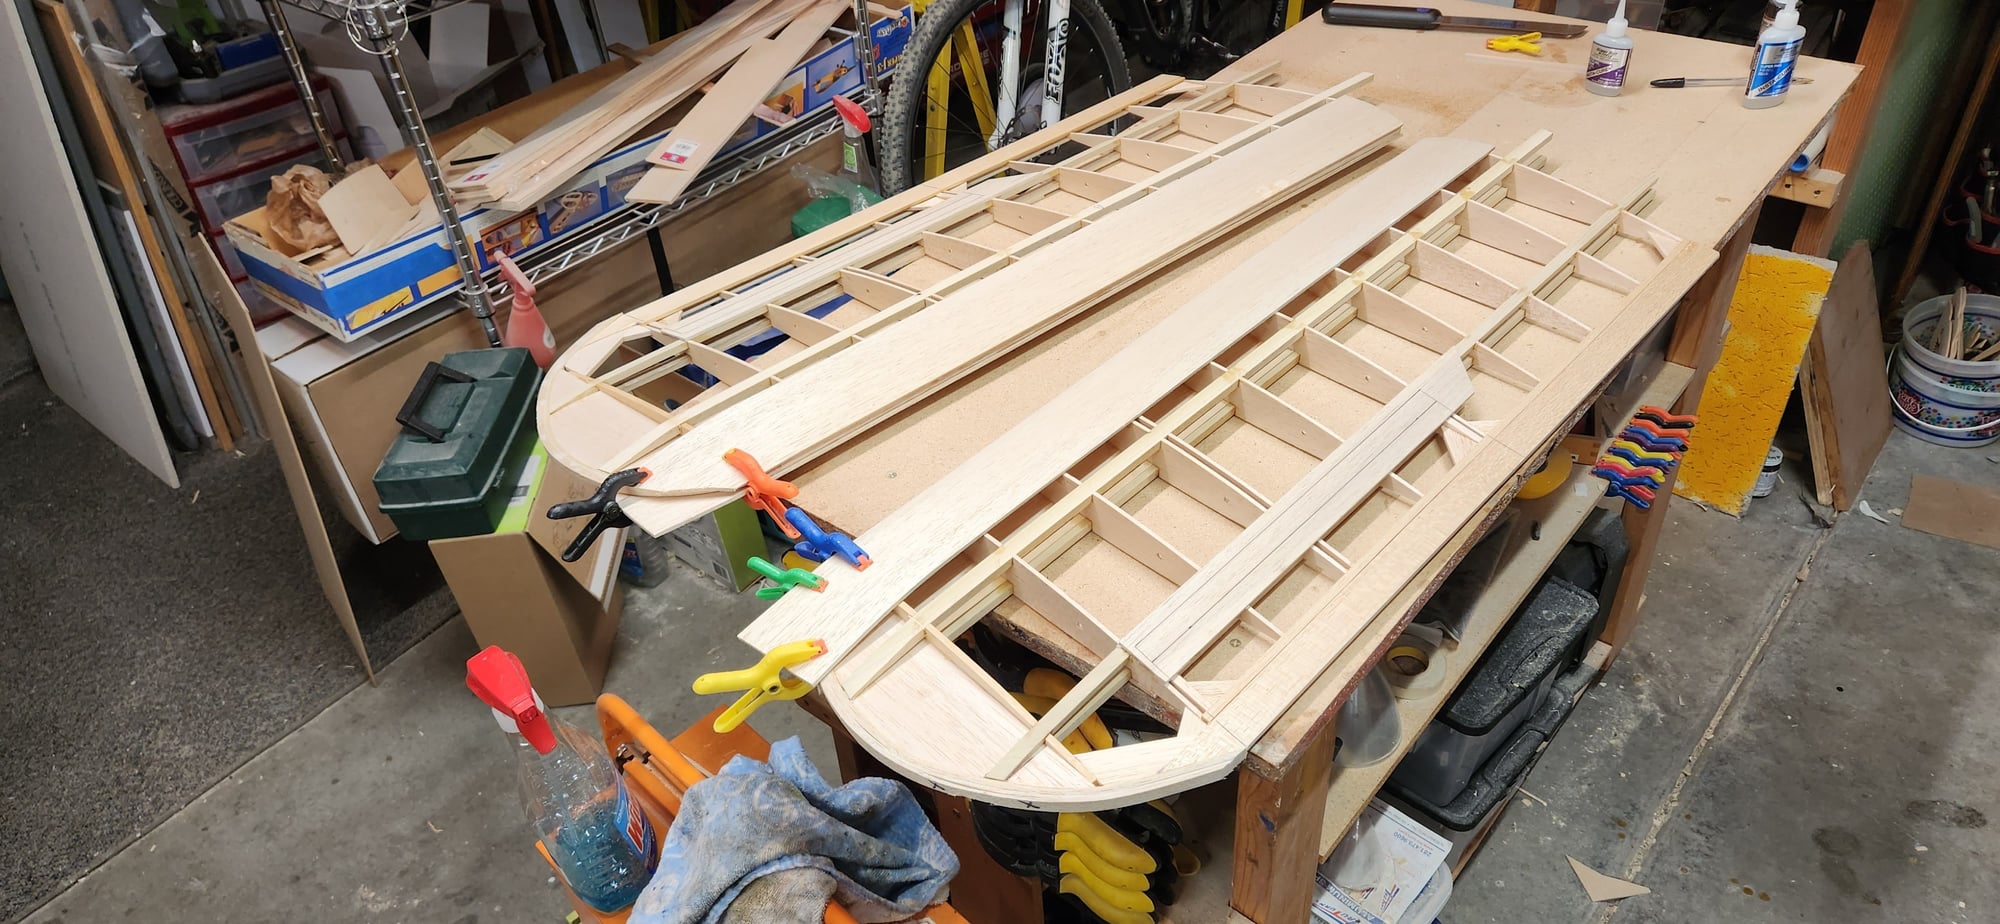
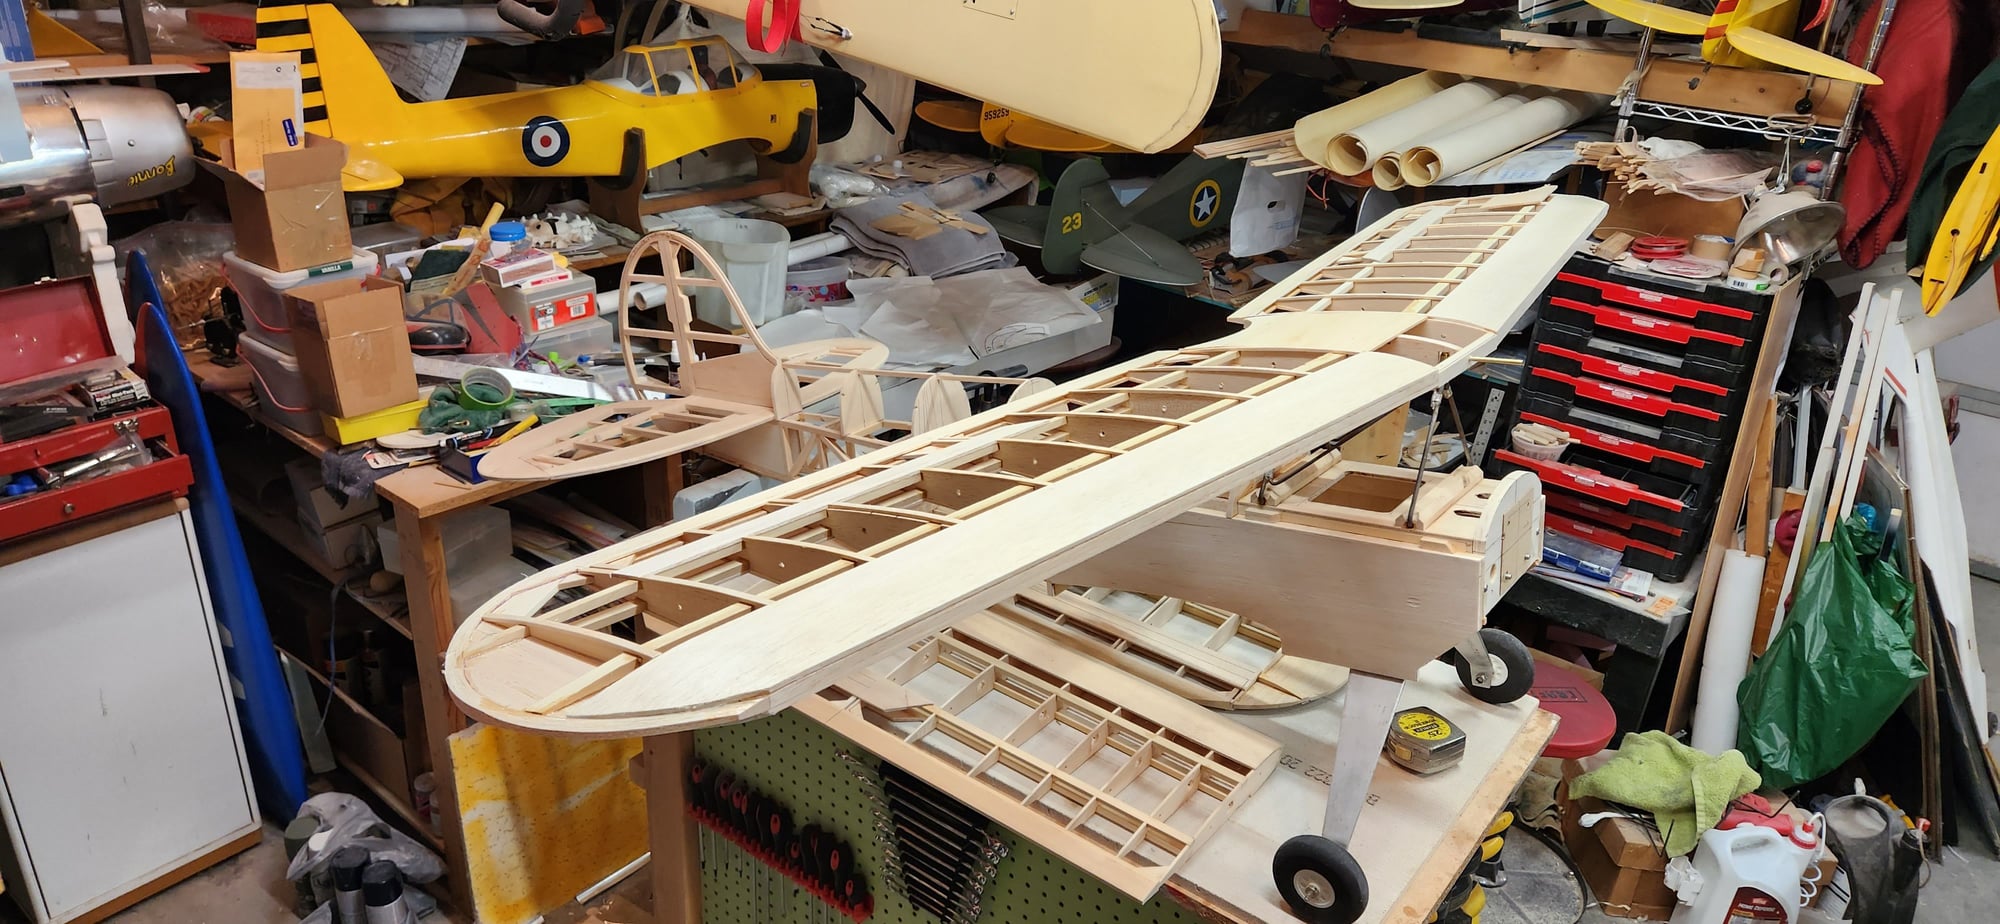
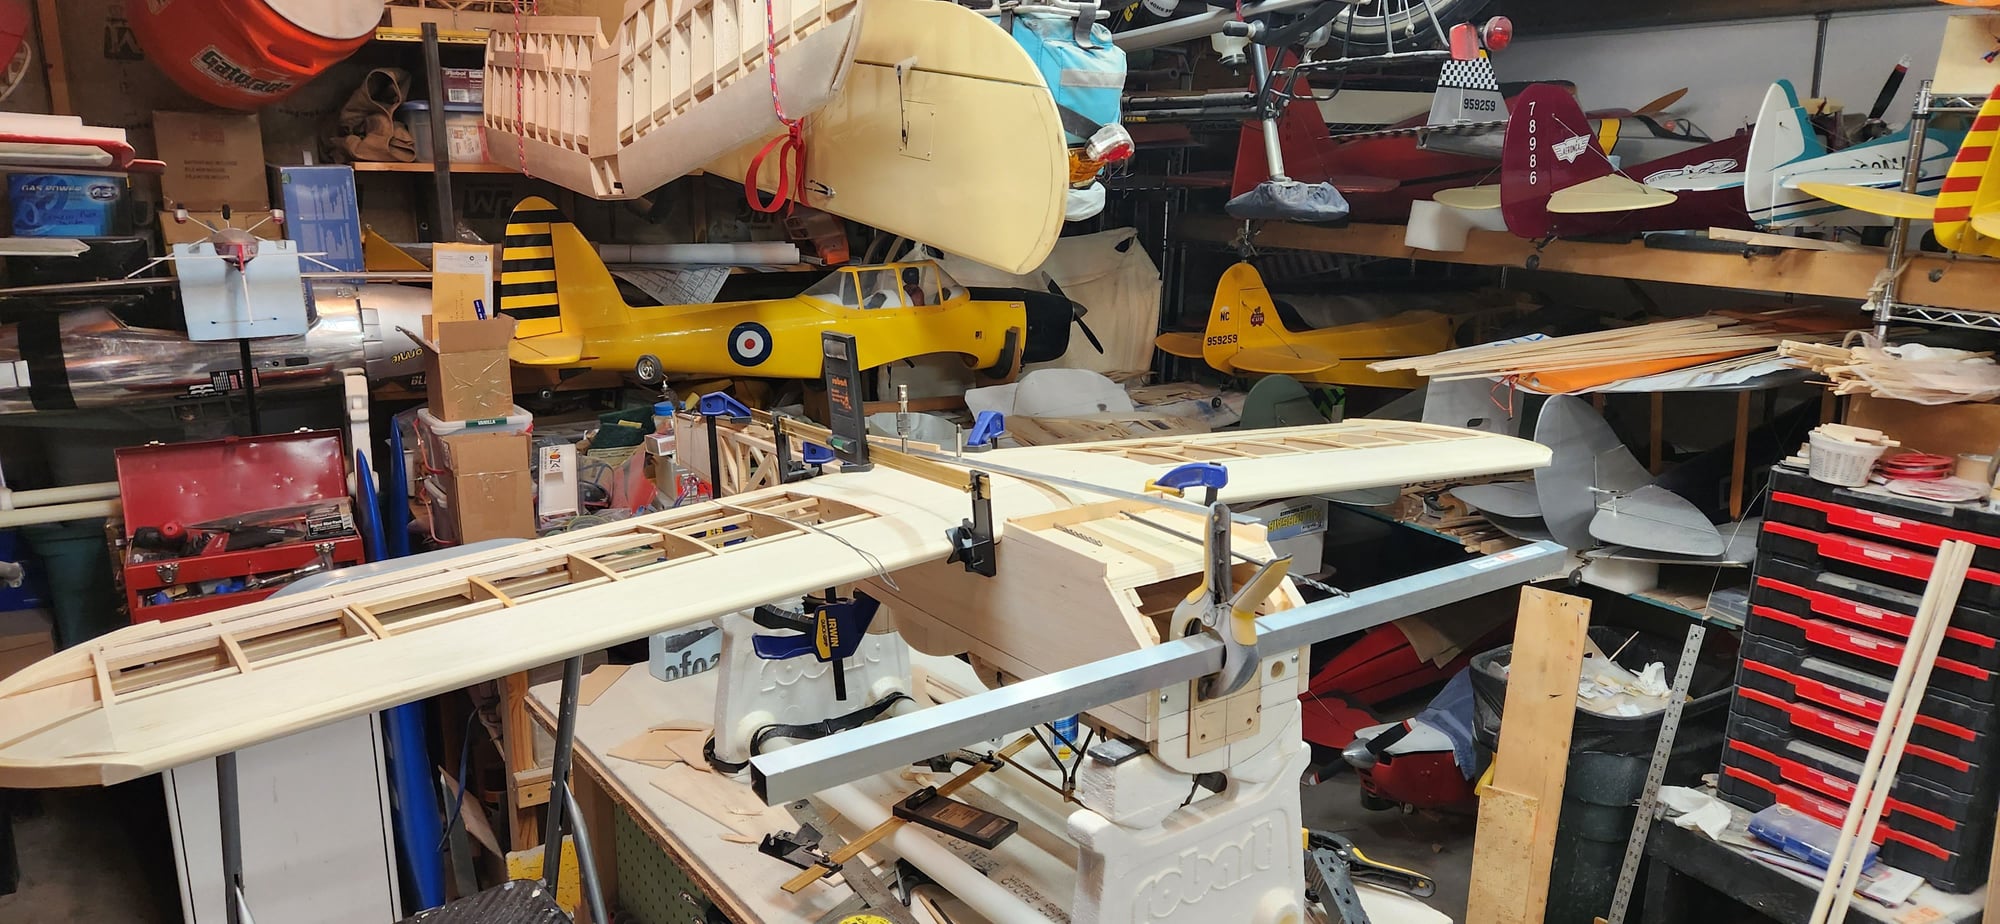
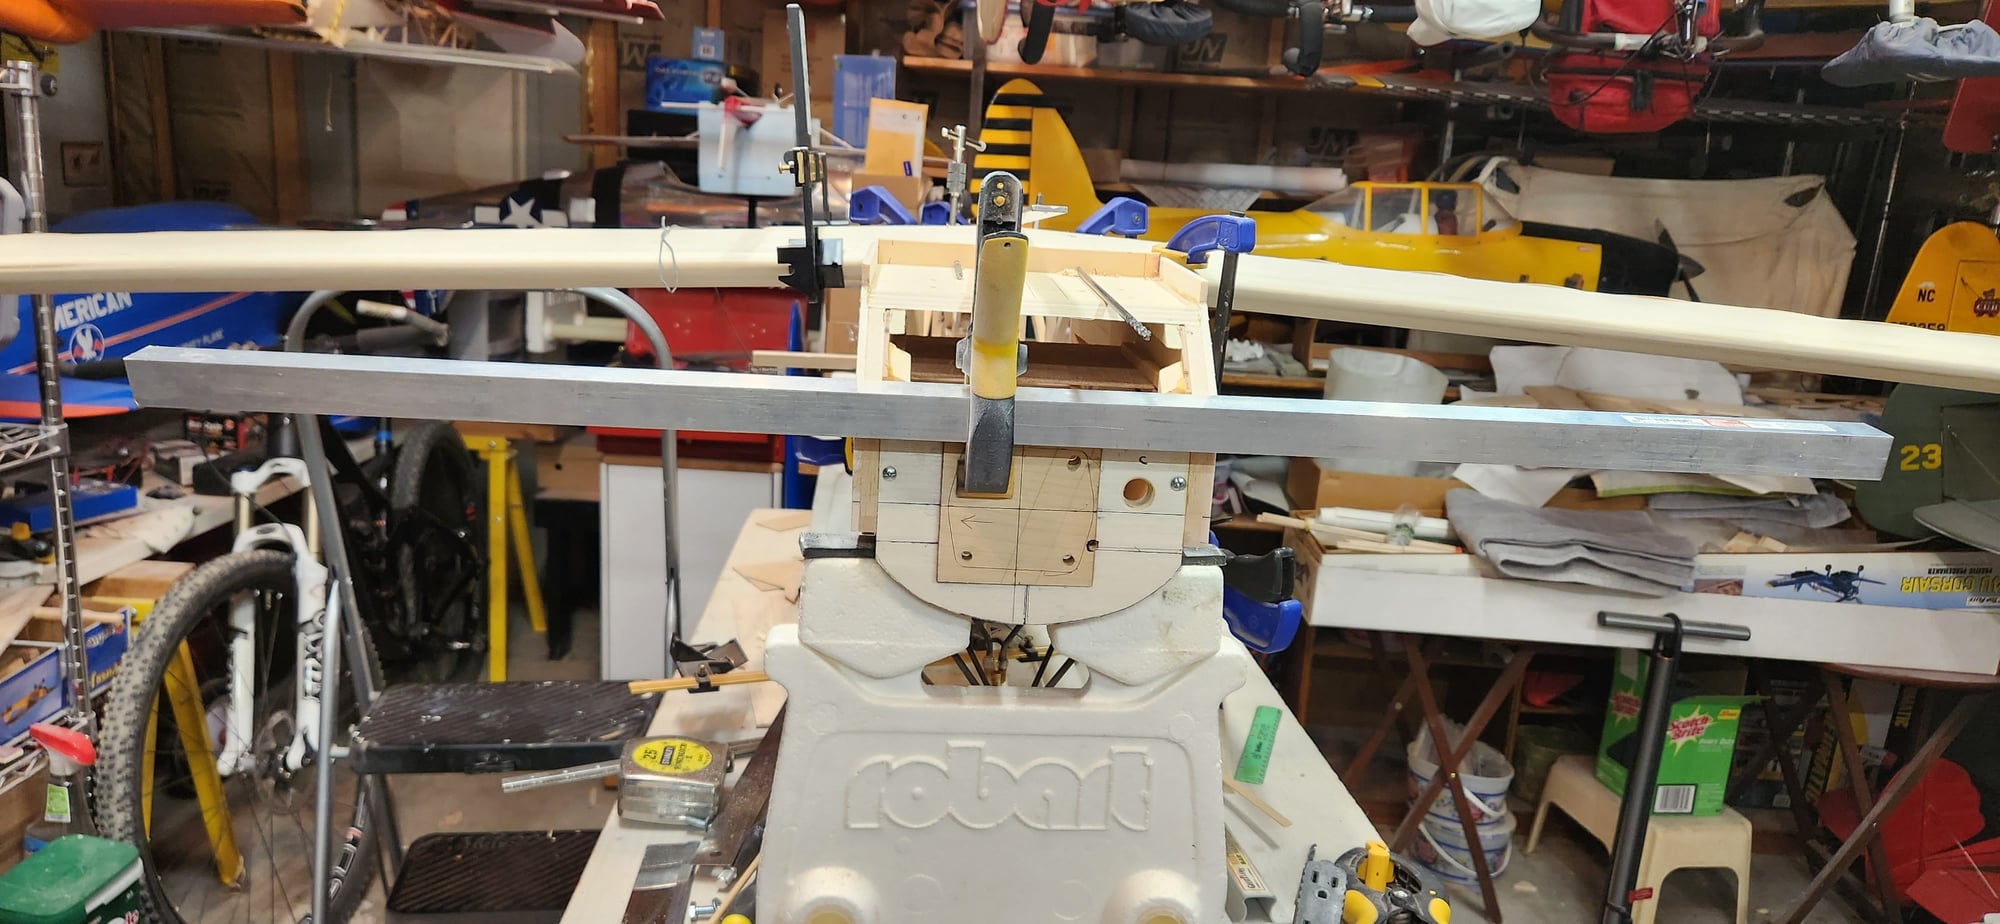
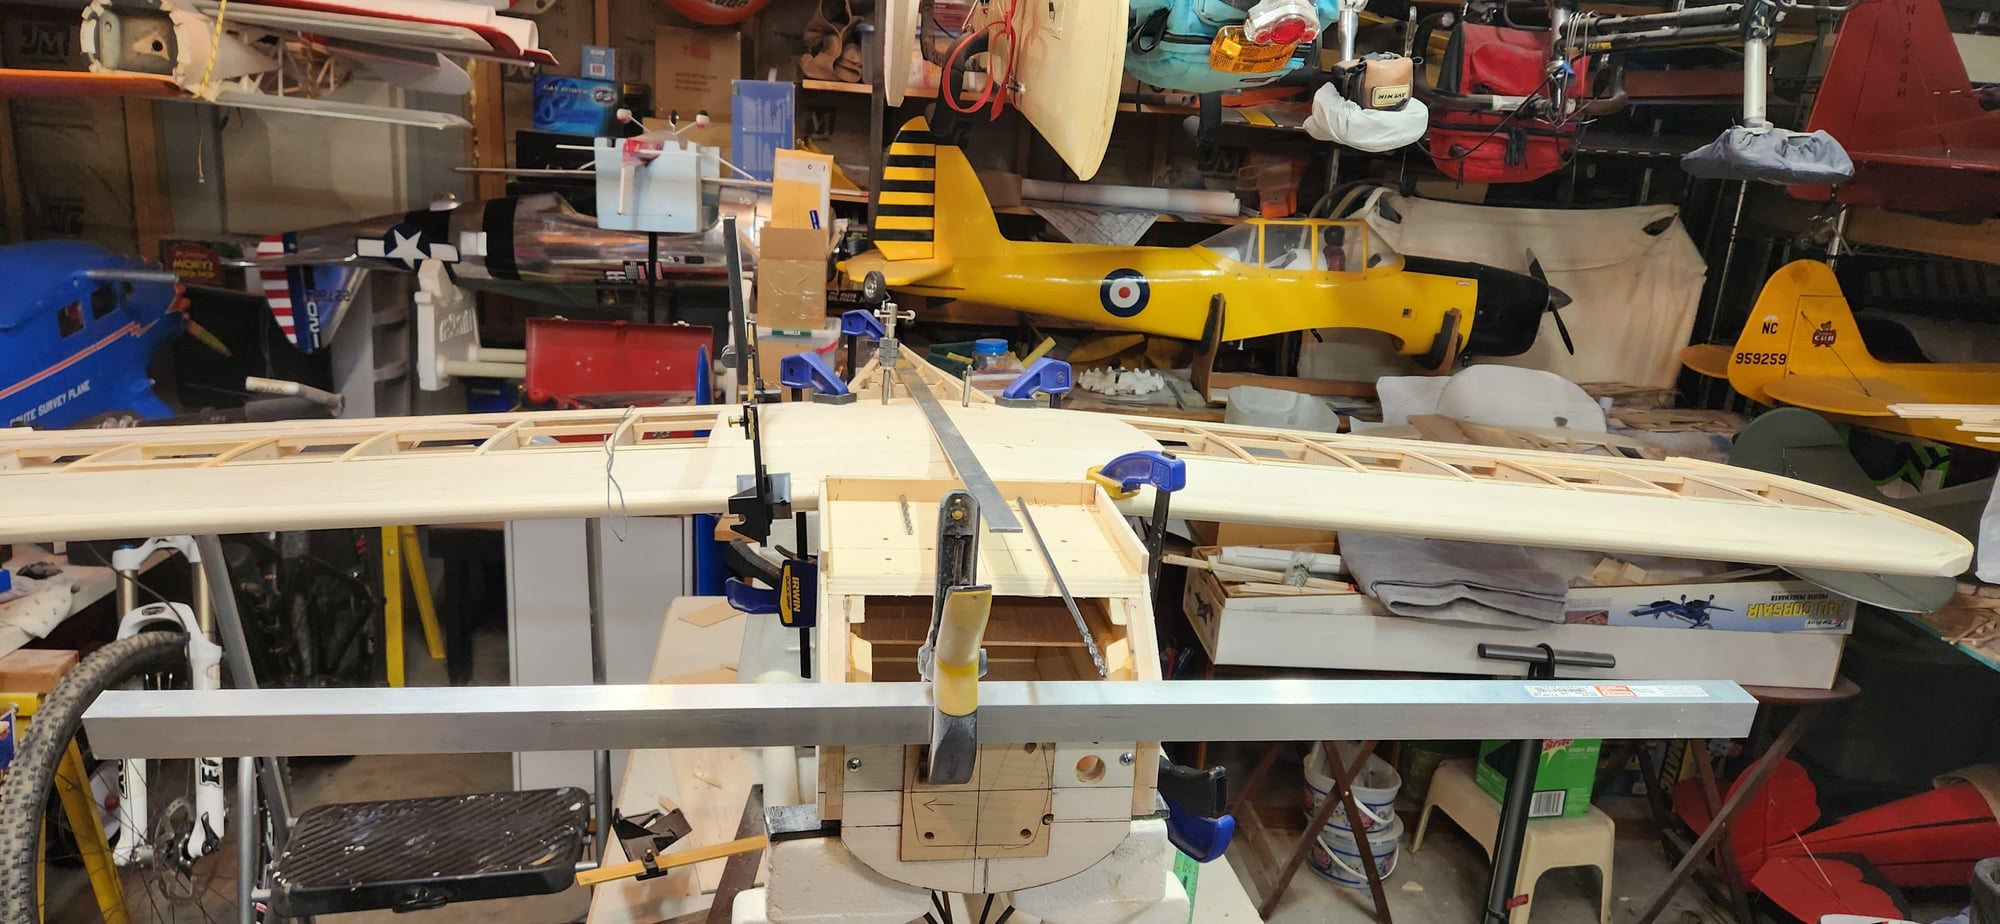
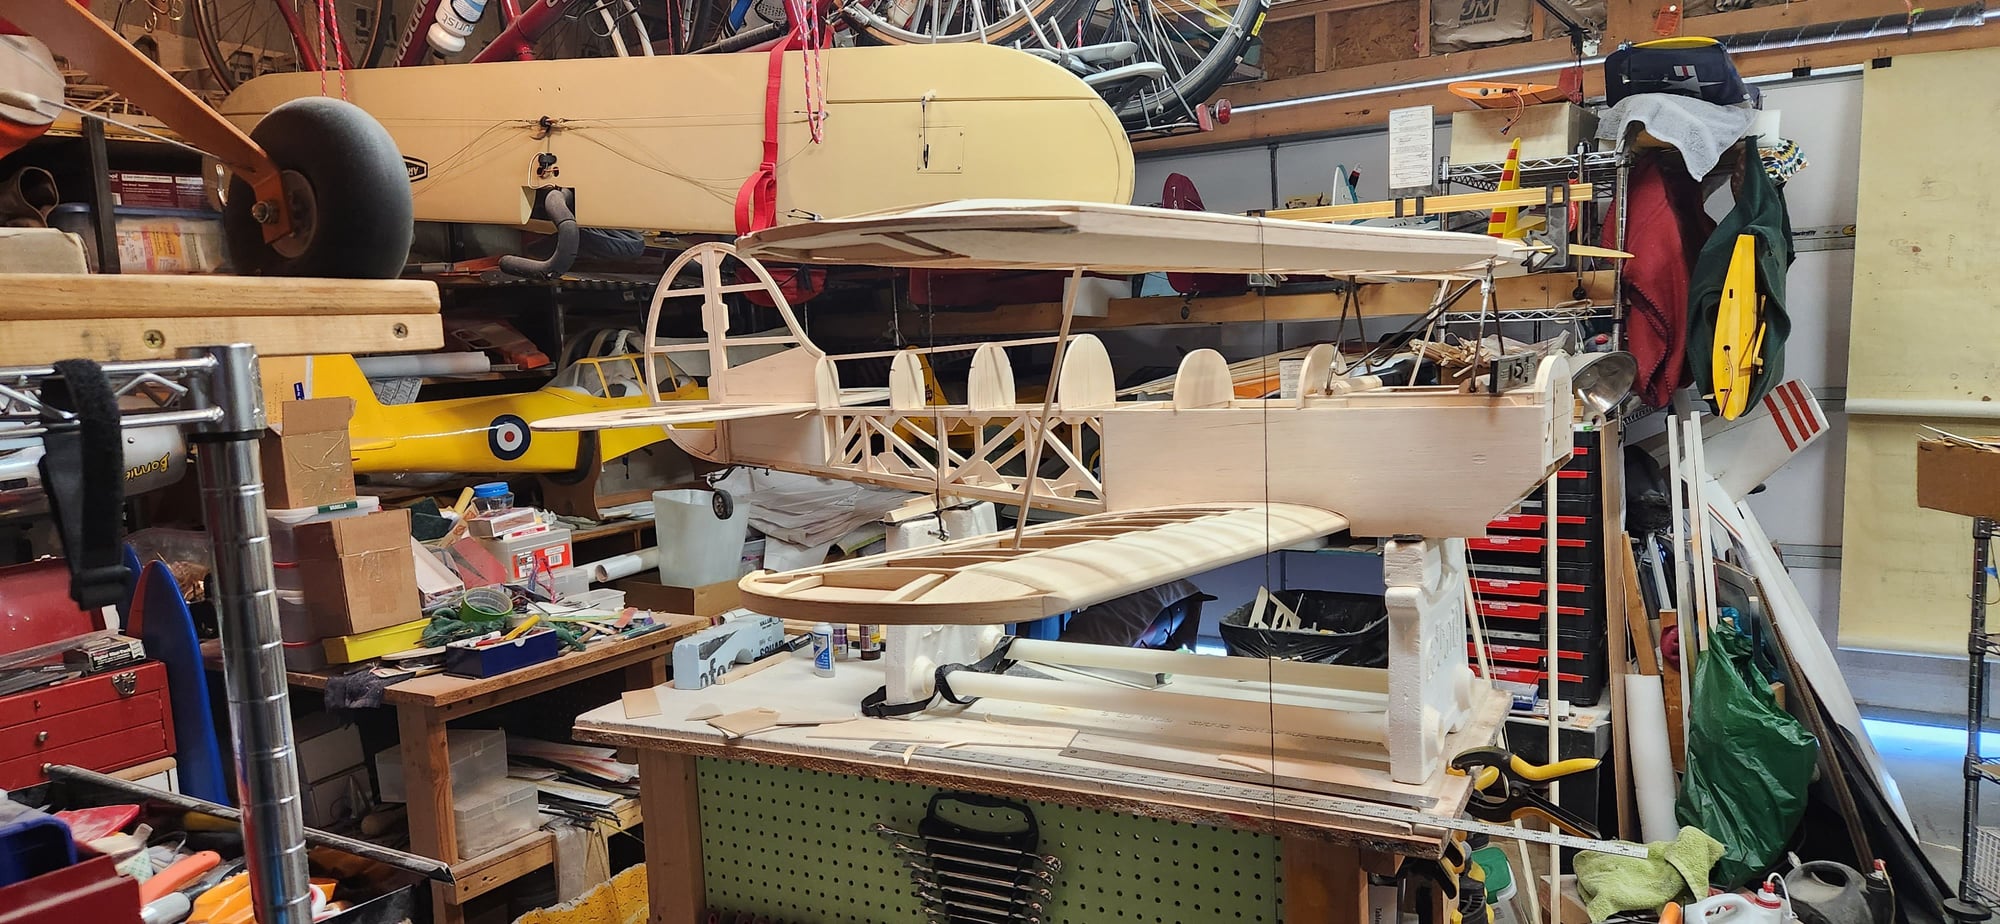
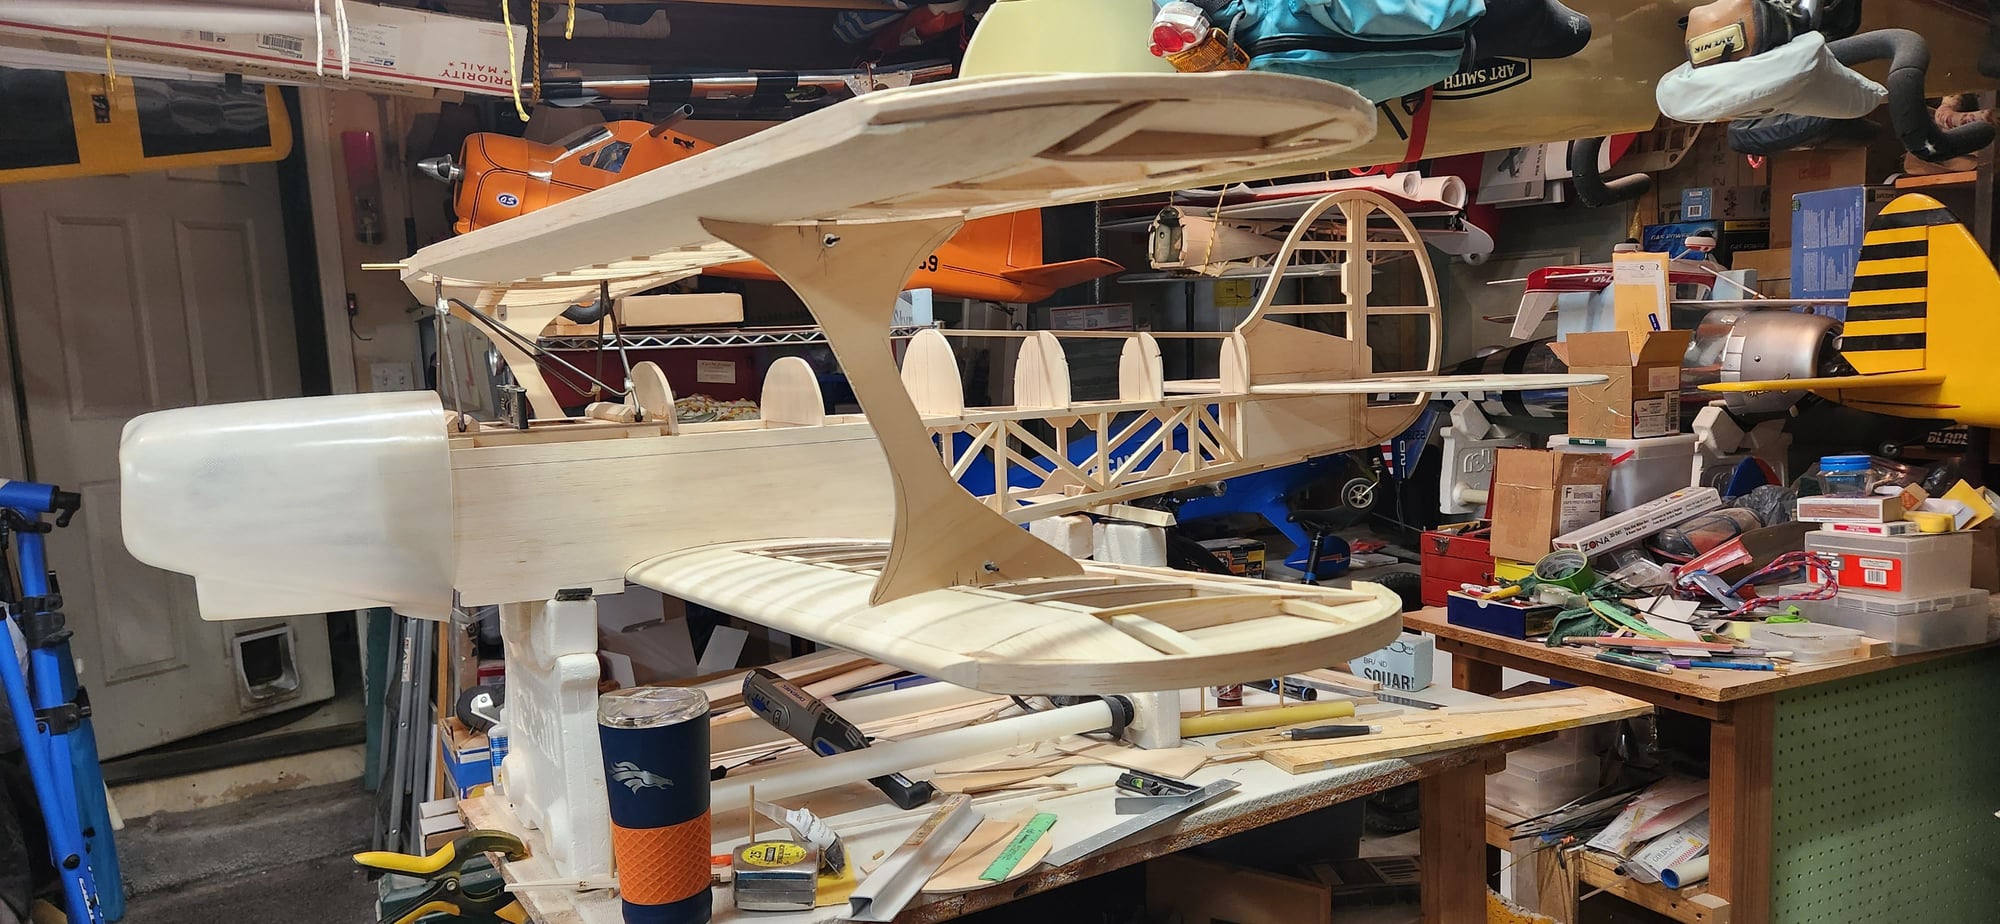
bottom wing
bottom wing has dihedral, it worked very good to set it on the leading edge for gluing. aluminum bar was good for measuring from and will later be landing gear brace.

both wings clamped in place to see what it's going to look like

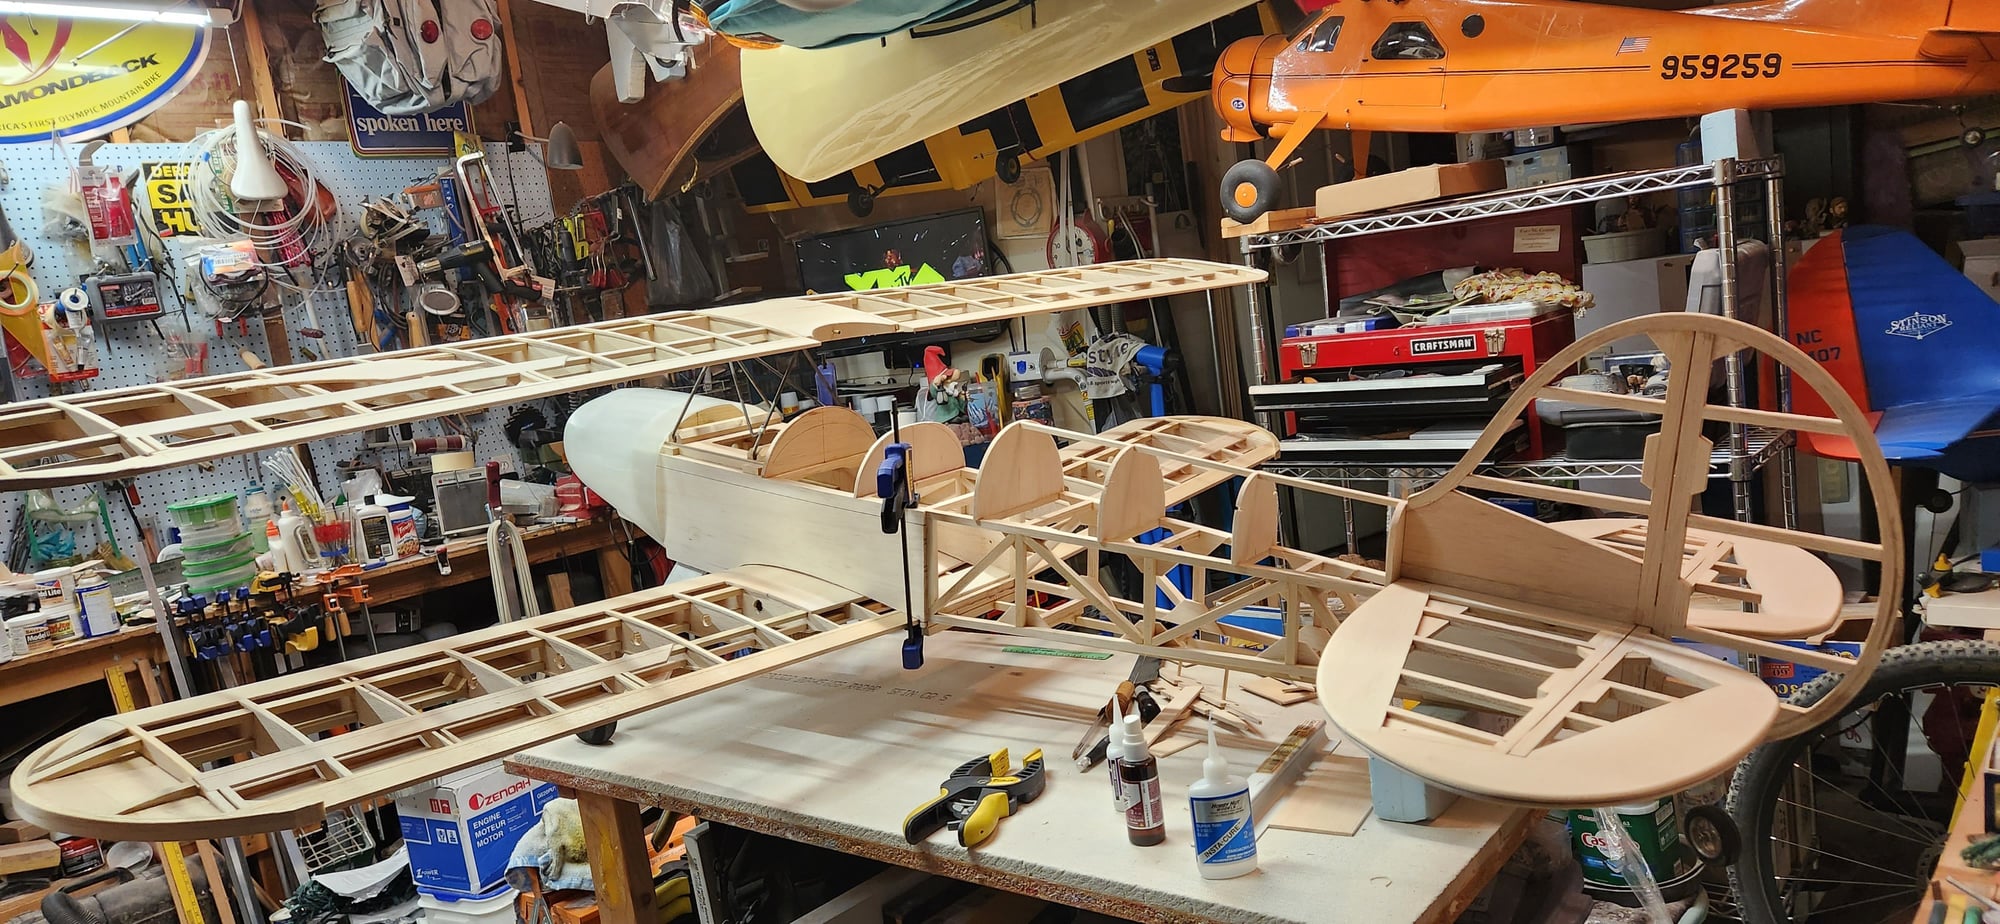
starting to look like a skybolt
bottom wing has dihedral, it worked very good to set it on the leading edge for gluing. aluminum bar was good for measuring from and will later be landing gear brace.
both wings clamped in place to see what it's going to look like
starting to look like a skybolt
10-11-2023, 08:15 PM
#14
My Feedback: (1)
Beautifull work Where do you keep your Magic wand? ha,ha .Are you going with Fabric and paint covering? Color scheme yet?
Do you think the LG will support planes weight or will you make the inner gear brace with dampining spring?
My Skybolt on hold for a few days while helping my little sister move to new home.
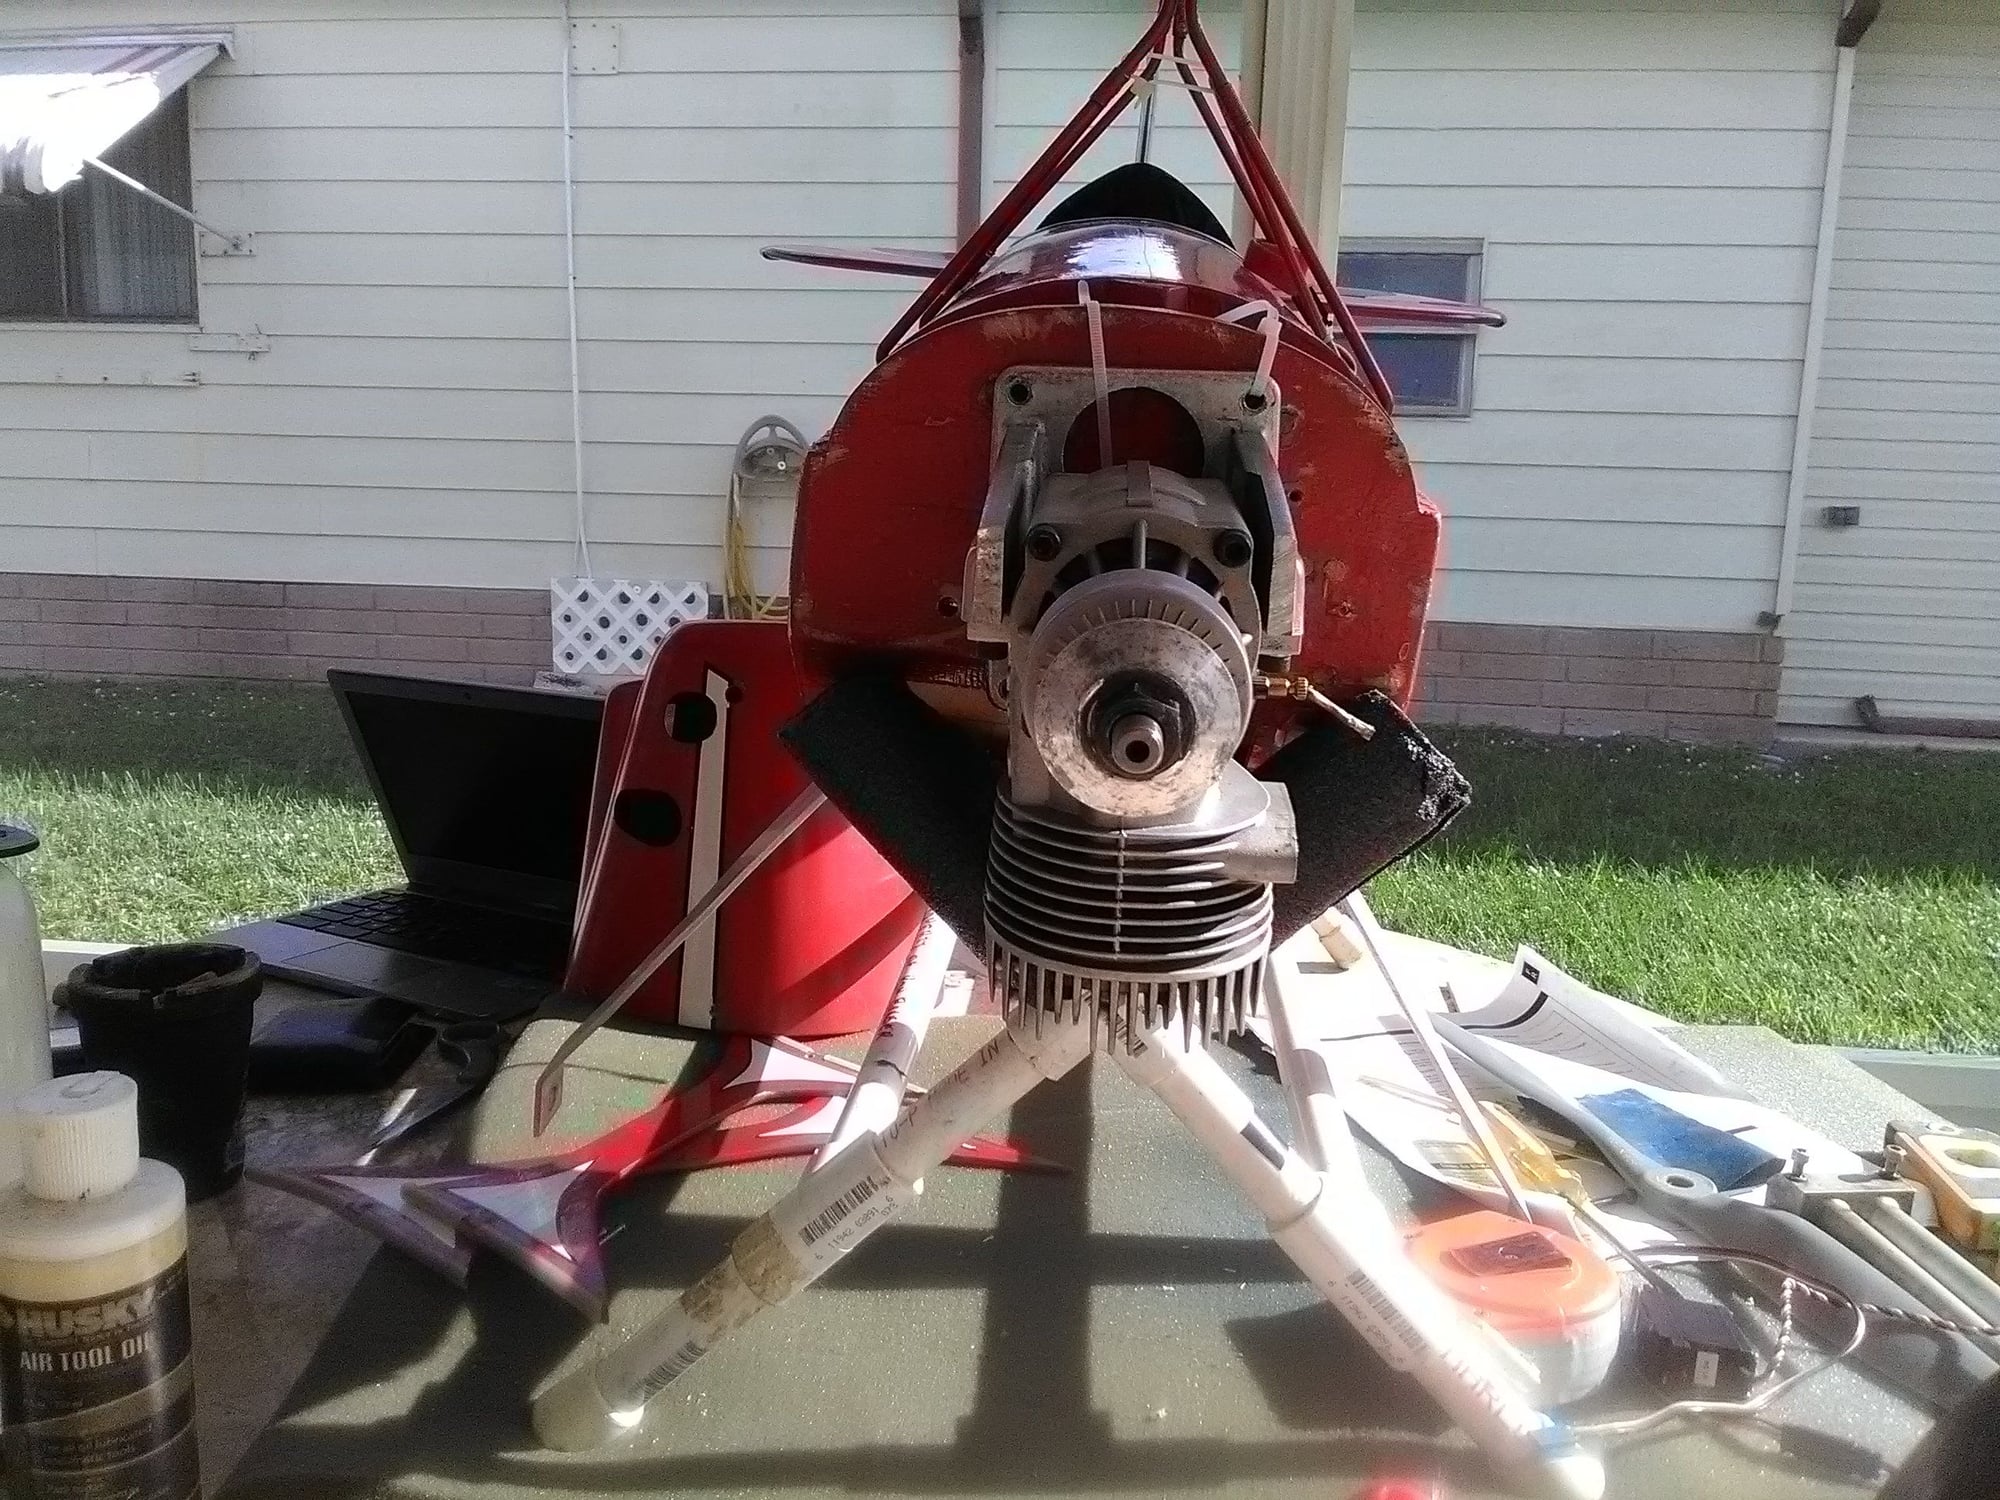
I did get the DLE 61 installed and test ran. Hope to lighten tail enough to omit adding ballast to engine compt. Thanks for posting plans. Vertical line from lower CG mark on plans to my top wing puts CG right where i figured it would be.
Do you think the LG will support planes weight or will you make the inner gear brace with dampining spring?
My Skybolt on hold for a few days while helping my little sister move to new home.
I did get the DLE 61 installed and test ran. Hope to lighten tail enough to omit adding ballast to engine compt. Thanks for posting plans. Vertical line from lower CG mark on plans to my top wing puts CG right where i figured it would be.
10-12-2023, 06:27 PM
#15
Thread Starter
Based on my experience with that landing gear in my stinson I think it would be ok but I am going to add the sprung brace. It will make the gear stronger and also add some nose weight. It will be fabric covered with rib stitching added, I am not sure on the color scheme yet but I think I will do a checkerboard on the bottom of the wings.
10-12-2023, 08:18 PM
#16
My Feedback: (1)
Was just looking at your latest pic's. She's gonna be a beauty with the fabic & rib stiching all right.
I hope to do the same when it is time to recover mine again. Ultracote looks good but doesn't last
long in this Florida heat. I saved another 4 ounces today by changing to Sullivan Lite wheels.
Checkerboard, Great idea. I really should do that as well. I had a little inverted flying incident myself
recently due to same solid color only on both top and bottom of wing.
10-13-2023, 06:54 PM
#17
Thread Starter
The foam wheels are lighter but I think that I will use some dubro inflatable wheels as I like the way they land better, I usually run them a little soft so that they absorb more shock. Also the wheel weight is forward of the cg which may help with balance.
My pilots arrived today now I have to decide which one will fly the Skybolt
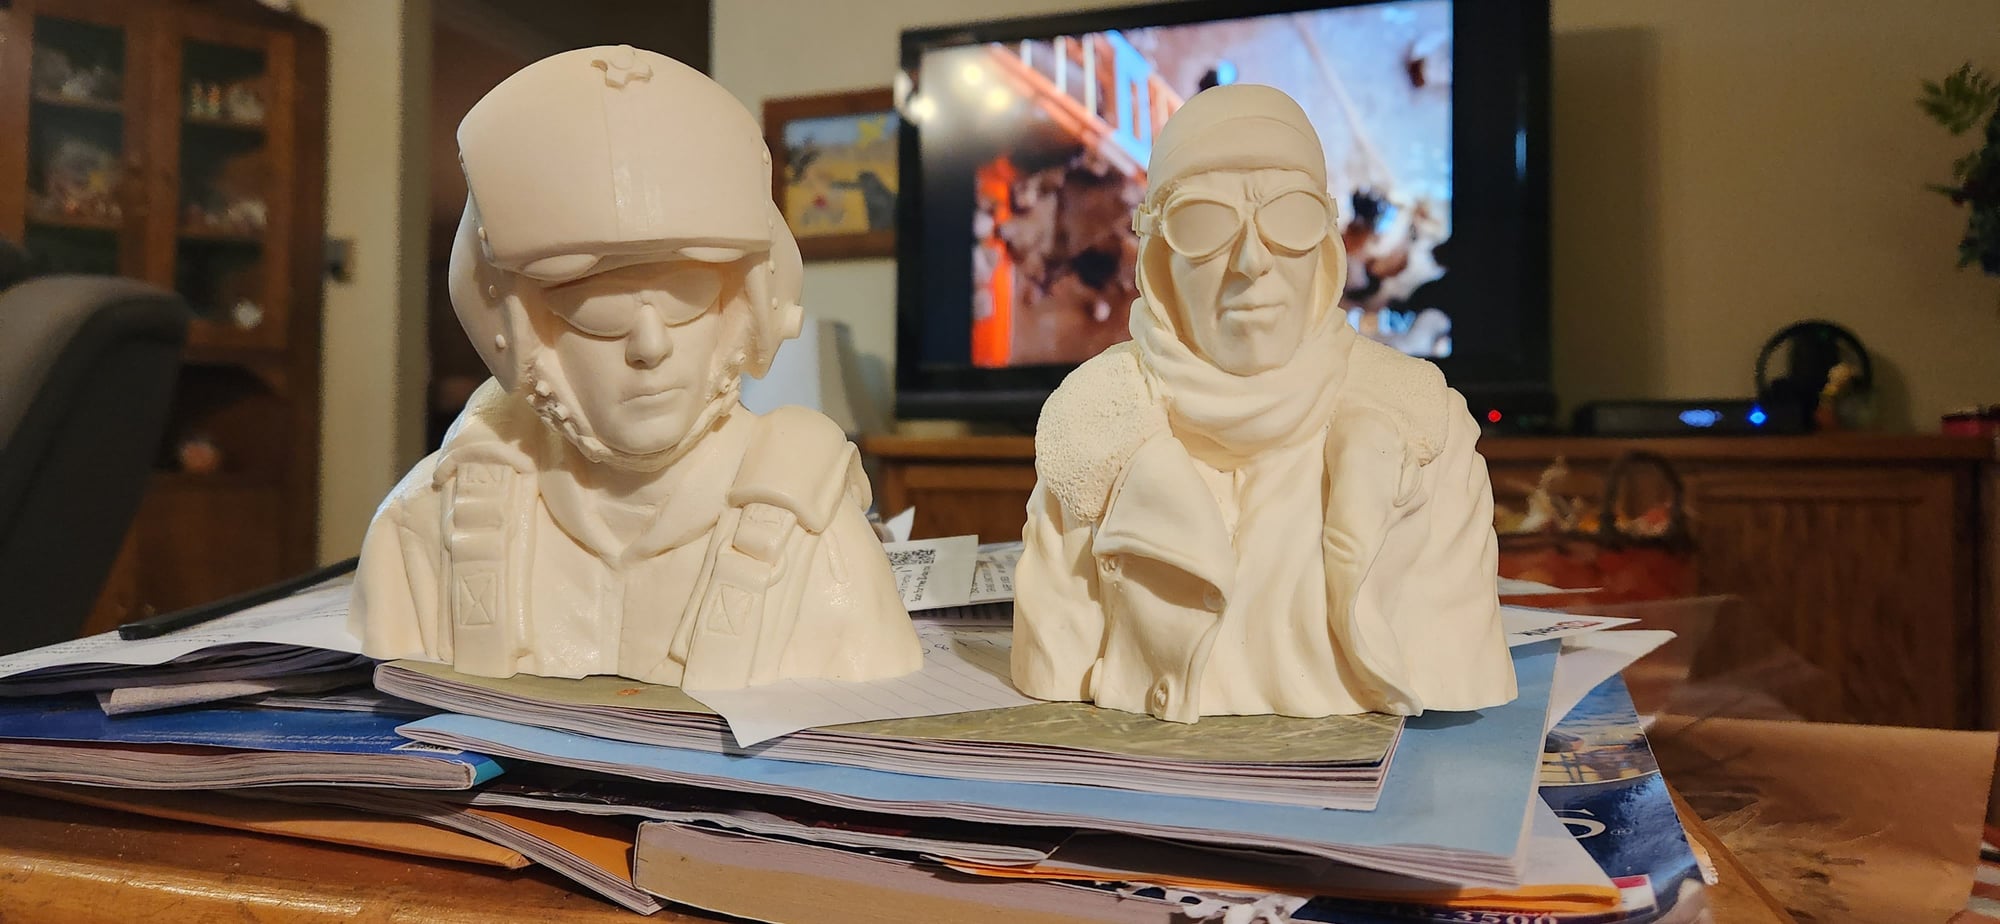
Aces Of Iron pilots --great quality at a good price.
My pilots arrived today now I have to decide which one will fly the Skybolt
Aces Of Iron pilots --great quality at a good price.
10-13-2023, 07:26 PM
#18
Thread Starter
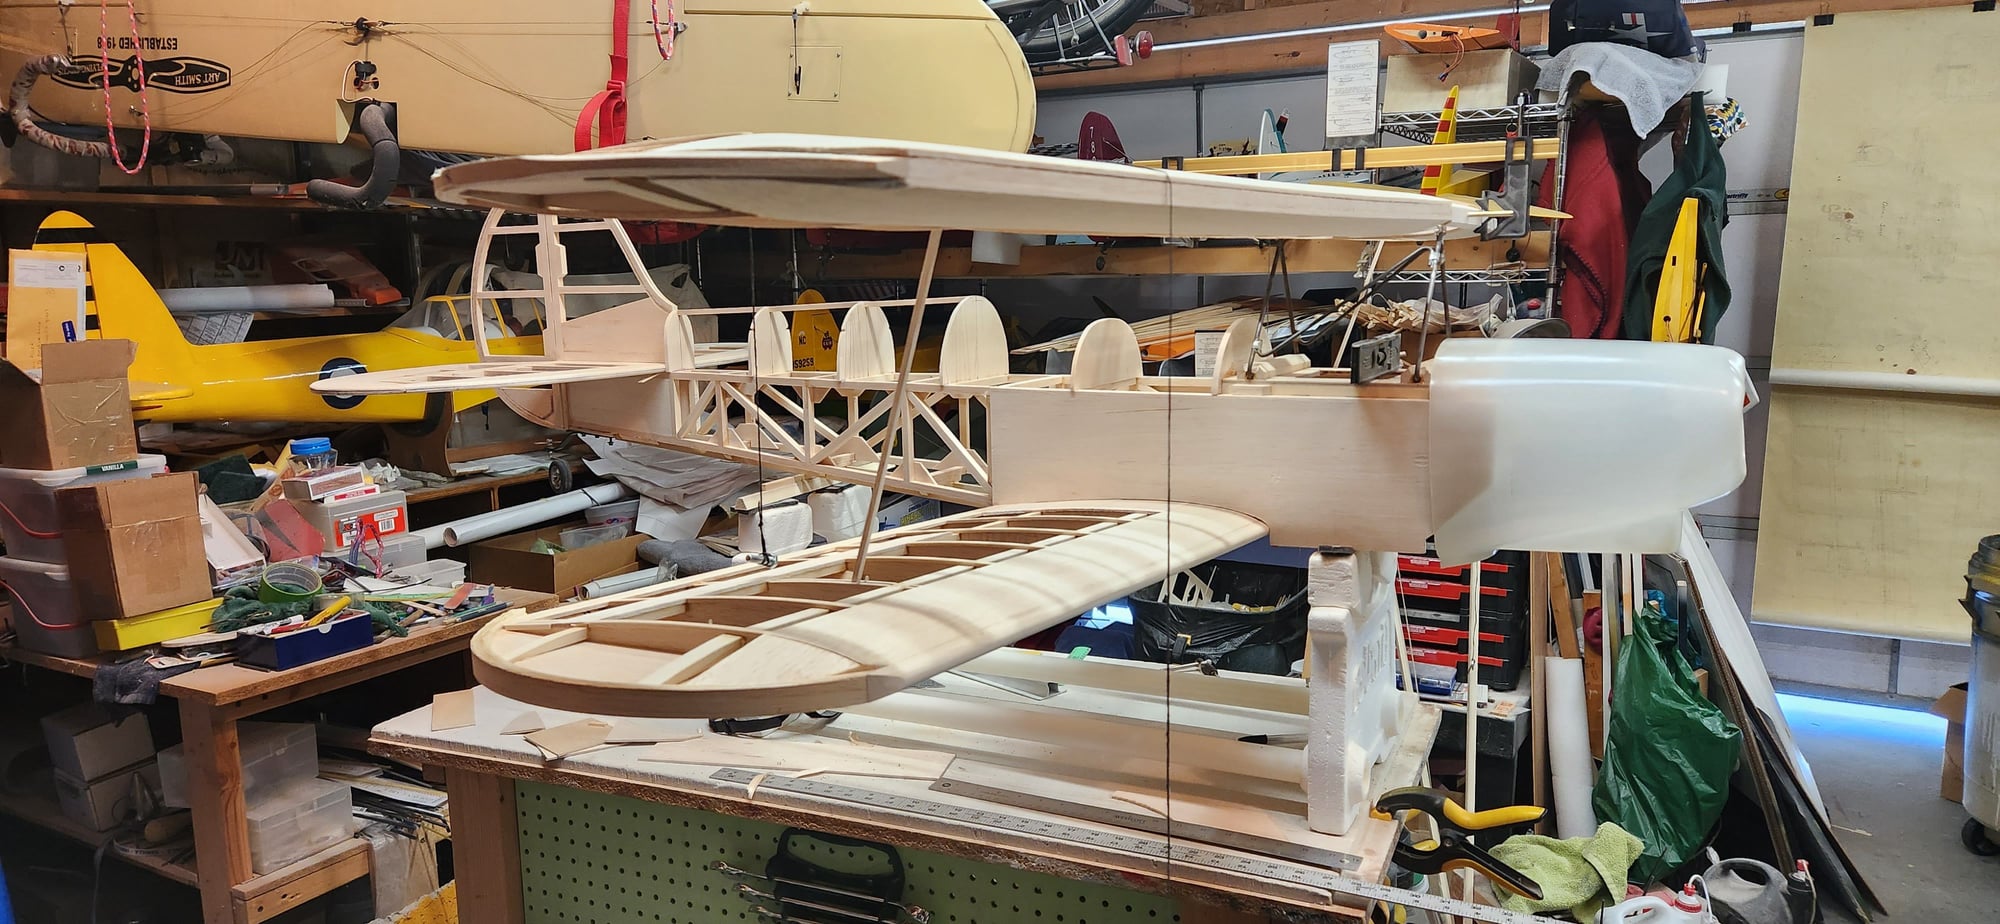
Now for the hard stuff, putting all the pieces together. I've seen a lot of stuff fly but if things are straight they fly a lot better.
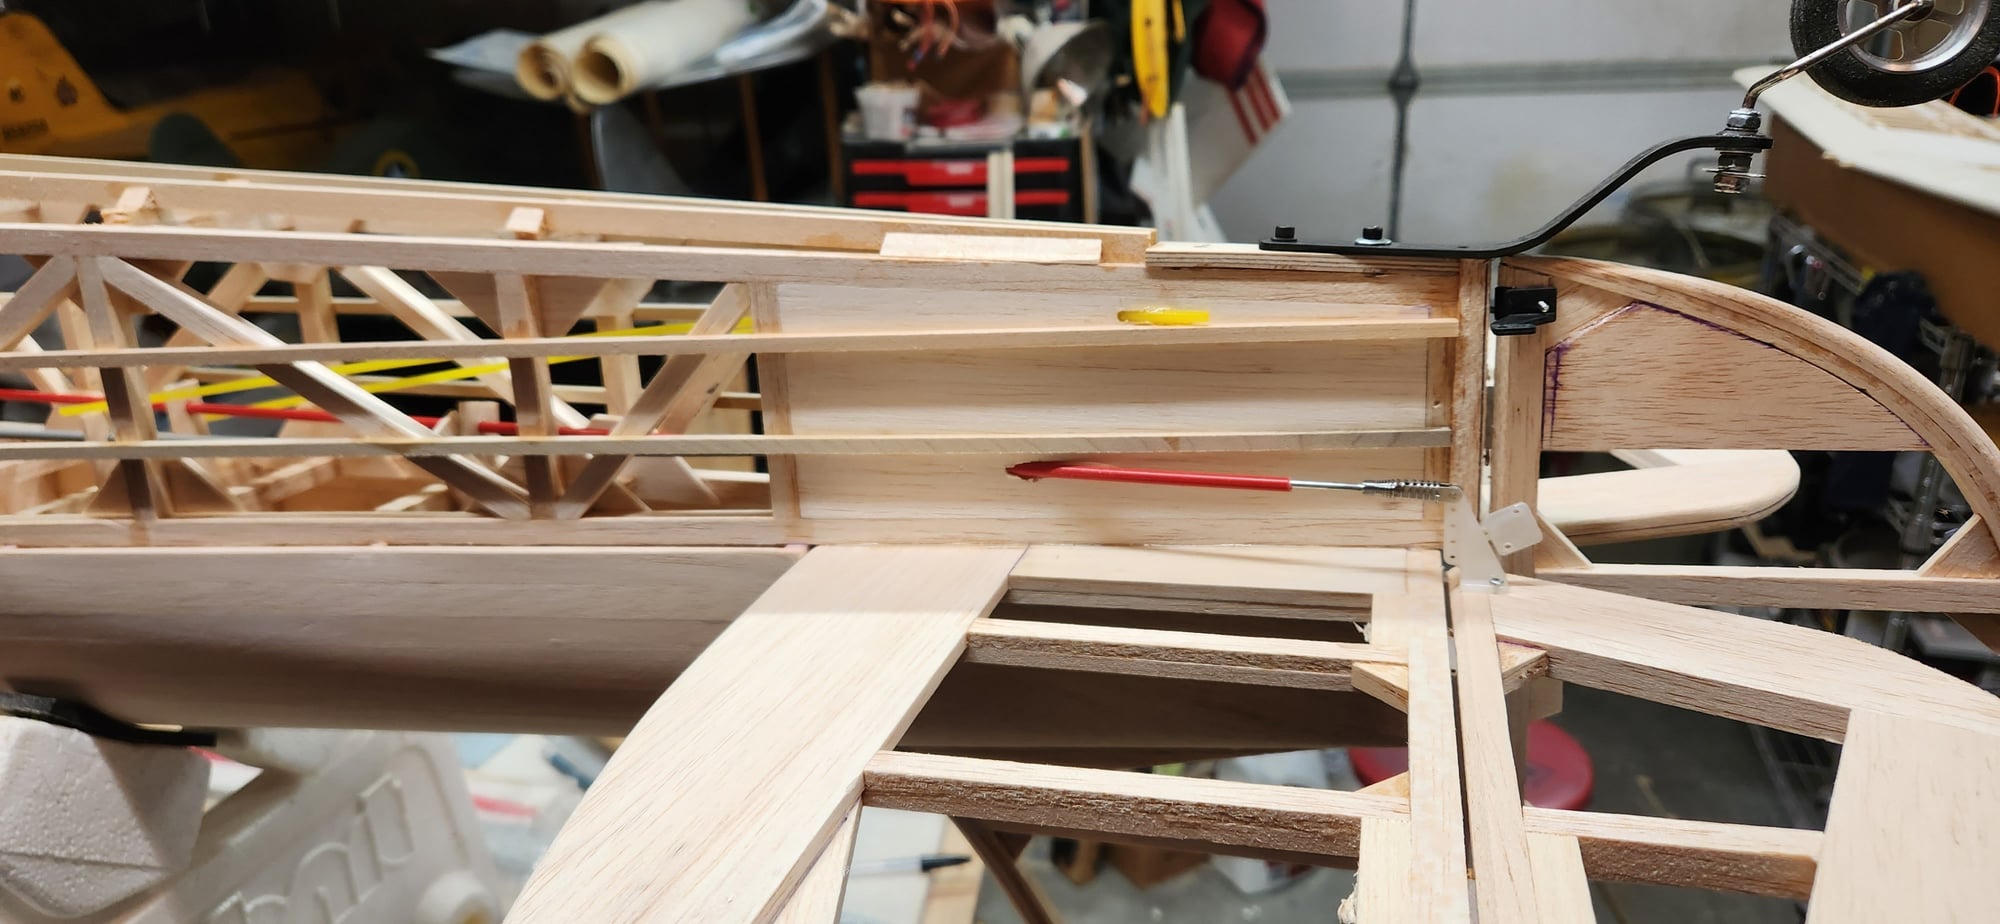
Plane is blocked up at 0degrees incidence, wing is on and square with fuselage. plans call for -1 degree of incidence, aluminum bar on firewall is used to make sure it is level side to side. Measure measure measure before I drill Drill bits and taps are holding wing in place
Plane is blocked up at 0degrees incidence, wing is on and square with fuselage. plans call for -1 degree of incidence, aluminum bar on firewall is used to make sure it is level side to side. Measure measure measure before I drill Drill bits and taps are holding wing in place
10-13-2023, 07:38 PM
#19
My Feedback: (1)
I exchanged my 4.5" Dubro inflatables for the Skylite rubber wheels to save weight but may put them back on
if needed for cg and better landing. Our club has a grass field but i still get the bouncies with my bipes at times.
I love the Aces of Iron pilots. Are they still based in Arizona?
if needed for cg and better landing. Our club has a grass field but i still get the bouncies with my bipes at times.
I love the Aces of Iron pilots. Are they still based in Arizona?
10-14-2023, 08:10 PM
#20
Thread Starter
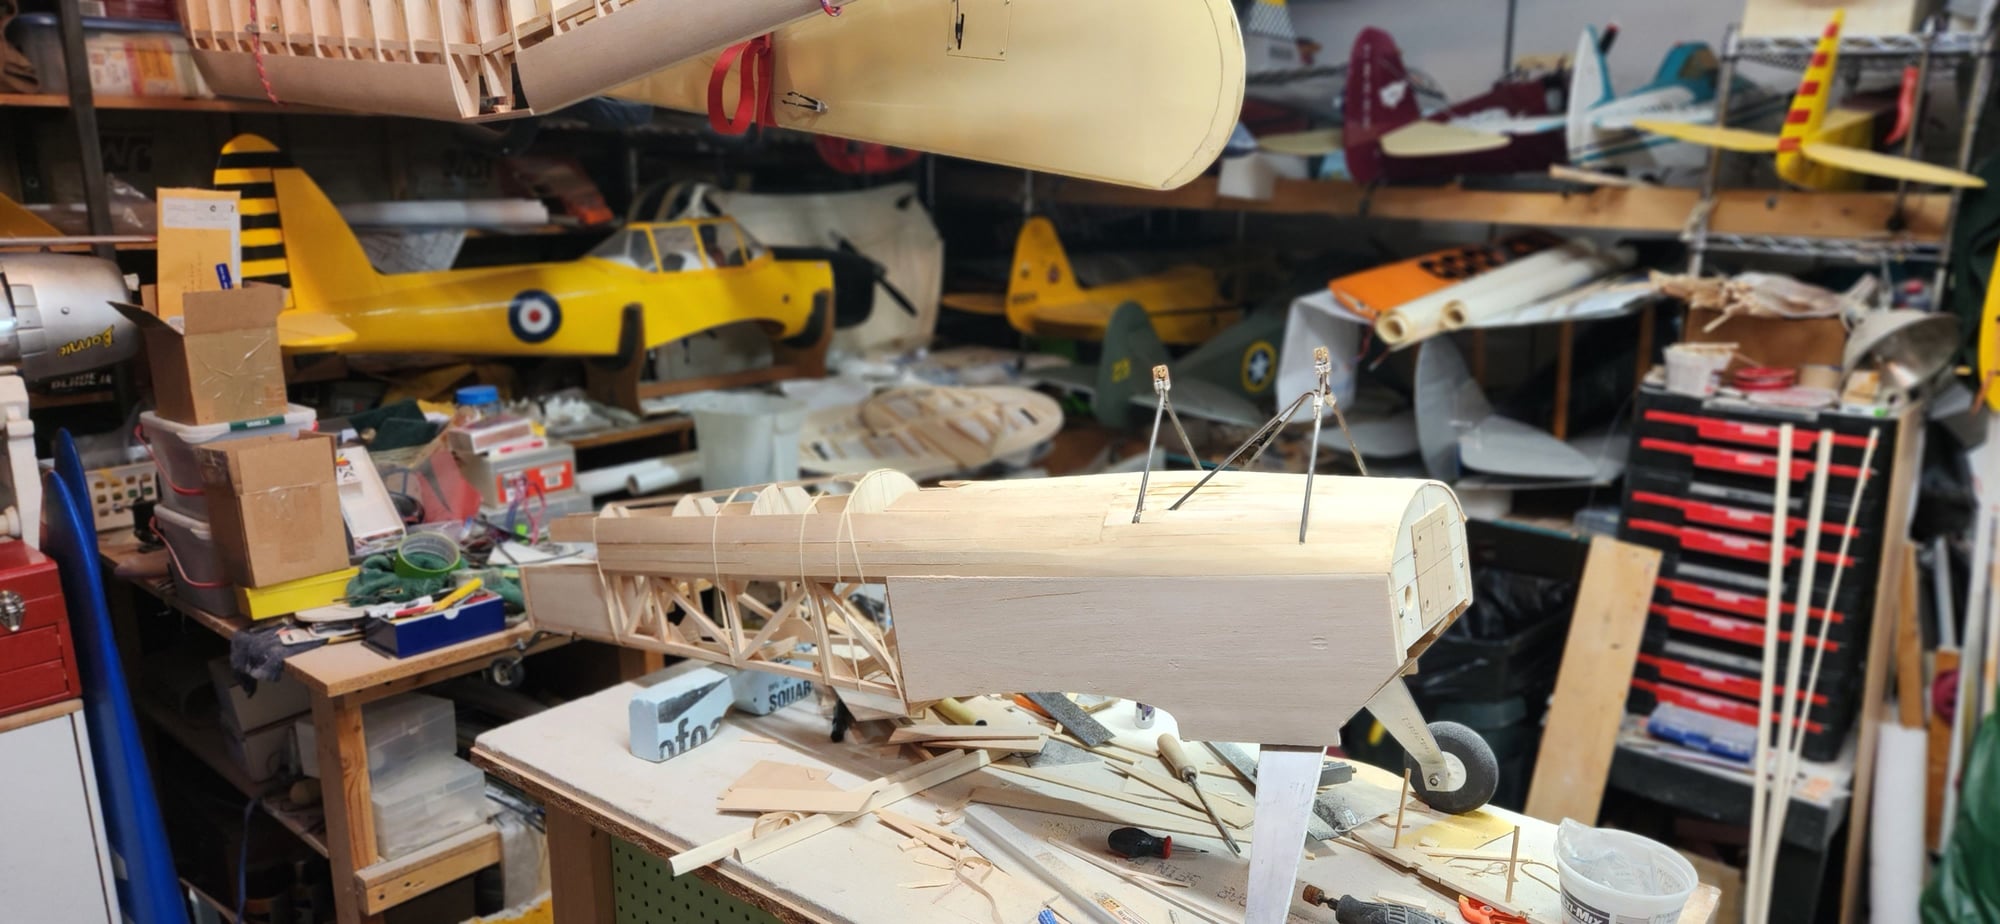
Yes the pilots shipped from Arizona. I think that the guy with the helmet gets the job.
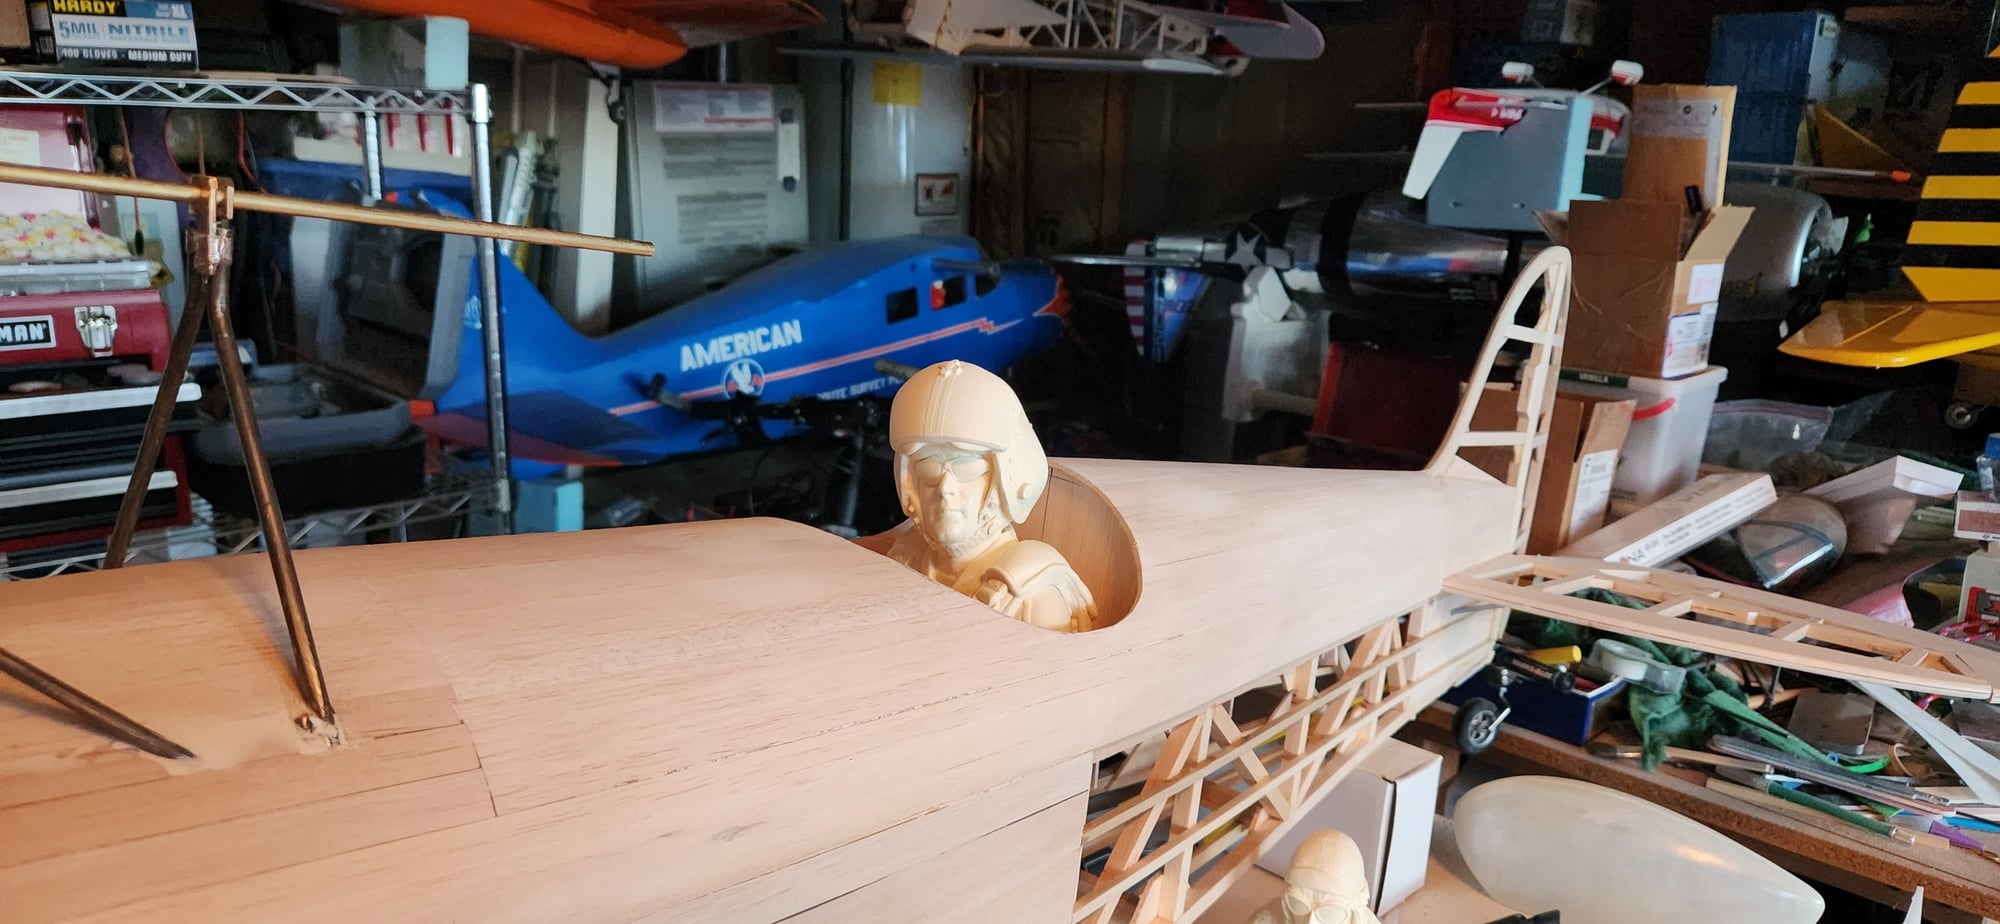
Future pilot, hope he knows how to fly!
2 incidence meters, level, and 4 plumb bobs. Measure, measure, measure.
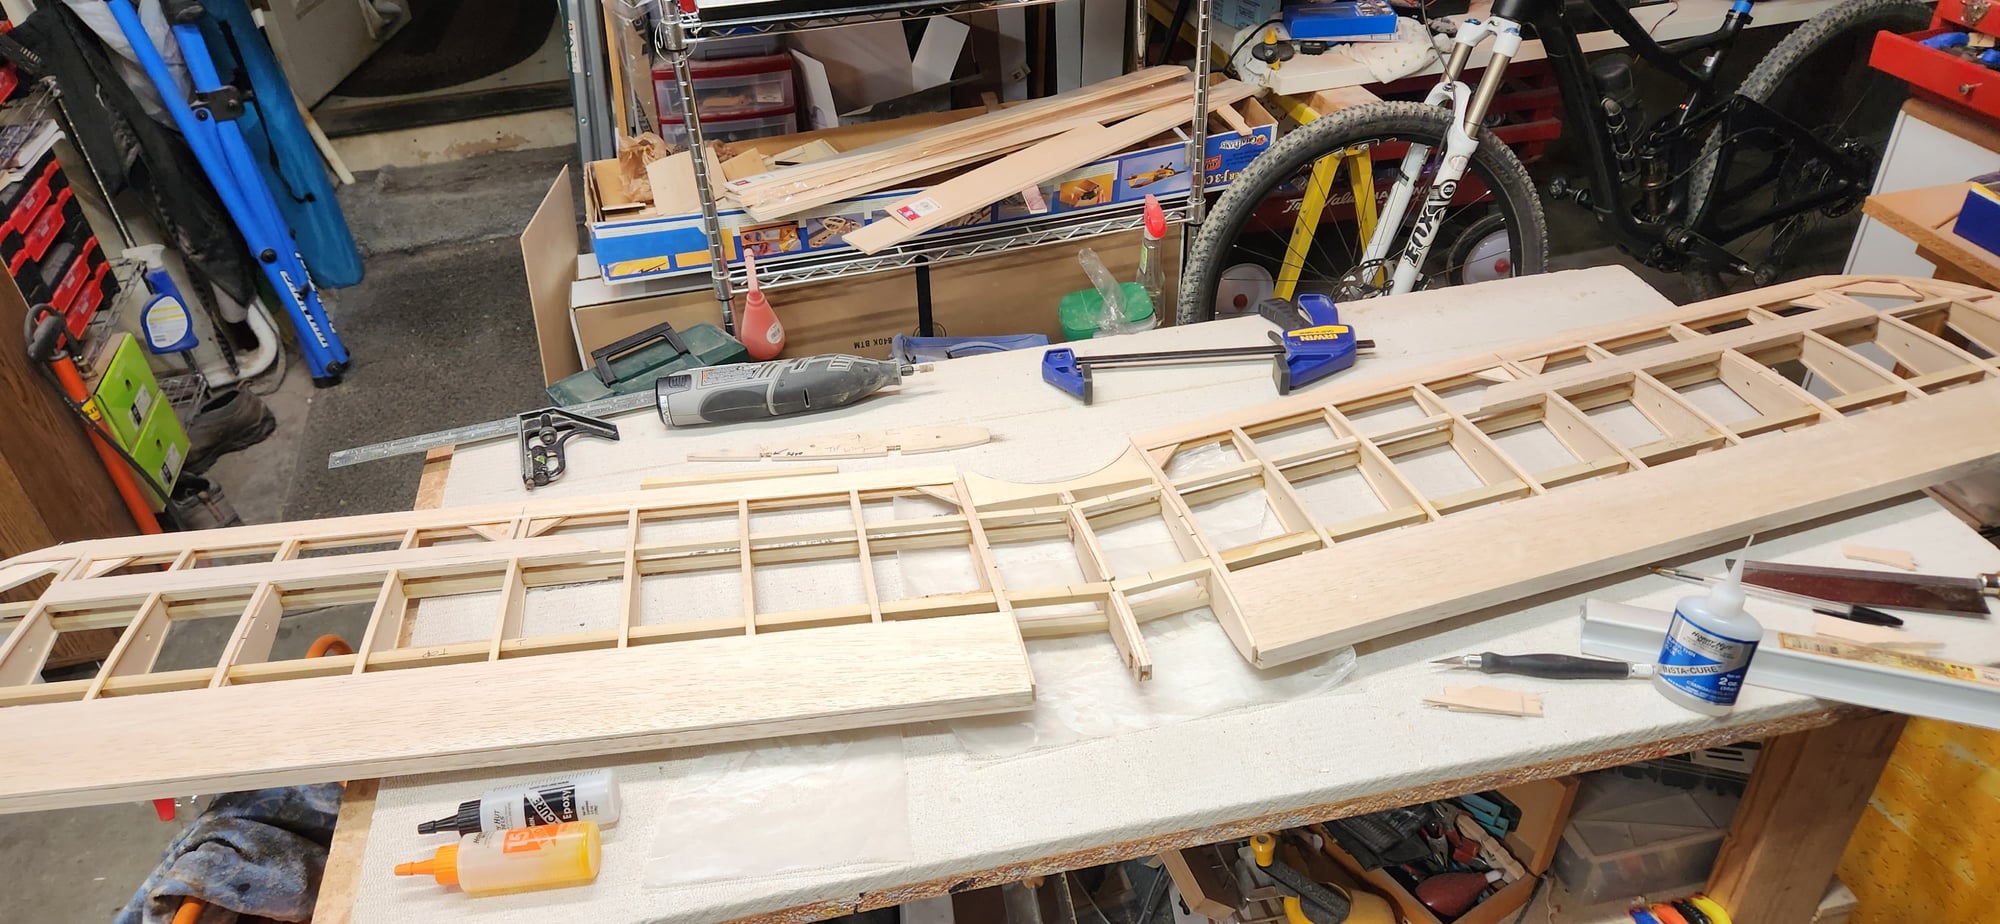
2 sticks glued in place to set the top wing square with the bottom so that I can make outer wing struts
Used this position to make a template for the struts, top and bottom pieces with a stick between that was then traced onto plywood and drawn to shape.
template and struts

first outer strut test fit on both sides
struts bolted in place
bottom wing has poplar leading edge installed and shaped, top still needs this.
Future pilot, hope he knows how to fly!
2 incidence meters, level, and 4 plumb bobs. Measure, measure, measure.
2 sticks glued in place to set the top wing square with the bottom so that I can make outer wing struts
Used this position to make a template for the struts, top and bottom pieces with a stick between that was then traced onto plywood and drawn to shape.
template and struts
first outer strut test fit on both sides
struts bolted in place
bottom wing has poplar leading edge installed and shaped, top still needs this.
 10-22-2023, 10:21 AM
#22
Thread Starter
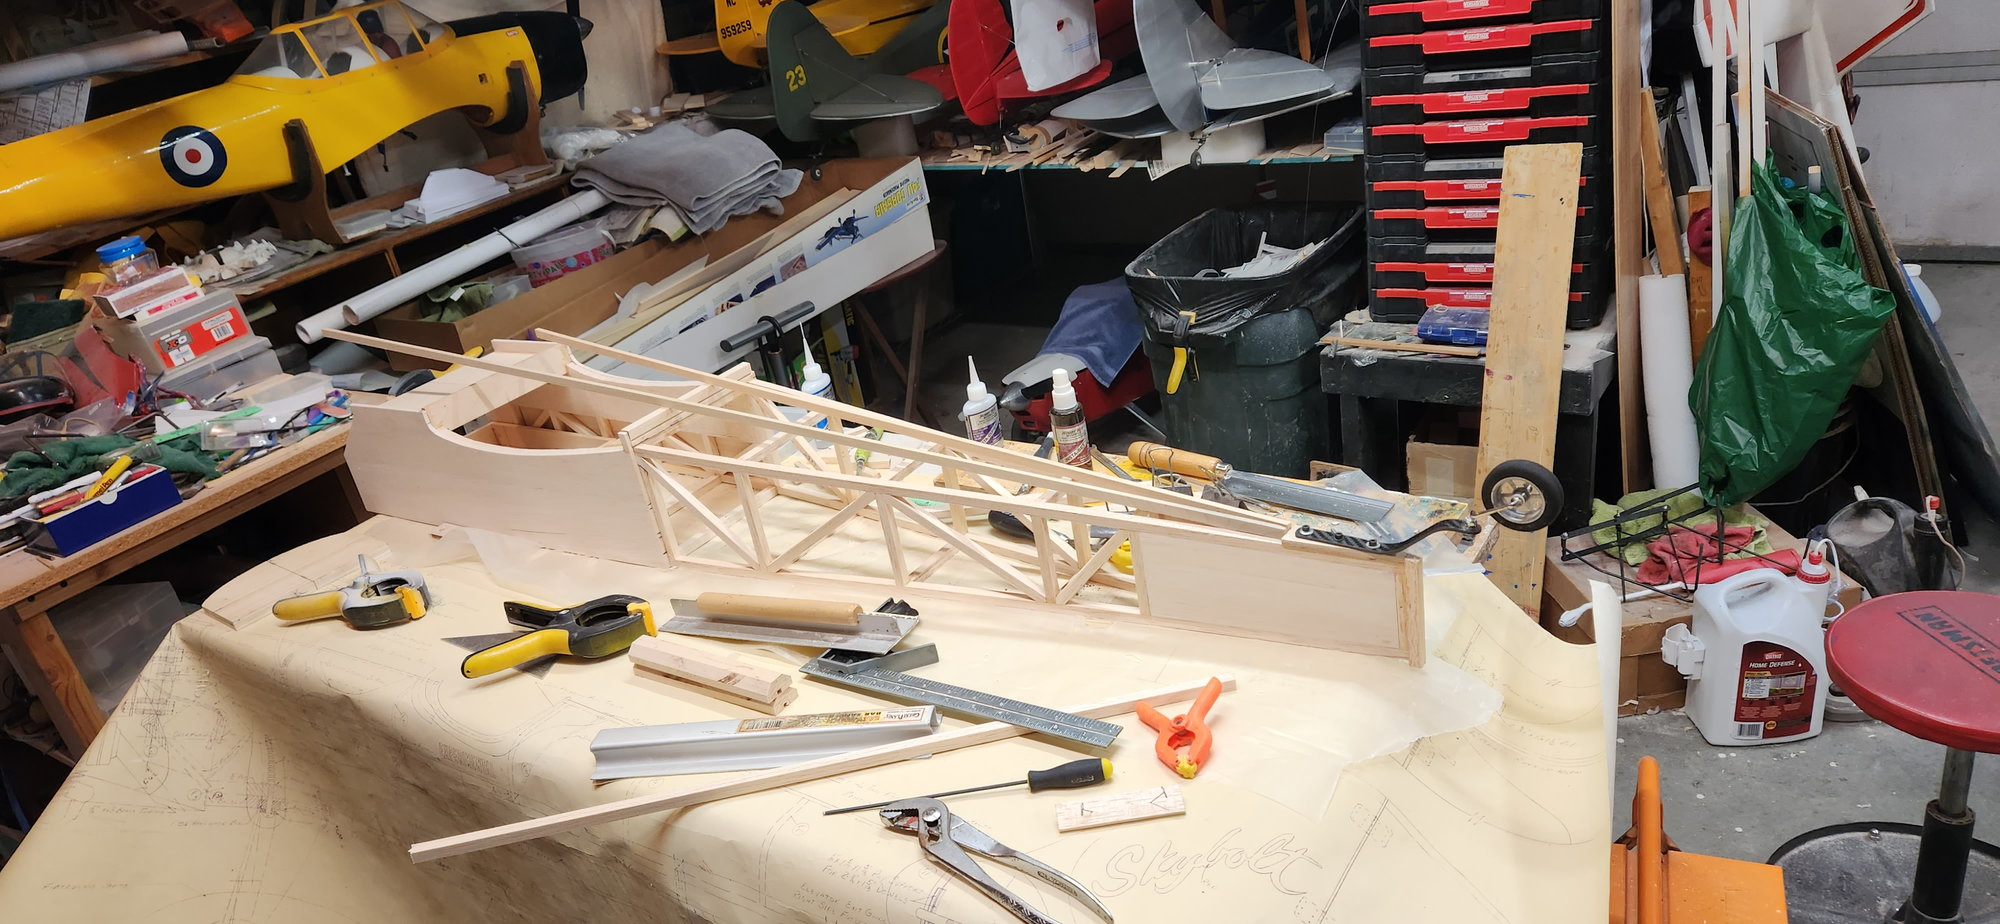
time to glue the tail on
Again measure two, three, four times before gluing stabilizer in place. I like to stand it up to see if it looks right.
fin glued in place
hollow balsa blocks to finish blending fuselage to fin and reinforce joint. I will also add bracing wires to fin and stabilizer.
4-40 Wire pushrods for elevator, one for each side. The rudder will be pull pull cable
10-30-2023, 07:59 PM
#23
Thread Starter
Next I mounted the cowl.
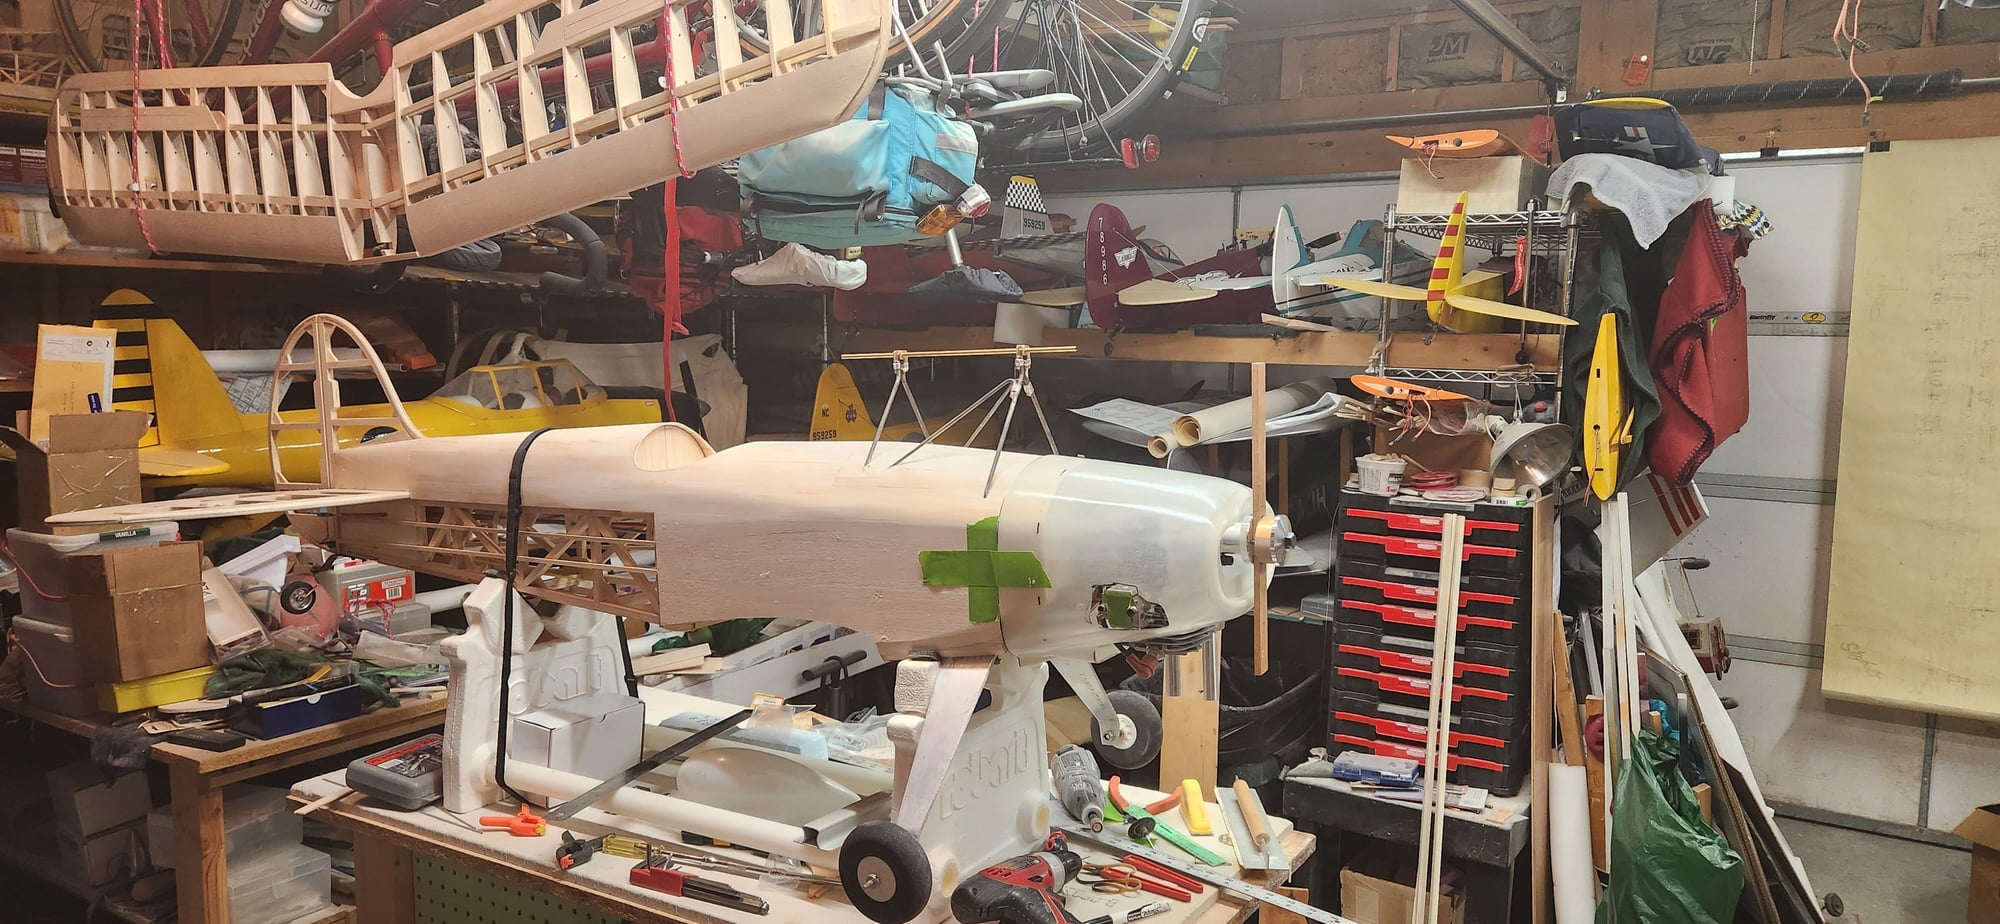
Had to cut 1" off of back of cowl
stick mounted on propshaft gives a good reference to measure from
should have plenty of cooling on the bottom
Had to cut 1" off of back of cowl
stick mounted on propshaft gives a good reference to measure from
should have plenty of cooling on the bottom
The following users liked this post:
gottabeme (11-06-2023)
11-07-2023, 07:48 PM
#24
Thread Starter
time to put it's pants on...
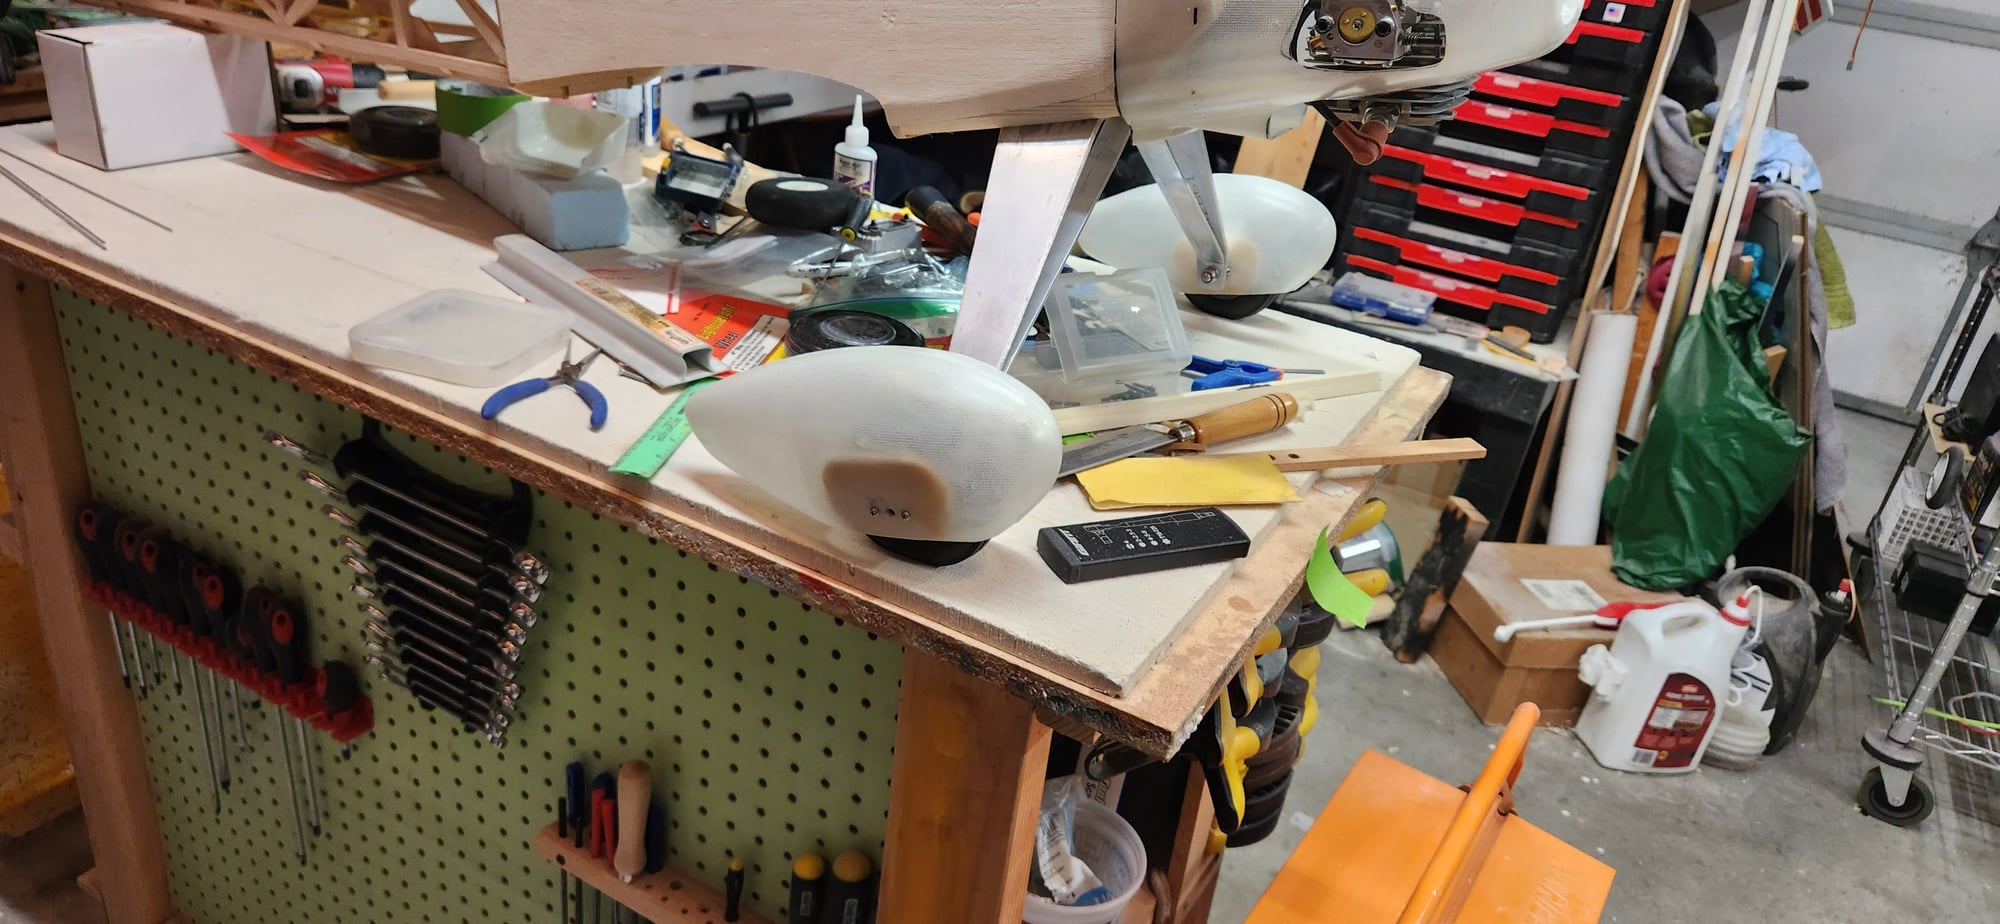
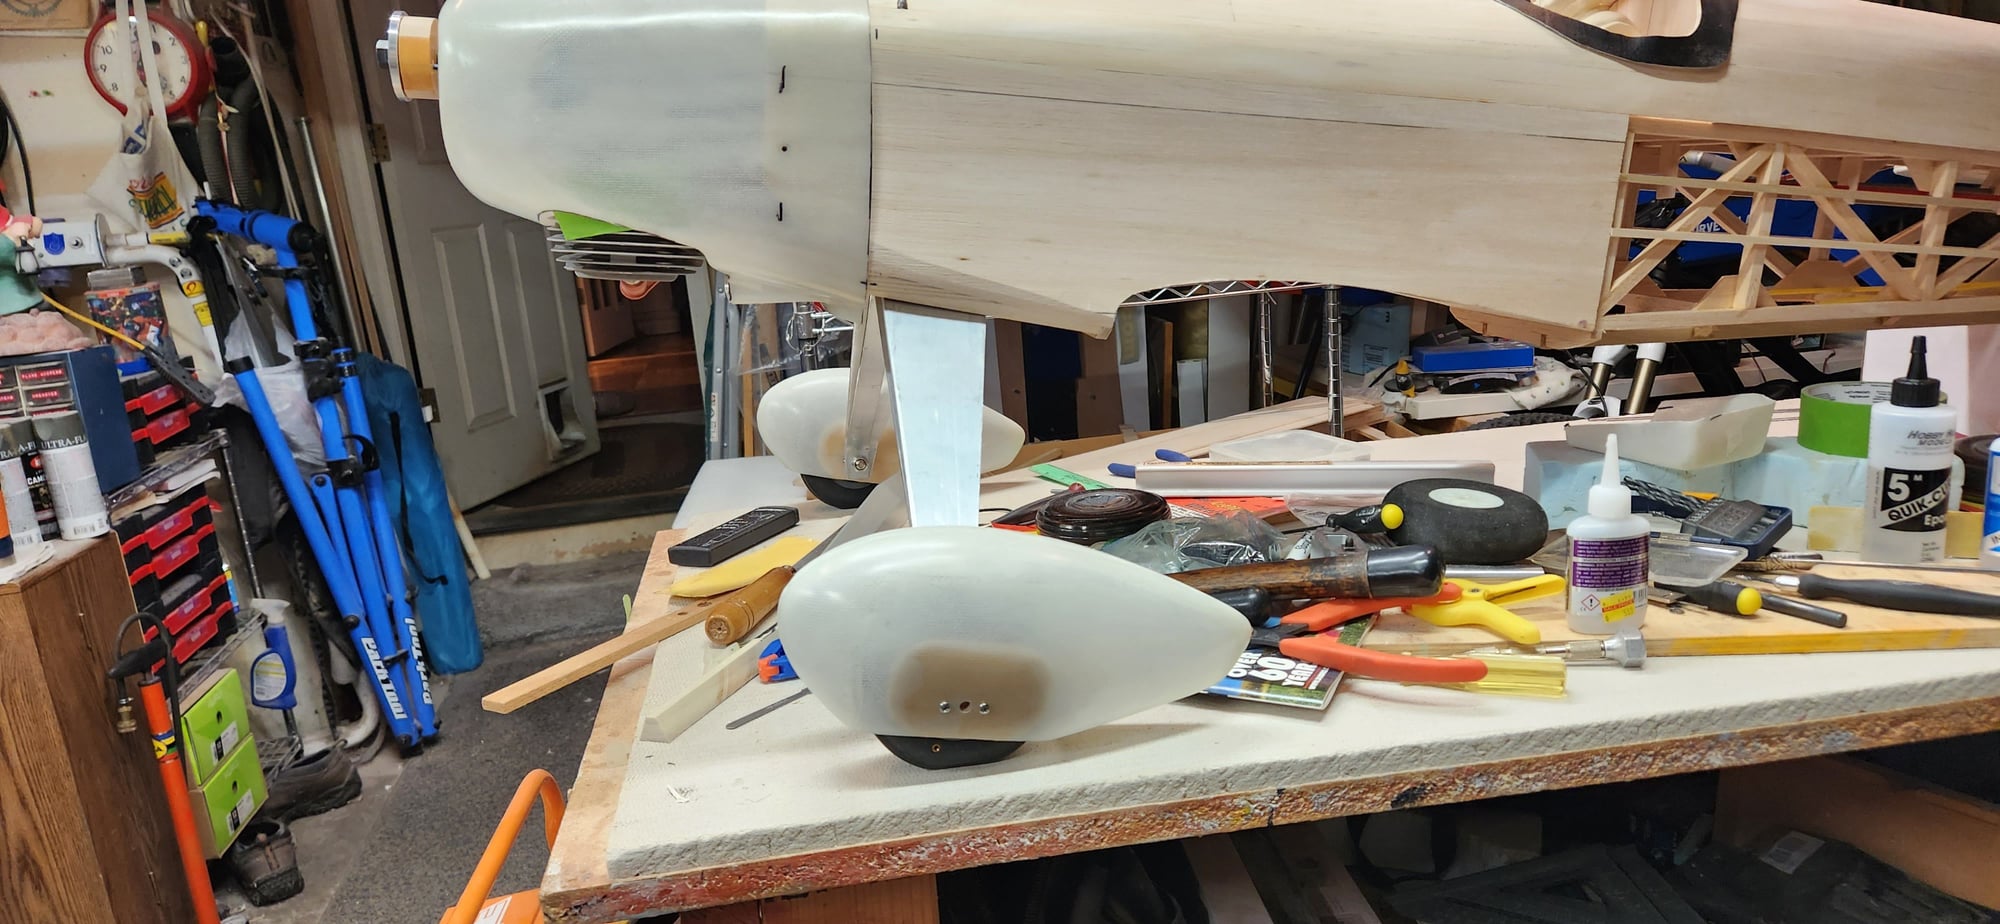
BB Wheel Collar Pants Mount - Universal from B&B Specialties very secure mount.
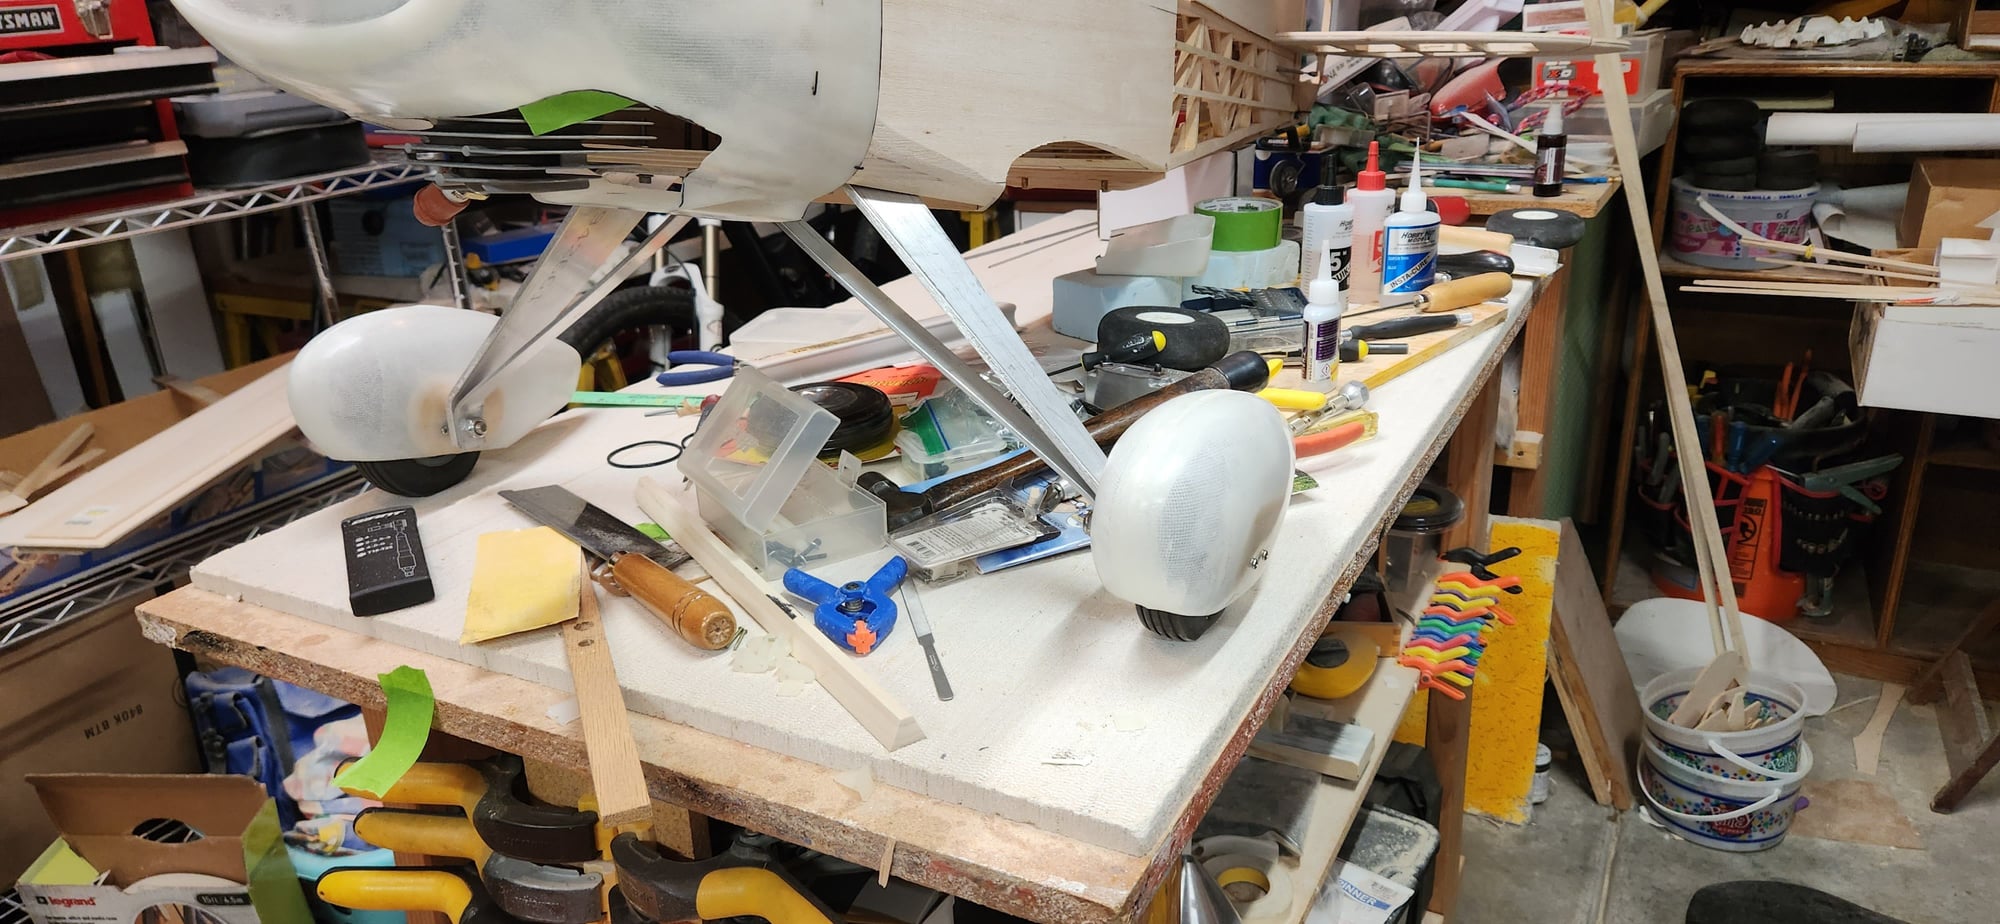
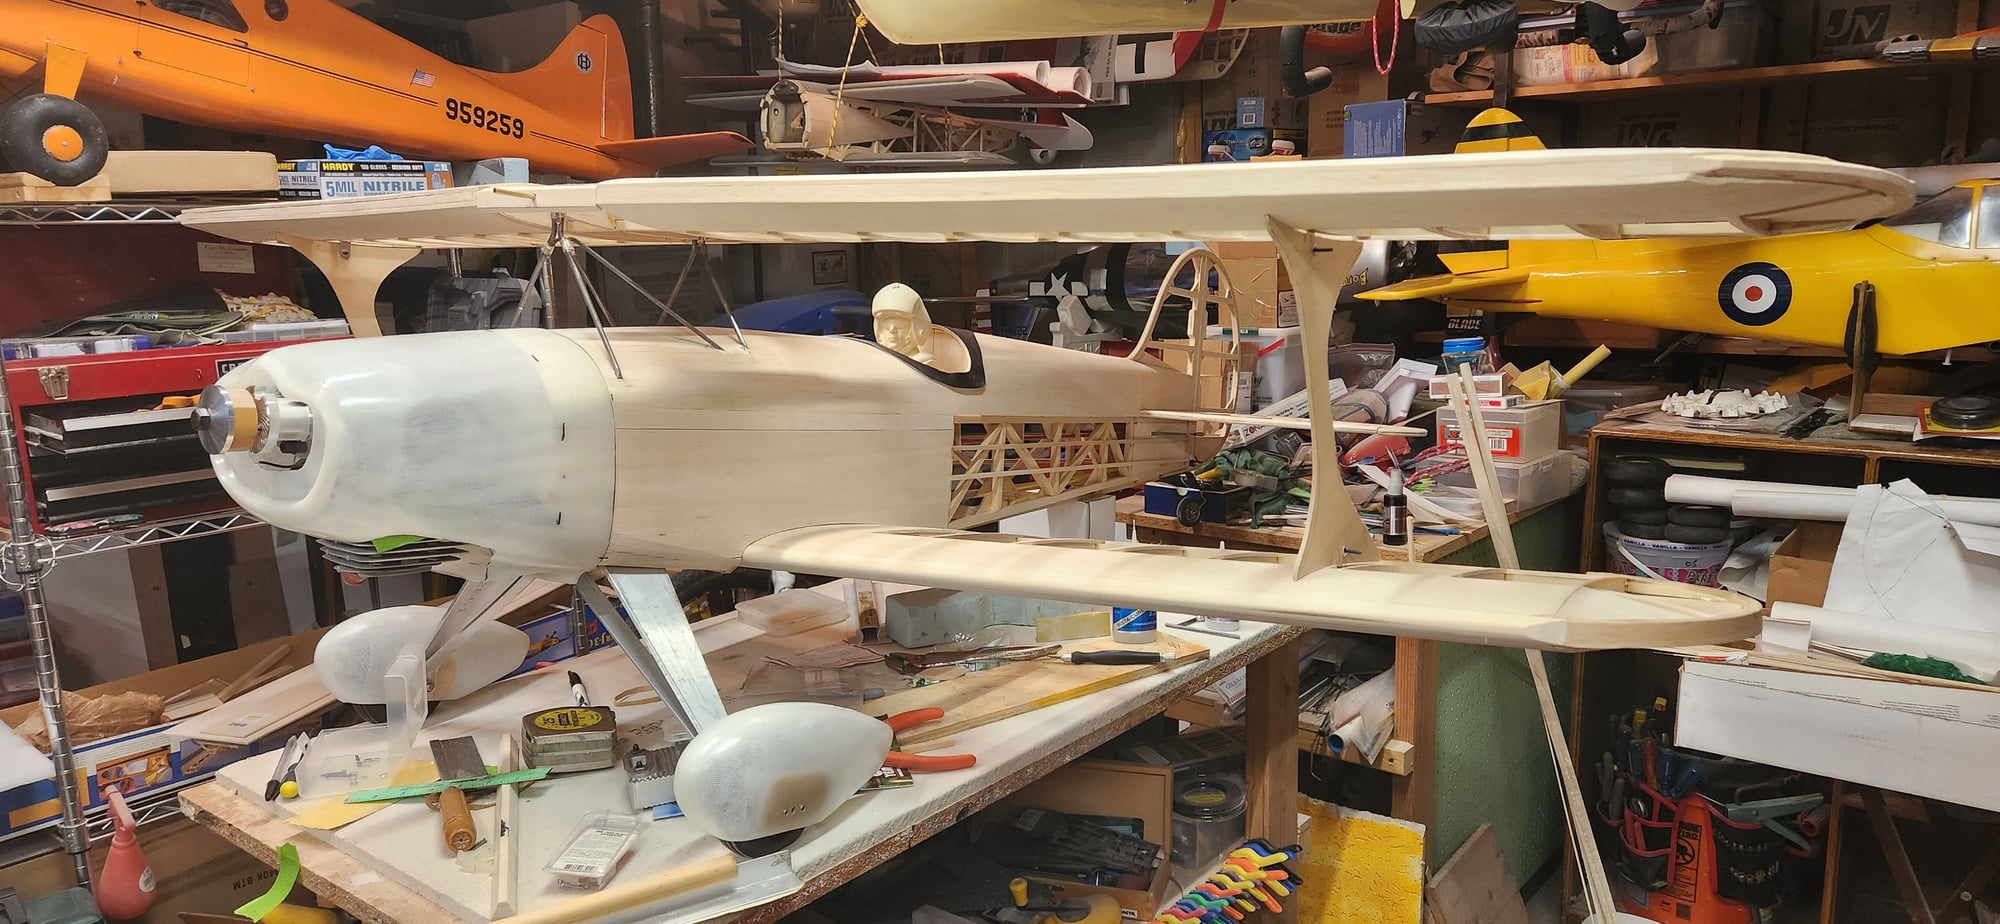


shows landing gear brace, spring on center bolt inside fuselage provides shock absorption
BB Wheel Collar Pants Mount - Universal from B&B Specialties very secure mount.
shows landing gear brace, spring on center bolt inside fuselage provides shock absorption
11-09-2023, 03:44 PM
#25
My Feedback: (1)
Beautifull. Looks like you will be ready to put her cloths on soon. Did she decide on Hot pants or an evening dress?
Kidding aside.looks great and I'm following along with your build and probably as excited as you to see her fly.
Like you choice of pilot. He got a name yet? I ended up with a plush toy Spiderman for a pilot. Don't ask. Ha.Ha
Still waiting to remaiden mine. She's done minus her pants. Wacky crazywindy weather here has slowed me up a bit.