


G&L 1/5 DHC chipmunk - diary of a build.
 06-13-2014, 07:58 AM
#101

I cut the elevator free from the stab with my scroll saw. I am working on the facings right now.

I used a large sanding block to true up the ends, works great.


I am using 3/32" balsa on the facing so I have room to sand if I need to adjust.


The facing on the elevator is 3/32" for the same reasons.


The center section will be removable for access and maintenance. I faced it with 1/16"


Once I am all done with the facing I will do the hinge pockets and get her ready to glass. I normally would spackle then sand, then glass but I don't use spackle anymore so just glass then sand, glass again and then any filling needed will be evercoat.
TB
I used a large sanding block to true up the ends, works great.
I am using 3/32" balsa on the facing so I have room to sand if I need to adjust.
The facing on the elevator is 3/32" for the same reasons.
The center section will be removable for access and maintenance. I faced it with 1/16"
Once I am all done with the facing I will do the hinge pockets and get her ready to glass. I normally would spackle then sand, then glass but I don't use spackle anymore so just glass then sand, glass again and then any filling needed will be evercoat.
TB
 06-13-2014, 11:42 AM
#103
So my stab is all done.
All the facing is done and everything fits nicely, I will go over it and make any adjustments before I glass.
She is all ready for the hinge pockets.


The torque rod arm came out very nice and this will work great with a ball link.


I seal my hinge pockets with a carbon fiber 6mmx1mm strip, and brace it with a piece of 1/8" balsa stick.


I start by cutting a piece od CF strip> I make it a little long because the end is open and I sand it flush when I am done.
To prep the area I take a small strip of wax paper and tape it to the top of the wing (or bottom) leaving it hang over about 3/8". Then I tape a strip of 3/32" balsa strip over the wax paper. I clamp this to the TE with spring clamps about every 1-1/2".
I lay the CF strip on top of the wax paper and push it tight agents the TE. I clamp it with small metal spring clamps, making sure it is tight agents the TE, very important.
Then I hit it with thin CA. I remove the clamps after a few and hit the whole strip again, you don't need much.


Then I cut a piece of balsa stick and lay it agents the TE on top of the CF strip, clamp it and hit it with thin CA.


Really not a lot to it.


You get a very easy pocket installation, tight joints and a sealed hinge. This all gets glassed over during finishing.


Post video.
http://youtu.be/9ZmflAoTScY
TB
All the facing is done and everything fits nicely, I will go over it and make any adjustments before I glass.
She is all ready for the hinge pockets.
The torque rod arm came out very nice and this will work great with a ball link.
I seal my hinge pockets with a carbon fiber 6mmx1mm strip, and brace it with a piece of 1/8" balsa stick.
I start by cutting a piece od CF strip> I make it a little long because the end is open and I sand it flush when I am done.
To prep the area I take a small strip of wax paper and tape it to the top of the wing (or bottom) leaving it hang over about 3/8". Then I tape a strip of 3/32" balsa strip over the wax paper. I clamp this to the TE with spring clamps about every 1-1/2".
I lay the CF strip on top of the wax paper and push it tight agents the TE. I clamp it with small metal spring clamps, making sure it is tight agents the TE, very important.
Then I hit it with thin CA. I remove the clamps after a few and hit the whole strip again, you don't need much.
Then I cut a piece of balsa stick and lay it agents the TE on top of the CF strip, clamp it and hit it with thin CA.
Really not a lot to it.
You get a very easy pocket installation, tight joints and a sealed hinge. This all gets glassed over during finishing.
Post video.
http://youtu.be/9ZmflAoTScY
TB
Last edited by TonyBuilder; 06-13-2014 at 12:48 PM.
06-14-2014, 02:38 AM
#104
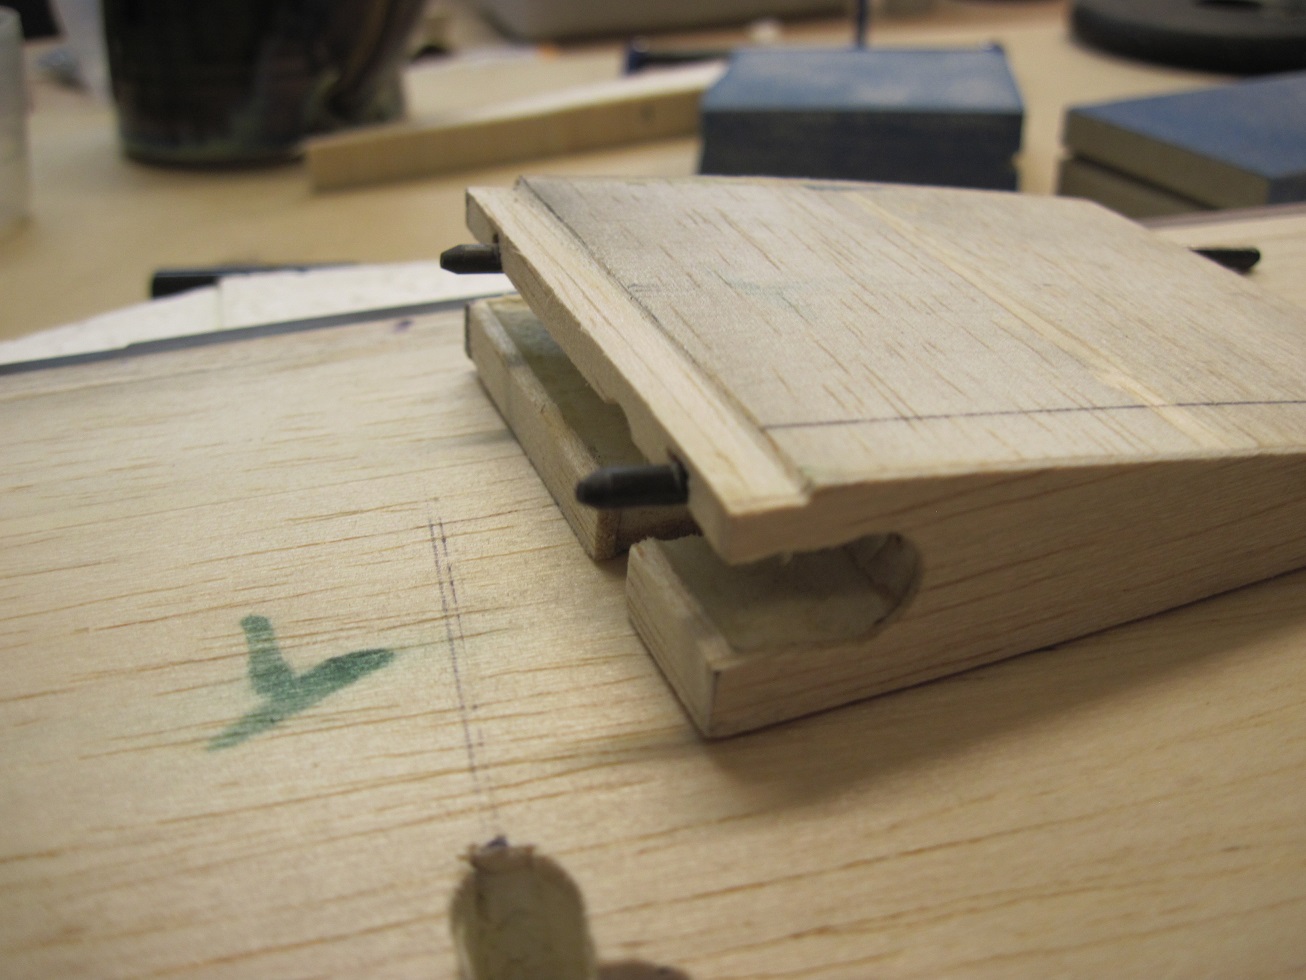
The section of the stabilizer that is in between the elevators will be removable for installation, setup, and maintenance.
With a system that has all the control linkages buried inside it is important to have access to them for construction and setup. I don't like gluing things blind so this will allow me to protect the pull-pull for the tail wheel and the elevator linkage.
I installed two carbon fiber dowels that are drilled threw the hatch and into the TE of the stab.


The TE of the hatch has not been done yet. I may cut a little more off and glue a hard wood block, shape it and then drill two small holes for two screws to secure the hatch to the fuselage.

Right now the hatch fits really tight and secure but still will have two screws.

I will glass the hatch and the stab next and then once I have sanded and it is ready for priming I will do the rider detailing.


TB
With a system that has all the control linkages buried inside it is important to have access to them for construction and setup. I don't like gluing things blind so this will allow me to protect the pull-pull for the tail wheel and the elevator linkage.
I installed two carbon fiber dowels that are drilled threw the hatch and into the TE of the stab.
The TE of the hatch has not been done yet. I may cut a little more off and glue a hard wood block, shape it and then drill two small holes for two screws to secure the hatch to the fuselage.
Right now the hatch fits really tight and secure but still will have two screws.
I will glass the hatch and the stab next and then once I have sanded and it is ready for priming I will do the rider detailing.
TB
Last edited by TonyBuilder; 06-14-2014 at 02:42 AM.
06-14-2014, 05:06 AM
#105
Next up is to prep the wing skins, and start gluing them in. I am doing one at a time so it might take a couple days, that's cool becouse I need to start on the fuselage. Going to mount the fin, cut the canopy off, install the firewall, and glue in the stab.
Stab, elevator, and ruder are ready to glass.
I am am adding navigation lights, tips, tail and landing light. I will be doing a pour mans lighting system. I got the green and Red LED (3.5v) from DW they are AirWorld. The landing light is a 7.4 LED from AirWorld. I will use two Rcexl optical switches. The one I will use for the engine kill will be the LEDs for wings and tail. Then the one for the landing light will be just for landing and mixed with flaps.
I will install the ASI (Pitio tube) and my telemetry system.
TB
Last edited by TonyBuilder; 06-14-2014 at 06:01 AM.
06-14-2014, 05:54 AM
#106


Join Date: Jul 2012
Location: Missouri
Posts: 1,127
Likes: 0
Received 0 Likes
on
0 Posts
Tony, you are a building animal. Where do you get all the time ?
One last question on the husks, they look indispensable.
Is it common practice for the husks to be sent with the wing or do you need to request them ?
Love the detail of your builds
Kevin
One last question on the husks, they look indispensable.
Is it common practice for the husks to be sent with the wing or do you need to request them ?
Love the detail of your builds
Kevin
06-14-2014, 03:11 PM
#110
Started glassing this afternoon. Got the first half of the stab, elevators and ruder done. I start with the bottom first and the left side of the ruder. I am using .56oz cloth on the tail. The wing will get .75oz cloth.
I masked all the joints off with blue tape. I will get the other half done in the morning and start sheeting the wings.


Getting exciting


TB
I masked all the joints off with blue tape. I will get the other half done in the morning and start sheeting the wings.
Getting exciting
TB
06-15-2014, 03:05 AM
#112
I glassed the top sides of the stab and elevators, and the right side of the ruder last night so the tail feathers are glassed. I will do the second coat in between working on the wing.
On the board for today is making the wing skins. I need to cut a channel for the nov lights, and Pitot Tube. Then I will start gluing the skins on.


TB
On the board for today is making the wing skins. I need to cut a channel for the nov lights, and Pitot Tube. Then I will start gluing the skins on.
TB
06-15-2014, 09:57 AM
#113
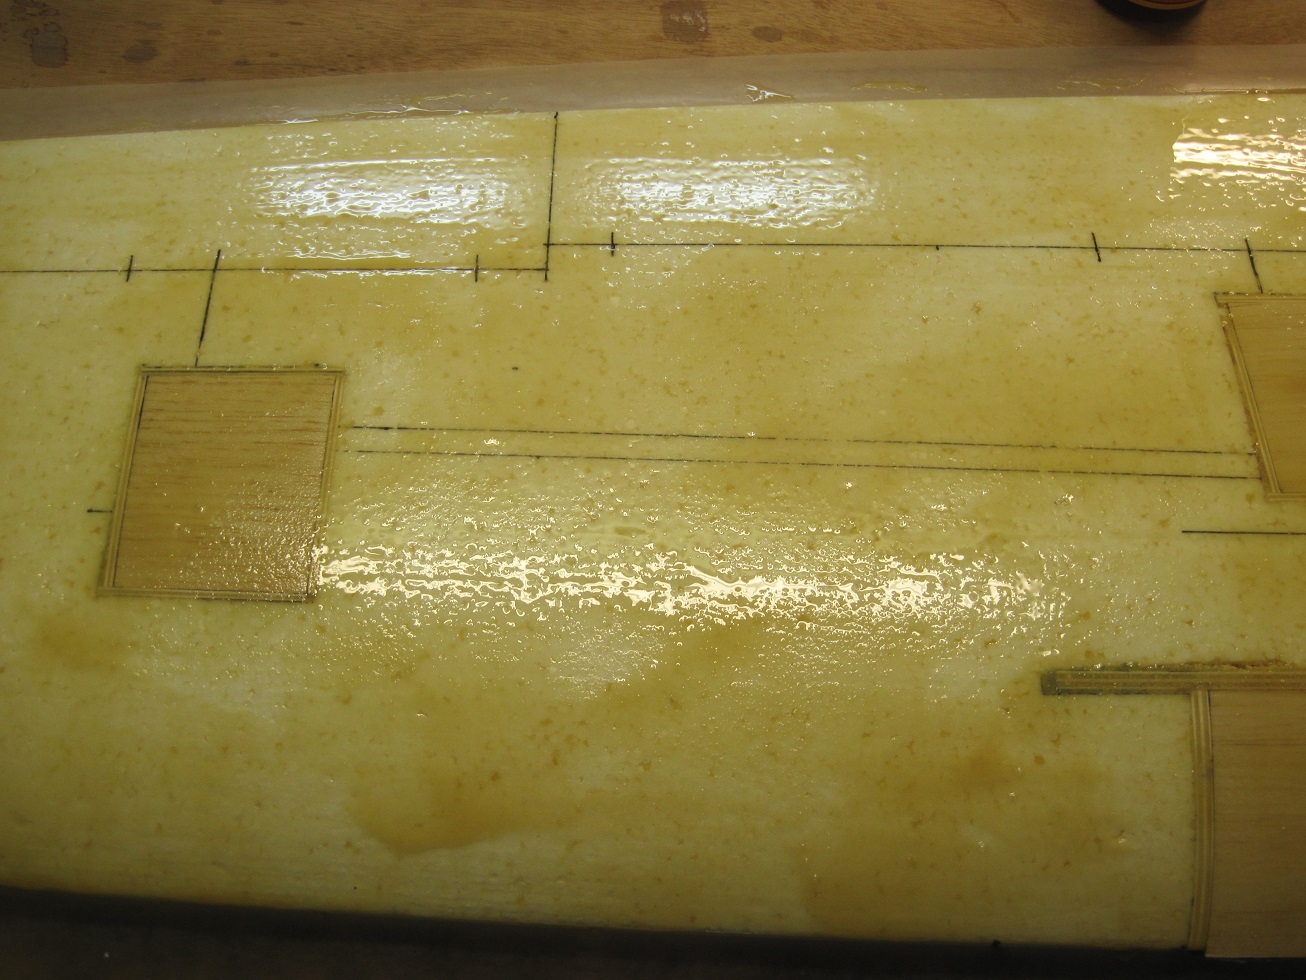
I redid the wire channels so accommodate the added nav lights. They are now 3/8" 3/8"


The left wing will have 4 wires and the right will have 3 so two TBolt 4 wire servo harnesses will be used.
I installed a new trench for the wingtip nav light. This will be fed from the aileron and flap servo bays. The landing light will be routed from the flap servo bay into the gear block bay.


I skinned the tops of the servo and gear bays to keep the Gorilla glue from filling into the bays.


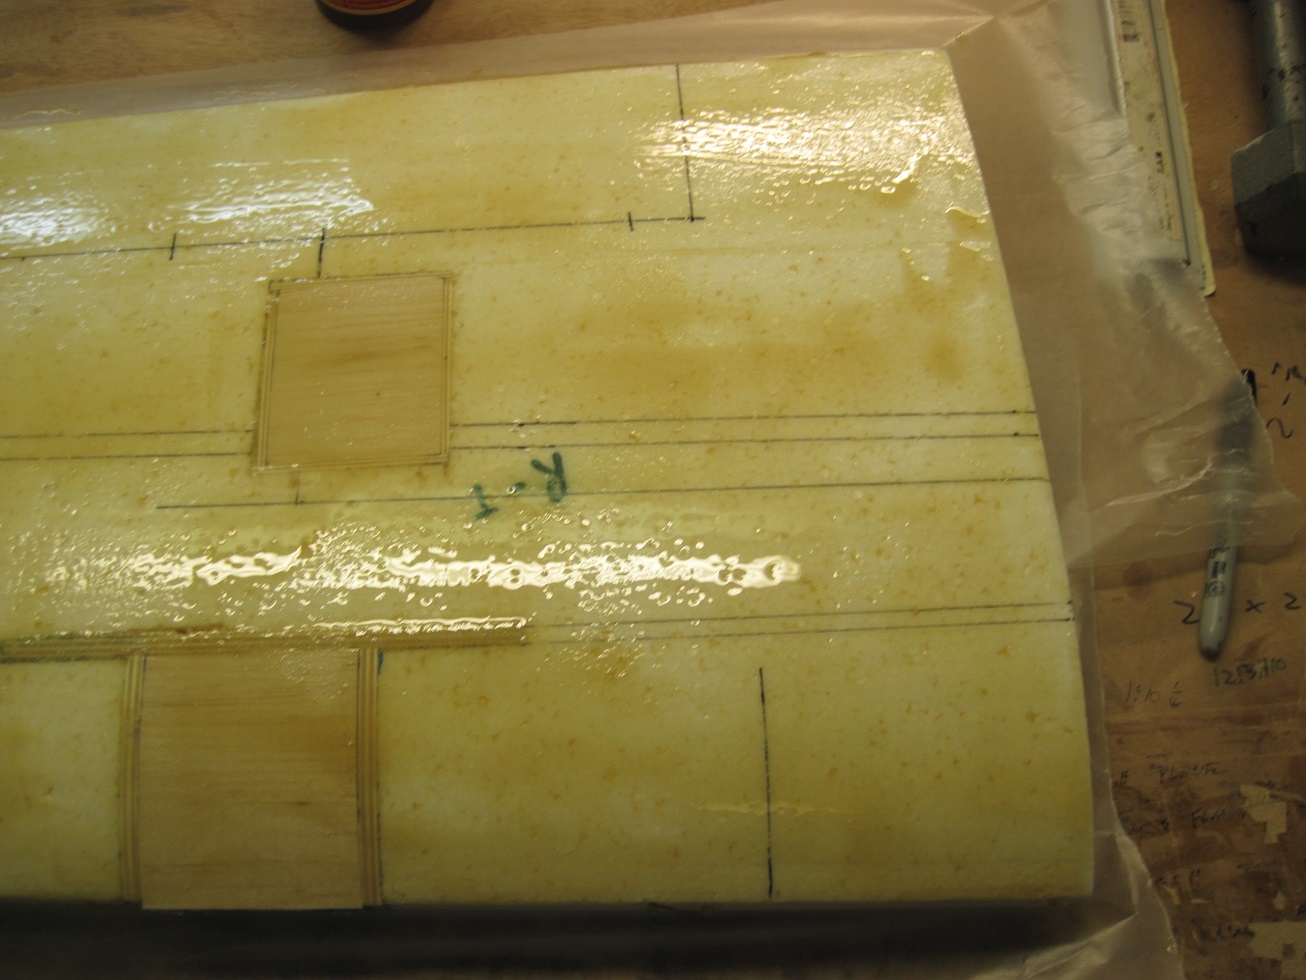
I made up my skins with 4- 4" x 42" 3/32" sheets. I match them up and then I do one at a time using thin CA, goes very quick and a nice tight joint.
I sand both sides smooth with a large sanding bar, first with #80 grit then with #220 grit. Gives a very nice skin.


For the skin I first cut the skin to size, check it then I line the bottom husk with wax paper. I pint the core to the bottom husk with large T-pins to keep it from creeping.
Then I spread the gorilla glue with a bondo spreader, works good. This time I only applied glue to the core. It will soak in so I hit it with enough to give a good coat.
Then I lay the skin over the core and pin it threw the skin into the core to keep t from slipping or creeping, it will if you done. Once you put weight on it, it wants to pop out!
I place wax paper in between the top husk on top of the skin and pin it with T-pins. A piece of MDF is placed on the husk and 3 4"x16" concrete blocks are used as weight. I will let this dry a few hours then flip and do the bottom.


TB
The left wing will have 4 wires and the right will have 3 so two TBolt 4 wire servo harnesses will be used.
I installed a new trench for the wingtip nav light. This will be fed from the aileron and flap servo bays. The landing light will be routed from the flap servo bay into the gear block bay.
I skinned the tops of the servo and gear bays to keep the Gorilla glue from filling into the bays.
I made up my skins with 4- 4" x 42" 3/32" sheets. I match them up and then I do one at a time using thin CA, goes very quick and a nice tight joint.
I sand both sides smooth with a large sanding bar, first with #80 grit then with #220 grit. Gives a very nice skin.
For the skin I first cut the skin to size, check it then I line the bottom husk with wax paper. I pint the core to the bottom husk with large T-pins to keep it from creeping.
Then I spread the gorilla glue with a bondo spreader, works good. This time I only applied glue to the core. It will soak in so I hit it with enough to give a good coat.
Then I lay the skin over the core and pin it threw the skin into the core to keep t from slipping or creeping, it will if you done. Once you put weight on it, it wants to pop out!
I place wax paper in between the top husk on top of the skin and pin it with T-pins. A piece of MDF is placed on the husk and 3 4"x16" concrete blocks are used as weight. I will let this dry a few hours then flip and do the bottom.
TB
Last edited by TonyBuilder; 06-15-2014 at 10:01 AM.
06-15-2014, 12:00 PM
#114

As always Tony you show alot of details when you build, your a great aid for picking up new ways for doing alot of what you do and I make notes. Plane is looking good, wouldn't expect anything less from those hands. Job or hobby, you get things done, no doubt you love building.
Leroy
Leroy
06-15-2014, 01:23 PM
#115
Thanks Leroy, I have found that I cant just fly, or just build and right now I don't have a plane to fly so this Quick build will satisfy that need. I just cant fly ARFs anymore. So even though I am putting 10-12hr a day in it is for a good cause, get me in the air. I also find that I cant fly planes that are not scale and building allows me to design and build a plane and then go fly it. For those that may wonder what happened to my P-47 build, well I really need a plane to fly and this plane will be in the air in no time, the P-47 will get done when it gets done, don't want to rush that.
Anyways on with the building.
TB
Anyways on with the building.
TB
06-15-2014, 01:25 PM
#116
The first skin came out good and I flipped the wing and the bottom is drying. It takes about 3 hr to dry before you can pull the weight off it. I will get the right wing done tomorrow. The flaps and ailerons will go quickly. I may end up waiting on parts.
TB
TB
06-16-2014, 09:50 AM
#119
The right wing top skin is glued in.
This Gorilla glue is great stuff. This wing is the strongest wing I have ever seen. On my first build it took a hell of a beating and kept on ticking. I have flown into the guard rails at the pilot station (on a bad landing) with just a minor dent in the LE. I have carwheeled down the field in a down wind dead stick as I clipped a bush with my wing tip, no damage")
This is one durable plane!

These concrete blocks are killing my back, will be glade when this is over


The wings stay in there husk while in waiting. The husk will get used long after the wing is sheeted. I use it for storage,, for construction, and I keep them for future use.

I glassed all the tail feathers with the second coat while I wait on the glue to dry. I am known around these parts as the "Heavy Builder" All my kits weigh a few pounds more then anyone's. I like to build heavy, they fly better


TB
This Gorilla glue is great stuff. This wing is the strongest wing I have ever seen. On my first build it took a hell of a beating and kept on ticking. I have flown into the guard rails at the pilot station (on a bad landing) with just a minor dent in the LE. I have carwheeled down the field in a down wind dead stick as I clipped a bush with my wing tip, no damage
This is one durable plane!
These concrete blocks are killing my back, will be glade when this is over
The wings stay in there husk while in waiting. The husk will get used long after the wing is sheeted. I use it for storage,, for construction, and I keep them for future use.
I glassed all the tail feathers with the second coat while I wait on the glue to dry. I am known around these parts as the "Heavy Builder" All my kits weigh a few pounds more then anyone's. I like to build heavy, they fly better
TB
06-16-2014, 11:48 AM
#120
I cut the fiberglass canopy from the fuselage. Looks so much better
I glued in some temporary braces to hold the shape while I work on the canopy area.


I am fitting the forms and once I get them all aliened I will glass the fuselage extensions for the canopy.


I am waiting on my canopy to do final fitting of the forms.


TB
I glued in some temporary braces to hold the shape while I work on the canopy area.
I am fitting the forms and once I get them all aliened I will glass the fuselage extensions for the canopy.
I am waiting on my canopy to do final fitting of the forms.
TB
06-16-2014, 12:32 PM
#121
So the right wing should be dry by this afternoon. I will start on the flaps and ailerons on the left wing tonight. Far as I can tel the flaps look to be a sealed hing so that will be easy.

Robart hing pins and the same pocket as the elevator.
Ailerons will be fries, G-10 hinges. The ailerons will be a little more work but not bad being they are strait at the TE and LE.


Once that is done its time to join the wing.
TB
Robart hing pins and the same pocket as the elevator.
Ailerons will be fries, G-10 hinges. The ailerons will be a little more work but not bad being they are strait at the TE and LE.
Once that is done its time to join the wing.
TB
Last edited by TonyBuilder; 06-16-2014 at 12:50 PM.
 06-16-2014, 05:56 PM
#123
Join Date: Jul 2012
Location: Missouri
Posts: 1,127
Likes: 0
Received 0 Likes
on
0 Posts
" I am known around these parts as the "Heavy Builder" All my kits weigh a few pounds more then anyone's. I like to build heavy, they fly better "
The heavy builder can sometimes cartwheel, clip bushes and fences and fly again unabated.
The light builder must bring a bag
I build heavy too. I don't fly well enough to build light.
Kevin
"The heavy builder can sometimes cartwheel, clip bushes and fences and fly again unabated.
The light builder must bring a bag
I build heavy too. I don't fly well enough to build light.
Kevin
06-17-2014, 02:00 AM
#125
Heavy Plaines fly good under power, they don't do so well without it. This kit says it builds from 14-16 lb. I can see that if you used very light wood and plastic covering everywhere and no detailing. My last build was 22lb and with a DLE55 that is a good weight. This build I estimate 23-24 with all the detailing, glassing and painting. She will fly just fine with 30lb of thrust. Light planes don't fly as well in wind, we have wind for 2/3 of the year so this chippy will surf well.
TB
TB