Go Back  RCU Forums > RC Airplanes > Kit Building
Reload this Page >

TF Beechcraft Bonanza F33A Build

Community
Search
Notices
Kit Building If you're building a kit and have questions or want to discuss kit building post it here.

TF Beechcraft Bonanza F33A Build

Thread Tools
 
Search this Thread
 
Old 03-08-2021, 03:42 PM
  #1626  
VincentJ
Thread Starter
 
VincentJ's Avatar
 
Join Date: Mar 2011
Location: Peterborough, NH
Posts: 4,582
Received 120 Likes on 108 Posts
Default


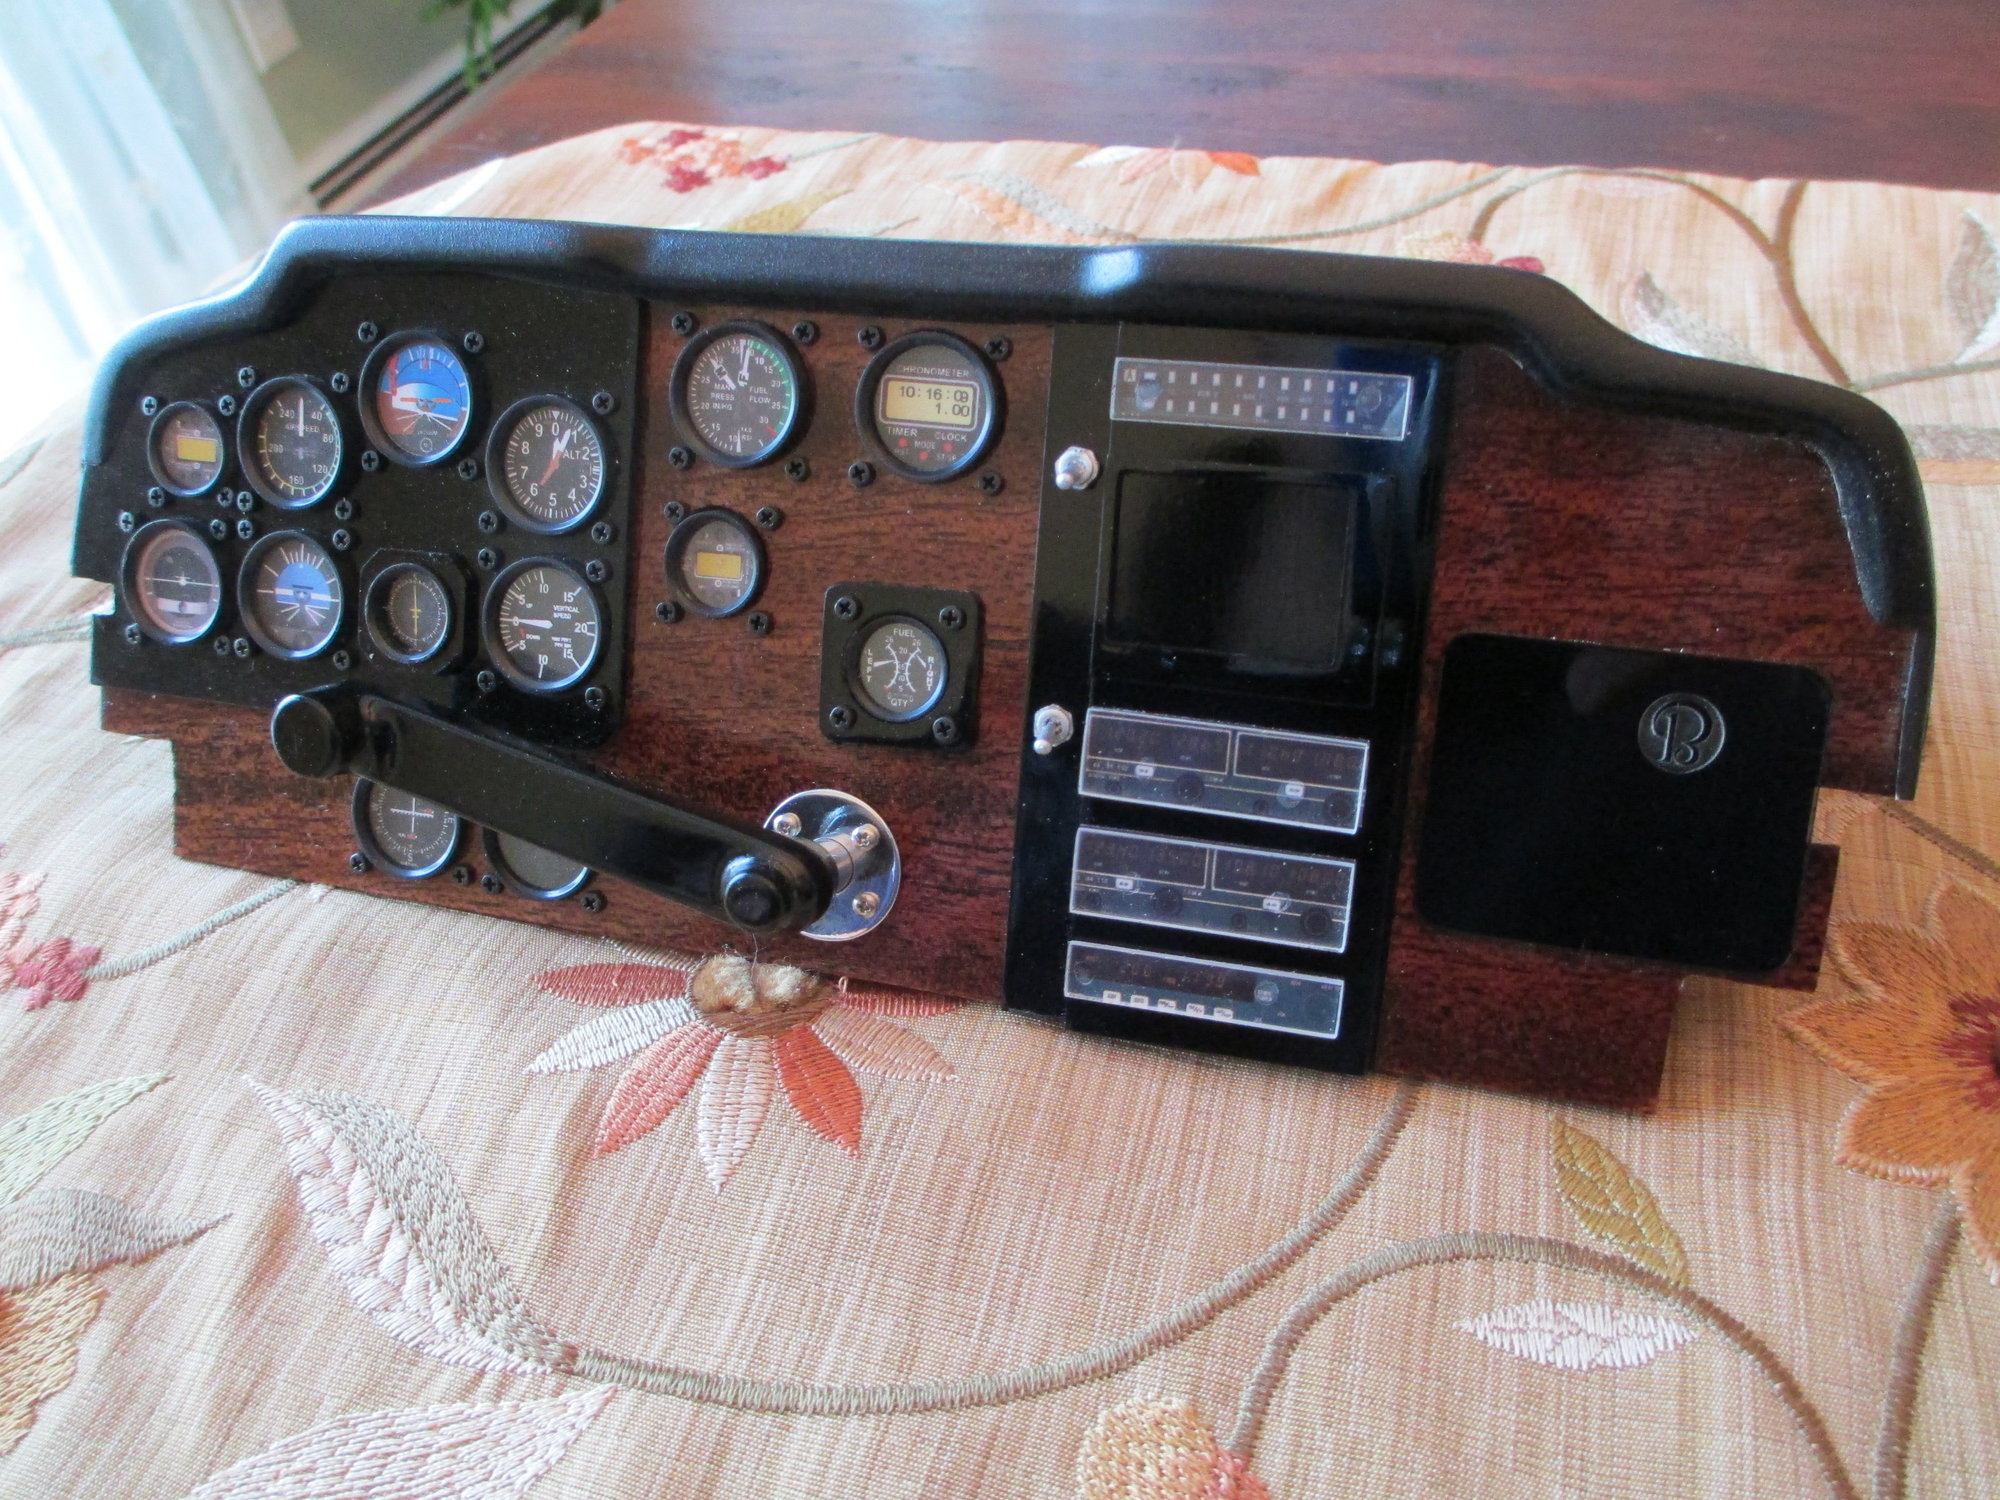
Little more progress made on the IP. The Turn and Slip Indicator gage is now in its correct orientation thanks to the keen eye from our friend from Finland, DINO. More work yet to come...

Last edited by VincentJ; 03-08-2021 at 03:45 PM.
Old 03-09-2021, 05:18 AM
  #1627  
FlyerInOKC
My Feedback: (6)
 
FlyerInOKC's Avatar
 
Join Date: Nov 2004
Location: Oklahoma City, OK
Posts: 14,163
Received 274 Likes on 239 Posts
Default

Looking good Vince!
Dino had me checking my IP. I started the airplane this week. The wing is one piece 84.5" span so it makes the building more of a challenge.


Last edited by FlyerInOKC; 03-09-2021 at 05:23 AM.
Old 03-09-2021, 09:04 AM
  #1628  
VincentJ
Thread Starter
 
VincentJ's Avatar
 
Join Date: Mar 2011
Location: Peterborough, NH
Posts: 4,582
Received 120 Likes on 108 Posts
Default

Very nice work there Mike! You're building in "style" in front of that large flat screen TV...
Old 03-09-2021, 09:19 AM
  #1629  
VincentJ
Thread Starter
 
VincentJ's Avatar
 
Join Date: Mar 2011
Location: Peterborough, NH
Posts: 4,582
Received 120 Likes on 108 Posts
Default


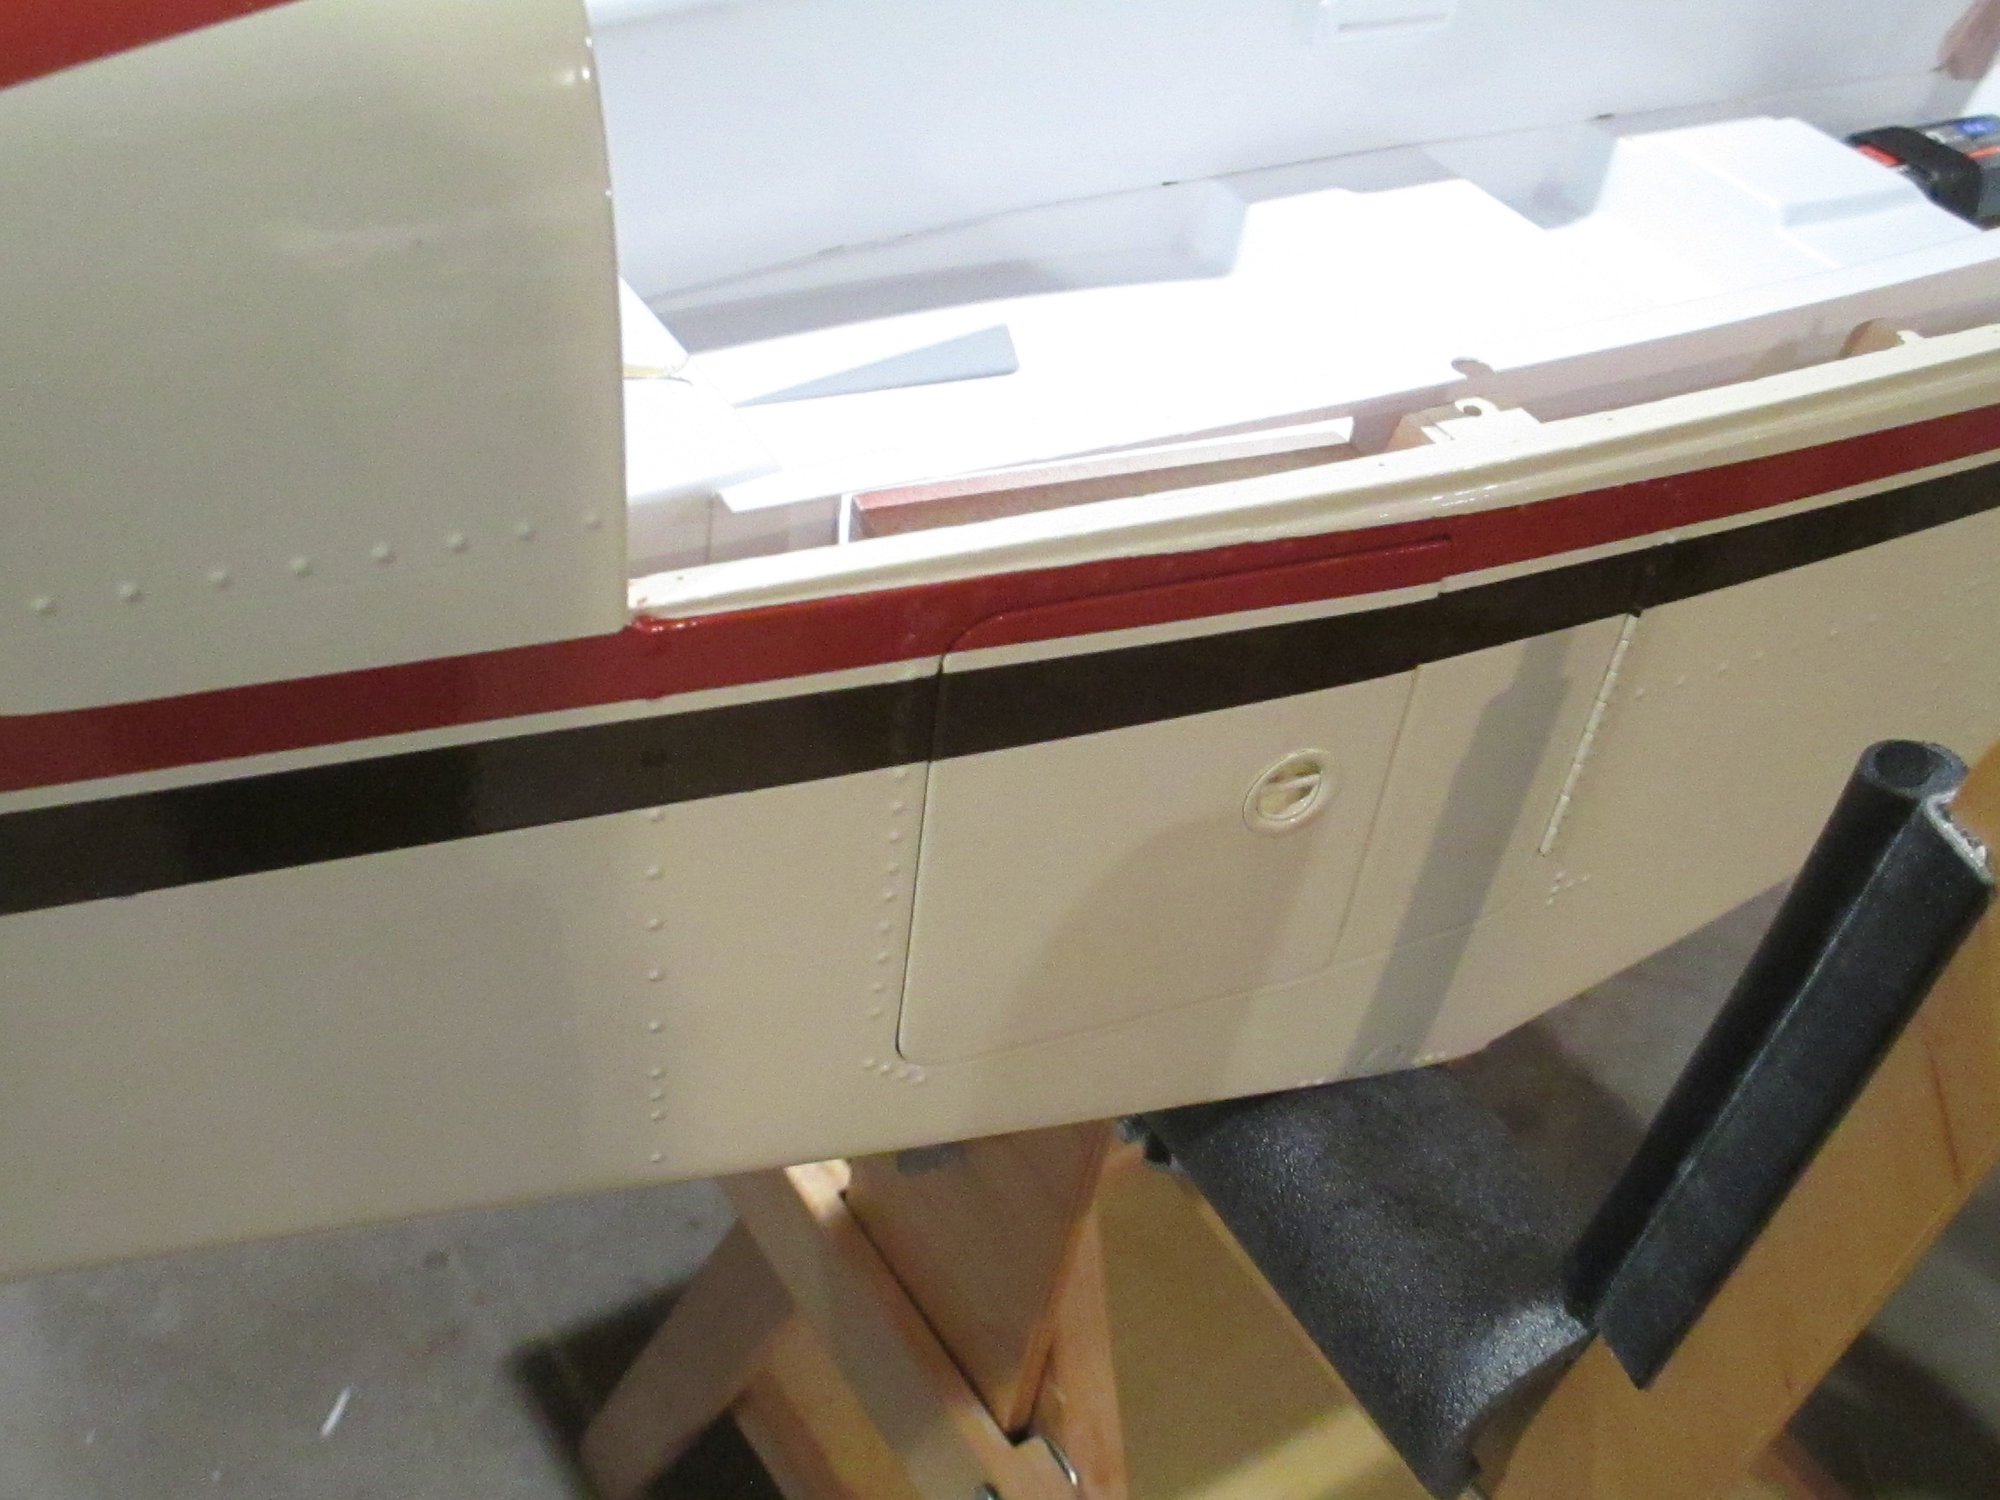
Baggage compartment door is now operational. Hinges were epoxied in place and the door opens and closes without any interference.


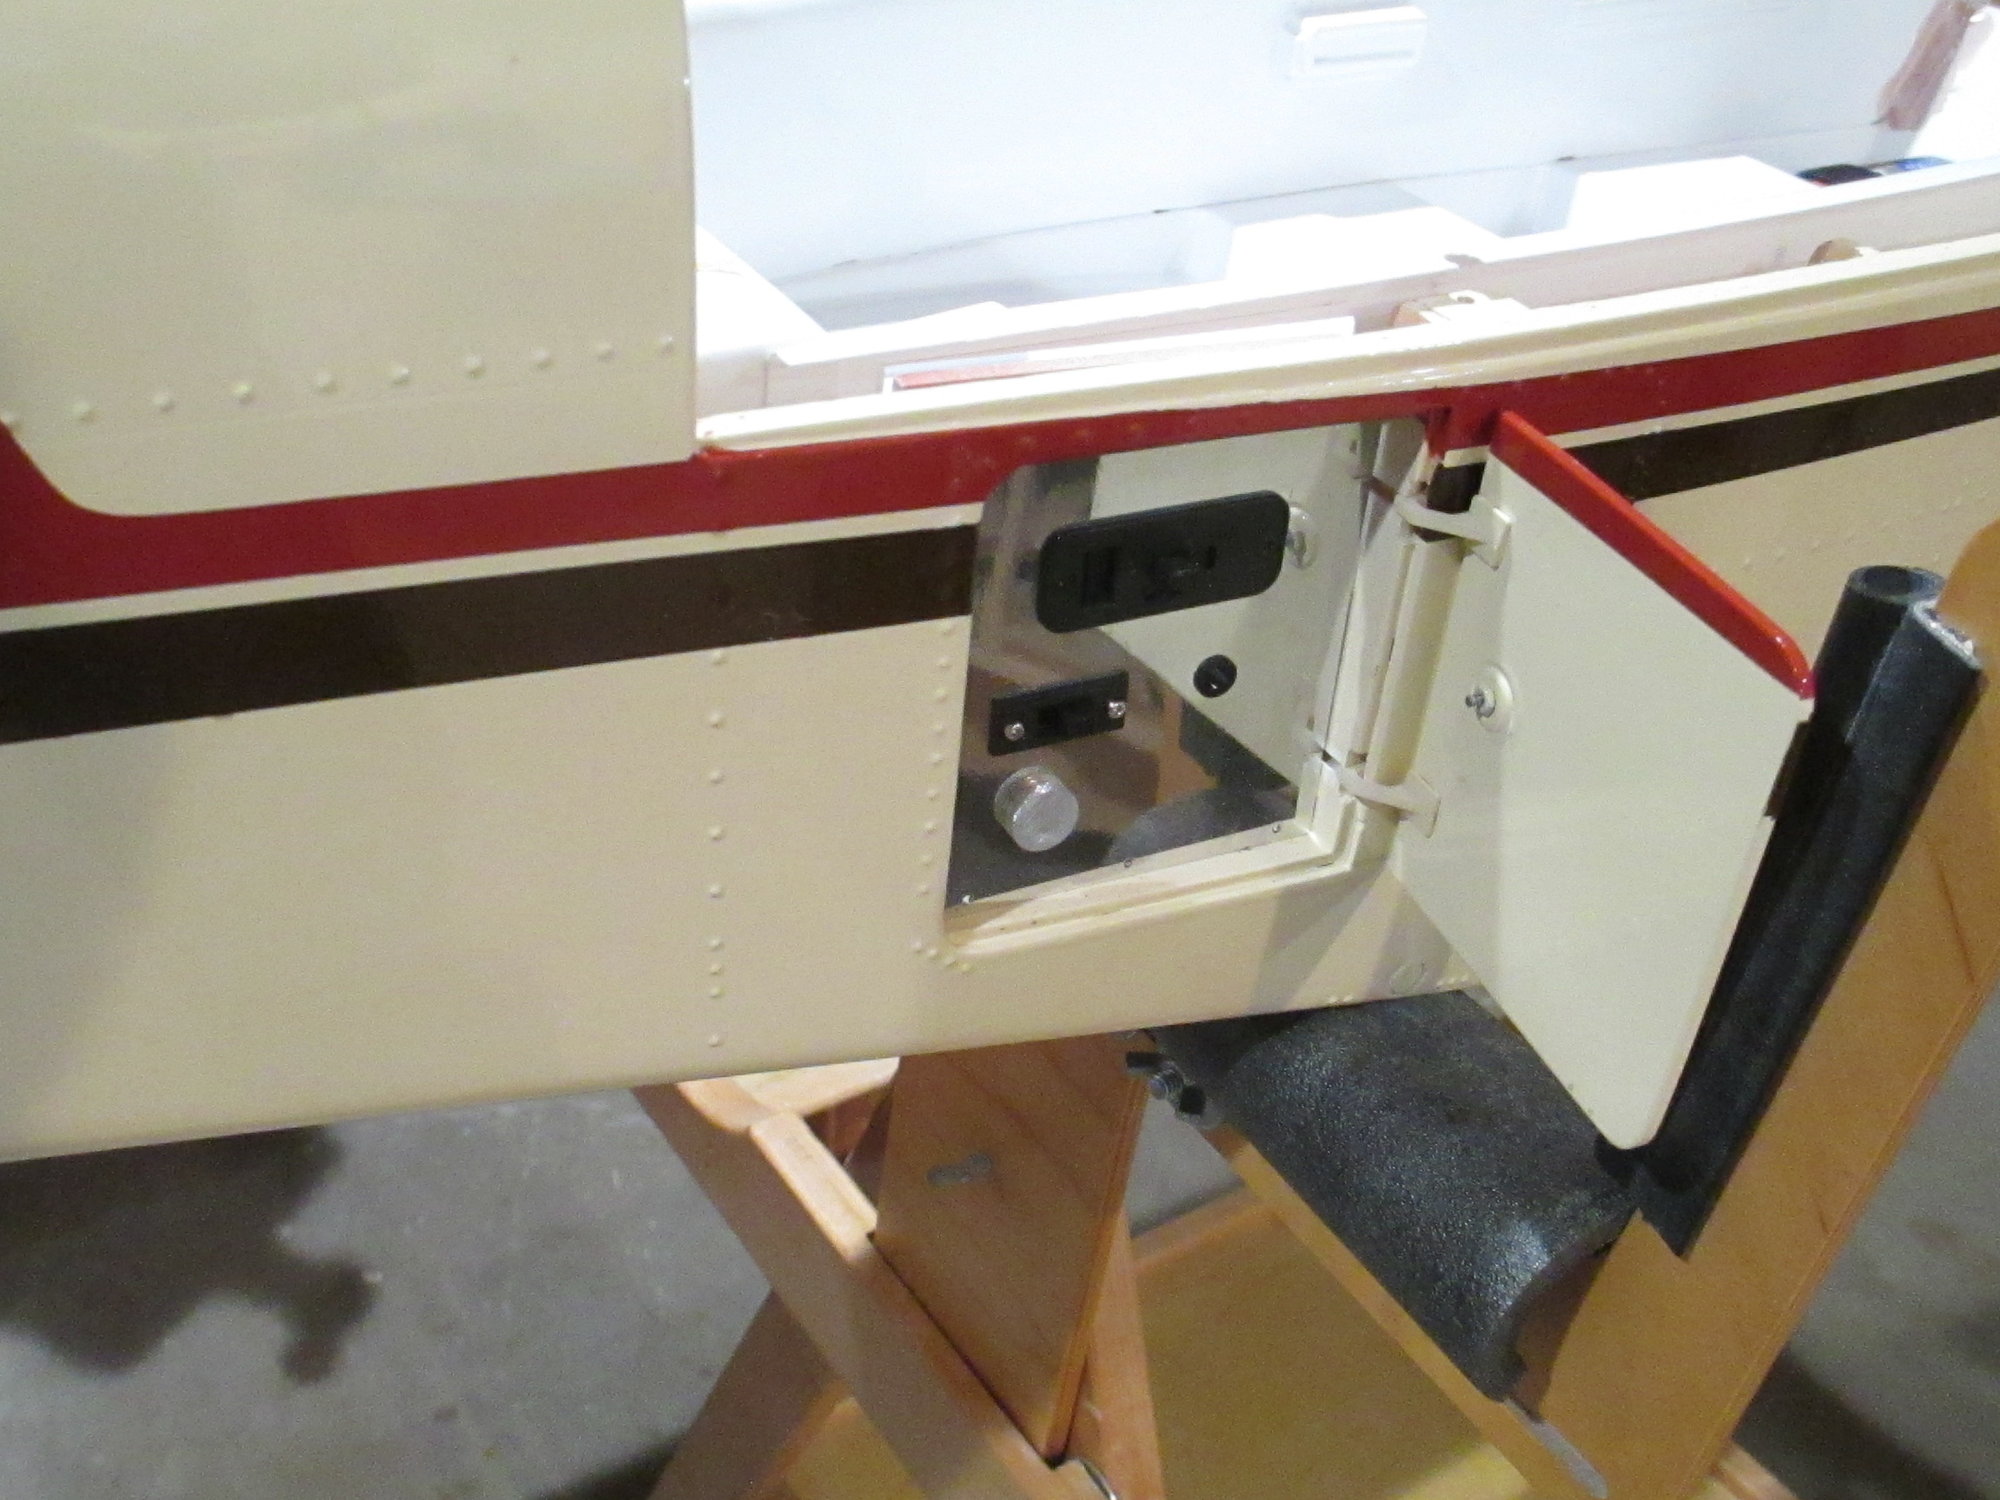
All of the switches as well as the fuel dot are now hidden.


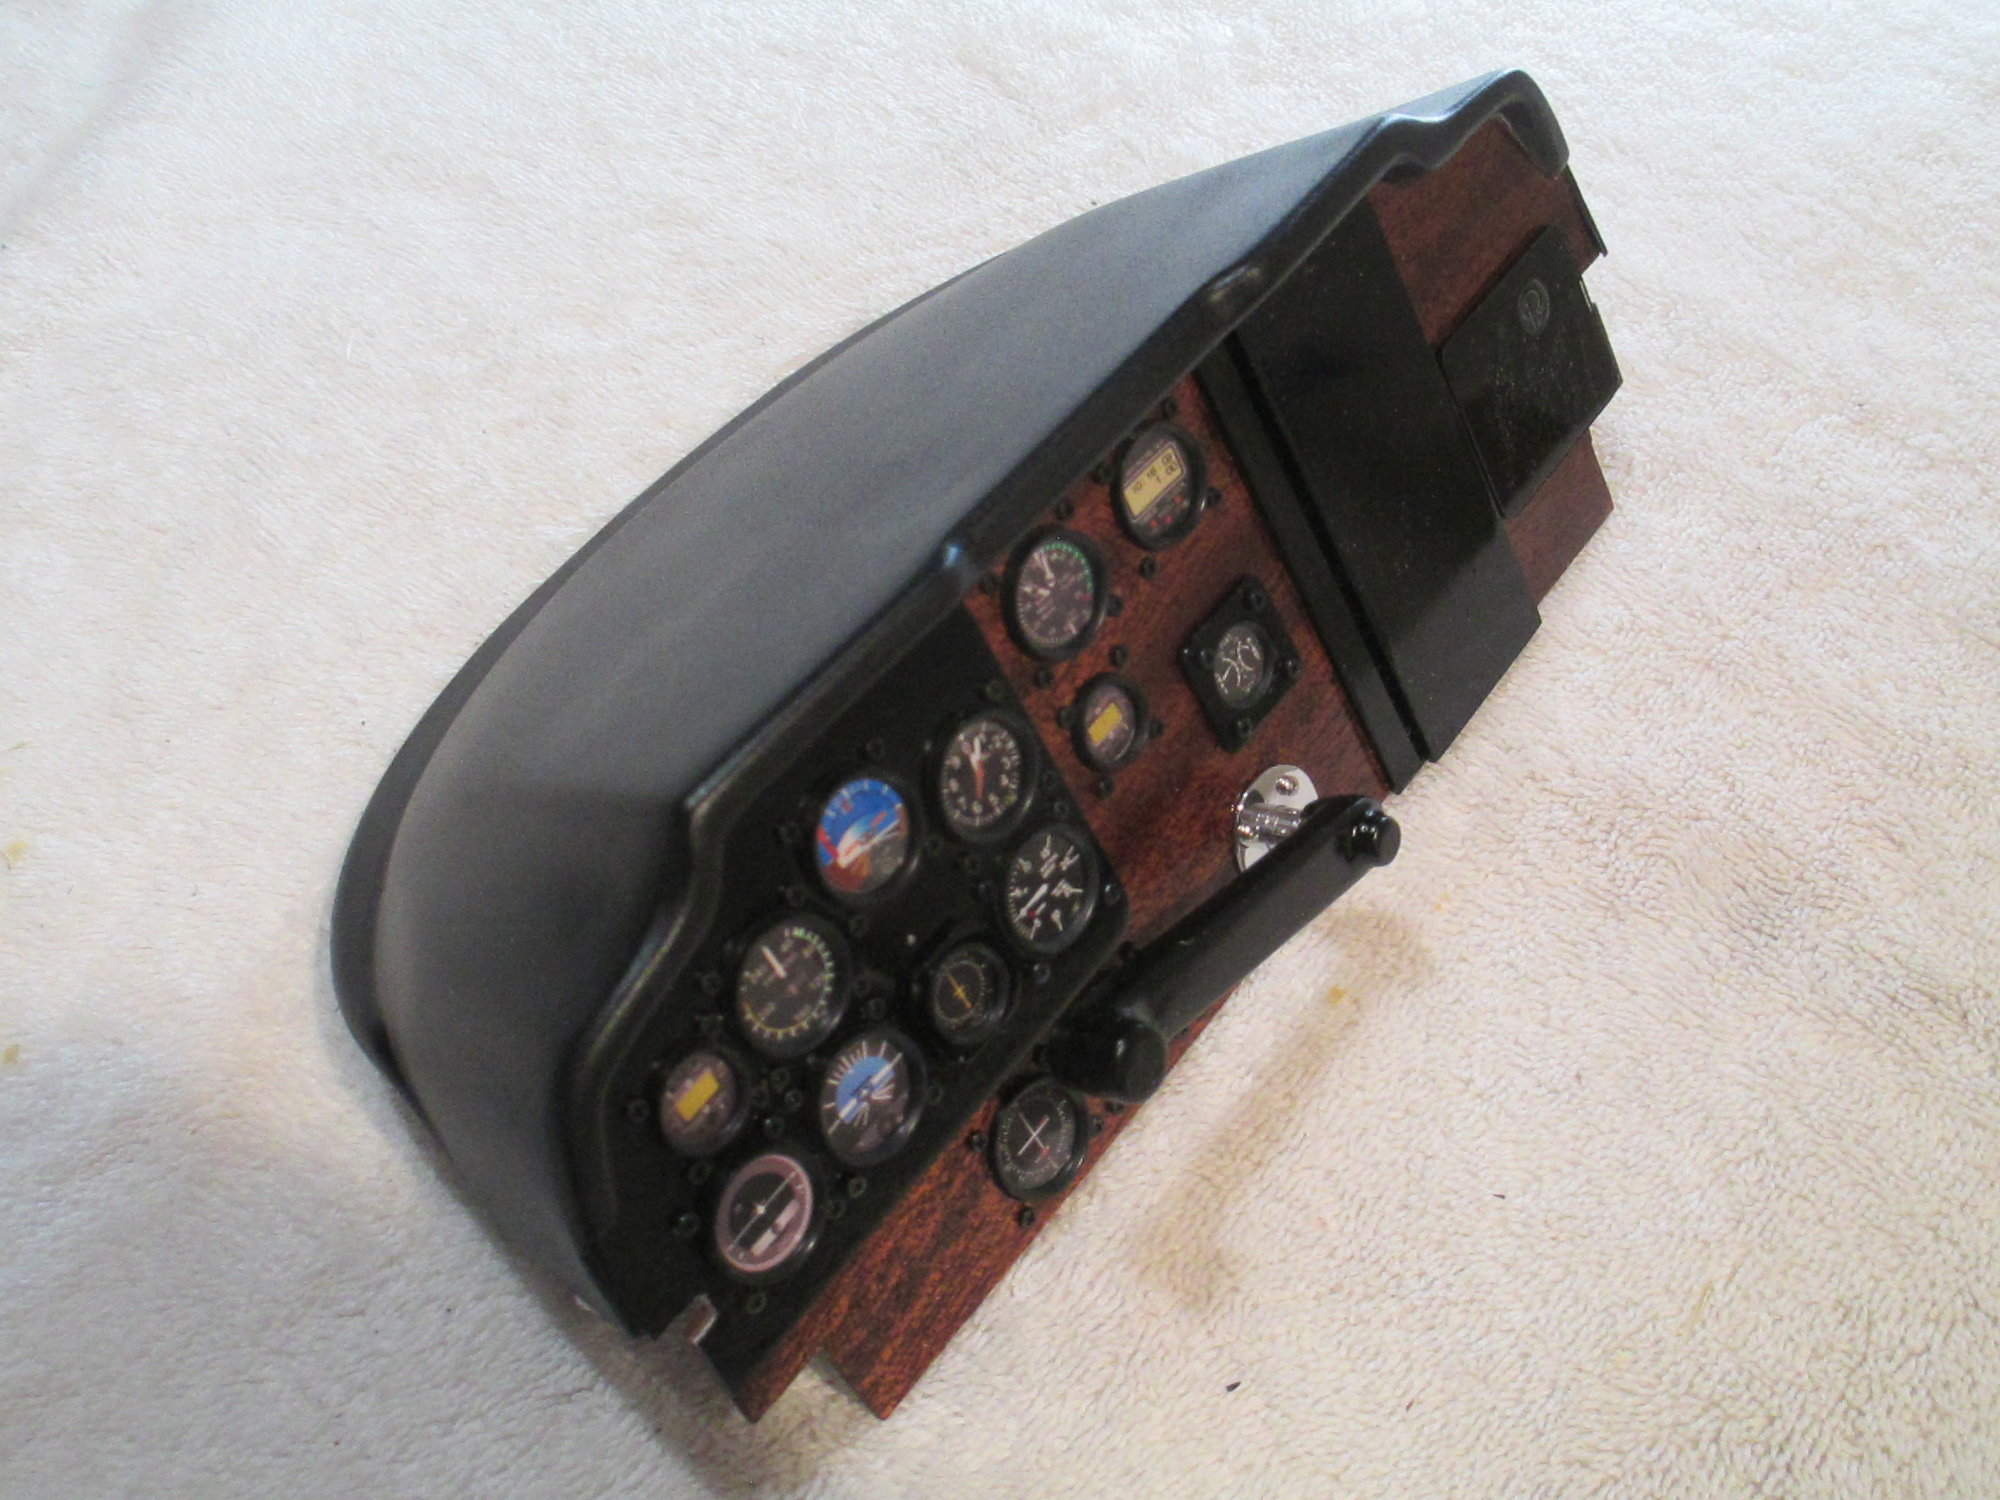
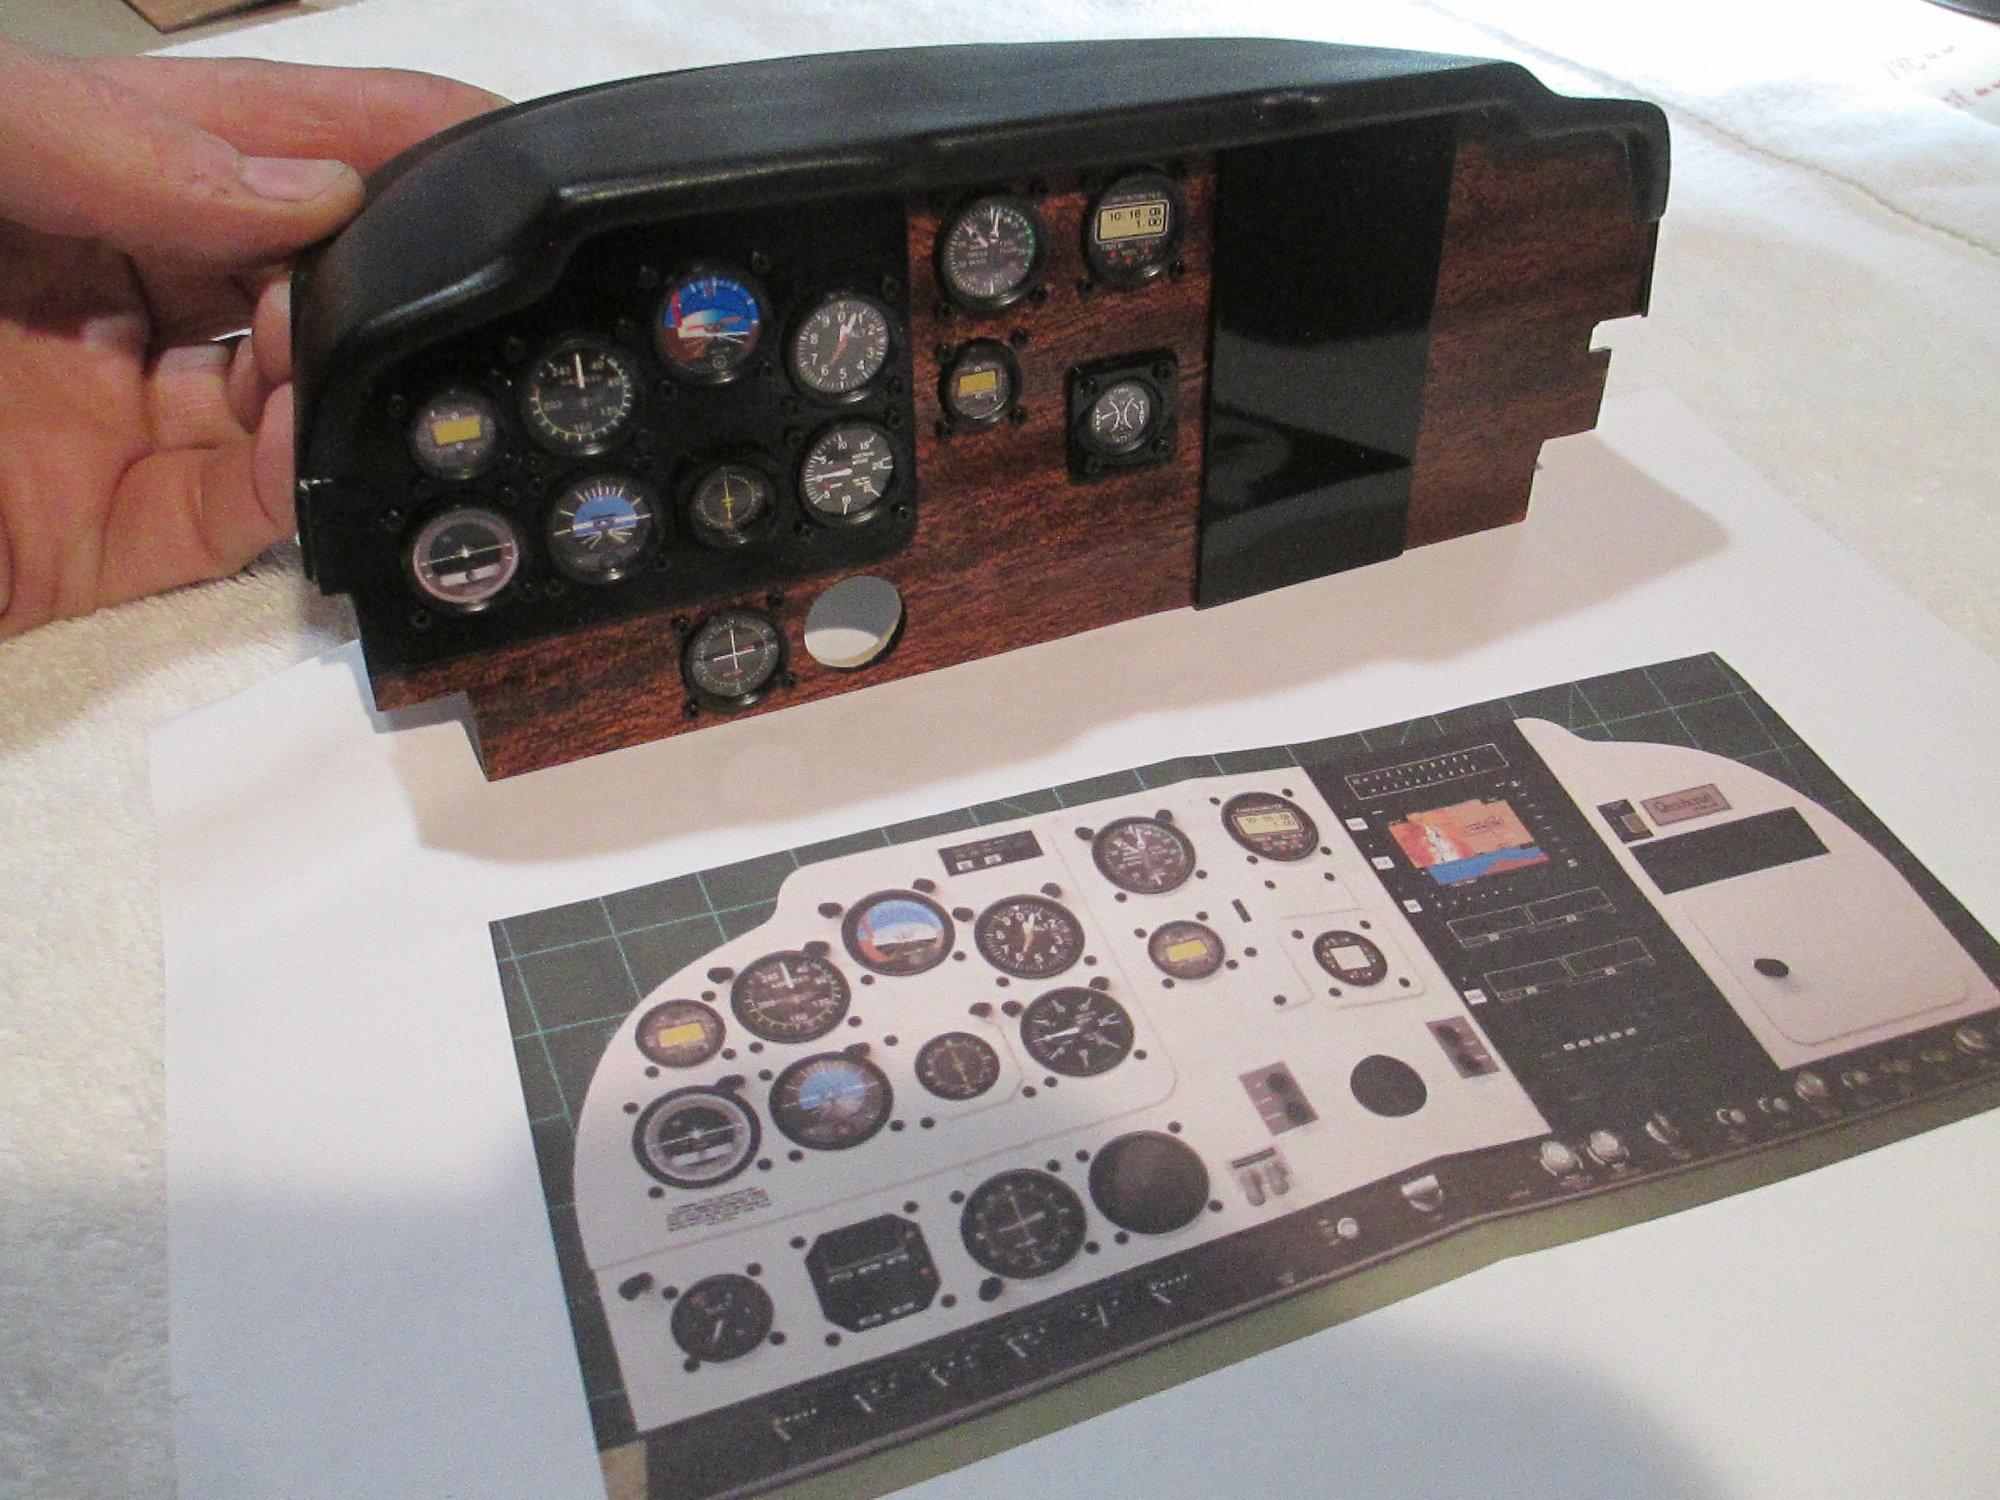
Work is progressing nicely on the IP. Many hours spent to get it to this point. I am currently making the yoke.


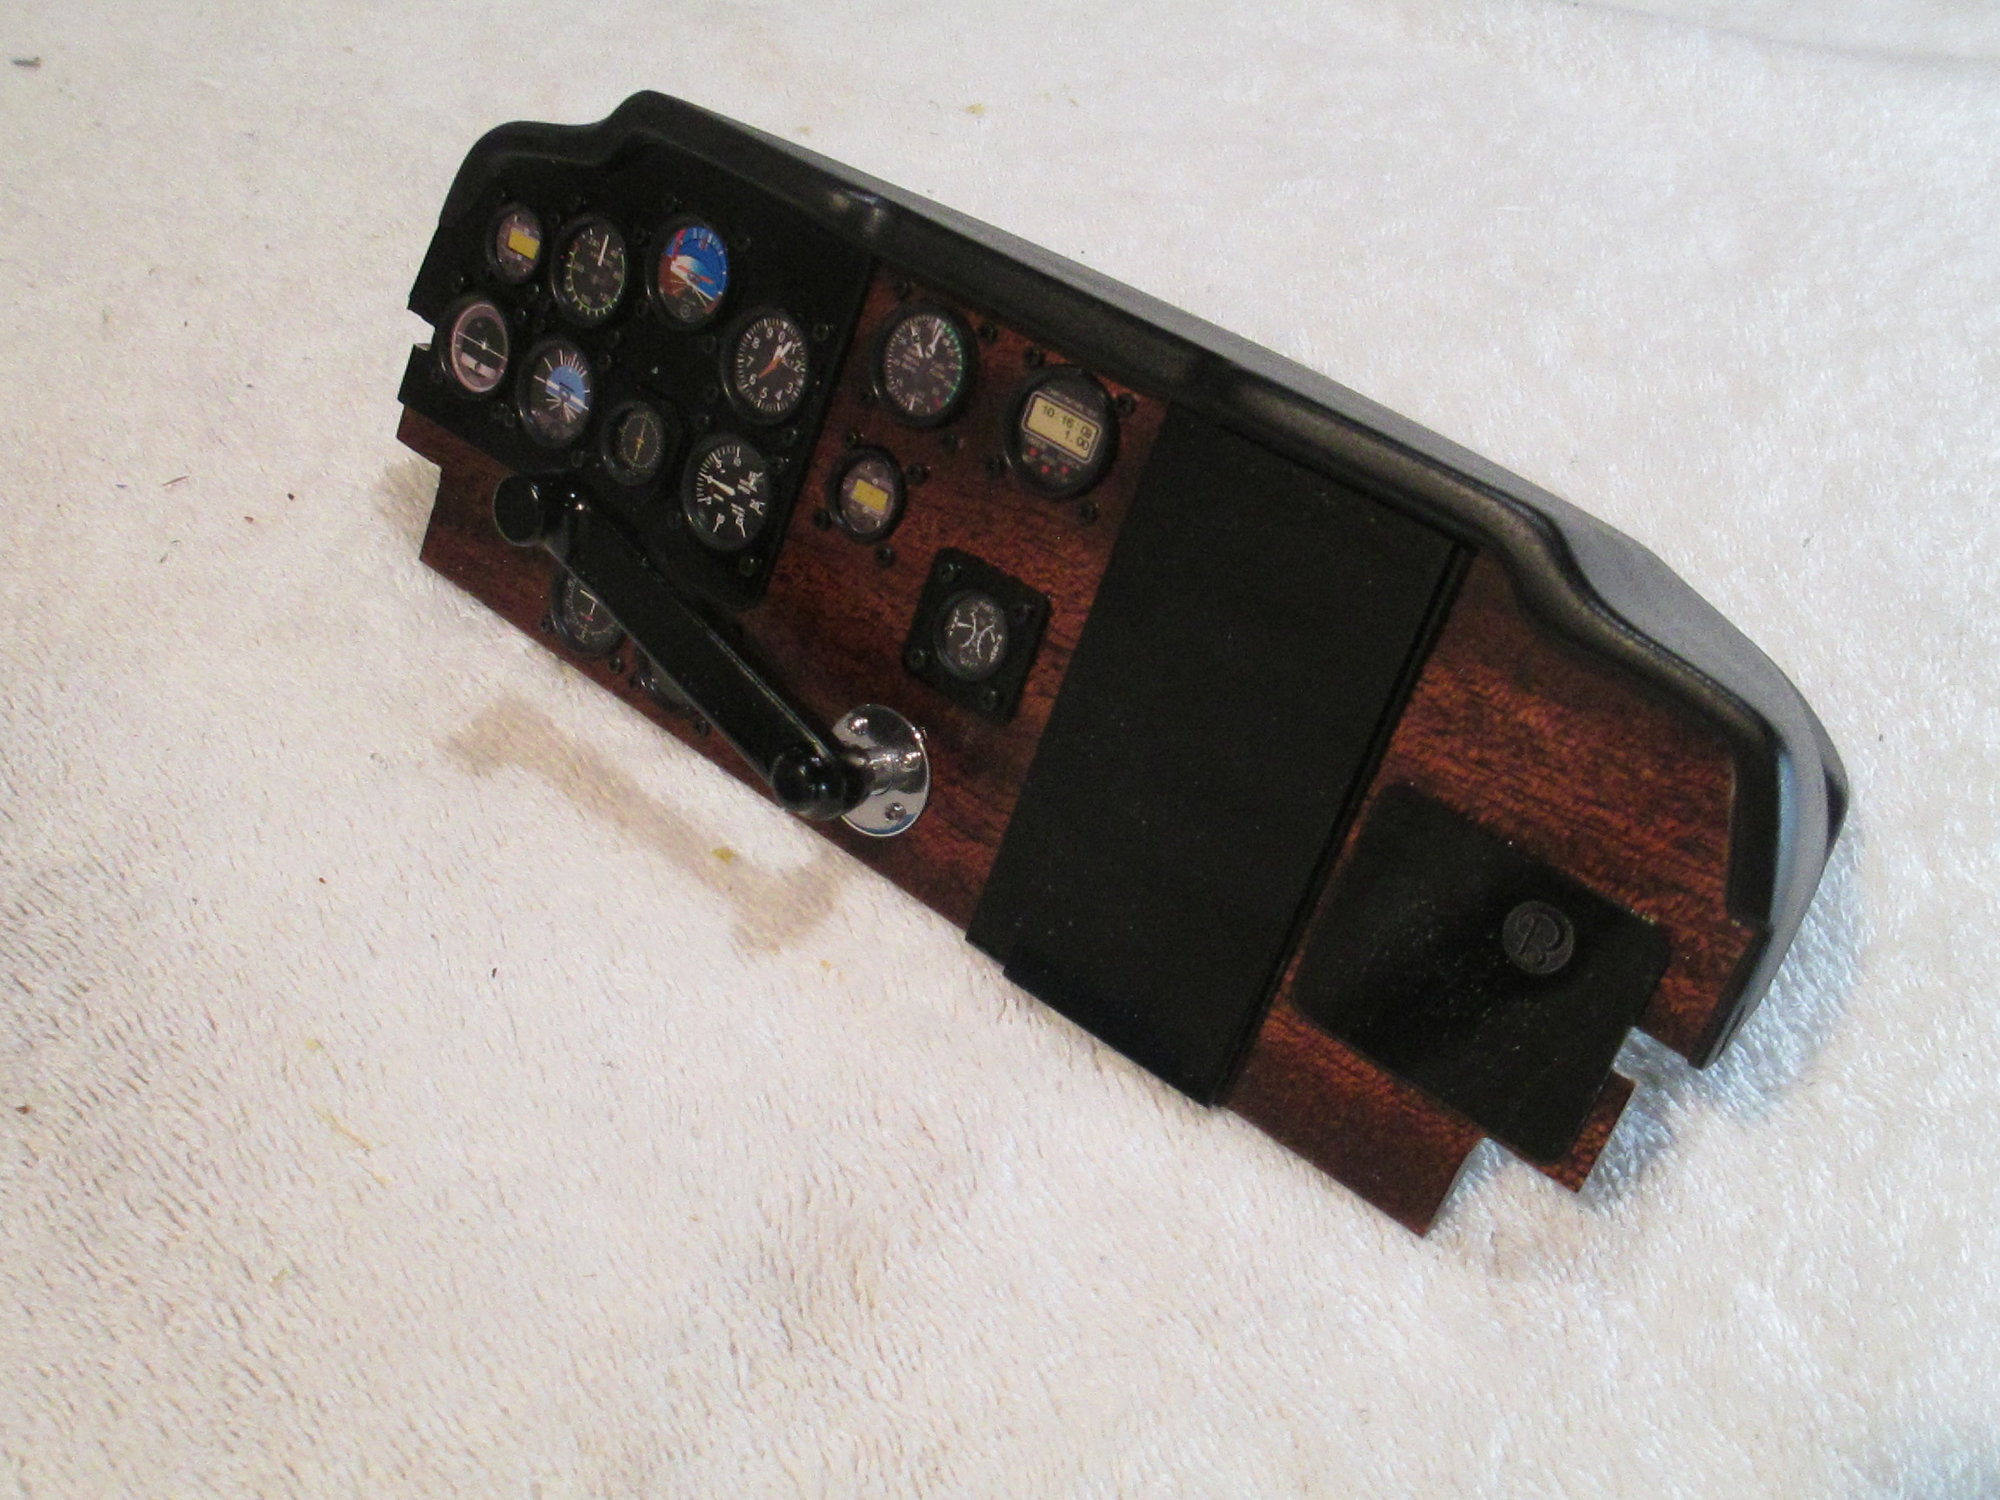
All of the shiny bits that secure the yoke arm were cut from aluminum sheet stock then polished.


Old 03-09-2021, 10:52 AM
  #1630  
FlyerInOKC
My Feedback: (6)
 
FlyerInOKC's Avatar
 
Join Date: Nov 2004
Location: Oklahoma City, OK
Posts: 14,163
Received 274 Likes on 239 Posts
Default

Nice work on the baggage door and panel additions! I see a receiver switch with charging receptacle and a second switch I am guessing is for the light package, is the phono jack to charge a separate battery for the light package?

The big screen normally stayed off when I was working on the wing, I didn't need the distraction. I have been asked to do a build thread but with all the delays between building times I'm not sure I would hold anyone's interest.
Old 03-09-2021, 11:07 AM
  #1631  
VincentJ
Thread Starter
 
VincentJ's Avatar
 
Join Date: Mar 2011
Location: Peterborough, NH
Posts: 4,582
Received 120 Likes on 108 Posts
Default

Originally Posted by FlyerInOKC
Nice work on the baggage door and panel additions! I see a receiver switch with charging receptacle and a second switch I am guessing is for the light package, is the phono jack to charge a separate battery for the light package?

The big screen normally stayed off when I was working on the wing, I didn't need the distraction. I have been asked to do a build thread but with all the delays between building times I'm not sure I would hold anyone's interest.
Mike, the larger (top) switch is for the navigational lights. The nav lights has its own battery which is charged from the jack in the switch. The smaller switch below is the main on/off switch for the Bonanza's receiver, Spektrum calls it a "soft switch", in the event of a switch failure it stays on.
http://spektrumrc.com/Products/Defau...ProdID=SPM6820

To the right of the soft switch isn't a phono jack, it's a LED light indicating if the kill switch for the DLE-20 engine is on or off.

Last edited by VincentJ; 03-09-2021 at 11:14 AM.
Old 03-09-2021, 11:19 AM
  #1632  
FlyerInOKC
My Feedback: (6)
 
FlyerInOKC's Avatar
 
Join Date: Nov 2004
Location: Oklahoma City, OK
Posts: 14,163
Received 274 Likes on 239 Posts
Default

Thanks Vince! My TF 182 has behind it's baggage door a receiver switch with charging receptacle, light set switch, battery compartment for a small LiPo to power the lights (It allows for easy removal for safe charging), and a remote glow plug receptacle for powering the glow plug when starting the ST .75 engine. Anytime I can keep the digits away from the spinning blade up front the better I like it. The tank is filler thru a DuBro Kwik-fill Fueling valve attached to the bottom of the firewall.
Old 03-10-2021, 01:19 PM
  #1633  
VincentJ
Thread Starter
 
VincentJ's Avatar
 
Join Date: Mar 2011
Location: Peterborough, NH
Posts: 4,582
Received 120 Likes on 108 Posts
Default

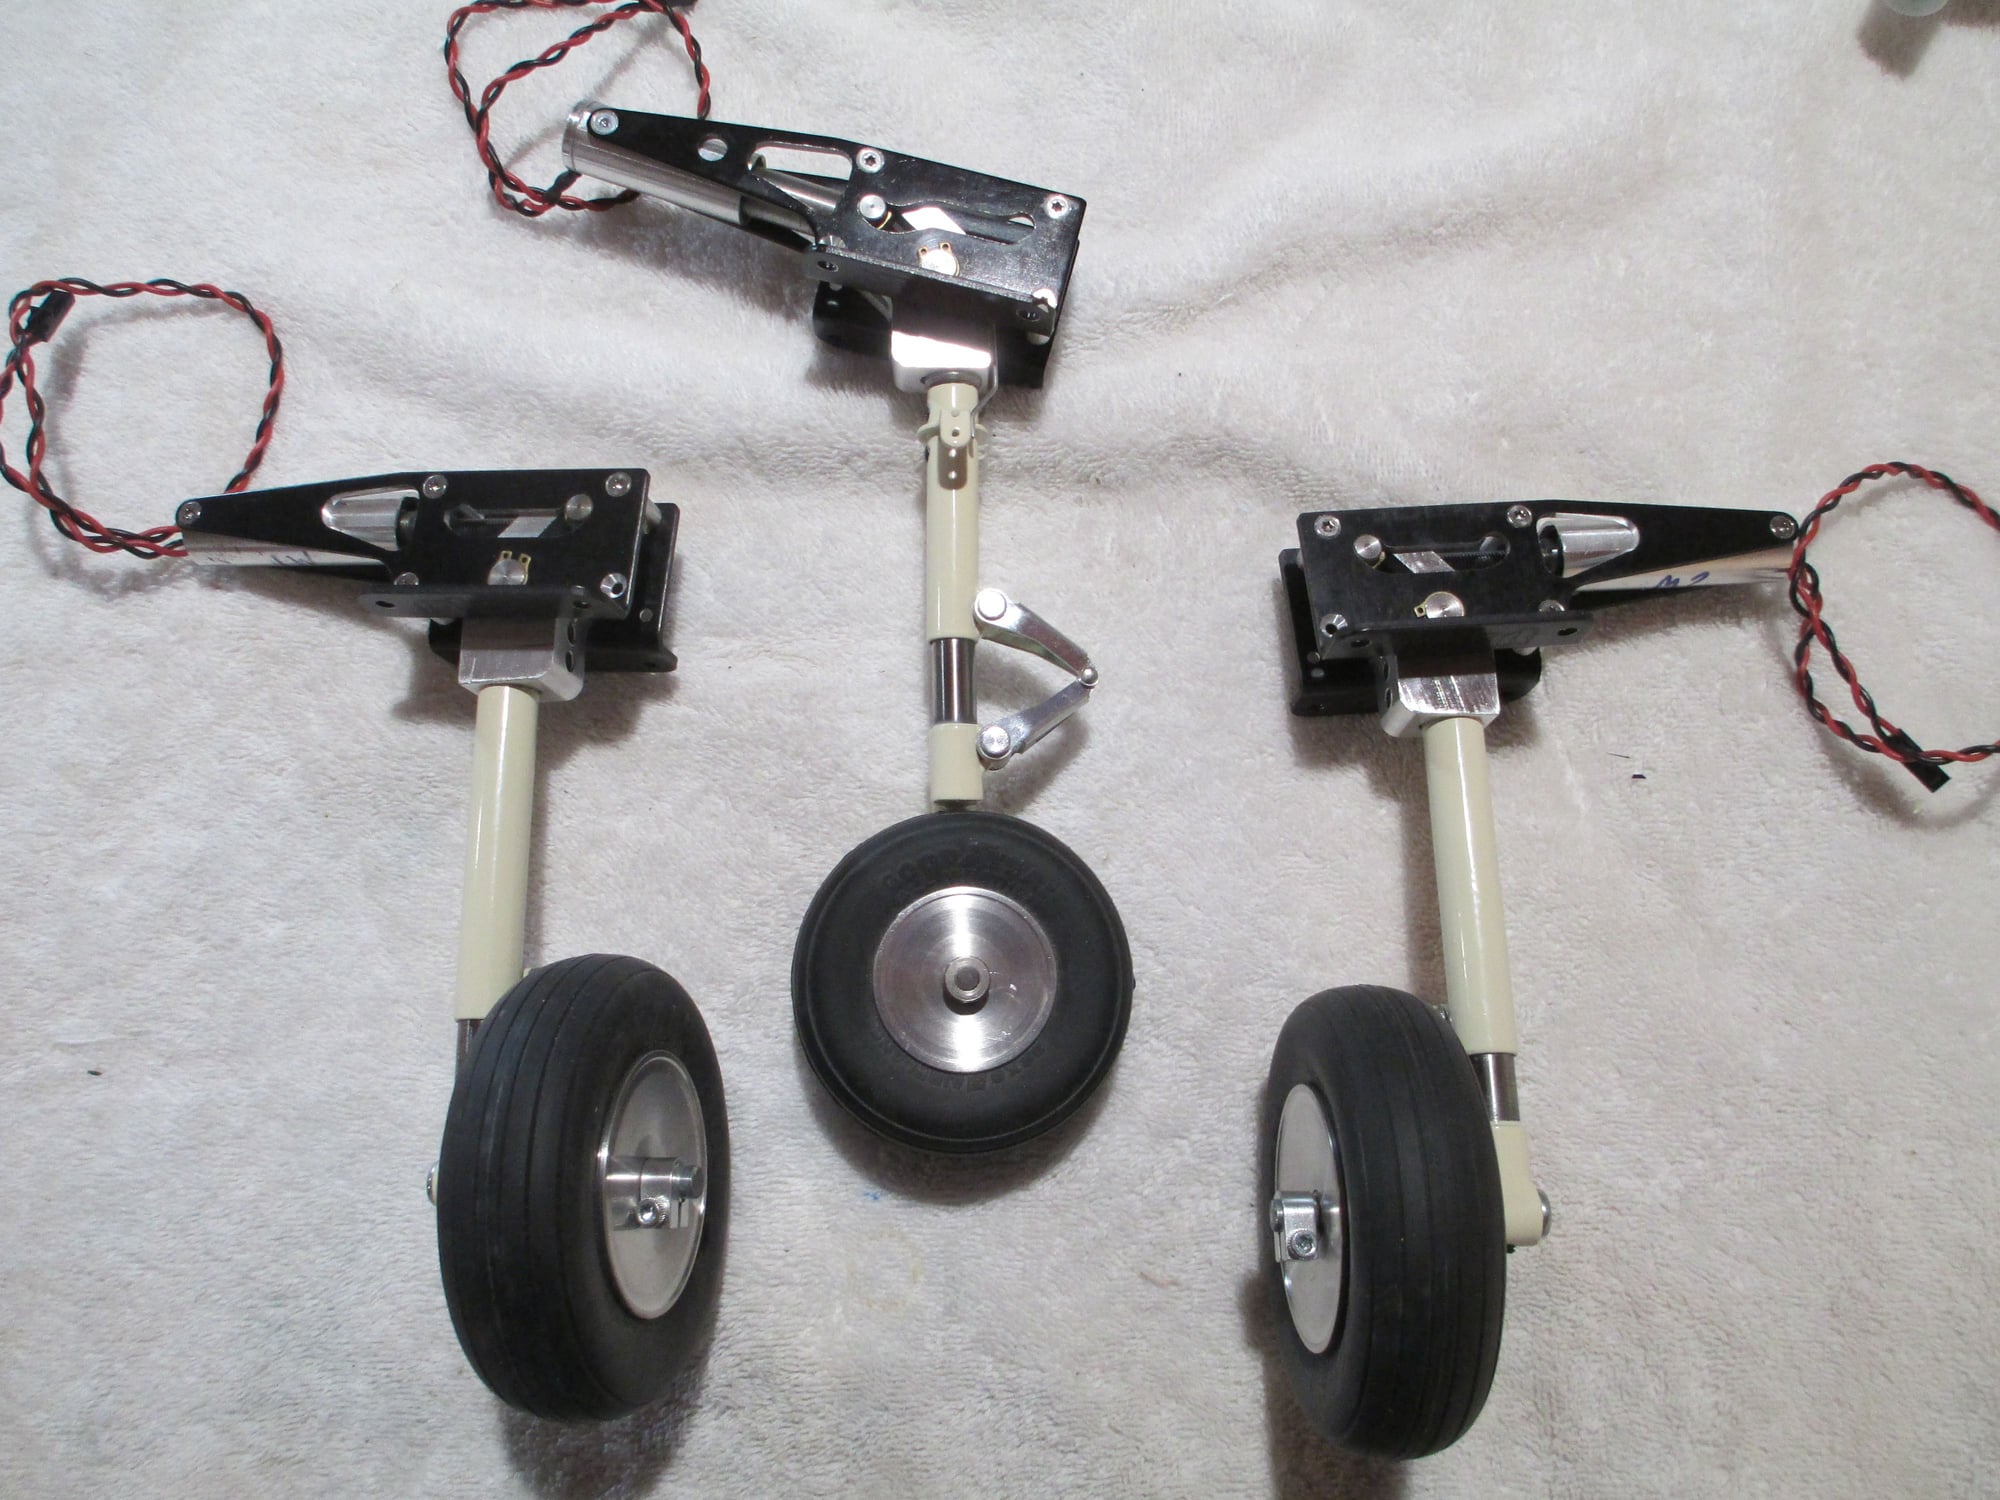
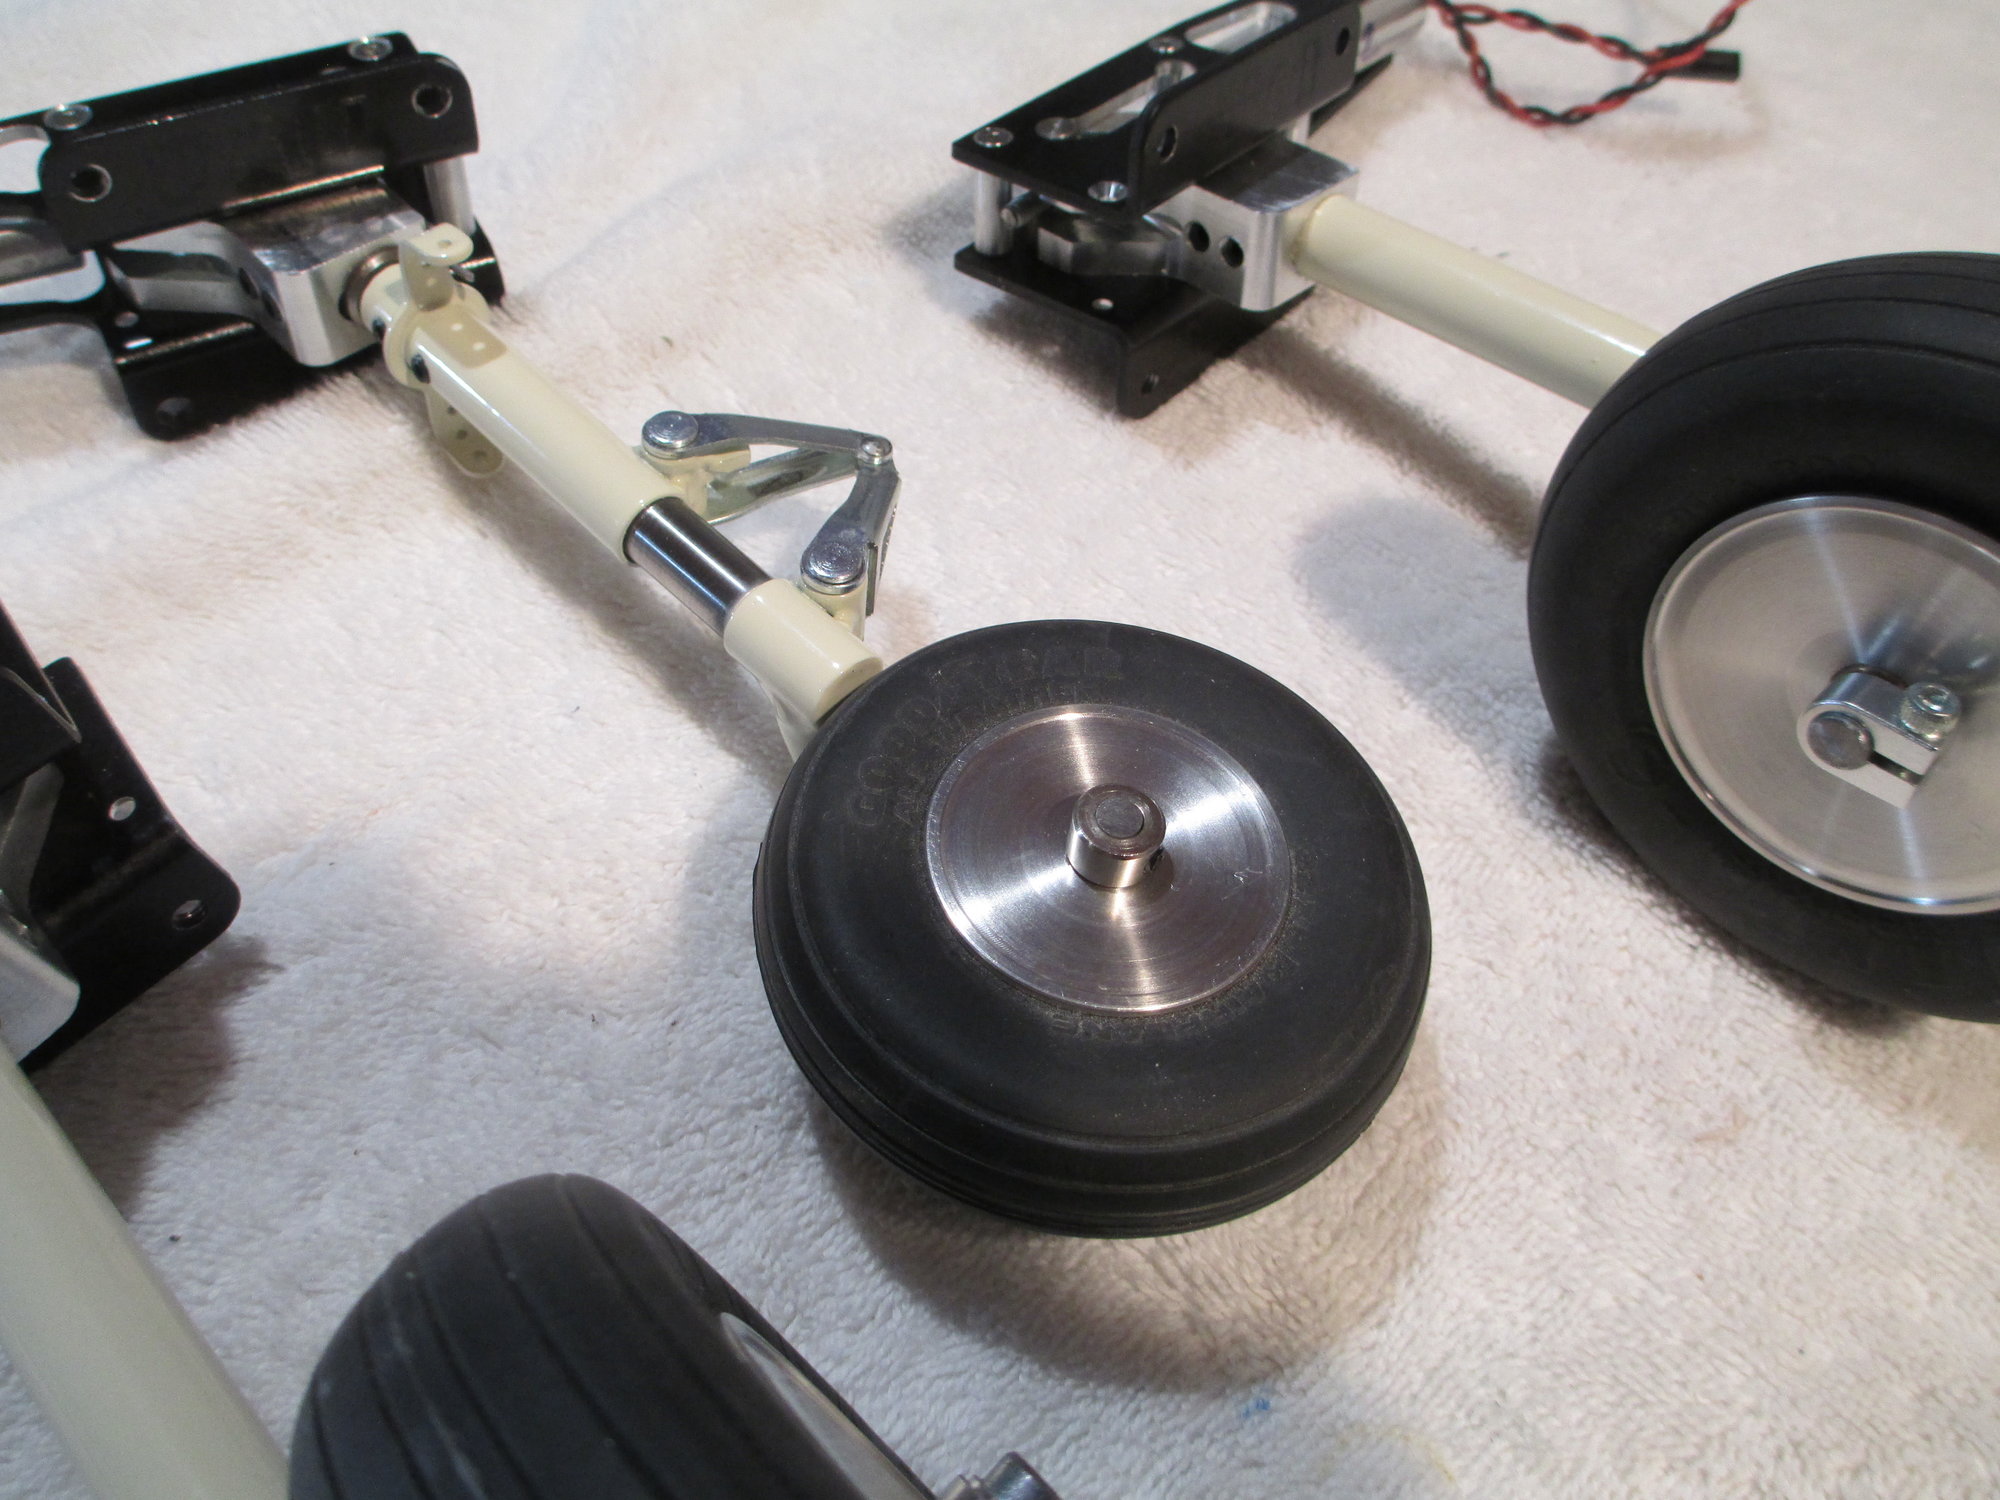
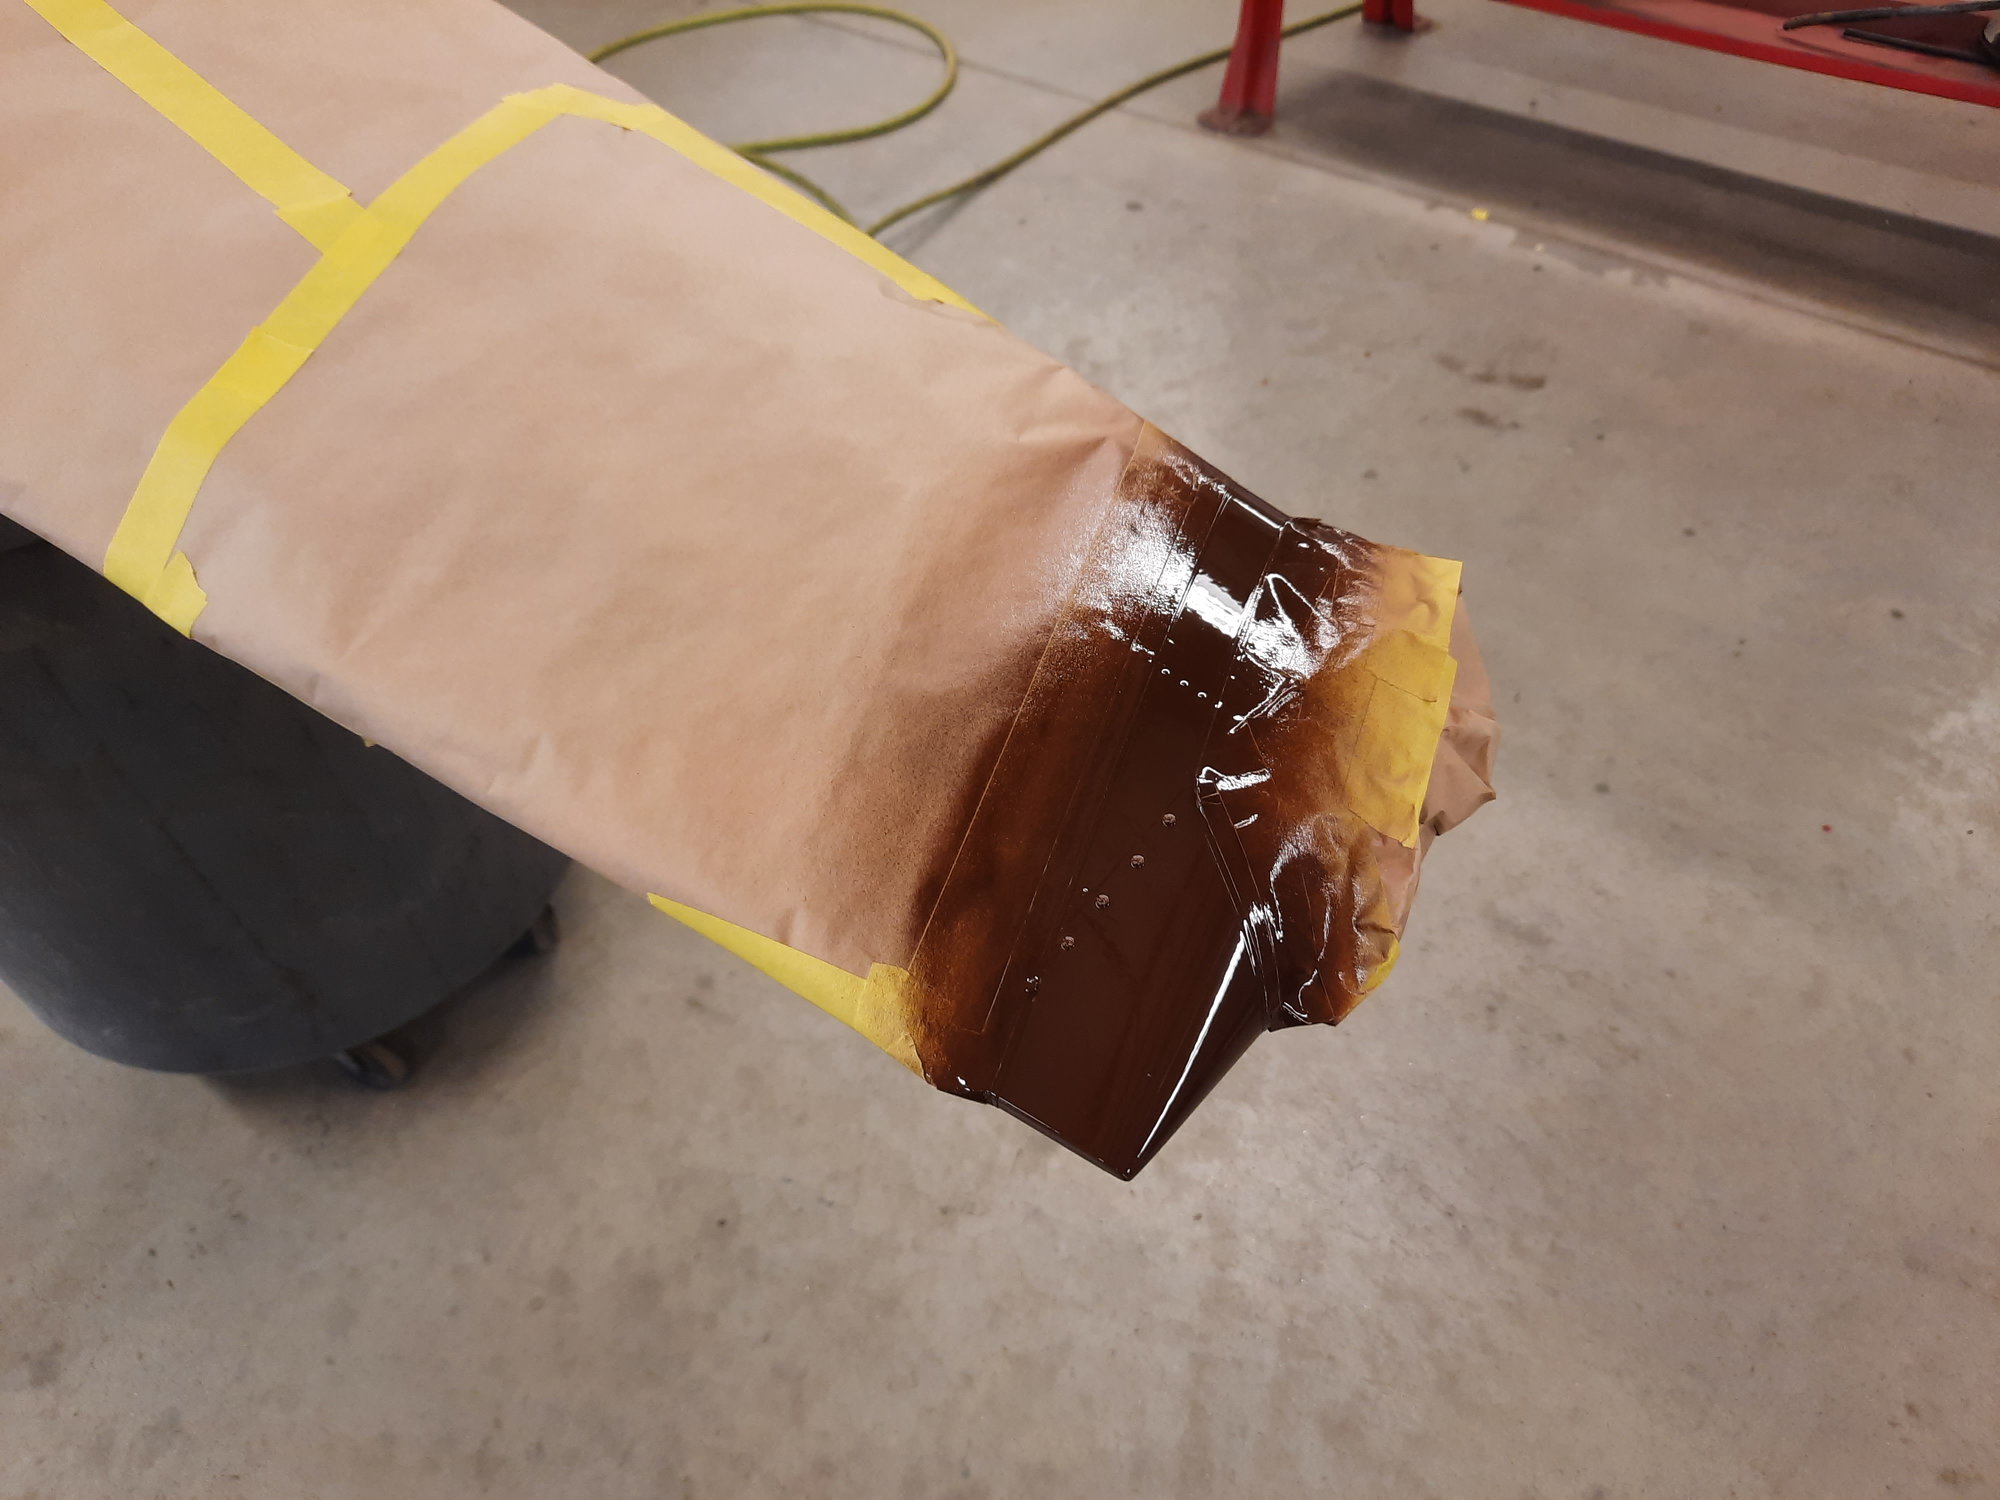
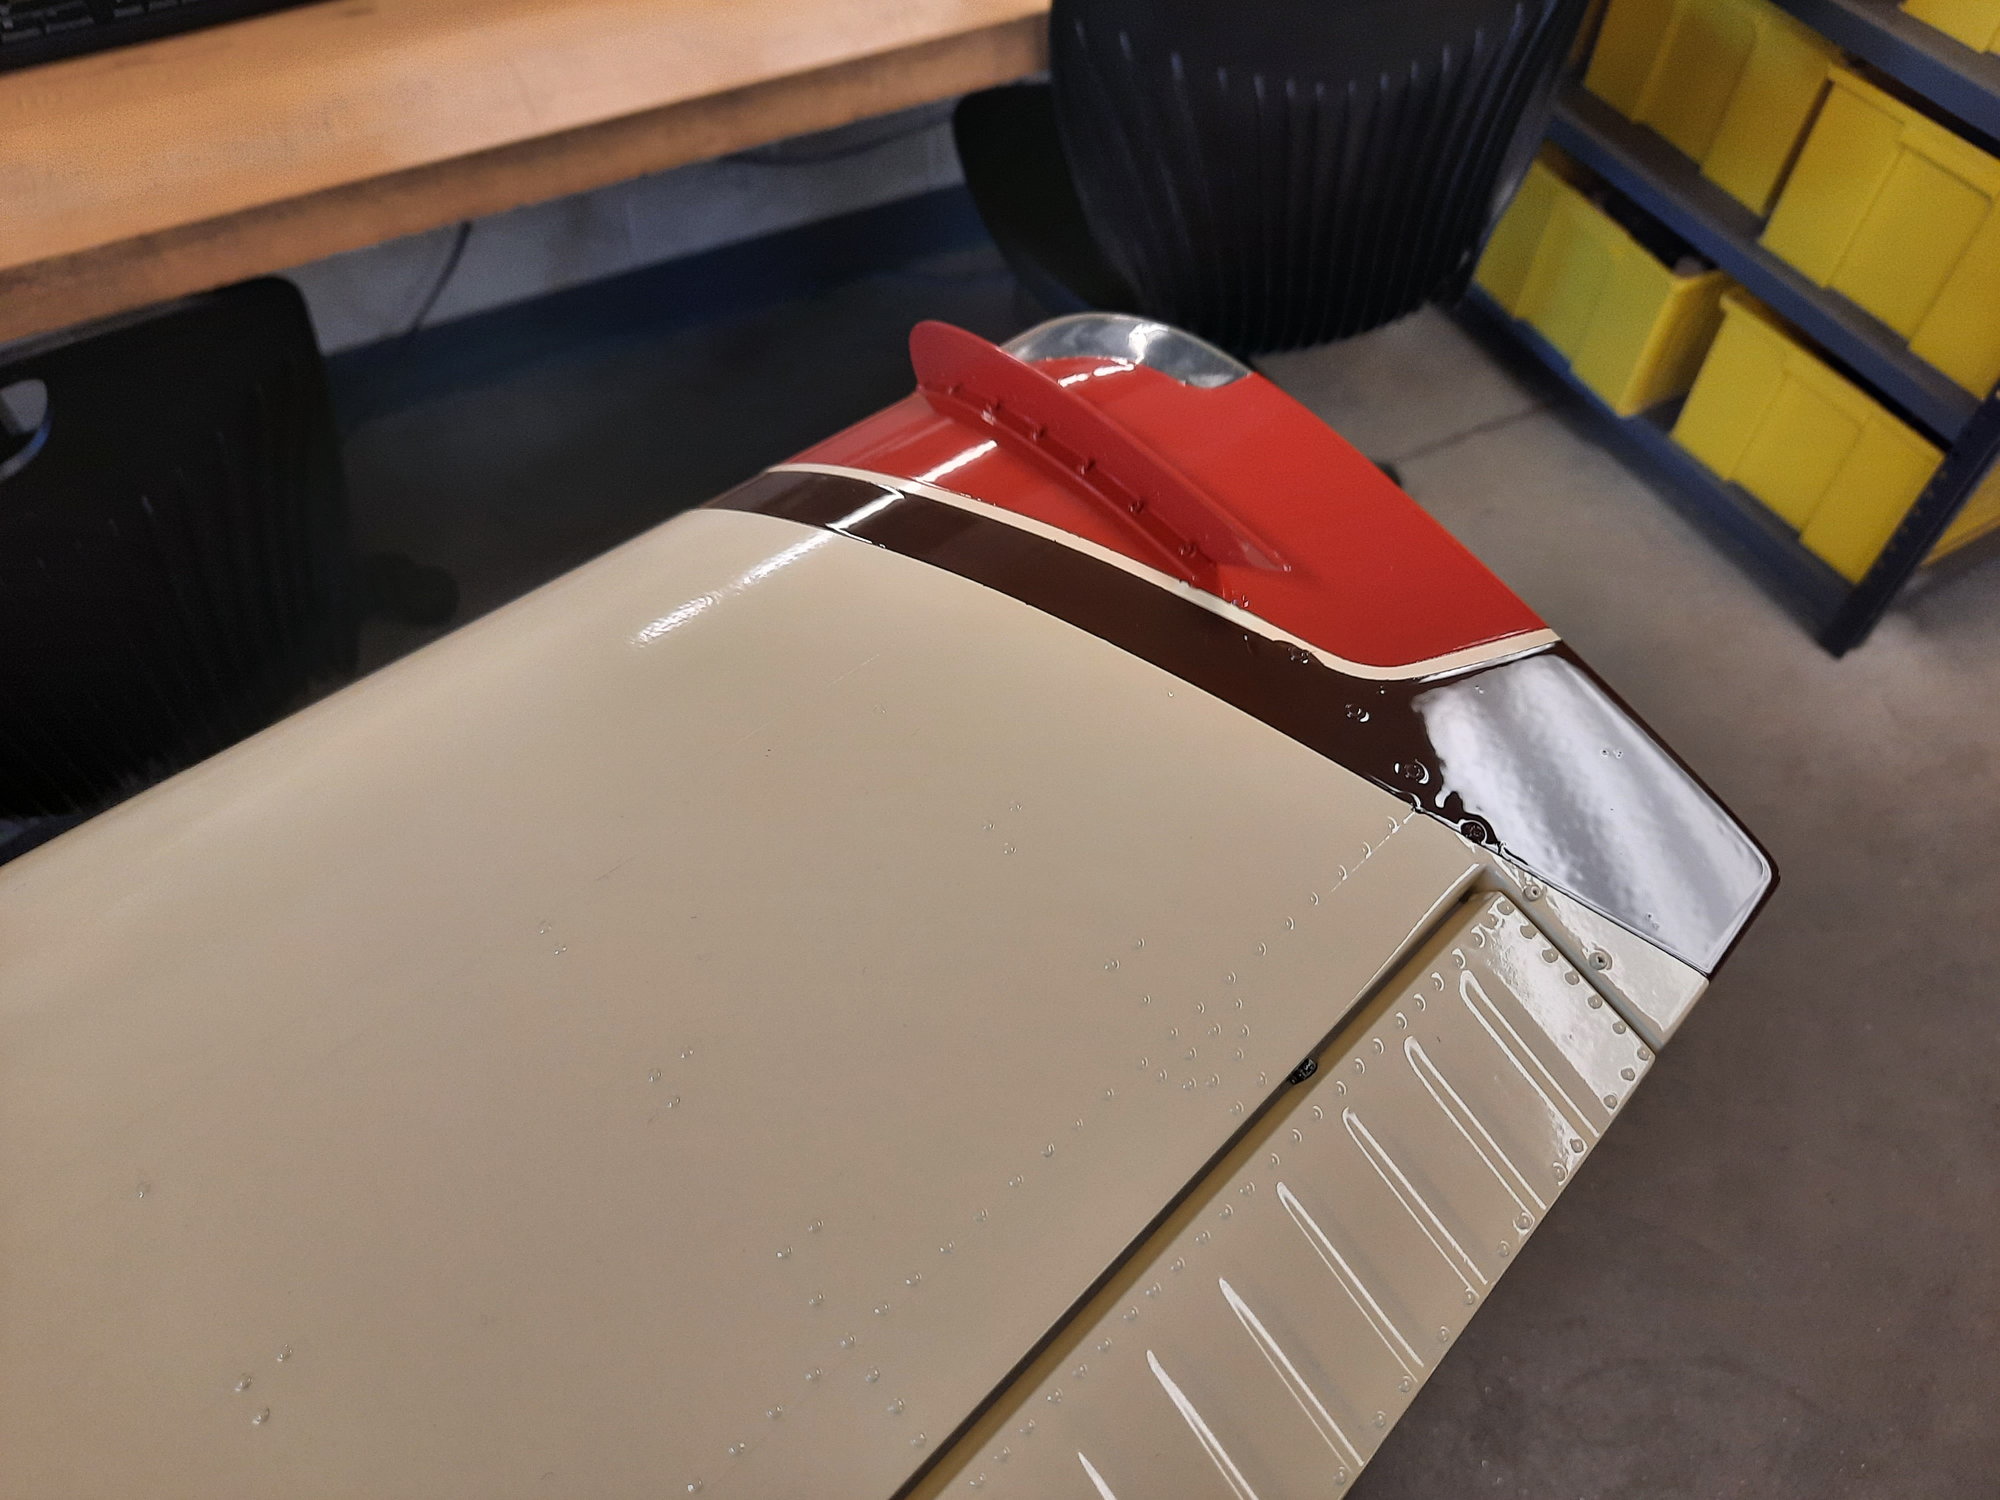
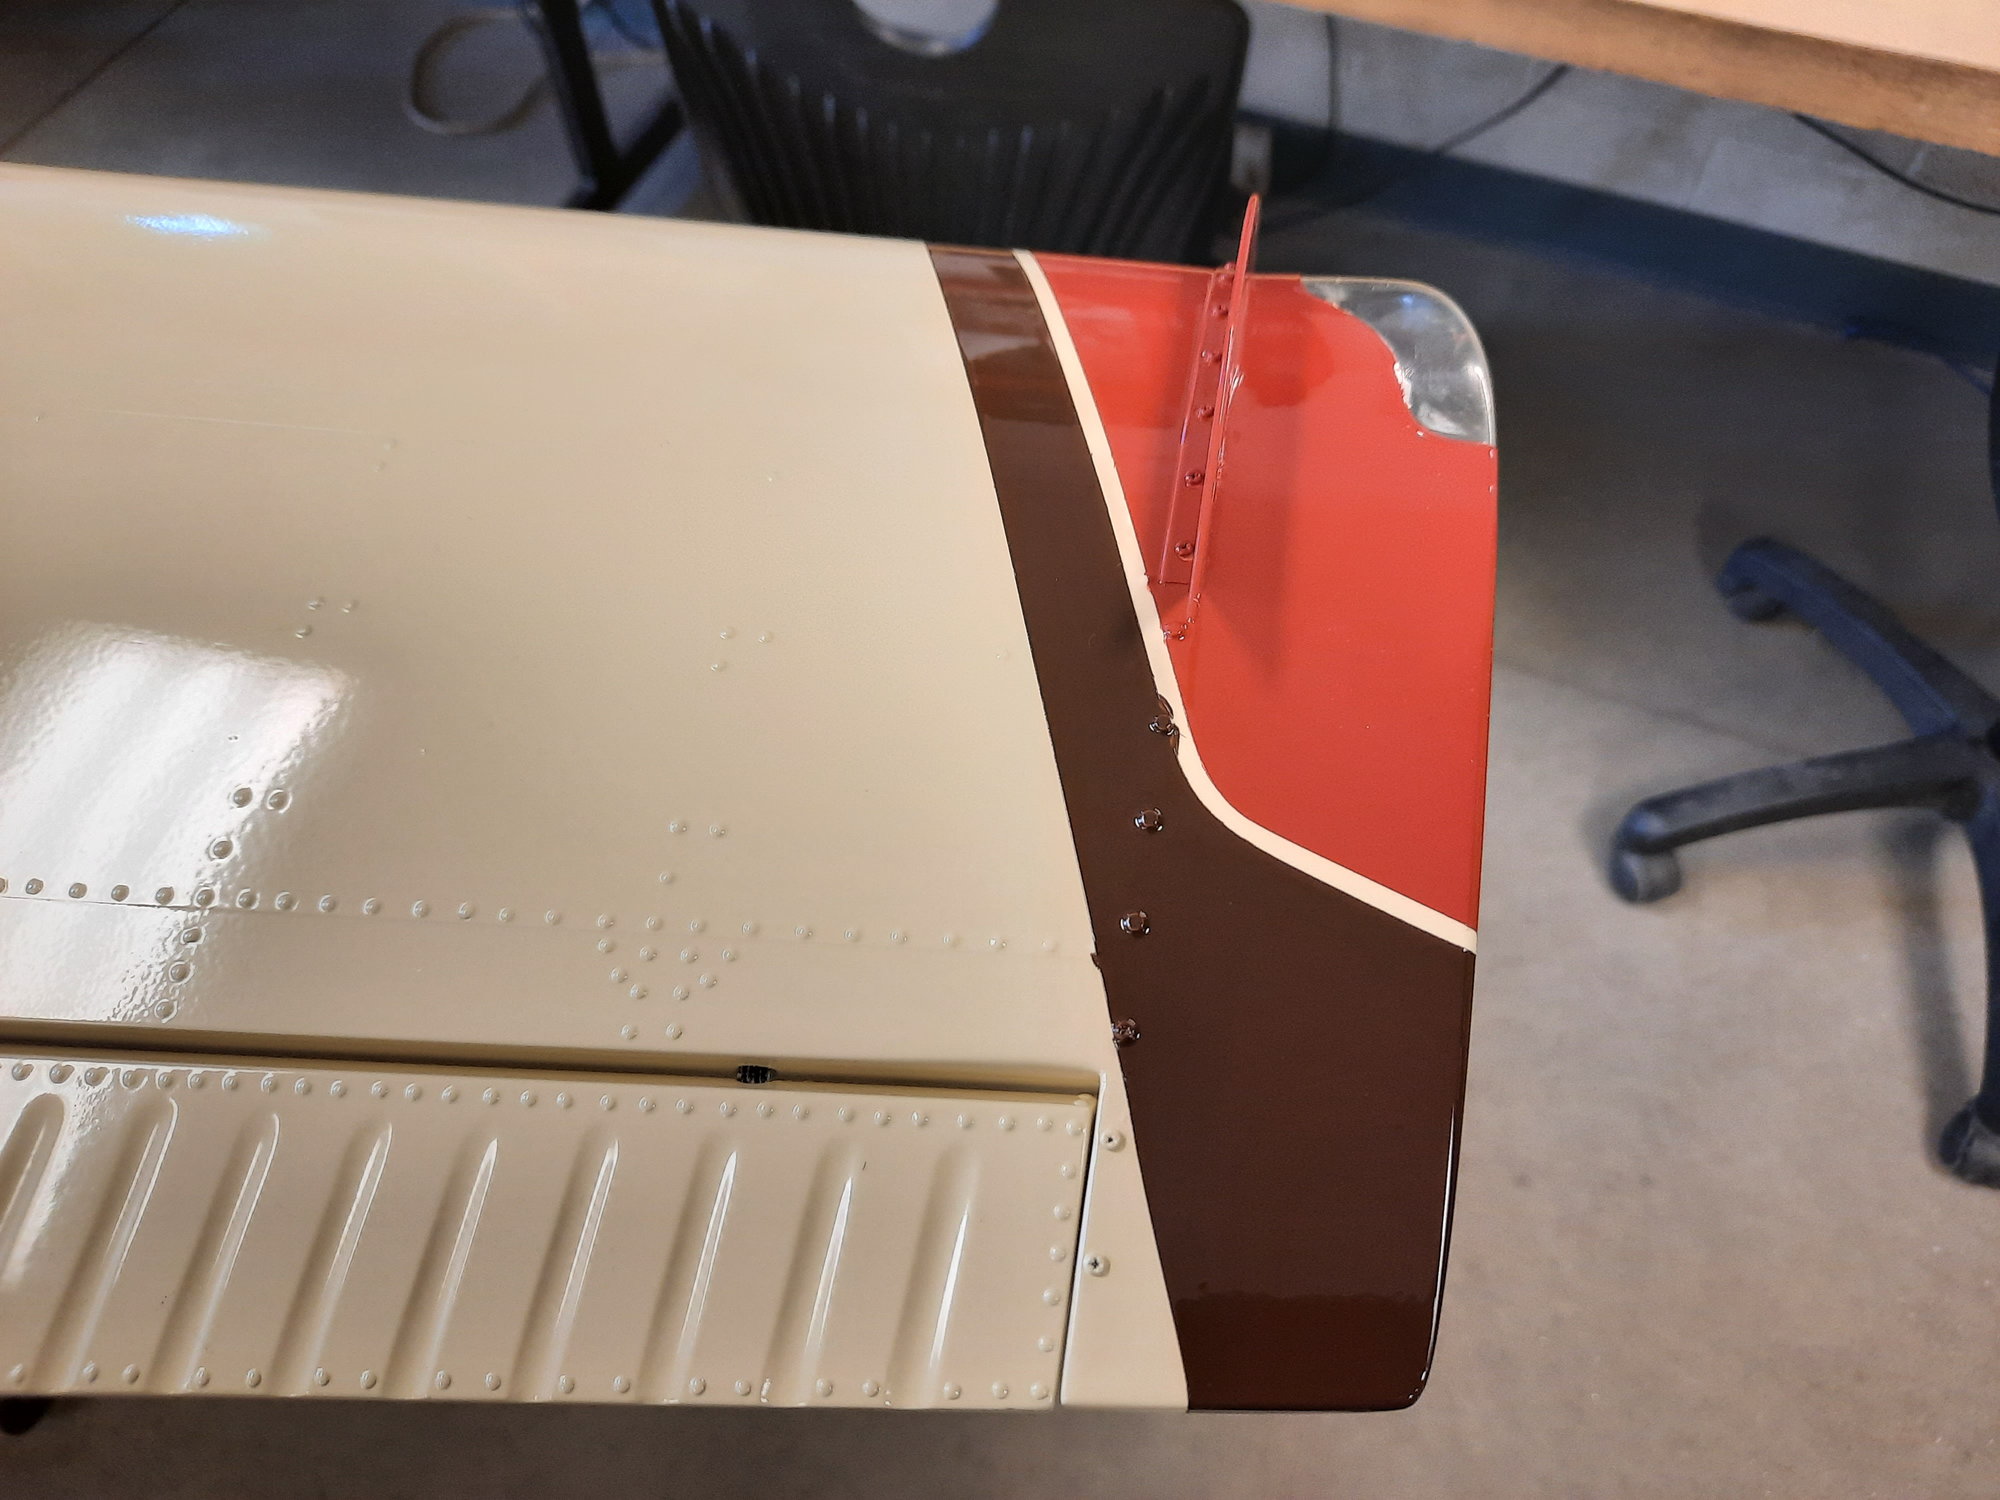
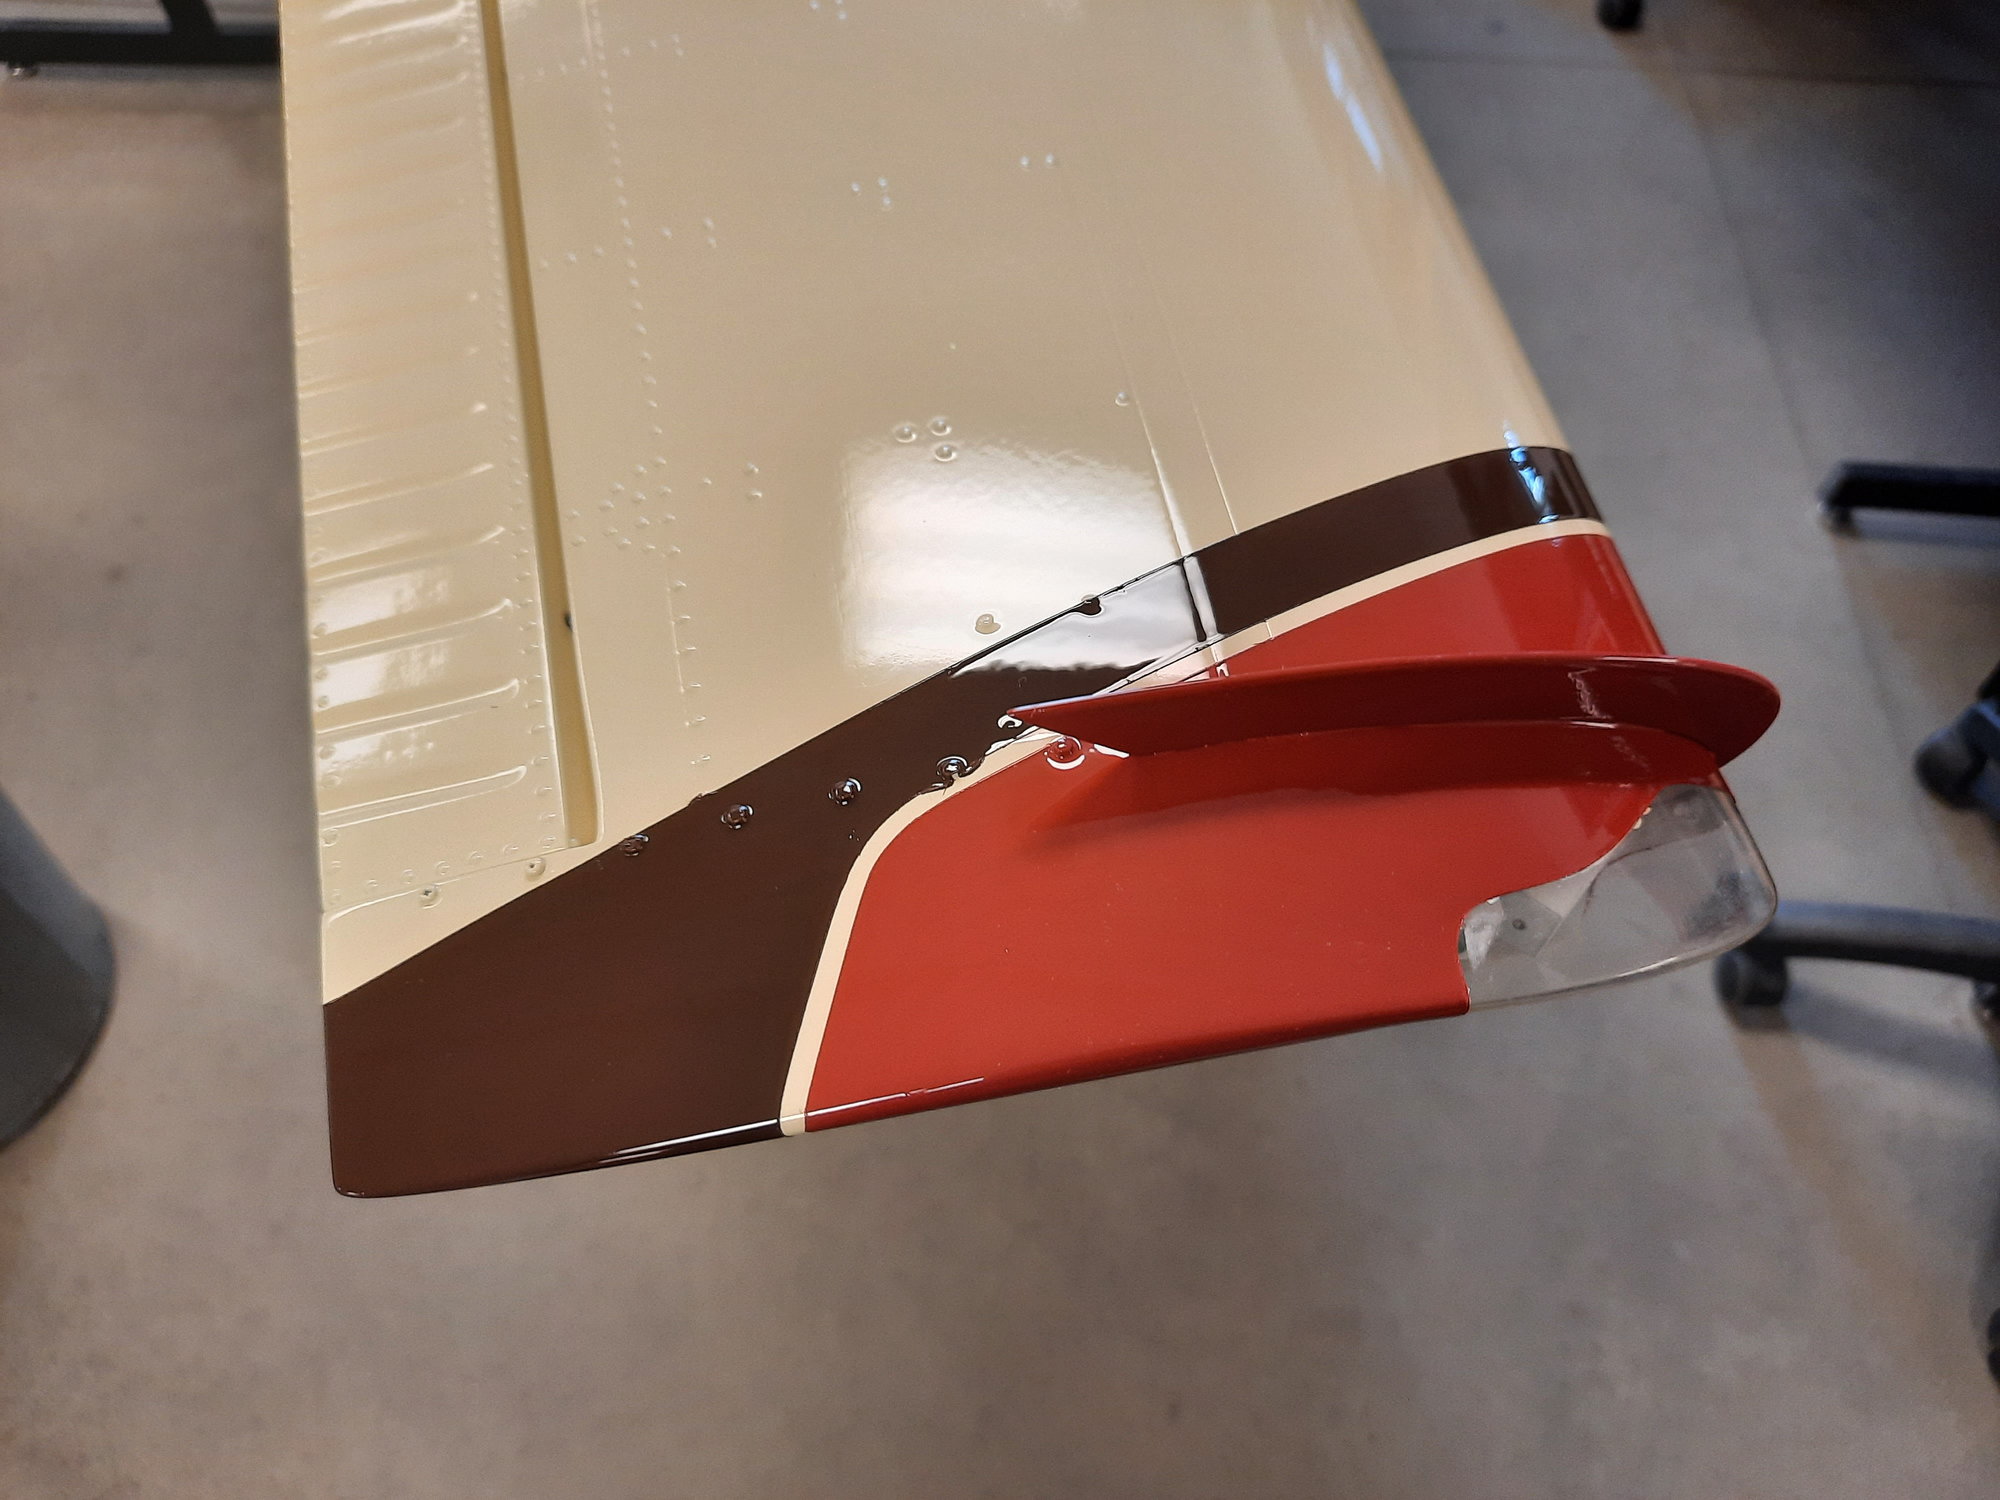
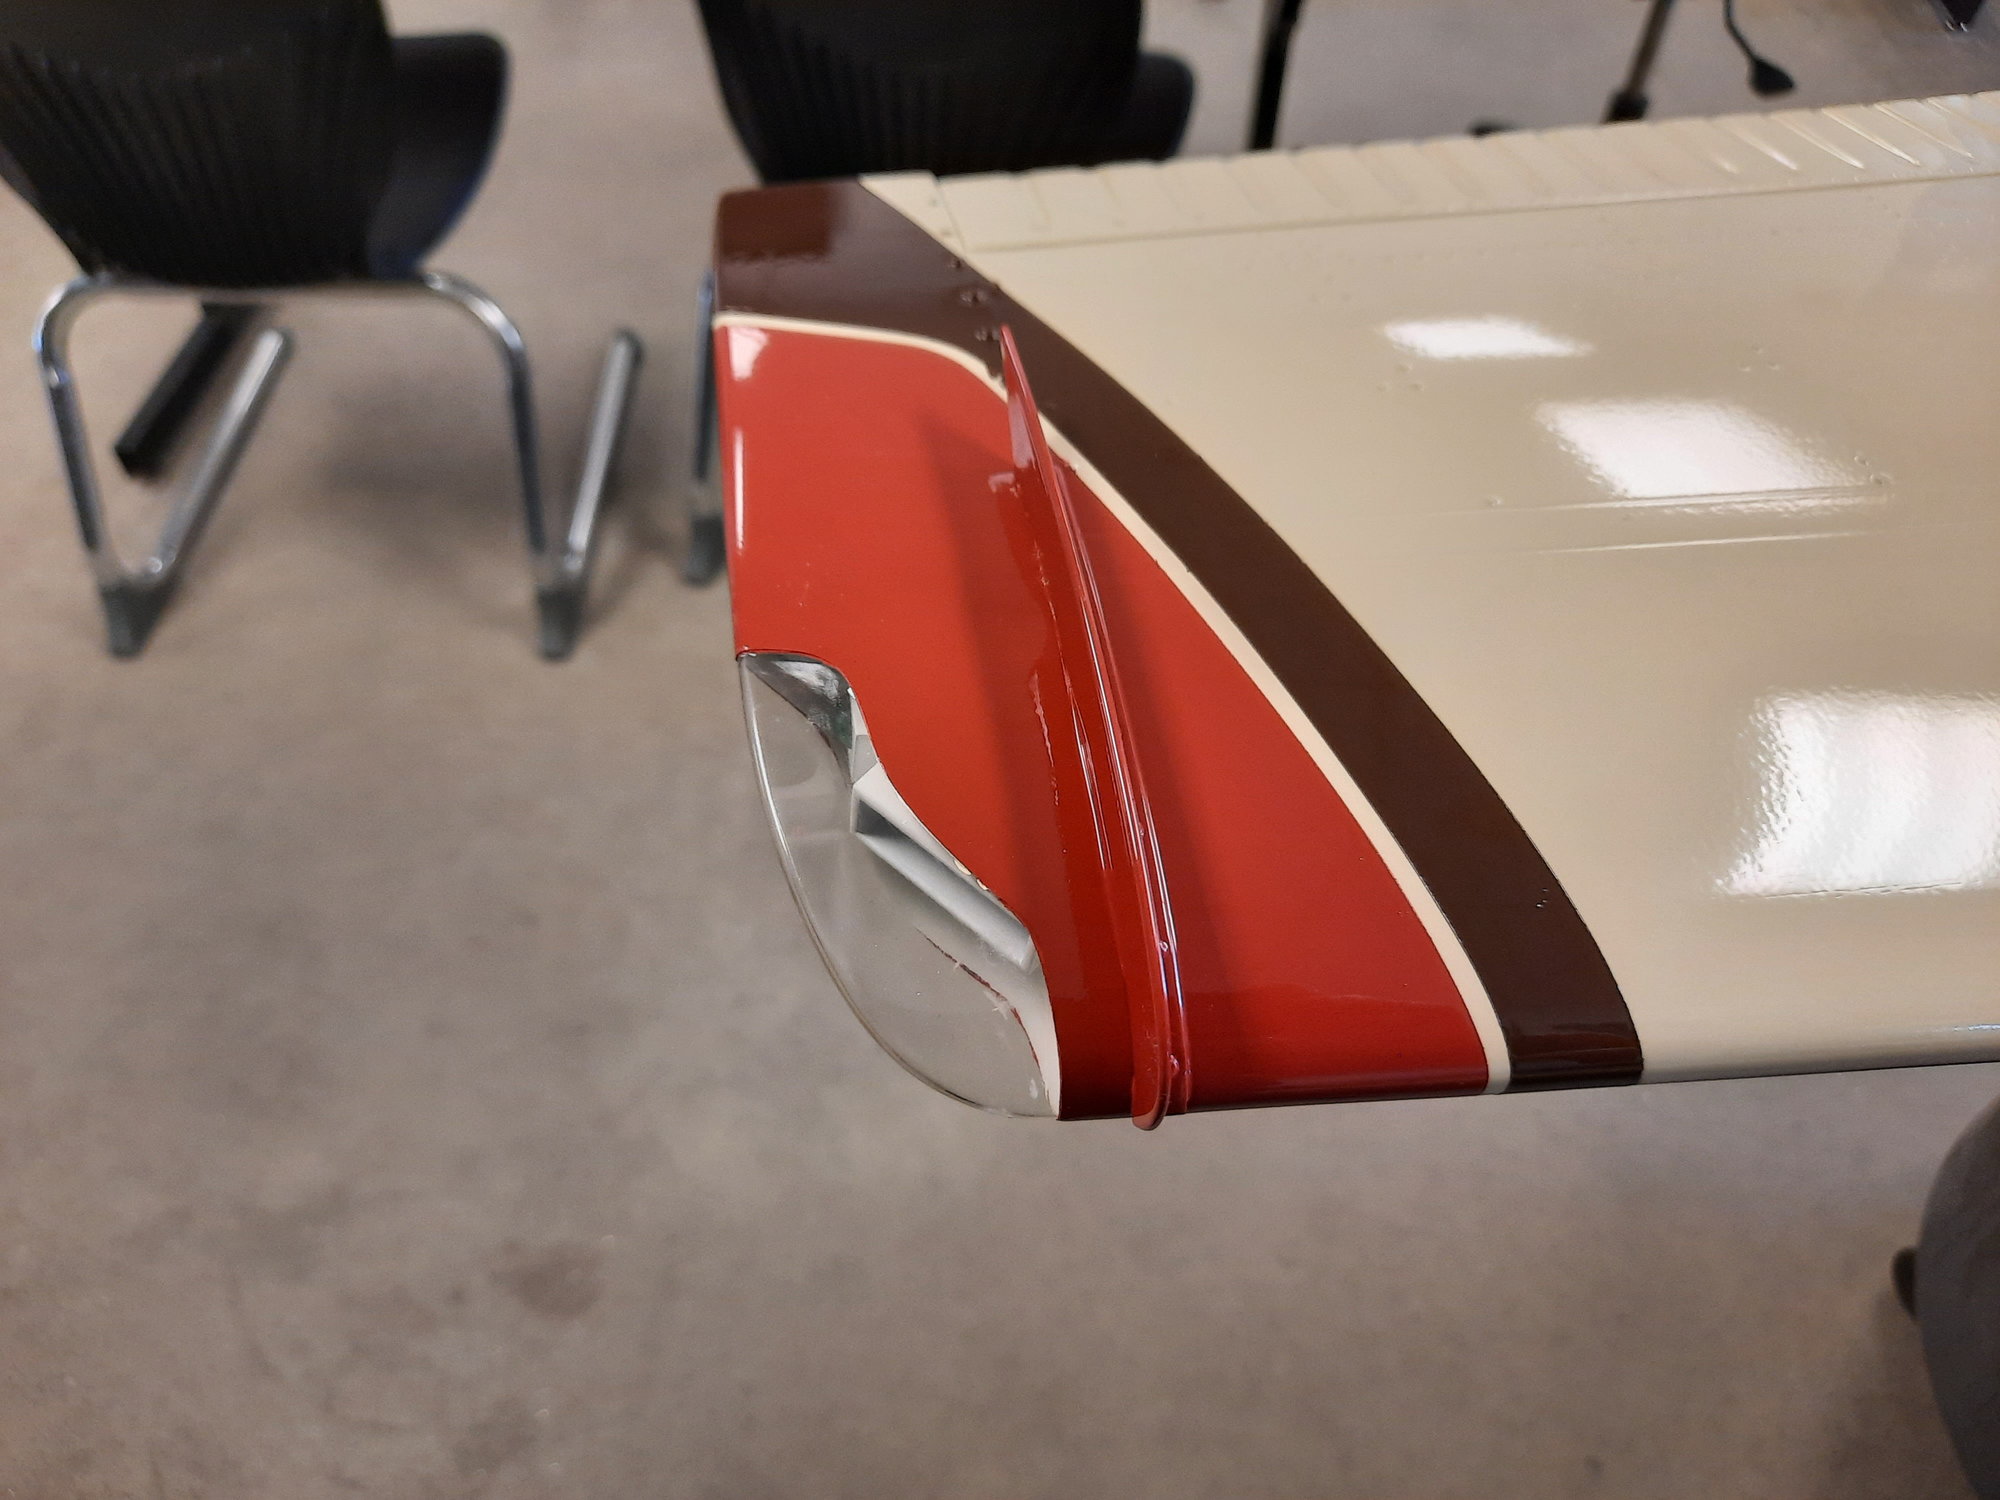
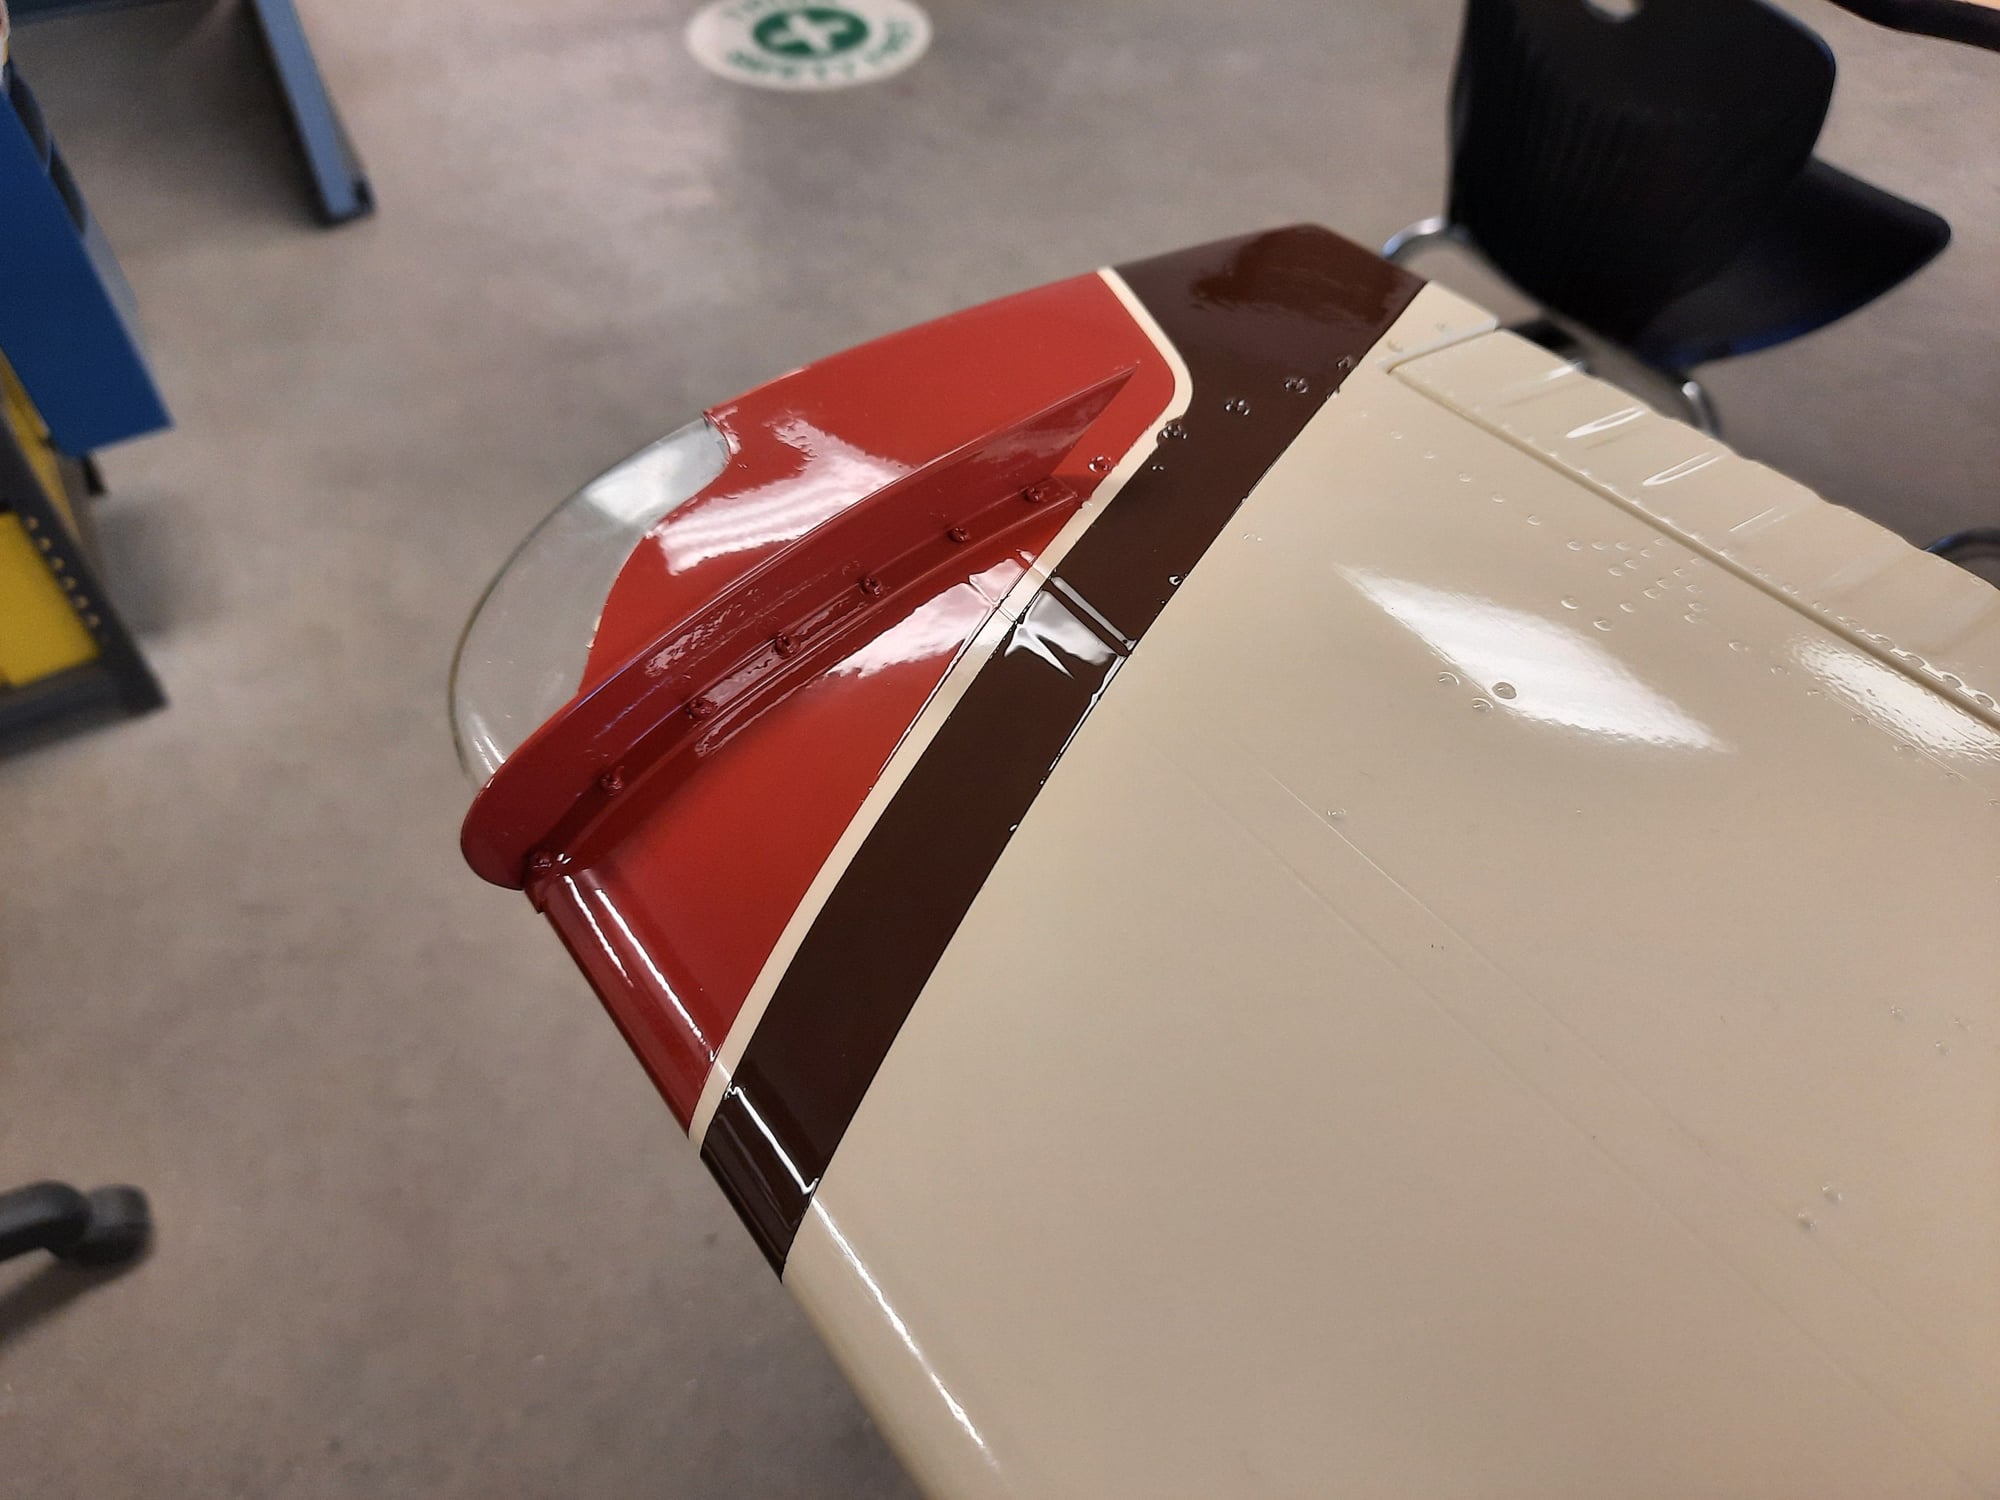
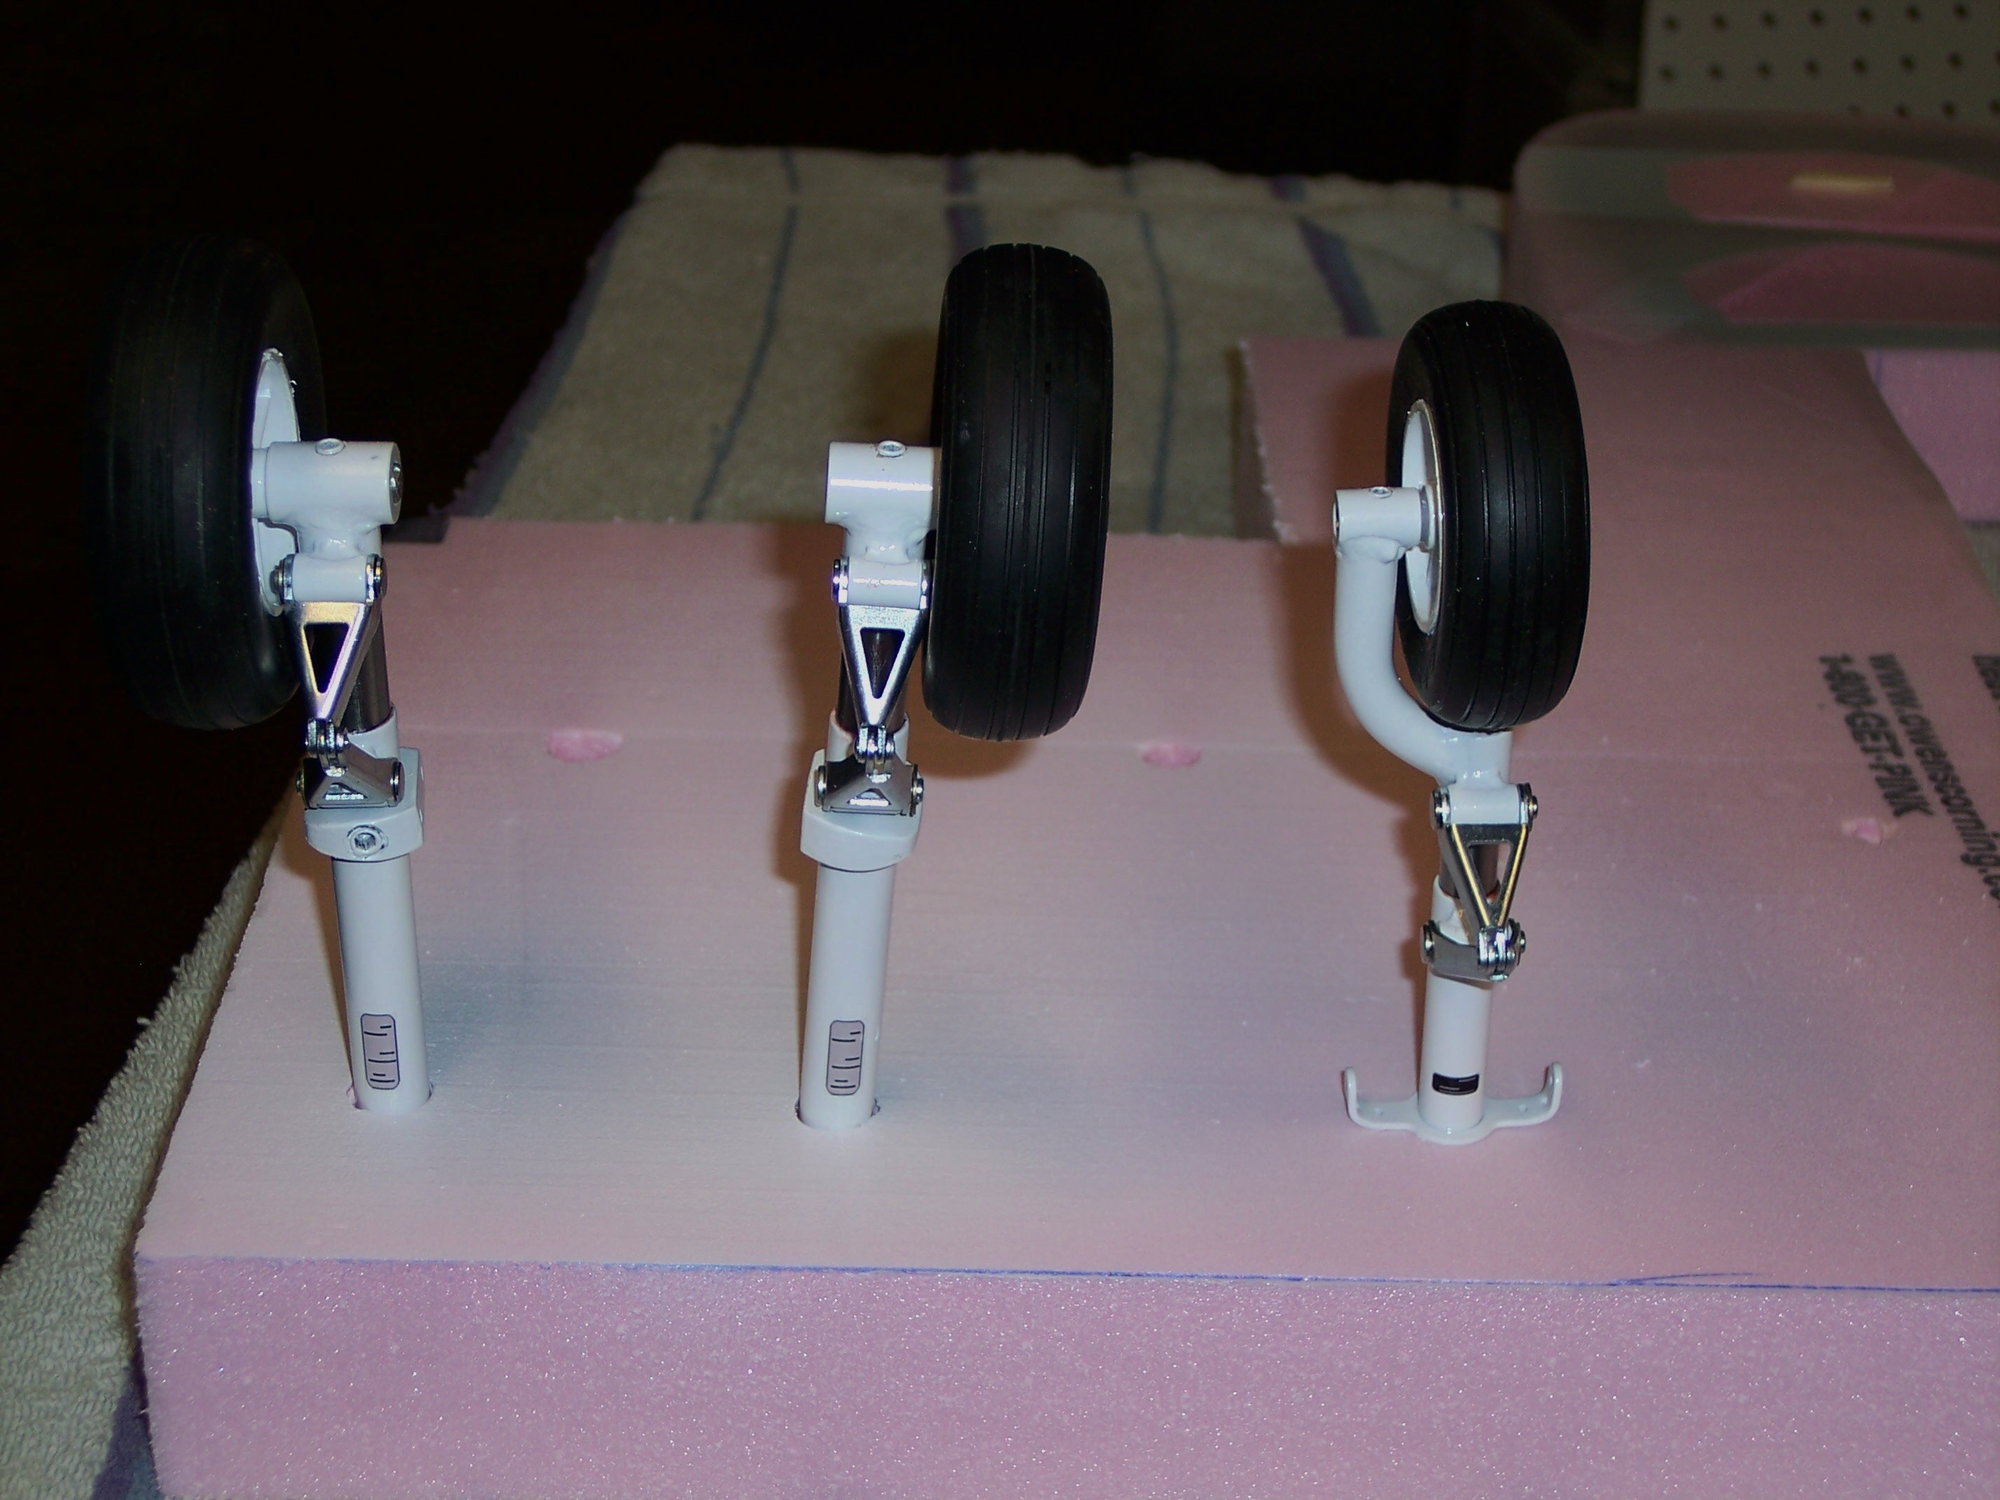
The wing was on my radar today to finish. I had the final brown to spray on the wingtips to make it complete, but not before more taping and masking! The Bonanza is almost 100% painted, the last bits to be sprayed are the main and nose gear retracts. I will have to disassemble and prep them before they get sprayed with the same Moon Dust color.

Work also continues on the IP, the yoke is the last part to make and install. I'll try and get a picture of the IP as it is later on tonight...


Last edited by VincentJ; 03-10-2021 at 01:22 PM.
Old 03-10-2021, 02:26 PM
  #1634  
VincentJ
Thread Starter
 
VincentJ's Avatar
 
Join Date: Mar 2011
Location: Peterborough, NH
Posts: 4,582
Received 120 Likes on 108 Posts
Default


Old 03-10-2021, 04:29 PM
  #1635  
FlyerInOKC
My Feedback: (6)
 
FlyerInOKC's Avatar
 
Join Date: Nov 2004
Location: Oklahoma City, OK
Posts: 14,163
Received 274 Likes on 239 Posts
Default

Beautiful work Vince!
Old 03-11-2021, 03:32 AM
  #1636  
edp
My Feedback: (5)
 
edp's Avatar
 
Join Date: Nov 2002
Location: Canton, OH
Posts: 622
Received 6 Likes on 5 Posts
Default


Here is a set painted w/ gloss white. I just wiped them down and the paint stuck very well. The placards are just homemade decals. I am diggin' your build.
The following users liked this post:
capt1597 (03-13-2021)
Old 03-11-2021, 03:52 AM
  #1637  
VincentJ
Thread Starter
 
VincentJ's Avatar
 
Join Date: Mar 2011
Location: Peterborough, NH
Posts: 4,582
Received 120 Likes on 108 Posts
Default

Thank you Ed. Nice job, good before and after results. I like your set-up to hold everything, makes spraying so much easier if you have something that's nice and solid to hold your parts. Did you loctite all of your set screws? Thankfully I won't have to take my rims apart to paint them as you did!

Last edited by VincentJ; 03-11-2021 at 06:05 AM.
Old 03-11-2021, 05:40 AM
  #1638  
FlyerInOKC
My Feedback: (6)
 
FlyerInOKC's Avatar
 
Join Date: Nov 2004
Location: Oklahoma City, OK
Posts: 14,163
Received 274 Likes on 239 Posts
Default

Nice paint job on the gear Ed!
Old 03-11-2021, 08:03 AM
  #1639  
edp
My Feedback: (5)
 
edp's Avatar
 
Join Date: Nov 2002
Location: Canton, OH
Posts: 622
Received 6 Likes on 5 Posts
Default

Just a drop of Blue Loctite and a slight flat spot on the axle. Did the same with the struts.
Old 03-11-2021, 08:16 AM
  #1640  
VincentJ
Thread Starter
 
VincentJ's Avatar
 
Join Date: Mar 2011
Location: Peterborough, NH
Posts: 4,582
Received 120 Likes on 108 Posts
Default

Originally Posted by edp
Just a drop of Blue Loctite and a slight flat spot on the axle. Did the same with the struts.
Good, I do the same but I also like to add just a dab of GOOP over the head of each set screw as well as over the ends of each wheel collar for an extra measure of holding protection…
Old 03-13-2021, 07:47 AM
  #1641  
mozsrm
Junior Member
 
Join Date: Mar 2020
Posts: 5
Likes: 0
Received 0 Likes on 0 Posts
Default Top Flite Bonanza

Hi can I buy your Top Flite Bonanza drawings?

Thanks,

-Moises
Old 03-13-2021, 08:03 AM
  #1642  
VincentJ
Thread Starter
 
VincentJ's Avatar
 
Join Date: Mar 2011
Location: Peterborough, NH
Posts: 4,582
Received 120 Likes on 108 Posts
Default

Originally Posted by mozsrm
Hi can I buy your Top Flite Bonanza drawings?

Thanks,

-Moises
Sorry no, I want them for future use.
Old 03-13-2021, 02:19 PM
  #1643  
VincentJ
Thread Starter
 
VincentJ's Avatar
 
Join Date: Mar 2011
Location: Peterborough, NH
Posts: 4,582
Received 120 Likes on 108 Posts
Default


Last bit of painting is about to be sprayed!
The following users liked this post:
capt1597 (03-13-2021)
Old 03-13-2021, 02:57 PM
  #1644  
edp
My Feedback: (5)
 
edp's Avatar
 
Join Date: Nov 2002
Location: Canton, OH
Posts: 622
Received 6 Likes on 5 Posts
Default

That sure looks familiar... LOL
Old 03-15-2021, 04:46 PM
  #1645  
VincentJ
Thread Starter
 
VincentJ's Avatar
 
Join Date: Mar 2011
Location: Peterborough, NH
Posts: 4,582
Received 120 Likes on 108 Posts
Default


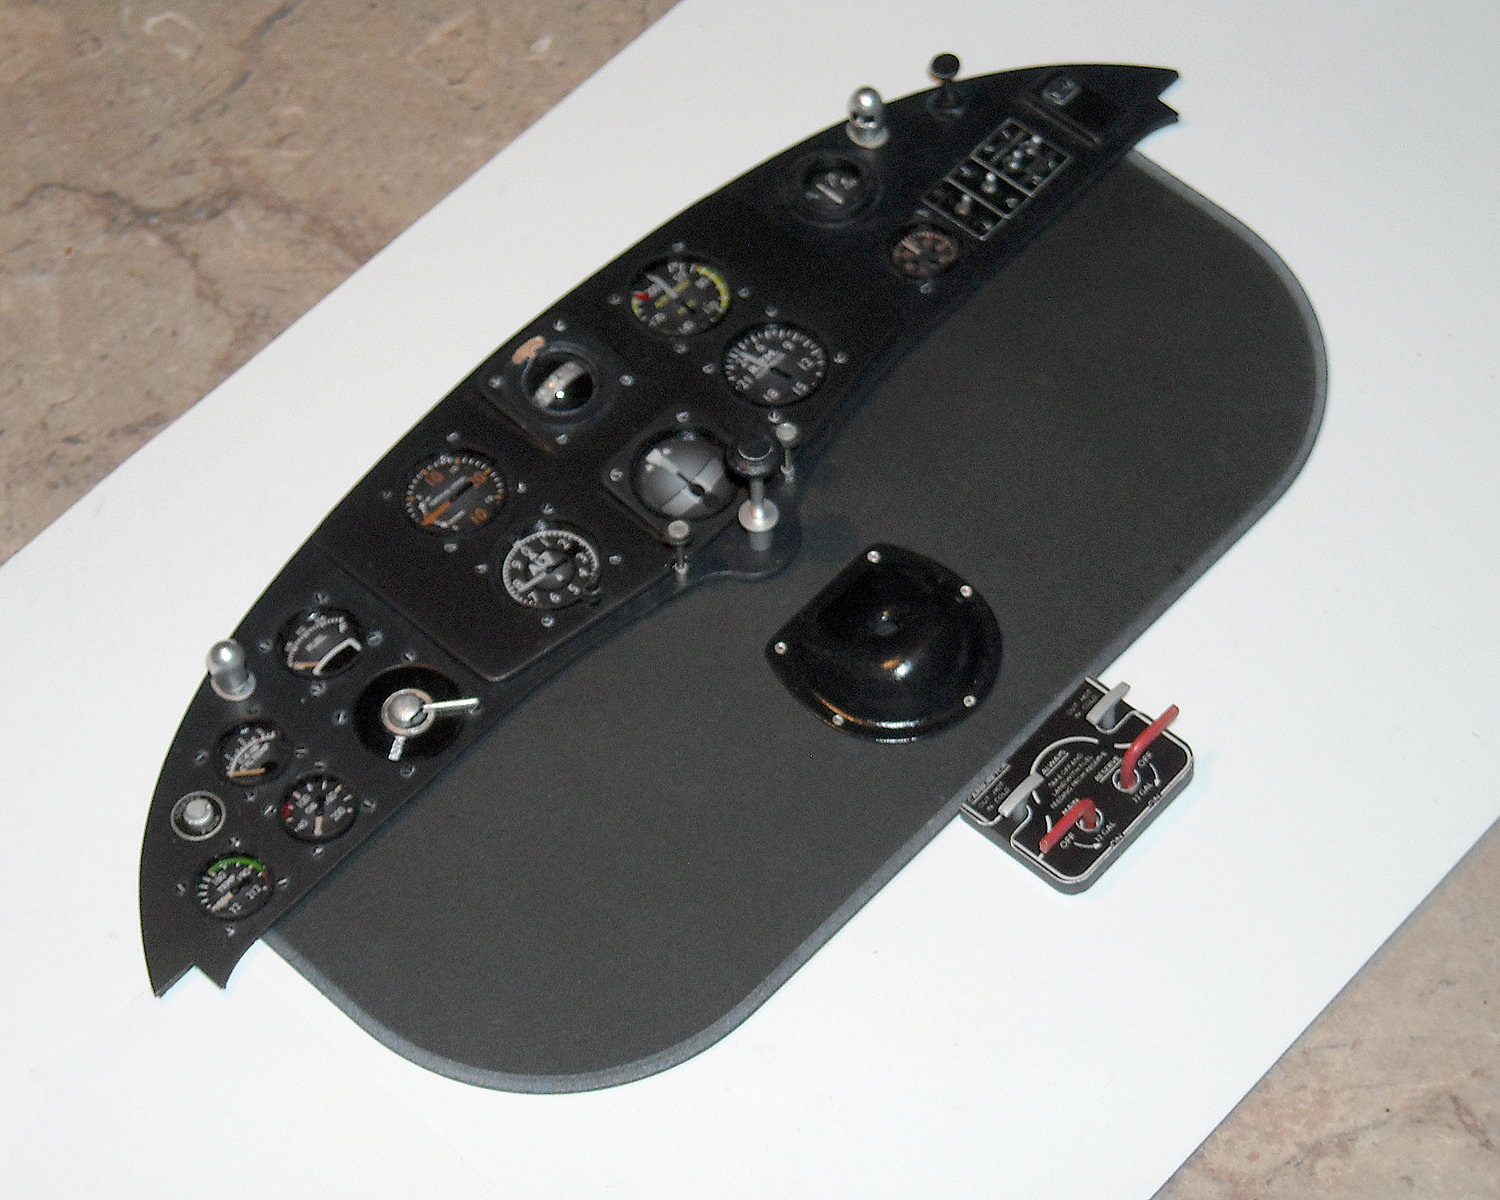
Exciting day for me. After all the time it took to make the IP, today I installed it in place permanently! The IP is secured to the upper canopy (using GOOP) and is simply lowered into the fuselage.


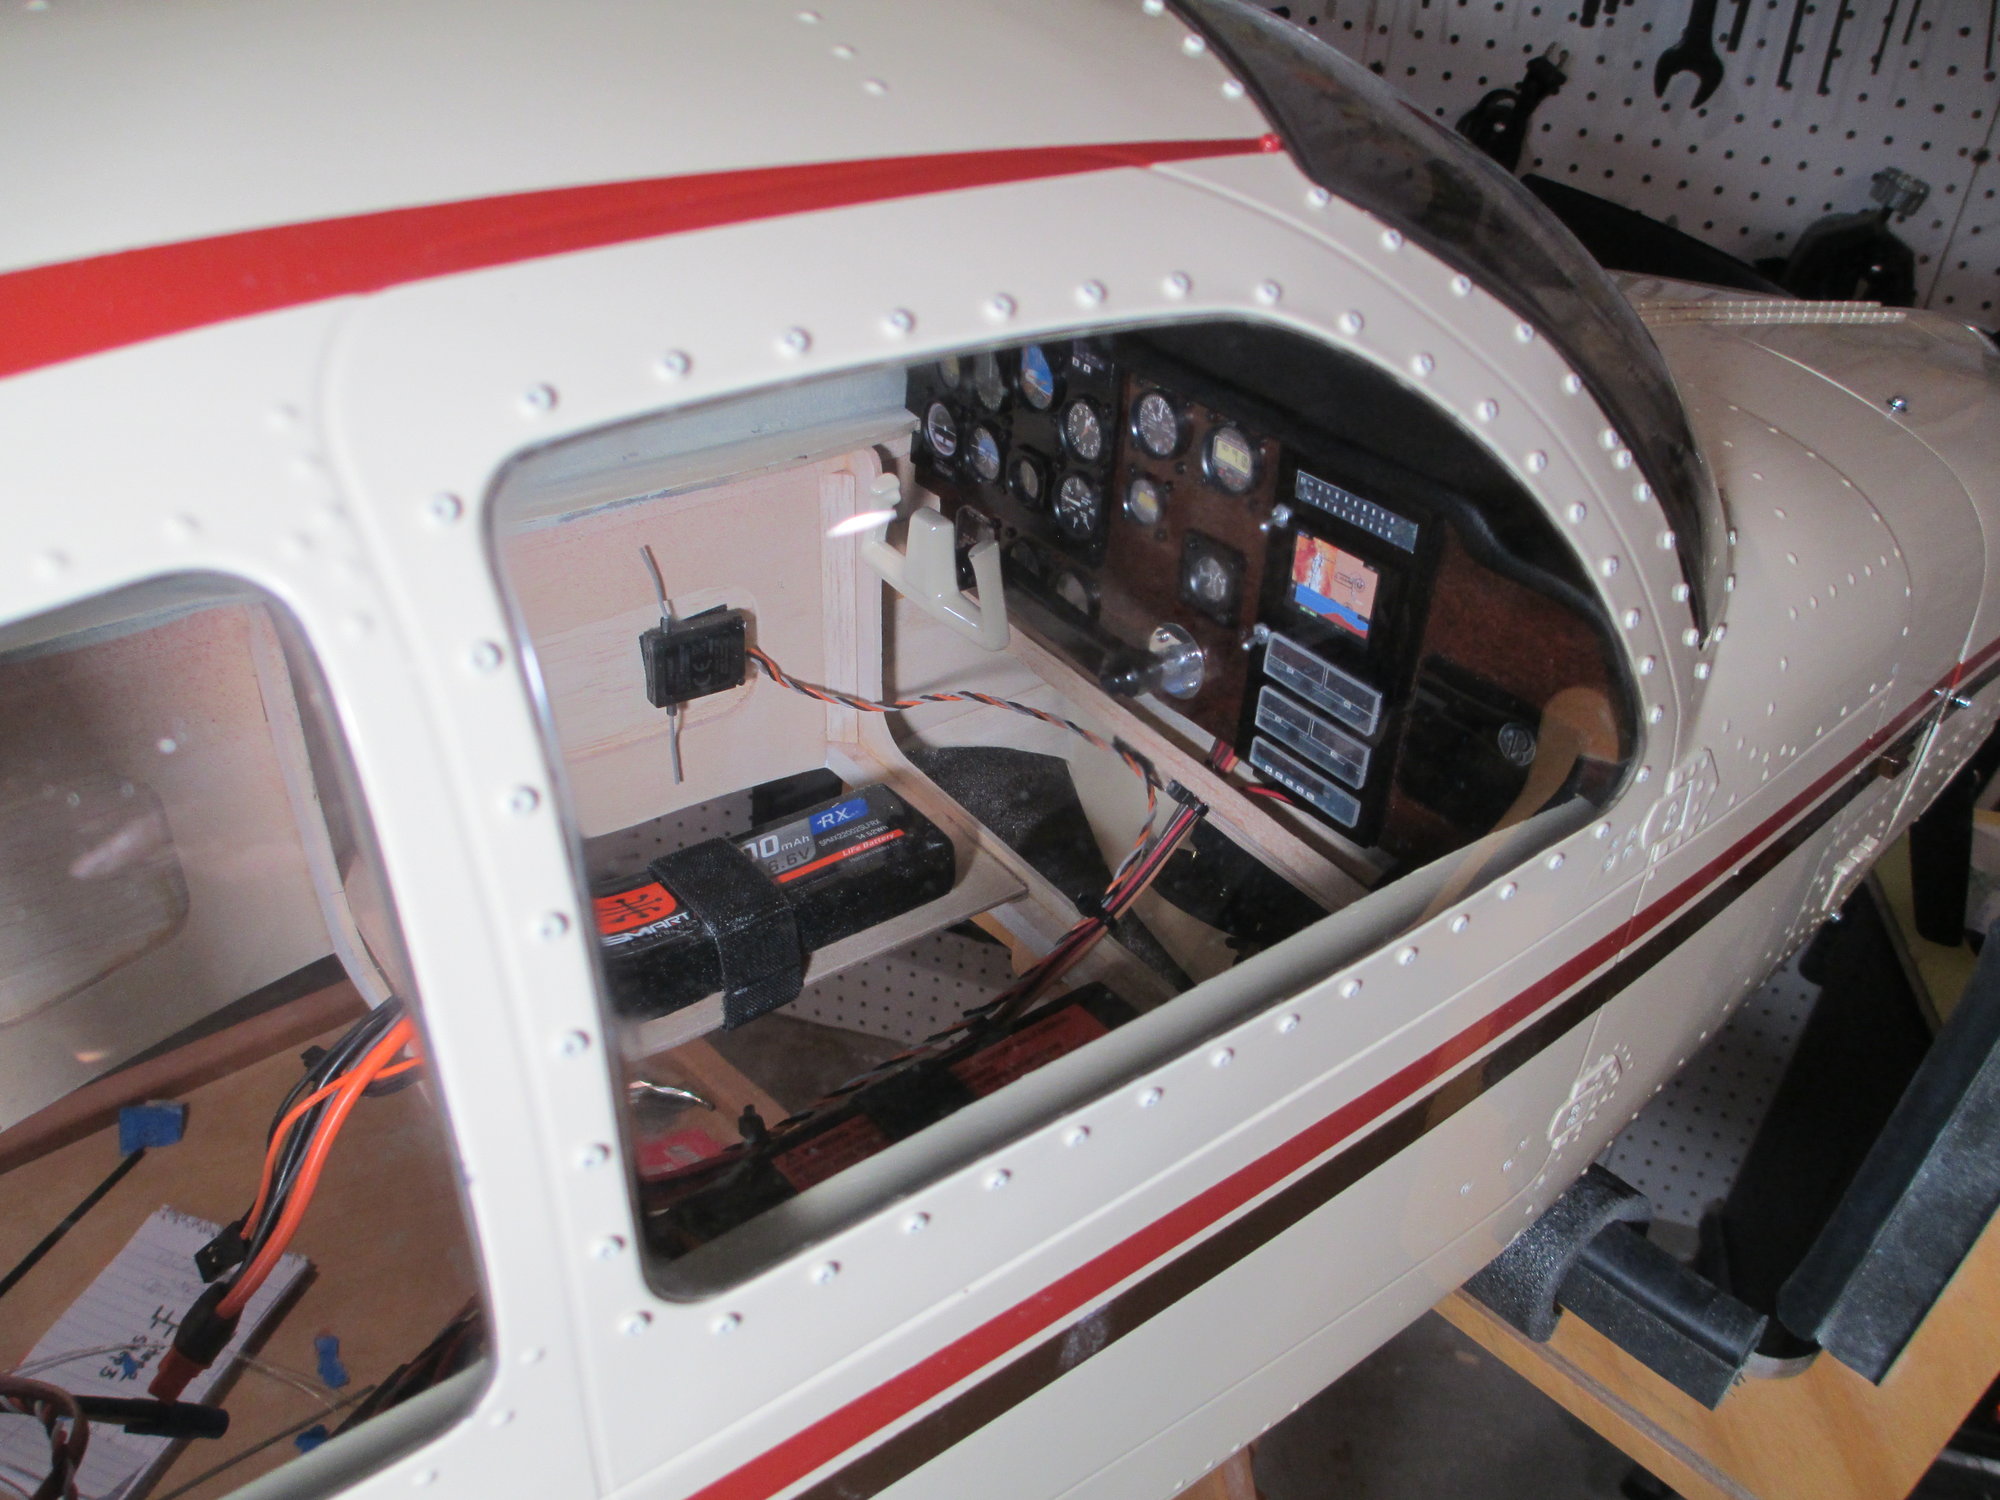
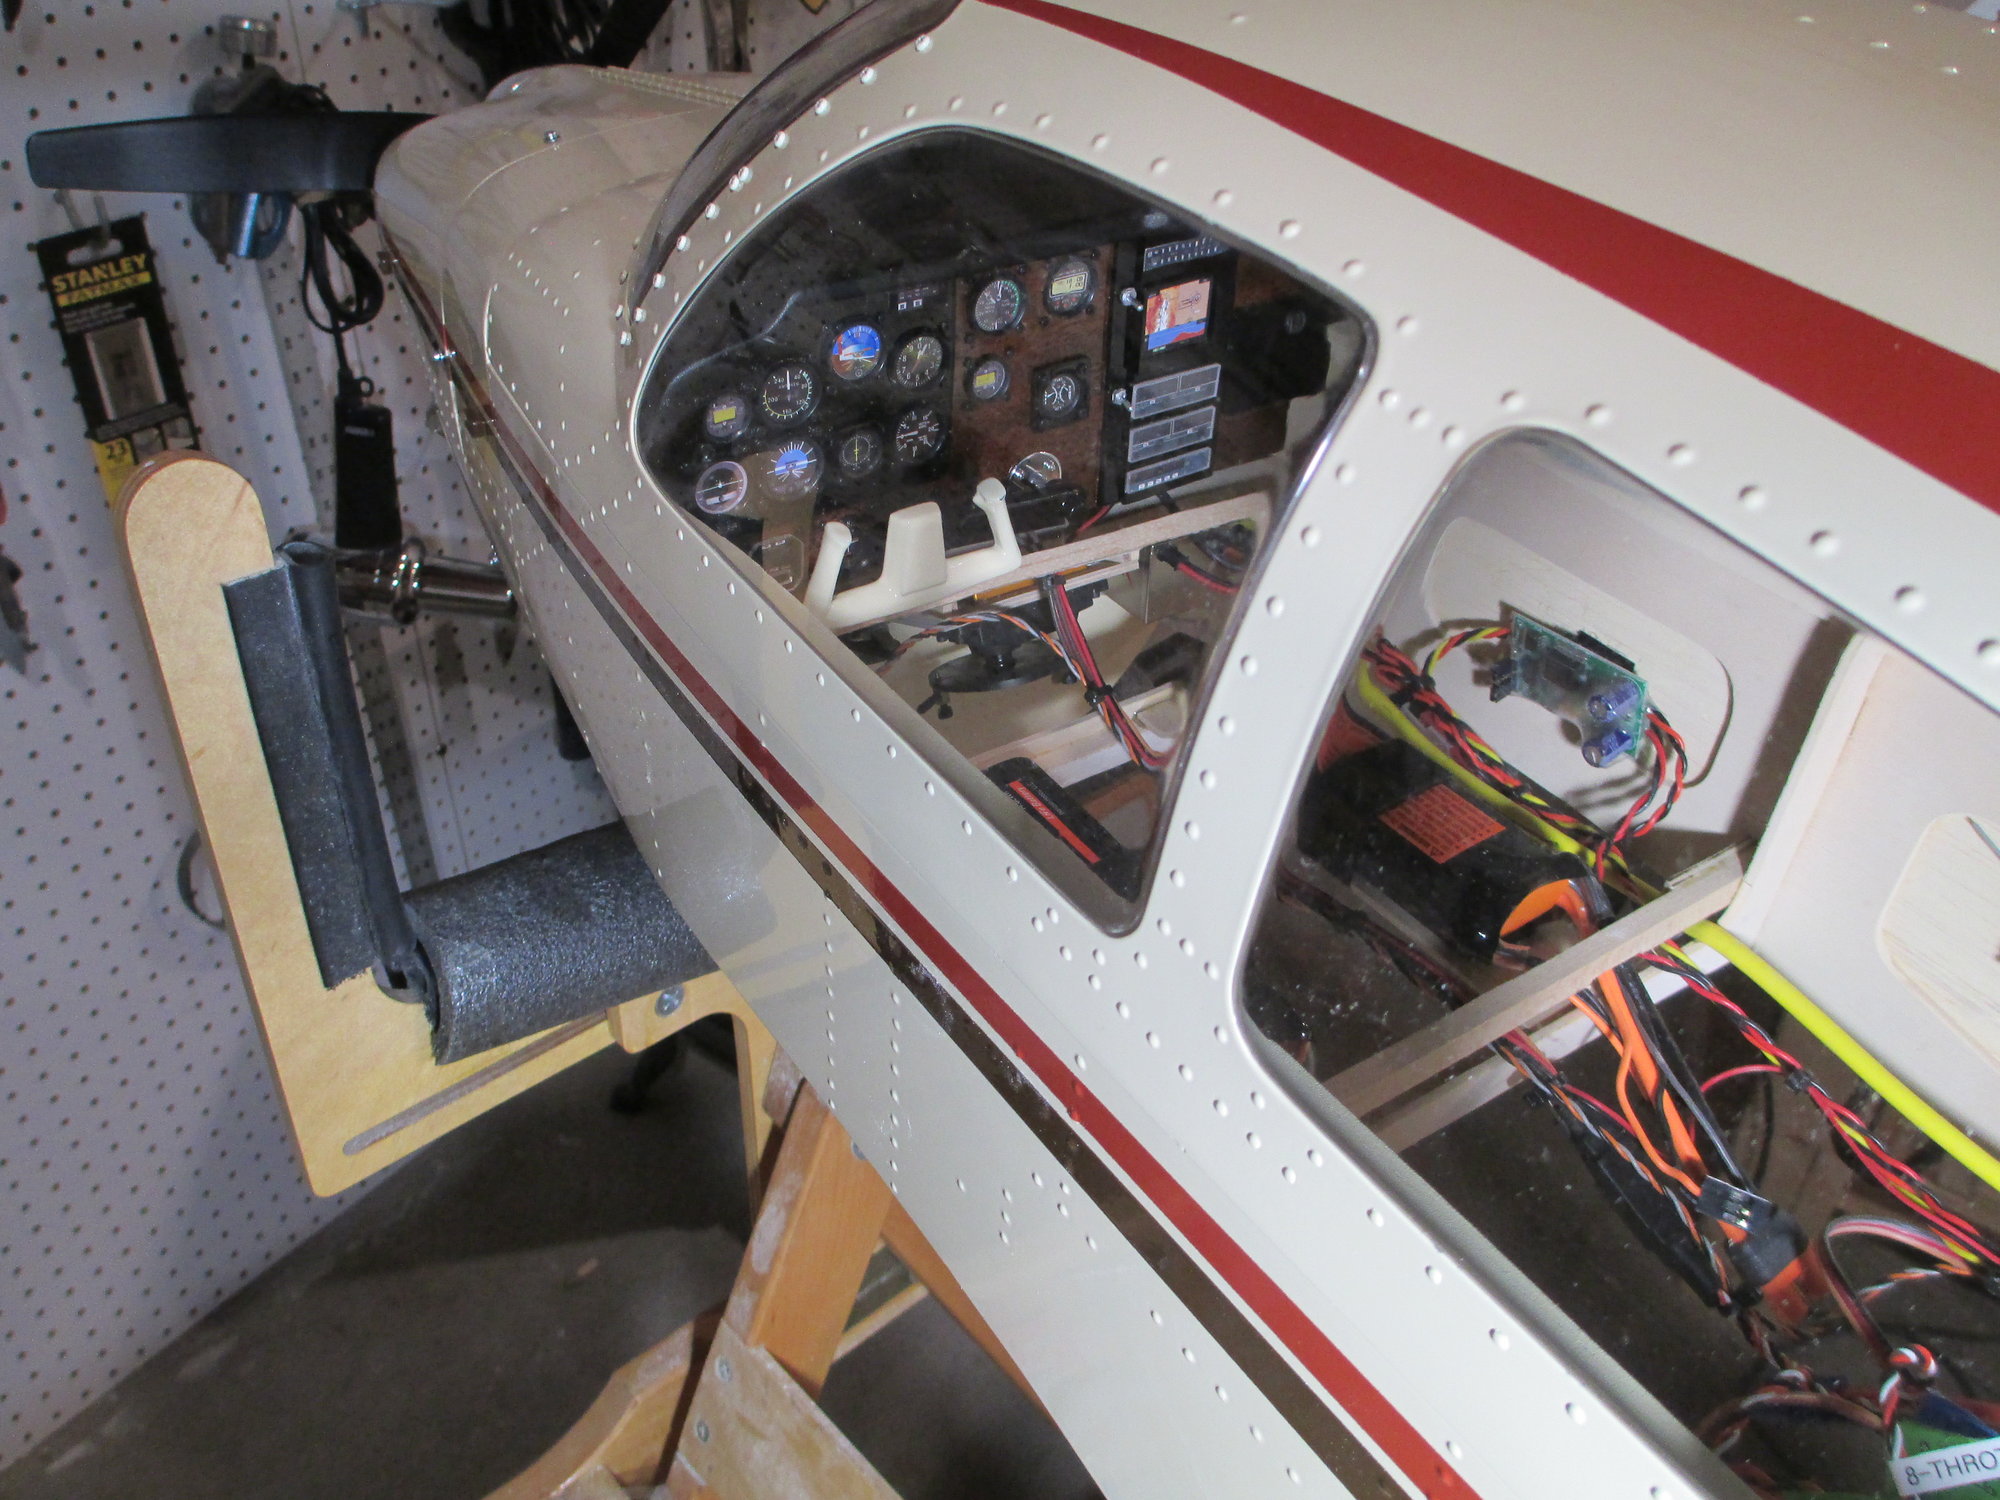
Good glimpse of the throw over yoke which allows the plane's pilot to fly either from the left or right seat.


I've been thinking a lot about what would be the best way to latch the baggage door. There are a number of ways and initially I was going to use a magnetic latch, but I chose to secure the door with this type of latch. I scoured the internet for different types of canopy latches, most of what I found were made of plastic and seemed rather flimsy. This latch impressed me, made from aluminum along with the correct dimensions...


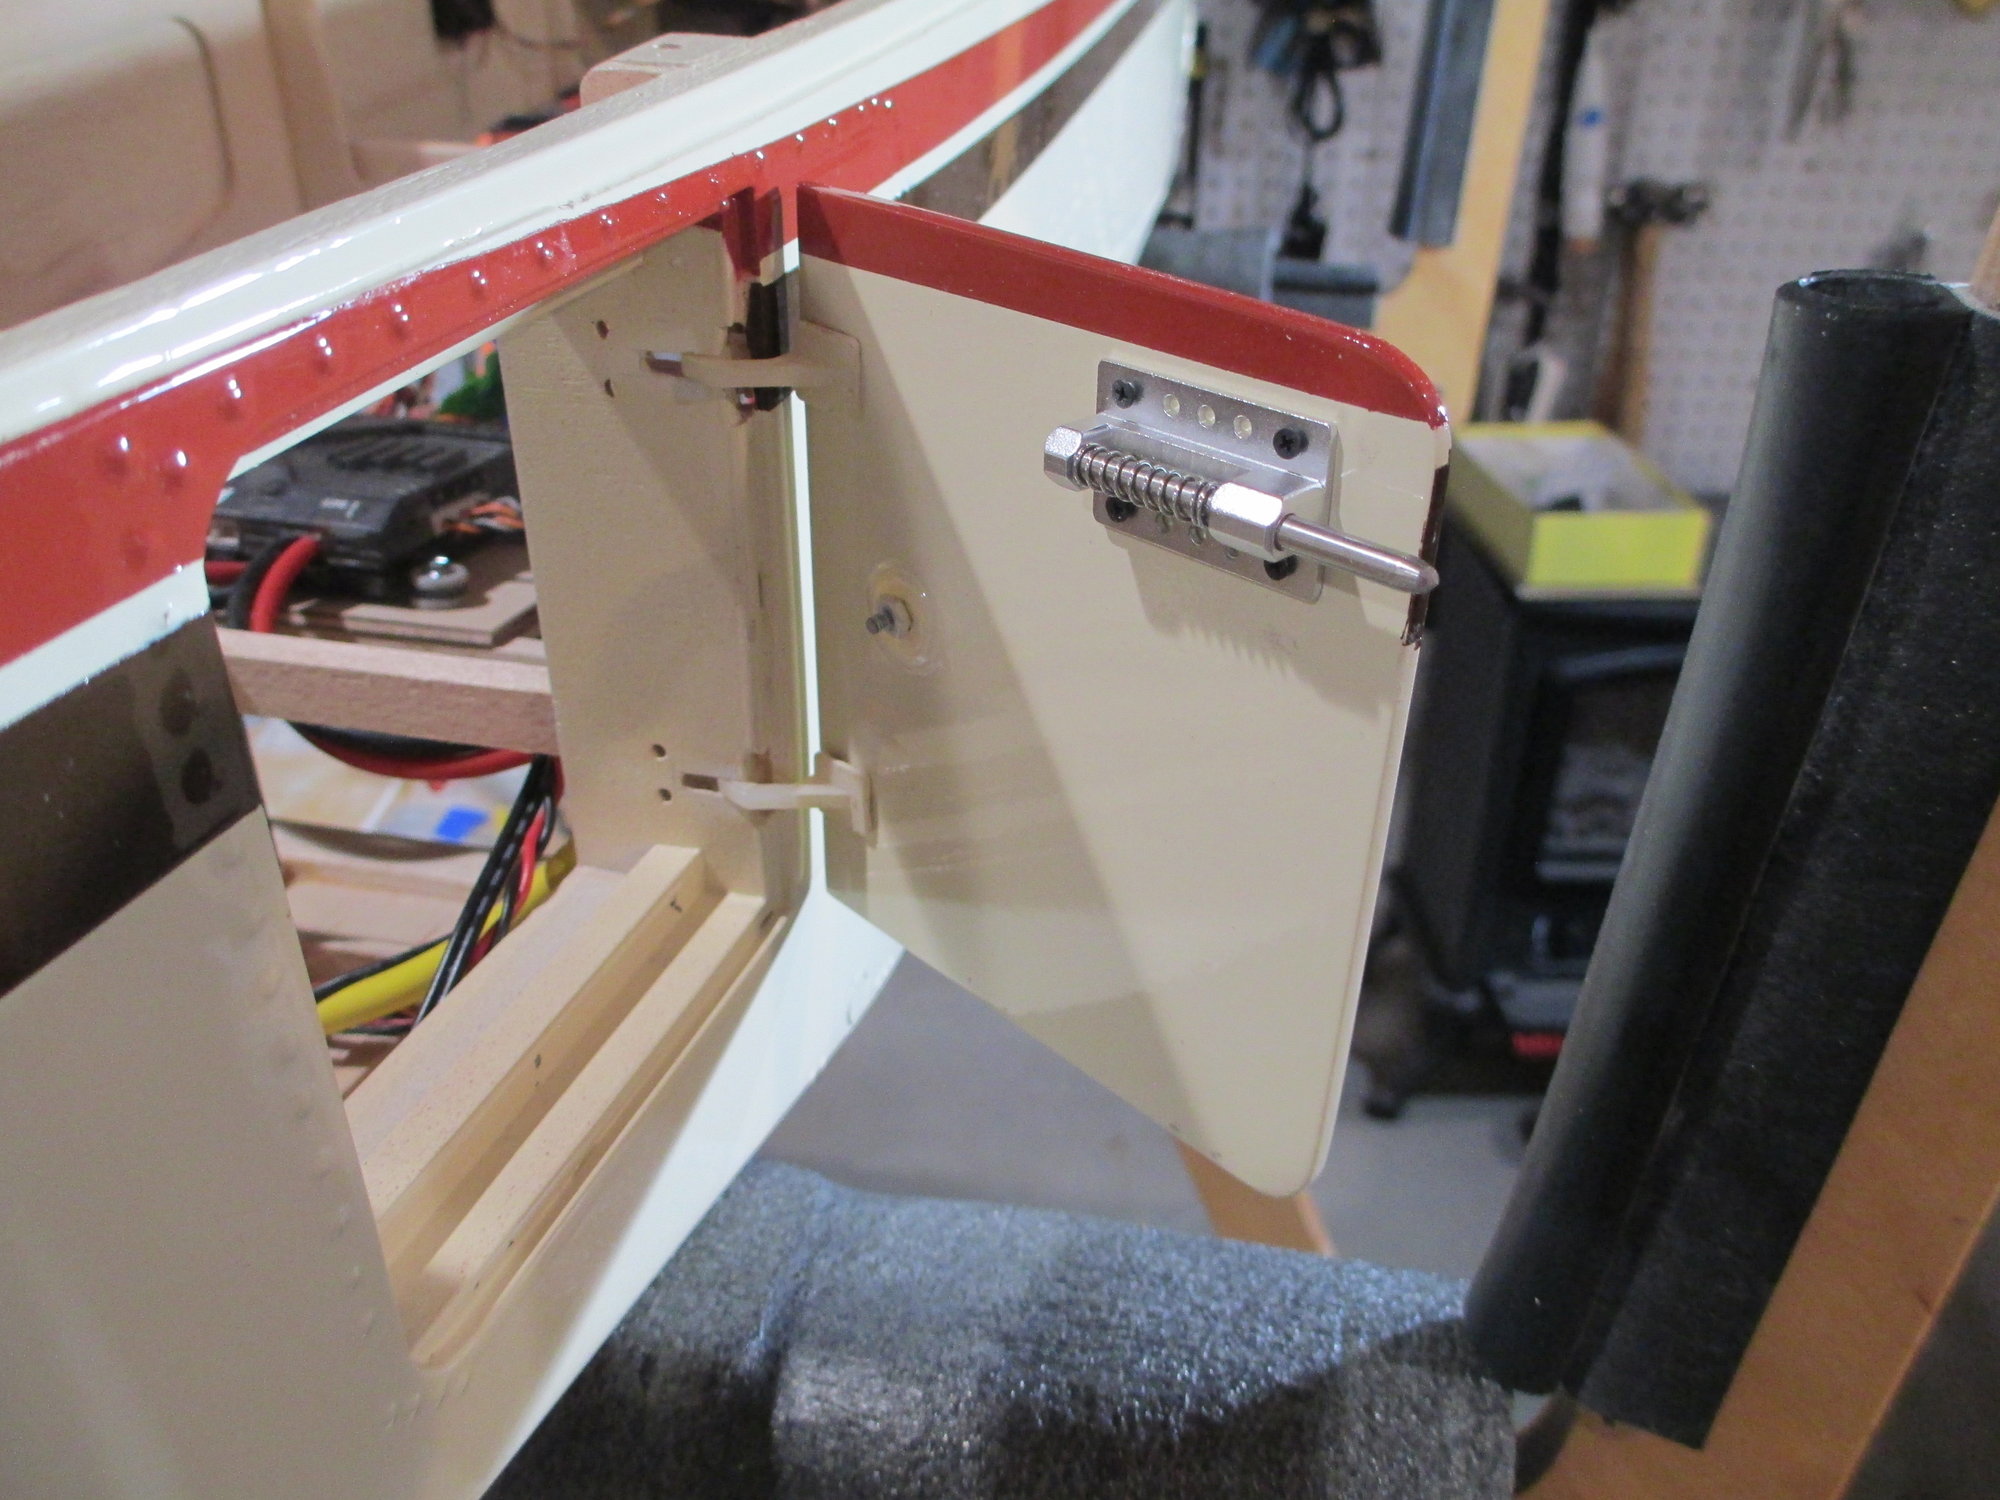
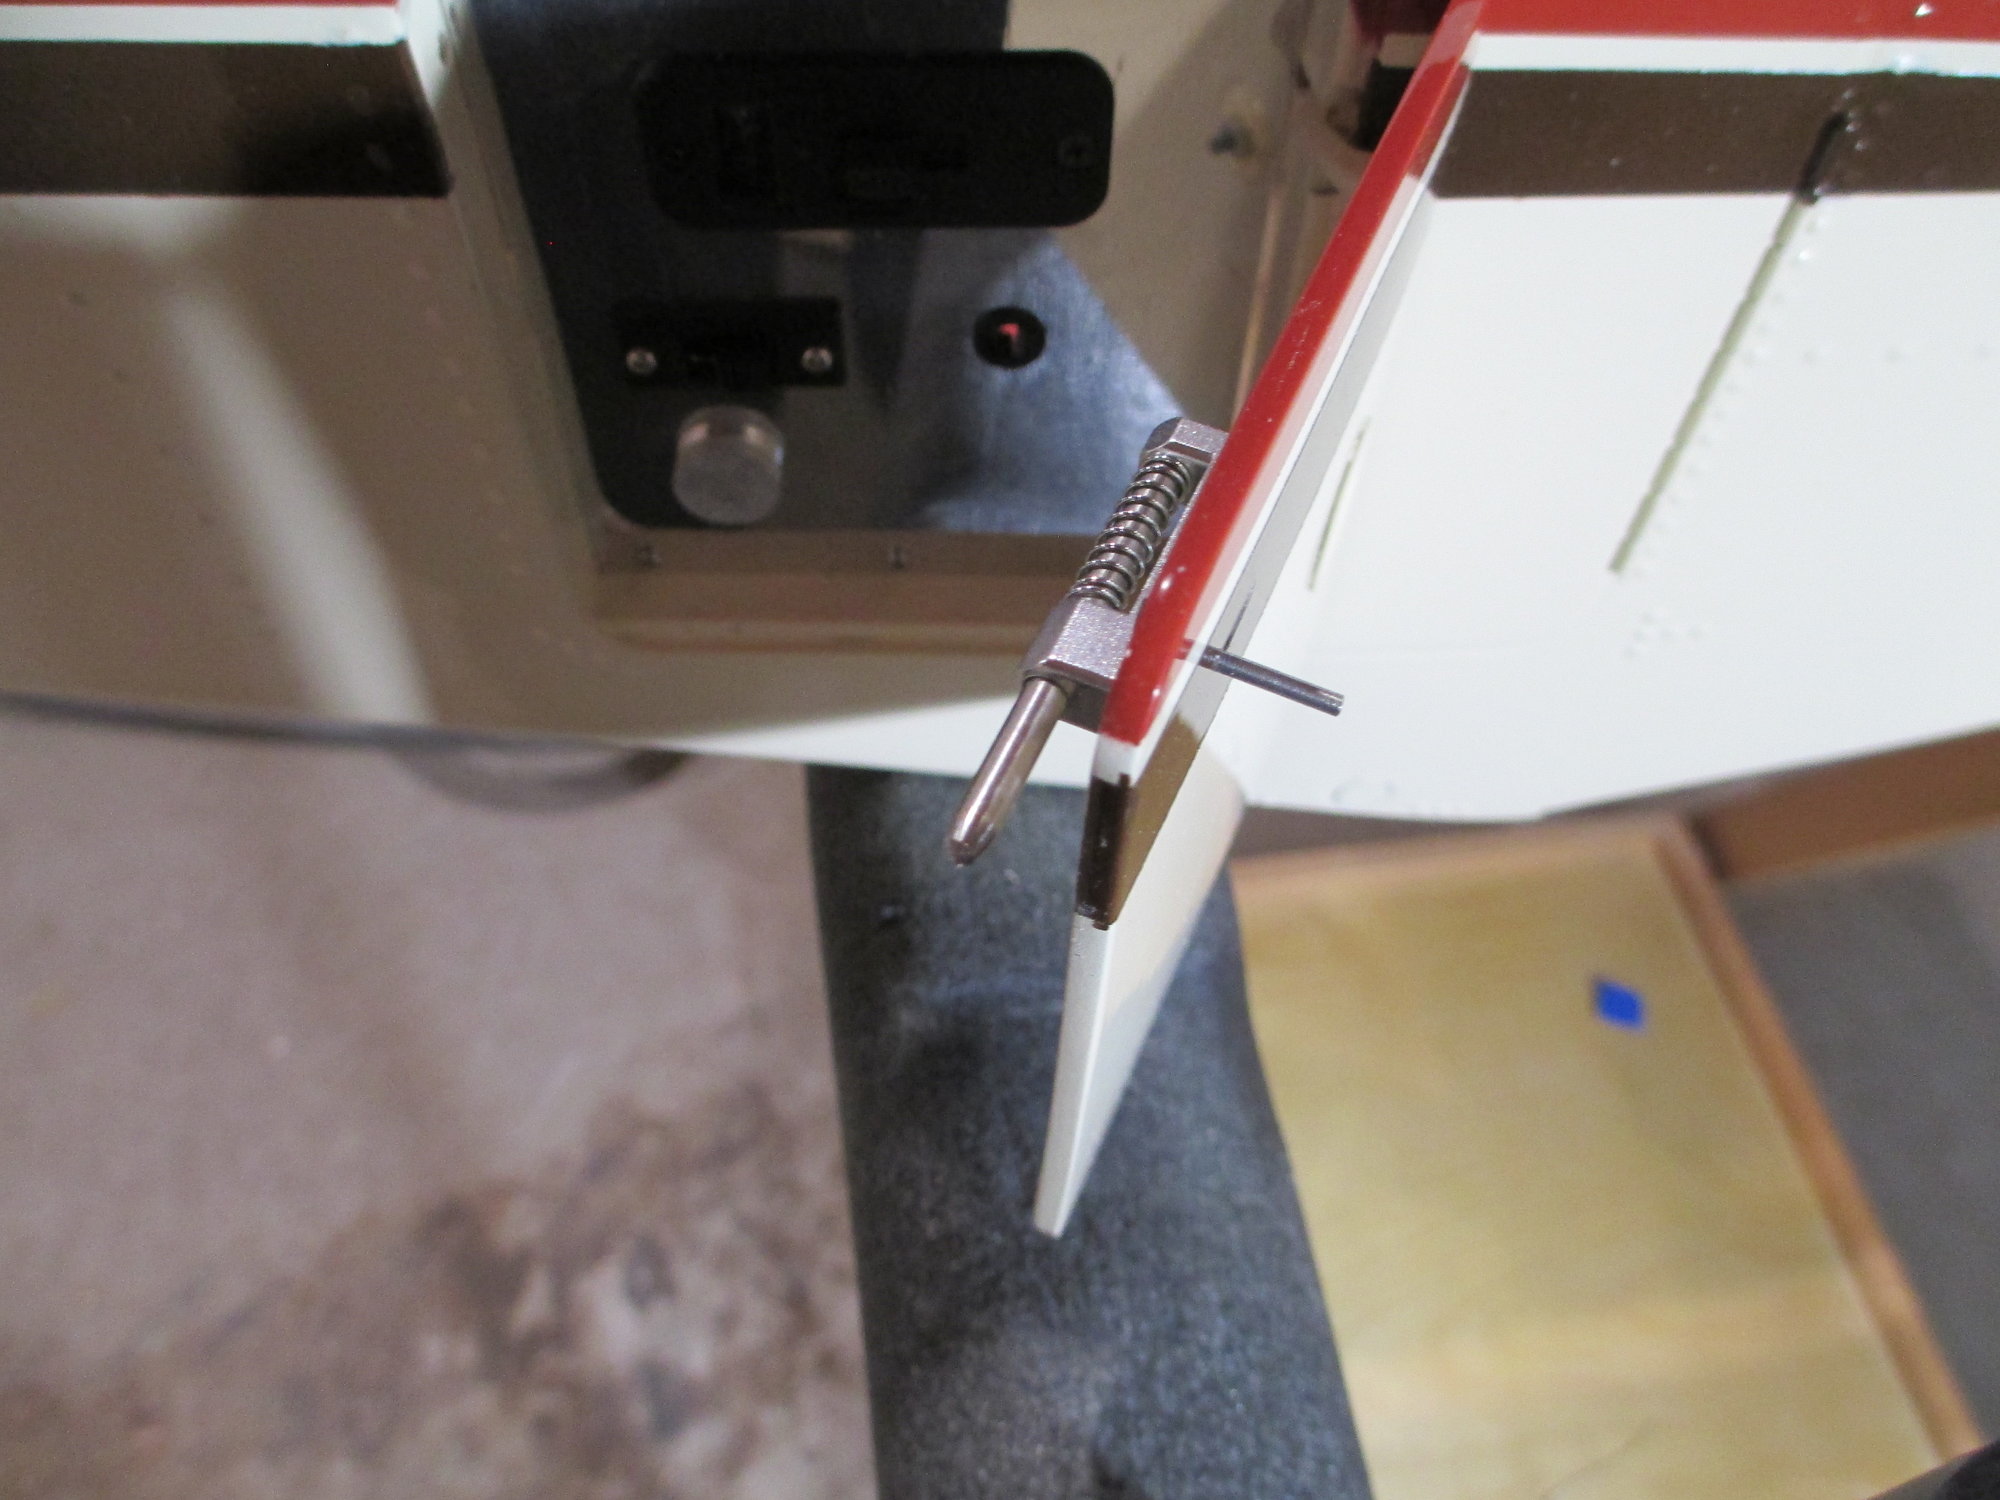
Its thin handle doesn't draw one's attention from the outside...and it opens and closes perfectly.


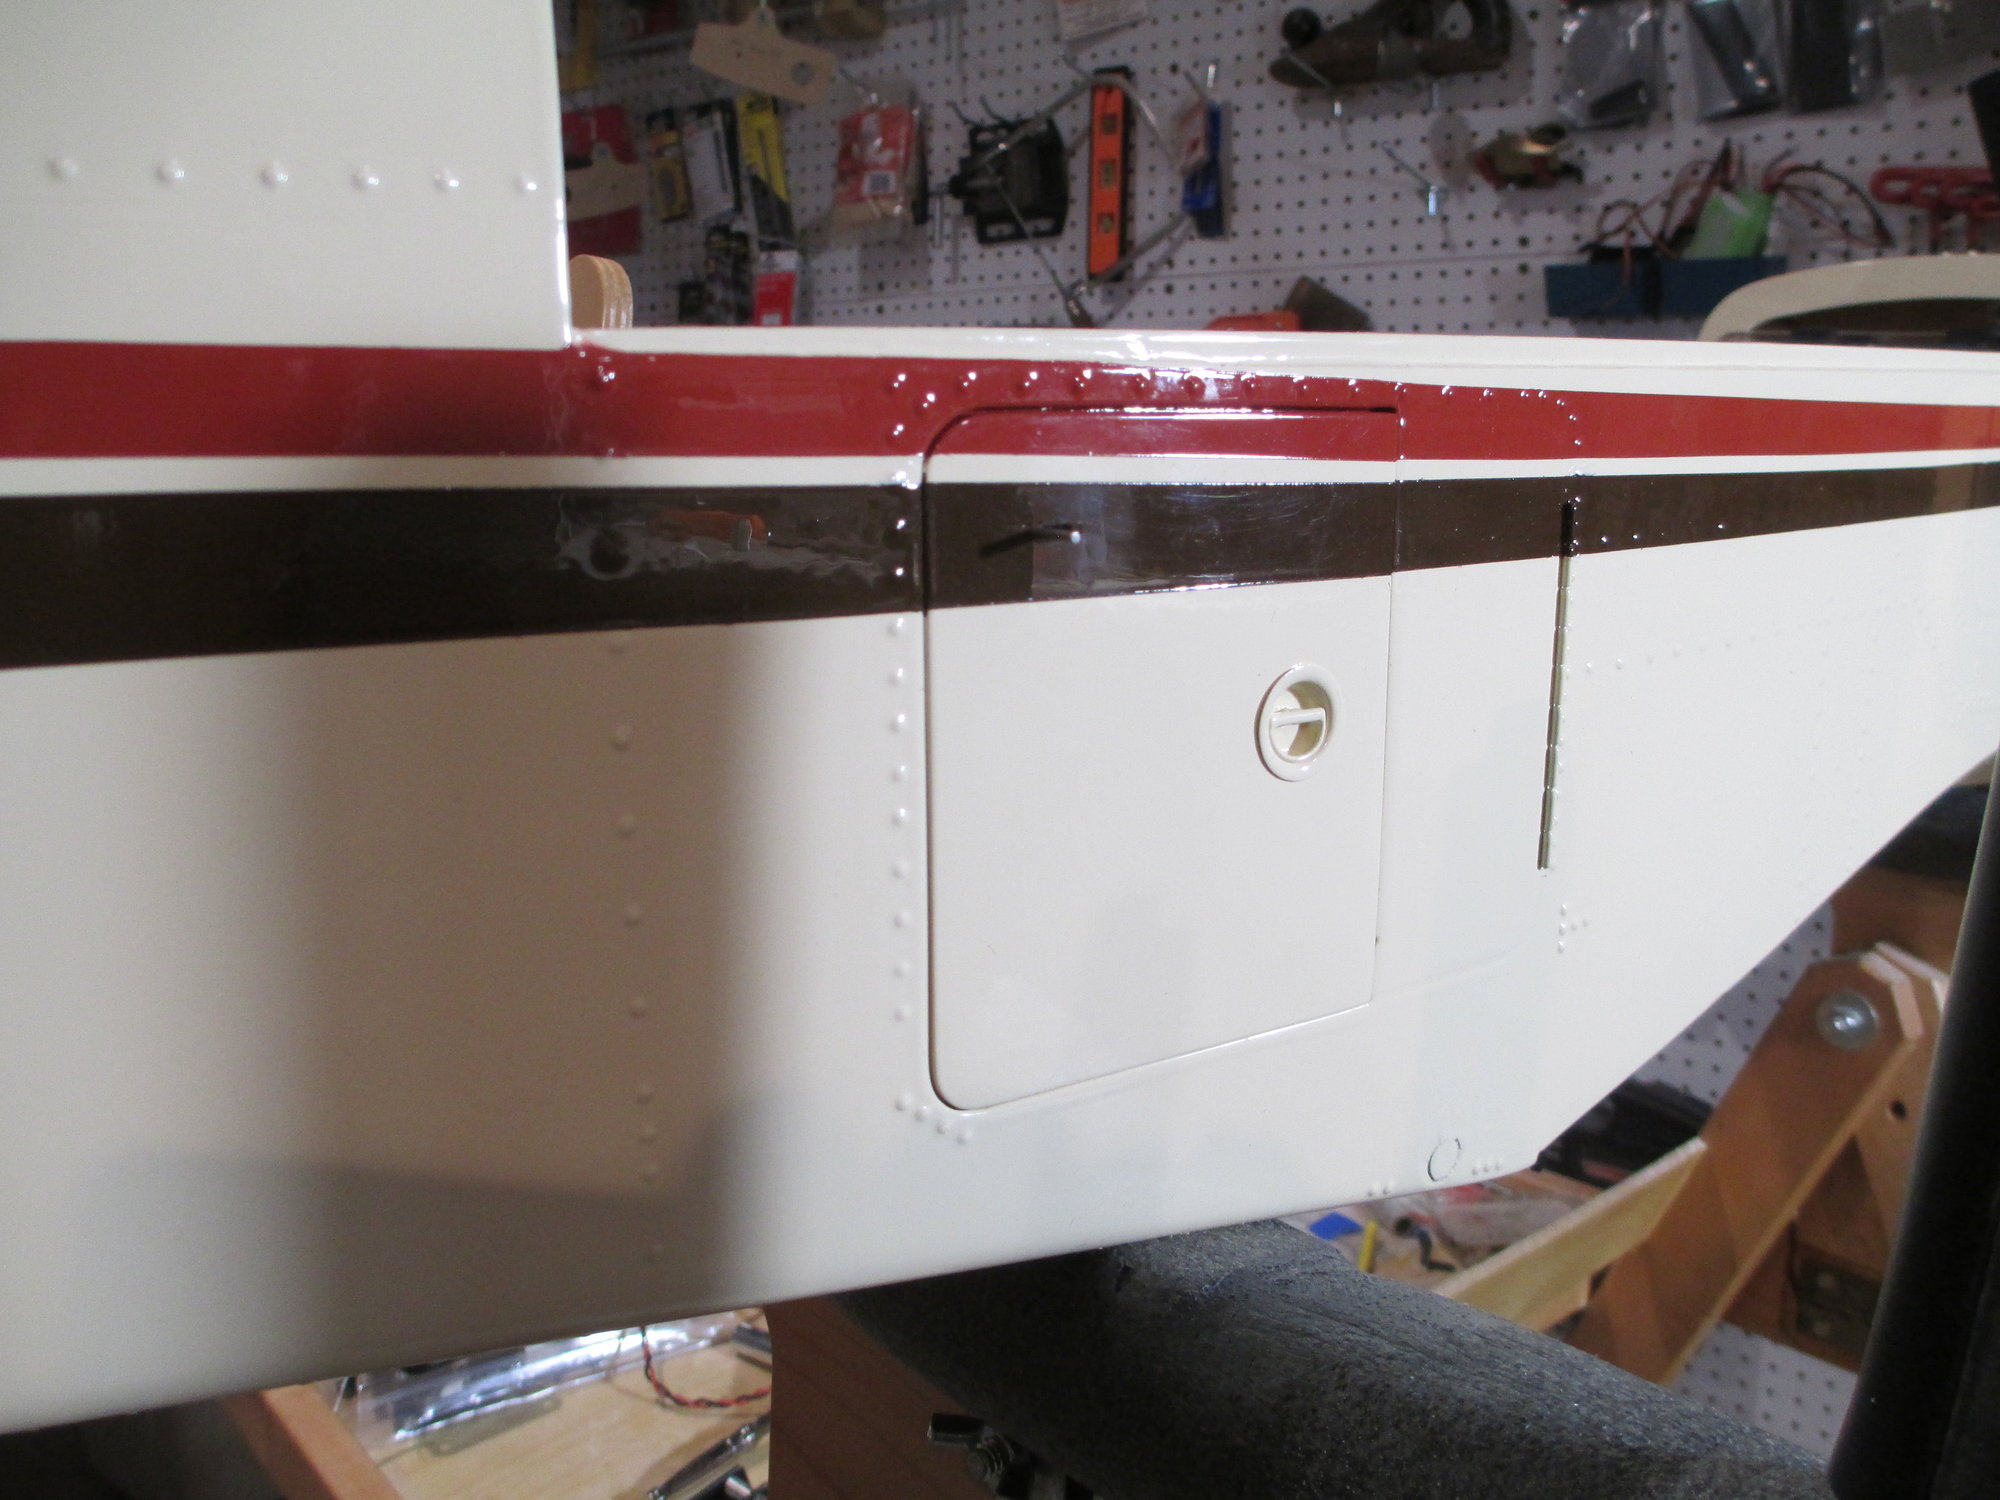
I chose to position it on the darker brown stripe to help further conceal it.

Last edited by VincentJ; 03-16-2021 at 02:59 AM.
The following users liked this post:
WacoNut (03-15-2021)
Old 03-15-2021, 05:17 PM
  #1646  
FlyerInOKC
My Feedback: (6)
 
FlyerInOKC's Avatar
 
Join Date: Nov 2004
Location: Oklahoma City, OK
Posts: 14,163
Received 274 Likes on 239 Posts
Default

Nice job Vince!
Old 03-15-2021, 05:21 PM
  #1647  
VincentJ
Thread Starter
 
VincentJ's Avatar
 
Join Date: Mar 2011
Location: Peterborough, NH
Posts: 4,582
Received 120 Likes on 108 Posts
Default

Originally Posted by FlyerInOKC
Nice job Vince!
Thanks Mike! I believe I am actually starting to see the light at the end of the tunnel...
Old 03-16-2021, 09:30 AM
  #1648  
FlyerInOKC
My Feedback: (6)
 
FlyerInOKC's Avatar
 
Join Date: Nov 2004
Location: Oklahoma City, OK
Posts: 14,163
Received 274 Likes on 239 Posts
Default

That is a good thing....


unless its an oncoming train!
Old 03-17-2021, 02:33 PM
  #1649  
VincentJ
Thread Starter
 
VincentJ's Avatar
 
Join Date: Mar 2011
Location: Peterborough, NH
Posts: 4,582
Received 120 Likes on 108 Posts
Default


The following 2 users liked this post by VincentJ:
capt1597 (03-18-2021), WacoNut (03-17-2021)
Old 03-17-2021, 08:11 PM
  #1650  
FlyerInOKC
My Feedback: (6)
 
FlyerInOKC's Avatar
 
Join Date: Nov 2004
Location: Oklahoma City, OK
Posts: 14,163
Received 274 Likes on 239 Posts
Default

Gear came out nice!


Contact Us - Manage Preferences - Archive - Advertising - Cookie Policy - Privacy Statement - Terms of Service -

Copyright © 2024 MH Sub I, LLC dba Internet Brands. All rights reserved. Use of this site indicates your consent to the Terms of Use.