


Sig Four Star 20 Super Sportster Build
 05-07-2022, 04:10 AM
#101


Even glow birds it sometimes requires testing different props. On the giant scale gas birds there is a lot of asking each other should what prop should I use. I see that on a forum for a 1/3 scale Pitts. At $30+ a prop I can understand. Course since they are tossing a variety of engines at it there is no clear answer. And add flying style.
Ken
Ken
 05-07-2022, 04:28 AM
#102
Senior Member
Thread Starter
Exactly, better to be prepared. During my glow fuel days I amassed quite a collection of props in my field box. Ill never take that prop stash out because you never know. I have only had 2 gasoline engined birds over the years. They were definitely less powerful than the glow counterparts, but the huge aircraft size made up for it My current flying club is electric only or believe me I'd be putting a OS 46la in this.
My current flying club is electric only or believe me I'd be putting a OS 46la in this.
05-07-2022, 09:19 AM
#103
A 46 in a 20 sized bird is almost enough. Think a 60 with a tuned pipe would fit?
I generally go bigger in engines. Even if I really don't fly with my foot in it. I can always run at low power levels, getting better engine longevity. Love those super short take offs and steep climb rates. And they have gotten me out of trouble more than once. But I have scared myself also. Low and slow don't punch they throttle if you don't want to suddenly find yourself practicing low level inverted flight. A gentle push on the throttle will work just fine.
Ken
05-07-2022, 12:09 PM
#104
Senior Member
Thread Starter
Last one I built like this was from scratch and had 2" more span and 1.5" more chord I believe. Might have been 2" more chord. Anyway it had the 46 in it for a while til I upgraded to a K&B 61 very little weight penalty....just less flight time on the tank already installed I've had a few that scared me for different reasons. 40 size Corsair with a 50 Hyper heli engine and prop hub from I think a 61 motor. The RPMs on that was scary and it screamed around the field. Due to the helicopter carb it had basically idle or wide open.
I've had a few that scared me for different reasons. 40 size Corsair with a 50 Hyper heli engine and prop hub from I think a 61 motor. The RPMs on that was scary and it screamed around the field. Due to the helicopter carb it had basically idle or wide open.
05-07-2022, 05:56 PM
#105
Senior Member
Thread Starter
Another one that was nerve rattling to put up in the air was honestly all my fault. I got some fool idea that putting a Magnum 52 4 stroke in a 45" sport plane was a good plan. It flew like a rocket and any amount of wind absolutely had no effect on it. The stall speed on the other hand was rather high due to wing loading which resulted in an abrupt and violent snap roll. After a dozen or so sessions with 50/50 landing success I retired it. I will say though it was a blast when at 3/4 throttle cruising around. I definitely learn better through failure unfortunately but sure do enjoy the journey.
05-07-2022, 09:13 PM
#106
I put a 40 in a Sig Cadet Jr. They only take a 15-25. I always use a 25. The 40 would flip the airplane invert in a slow pass if you punched the throttle hard. I*t would also take it straight up vertical. But 4 ounce of fuel don't go far in a 40. It did not take me long to remove and put a 25 back in. I did end up putting a ST 34 in though. That was not bad heck of a climb rate. Still had to watch how fast you advanced the throttle at low and slow. Even with a 25, easing the throttle forward not a bad ideal if you really slow.
Ken
Ken
 05-25-2022, 05:00 PM
#108
Senior Member
Thread Starter
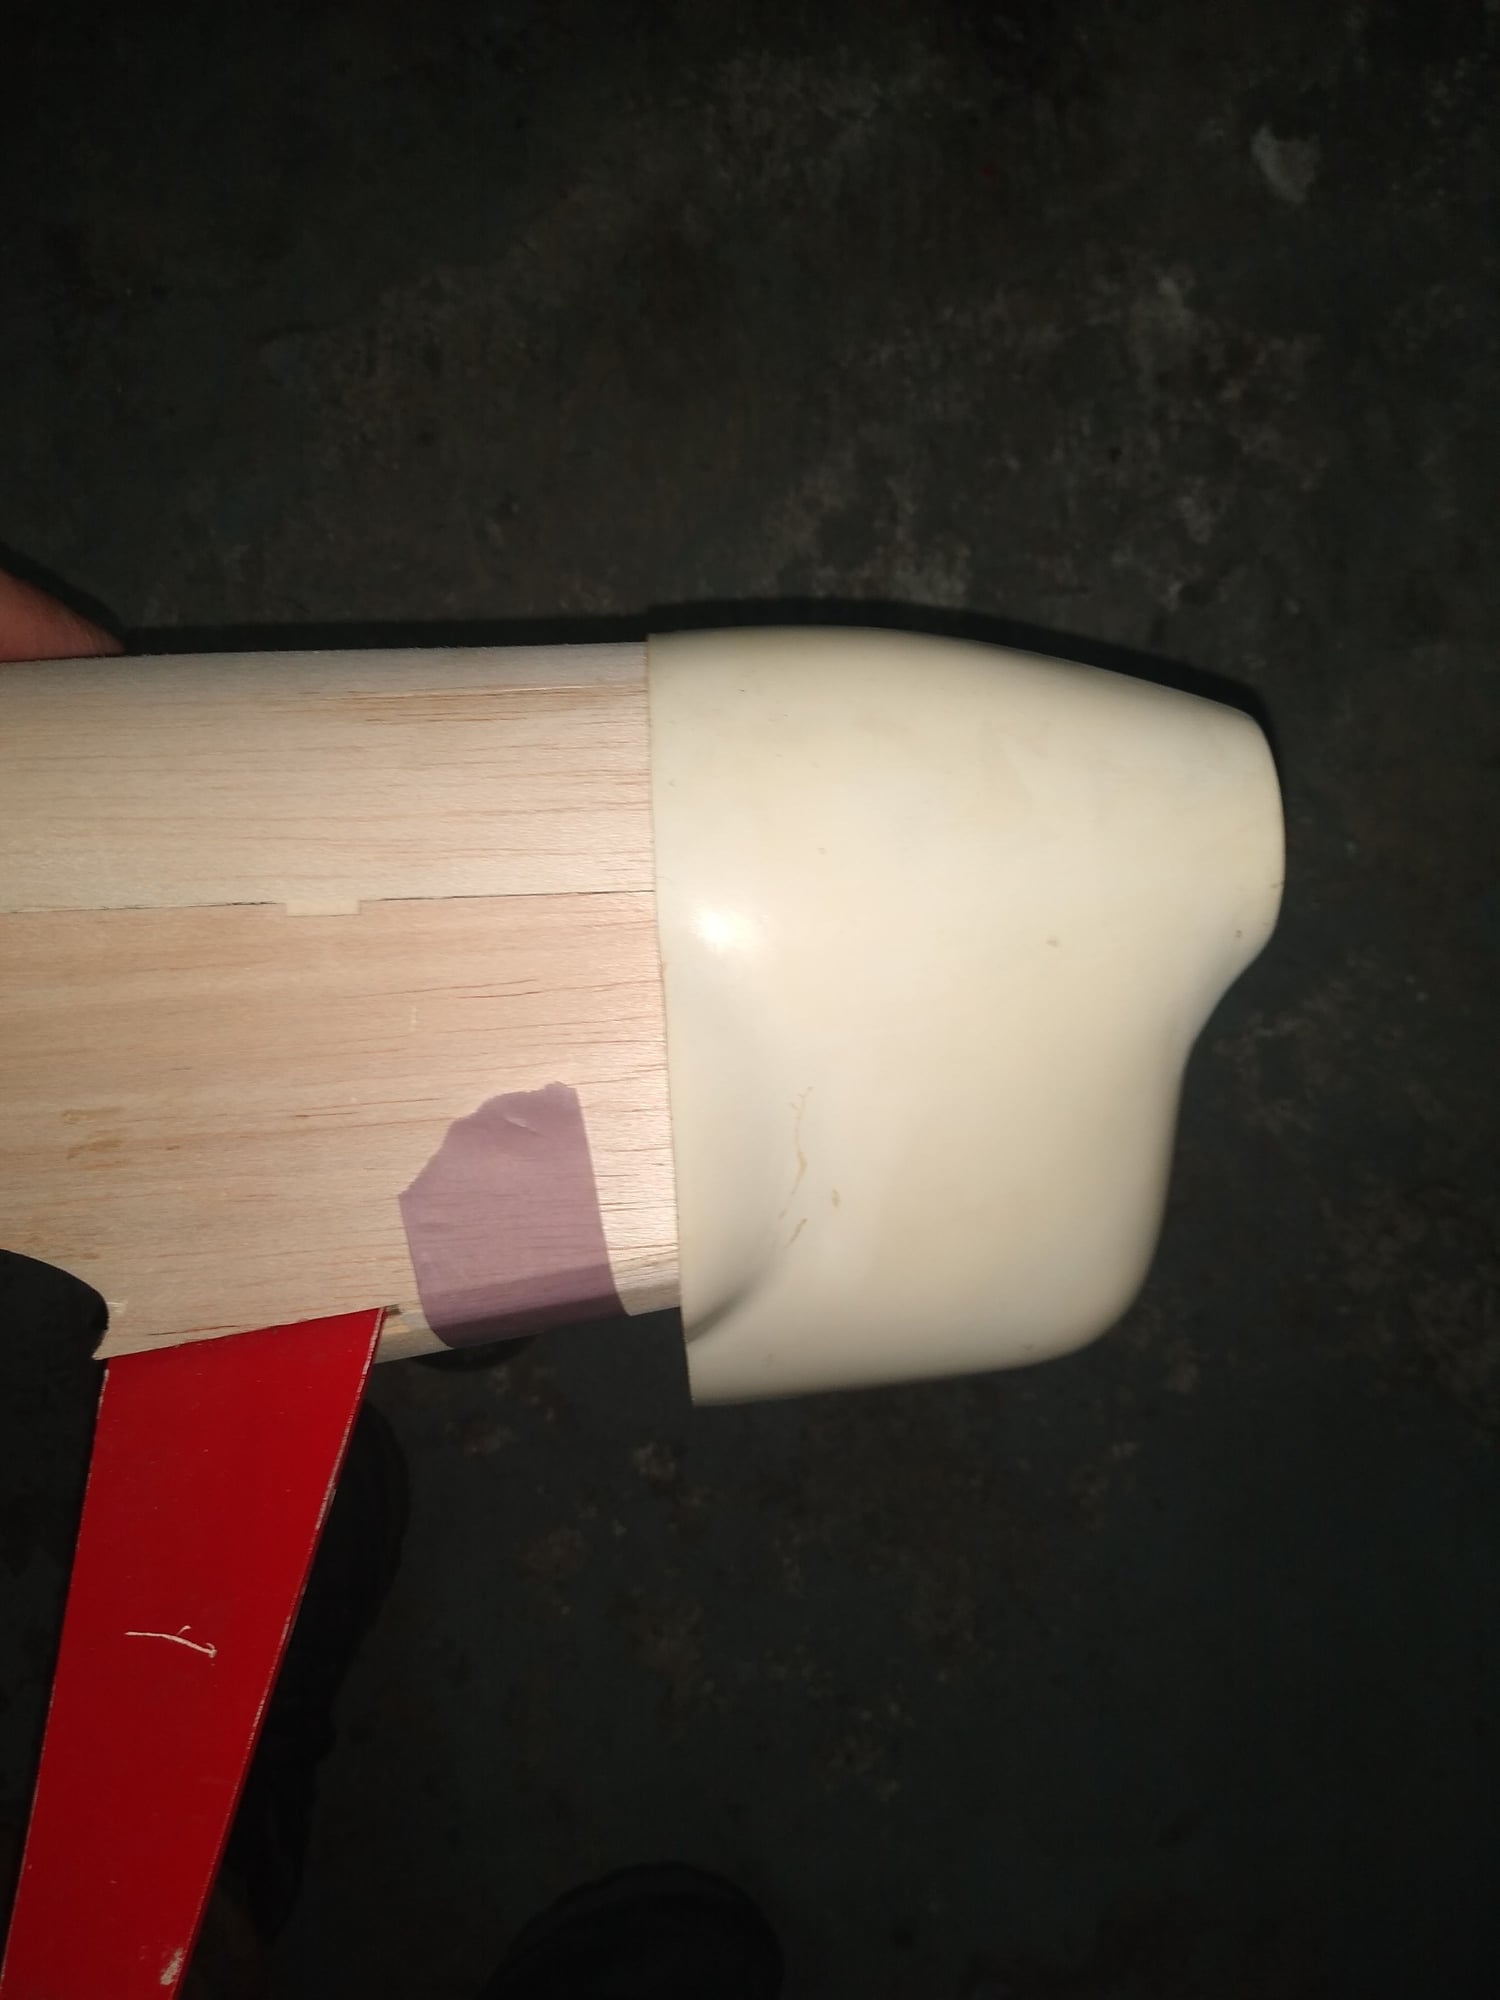
The pictures are of a cowl I recently acquired in an estate auction along with a scaled down Red Zephyr and Gentle Lady. The cowl I think is from a Ryan ST abeit slightly oversized for this. No worries though I can work some magic to make it fit
07-02-2022, 04:03 PM
#109
Senior Member
Thread Starter
After a long break I'm back on the build! Here's what I got finished today. The motor mount and cowl are next up on the list. Next week possibly for that. Then I'll work my way back on loose ends.
07-03-2022, 11:11 AM
#111
Senior Member
Thread Starter
Thanks! Today is the beginning of the front end work. The big cowl I acquired is now cut down to a usable top cowl. The basswood mounting blocks are epoxied on and curing currently to secure to. I need to find tune the cowl air inlet with a small file so I'm going to dig one up and get that finished while waiting on epoxy.
Next step will be determine the motor position and cut out parts for a mount. The ESC will sit on a 45 degree angle below the motor on the same mount. I'm thinking this method will keep that ESC plenty cool during a flight.
Next step will be determine the motor position and cut out parts for a mount. The ESC will sit on a 45 degree angle below the motor on the same mount. I'm thinking this method will keep that ESC plenty cool during a flight.
07-03-2022, 03:27 PM
#112
Senior Member
Thread Starter
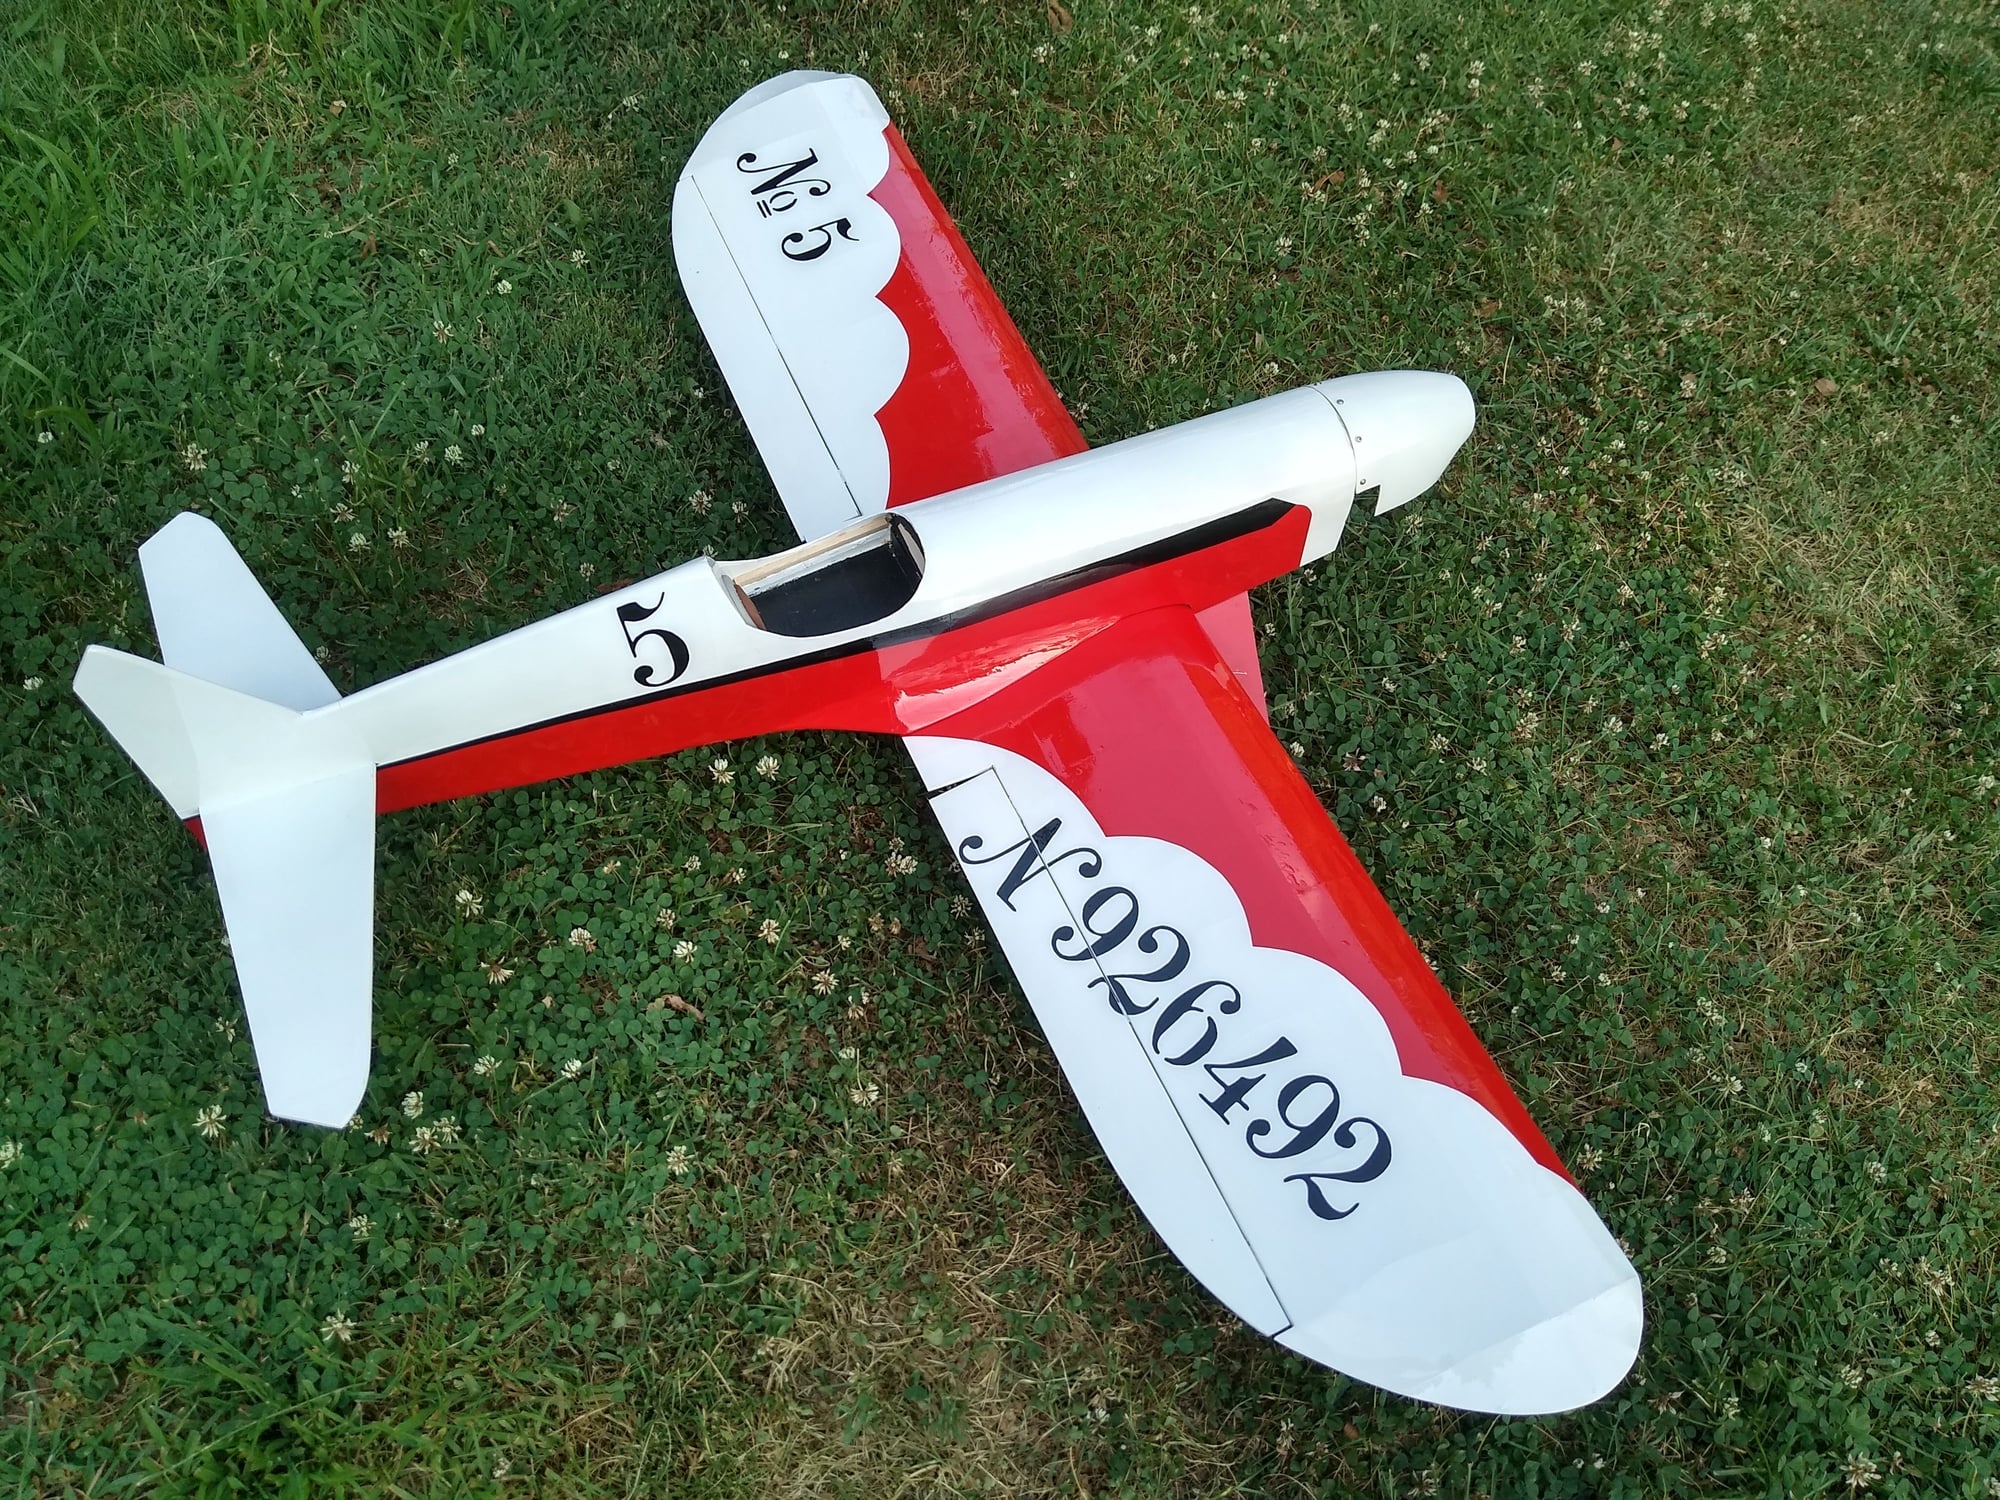
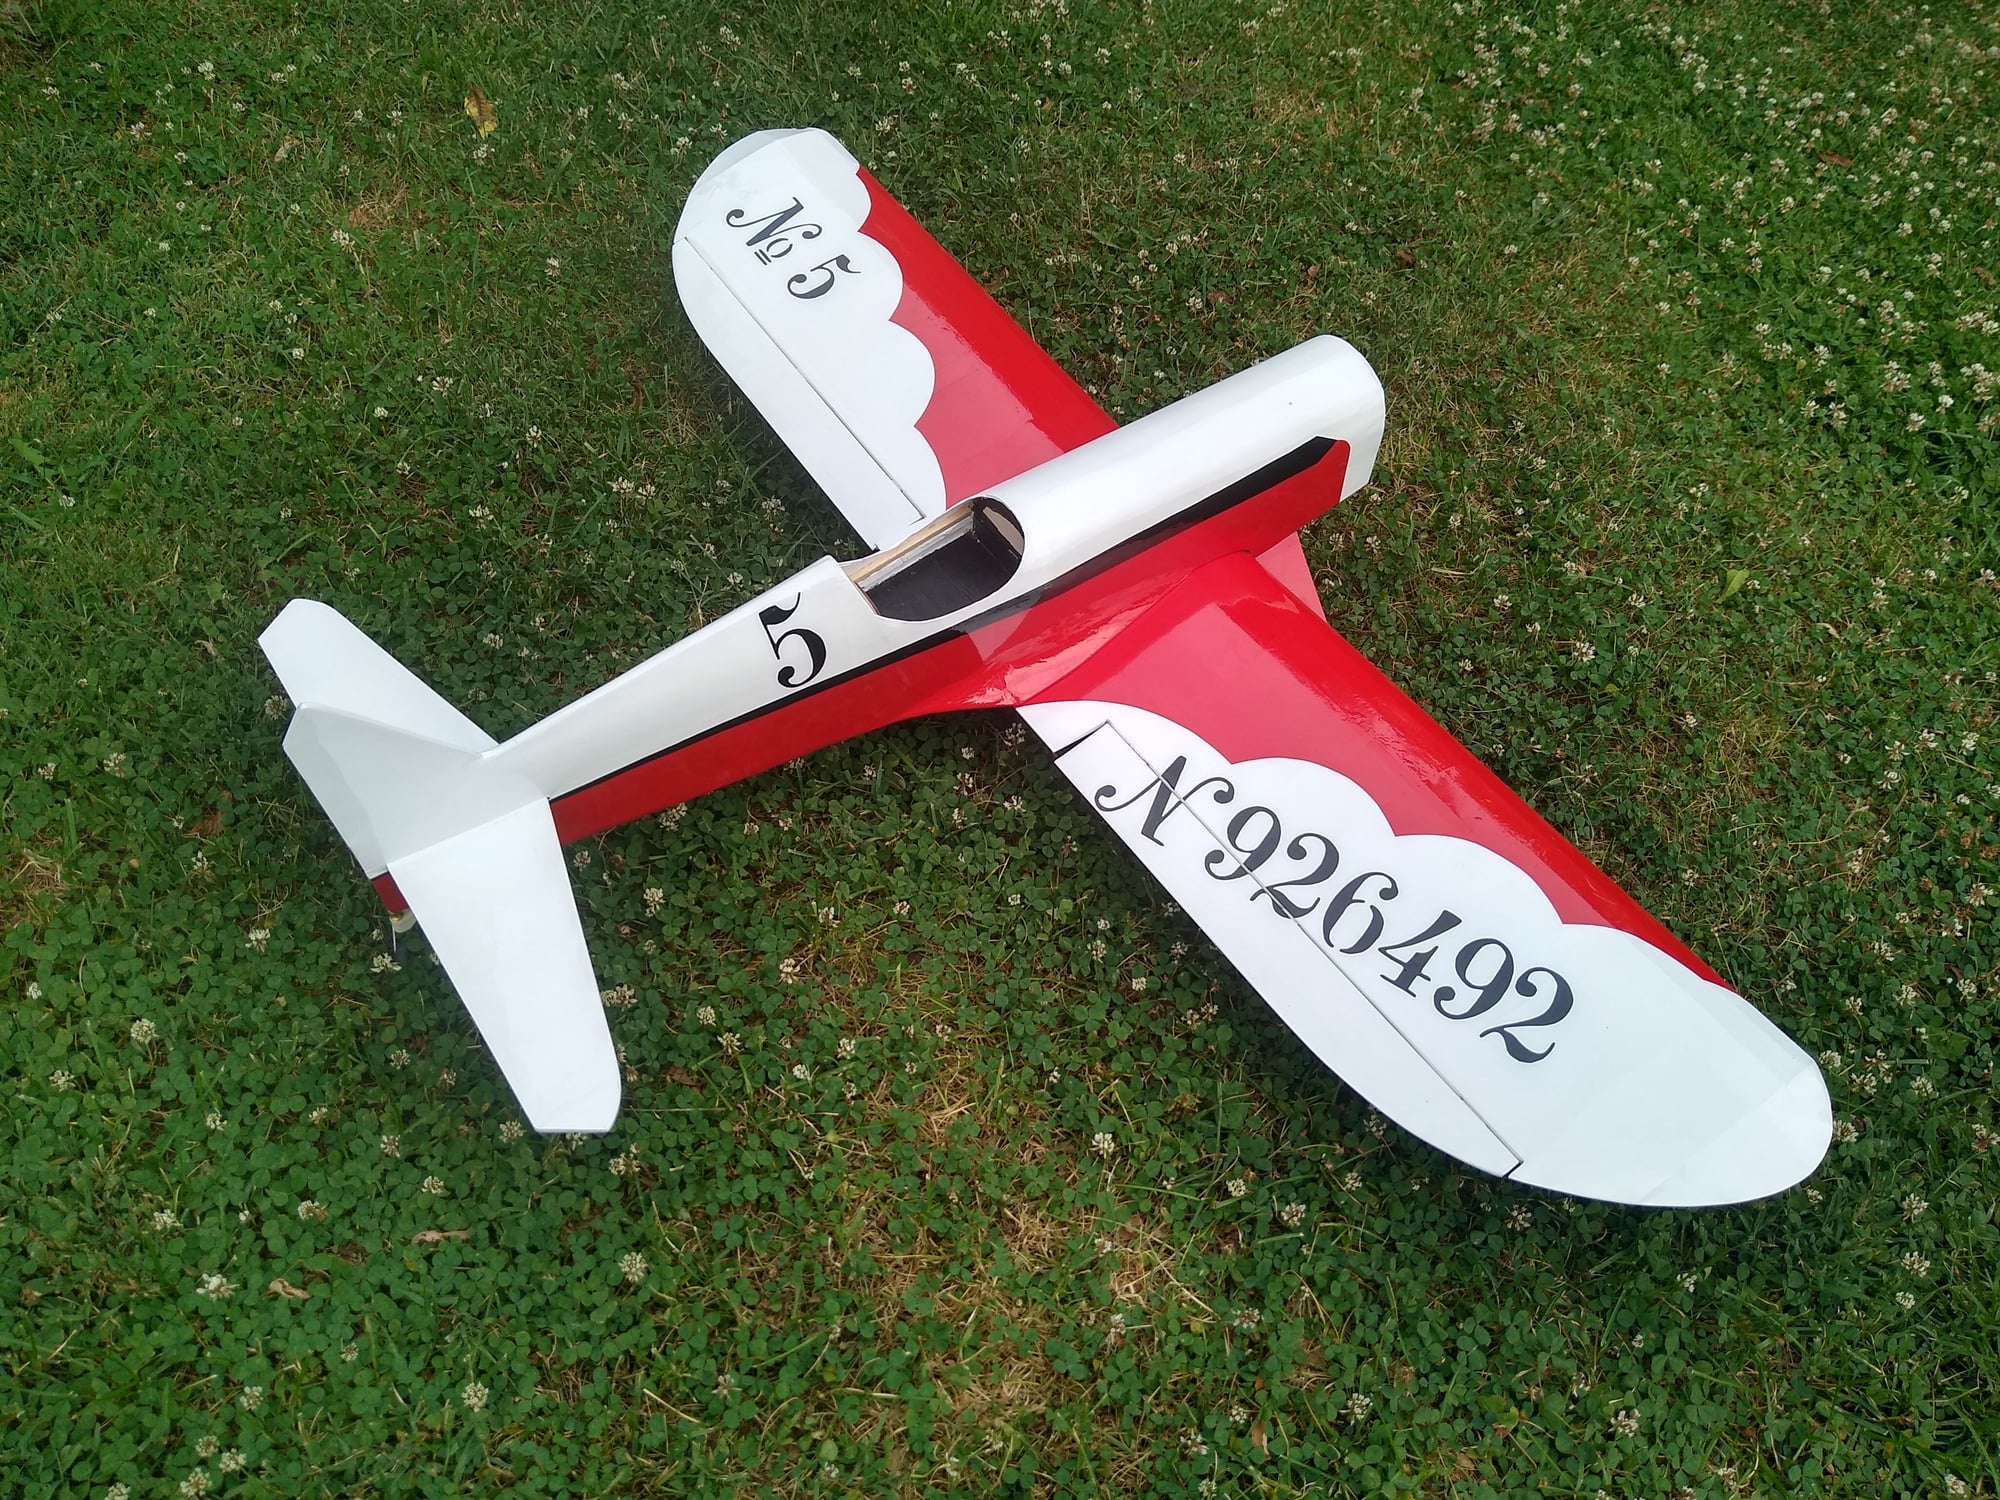
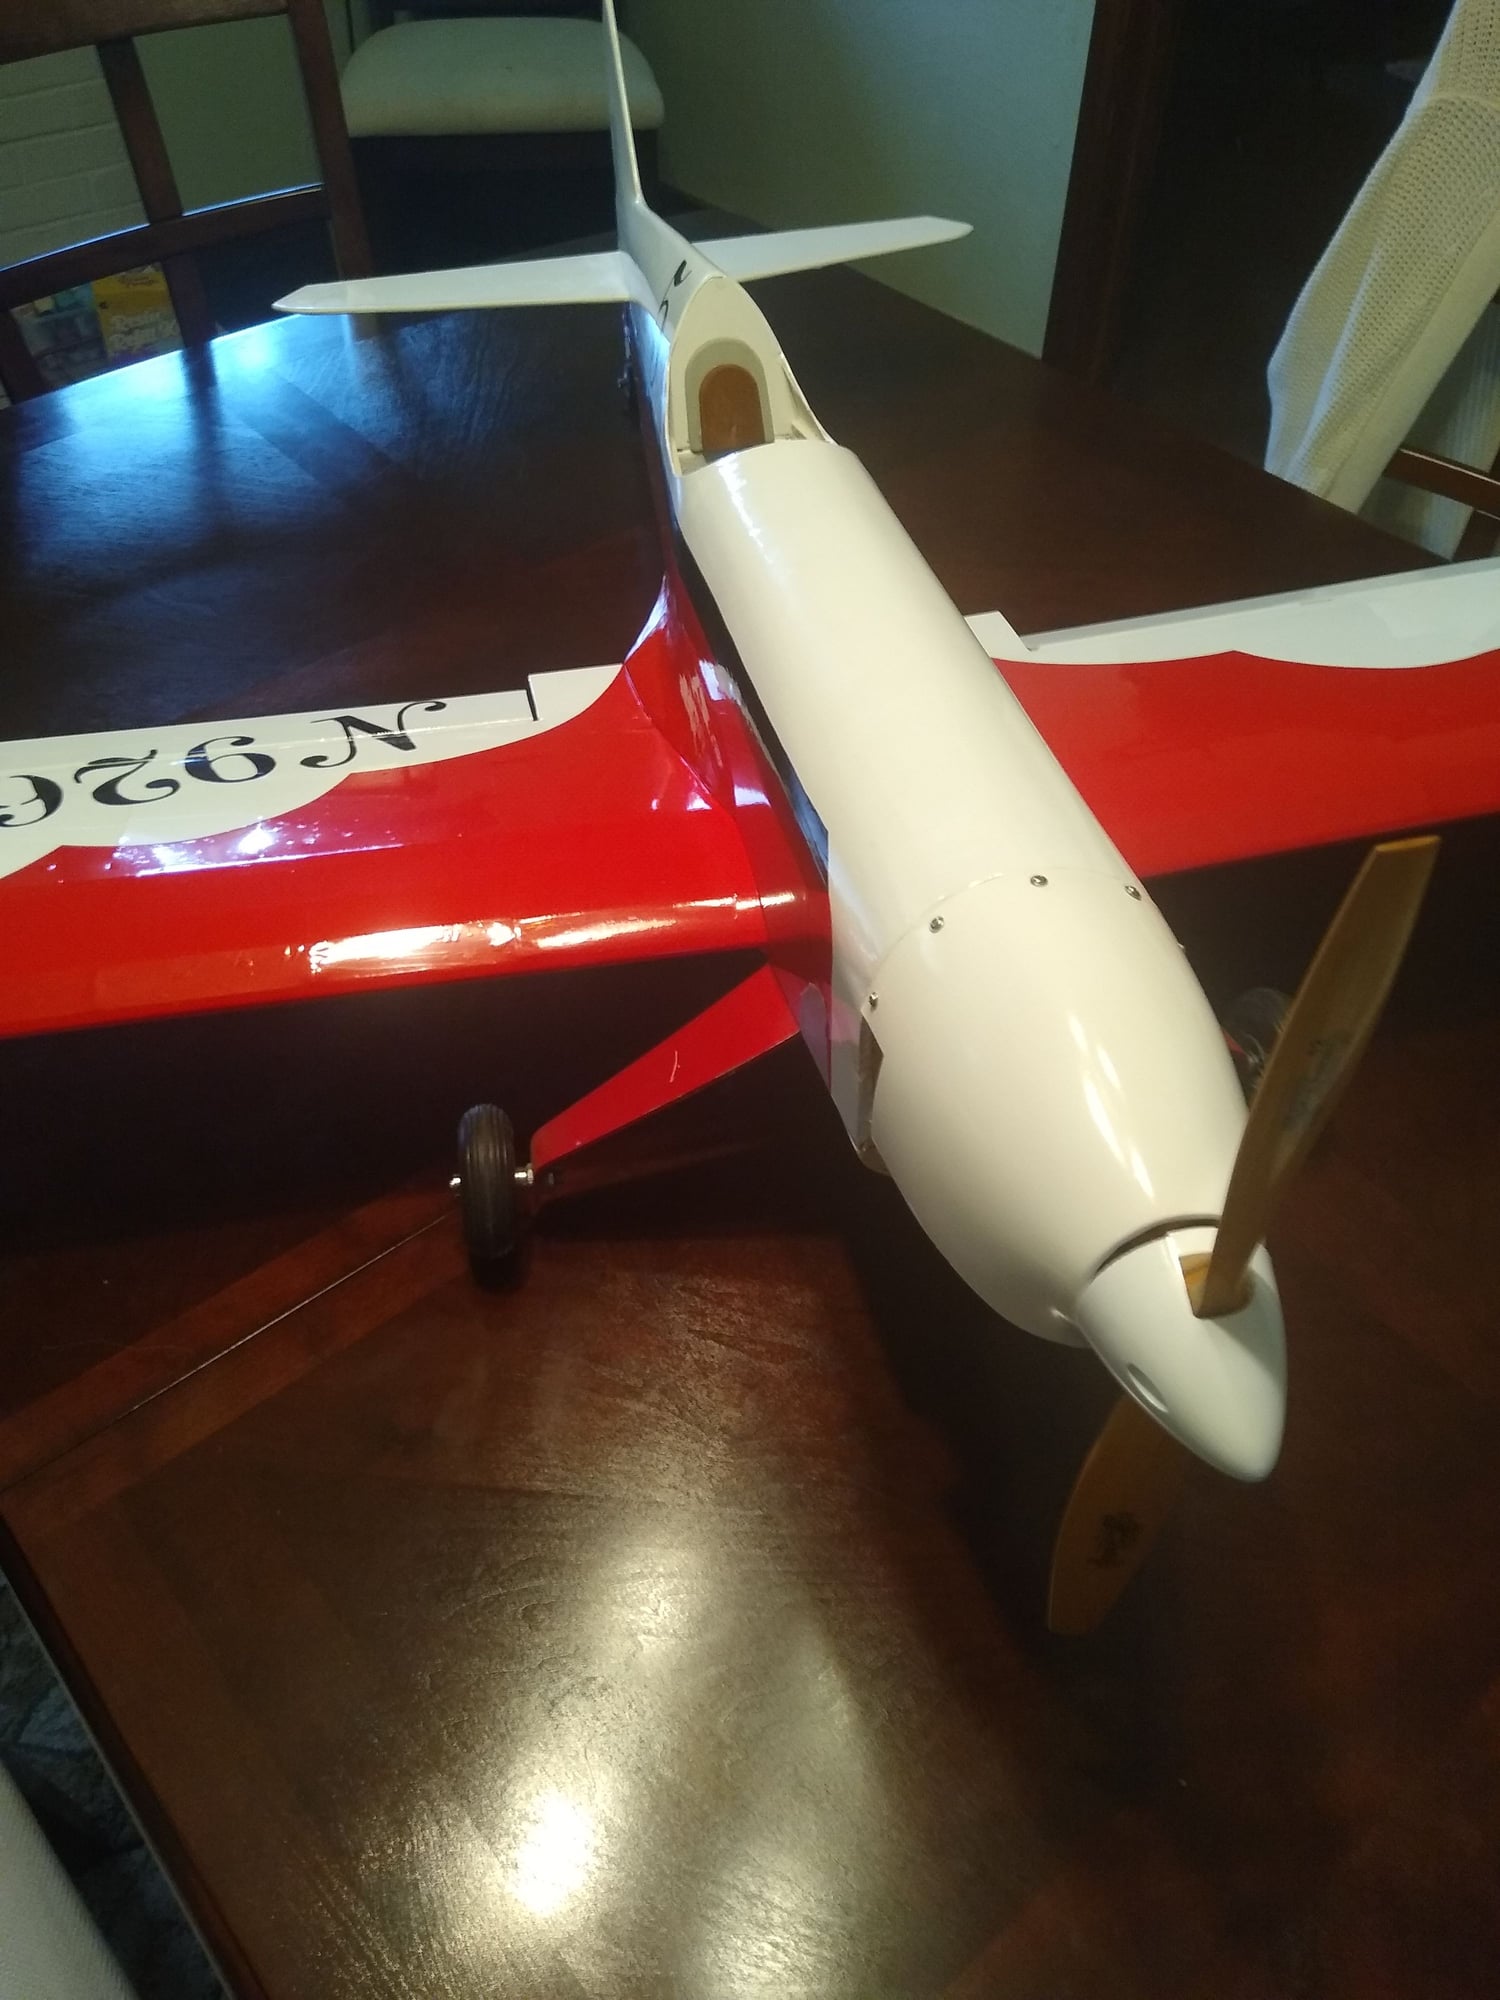
The upper cowl is installed! Next few days I'll build the ply motor mount and then the balsa lower cowl. It's definitely coming together fast now.
07-04-2022, 05:12 AM
#113
Senior Member
Thread Starter
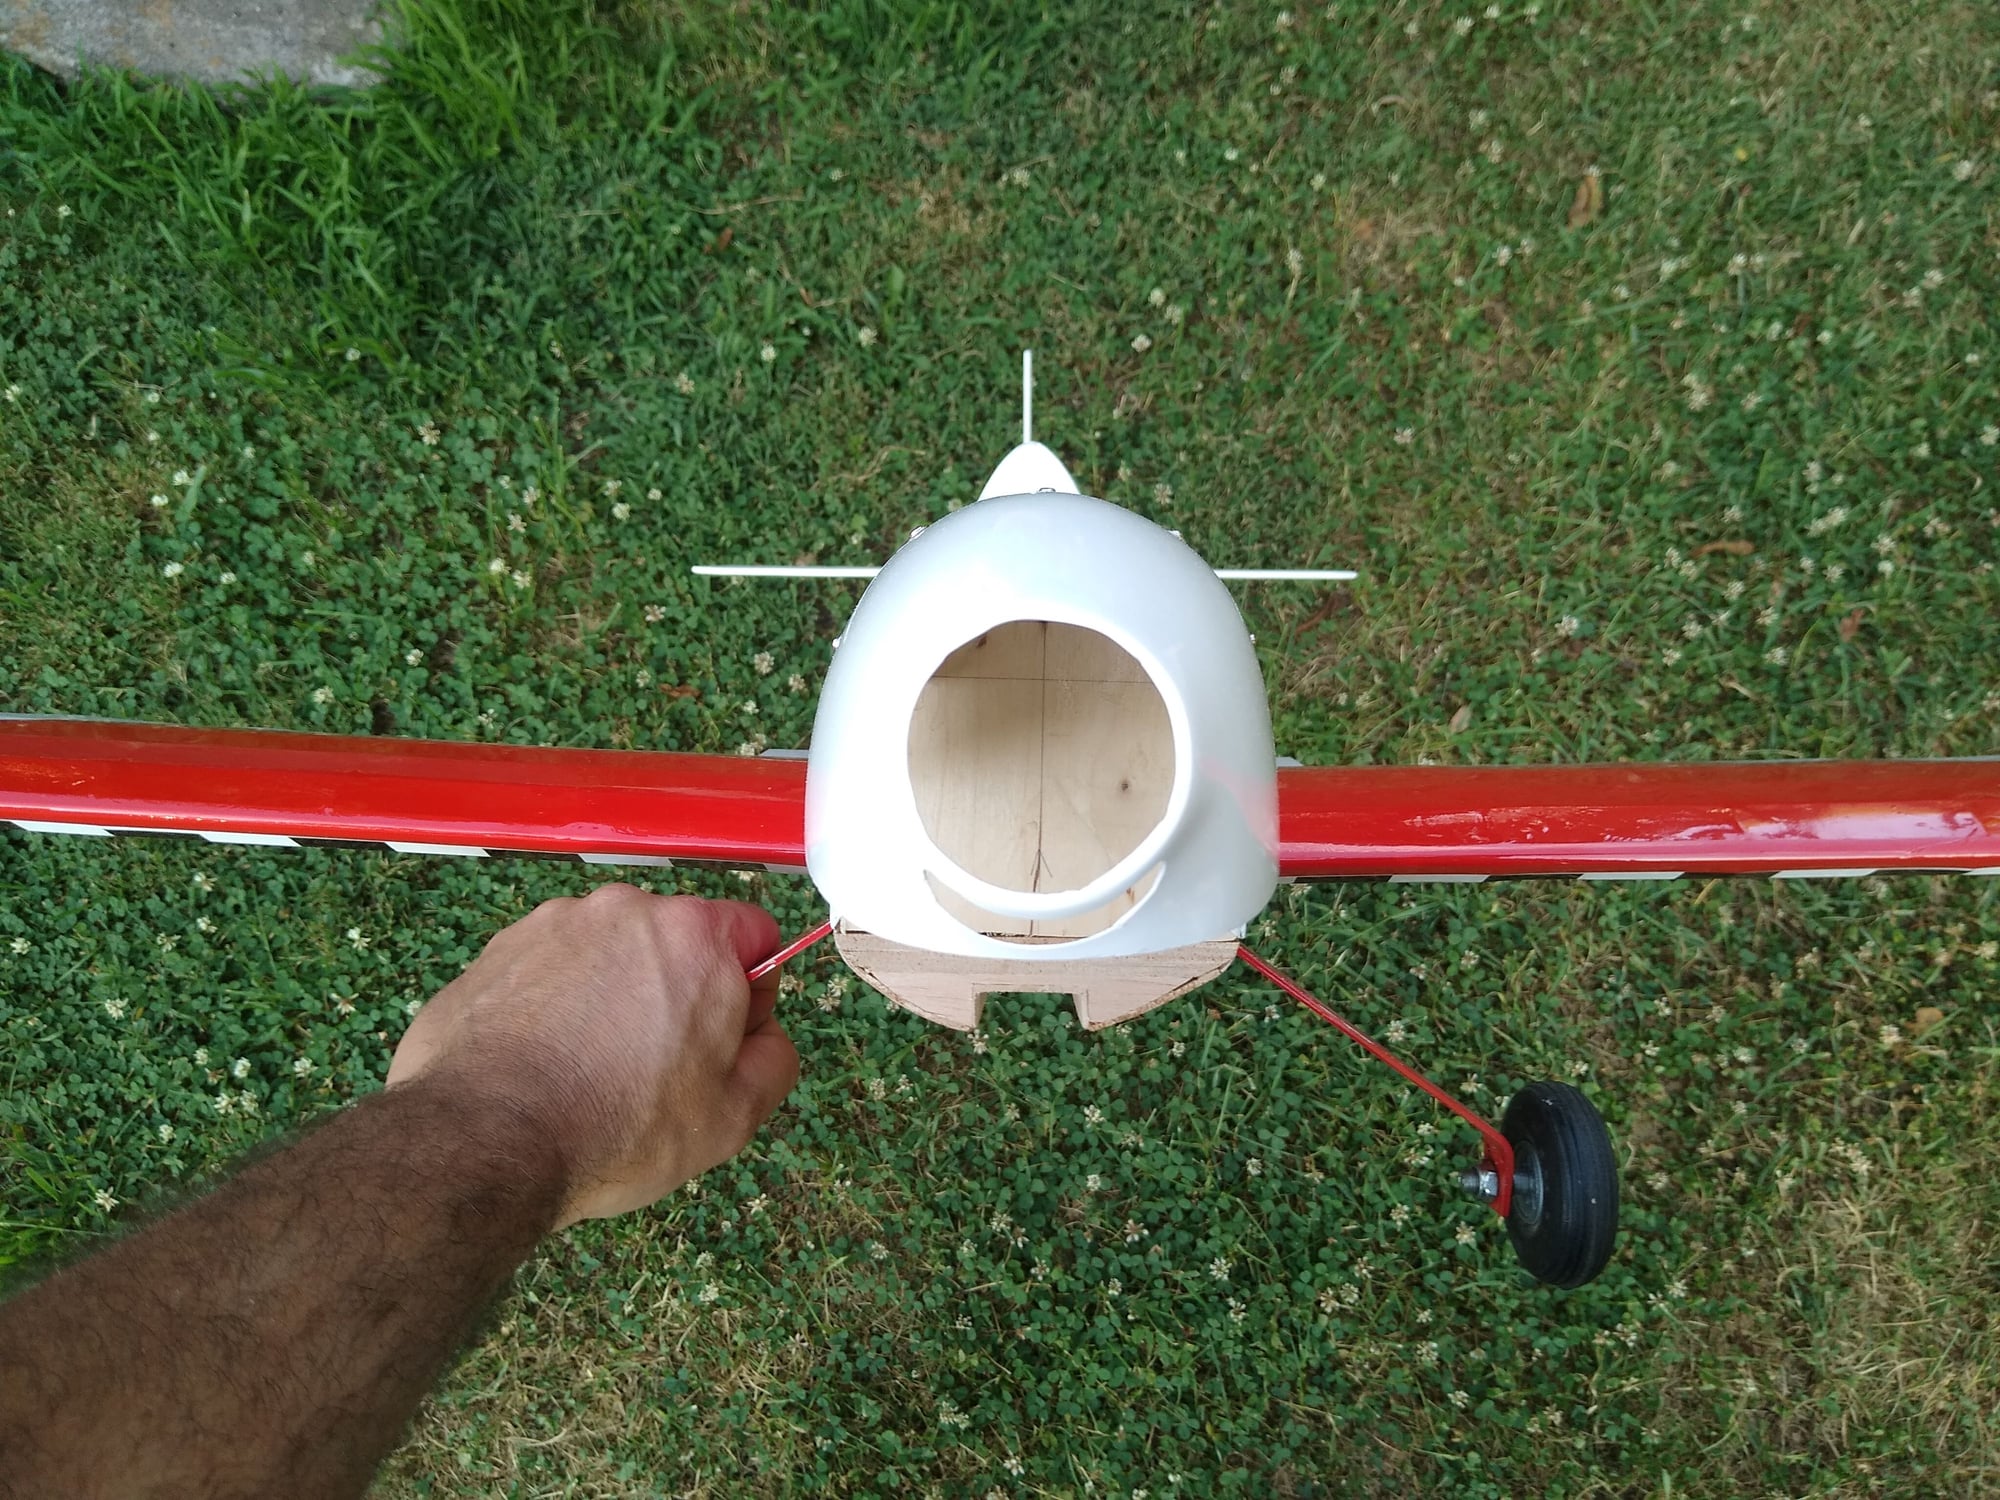
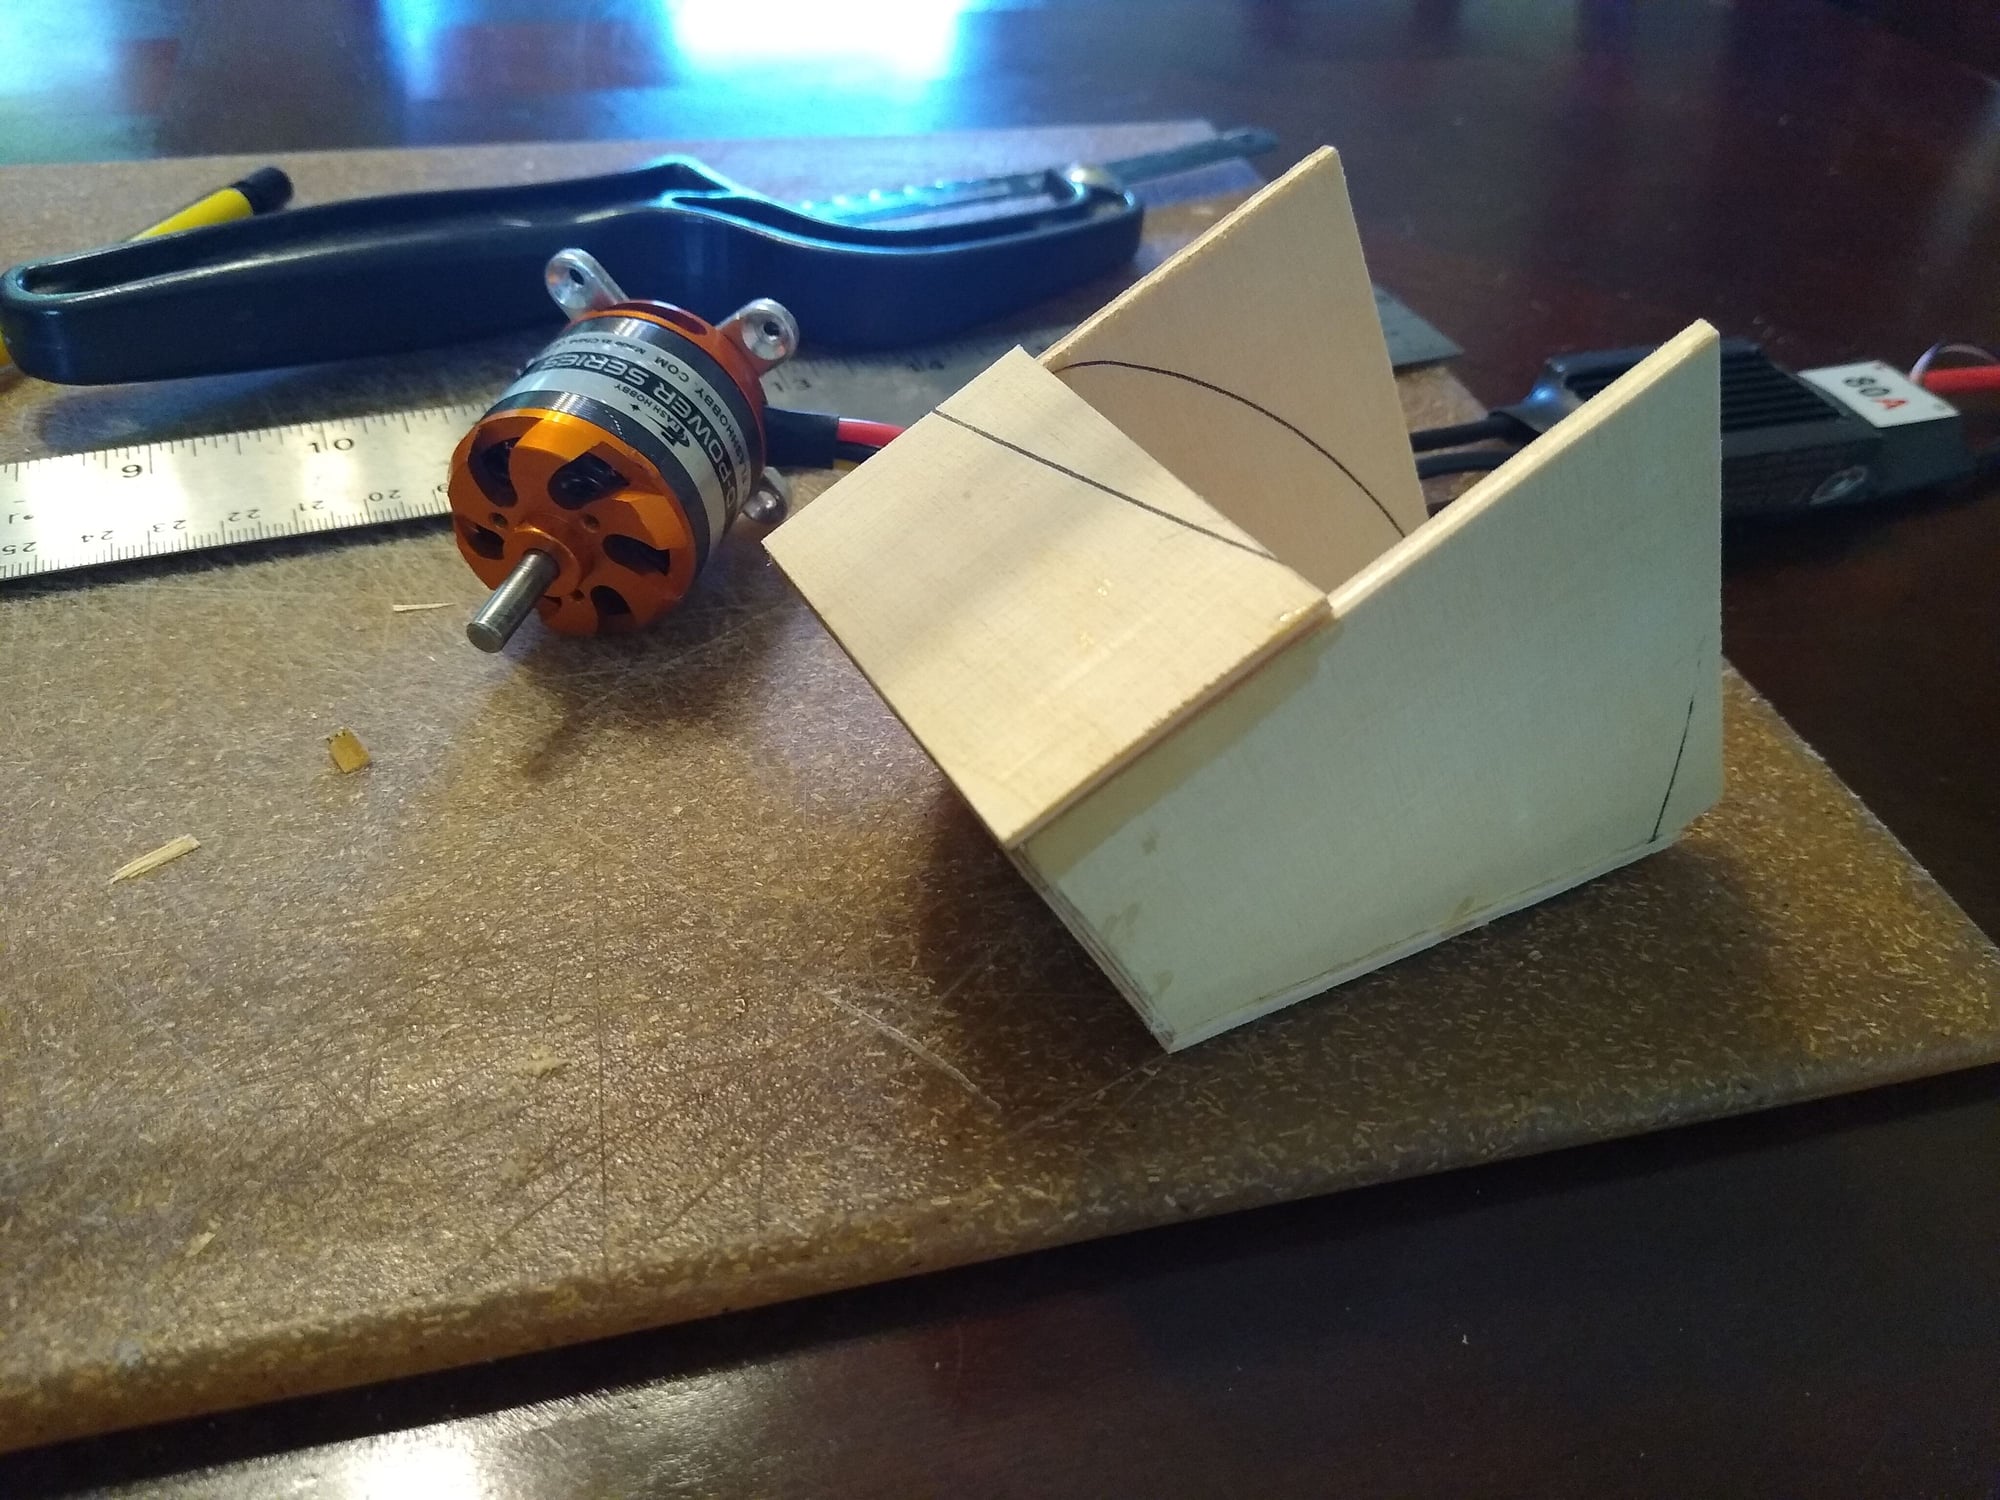
Good morning! It's my favorite holiday today, so I decided to start it with the relaxation of building. I measured the distance needed for the spinner and built up a mount. The bulk of it is 1/8 lite ply, the actual motor mount is 3/32 birch ply face with 2 layers of 1/8 lite ply behind. There is 1/4 bass stringers behind that inside the box for extra strength. I've never used a motor this strong so I went a little extra compared to my normal builds. Once the epoxy cures I'll drill holes to zip tie the ESC in place and install the blind nuts for the motor. The mount will eventually cradle 2 basswood rails epoxied and screwed to the firewall. If this doesn't hold the motor put I don't know what will.
07-05-2022, 04:47 PM
#115
Senior Member
Thread Starter
As always much appreciated  I am going to install the blind nuts tonight for the motor so it's out of the way, and most likely work on getting the mount in place tomorrow.
I am going to install the blind nuts tonight for the motor so it's out of the way, and most likely work on getting the mount in place tomorrow.
07-06-2022, 06:51 PM
#117
Senior Member
Thread Starter
After some cutting and shaving to fit perfectly, the motor mount rails are set! Tomorrow I'll take the upper cowl off and remove the mount to screw down the rails. After that epoxy the whole thing for a super secure assembly.
07-07-2022, 01:41 PM
#119
Senior Member
Thread Starter
Motor mount is 100% secure now! I'll let the epoxy cure overnight and work on securing the ESC tomorrow. Also I want to route wiring to the receiver before moving on. Next major step is build the lower cowl.
 07-08-2022, 02:36 PM
#122
Senior Member
Thread Starter
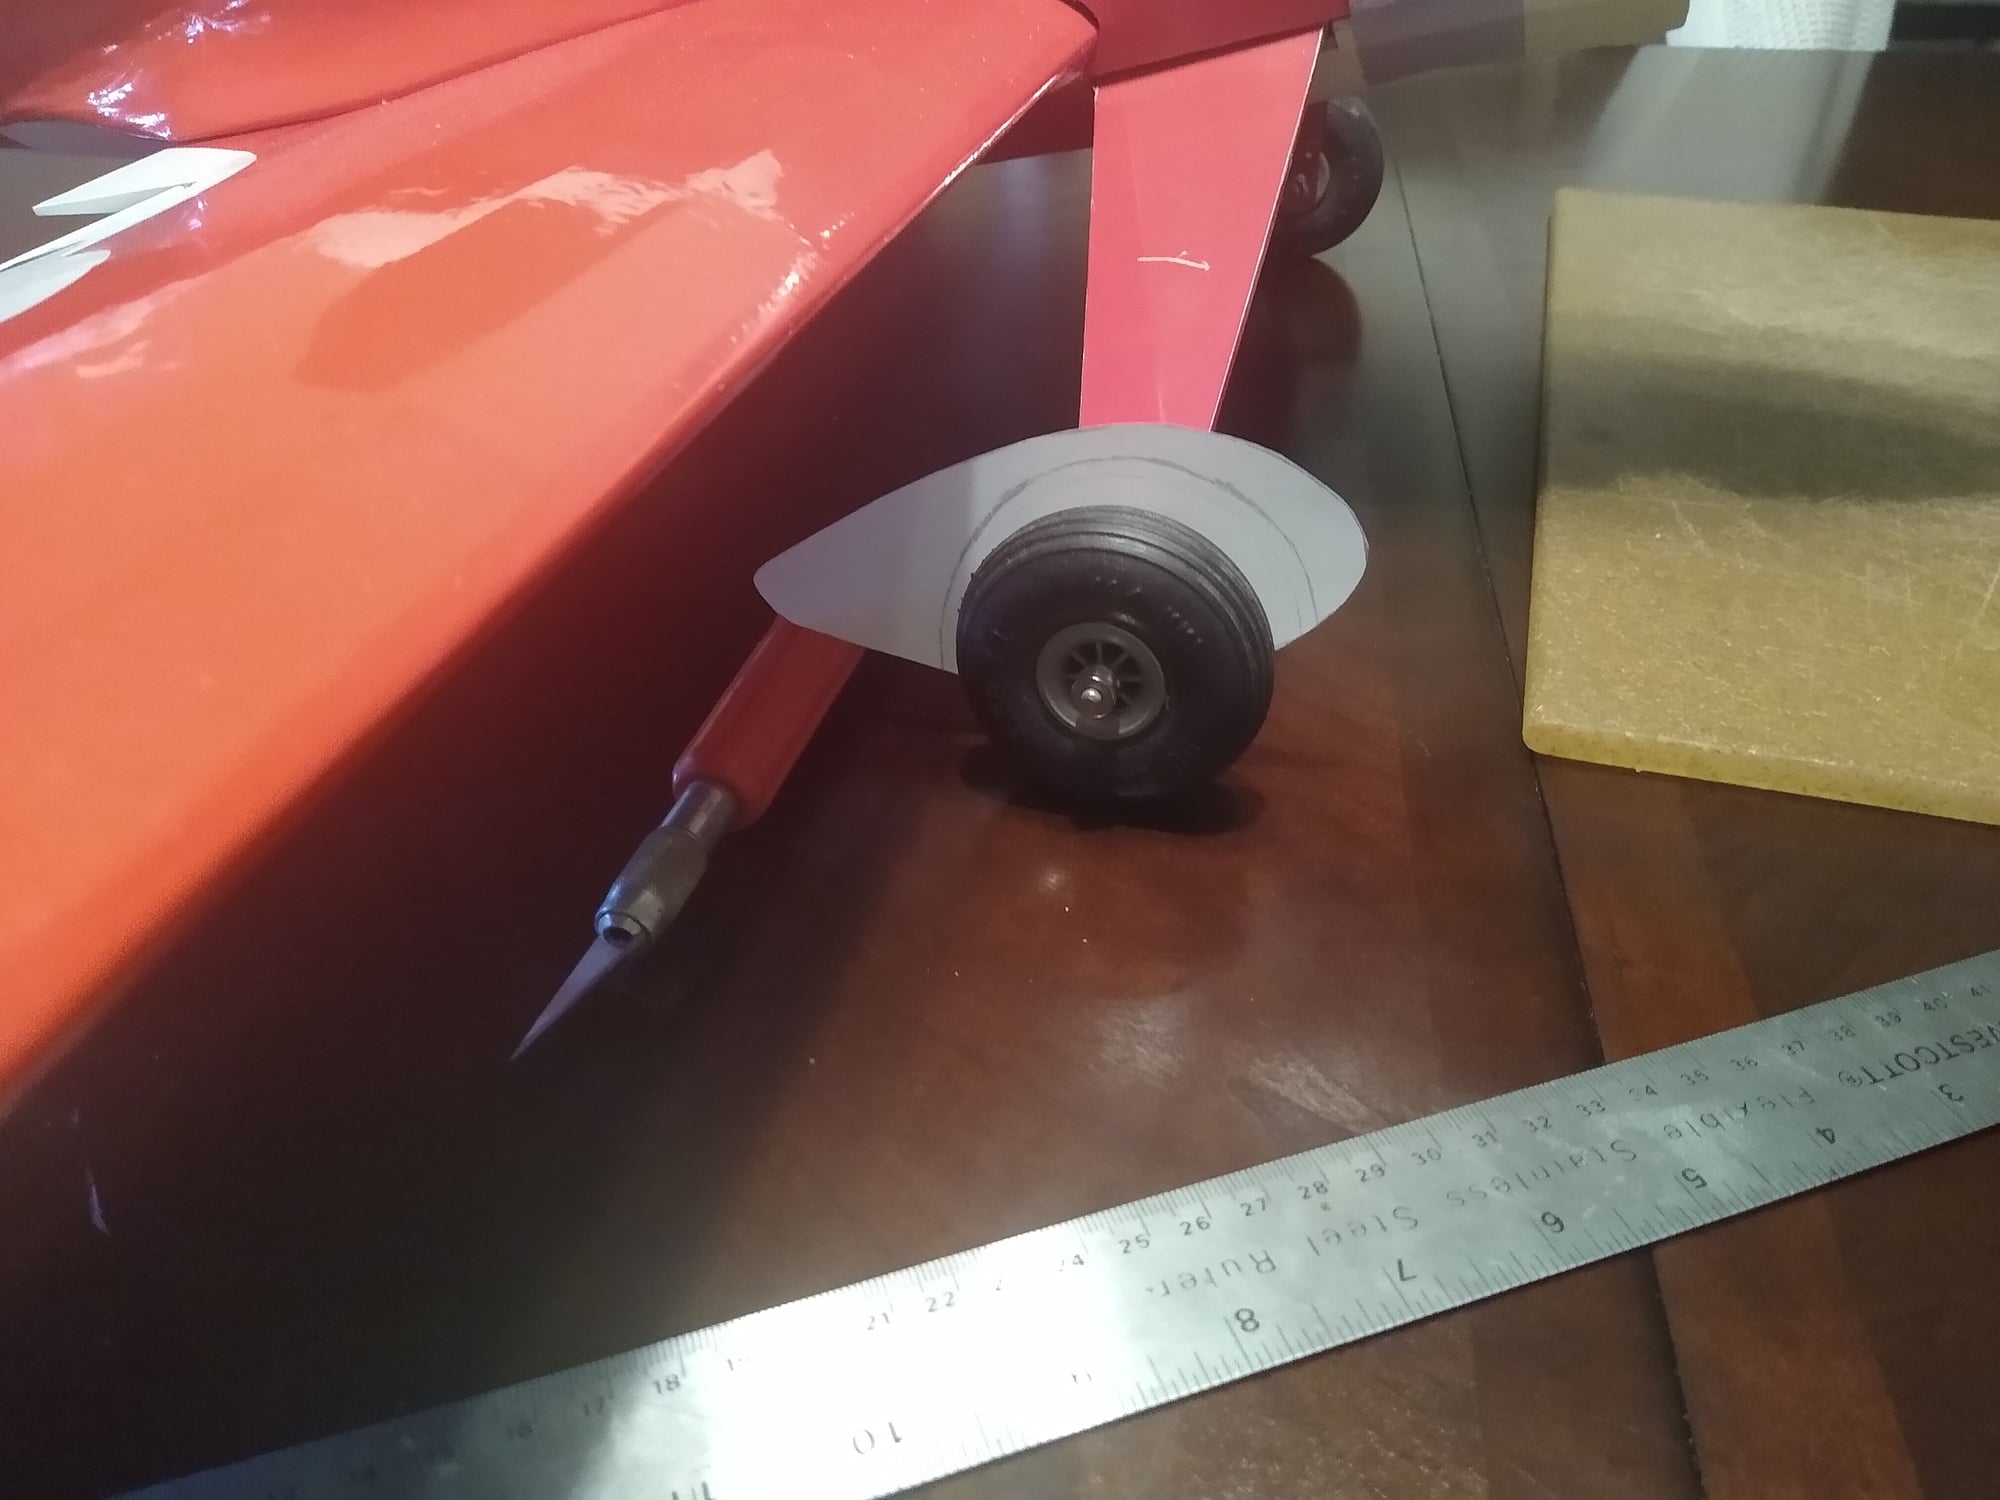
I was looking at the front and working out how to make the cowl but then it hit me. I'm not really in the mood to work on that today it's just going to be time consuming. Instead we're making wheel pants today!
07-08-2022, 04:58 PM
#123
Senior Member
Thread Starter
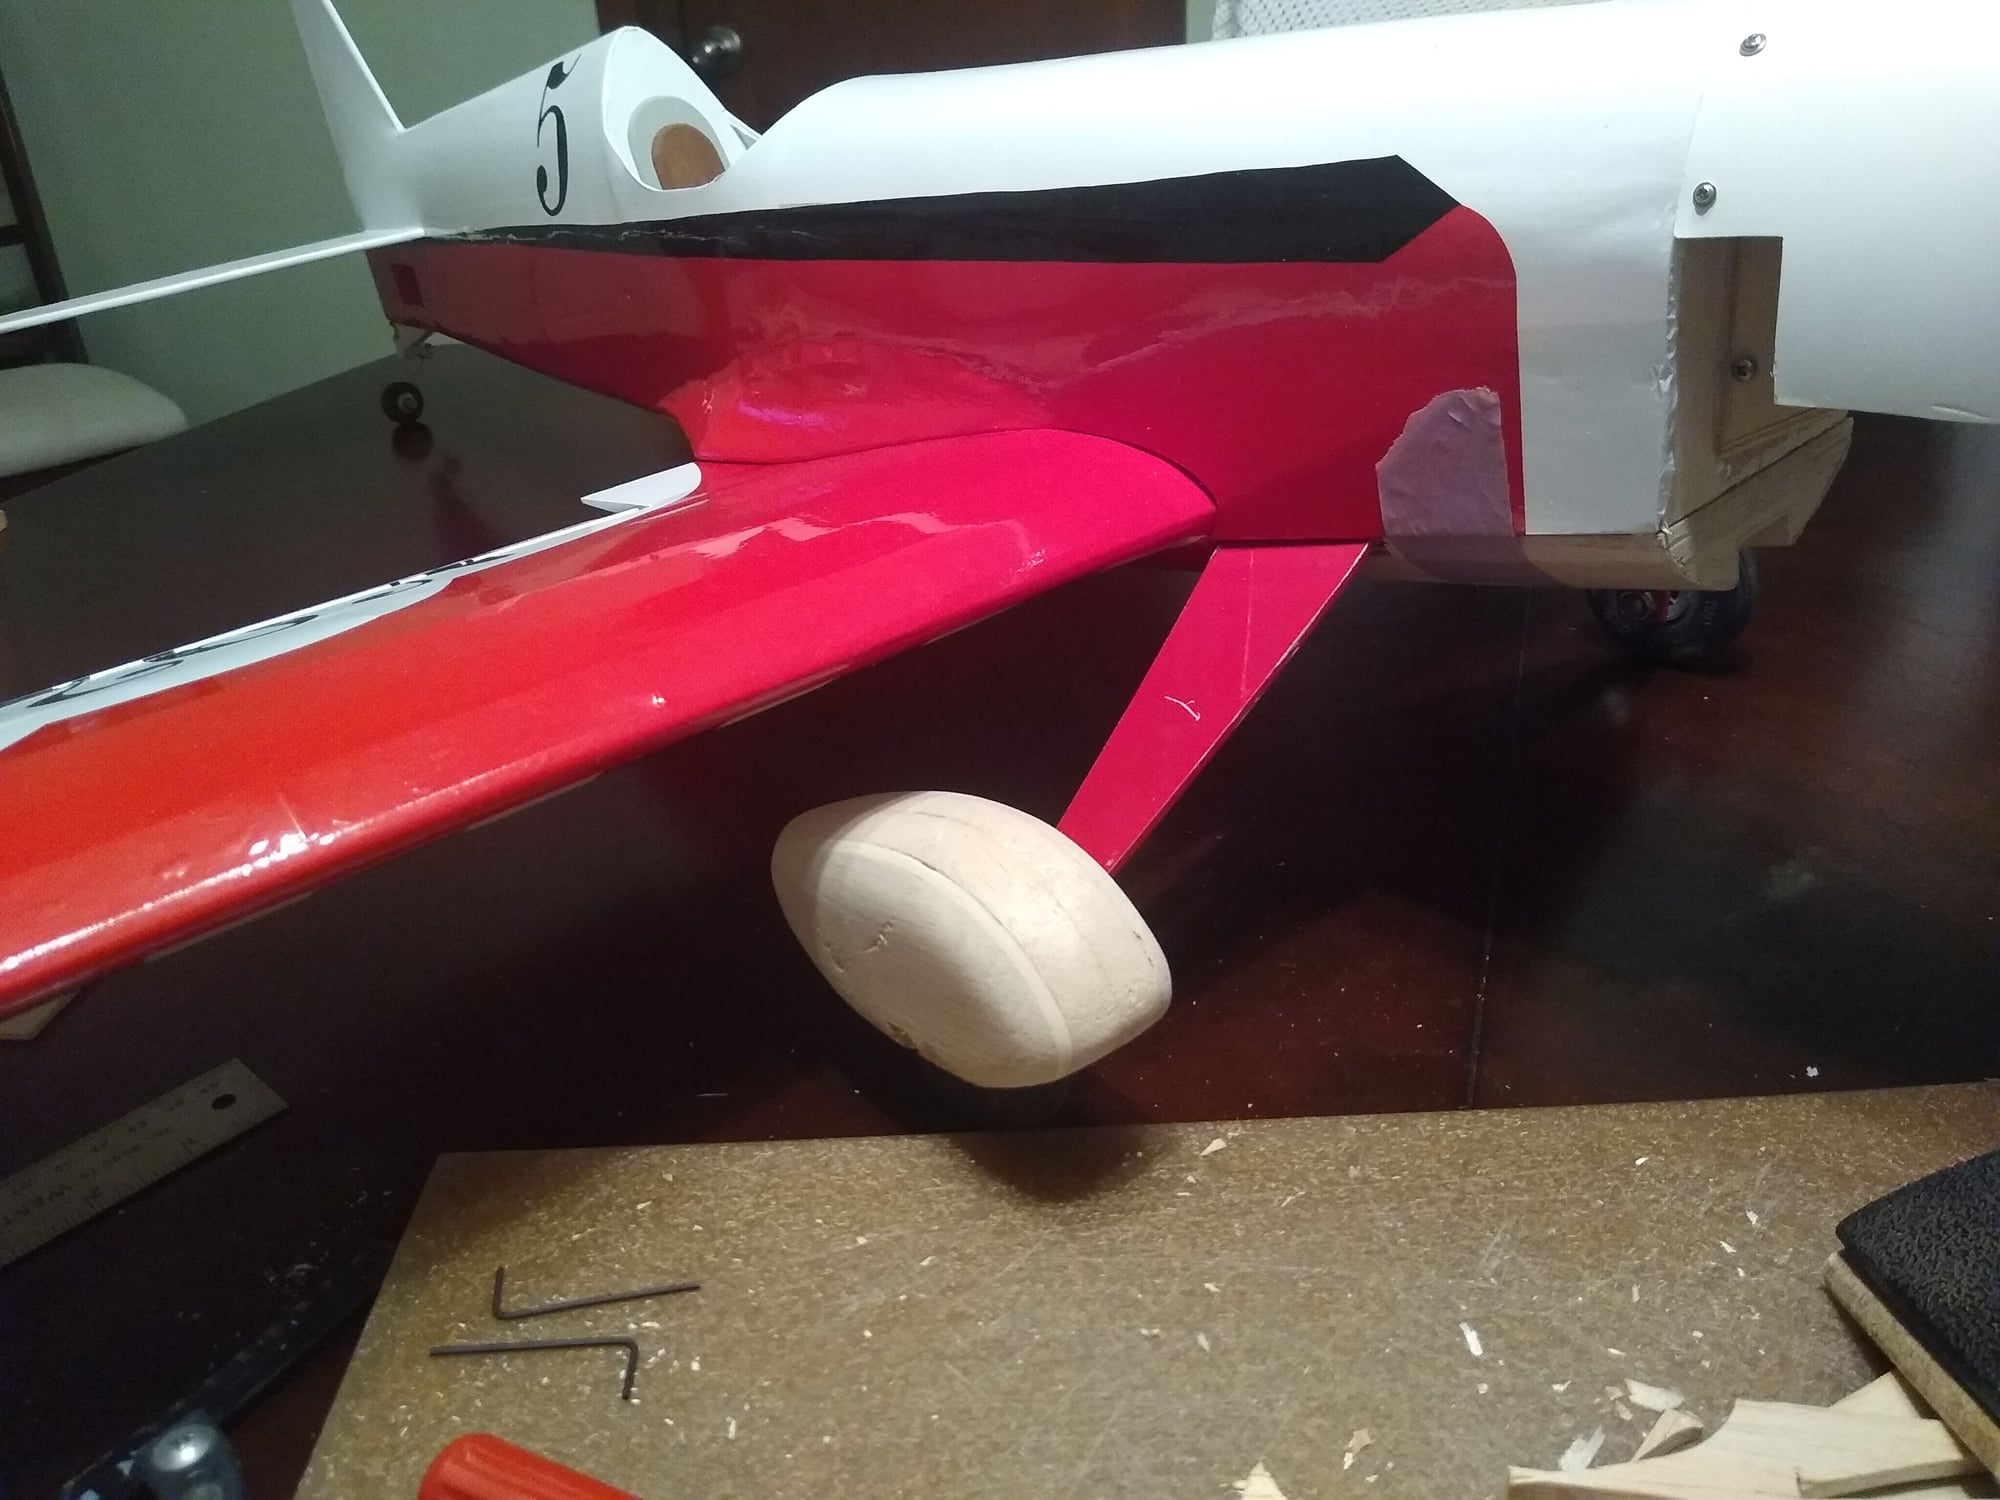
The first one is roughed out. Lot of fine tuning to do tomorrow before I make the second. I like it though, going to be nice once covered.
07-08-2022, 05:58 PM
#124
Thats cool. I have made one set of pants. Plenty of cowls, but just the one wheel pant set. Started to make more but abandoned the attempt or just got frustrated I reckon.
Ken
Ken
07-08-2022, 07:59 PM
#125
Senior Member
Thread Starter
Well you and I are now even as this is my first set of wheel pants Will I do this again? Probably not, but was a good experience making this set. I will say this was a much faster route vs making fiberglass ones. Next time should there be one I will just buy pre made ones.
Will I do this again? Probably not, but was a good experience making this set. I will say this was a much faster route vs making fiberglass ones. Next time should there be one I will just buy pre made ones.