


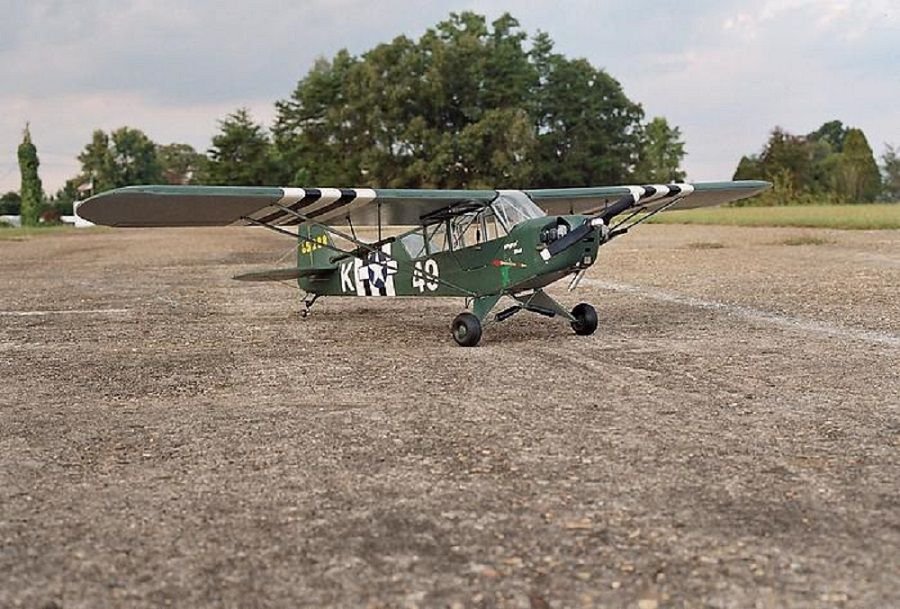
Sig 1/4 scale Clipped wing Cub
 10-22-2025 | 12:59 PM
#1
Thread Starter

My Feedback: (12)
Hey folks! Starting a new build for this winter. Sig 1/4 scale Clipped Wing Cub. Have a couple of initial questions hoping some of you may be able to offer advise. First is the power plant. I have a Saito 1.25 sitting around but would like to consider evolving into the gas market. No experience with gas at all. So interested in pros and cons as well as what power plant you may recommend.
2nd is covering. Got reasonably proficient with Monokote but that is not longer offered. Built a plane with Ultracote last season and the verdict is still out. Have 0 experience with paint. So any suggestions would be helpful. I will be posting my progress here.
Thanks in advance for your assistance.

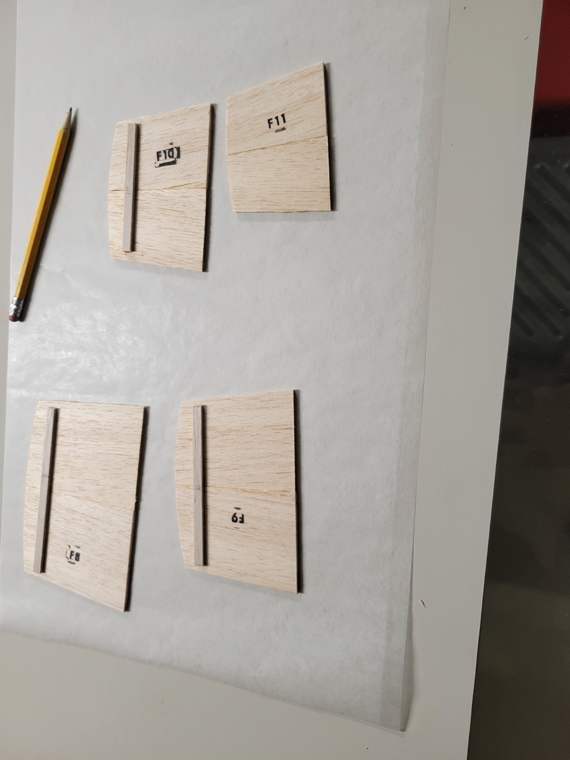
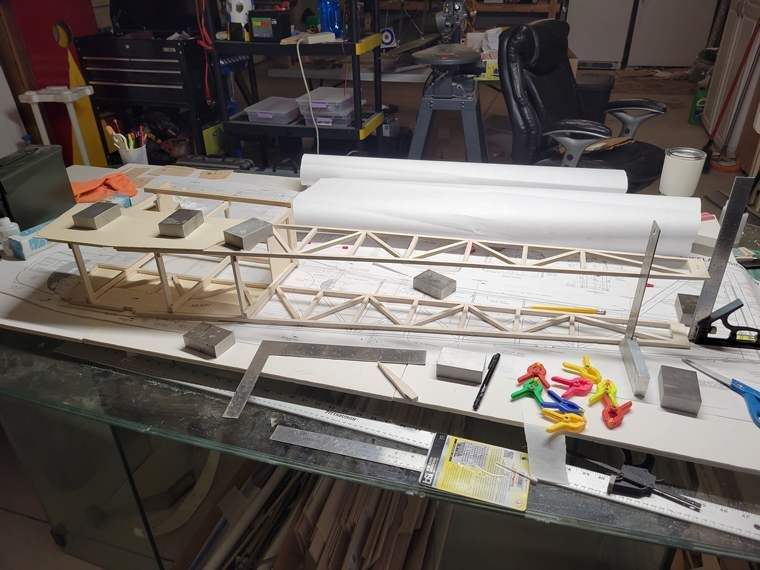
Starting with fuse formers

2nd is covering. Got reasonably proficient with Monokote but that is not longer offered. Built a plane with Ultracote last season and the verdict is still out. Have 0 experience with paint. So any suggestions would be helpful. I will be posting my progress here.
Thanks in advance for your assistance.
Starting with fuse formers

The following users liked this post:
khodges (10-24-2025)
 10-23-2025 | 05:29 AM
#3

AD Reliable,
LOL,
Are you from Logan, Utah or Logan, California. I see that both exist.

I have one of these kits waiting on its turn for me to build. I also have acquired a Sig !/4 scale with full wing that is mostly built with cloth covering on it. still needing paint.
Hope you will be able to continue your thread. I will be along for the ride seeing how things go.
Even though this plane is a good size, it does not require gobs of power. 20cc gas would get it done easily. As you know, Sig claims a .90 (15cc) two stroke glow is all you need.
If you are comfortable with covering with Monokote, then you could easily adapt to the "NEUCOVER" sold by Value Hobby at https://valuehobby.com/covering
It requires a little less temperature but works nice.
My experience has proven Nuecover to have a longer life span compared to Ultracote.
Oh, forgot to mention Neucover comes in +/- 16 foot long rolls.
LOL,
Are you from Logan, Utah or Logan, California. I see that both exist.
I have one of these kits waiting on its turn for me to build. I also have acquired a Sig !/4 scale with full wing that is mostly built with cloth covering on it. still needing paint.
Hope you will be able to continue your thread. I will be along for the ride seeing how things go.
Even though this plane is a good size, it does not require gobs of power. 20cc gas would get it done easily. As you know, Sig claims a .90 (15cc) two stroke glow is all you need.
If you are comfortable with covering with Monokote, then you could easily adapt to the "NEUCOVER" sold by Value Hobby at https://valuehobby.com/covering
It requires a little less temperature but works nice.
My experience has proven Nuecover to have a longer life span compared to Ultracote.
Oh, forgot to mention Neucover comes in +/- 16 foot long rolls.
Last edited by RICKSTUBBZ; 10-23-2025 at 05:30 AM. Reason: P.S.
10-24-2025 | 09:29 AM
#4
My Feedback: (1)
Hey folks! Starting a new build for this winter. Sig 1/4 scale Clipped Wing Cub. Have a couple of initial questions hoping some of you may be able to offer advise. First is the power plant. I have a Saito 1.25 sitting around but would like to consider evolving into the gas market. No experience with gas at all. So interested in pros and cons as well as what power plant you may recommend.
2nd is covering. Got reasonably proficient with Monokote but that is not longer offered. Built a plane with Ultracote last season and the verdict is still out. Have 0 experience with paint. So any suggestions would be helpful. I will be posting my progress here.
Thanks in advance for your assistance.
The newer designs where the carb and muffler are in line with the cylinder or the carb is behind the cylinder are better for appearance if you like scale details. I have a Stinger SE-26RE that I bought for my BUSA 1/4 scale J-3, but decided not to put a functional engine on it as the plane will be for display only. It is 26cc, rear exhaust with electronic ignition, and I have both a single and dual outlet muffler for it. It makes 3.1 horsepower and will turn a 18 x 10 prop. (18 inch diameter is scale for the 1/4 J-3) It will completely hide in a 1/4 scale J-3 cowling and I already have it on an engine mount. I'd make you a good deal on it if you're interested, as I do not plan to use it on anything, as I don't fly planes any more. Here's the spec sheet on it, PM me if you are interested and we'll talk about price and shipping. My build thread is in this section if you haven't seen it, look for "BUSA 1/4 scale L-4". I built a Sig 1/5 scale L-4 from a J-3 kit years ago. It was a great kit and flew very well. I flew it on a .65 Saito.
WELCOME TO RCGF STORE GAS ENGINE


Last edited by khodges; 10-24-2025 at 09:34 AM.
10-30-2025 | 02:38 PM
#5
Thread Starter
My Feedback: (12)
Thanks all for your comments. I may have to look into the neucover material. Still considering the power plant. Probably sticking with the saito 1.25 at this point.

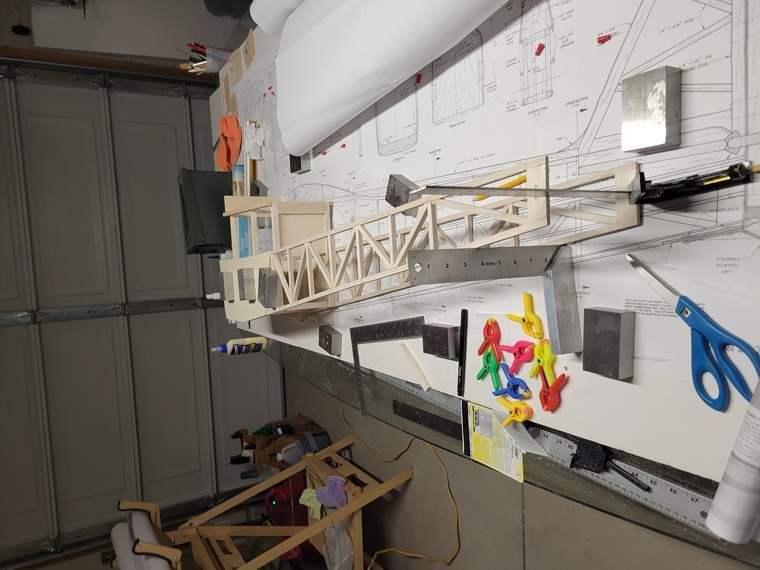
Starting the main frame

Building 2nd side over 1st to insure accuracy
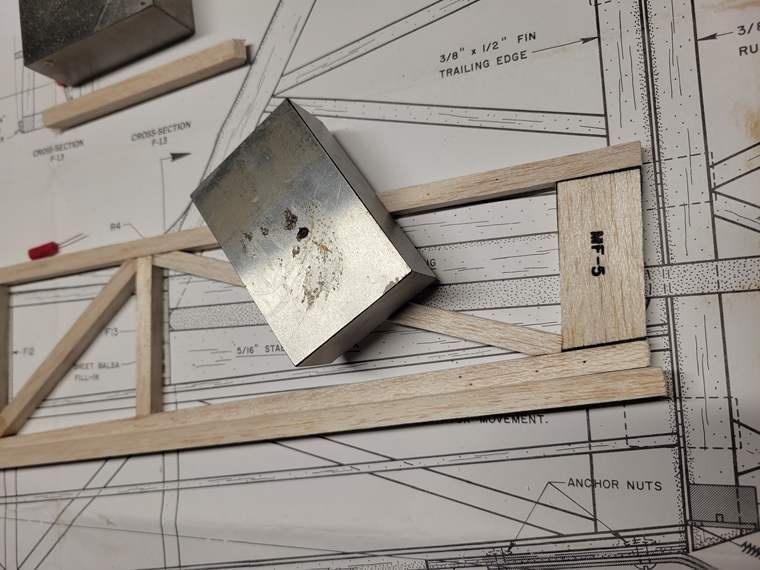
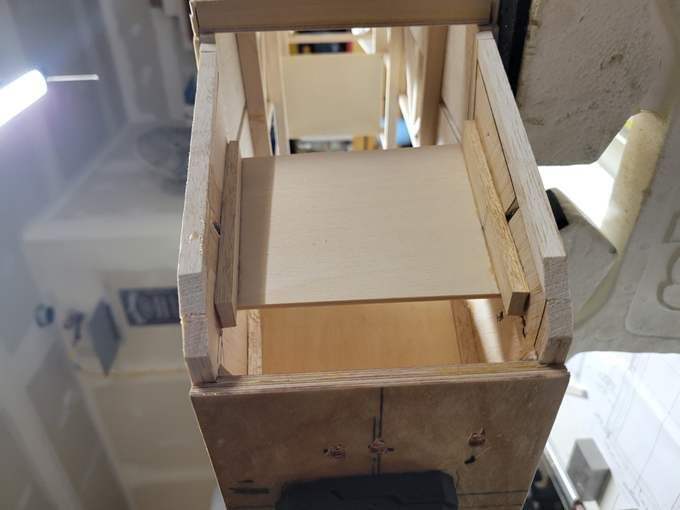
For anyone building this kit the part MF5 is not listed in the manual or on the plans. This pic may you sort it out
Starting the main frame
Building 2nd side over 1st to insure accuracy
For anyone building this kit the part MF5 is not listed in the manual or on the plans. This pic may you sort it out
10-31-2025 | 04:02 AM
#6
My Feedback: (1)
I'm not familiar with "Neucover" material, is it like Solartex or more like Monokote?. All my fabric skinned planes were covered with Sig Koverall, doped and painted. It might be a bit more work but it is very durable.
11-04-2025 | 01:12 PM
#7
Thread Starter
My Feedback: (12)
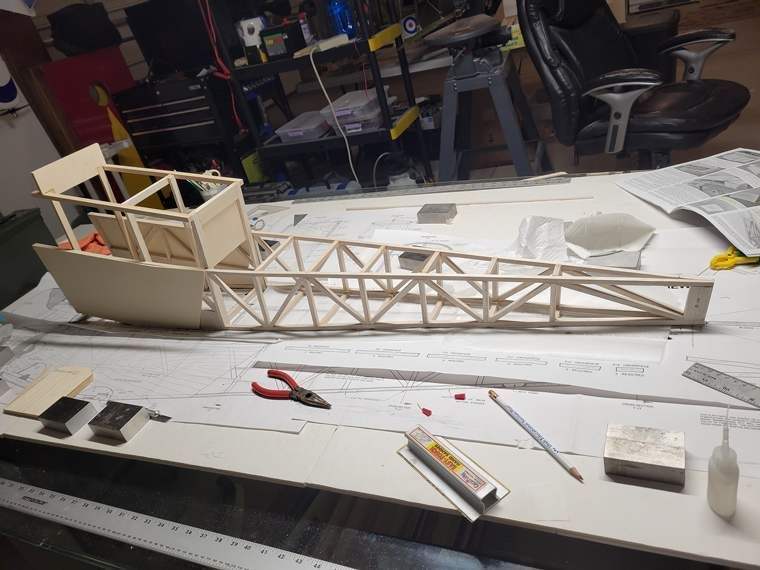
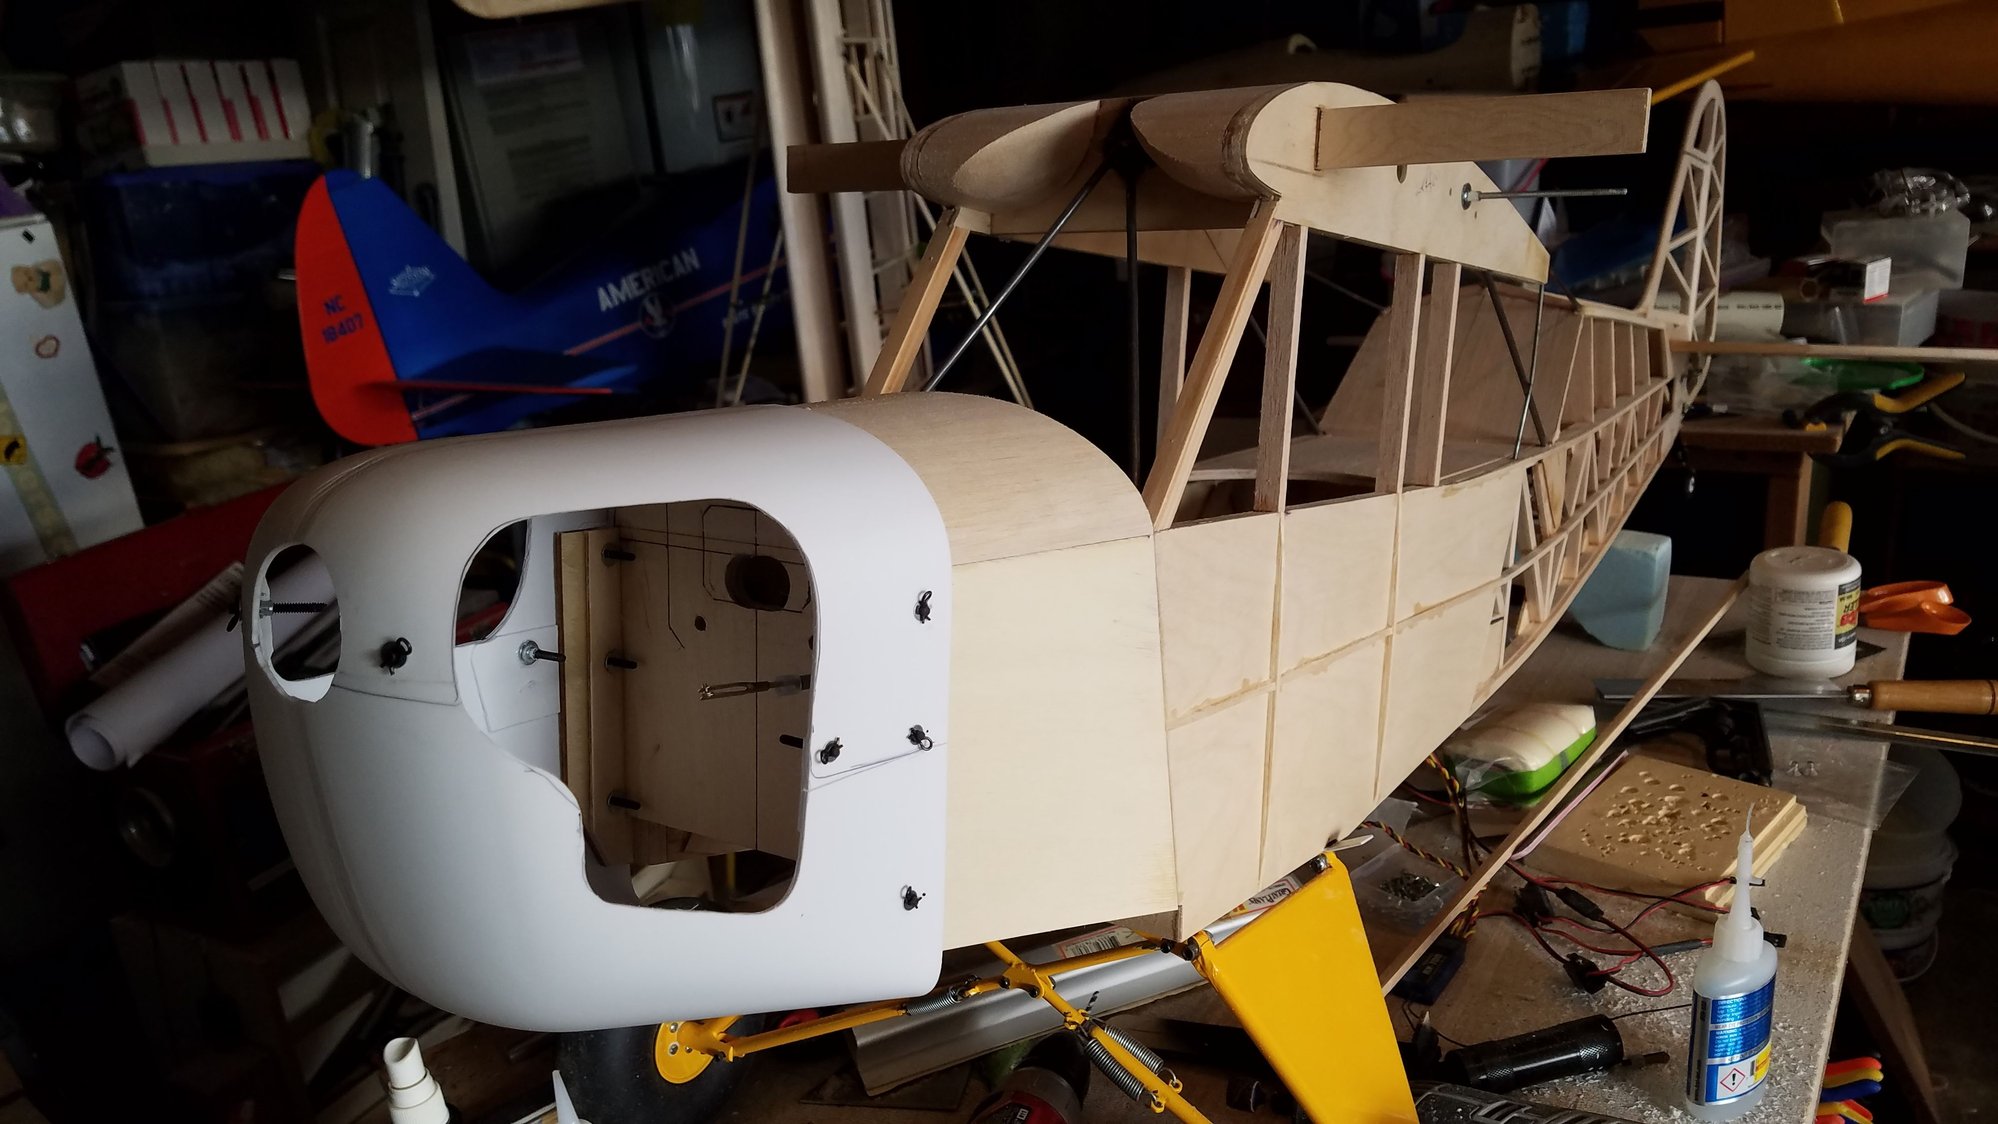
Further progress on the fuse. Got the sides attached.
Just a note on the build. This is a bit challenging for me. I have built a lot of kits primarily Top Flite etc where you get step by step clear instructions. This is a little more vague and needs a lot more forethought. Foreseeing that, I built the 1/6 scale version first to get an idea on the challenges. Didn't come out a well as I would like. So any suggestions, critiquing, etc. would be welcome.
Just a note on the build. This is a bit challenging for me. I have built a lot of kits primarily Top Flite etc where you get step by step clear instructions. This is a little more vague and needs a lot more forethought. Foreseeing that, I built the 1/6 scale version first to get an idea on the challenges. Didn't come out a well as I would like. So any suggestions, critiquing, etc. would be welcome.
11-06-2025 | 05:53 PM
#8
My Feedback: (1)
Further progress on the fuse. Got the sides attached.
Just a note on the build. This is a bit challenging for me. I have built a lot of kits primarily Top Flite etc where you get step by step clear instructions. This is a little more vague and needs a lot more forethought. Foreseeing that, I built the 1/6 scale version first to get an idea on the challenges. Didn't come out a well as I would like. So any suggestions, critiquing, etc. would be welcome.
Just a note on the build. This is a bit challenging for me. I have built a lot of kits primarily Top Flite etc where you get step by step clear instructions. This is a little more vague and needs a lot more forethought. Foreseeing that, I built the 1/6 scale version first to get an idea on the challenges. Didn't come out a well as I would like. So any suggestions, critiquing, etc. would be welcome.
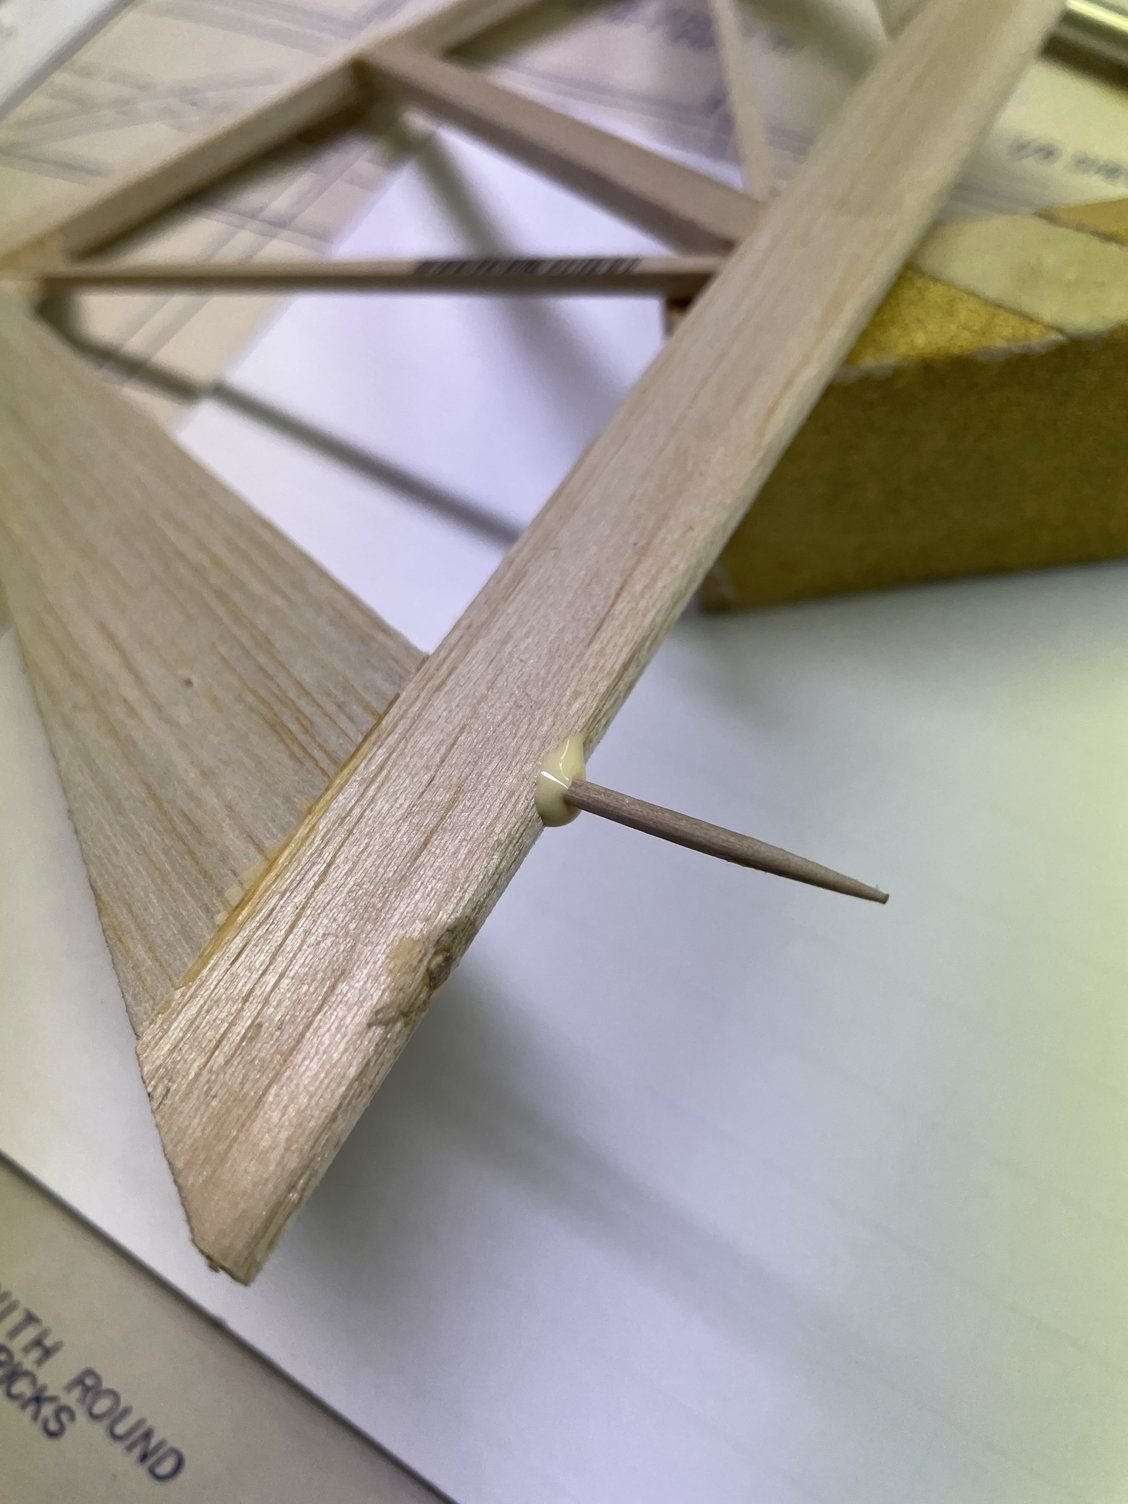
Anytime you want additional strength in a joint but can't put gussets or bracing, you can pin the joint after gluing it by drilling through the joint and using a piece of round toothpick glued in the drilled hole. It's surprising how much strength it adds without adding significant weight. The picture below shows pinning part of the rudder, but it works anywhere. You only need enough to go about 3/16" to 1/4" into either side of the joint:

 11-10-2025 | 05:26 AM
#11
My Feedback: (1)
Sig makes a nice kit. The 1/5 scale Cub built slightly different from your 1/4 scale, the sides behind the cabin were laser-cut sheets punched out to lighten them, instead of stick-built, but either way it is a strong construct. My first RC plane was a Sig Kadet MkII kit, it had to be strong to survive my flight training, lol.
11-10-2025 | 06:49 AM
#12
I self taught on a glider, then my Sig Seniorita. It was a learning experience on that build. I can not ever forget the excitement of flying and not breaking anything, taking my plane home in one piece. I just flew at some random field..by myself. I loved building so much I went straight to the hobby shop and bought another kit..
So much Adrenalin and good times in the hobby in my earliest days.
So much Adrenalin and good times in the hobby in my earliest days.
11-14-2025 | 02:21 PM
#13
Thread Starter
My Feedback: (12)
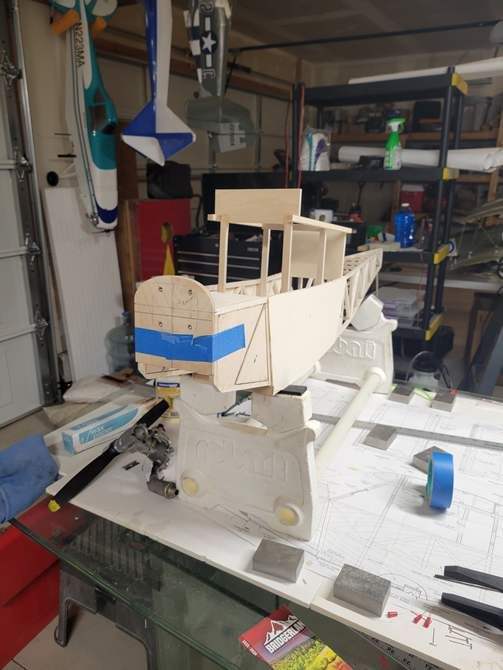
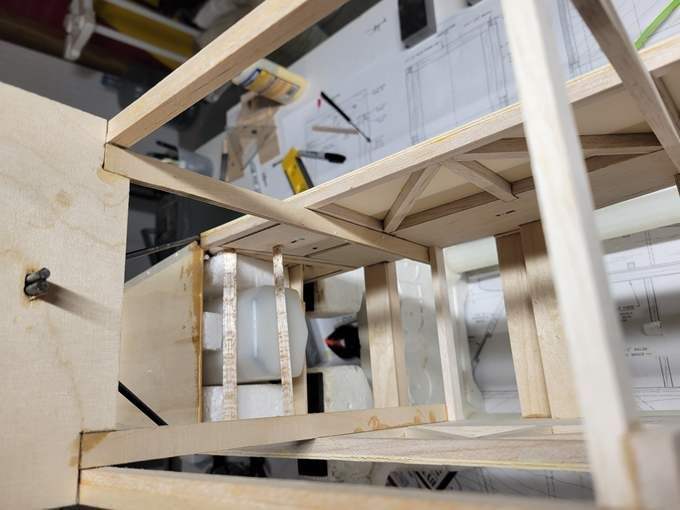
Further progress with firewall installed. Another overnight wait for epoxy before continuing. the structure in the nose sure seems light when considering the vibration and thrust involved for this plane. Anyone else have the same concerns or mods they have done to strengthen this area?
11-15-2025 | 05:13 AM
#14
Maybe even put a few TOOTHPICK PINS as Ken demonstrated a few post ago.
The following users liked this post:
scottrc (12-01-2025)
The following users liked this post:
bisco (11-18-2025)
11-17-2025 | 06:53 PM
#16
Thread Starter
My Feedback: (12)
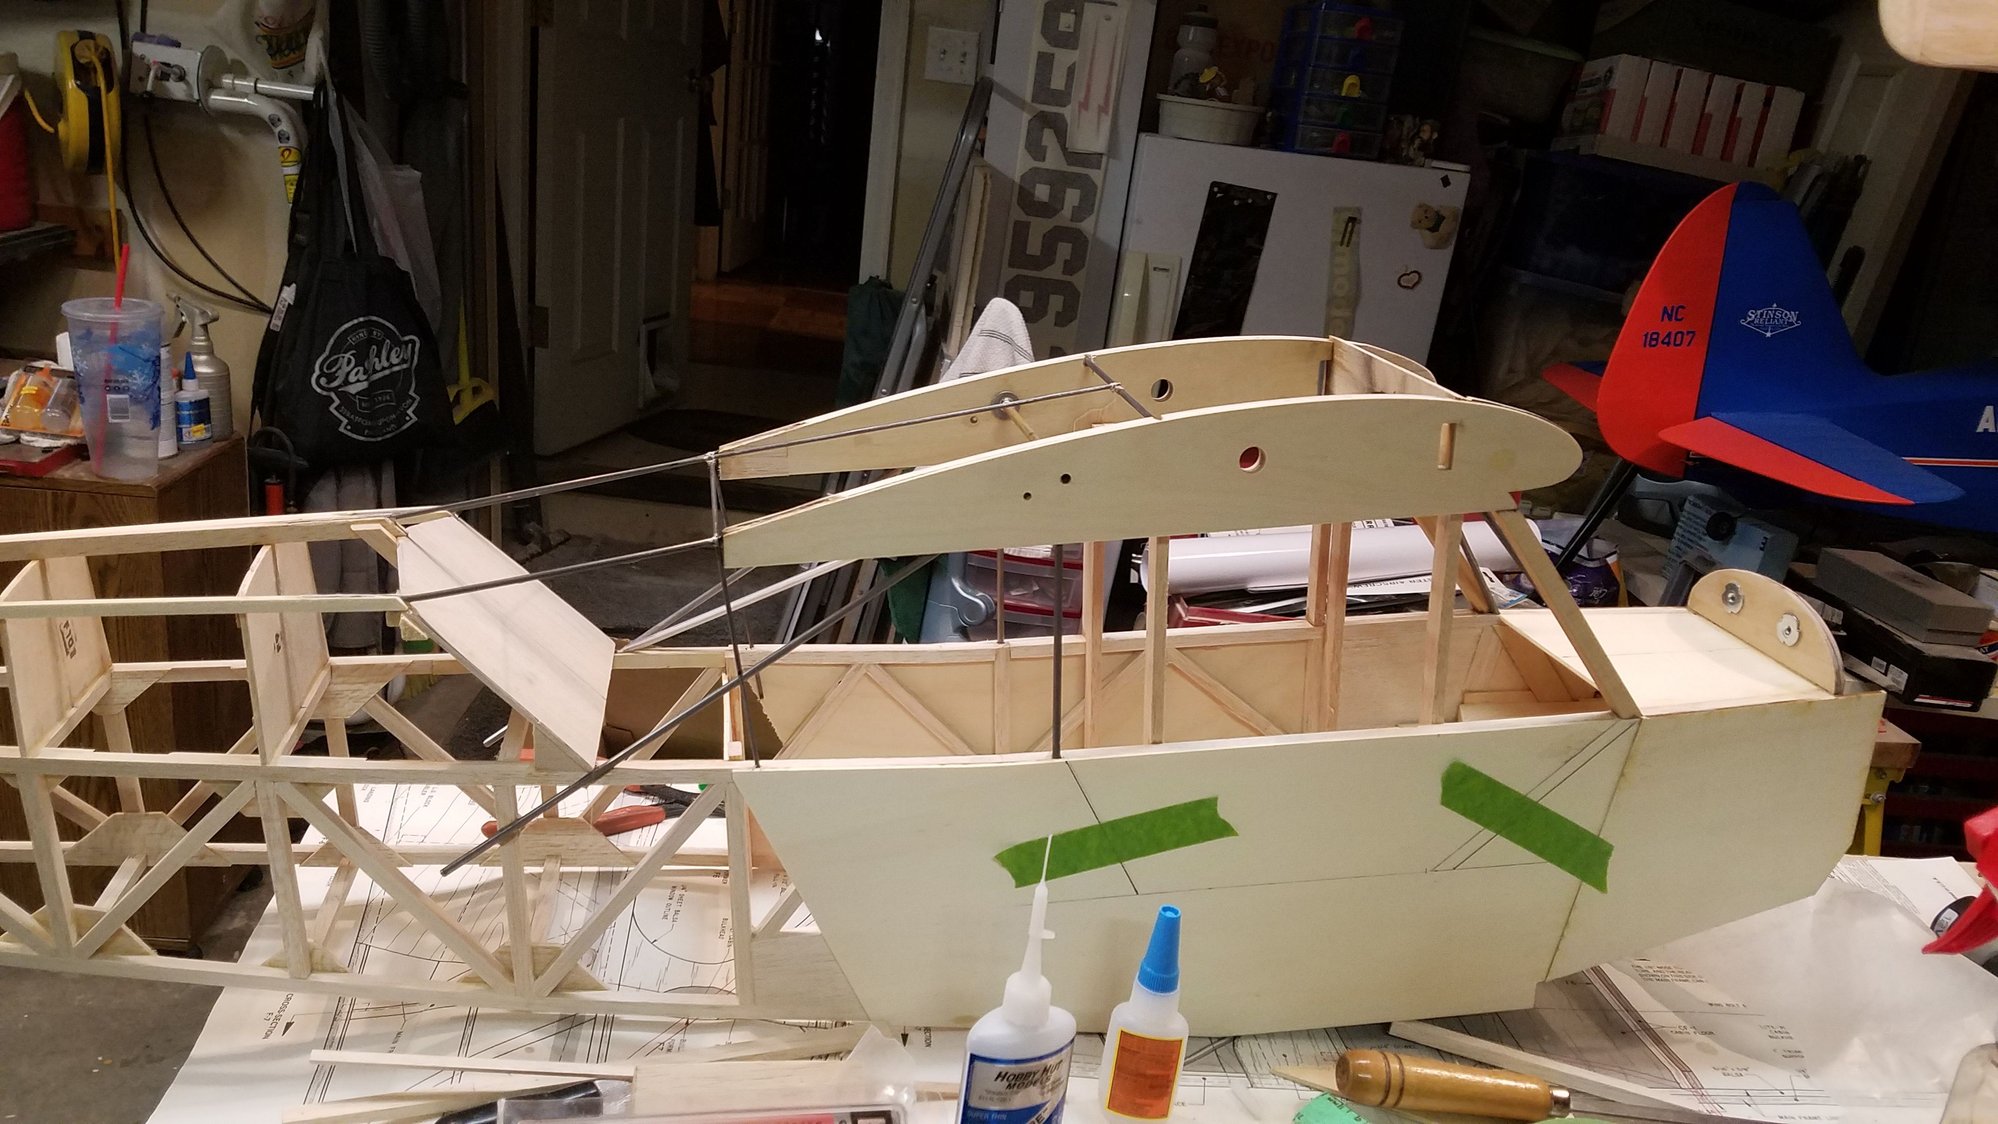
Added the cabin wires. Must say feel a bit silly after the tri stock affair. I remember why. I was focused on the joint between the nose frame and the main frame. They are simply attached by epoxy of 2 5/16 balsa sticks on either side and thus just lost track of the firewall. Now that I have the cabin wires installed it seems much more stout. May yet consider fibre-glassing the interior, especially at that joint. Stay with me 

The following users liked this post:
scottrc (11-18-2025)
11-18-2025 | 11:24 AM
#17

My Feedback: (19)
Good work! One problem with the Sig 1/4 CUB is that the top firewall engine mounting bolts have blind nuts that are forever sealed in place where they can't be serviced in any way. There is a flat tank compartment top piece that mounts horizontal behind the firewall that doesn't give access to that area. I cut most of the center out of that piece so I can get a hand in that area if needed in the future It really doesn't serve much of a purpose that can't be dealt with in other ways.
I love the SIG CUB and still have a fairly highly modified version still in my stable but the kit did get a bit dated over the years. It's a shame that a version 2 never came along as many of the building challenges you have come across could have been designed out with newer construction techniques. It's still a great airplane! Mine is powered with a DLE30 but any 20 - 30 gas engine is a good choice if you choose to go gas. Have had 4 stroke engines in CUBs before but didn't care for them as I'm just not a 4 stroke guy.
I love the SIG CUB and still have a fairly highly modified version still in my stable but the kit did get a bit dated over the years. It's a shame that a version 2 never came along as many of the building challenges you have come across could have been designed out with newer construction techniques. It's still a great airplane! Mine is powered with a DLE30 but any 20 - 30 gas engine is a good choice if you choose to go gas. Have had 4 stroke engines in CUBs before but didn't care for them as I'm just not a 4 stroke guy.
11-19-2025 | 06:53 AM
#18
My Feedback: (1)
Added the cabin wires. Must say feel a bit silly after the tri stock affair. I remember why. I was focused on the joint between the nose frame and the main frame. They are simply attached by epoxy of 2 5/16 balsa sticks on either side and thus just lost track of the firewall. Now that I have the cabin wires installed it seems much more stout. May yet consider fibre-glassing the interior, especially at that joint. Stay with me
Last edited by khodges; 11-19-2025 at 06:55 AM.
The following users liked this post:
scottrc (12-01-2025)
11-20-2025 | 08:06 PM
#20
When you install the ply sheeting to the front add a few toothpicks into the sides of the firewall. on both of mine I needed to move the firewall back an inch for the OS gt 22 engine so I remade the firewall to fit and put triangle stock on the front and rear

firewall moved back 1" on j-3


trailing edge beveled stock in corners

ply extends onto edge of firewall on L-4
cowl mounting in ply before triangle stock installed, I added an extra layer of ply for blind nuts to attach cowl
firewall moved back 1" on j-3
trailing edge beveled stock in corners
ply extends onto edge of firewall on L-4
cowl mounting in ply before triangle stock installed, I added an extra layer of ply for blind nuts to attach cowl
 11-22-2025 | 11:37 AM
#24

Senior Member
My Feedback: (2)
The build is looking good. Stick building is fun. I love stick building. I built 2 of the smaller versions of the same plane in the past, and loved the build, with the exception of a the wire braces and a huge hassle on part of the tail.
If you haven't flown one before, beware that when they snap roll, it can be wickedly violent. It scares the snot out of me. And do wheel landings - 3 pointers will bite yo' arse. Finally, be very careful about horsing them off the ground before they're ready. Otherwise, they are very fun fliers. I used .40 4-strokes on little ones, which were perfect for that size Cub.
If you haven't flown one before, beware that when they snap roll, it can be wickedly violent. It scares the snot out of me. And do wheel landings - 3 pointers will bite yo' arse. Finally, be very careful about horsing them off the ground before they're ready. Otherwise, they are very fun fliers. I used .40 4-strokes on little ones, which were perfect for that size Cub.
11-22-2025 | 12:08 PM
#25
Let the tail come up before trying to lift off.
This minimizes the angle of attack for the wing and allows the airplane to lift off with those long wings (not being in a stall condition).

