


Sig Four Star .40 Build Thread!!!!!!!!
 08-14-2009 | 02:38 PM
#51

IMO having two four stars 40 and 60 I would cut one wing bay to stop it from floating on landing.
Flaps what for? it flies very slow as is.
sheeting the wing again what for? the best feature about unsheeted wing is that you can fix in no time.
just to remind you guys its a Low wing from the ground.
you guys are looking how to get into mods that will delay you from actual flying, build it as instructed and go fly it.
Alex
 08-15-2009 | 02:50 AM
#52

Joined: Jul 2004
Posts: 579
Likes: 0
Received 0 Likes
on
0 Posts
From: Cape Town, SOUTH AFRICA
I Sheeted the leading edge of my 4* by sanding down the ribs in front of the main spar using the root ribs as a template and then sheeting between the spars. I like the look of this and would do it again should I build another.
I also added an extra aileron servo and mounted them in each wing and have set the plane up with flaperons/spoilerons. I agree that the plane does not need flaps but spoilers may help to reduce the floatiness on landing - I have not had much of a chance to play around with this yet, but it was really easy to do and whether I use it or not the capability is there for only the weight penalty of 1 servo (which I would have added anyway as it makes setup easier!).
I like how my 4* flys and also that it is dfferent from all the other planes at the club. I still have club members come up to me asking me as to the type of plane and complimenting the looks and flight characteristics.
Also added rounded wingtips so modify it and make it unique it will still fly great.
08-15-2009 | 10:15 AM
#53

Thread Starter

Joined: Jan 2004
Posts: 288
Likes: 0
Received 0 Likes
on
0 Posts
From: Warrensburg , MO
All,
Thanks for the compliments on my test stand. I needed something quick and that was the best solution I could come up with.
Also I am on my way to the hobby shop to pick up all of the last parts that I need. I am also hopefully going to pick up some monokote. Unfortunately I don't have the money for a new flight pack right now but that will come soon. So I want to get it completely ready for radio installation.
Lastly I agree lets keep it simple I know that the mods will look good. Just my opinion!
Have a great weekend.
08-15-2009 | 03:23 PM
#54
Senior Member
Joined: Dec 2005
Posts: 824
Likes: 0
Received 0 Likes
on
0 Posts
From: Ballwin,
MO
Well my wings are already built up, so could I just sheet the leading edge and then sand it with a block, side to side (wing tip to wing base) until it was flush with the spar? Basically have the balsa taper?
08-21-2009 | 06:12 PM
#55
Senior Member
Joined: Dec 2005
Posts: 824
Likes: 0
Received 0 Likes
on
0 Posts
From: Ballwin,
MO
Hey Guys
I got this kit but it doesn't have the instructions anymore. Does anyone have a link or can forward me a scan of their instructions?
I got this kit but it doesn't have the instructions anymore. Does anyone have a link or can forward me a scan of their instructions?
08-21-2009 | 08:21 PM
#56
Senior Member
Joined: Jul 2005
Posts: 141
Likes: 0
Received 0 Likes
on
0 Posts
From: Jacksonville ,
AR
see if this works go to the sig website and on information and manuals and click on the side sport models and click on the picture of the plane you want
http://www.kavanrc.de/instructions/s...fourstar40.pdf
http://www.kavanrc.de/instructions/s...fourstar40.pdf
08-22-2009 | 09:06 PM
#57

Bringing back memories.. it sure does look nice with the engine coweled in in the second page. The build looks very good...you really can't make a mistake on this kit as it just falls together. With increased throws its a jack rabbit on the run  . I had a 46 2 stroke on mine and flew it 1/2 to 3/4 and it was way more than enough power.
. I had a 46 2 stroke on mine and flew it 1/2 to 3/4 and it was way more than enough power.
08-29-2009 | 09:00 AM
#58
Thread Starter
Joined: Jan 2004
Posts: 288
Likes: 0
Received 0 Likes
on
0 Posts
From: Warrensburg , MO
Hello friends,
I have been working a little bit on this plane. With two months of 100 degree weather here is SA it has been hard to find time to bake in the shop.
Anyways here are a couple pictures that I took. I added an inch to the rudder but I still need to add some curves to it. Also added a tank and got the landing gear panted up to match my RED AND WHITE theme.
Sorry but yes I am using econokote I am on a budget.
Anyways I hope to start covering this bad boy tonight. Get a pilot and wait till I can afford a new flight pack.
Thanks for following.
Mark
08-29-2009 | 10:53 AM
#59

Senior Member
Looking good! Shape that rudder like an Extra and it will look cool.
I can imagine it being pretty warm in Texas this time of year. I too
have an un-air conditioned, un-heated workshop.
I just ordered a Four-star kit and will be building it exactly ten years
after I built my first one.
I can imagine it being pretty warm in Texas this time of year. I too
have an un-air conditioned, un-heated workshop.
I just ordered a Four-star kit and will be building it exactly ten years
after I built my first one.
09-15-2009 | 10:28 PM
#60
Thread Starter
Joined: Jan 2004
Posts: 288
Likes: 0
Received 0 Likes
on
0 Posts
From: Warrensburg , MO
Ok I shaped the tail like and extra and added the counterbalance for looks. Thanks for the suggestion.
I also had a little time this week with the great cool weather to get some work done on my Four Star. I have attached a few pictures of what I have done thus far.
Let me know what you think.
Have a great week.
Mark.
I also had a little time this week with the great cool weather to get some work done on my Four Star. I have attached a few pictures of what I have done thus far.
Let me know what you think.
Have a great week.
Mark.
09-15-2009 | 10:31 PM
#61
Thread Starter
Joined: Jan 2004
Posts: 288
Likes: 0
Received 0 Likes
on
0 Posts
From: Warrensburg , MO
Me again!
I just wanted to add that I will be leaving the bottom the way it is because it will very easy to see in the air.
As far as the top I will add something it white but I dont what yet. I have a lot of white econokote and a little blue so suggestions would be great.
Have a great night.
I just wanted to add that I will be leaving the bottom the way it is because it will very easy to see in the air.
As far as the top I will add something it white but I dont what yet. I have a lot of white econokote and a little blue so suggestions would be great.
Have a great night.
 07-21-2010 | 10:17 PM
#63
Thread Starter
Joined: Jan 2004
Posts: 288
Likes: 0
Received 0 Likes
on
0 Posts
From: Warrensburg , MO
Well I got to Maiden my Four Stat last week and let me tell you this is my favorite plane to date. Sig made great flying kit. I put it thru the wringer and it handled every bit of it. Every modeler should have one!!!!!!! I will try to post a video soon.
Mark
Mark
01-19-2012 | 03:44 PM
#64
Member
My Feedback: (4)
Joined: Jan 2012
Posts: 97
Likes: 0
Received 0 Likes
on
0 Posts
From: Mooresville,
NC
I've been bitten by the bug again after a 8 year hiatus. This thread and this airplane as inspired me.
I'm going to document my build at this site here. http://sigfourstar.weebly.com/index.html
If you are flying the 4* (any size) and have a link you'd like to share, contact me the site above and
I'll add it to the links page.
Thanks for the inspiration.
Tyler
I'm going to document my build at this site here. http://sigfourstar.weebly.com/index.html
If you are flying the 4* (any size) and have a link you'd like to share, contact me the site above and
I'll add it to the links page.
Thanks for the inspiration.
Tyler
02-13-2014 | 02:45 PM
#65

Joined: Nov 2012
Posts: 36
Likes: 0
Received 0 Likes
on
0 Posts
From: Lincoln, UNITED KINGDOM
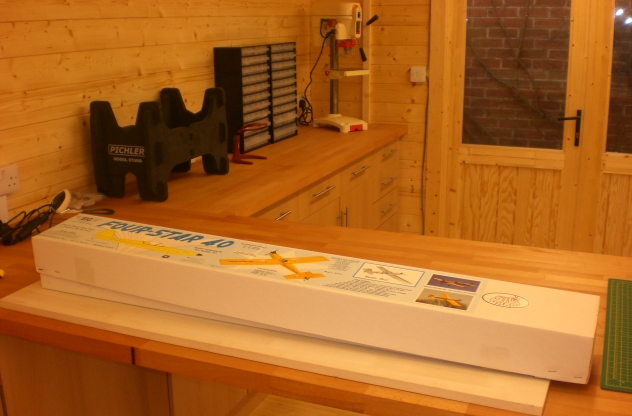
This is an old thread but I thought I'd add some pictures of the changes I made during the build of my 4 Star. I know there are a lot of modified Sigs out there but not many pictures of the mods in progress.
So, first of all you start with a frighteningly clean workshop and a box of bits!!
There's a lot of information out there concerning Sig Mods so, after deciding what changes I was going to make, I amended a copy of the manual to make sure I did things in the correct order.

So, first of all you start with a frighteningly clean workshop and a box of bits!!
There's a lot of information out there concerning Sig Mods so, after deciding what changes I was going to make, I amended a copy of the manual to make sure I did things in the correct order.
02-13-2014 | 02:58 PM
#66
Joined: Nov 2012
Posts: 36
Likes: 0
Received 0 Likes
on
0 Posts
From: Lincoln, UNITED KINGDOM
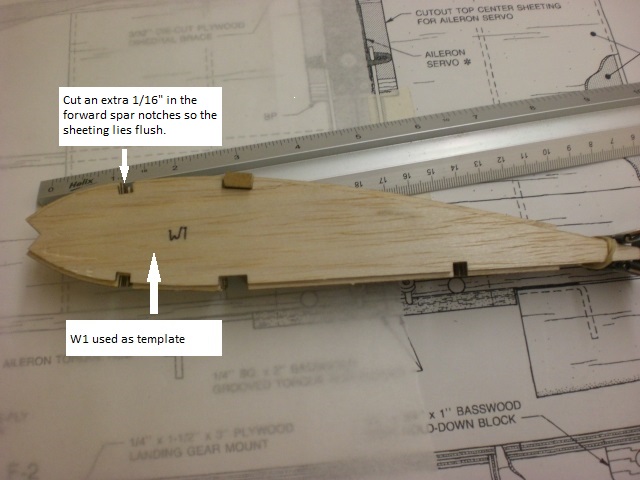
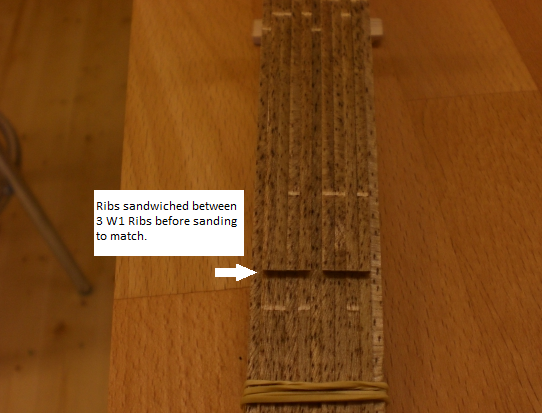
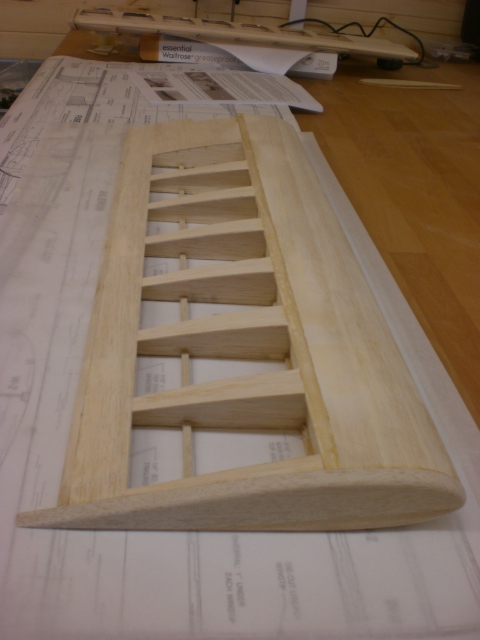
I decided to sheet the Wing LE and cap the Ribs, so the first step was to modify the W2 Ribs. I sandwiched the W2's between 3 of the W1's and sanded them down to match. I then deepened the forward spar slots so the sheeting would sit flush from the LE to the Main Spar.
The Wing was then constructed in the normal way except I shortened it by one bay each side.
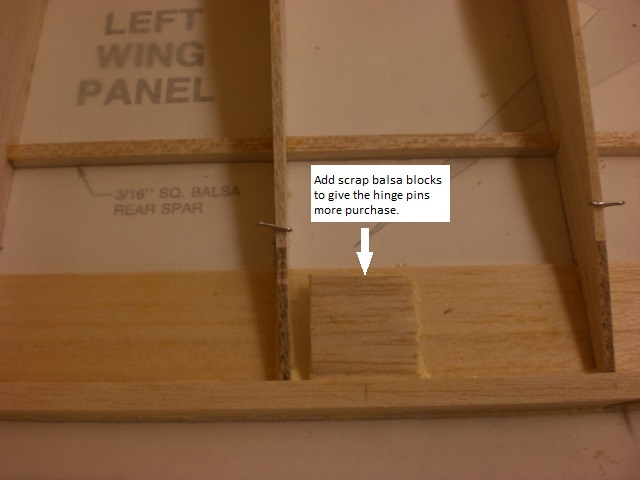
My preference is for Robart Hinges so I added scrap balsa at the hinge points to give them more balsa to secure to.
The Wing was then constructed in the normal way except I shortened it by one bay each side.
My preference is for Robart Hinges so I added scrap balsa at the hinge points to give them more balsa to secure to.
02-13-2014 | 03:09 PM
#67
Joined: Nov 2012
Posts: 36
Likes: 0
Received 0 Likes
on
0 Posts
From: Lincoln, UNITED KINGDOM
I added scrap balsa along the LE to make a 'ledge' the sheeting could sit on.
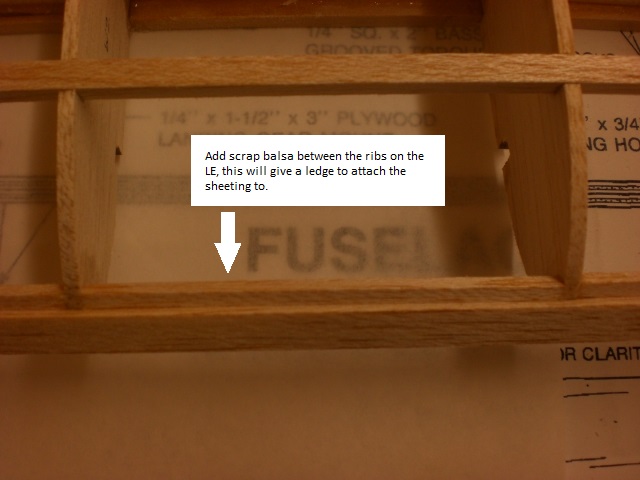
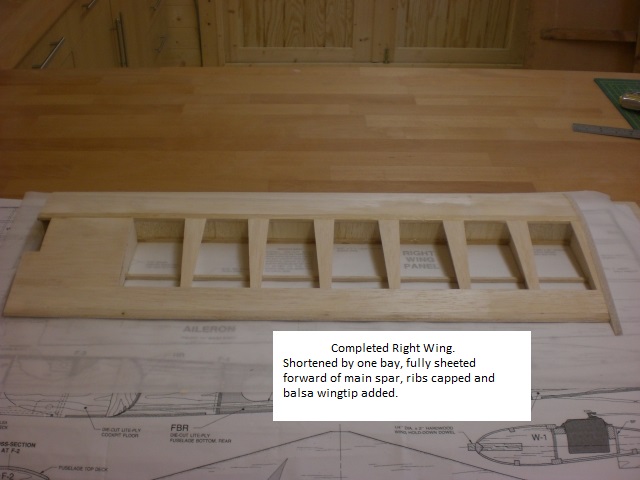
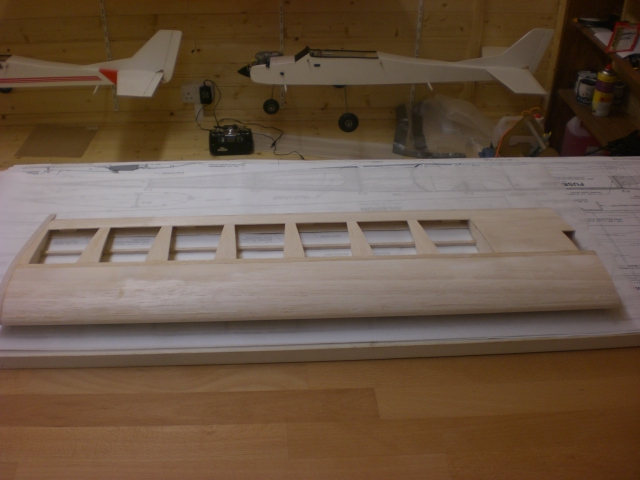
And here's the final result, a shortened Wing with capped Ribs, sheeted LE and a Balsa Wing Tip that protects the Aileron tip.
Next post I'll show details of the balsa Nose Cowl, the sheeted Turtle Deck and the Sullivan Tail Wheel.
And here's the final result, a shortened Wing with capped Ribs, sheeted LE and a Balsa Wing Tip that protects the Aileron tip.
Next post I'll show details of the balsa Nose Cowl, the sheeted Turtle Deck and the Sullivan Tail Wheel.
02-14-2014 | 04:08 AM
#68
Joined: Nov 2012
Posts: 36
Likes: 0
Received 0 Likes
on
0 Posts
From: Lincoln, UNITED KINGDOM
To add a Balsa Cowl I built the Fuselage as per the plans but did not put any glue on the fuselage sides and doublers forward of the firewall. Once the fuselage was built I cut off the cheeks forward of F1. (Not gluing the Cheek sides and Doublers together means you can use one of them to make the Spinner Ring later on).
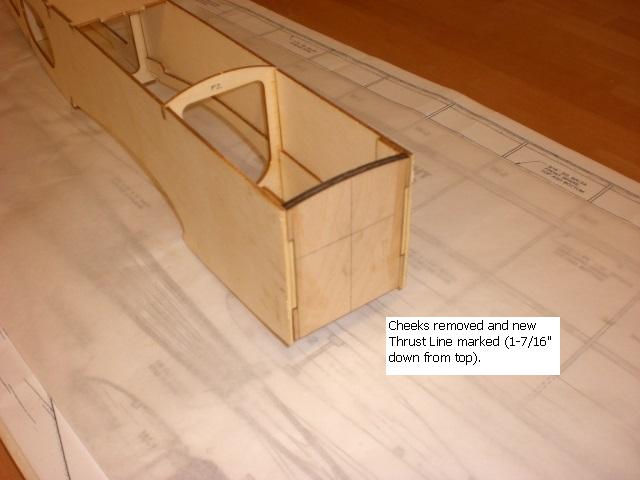
I then marked the new Thrust Line 1-7/16" down from the top.
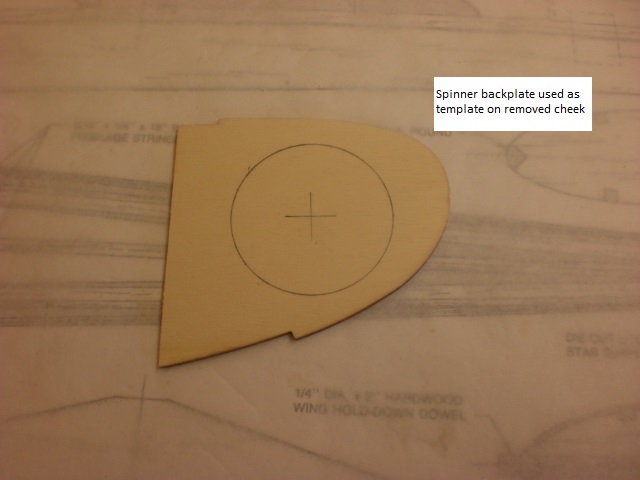
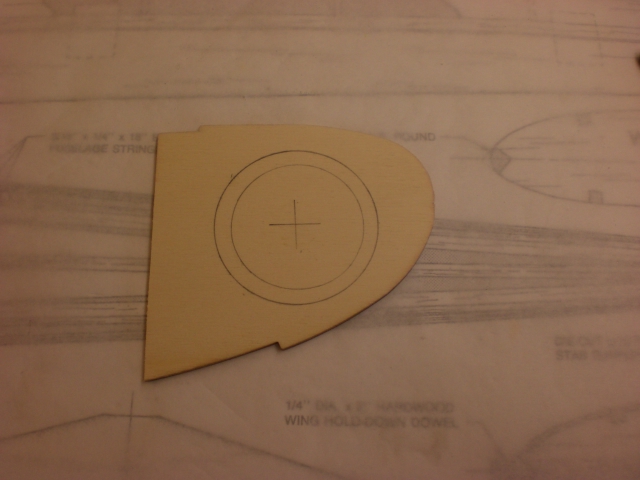
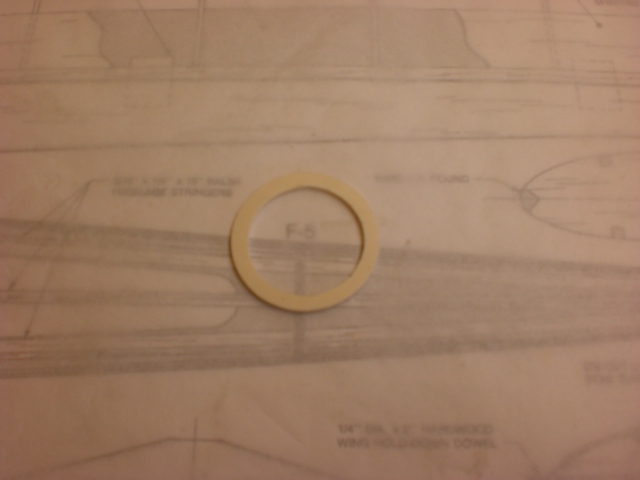
Make a Spinner Ring from one of the Cheeks by tracing around the Spinner Back Plate (2-1/4") cutting it out then cut a 1-3/4" diameter hole in the centre of the resulting plate.
I then marked the new Thrust Line 1-7/16" down from the top.
Make a Spinner Ring from one of the Cheeks by tracing around the Spinner Back Plate (2-1/4") cutting it out then cut a 1-3/4" diameter hole in the centre of the resulting plate.
02-14-2014 | 04:40 AM
#69
Joined: Nov 2012
Posts: 36
Likes: 0
Received 0 Likes
on
0 Posts
From: Lincoln, UNITED KINGDOM
I mounted the Engine on the Engine Mount and installed the Muffler on the Engine. I then held the assembly, with the engine in the horizontal position, against the firewall, centred on the thrust lines. The Muffler fouled the fuselage sides (it's a 2 stroke) so I rotated it clockwise until the Muffler cleared the fuselage by about 1/8". Making sure the mount was still centred on the thrust lines, I marked the mounting holes and also the positions of the fuel lines. I then installed the blind nuts in the firewall and mounted the engine (minus muffler).
I tacked four small 1/16" balsa spacers to the back of the Spinner Back Plate (1 at each compass point) and then tacked the Plywood Spinner Ring to them, ensuring the Ring and Plate remained perfectly aligned. I then installed the Spinner/Ring assembly onto the engine (a broken prop hub works well). Then I installed the 3/8" balsa sheet cowl top and bottom blocks. They need to be fitted so that they protrude slightly above the fuselage and the Spinner Ring, to allow for later trimming. The 1/4" balsa sheet sides were then added, again protruding above the fuselage and spinner ring. The right side was cut to fit around the engine; a close fit but not too close (the Engine has to be able to be removed and installed).
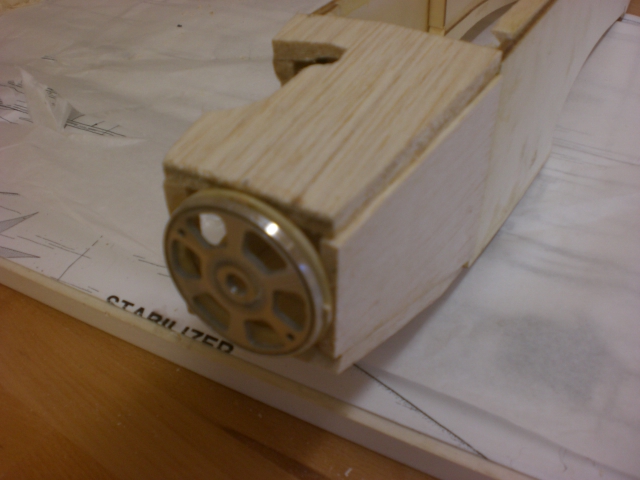
With The Engine removed, I installed 1/2" balsa triangle strips alongside all four inside corners between the Spinner Ring and the Firewall.

I also installed 1/2" triangle strips to the back of the firewall and between F2 and F1, again to allow for trimming.
I tacked four small 1/16" balsa spacers to the back of the Spinner Back Plate (1 at each compass point) and then tacked the Plywood Spinner Ring to them, ensuring the Ring and Plate remained perfectly aligned. I then installed the Spinner/Ring assembly onto the engine (a broken prop hub works well). Then I installed the 3/8" balsa sheet cowl top and bottom blocks. They need to be fitted so that they protrude slightly above the fuselage and the Spinner Ring, to allow for later trimming. The 1/4" balsa sheet sides were then added, again protruding above the fuselage and spinner ring. The right side was cut to fit around the engine; a close fit but not too close (the Engine has to be able to be removed and installed).
With The Engine removed, I installed 1/2" balsa triangle strips alongside all four inside corners between the Spinner Ring and the Firewall.
I also installed 1/2" triangle strips to the back of the firewall and between F2 and F1, again to allow for trimming.
02-14-2014 | 05:10 AM
#70
Joined: Nov 2012
Posts: 36
Likes: 0
Received 0 Likes
on
0 Posts
From: Lincoln, UNITED KINGDOM
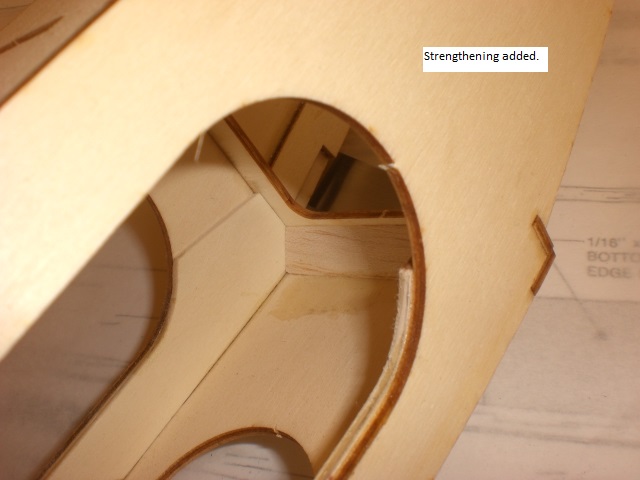
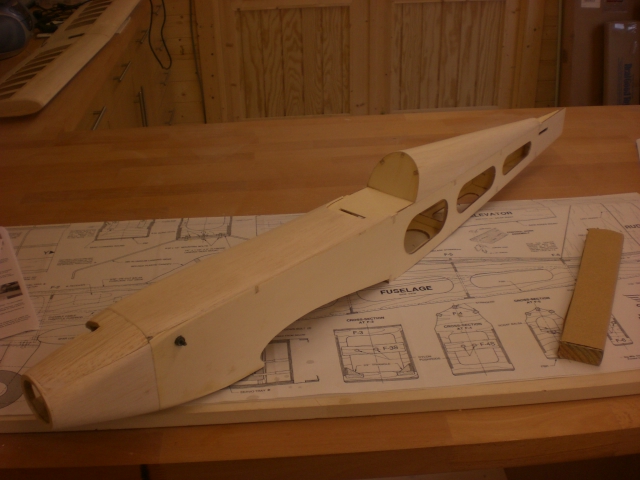
The Sig 4 Star is reportedly weak at the wing saddle, so I added some reinforcement.
To add the Turtle Deck Sheeting (I used 1/16" balsa) I simply followed the build manual but then sanded the Formers down by 1/16" at the point they met the fuselage side. I also used some scrap balsa, glued 1/16" in from the fuselage side, to give an edge that I could glue the sheeting to.
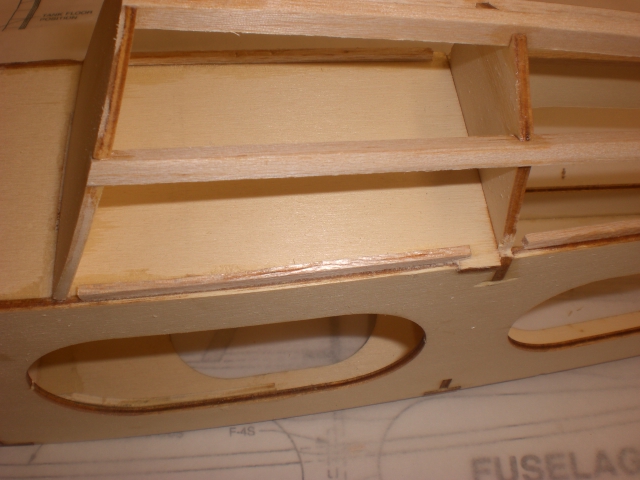
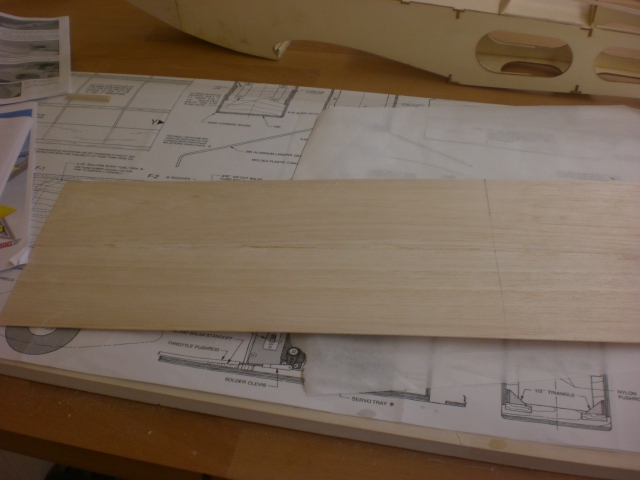
The Sheeting was made from some 1/16" balsa sheet, glued together, and then cut oversize for the Turtle Deck area. It was thoroughly damped down and formed over the Turtle Deck until it could be held in place by elastic bands.
I then marked and cut one side, taped it securely in place, tightly wrapped the sheet over the Formers and marked the opposite side. Cutting this final side left me with Deck Sheeting that fitted perfectly side to side but was slightly over length. I then CA'd it down one side, from cockpit to tail, before stretching it over the formers and gluing it to the front and rear formers as I went (I did not glue it to the intermediate formers so it could form a more natural curve). Finally I glued it along the opposite side. A sharp knife removed the excess balsa from the two ends.
To add the Turtle Deck Sheeting (I used 1/16" balsa) I simply followed the build manual but then sanded the Formers down by 1/16" at the point they met the fuselage side. I also used some scrap balsa, glued 1/16" in from the fuselage side, to give an edge that I could glue the sheeting to.
The Sheeting was made from some 1/16" balsa sheet, glued together, and then cut oversize for the Turtle Deck area. It was thoroughly damped down and formed over the Turtle Deck until it could be held in place by elastic bands.
I then marked and cut one side, taped it securely in place, tightly wrapped the sheet over the Formers and marked the opposite side. Cutting this final side left me with Deck Sheeting that fitted perfectly side to side but was slightly over length. I then CA'd it down one side, from cockpit to tail, before stretching it over the formers and gluing it to the front and rear formers as I went (I did not glue it to the intermediate formers so it could form a more natural curve). Finally I glued it along the opposite side. A sharp knife removed the excess balsa from the two ends.
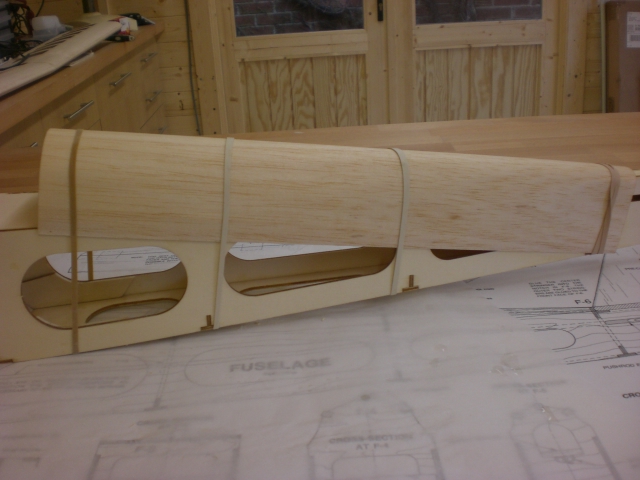
02-14-2014 | 05:39 AM
#71
Joined: Nov 2012
Posts: 36
Likes: 0
Received 0 Likes
on
0 Posts
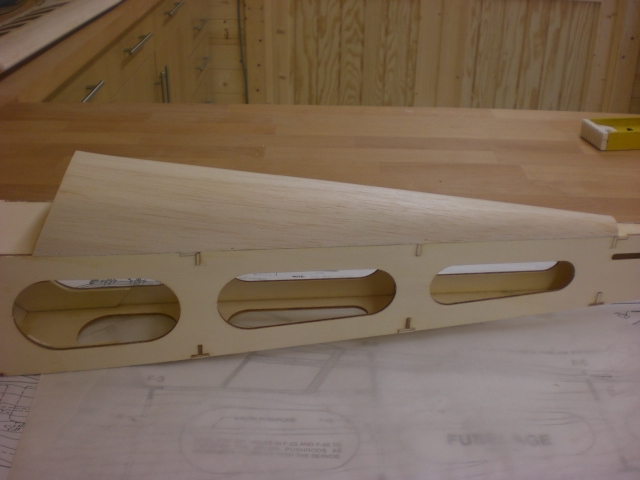
From: Lincoln, UNITED KINGDOM
The Nose Cowl was initially shaped by using a balsa plane and a sanding block. The corners were cut at 45 deg, keeping the surfaces flat and forming a smooth curve forward to the Spinner Ring. The edges were then sanded at 30 deg and 60 deg, again keeping the surfaces flat before sanding the edges again at 15 deg and 75 deg. Finally the remaining edges were sanded smooth, giving the finished profile.
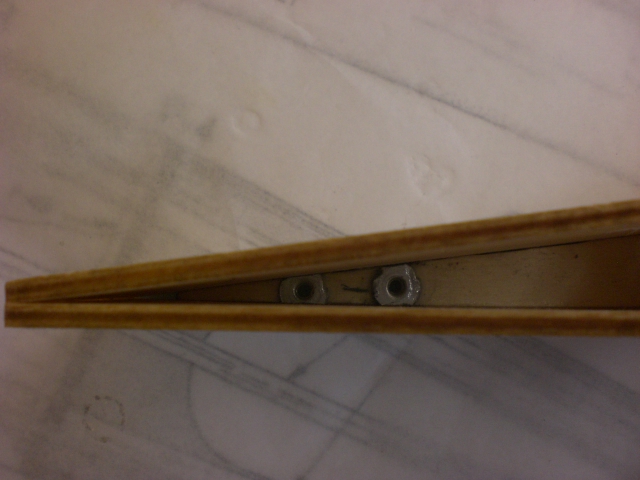
I'd decided to fit a Sullivan Tail Wheel so, before installing the rear underside of the fuselage, I marked and drilled the position of the Tail Wheel and installed 2 Blind Nuts. These overhung the sides of the plywood so I used my grinder to reduce them to size. The underside was then glued in place as per the build manual.
I also opted to use Carbon Main Landing Gear rather than the supplied item. This simply involved drilling the fuselage mounting plate to suit the new Landing Gear rather than as detailed in the build manual.
02-14-2014 | 10:58 AM
#73
My Feedback: (4)
Nice work G-JIMG! Love the attention to detail and the very clear explanation of your work.
i have a used and somewhat abused 60 size version waiting to be redone, and i think i will add some of your mods (turtle deck sheeting and the cowl) to it.
RCM had a good article years ago about adding cowls to normally open engine planes.
http://www.rcmplans.com/issues/reque...-092000-1.html
Bill S.
02-14-2014 | 11:45 AM
#74
Senior Member
Joined: Sep 2003
Posts: 327
Likes: 0
Received 0 Likes
on
0 Posts
From: pittsburgh,
PA
I love my Sig 4Star 40. It was a great build, and she's a pleasure to fly. I sheeted my turtle deck, enclosed the nose, and added rounded wing tips. I have some pics on my profile.

