Go Back  RCU Forums > RC Airplanes > Kit Building
Reload this Page >

SIG Ryan STA special kit by Maxy Hester

Community
Search
Notices
Kit Building If you're building a kit and have questions or want to discuss kit building post it here.

SIG Ryan STA special kit by Maxy Hester

Thread Tools
 
Search this Thread
 
Old 02-22-2016, 02:19 PM
  #151  
thomasmuckus
 
thomasmuckus's Avatar
 
Join Date: Jan 2014
Location: Eppendorf, Saxonia, Germany
Posts: 129
Likes: 0
Received 7 Likes on 7 Posts
Default

I love Your alu-exhaust, and the main thing, it is thirty grams lighter than mine. great respect.
Old 02-22-2016, 04:38 PM
  #152  
jwharkinz
Thread Starter
 
jwharkinz's Avatar
 
Join Date: Nov 2006
Location: Santa Teresa, N.M.
Posts: 168
Likes: 0
Received 0 Likes on 0 Posts
Default

Thanks
Here are some photos to show progress installing new radio gear and servos.
I have a set of mini-cock valves to aid in fueling and to help deal with all the crazy plumbing in this thing. I hope to video testing of the engine running and the smoke system functioning.
Here are a couple of pics


definitely more to come...
Attached Thumbnails Click image for larger version

Name:	IMG_1191.JPG
Views:	506
Size:	669.9 KB
ID:	2148896   Click image for larger version

Name:	IMG_1192.JPG
Views:	517
Size:	432.9 KB
ID:	2148897   Click image for larger version

Name:	IMG_1193.JPG
Views:	505
Size:	480.5 KB
ID:	2148898   Click image for larger version

Name:	IMG_1194.JPG
Views:	486
Size:	516.7 KB
ID:	2148899   Click image for larger version

Name:	IMG_1195.JPG
Views:	487
Size:	482.6 KB
ID:	2148900   Click image for larger version

Name:	IMG_1196.JPG
Views:	482
Size:	520.8 KB
ID:	2148901   Click image for larger version

Name:	IMG_1197.JPG
Views:	468
Size:	543.9 KB
ID:	2148902   Click image for larger version

Name:	IMG_1198.JPG
Views:	471
Size:	524.9 KB
ID:	2148903  

Click image for larger version

Name:	IMG_1199.JPG
Views:	472
Size:	464.2 KB
ID:	2148904   Click image for larger version

Name:	IMG_1200.JPG
Views:	474
Size:	490.5 KB
ID:	2148905   Click image for larger version

Name:	IMG_1201.JPG
Views:	468
Size:	589.9 KB
ID:	2148906   Click image for larger version

Name:	IMG_1202.JPG
Views:	472
Size:	598.7 KB
ID:	2148907   Click image for larger version

Name:	IMG_1203.JPG
Views:	477
Size:	588.5 KB
ID:	2148908   Click image for larger version

Name:	IMG_1204.JPG
Views:	457
Size:	563.2 KB
ID:	2148909   Click image for larger version

Name:	IMG_1205.JPG
Views:	475
Size:	534.8 KB
ID:	2148910   Click image for larger version

Name:	IMG_1206.JPG
Views:	471
Size:	485.9 KB
ID:	2148911  

Old 02-22-2016, 05:01 PM
  #153  
jwharkinz
Thread Starter
 
jwharkinz's Avatar
 
Join Date: Nov 2006
Location: Santa Teresa, N.M.
Posts: 168
Likes: 0
Received 0 Likes on 0 Posts
Default

Almost forgot to mention that I mapped the fuel system, The new mechanic is gonna need this!

Attached Thumbnails Click image for larger version

Name:	SmokeSystemRyanSTA.jpg
Views:	483
Size:	560.4 KB
ID:	2148913  
Old 02-23-2016, 06:35 AM
  #154  
FlyerInOKC
My Feedback: (6)
 
FlyerInOKC's Avatar
 
Join Date: Nov 2004
Location: Oklahoma City, OK
Posts: 14,153
Received 272 Likes on 237 Posts
Default

I like the color coding on the tubing, top notch idea!
Old 02-25-2016, 06:09 AM
  #155  
jwharkinz
Thread Starter
 
jwharkinz's Avatar
 
Join Date: Nov 2006
Location: Santa Teresa, N.M.
Posts: 168
Likes: 0
Received 0 Likes on 0 Posts
Default

Another day of creativity and the hull is almost completed. I have some detail work for sure but the main thing is that its a lot closer to flying. I have more to do on the wing and now I'll shift gears to that area and complete the landing gear pants. I love thomasmuckus's landing gear design, I would love to imitate his concept of having the flying wires attached, then have the pants installed around that. Oh well, I'll continue with my old tried and true method of origami: tire, wheel pant, and landing wire, juggle. Been doing it for 30 years, why stop now??? (heh) There are some photos here of my many attempts to accurately weigh this hull. As you can see this thing was gaining weight just hanging there, so I pulled the plug before this became too heavy! I'm going to call it 7lbs. A little fat, my main goal is to come in close to 9lbs. total and empty. I weighed 32 oz. of alcohol and it is 2lbs. Damn. this is gonna be a bomber on takeoff! looks like I'm doing some more math to determine my new wing loading. Shouldn't be all that bad, I did plan for this early on with the changed wing design. Don't you just love the unknown! (Hell NO!) We know big risk = big gain. Just makes me nervous tho.

Attached Thumbnails Click image for larger version

Name:	IMG_1220.JPG
Views:	485
Size:	386.1 KB
ID:	2149319   Click image for larger version

Name:	IMG_1221.JPG
Views:	461
Size:	488.8 KB
ID:	2149320   Click image for larger version

Name:	IMG_1222.JPG
Views:	468
Size:	509.8 KB
ID:	2149321   Click image for larger version

Name:	IMG_1223.JPG
Views:	473
Size:	475.4 KB
ID:	2149322   Click image for larger version

Name:	IMG_1224.JPG
Views:	470
Size:	400.3 KB
ID:	2149323   Click image for larger version

Name:	IMG_1225.JPG
Views:	464
Size:	467.1 KB
ID:	2149324   Click image for larger version

Name:	IMG_1226.JPG
Views:	449
Size:	363.4 KB
ID:	2149325   Click image for larger version

Name:	IMG_1227.JPG
Views:	450
Size:	594.1 KB
ID:	2149326  

Click image for larger version

Name:	IMG_1228.JPG
Views:	456
Size:	389.4 KB
ID:	2149327   Click image for larger version

Name:	IMG_1229.JPG
Views:	470
Size:	409.0 KB
ID:	2149328   Click image for larger version

Name:	IMG_1230.JPG
Views:	459
Size:	496.5 KB
ID:	2149329   Click image for larger version

Name:	IMG_1231.JPG
Views:	470
Size:	432.9 KB
ID:	2149330   Click image for larger version

Name:	IMG_1233.JPG
Views:	462
Size:	478.6 KB
ID:	2149331   Click image for larger version

Name:	IMG_1234.JPG
Views:	448
Size:	456.2 KB
ID:	2149332   Click image for larger version

Name:	IMG_1235.JPG
Views:	489
Size:	245.7 KB
ID:	2149333   Click image for larger version

Name:	IMG_1236.JPG
Views:	443
Size:	560.4 KB
ID:	2149334  

Click image for larger version

Name:	IMG_1237.JPG
Views:	489
Size:	596.3 KB
ID:	2149335   Click image for larger version

Name:	IMG_1238.JPG
Views:	465
Size:	583.2 KB
ID:	2149336  
Old 02-25-2016, 07:21 AM
  #156  
jwharkinz
Thread Starter
 
jwharkinz's Avatar
 
Join Date: Nov 2006
Location: Santa Teresa, N.M.
Posts: 168
Likes: 0
Received 0 Likes on 0 Posts
Default

Checking in on the spinner order.

Looking to have a custom spinner fabbed for this model. The guys at Tag Model Spinners(http://www.tag-model-spinners.com/spinner/) are going to complete the work to totally rock this look.
Old 02-25-2016, 07:40 AM
  #157  
FlyerInOKC
My Feedback: (6)
 
FlyerInOKC's Avatar
 
Join Date: Nov 2004
Location: Oklahoma City, OK
Posts: 14,153
Received 272 Likes on 237 Posts
Default

Your exaust system really temps me. I am seriously considering try my hand at replicating it on my Ryan SC-M project.
Attached Thumbnails Click image for larger version

Name:	SC-M 1.jpg
Views:	438
Size:	26.7 KB
ID:	2149357  
Old 02-27-2016, 05:27 AM
  #158  
jwharkinz
Thread Starter
 
jwharkinz's Avatar
 
Join Date: Nov 2006
Location: Santa Teresa, N.M.
Posts: 168
Likes: 0
Received 0 Likes on 0 Posts
Default

Go for it dude, All I did was buy aluminum welding rods(http://www.harborfreight.com/8-piece...ods-44810.html) from HF. a Propane torch, and some time with an old aluminum computer case...
Old 02-29-2016, 06:27 AM
  #159  
FlyerInOKC
My Feedback: (6)
 
FlyerInOKC's Avatar
 
Join Date: Nov 2004
Location: Oklahoma City, OK
Posts: 14,153
Received 272 Likes on 237 Posts
Default

It's tempting! What kind of propane torch did you use?
Old 02-29-2016, 11:47 AM
  #160  
jwharkinz
Thread Starter
 
jwharkinz's Avatar
 
Join Date: Nov 2006
Location: Santa Teresa, N.M.
Posts: 168
Likes: 0
Received 0 Likes on 0 Posts
Default

Check this out, I bought the cheapest stuff I could get my hands on. The torch was from Homo Depot and was like 7-8 bills. The bottles are about $4 each I think. Most expensive was the aluminum rod from harbor freight, 20 dollars. Scrap I've had for a while, just some aluminum computer case sides. Finally I used aluminum tube 5/8 and 1/2 od for the exhaust tips, use the heavy wall as I had problems with the thinner stuff.

Attached Thumbnails Click image for larger version

Name:	IMG_1240.JPG
Views:	450
Size:	607.0 KB
ID:	2150019   Click image for larger version

Name:	IMG_1241.JPG
Views:	444
Size:	431.5 KB
ID:	2150020   Click image for larger version

Name:	IMG_1242.JPG
Views:	425
Size:	523.5 KB
ID:	2150021  
Old 02-29-2016, 11:58 AM
  #161  
FlyerInOKC
My Feedback: (6)
 
FlyerInOKC's Avatar
 
Join Date: Nov 2004
Location: Oklahoma City, OK
Posts: 14,153
Received 272 Likes on 237 Posts
Default

Cool, I already have the torch.
Old 03-02-2016, 05:48 PM
  #162  
jwharkinz
Thread Starter
 
jwharkinz's Avatar
 
Join Date: Nov 2006
Location: Santa Teresa, N.M.
Posts: 168
Likes: 0
Received 0 Likes on 0 Posts
Default

Today was dedicated to wing time. Specifically the landing gear and pants assembly and mounting. I am also doing touch-up on the fabric covering and was thinking of using some kind of spray on sealer/hardener. I want to find something to help make the elevator and rudder more rigid. The scale design doesn't lend itself to hard sport flying, with more than triple the engine power I am looking into some options. I'm used to building stout lightweight aerobatic models subjected to a lot of abuse and standing up to it. It'd be nice to have that security here.

Attached Thumbnails Click image for larger version

Name:	IMG_1247.JPG
Views:	450
Size:	577.0 KB
ID:	2150498   Click image for larger version

Name:	IMG_1249.JPG
Views:	428
Size:	365.0 KB
ID:	2150499   Click image for larger version

Name:	IMG_1250.JPG
Views:	445
Size:	532.0 KB
ID:	2150500   Click image for larger version

Name:	IMG_1251.JPG
Views:	440
Size:	365.1 KB
ID:	2150501   Click image for larger version

Name:	IMG_1252.JPG
Views:	448
Size:	508.6 KB
ID:	2150502   Click image for larger version

Name:	IMG_1253.JPG
Views:	433
Size:	508.1 KB
ID:	2150503   Click image for larger version

Name:	IMG_1254.JPG
Views:	413
Size:	450.0 KB
ID:	2150505   Click image for larger version

Name:	IMG_1255.JPG
Views:	439
Size:	440.4 KB
ID:	2150506  

Click image for larger version

Name:	IMG_1256.JPG
Views:	424
Size:	413.8 KB
ID:	2150507   Click image for larger version

Name:	IMG_1257.JPG
Views:	421
Size:	444.0 KB
ID:	2150508   Click image for larger version

Name:	IMG_1258.JPG
Views:	431
Size:	382.6 KB
ID:	2150509   Click image for larger version

Name:	IMG_1259.JPG
Views:	415
Size:	356.8 KB
ID:	2150510   Click image for larger version

Name:	IMG_1260.JPG
Views:	418
Size:	441.2 KB
ID:	2150511   Click image for larger version

Name:	IMG_1261.JPG
Views:	431
Size:	419.5 KB
ID:	2150512   Click image for larger version

Name:	IMG_1262.JPG
Views:	413
Size:	424.4 KB
ID:	2150513   Click image for larger version

Name:	IMG_1263.JPG
Views:	421
Size:	524.1 KB
ID:	2150514  

Click image for larger version

Name:	IMG_1264.JPG
Views:	439
Size:	523.6 KB
ID:	2150515   Click image for larger version

Name:	IMG_1266.JPG
Views:	403
Size:	317.7 KB
ID:	2150516   Click image for larger version

Name:	IMG_1267.JPG
Views:	499
Size:	474.7 KB
ID:	2150517  
Old 03-03-2016, 01:12 PM
  #163  
thomasmuckus
 
thomasmuckus's Avatar
 
Join Date: Jan 2014
Location: Eppendorf, Saxonia, Germany
Posts: 129
Likes: 0
Received 7 Likes on 7 Posts
Default

I understand Your system by the gear and I hope it works as well. Great work. Have You tested it ? How far moving the flying wires ? To the stability of the tail, I don`t belive that You must have any bad minds about this, I had build a Christen Eagle, powered by a tuned 60 ccm engine (more than 6 hp). The tail by this is build lighter than by the Ryan, the flying whires give thes a realy strenght, no problemy by the way. Surely You had to make them not as dummys
I also was a little bit afraid about the whigt,it was the reason for me to rebuild the complete wing

I used Stefano Durantis DevWing-program, very, very nice (not expensive but very great). I helps me to save 150 gramm. In time I´m at 4,2 kg (whitout colour, but with engine, radio, accu and so on)I hope to finish at 5,5 kg. If we can calculate with ca. 59 dm² aera it will means a aera loading lesser than 100 g/dm², I`m sure it will be a good score for a scale aircraft.
Attached Thumbnails Click image for larger version

Name:	Rippen.jpg
Views:	407
Size:	258.4 KB
ID:	2150684  

Last edited by thomasmuckus; 03-03-2016 at 01:14 PM.
Old 03-08-2016, 06:47 AM
  #164  
jwharkinz
Thread Starter
 
jwharkinz's Avatar
 
Join Date: Nov 2006
Location: Santa Teresa, N.M.
Posts: 168
Likes: 0
Received 0 Likes on 0 Posts
Default

Have a snapshot of the awesome custom spinners being machined for this plane...

Attached Thumbnails Click image for larger version

Name:	spinner.jpg
Views:	378
Size:	432.2 KB
ID:	2151424  
Old 03-08-2016, 07:32 AM
  #165  
FlyerInOKC
My Feedback: (6)
 
FlyerInOKC's Avatar
 
Join Date: Nov 2004
Location: Oklahoma City, OK
Posts: 14,153
Received 272 Likes on 237 Posts
Default

Who made your spinners?
Old 03-08-2016, 09:03 AM
  #166  
jwharkinz
Thread Starter
 
jwharkinz's Avatar
 
Join Date: Nov 2006
Location: Santa Teresa, N.M.
Posts: 168
Likes: 0
Received 0 Likes on 0 Posts
Default

I contacted Graham at:

http://www.tag-model-spinners.com/spinner/

John
Old 03-19-2016, 02:11 PM
  #167  
jwharkinz
Thread Starter
 
jwharkinz's Avatar
 
Join Date: Nov 2006
Location: Santa Teresa, N.M.
Posts: 168
Likes: 0
Received 0 Likes on 0 Posts
Default

Here is a sneak at the assembled plane w/o rigging, testing the fit, and the amount of cramming I may need to address. So far it looks good tho. As you can see in the photo the covering needs to be re-tightened and then touched up. Finally I am going to spray an epoxy clear to help keep things tight. The exhaust was off a couple of degrees in clock, causing the pipes to look lower in the opening. I plan to open this a little and finish fabing the aluminum cover. This would be the perfect project for headers like the beast of turin.

Attached Thumbnails Click image for larger version

Name:	IMG_1281.JPG
Views:	439
Size:	584.4 KB
ID:	2153191   Click image for larger version

Name:	IMG_1282.JPG
Views:	429
Size:	563.5 KB
ID:	2153192   Click image for larger version

Name:	IMG_1283.JPG
Views:	437
Size:	559.5 KB
ID:	2153193  
Old 03-21-2016, 06:39 AM
  #168  
FlyerInOKC
My Feedback: (6)
 
FlyerInOKC's Avatar
 
Join Date: Nov 2004
Location: Oklahoma City, OK
Posts: 14,153
Received 272 Likes on 237 Posts
Default

If you're not careful that thing could really fly! Beautiful job John!
Old 03-24-2016, 04:25 AM
  #169  
jwharkinz
Thread Starter
 
jwharkinz's Avatar
 
Join Date: Nov 2006
Location: Santa Teresa, N.M.
Posts: 168
Likes: 0
Received 0 Likes on 0 Posts
Default

Thanks FlyerInOKC, we all seem to have a little crow in our blood. Ask me what my favorite color is and I'll say; Chrome!... I love shiny things!

P.S. I can relate, hell I live it... "Builders Slower Than a Dead Turtle Nailed to a Fence Post Association
My bench where you always find the weird and unusual!"
Old 03-24-2016, 05:15 AM
  #170  
FlyerInOKC
My Feedback: (6)
 
FlyerInOKC's Avatar
 
Join Date: Nov 2004
Location: Oklahoma City, OK
Posts: 14,153
Received 272 Likes on 237 Posts
Default

Originally Posted by jwharkinz
Thanks FlyerInOKC, we all seem to have a little crow in our blood. Ask me what my favorite color is and I'll say; Chrome!... I love shiny things!

P.S. I can relate, hell I live it... "Builders Slower Than a Dead Turtle Nailed to a Fence Post Association
My bench where you always find the weird and unusual!"
Well that last one can only apply if you build your own like we do! Unless you are talking about the loose nut standing/sitting in front of the bench, then it applies all of the time!
Old 03-24-2016, 07:26 AM
  #171  
jwharkinz
Thread Starter
 
jwharkinz's Avatar
 
Join Date: Nov 2006
Location: Santa Teresa, N.M.
Posts: 168
Likes: 0
Received 0 Likes on 0 Posts
Default

I've been referred to as "the loose nut holding the steering wheel"...
Old 03-26-2016, 04:49 AM
  #172  
jwharkinz
Thread Starter
 
jwharkinz's Avatar
 
Join Date: Nov 2006
Location: Santa Teresa, N.M.
Posts: 168
Likes: 0
Received 0 Likes on 0 Posts
Default

And so I had to clean up after a little accident the other day. While taking out the trash, my dad lost balance going thru the door and held onto it while it pushed a row of shelves along the wall and chiseled off anything mounted to the wall over my workbench... He's fine, his pride got bruised more than anything else, I hate when that happens .

Some photos of the wreckage.


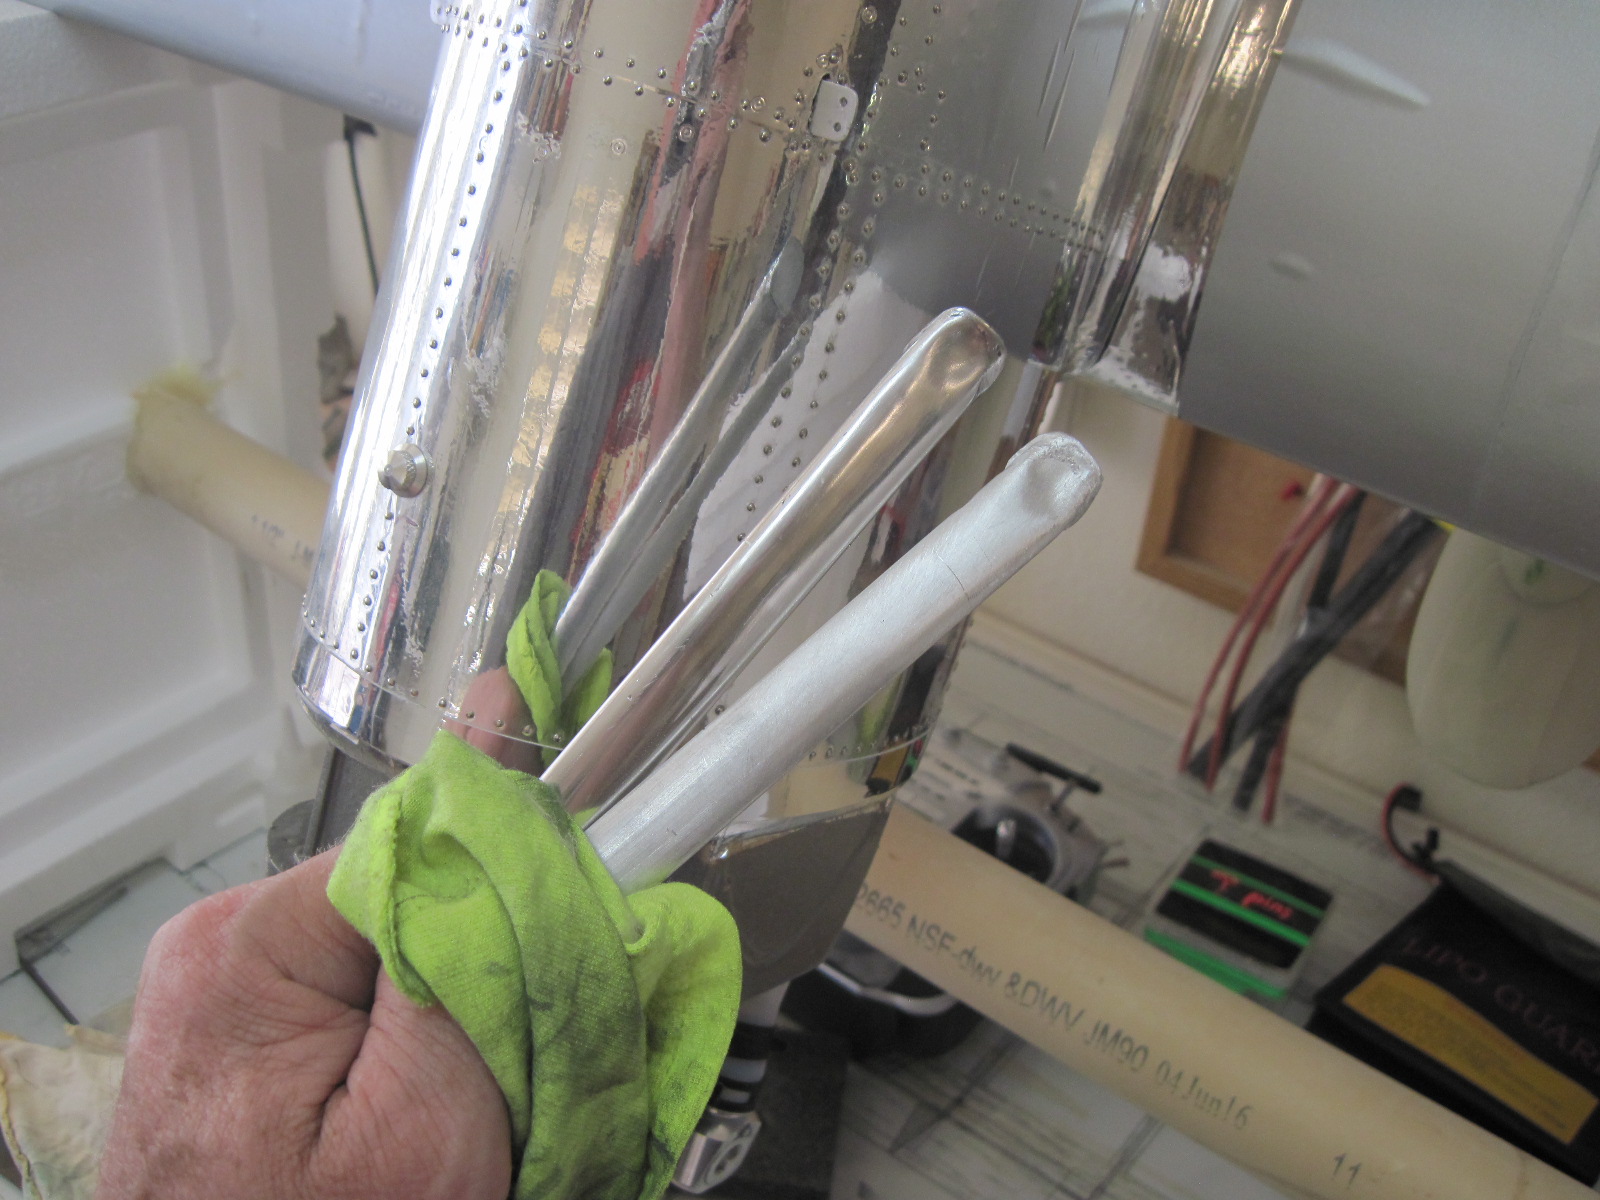
P.S. the aluminum struts pictured didn't survive..
Attached Thumbnails Click image for larger version

Name:	IMG_1297.JPG
Views:	400
Size:	453.4 KB
ID:	2154242   Click image for larger version

Name:	IMG_1298.JPG
Views:	395
Size:	496.8 KB
ID:	2154243   Click image for larger version

Name:	IMG_1299.JPG
Views:	410
Size:	791.4 KB
ID:	2154244   Click image for larger version

Name:	IMG_1300.JPG
Views:	397
Size:	529.9 KB
ID:	2154245   Click image for larger version

Name:	IMG_1301.JPG
Views:	397
Size:	658.3 KB
ID:	2154246   Click image for larger version

Name:	IMG_1302.JPG
Views:	425
Size:	633.2 KB
ID:	2154247  
Old 03-28-2016, 05:38 AM
  #173  
FlyerInOKC
My Feedback: (6)
 
FlyerInOKC's Avatar
 
Join Date: Nov 2004
Location: Oklahoma City, OK
Posts: 14,153
Received 272 Likes on 237 Posts
Default

At least he isn't seriously injured! Oh well, good excuse to sort and reorganize your hardware.
Old 03-31-2016, 06:47 AM
  #174  
jwharkinz
Thread Starter
 
jwharkinz's Avatar
 
Join Date: Nov 2006
Location: Santa Teresa, N.M.
Posts: 168
Likes: 0
Received 0 Likes on 0 Posts
Default

Received the spinners from Graham and I gotta say these are sweet! Some final work to complete the hull and direct my attention to the wing for finishing. The home stretch seems to expand exponentially. There is a maiden flight in sight.
Old 04-01-2016, 05:42 AM
  #175  
jwharkinz
Thread Starter
 
jwharkinz's Avatar
 
Join Date: Nov 2006
Location: Santa Teresa, N.M.
Posts: 168
Likes: 0
Received 0 Likes on 0 Posts
Default

Life wants to get in the way of my moment in zen(building/fabricating).

Gotta have Zen...
Attached Thumbnails Click image for larger version

Name:	IMG_1303.JPG
Views:	368
Size:	594.7 KB
ID:	2155387   Click image for larger version

Name:	IMG_1304.JPG
Views:	362
Size:	598.2 KB
ID:	2155388   Click image for larger version

Name:	IMG_1305.JPG
Views:	351
Size:	450.7 KB
ID:	2155389   Click image for larger version

Name:	IMG_1311.JPG
Views:	364
Size:	621.5 KB
ID:	2155390   Click image for larger version

Name:	IMG_1312.JPG
Views:	338
Size:	547.1 KB
ID:	2155391   Click image for larger version

Name:	IMG_1313.JPG
Views:	341
Size:	486.3 KB
ID:	2155392   Click image for larger version

Name:	IMG_1314.JPG
Views:	333
Size:	436.5 KB
ID:	2155393   Click image for larger version

Name:	IMG_1315.JPG
Views:	370
Size:	569.5 KB
ID:	2155394  

Click image for larger version

Name:	IMG_1316.JPG
Views:	335
Size:	540.1 KB
ID:	2155395   Click image for larger version

Name:	IMG_1317.JPG
Views:	339
Size:	458.0 KB
ID:	2155396   Click image for larger version

Name:	IMG_1318.JPG
Views:	342
Size:	501.4 KB
ID:	2155397   Click image for larger version

Name:	IMG_1319.JPG
Views:	332
Size:	478.0 KB
ID:	2155398   Click image for larger version

Name:	IMG_1320.JPG
Views:	340
Size:	533.8 KB
ID:	2155399   Click image for larger version

Name:	IMG_1321.JPG
Views:	341
Size:	565.4 KB
ID:	2155400   Click image for larger version

Name:	IMG_1322.JPG
Views:	327
Size:	445.0 KB
ID:	2155401   Click image for larger version

Name:	IMG_1323.JPG
Views:	326
Size:	424.2 KB
ID:	2155402  

Click image for larger version

Name:	IMG_1324.JPG
Views:	328
Size:	423.4 KB
ID:	2155403   Click image for larger version

Name:	IMG_1325.JPG
Views:	328
Size:	456.3 KB
ID:	2155404   Click image for larger version

Name:	IMG_1326.JPG
Views:	322
Size:	418.7 KB
ID:	2155405   Click image for larger version

Name:	IMG_1327.JPG
Views:	321
Size:	405.3 KB
ID:	2155406   Click image for larger version

Name:	IMG_1328.JPG
Views:	323
Size:	441.0 KB
ID:	2155407   Click image for larger version

Name:	IMG_1329.JPG
Views:	327
Size:	480.7 KB
ID:	2155408   Click image for larger version

Name:	IMG_1330.JPG
Views:	353
Size:	462.6 KB
ID:	2155409   Click image for larger version

Name:	IMG_1331.JPG
Views:	340
Size:	483.4 KB
ID:	2155410  

Click image for larger version

Name:	IMG_1332.JPG
Views:	312
Size:	406.2 KB
ID:	2155411   Click image for larger version

Name:	IMG_1333.JPG
Views:	320
Size:	402.9 KB
ID:	2155412   Click image for larger version

Name:	IMG_1334.JPG
Views:	327
Size:	516.0 KB
ID:	2155413   Click image for larger version

Name:	IMG_1335.JPG
Views:	348
Size:	582.7 KB
ID:	2155414   Click image for larger version

Name:	IMG_1336.JPG
Views:	343
Size:	558.0 KB
ID:	2155415   Click image for larger version

Name:	IMG_1337.JPG
Views:	335
Size:	450.2 KB
ID:	2155416  


Contact Us - Archive - Advertising - Cookie Policy - Privacy Statement - Terms of Service -

Copyright © 2024 MH Sub I, LLC dba Internet Brands. All rights reserved. Use of this site indicates your consent to the Terms of Use.