


obliterated brand new corsair
 06-11-2009 | 04:05 PM
#1
Thread Starter
Senior Member
Joined: Dec 2007
Posts: 101
Likes: 0
Received 0 Likes
on
0 Posts
From: Vaughan,
ON, CANADA
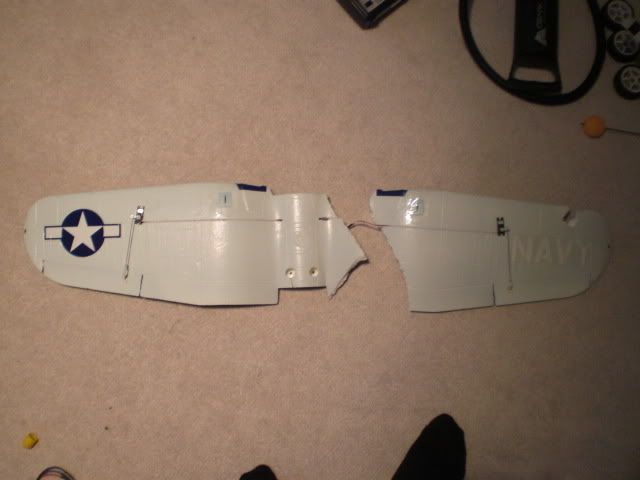
Ordered this plane from nitroplanes.com 2 weeks ago. Its an art tech corsair. Cane in the mail 2 days ago, i flew it for the first time yesterday, it flew very nicely, amazing plane. Today went out for a second flight and crashed it into my friend's P51 in mid air. The wing tore off instantly and the rest of the plane barrel rolled into the ground. Is my brand new 2 day old pile of junk worth fixing, or should i just get a kit and use these electronics?.


 06-11-2009 | 04:11 PM
#2

elmers white glue will glue the foam pices back together if there are no gaps,use masking tape to hold things together and in alignment as the glue dries overnight.only glue a few pieces at a time go slow.
06-11-2009 | 04:16 PM
#3

Joined: Jul 2007
Posts: 559
Received 0 Likes
on
0 Posts
From: BouldercombeQueensland, AUSTRALIA
and if you have gaps, find some foam about the same density, cut the crushed or missing area to a neat straight size, cut some foam to fill the area.<div>Don't worry about getting the outside shape right, cause you sand that down after the glue has set.</div><div>
</div><div>Foam is easily fixable. Unless you have a mid air with a heli as happened at our field, then no amount of glue could fit all that foam snow back together.</div>
</div><div>Foam is easily fixable. Unless you have a mid air with a heli as happened at our field, then no amount of glue could fit all that foam snow back together.</div>
06-11-2009 | 04:26 PM
#4
Thread Starter
Senior Member
Joined: Dec 2007
Posts: 101
Likes: 0
Received 0 Likes
on
0 Posts
From: Vaughan,
ON, CANADA
yeah heli sound pretty bad. you see the plastic motor mount inside the nose is shattered beoynd fixing, theres part missing, and everything, that engine is not staying in there with the stock motor mound, and theres a good 1/3 of the wing missing.
If i can get a whole new body for $35 is that a good deal, because i need a new motor mount anyway, and i hesitate flying on a home glued wing.
If i can get a whole new body for $35 is that a good deal, because i need a new motor mount anyway, and i hesitate flying on a home glued wing.
06-11-2009 | 05:00 PM
#6
Senior Member
Joined: Jun 2008
Posts: 349
Likes: 0
Received 0 Likes
on
0 Posts
From: Brisbane Queensland , AUSTRALIA
Dude if you going to fly foamies then get yourself some of this http://www.selleys.com.au/Selleys-Ar...y/default.aspxThe joints will be stronger than the original.Grab an engine mount from your local LHSit will be better than what was installed. They quite often make it a weakpoint so itbreaks before all ealse. Goodgrouding for repairs when you step up to balsa and coveral, because you have to acess the situation work out how to fix it. With foam you can improvise, strengthen members with timber screwers or tooth pics and all surfaces are glueable. Nothingwrong with a good foamie to play with ........................have fun.
Disapointing thatthis is a two day old plane but definately not a throw away there's more fun to be had with that bird yet ..............cheers
Ps you can beef up the firewall by inserting a light ply replacement, did that to a p51 when installed a bigger motor required diferant set back.
Disapointing thatthis is a two day old plane but definately not a throw away there's more fun to be had with that bird yet ..............cheers
Ps you can beef up the firewall by inserting a light ply replacement, did that to a p51 when installed a bigger motor required diferant set back.
06-11-2009 | 05:29 PM
#7
Joined: Jul 2007
Posts: 559
Received 0 Likes
on
0 Posts
From: BouldercombeQueensland, AUSTRALIA
the 'packaging foam' or styrene foam planes are not meant to be durable, but are easily fixable. I started on a GWS Tiger Moth that was nearly 25% epoxy by the time I retired it. I couldn't count the number of prangs and fixes it had.<div>And of course I was adding more power all the time, went from NiMh to LiPo, then to a DIY brushless when I got sick of replacing the brushed motors after half a dozen flights.</div><div>But no matter how badly I ploughed the farm with the airframe it was fixable.</div><div>Each repair gives you a chance to add more strength to the airframe. </div><div>I ended up with not just a single carbon spar in the lower wing, but top and bottom carbon spars in both wings, plus flying wires (they made ALL the difference on a bipe), carbon spar down the fuse (each side eventually).</div><div>All this added weight but I just added more power. The plane actually became more stable and better to fly as a consequence.</div><div>When I purchased a second one, I built it from scratch with all the mods and strengthening I had used in the first one, and without the weight of all that epoxy it was the meanest quickest foamy at the field.</div><div>
</div><div>The Multiplex EPP foam is probably about the most durable on the market, although it is more flexible than styrene, but doesn't break like styrene, and you can use standard CA for construction and repairs.</div>
</div><div>The Multiplex EPP foam is probably about the most durable on the market, although it is more flexible than styrene, but doesn't break like styrene, and you can use standard CA for construction and repairs.</div>
06-11-2009 | 05:55 PM
#8
Thread Starter
Senior Member
Joined: Dec 2007
Posts: 101
Likes: 0
Received 0 Likes
on
0 Posts
From: Vaughan,
ON, CANADA
OK i will rebuild this plane. Besides after taking all the parts apart it doesn't seem all that bad. I would really like to install a carbon rod in the wing but the corsair's wing isn't exactly straight. Is it possible to bend a cf rod? I will also post my rebuilding process as I go, might start with the main wing today.
06-11-2009 | 07:53 PM
#9
Thread Starter
Senior Member
Joined: Dec 2007
Posts: 101
Likes: 0
Received 0 Likes
on
0 Posts
From: Vaughan,
ON, CANADA
The plane is surprisingly easy to glue back together. I have already started. I got the 3 main parts of the wing drying, and the nose piece drying right now. Here are the updates:


 06-11-2009 | 08:12 PM
#11
Thread Starter
Senior Member
Joined: Dec 2007
Posts: 101
Likes: 0
Received 0 Likes
on
0 Posts
From: Vaughan,
ON, CANADA
honestly, you can get a completely new airframe for $35, I just dont see the logic in buying a broken one and fixing it
06-11-2009 | 11:12 PM
#13
Thread Starter
Senior Member
Joined: Dec 2007
Posts: 101
Likes: 0
Received 0 Likes
on
0 Posts
From: Vaughan,
ON, CANADA
I will probably get a lot of work done on the plane on the weekend, going to go to my LHS tomorrow to pick up some 5 minute epoxy and a small block of balsa, or other wood to make a new motor mount. So should i get carbon rods for the wings? Can i bend the rods permanently?
06-12-2009 | 04:20 PM
#14
Thread Starter
Senior Member
Joined: Dec 2007
Posts: 101
Likes: 0
Received 0 Likes
on
0 Posts
From: Vaughan,
ON, CANADA
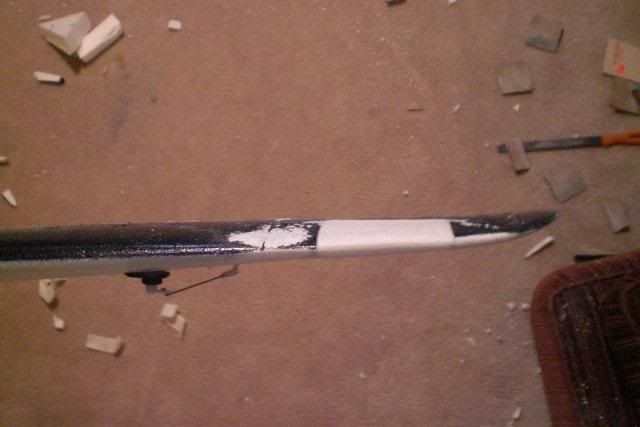
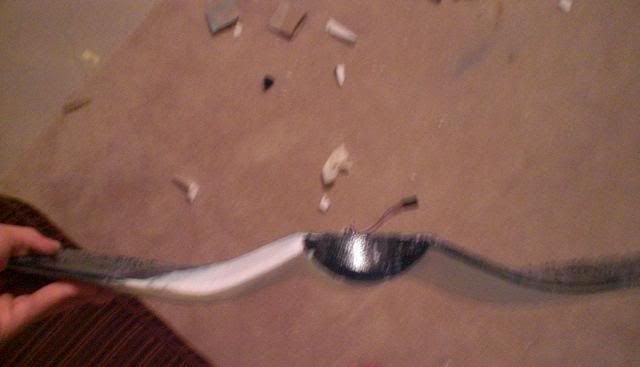
The wing dried, and it is surprisingly strong, in the second picture im holding the wing up by the wingtip on the broken side. I also cut out the parts of the wing that were broken and missing, and fabricated replacement parts out of the box that the plane came in. The other wing pieces are now drying. The nose cone has fused at the back, and was glued at the front today.
[img]file:///G:/DCIM/100CASIO/CIMG1030.JPG[/img]


[img]file:///G:/DCIM/100CASIO/CIMG1030.JPG[/img]
06-12-2009 | 06:13 PM
#15
Joined: Jul 2007
Posts: 559
Received 0 Likes
on
0 Posts
From: BouldercombeQueensland, AUSTRALIA
Looking good.<div>Bit of carving and sanding, some paint and your almost done.</div><div>
</div><div>Keep up the good work.</div><div>
</div><div>
</div>
</div><div>Keep up the good work.</div><div>
</div><div>
</div>
06-12-2009 | 09:02 PM
#16
Thread Starter
Senior Member
Joined: Dec 2007
Posts: 101
Likes: 0
Received 0 Likes
on
0 Posts
From: Vaughan,
ON, CANADA
I don't think im going to paint the new parts, i kinda like them the way the are, white. I was at the park where i crashed it today, and i accidentally found that missing bit of the wing... too bad i already cut out and glued the new piece, oh well.
06-12-2009 | 09:41 PM
#17
Senior Member
My Feedback: (3)
Joined: Sep 2002
Posts: 2,694
Likes: 0
Received 0 Likes
on
0 Posts
From: OZark,
MO
A well rebuilt plane is a reward in itself. I have become good at fixin' 'em But sometimes its fun to scratch a new one. There is just a little less than a kazilion free foamie plans around. A 30 buck package of blue house wrap foam ought to make enough planes to keep you occupied for a couple of years.
But sometimes its fun to scratch a new one. There is just a little less than a kazilion free foamie plans around. A 30 buck package of blue house wrap foam ought to make enough planes to keep you occupied for a couple of years.
06-13-2009 | 03:02 PM
#18
Thread Starter
Senior Member
Joined: Dec 2007
Posts: 101
Likes: 0
Received 0 Likes
on
0 Posts
From: Vaughan,
ON, CANADA
the nose of the plane just dried, and im going to start making a motor mount now, got some balsa for it. Since this is my first building of anything i have to ask some questions. The motor should be offset... 2 degrees left and 2 degrees down right? That's what the stock setup looked like (approximately) Also there seems to be no access to the engine compartment at all, so i will have to carefully cut off the freshly glued together cowl to mount the motor. So when im trying to put the cowl back on, do i have to glue it or can i use magnets or something to hold it in place and be removable for future repairs? Like will the magnets be too unreliable?
06-13-2009 | 03:17 PM
#19
Joined: Jul 2007
Posts: 559
Received 0 Likes
on
0 Posts
From: BouldercombeQueensland, AUSTRALIA
This is the joy of modelling, creating something that works.<div>Use whatever materials and/or gadgets you have at hand.</div><div>Strong earth magnets will do the job, especially as the forces on the cowl tend to hold it on anyway.</div><div>A lot of cowls are screwed on. Flat piece of plastic glued to the foam underneath that hold the screw.</div><div>
</div><div>
</div><div>In these setups the down/side thrust is not critical, and if it looks right it should fly right.</div>
</div><div>
</div><div>In these setups the down/side thrust is not critical, and if it looks right it should fly right.</div>
06-13-2009 | 03:41 PM
#20
Thread Starter
Senior Member
Joined: Dec 2007
Posts: 101
Likes: 0
Received 0 Likes
on
0 Posts
From: Vaughan,
ON, CANADA
that screw on idea is really nice, i think i will do that instead just because the only magnets i have are cheap dolarama ones that barely stick to each other. I will probably sue balsa pieces to hold the screw in place. more updates coming soon, i already started carving the wing.
06-13-2009 | 04:39 PM
#21
Thread Starter
Senior Member
Joined: Dec 2007
Posts: 101
Likes: 0
Received 0 Likes
on
0 Posts
From: Vaughan,
ON, CANADA
I epoxied the nose onto the fuselage, and finished carving the wing. all that remains is motor mount and painting : )


might start the motor mount later today.
might start the motor mount later today.
06-13-2009 | 11:10 PM
#23
Thread Starter
Senior Member
Joined: Dec 2007
Posts: 101
Likes: 0
Received 0 Likes
on
0 Posts
From: Vaughan,
ON, CANADA
Well i finished the plane. Its completely flight worthy now, except for the paint job. I carefully cut off the cowl, and made balsa support for it, the cowl is held in by 3 screws, inside i made a new motor mount out of foam and balsa, with approximate offset. I hope it works when i take it up tomorrow or Monday depending on the weather. Im really worried the motor will just rip right off the motor mount, its has a lot of torque, maybe more than 3 screws in balsa can handle.


06-14-2009 | 03:08 AM
#24
Senior Member
Joined: Jun 2008
Posts: 349
Likes: 0
Received 0 Likes
on
0 Posts
From: Brisbane Queensland , AUSTRALIA
sgt peanut ......awesome job on the rebuild thats a credit to you.
Two things 1. howis the balsa engine mount fixed to the foam block on the fire wall. Is that block solid, and if so is that a strong connection?As you said youdon't want that coming loose.
2. Test your paint on anoff cut of foam to make sure it doesn't reactwith it. Iam not sure what youcan your lhs may be ableto help.
Great job on the cowl like yourfixing points ........................ keep it up cheers
06-14-2009 | 03:23 AM
#25
Joined: Jul 2007
Posts: 559
Received 0 Likes
on
0 Posts
From: BouldercombeQueensland, AUSTRALIA
<span style="font-family: Times; font-size: medium; "><div style="margin-top: 0px; margin-right: 0px; margin-bottom: 0px; margin-left: 0px; padding-top: 0px; padding-right: 0px; padding-bottom: 0px; padding-left: 0px; background-image: initial; background-repeat: initial; background-attachment: initial; -webkit-background-clip: initial; -webkit-background-origin: initial; background-color: rgb(255, 255, 255); font-family: Arial; font-size: 12px; background-position: initial initial; ">Your assumption about the engine mount might be correct.<div>
</div><div>You may need to increase the load bearing area by painting the balsa block, foam block and firewall with some epoxy to form a lightweight 'skin' to spread the load area.</div><div>
</div><div>Try running up the motor with the cowl off and check to see if there is any movement.</div><div>
</div><div>Note the area of the previous plastic mount and try to simulate the same strength (or better).</div><div>
</div><div>Maybe some balsa sides to your front block to form a box or part box.</div><div>
</div></div></span>

