


View Poll Results: Would you like to see a Bro******** e-book published
Yes - that would be great !


17
73.91%
Not particularly


6
26.09%
Voters: 23. You may not vote on this poll
Bro rc Surfer Custom Boards
 11-13-2013, 02:34 AM
#601

Thread Starter

Join Date: May 2009
Location: Cape Towm, SOUTH AFRICA
Posts: 2,769
Likes: 0
Received 0 Likes
on
0 Posts
Collective glass layers on hull - 2 layers for the most of the board area - 4 layers over the pod - 7 layers for the housing base...
All glass wraps - laps and joints 'sanded down' (smooth) - final color filler coat applied - before decals and clear coat is applied.....


Lots of work - BUT - O So ! worth it !
All glass wraps - laps and joints 'sanded down' (smooth) - final color filler coat applied - before decals and clear coat is applied.....
Lots of work - BUT - O So ! worth it !
Last edited by YPC; 11-13-2013 at 02:38 AM.
 11-14-2013, 01:57 AM
#602
Thread Starter
Join Date: May 2009
Location: Cape Towm, SOUTH AFRICA
Posts: 2,769
Likes: 0
Received 0 Likes
on
0 Posts
Creating the 'housing'.......and .....sealing the housing..


Glass is positioned at a 45 degree angle up the sides to ensure maximum strength to bond the deck and hull to the housing wall.
This bond helps prevents the hull from pulling away from the surrounding foam due to the weight that it carries.....


Pod will be hollowed out once the housing glass layer has cured....then finished with a white flow coat

Glass is positioned at a 45 degree angle up the sides to ensure maximum strength to bond the deck and hull to the housing wall.
This bond helps prevents the hull from pulling away from the surrounding foam due to the weight that it carries.....
Pod will be hollowed out once the housing glass layer has cured....then finished with a white flow coat
11-15-2013, 01:28 AM
#603
Thread Starter
Join Date: May 2009
Location: Cape Towm, SOUTH AFRICA
Posts: 2,769
Likes: 0
Received 0 Likes
on
0 Posts
Pod hollowed out !
Foam left in the front of the pod to increase the strength........platform created at the back for the battery to rest on. Good bond between housing floor and housing wall....white flow coat to follow..


Foam left in the front of the pod to increase the strength........platform created at the back for the battery to rest on. Good bond between housing floor and housing wall....white flow coat to follow..
11-16-2013, 04:20 AM
#605
Thread Starter
Join Date: May 2009
Location: Cape Towm, SOUTH AFRICA
Posts: 2,769
Likes: 0
Received 0 Likes
on
0 Posts
Second coat of white flow coat applied - overlap sanded down...


Deflection rim created.....


Deflection rim coated with a pigment colored resin (1st coat)

Rudder tube installed ...positioned within a larger diameter hole to ensure
that the epoxy flows around the entire tube whilst saturationg into the foam
ensuring that all the air bubbles are out for a 'strong' bond...


Deflection rim created.....
Deflection rim coated with a pigment colored resin (1st coat)
Rudder tube installed ...positioned within a larger diameter hole to ensure
that the epoxy flows around the entire tube whilst saturationg into the foam
ensuring that all the air bubbles are out for a 'strong' bond...
11-17-2013, 06:01 AM
#606
Thread Starter
Join Date: May 2009
Location: Cape Towm, SOUTH AFRICA
Posts: 2,769
Likes: 0
Received 0 Likes
on
0 Posts
Deck deflection rim sanded down.... deck surface ready for second color pigment coat


Final color pigmented coat applied to deck.....note how the resin filler coat fills in around the rudder tube and 'adds' further strength..


Once cured ....to be sanded down smooth....Screen printed / rice paper decals and 'clear' resin finish coat to be applied applied .........
Final color pigmented coat applied to deck.....note how the resin filler coat fills in around the rudder tube and 'adds' further strength..
Once cured ....to be sanded down smooth....Screen printed / rice paper decals and 'clear' resin finish coat to be applied applied .........
Last edited by YPC; 11-17-2013 at 06:04 AM.
11-18-2013, 01:33 AM
#607
Thread Starter
Join Date: May 2009
Location: Cape Towm, SOUTH AFRICA
Posts: 2,769
Likes: 0
Received 0 Likes
on
0 Posts
Processing the screen printed / rice paper decals ...so that they can now be applied with the final 'clear resin coat' ....various color choices...the white decals are transparent....

11-19-2013, 02:15 AM
#608
Thread Starter
Join Date: May 2009
Location: Cape Towm, SOUTH AFRICA
Posts: 2,769
Likes: 0
Received 0 Likes
on
0 Posts
Busy with a ORANGE F1 build ...


Decided to transform 'my' original float'er to 'all orange' - will apply decals with a clear resin coat..should look ...cool...

Decided to transform 'my' original float'er to 'all orange' - will apply decals with a clear resin coat..should look ...cool...
12-03-2013, 12:23 AM
#610
Senior Member
Join Date: Aug 2012
Location: sydney, AUSTRALIA
Posts: 388
Likes: 0
Received 0 Likes
on
0 Posts
Hi Brosurfer nice F1 hull.
Was wondering what the long yellow round things are and what kind of glue do you use to join top to bottom.... not that i'm gunna make one just interested in the way you do it.
all the best bc
Was wondering what the long yellow round things are and what kind of glue do you use to join top to bottom.... not that i'm gunna make one just interested in the way you do it.
all the best bc
12-05-2013, 04:05 AM
#611
Senior Member
Join Date: Aug 2012
Location: sydney, AUSTRALIA
Posts: 388
Likes: 0
Received 0 Likes
on
0 Posts
hi Brosurfer, you have been pretty quiet lately hope all is well.....?
Just lettin you and all enthusiasts know some of us east coast oz guys are havin a first ever slash on 21st december down wombarra way east of Sydney NSW.... destination unknown as yet more info as we get closer check out ****************** ********s damn i'm not sure of the real site name but its the Aussie one...
Was hopin you could send a 'heads up' to any of your customers who live in our area to bring their Brosurfers down for some fun.
Santa says it could be 3 to 4' with slight offshore winds all day......... lol
12-26-2013, 04:30 AM
#612
Senior Member
Join Date: Aug 2012
Location: sydney, AUSTRALIA
Posts: 388
Likes: 0
Received 0 Likes
on
0 Posts
Hi brosurfer
Merry Christmas and all the best for the new year to you and your family wherever you are......
Outlaw crew had a cool time down sandon point... my board went ok and as you always wanted me to post a pic of your flexy dude riding a wave here he is.
Clarrie from sandonpointphotos took 119 cool pics of our sesh...
Barrels made a cool vid too.. 'sandonsurfsesh' on the youtube
best regards.. bc
Last edited by bearcave; 12-26-2013 at 04:33 AM.
01-20-2014, 07:08 PM
#613
Junior Member
Join Date: Oct 2013
Location: florida
Posts: 11
Likes: 0
Received 0 Likes
on
0 Posts
Last edited by casper1zrc; 01-20-2014 at 07:10 PM.
01-21-2014, 12:08 AM
#614
Thread Starter
Join Date: May 2009
Location: Cape Towm, SOUTH AFRICA
Posts: 2,769
Likes: 0
Received 0 Likes
on
0 Posts
Howzit ALL !
HAPPY NEW YEAR - ALL THE BEST FOR 2014 !!!!!
No ! - Not missing in action - Very much alive and kicking !... been enjoying an awesome extended family vacation 'finally' got my ass back to work......albeit very slowly.
BC - great to 'sea' you out in the surf with your build - looks like you had an awesome session - great picture !
CASPER - love the creative video - very cool !
I have had some awesome rc surfing sessions over the holidays - Lisa-Marie managed to video a few - I just need to edit the footage.
My main PC is in for a much needed 'upgrade' considering all my photos and videos stored - I will be spending much time this year compiling the Bro rc Surfer build book - so some extra PC space and ram will be great !
Looking forward to SEA'ING what 2014 delivers in the world of rc surfing !
01-22-2014, 02:39 PM
#615
Thread Starter
Join Date: May 2009
Location: Cape Towm, SOUTH AFRICA
Posts: 2,769
Likes: 0
Received 0 Likes
on
0 Posts
Howzit guys !.....getting back into the 'groove' .....first NEW video post for 2014 
The board is still the same 'old' float'er I have been surfing for he best part of 2013 - just gave it a quick makeover ( aerosol spray) the colour works well in the surf.
http://www.youtube.com/watch?v=i1SZkDVVyNo
The board is still the same 'old' float'er I have been surfing for he best part of 2013 - just gave it a quick makeover ( aerosol spray) the colour works well in the surf.
http://www.youtube.com/watch?v=i1SZkDVVyNo
01-23-2014, 12:47 AM
#616
Thread Starter
Join Date: May 2009
Location: Cape Towm, SOUTH AFRICA
Posts: 2,769
Likes: 0
Received 0 Likes
on
0 Posts
I put this video together, hoping to demonstrate 'just how much fun' onshore - small - sloppy - surf can be - still offering the opportunity to pull a few good moves - jumps - rotations - 360's - back flips - I have a number of enquirers from the UK and Germany - where the surf is not that good - wanting to enthuse those living there - its all fun !......
http://www.youtube.com/watch?v=LvLQenVSQ2Y
http://www.youtube.com/watch?v=LvLQenVSQ2Y
01-23-2014, 11:36 PM
#617
Thread Starter
Join Date: May 2009
Location: Cape Towm, SOUTH AFRICA
Posts: 2,769
Likes: 0
Received 0 Likes
on
0 Posts
Thursday late afternoon session 'down at the berg' ( very famous cosmopolitan beach - Muizenberg) - awesome weather - slight off-shore / side shore - fun swell size - touch far out !
Plenty of surfers around - everyone enjoying Bro's STOKE !.......taking a few pointers !......
http://www.youtube.com/watch?v=XByKc0J4dmk
Plenty of surfers around - everyone enjoying Bro's STOKE !.......taking a few pointers !......
http://www.youtube.com/watch?v=XByKc0J4dmk
01-24-2014, 04:40 AM
#618
Senior Member
Join Date: Aug 2012
Location: sydney, AUSTRALIA
Posts: 388
Likes: 0
Received 0 Likes
on
0 Posts
Hi YPC
Like your cosmic surfing trip with family and Major Tom... cool... thanks for inviteing me not.
I don't care i'm havin too much fun surfin Oz style wouldn't have gone with ya's anyway.
Btw is that my sister in the black bikini last vid.... tsk tsk....
Anyway, all is good here enjoy 2014 over there.
Best regards Flexybro.
btw.. check out my new wave halo defense mechanism... lol
01-24-2014, 07:42 AM
#619
Thread Starter
Join Date: May 2009
Location: Cape Towm, SOUTH AFRICA
Posts: 2,769
Likes: 0
Received 0 Likes
on
0 Posts
Howzit BC -good to hear from you - we will put you on the 'invite list' for future ......LOL
Looking forward to 'seaing' more of the OZ boyz in action......I love the video's
You have some great Pics of your Flexybro - poster stuff...
The 'bikini girl is my aspiring daughter 'Jessica' .....growing up 'so fast '")
The little one is my youngest 'Cassidy'......just loves Bro !
Been so spoilt with consistent surf - really 'oh so' loving it !!!
Hoping to push the envelope somehow / somewhere this year !!!
Looking forward to 'seaing' more of the OZ boyz in action......I love the video's
You have some great Pics of your Flexybro - poster stuff...
The 'bikini girl is my aspiring daughter 'Jessica' .....growing up 'so fast '
The little one is my youngest 'Cassidy'......just loves Bro !
Been so spoilt with consistent surf - really 'oh so' loving it !!!
Hoping to push the envelope somehow / somewhere this year !!!
01-26-2014, 05:14 AM
#621
Thread Starter
Join Date: May 2009
Location: Cape Towm, SOUTH AFRICA
Posts: 2,769
Likes: 0
Received 0 Likes
on
0 Posts
A little tweak I made a while back, improving my boards performance - is to �nly' bend one side of the bi-fin tip (foil) - the left side - this counters the rotational torque and does not pull the tail down as hard - definitely makes for more speed and improved ( equal) handling - left and right.... ( if you have a aluminium bi-fin its quite easy to straighten out the right hand foil....


Last edited by YPC; 01-26-2014 at 05:23 AM.
01-31-2014, 03:07 AM
#622
Thread Starter
Join Date: May 2009
Location: Cape Towm, SOUTH AFRICA
Posts: 2,769
Likes: 0
Received 0 Likes
on
0 Posts
After running this Turnigy 120A ESC for well over 18 months now - surfing very regularly - I recently started experiencing intermittent power issues - On examination of the unit, I found that the actual wire in the -/+ power leads have actually corroded/broken down to the point of collapsing - possible due to heat - not even able to solder.
Unfortunately the leads location is in between two pc panels - so near impossible to replace the leads.


New ESC sealed with RU Adhesive and insulation tape - this method has worked extremly well for me


I use the RU Adhesive to wrap/seal the RX then cover with a balloon - 100% seal


I like to double up on the heat shrink sleeve for added insulation and strength - also cover the ESC / MOTOR
plug joint to prevent any moisture getting inside the plug.


Unfortunately the leads location is in between two pc panels - so near impossible to replace the leads.
New ESC sealed with RU Adhesive and insulation tape - this method has worked extremly well for me
I use the RU Adhesive to wrap/seal the RX then cover with a balloon - 100% seal
I like to double up on the heat shrink sleeve for added insulation and strength - also cover the ESC / MOTOR
plug joint to prevent any moisture getting inside the plug.
Last edited by YPC; 02-03-2014 at 01:47 AM.
02-03-2014, 01:38 AM
#623
Thread Starter
Join Date: May 2009
Location: Cape Towm, SOUTH AFRICA
Posts: 2,769
Likes: 0
Received 0 Likes
on
0 Posts
Finn ally got my tissue paper / screen printed decals from the print shop ......
Using the colour resin in the layup process means that the decals need to be placed on last, saturated in a clear sanding coat.


Once cured it will require a light sand and a final finishing coat....
Using the colour resin in the layup process means that the decals need to be placed on last, saturated in a clear sanding coat.
Once cured it will require a light sand and a final finishing coat....
02-08-2014, 11:18 AM
#625
Thread Starter
Join Date: May 2009
Location: Cape Towm, SOUTH AFRICA
Posts: 2,769
Likes: 0
Received 0 Likes
on
0 Posts
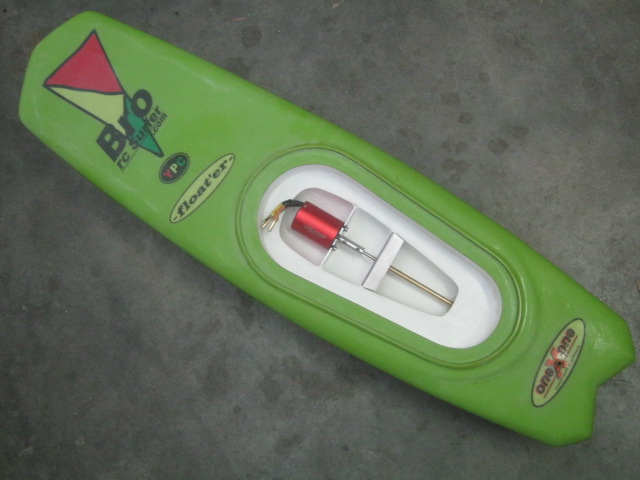
Manufactured the hardware for the motor/battery mount and drive shaft assembly - 4mm solid stainless steel shaft
housed within a brass stuffing tube.....with a serviceable brass bush fitted into a stainless steel drive shaft housing.
This system has proved to be very robust and durable. Initial alignment is critical - once set - removal and replacement
of motor and drive shaft is very simple. (water jacket still to be fitted over motor)


Setting the motor as low as possible within the pod belly improves the desired low CG and reduces
the drive shaft thrust angle considerably - helping reduce the nose lift (porpoise)


housed within a brass stuffing tube.....with a serviceable brass bush fitted into a stainless steel drive shaft housing.
This system has proved to be very robust and durable. Initial alignment is critical - once set - removal and replacement
of motor and drive shaft is very simple. (water jacket still to be fitted over motor)
Setting the motor as low as possible within the pod belly improves the desired low CG and reduces
the drive shaft thrust angle considerably - helping reduce the nose lift (porpoise)