


VX18 thread
 05-05-2008 | 08:45 AM
#1
Thread Starter
Senior Member
Joined: Mar 2008
Posts: 357
Likes: 0
Received 0 Likes
on
0 Posts
From: Calgary, AB, CANADA
Or, "project Sow's Ear".
So my very first truck ever, which I enjoy a great deal (and probably a bit TOO much) is an HSP Tyrannosaurus with the VX18 engine. Being the kind of guy I am, and being that I don't know the history of this (used) engine, I figured I'd better crack 'er open and have a look inside.
First thoughts: "Crap, it looks good in here. I guess I can't justify a new engine just yet." Sleeve and piston are completely without scratches or scars, no pitting or burning, no coking or carbon buildup, nothing. Connecting rod is still nice and tight on the wrist and crank pins, with only a minor film on the wristpin end. Crankshaft looks brand new, and bearings feel great. Pinch is awesome - in fact, after I broke the sleeve loose and wiped everything down, the piston would try to push the sleeve out of the case at TDC.
I timed it up and came up with some rather awful numbers:
Crank opens 43 ABDC and closes 52 ATDC for 189* duration
Boost 53 BBDC for 106* duration
Transfer 57 BBDC for 114* duration
Exhaust 77 for 154* duration
The crank duration is about as much as I'd want for a low speed motor, but the transfer, boost, and exhaust are all a little low. The boost port is fed by a hole in the piston, and the hole & boost port are terribly poorly matched up & I'm sure the whole thing could be done better. The transfer port on the backplate side isn't terrible, but the one on the flywheel side is fairly shrouded by the unfinished machining in the case. The transfer ports are both way bigger than they need to be, as they come down far below the piston crown at BDC. The exhaust port doesn't match up very well with the case, either - the top edge of the port and the top edge of the case make a step that can't be seen, only felt. The crankshaft bore is TINY.
Now I see why everyone says "just don't bother".
I've already got a Redcat tube header and a Team AE torque pipe on this engine and they seemed to wake it up quite nicely, but I can only imagine what'll happen if someone ports the thing. Well, I can't ONLY imagine... I can do something about it. I've got a new connecting rod to install because this engine spent a bit of time at WOT without any load, and because I don't know the history, and because I know aluminium will fail eventually, but while I'm in here I might clean things up a bit. I might go a bit further later, when I've got a bit of time.
I'll be updating this post with pictures when I get home tonight.
Has anyone done any work to these things, and how did it work out? I've seen one member post pics of a bit of sleeve work he did, but I haven't read any reviews on what it did for him. Anyone else?
 05-05-2008 | 09:18 AM
#2

i didnt port or polish the vx but i have done it to the sh.18 and various other engines and liked the results. The vx is a 2 port engine and thats why it just can get the rpm or power up. You can smooth the edges and match up the ports but you wont get much more out of it. Get the sh.18 and you will be amazed by the difference and even more amazed if you p&p it.
05-05-2008 | 09:20 AM
#3
Senior Member
Joined: Jul 2007
Posts: 477
Likes: 0
Received 0 Likes
on
0 Posts
From: louisville,
KY
you do what you want and i wish you luck, but for me thats a little to much time and work to put into a vx.18  again good luck .please keep us updated with your progress
again good luck .please keep us updated with your progress
05-05-2008 | 11:26 AM
#4
Senior Member
Joined: Jan 2008
Posts: 704
Likes: 0
Received 0 Likes
on
0 Posts
From: somewhere,
MN
another canadian....cool and from my hometown as well, welcome to the forum. keep us updated and some pics too if you can.if you have a hard time gettin parts i know of a couple places in winnipeg that can help if ed don't have what you need to get it goin for you.
05-05-2008 | 12:08 PM
#5
Thread Starter
Senior Member
Joined: Mar 2008
Posts: 357
Likes: 0
Received 0 Likes
on
0 Posts
From: Calgary, AB, CANADA
You're from Calgary? Where'd you live? If you haven't been here in the past 5 years or so, boy has it changed...
Rob at Vancouver Hobbies has been getting my business lately - nothing against Ed or anyone else, but you can't beat NOT paying duty on stuff (and the wait that comes along with it). Vancouver Hobbies (Redcat Vancouver) has their website up and running, by the way, though it's still under construction. www.vancouverhobbies.com
Yeah, I'll try and get some pix posted tonight. I'm not sure if I'll monkey with the engine much right away - I had plans to do a series of staged mods along with reviews and possible testing, but wow that's a lot of work for a guy with so much already on his plate.
05-05-2008 | 02:14 PM
#6
Senior Member
Joined: Jan 2008
Posts: 704
Likes: 0
Received 0 Likes
on
0 Posts
From: somewhere,
MN
it said winnipeg before. but i have been to cowtown plenty of times i used to be a truck driver up until a short while ago. ok i had to edit my last post because i'm an idiot lol. i posted in the wrong thread, it happens when you inhale too much nitro fumes lol
05-05-2008 | 10:49 PM
#8
Thread Starter
Senior Member
Joined: Mar 2008
Posts: 357
Likes: 0
Received 0 Likes
on
0 Posts
From: Calgary, AB, CANADA
Okay, finally some pictures. The first three are of the bare sleeve, obviously, and are pretty self explanitory.
The next four show the piston at BDC. The first two are of the boost port: you'll see in a later photo that there is no channel in the crankcase around this area, so the boost port is fed by that little hole in the piston - air/fuel comes out that hole and into the port, where it travels up and past the piston, into the cylinder. The next picture shows the poor alignment of the piston and the transfer ports - yes, the piston is at BDC! Also shown is the exhaust port again.
The next set of pictures shows the engine reassembled and with the piston at BDC - first picture is the boost port and the last picture is the exhaust and rear transfer port.
"Don't bother". Making more and more sense.
05-05-2008 | 11:05 PM
#9
Thread Starter
Senior Member
Joined: Mar 2008
Posts: 357
Likes: 0
Received 0 Likes
on
0 Posts
From: Calgary, AB, CANADA
The rest of the pictures:
The first two show a fairly boring crankshaft. The center hole elbow is actually pretty good, in that the back side is nicely radiused and the entry isn't as bad as some other engines I've seen pictures of (cough)Traxxas(cough)
Finally are some pictures of the crankcase, mostly showing areas where the machining could be "finished" a bit nicer. There's a ridge at the bottom of the bore for the sleeve that can impede airflow with the piston at BDC, and there's a chunk of metal at the bottom of the front transfer port, but it is probably not too badly in the way.
For improvements I see a few areas that are going to be fairly easy and could be effective: I will open up the hole in the piston to match the width of the boost port and I will shape the bottom of the boost port to allow upward airflow. I will radius the inside edge of the piston hole a little bit too. I will remove the ridge at the bottom of the bore in areas where it will help (pretty much only around the front transfer channel) and I will remove other casting flash while I'm at it. Since the bearings must be removed for this operation, I'll probably get me a sealed front bearing to gain a bit of lower chamber compression. I will consider opening up the ports a little and changing the timing to something approaching some hotter engines (copying timing numbers, basically), getting the boost and transfer port timing to around 120/125* and bringing the exhaust port timing to closer to 165-170*. I will radius the edge of the crank bore inlet a little and I MIGHT try some turbo scoops, but I'm not sure if I should open up the crank timing to closer to 200* or not.
05-05-2008 | 11:15 PM
#10
Great post and great informtion bro, you have to keep this thread going with your progress and a video of the finished product!!!! I would like to see what you can get out of a vx.
05-05-2008 | 11:27 PM
#11
Senior Member
Joined: Jan 2008
Posts: 704
Likes: 0
Received 0 Likes
on
0 Posts
From: somewhere,
MN
i'd love to see how much power can be gotten from a vx engine. i got one myself and would love to have more power out of it. just to say i got it lol. also where in winnipeg you from? i was born and bred in winnipeg, but living in minnesota now.
05-06-2008 | 12:05 AM
#12

Senior Member
Joined: Jul 2005
Posts: 10,544
Likes: 0
Received 1 Like
on
1 Post
From: Torchy the Fiery Fast RC Turtl
Definitely, open the crank induction timing to at least 200degrees if you want to increase your lateral intakes to 120-125degrees and your exhast duration to 165-170 degrees. With some simple trig, you can calculate just how much to cut left, right, or both to increase the total duration even before you put the Dremel to it. To verify your work and se whether you achieved you target induction pofile, use your degree wheel of course.
Since your engine is a side exhaust, seriously consider reshaping your lateral intake ports to direct the fuel-air charge away from the exhaust port. (These lateral sleeve intake ports are not "lateral" in relation to the centerline of your engin, in reality, they are posterior and anterior to your engine centerline.) Camfering the ports to direct the fluid flow up and away from the exhaust port is a start, and camfering the upper part of the ports will also increase their duratrion to your target profile. Additionally, you will have to reshape the block passages to also help the Schnuerle effect of the loop scavaneging and directeing the fresh fuel-air charge away from your exhaust port. Not an easy thing to do in a side exhaust engine.
As for your xhaust port, the shape of the side exhaust port is as you put it in the engine forum, quiant. Actually, it is seriously inefficient. I do not know the dimnsions of that side port nor how much material you have to play with, but to help with exhaust flow out this port, the best you might be able to do is reshape it in a flattened diamond shape or a flattened pentagram shape. You will have to similarly mod your pile manifold so that the modified exhaust "slit" now matches your engine's exhaust.
Post your your progress in the engine forum too, though we mostly mod rear exhasust engines, many of us are intrested in how one would mod a "quaint" port configuration and port shapes to improve output. Also, aside from letting us know what timing profiles you achieved, let us know what your new port areas are in relation to what ther were before you started.
05-06-2008 | 09:43 AM
#13
Thread Starter
Senior Member
Joined: Mar 2008
Posts: 357
Likes: 0
Received 0 Likes
on
0 Posts
From: Calgary, AB, CANADA
Ed - yeah, I'll be updating the thread as I make progress. I'll put it back together dead stock and make "before" videos, so that the "after" videos have a little meaning. Hopefully.
Jim - The port areas are going to be tough to calculate properly because as you see, the bottom of the piston actually defines the bottom of the port. I can give the width and I can measure the piston travel before the port is covered, and that should be sufficient.
Sadly in this design there is no "short side radius" to be had - obviously I can't modify the piston, though that would definitely increase flow it would also kill the pinch.
I believe the defining limitation to the boost port is going to be the hole in the piston and how much meat I want to remove from that. The one side of the hole encroaches into the pin boss area, so carving away at that willy-nilly can weaken the piston significantly. We'll see what happens.
The transfer ports have a slight bevel to the edges, pointing the flow towards the boost port, but yes I intend to widen the transfer port towards the boost port and modify the flow channel in the case to suit.
One thing I noticed after I posted the pictures is the burn pattern on the top of the piston: at the edge of the piston right near the exhaust port there is a moderate brown stain that is also faintly showing in the middle of the piston, but on the sides where the three intake ports are the piston is clean. It's pretty clear where the fuel is washing the piston down... In the full-size engine world, one would read this to mean that you've got fuel separation at these clean areas and the burn is all happening near the dark areas, and you'd start reshaping the combustion chamber to try to eliminate flow separation. Clearly there's nothing to be done about it in this engine.
Oh, and I should also mention: this engine has about .010" squish clearance, but I haven't looked closely at the button to see what it's shaped like. I know the center is hemispherical but I don't know if there's a conical or spherical shape to the squish band. The piston is dead flat.
Ranger - you're the only one who keeps mentioning Winnipeg...
05-06-2008 | 02:28 PM
#18
Joined: Dec 2007
Posts: 2,137
Likes: 0
Received 0 Likes
on
0 Posts
From: Panorama,
CA
Cool Post....
Lots of good info for those of us that are trying to learn the DETAILS of Port n Polishing an engine.
Here is something that might help some of us that cannot figure out all that TIMING stuff, but DO know enough to COPY a Good Thing.
.....O.S. makes a rear exhaust .18 engine that is Hand built and Ported/Polished/Crank Balanced at the O.S. Factory.
If someone were to buy that Engine and take Pictures, we would have an example of what the FACTORY does to its High Perfomance engines.....
Lol...only problem is that THIS engine costs about $250.....
05-06-2008 | 07:18 PM
#19
Senior Member
Joined: Jul 2005
Posts: 10,544
Likes: 0
Received 1 Like
on
1 Post
From: Torchy the Fiery Fast RC Turtl
Dont give up your efforts, modding an engine is not an easy thing, especially at first, but once you can make consistent grinds and clean mods, just the appearance alone of your work will be very satisfying. Of course, modding the passages in any block, side exhaust or rear exhaust, is always very hard. Even professional modders have to turn their Dremelling tools into contortion artists to get at those internal passageways.
As for the port mods, continue and go with what you described and make small cuts, and feel free to ocasionally test fit everthing and even semi-assemble the engine (reinstalling the crank, conrod, piston, and modded sleeve) and use the degree wheel to check your progress. That way, you will be certain that you are not overcutting the ports to a duration that is too high. It is better to make tiny cuts and view your work after each tiny cut and slowly progress as you go along, that way, you get steadier hands and moe experience in improving your Dremeling skills. Of course, prior to test fitting the prgression of your parts, clean them off to prevent the parts marring and scrubbing from the ginding shards and metal bits.
As for your fuel pooling like you are mentioning, the turbo cuts on the crank can help distribute the fule into the air more evenly , this should help with reducing the pooling and even help in ful economy and better power output the fuel-air will burn more completely since they are better mixed.
If you want to better your modding skills before you do any big mods on your engine, if you can get a hold of work out sleeves (or have some laying around from prior rebuilds) or get a hold of some junk engines, practice on those to further improve your dremelling and modding skills so you dont have to be afraid ruining a perfectly good engine.
As a hobby modder myself, I truely believe that anyone can learn to successfully mod their engines with enough practice. Though we hobby modders may never become the master artisans that reputable professional modders are, I believe that we hobby modders can in some cases come close.
05-06-2008 | 08:43 PM
#20
Thread Starter
Senior Member
Joined: Mar 2008
Posts: 357
Likes: 0
Received 0 Likes
on
0 Posts
From: Calgary, AB, CANADA
What gives you the impression I'm giving up? I want to do this methodically and properly, and document the steps as I perform them so that I know where I started, where I end up, and what kind of improvements I've seen without going off what I call the "butt dyno" (though in this case it's "eyes & ears dyno".)
I'll be doing exactly what you sugegst - I'll leave the engine set up on the timing wheel and I'll be checking and re-checking my work as I go. I'll draw everything out before I make a cut and I'll do my best to duplicate side-to-side. I have probably 15 cylinder heads under my belt so I know my way around a die-grinder, but this kind of work is a bit small for that tool so I'll resort to the dremel + cable drive and the 1/8" bits.
I'm not sure what you mean by "fuel pooling" - if you're talking about the pattern on the piston I fully expect it. Fuel spray coming out the ports is always going to clean off the areas it's aimed, and the piston is the closest thing to the ports so I imagine that's what'll get cleaned first. I'm not worried about pooling in a 20,000+ RPM motor, in any event, but I'll still be doing my best to keep things atomized.
No spare cylinders - this is my first engine so if I mess it up I'll get an SH18 to replace it, as so many people have told me to do.
Thanks for all the help & advise, Jim - I do appreciate it. Though I'm experienced in full size gasoline engines I'm still new to this, though I'm familiar with the concepts.
As promised, here are the stock port dimensions:
-Boost port is .308" wide, and .084" is open between the piston at BDC and the top inside edge of the port. Of course since the top of the port is beveled towards the cylinder, the area is hard to measure otherwise.
-Transfer ports are .250" wide, and .103" is open between piston at BDC and top of the port. Width is estimated (+/- .005" ) at the entry to the port, again because the side walls of the port are angled towards the boost port.
-Exhaust port is .440" wide at the inside edge and .170" between piston and top of the port. Impossible at this time to measure the sleeve/case mismatch, but I'd estimate it at .010".
-Crank port is .275" wide by .415" at the longest point.
-Piston hole is .215" in diameter. Clearly this can be increased to match the .308" wide boost port, even if the boost port width is left alone.
Crud... now that the engine is back together I realized that I forgot to measure the thickness of the sleeve wall.
Oh, yes. The engine is back together. I plan on running it a bit more, for the next couple weeks or so, and I'll do my best to get some good video of it so that we can compare the before-after. I'll look for a good paved parking lot with painted dividers so that I can (hopefully) time the truck between set points to measure speed and average acceleration by analyzing the video frame-by-frame.
05-06-2008 | 10:23 PM
#21
Joined: Dec 2007
Posts: 2,137
Likes: 0
Received 0 Likes
on
0 Posts
From: Panorama,
CA
Im very interested in this stuff in general. I have a mechanical background, but never got that deep into modifying engines.
Im wondering how you go about GETTING the angle measurements? There was a mention of a TIMING WHEEL. What IS That? Where can I get one and how do I USE it?
If I can Duplicate those angle measurements for myself, I would be happy to research some of this stuff on my own. But, all the Theory in the world is useless, if I cant figure a way to APPLY it to MY engine...
05-06-2008 | 10:45 PM
#22
Thread Starter
Senior Member
Joined: Mar 2008
Posts: 357
Likes: 0
Received 0 Likes
on
0 Posts
From: Calgary, AB, CANADA
A timing wheel is a disc with graduated degrees all over it. I used my 11" Moroso wheel and a couple of adapters I made up on my lathe to fit the Vertex crankshaft.
Here's what it looks like:
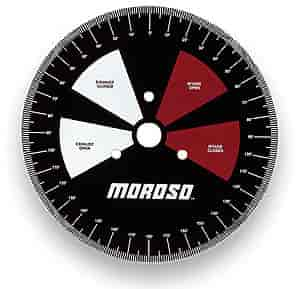
You use it along with a pointer so that you can figure out all your timing needs. You set the pointer with a depth gauge so you can ensure the pointer reads the same value on either side of zero when the piston is a specific depth below TDC. i.e., my gauge read .105" at TDC, so I'd turn the crank so that the piston was at .120" both before and after TDC and made sure the pointer read the same value on the timing wheel at both times. Then I verified that at .105", the degree wheel read zero. The reason for this method is that the piston moves VERY slowly at TDC and it's difficult to know exactly when it's bang on TDC. You can be off by a couple degrees, and when you're doing precision work, it matters.
Of course, you're doing your best guess when determining when the port is actually closing, so you've got to run it 'round a few times to be sure.
Here's what it looks like:
You use it along with a pointer so that you can figure out all your timing needs. You set the pointer with a depth gauge so you can ensure the pointer reads the same value on either side of zero when the piston is a specific depth below TDC. i.e., my gauge read .105" at TDC, so I'd turn the crank so that the piston was at .120" both before and after TDC and made sure the pointer read the same value on the timing wheel at both times. Then I verified that at .105", the degree wheel read zero. The reason for this method is that the piston moves VERY slowly at TDC and it's difficult to know exactly when it's bang on TDC. You can be off by a couple degrees, and when you're doing precision work, it matters.
Of course, you're doing your best guess when determining when the port is actually closing, so you've got to run it 'round a few times to be sure.
05-07-2008 | 11:15 AM
#23
Senior Member
Joined: Jul 2005
Posts: 10,544
Likes: 0
Received 1 Like
on
1 Post
From: Torchy the Fiery Fast RC Turtl
ORIGINAL: Redharris
Im very interested in this stuff in general. I have a mechanical background, but never got that deep into modifying engines.
Im very interested in this stuff in general. I have a mechanical background, but never got that deep into modifying engines.
http://www.rcuniverse.com/forum/m_5226191/tm.htm
http://www.rcuniverse.com/forum/m_7452102/tm.htm
http://www.rcuniverse.com/forum/m_7165950/tm.htm
http://www.rcuniverse.com/forum/m_7106642/tm.htm
http://www.rcuniverse.com/forum/m_59...tm.htm#5995115
http://www.rcuniverse.com/forum/m_52..._1/key_/tm.htm
Some of these threads are quite long, that is because we are all asking each other questions and answering each others questions. But a good chunk of what engine modders know are in these threads. Though they are a long read, they indeed are very informative. If you want to try your hand at engine modding, I highly encourage you to do so.


