


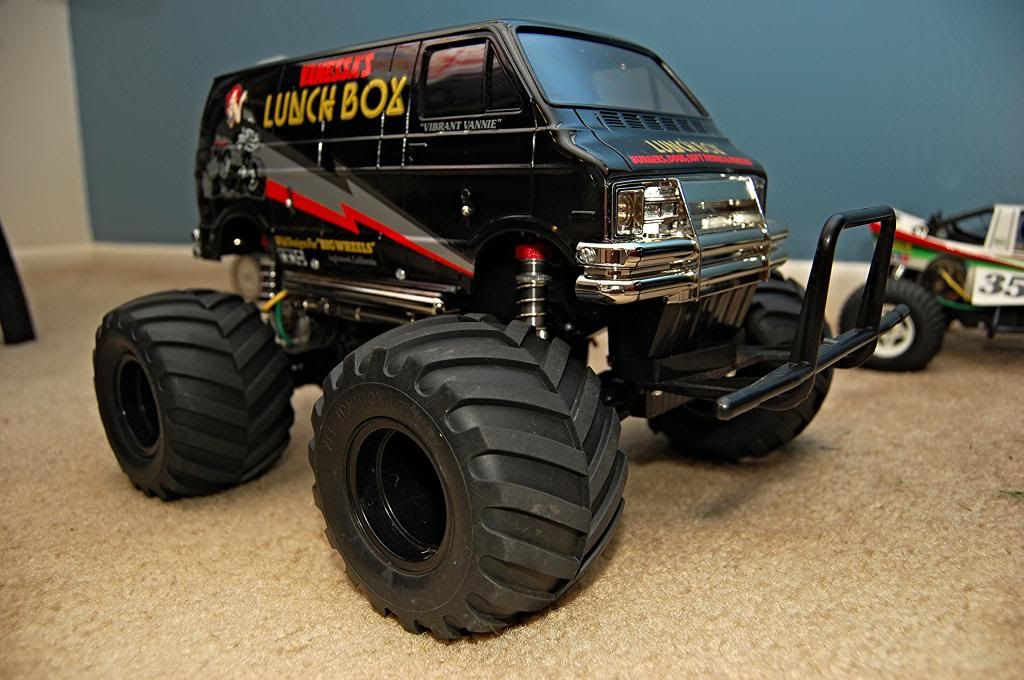
Return of Lunchbox..
 10-15-2013, 07:15 PM
#7826
Senior Member
Join Date: Sep 2008
Location: Harleysville, PA
Posts: 1,251
Likes: 0
Received 0 Likes
on
0 Posts
As I said on tamiyaforums.com, I'm not sure if this is just dumb luck, pure genius or if anyone has thought of this yet. This vehicle has been out so long it has to have been done before though.
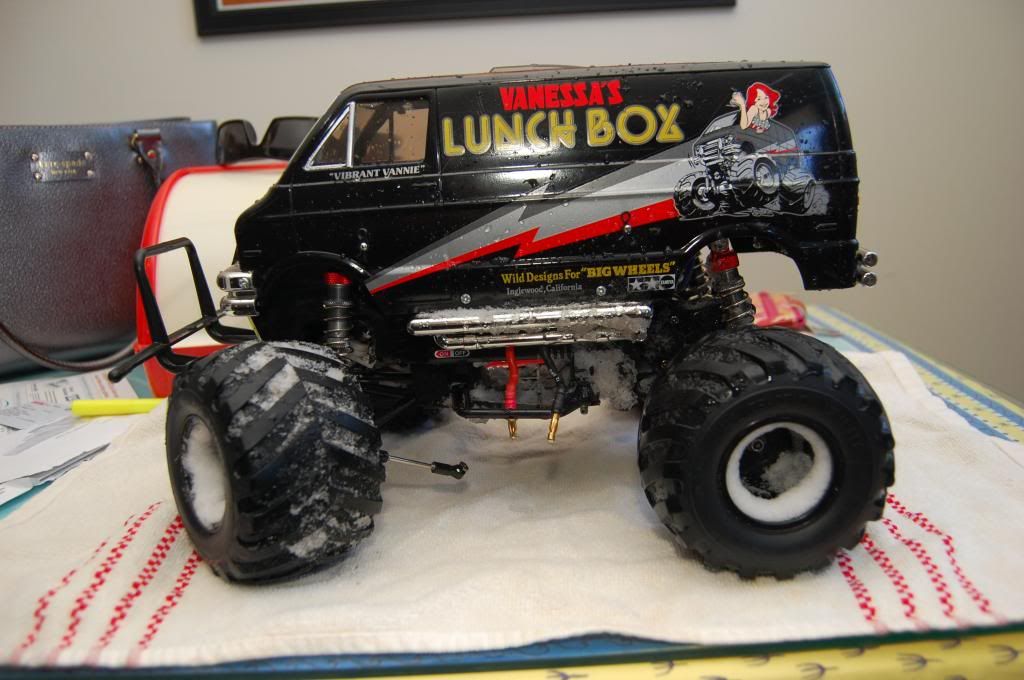
When attempting the 5th shock mod initially I used a CR shock which proved to be too large of diameter and hit the motor and didn't allow free movement of the suspension. I dug around the parts and remembered I have the Grasshopper rear dampers since I switched those out for Hornet dampers on the buggy. Its like Tamiya had this planned from the start because it fits so well.
I notched out the gearcase with a Dremel and sanding drum so I could slid the pivot rod through the bottom of the shock. Seen this done before and saves on parts needed to attach the shock.
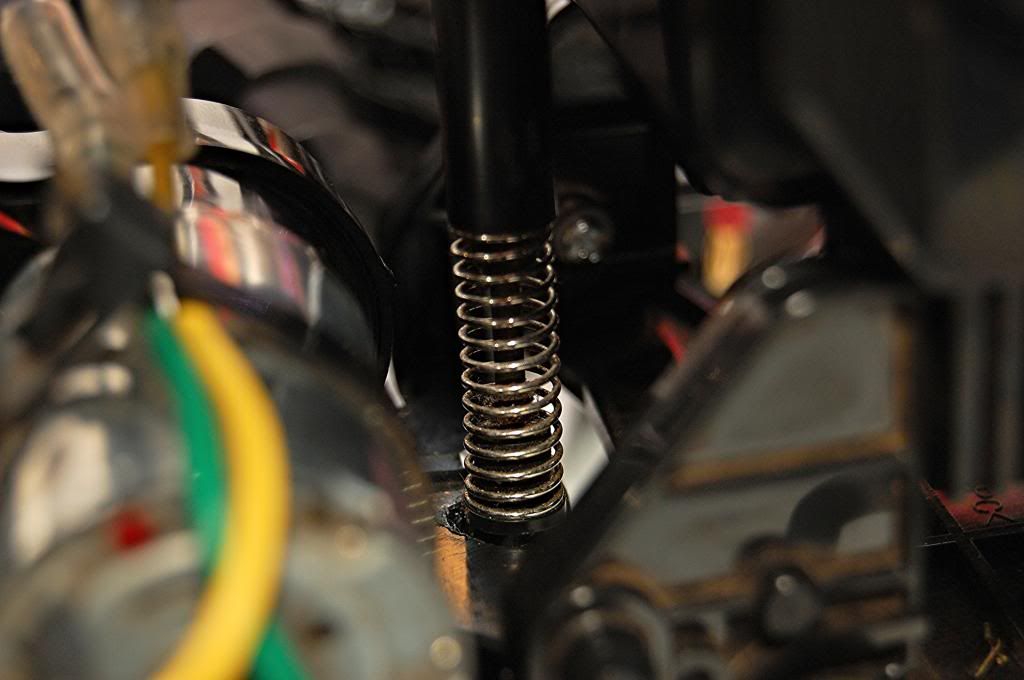
Used a Yeah Racing ball end stand off here. A long screw with a nyloc nut on the end holds the whole thing together and keeps the shock from potentially popping off
And put the Yeah Racing oil dampers on. This titanium color set ended up being a good match of the LB Black edition graphics.


When attempting the 5th shock mod initially I used a CR shock which proved to be too large of diameter and hit the motor and didn't allow free movement of the suspension. I dug around the parts and remembered I have the Grasshopper rear dampers since I switched those out for Hornet dampers on the buggy. Its like Tamiya had this planned from the start because it fits so well.
I notched out the gearcase with a Dremel and sanding drum so I could slid the pivot rod through the bottom of the shock. Seen this done before and saves on parts needed to attach the shock.
Used a Yeah Racing ball end stand off here. A long screw with a nyloc nut on the end holds the whole thing together and keeps the shock from potentially popping off
And put the Yeah Racing oil dampers on. This titanium color set ended up being a good match of the LB Black edition graphics.


 10-16-2013, 02:57 AM
#7829
Senior Member
Join Date: Sep 2008
Location: Harleysville, PA
Posts: 1,251
Likes: 0
Received 0 Likes
on
0 Posts
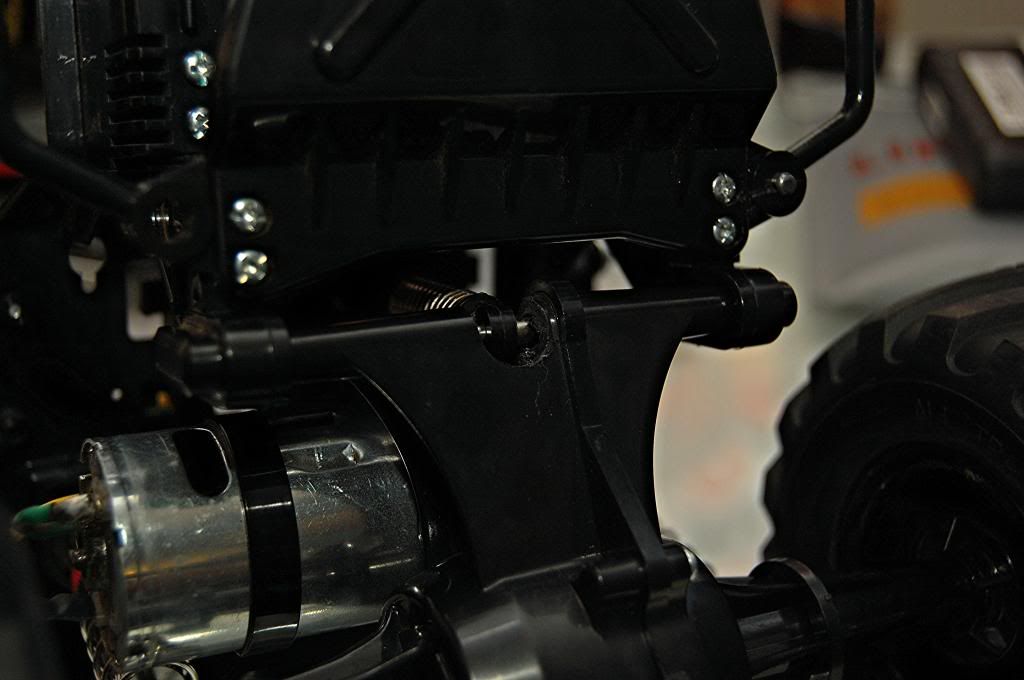
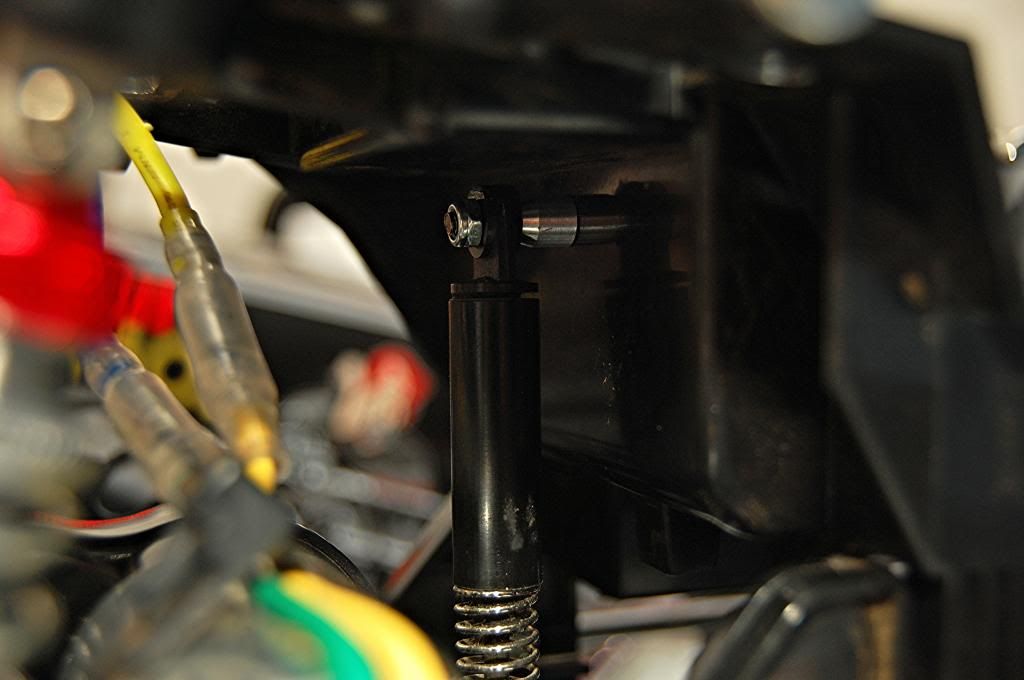
Here;s the best I could do. Its so buried in there it's hard to photograph.
DSC_4881_zps21faa8ec.jpg?t=1381834416
That screw under the ESC is where its mounted to the chassis.
DSC_4883_zpse7a2e699.jpg?t=1381920733
DSC_4884_zps76e5094b.jpg?t=1381920672
DSC_4885_zps8304e9ea.jpg?t=1381920618
DSC_4886_zps14212f73.jpg?t=1381920541
DSC_4881_zps21faa8ec.jpg?t=1381834416
That screw under the ESC is where its mounted to the chassis.
DSC_4883_zpse7a2e699.jpg?t=1381920733
DSC_4884_zps76e5094b.jpg?t=1381920672
DSC_4885_zps8304e9ea.jpg?t=1381920618
DSC_4886_zps14212f73.jpg?t=1381920541
01-15-2014, 09:48 AM
#7831

Thread Starter
 01-24-2014, 09:40 PM
#7833
Senior Member
Join Date: Sep 2008
Location: Harleysville, PA
Posts: 1,251
Likes: 0
Received 0 Likes
on
0 Posts
Went out in the snow today. The freely spinning diff is pretty much useless to try and get traction, lots of donuts! After a few jumps a ball stud unscrewed from the servo saver, oops!
01-25-2014, 11:39 AM
#7835

Hi if you want your diff to run much better I have some info for you as I did this with most all my open diff tamiyas and they run much better.
I used the Tamiya antiwear grease on all the moving parts on the open diffs { bevel gears and shafts and the axle with the nipple } First degrease all the parts make sure there is NO grease on them then coat them with the Tamiya anti wear grease the stuff is so sticky it works wonders on any open diff!!
Hope this helps.
01-25-2014, 12:21 PM
#7836
Hi Guy's here is a neat trick I do to my lunch box type chassis cars so it helps act like oil shocks more and takes away the dreaded lunch box bounciness!
I Use the rubber hose Tamiya supplies in the kits for the shocks shafts and I cut two 4 to 5mm sections for the front and two 1 to 2mm sections for the rear I degrease them and degrease the chassis where the top shock shaft goes through.
Next I use a shock shaft for a guide to glue the tube on the top of the chassis.
I lube up the shock shaft slide the rubber tube on it making sure no grease gets on the bottom of the tube then I put just a small tiny bead of CA glue the bottom of tubing and stick the shock shaft through the top of the chassis and hold it down on the chassis till the glue dries ( if CA glue gets on your shock shaft it should not stick because you lubed it up before putting the tubing on) next I go around the outside edge of the tubing with a small bead of CA and let it fully dry.
do this to all 4 spots thin spacers in the rear thick up front.
now put the shocks together as normal lube up the shafts and now your truck should work much better than with just having springs..
Hope this helps.
here are some photos.
Last edited by shenlonco; 01-25-2014 at 12:25 PM.
02-10-2014, 09:40 PM
#7840
Junior Member
Join Date: Feb 2014
Posts: 2
Likes: 0
Received 0 Likes
on
0 Posts
Hi guys, am new to RC. Just got my Lb last month and have now installed GT tuned motor, CVA dampers and bearings all around. I've also done my third shock modification. I'm now thinking of what I should upgrade next.

Last edited by docbaca; 02-11-2014 at 04:38 AM.
02-11-2014, 05:29 AM
#7842
Junior Member
Join Date: Feb 2014
Posts: 2
Likes: 0
Received 0 Likes
on
0 Posts
My LB is actually a Blue Edition with extra RC soccer stickers. Painted it black and white to make it unique.
I also installed headlights, rear and front signal lights, brake lights and reverse lights - all working with the ESC. Really happy with the LED kit i bought from my LHS for a little over $20 coz it already includes all the LEDs you need plus a control box to link with the ESC!
I also installed headlights, rear and front signal lights, brake lights and reverse lights - all working with the ESC. Really happy with the LED kit i bought from my LHS for a little over $20 coz it already includes all the LEDs you need plus a control box to link with the ESC!
06-08-2014, 04:00 PM
#7843
Senior Member
Join Date: Sep 2008
Location: Harleysville, PA
Posts: 1,251
Likes: 0
Received 0 Likes
on
0 Posts
Lowride Pumpkin (M-06) definitely need to ditch the plastic bumper
I guess this might point to a Lowride Lunchbox on the horizon?
I guess this might point to a Lowride Lunchbox on the horizon?
Last edited by 860Crawler; 06-08-2014 at 04:03 PM.
11-12-2014, 01:00 AM
#7845
Junior Member
Join Date: Oct 2006
Location: Adelaide, AUSTRALIA
Posts: 18
Likes: 0
Received 0 Likes
on
0 Posts
Hey guys, we bought a lunchbox a couple of years ago but after the initial fun we did not use it much for a couple of reasons; there was an intermittent fault (presumably in the super cheap TX/RX) but the main problem was the tyres/tires kept coming off. It was infuriating, even tried superglue with no luck. I'd like to solve that if possible.
The other thing is the NiMH battery understandably needs to be replaced. I have a decent universal charger, so I thought I'd buy a LiPo, and add a Dean's plug (I guess?) to replace the Tamiya battery plug on the car. (Or do I just get a Tamiya - Deans adapter?)
How does this sound so far.
I figure I need a 2S battery, would 30C be OK? Otherwise, is 2200mAh too low and should I aim for 3000+mAh?
So in summary can you help me with the ****ing tyres, should I aim for using Dean's plugs (for near universality - I don't want to inflict my terrible soldering skills on the car more than once), and is a 2S 30C 3000+ mAh battery what I need?
Thanks for reading and any input. I hope we can get a bit more use out of what is a very fun machine.
(In addition to the battery, I'm also getting another TX/RX unit so we'll be good to go)
Last edited by mta3d; 11-12-2014 at 01:09 AM.
11-12-2014, 01:34 AM
#7846
Member
Join Date: Feb 2012
Location: Tauranga, New Zealand, NEW ZEALAND
Posts: 61
Likes: 0
Received 0 Likes
on
0 Posts
I like the lunchie with a nimh. the extra weight of the nimh makes it more stable. also i just use canopy glue for the tires. its enough to hold them on but you can peel it off for cleaning etc.
11-12-2014, 03:29 AM
#7847
Junior Member
Join Date: Oct 2006
Location: Adelaide, AUSTRALIA
Posts: 18
Likes: 0
Received 0 Likes
on
0 Posts
Well that's the easy way  I suppose I don't want to buy old battery technology of NiMH for the same price or even more than the newer LiPo, but if all that matters is the mAh then I guess it doesn't matter. Also good point about the weight; the Lunchbox is no doubt designed for the heavier 6 cell battery.
I suppose I don't want to buy old battery technology of NiMH for the same price or even more than the newer LiPo, but if all that matters is the mAh then I guess it doesn't matter. Also good point about the weight; the Lunchbox is no doubt designed for the heavier 6 cell battery.
Last edited by mta3d; 11-12-2014 at 03:32 AM.
11-12-2014, 05:46 AM
#7848
You can find 4000mah lipo that will fit the battery box. I might have read a couple guys found larger that fit.
Deans are good, dont mess with adapters.
Traxxas plugs, or ec3, good too, there are a few decent ones out there
Deans are good, dont mess with adapters.
Traxxas plugs, or ec3, good too, there are a few decent ones out there
Last edited by kistner; 11-12-2014 at 11:34 AM.
11-12-2014, 10:30 AM
#7849
Senior Member
Join Date: Sep 2008
Location: Harleysville, PA
Posts: 1,251
Likes: 0
Received 0 Likes
on
0 Posts
I have one hard case Lipo that fits in the LB. It's a Zippy 4000mah but its really skinny. It just and I mean just fits.
Also I have never glued the tires and they have never come off. Must be just lucky
Also I have never glued the tires and they have never come off. Must be just lucky